
XE20 - Keyboard KORG - Free user manual and instructions
Find the device manual for free XE20 KORG in PDF.


| Product Type | Digital Ensemble Piano |
| Keyboard | NH (Natural Weighted Hammer Action) Keyboard, 88 keys (A0-C8) |
| Touch Sensitivity | Soft, Medium, Hard, Fixed |
| Sound Engine | Stereo PCM Sound Generator |
| Maximum Polyphony | 184 voices (up to 120 for German/Italy Piano, up to 64 for others) |
| Number of Sounds | Over 705 sounds, 41 drum kits |
| Effects | Accompaniment: 2 stereo digital multi-effects; Keyboard: 2 stereo digital multi-effects |
| Styles | More than 280 preset styles, over 64 music styles |
| Demo Songs | 21 demo songs |
| Audio Playback | MP3, WAV, SMF (Standard MIDI File) formats |
| Sequencer | Real-time recording, up to 999 songs, 12 tracks, original format (convertible to SMF0) |
| Metronome | Yes, with selectable time signatures, tempo, and volume |
| Tempo Range | 30 – 240 BPM |
| Transpose | -12 to +12 semitones |
| Tuning | 427.5 – 452.9 Hz |
| Display | Custom LCD with backlighting |
| Connectivity | USB TO DEVICE, USB TO HOST, AUDIO IN (3.5 mm), AUDIO OUT (6.3 mm L/MONO, R), Headphone, FOOT CONTROLLER, PEDAL |
| Speaker System | Amp: 18 W x 2, Speakers: 57 x 126 mm elliptical, bass reflex box, 8 EQ types |
| Power Consumption | 13 W (AC adapter DC 19V) |
| Dimensions (XE20) | 1312 x 336 x 118 mm (51.65 x 13.23 x 4.65 in) |
| Weight (XE20) | 11.4 kg (25.13 lbs) |
| Included Accessories | Quick Start Guide, AC adapter, music stand, damper pedal (XE20), stand with pedal unit (XE20SP) |
| Optional Accessories | DS-1H damper pedal, PU-2 pedal unit, PS-1/PS-3 pedal switch, EXP-2 foot controller |
| Auto Power-Off | Yes, programmable (5/10/30/60/120 minutes or disable) |
Frequently Asked Questions - XE20 KORG
User questions about XE20 KORG
0 question about this device. Answer the ones you know or ask your own.
Ask a new question about this device
Download the instructions for your Keyboard in PDF format for free! Find your manual XE20 - KORG and take your electronic device back in hand. On this page are published all the documents necessary for the use of your device. XE20 by KORG.
USER MANUAL XE20 KORG
natural_image
Line drawing of a vintage electronic instrument with piano keys and control panel (no text or symbols)Table of Contents
Main Features ....3
Part Names....4
Front panel 4
Rear panel 4
Underside....4
Control panel 5
Display....6
Preparing to Play 7
Using the AC adapter....7
Turning the power on/off....7
Adjusting the volume....7
Using music stand....7
Using headphones 7
Using a pedal....8
Preparing to Play: What is Auto-Accompaniment?......9
What is auto-accompaniment? 9
Basic operations 12
About modes 12
Other functions.... 12
Selecting sounds and changing values.... 12
Playing the XE20 (style mode)....13
Selecting a grand piano....13
Selecting sounds in the style set....13
Muting parts and changing sounds....13
Selecting a set list 14
Changing the sounds on the left and right (split).... 14
Playing in time with the metronome....15
Setting the key and octave 16
Adding effects and embellishments to your playing....16
Auto-accompaniment (style mode) 18
Playing along with auto-accompaniment....18
Making changes to the auto-accompaniment 19
Choosing a music style and playing....20
Saving the set list (WRITE) 21
Recording your performance....21
Song mode 22
Listening to the demo songs....22
Playing along with a song....22
Playing back using different methods....22
Editing a song....23
SETTING functions....25
Basic methods of use....25
Main SETTING functions....25
List of SETTING functions....26
MEDIA functions....28
Connecting and removing USB flash drives 28
Basic method of use 28
List of MEDIA functions 29
Connecting to an external device ....30
Connecting an audio player....30
Connecting powered monitor speakers....30
Connecting to a computer....31
Appendix....32
Checking the software version....32
Restoring the XE20 to factory default settings 32
Calibrating an expression pedal....32
Troubleshooting 32
List of chords recognized 34
Specifications....35
MIDI Implementation Chart....36
Thank you for purchasing the Korg XE20/XE20SP digital ensemble piano. To help you get the most out of your new instrument, please read this manual carefully.
About this manual
The XE20 comes with the following manuals.
- Quick Start Guide (printed)
- Owner's Manual (this document, PDF)
• Voice Name List (PDF) - Stand Assembly Guide (printed, XE20SP only)
Quick Start Guide (booklet)
Read this manual first. This guide explains the basic operations and other features of the XE20.
Owner's Manual (this document, PDF)
This explains how to use the detailed functions of the XE20.
Voice Name List (PDF)
This is a list of the styles, demo songs and other data used on the XE20.
Stand Assembly Guide (printed, XE20SP only)
This explains how to assemble the stand for the XE20SP.
Download the PDF from the following Korg website. www.korg.com
■ Conventions in this manual
Symbols 📁 Note, Tip
These symbols respectively indicate a caution, a supplementary note, or a tip.
■ Example screen displays
The parameter values shown in the example screens of this manual are only for explanatory purposes, and may not necessary match the values that appear in the screen of your instrument.
Main Features
High-definition piano sounds
The XE20 features Korg's unique high-definition grand piano sounds, such as the German Piano. You can play the grand piano amongst many other sounds with the touch of a button. page 13
Playing with different sounds
The XE20 lets you play many different kinds of instrument sounds in addition to piano, violin, sax, drums and so on. ......page 13
Playing along with a style (auto-accompaniment)
You can select from different genres of "styles," which are like a backing band or rhythm accompaniment. Try playing a melody in your right hand while playing a chord with your left hand. ...... page 18
Playing back a sound source from a USB flash drive
The XE20 lets you play back MP3, WAV and SMF files contained on a USB flash drive. Select the sound you want and enjoy playing along. ......page 22
Connecting to an external device and playing back audio
You can play audio from external devices, such as MP3 players, smartphones and other mobile devices, computers and so on, and hear it through the built-in speakers of the XE20. page 30
Adding effects to sounds
You can add distortion or reverb to sounds, giving the sound a different character. ...... page 16
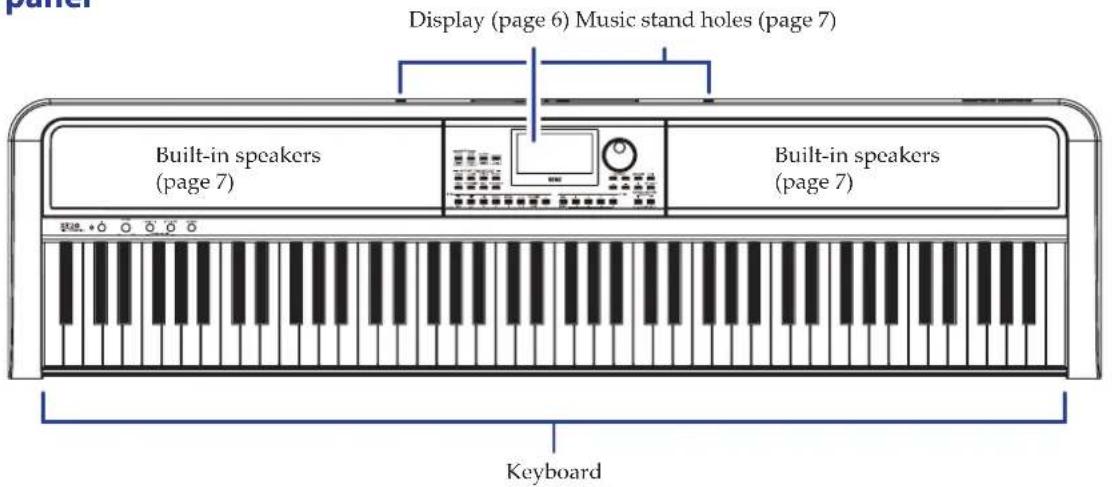
Part Names
Front panel
Rear panel
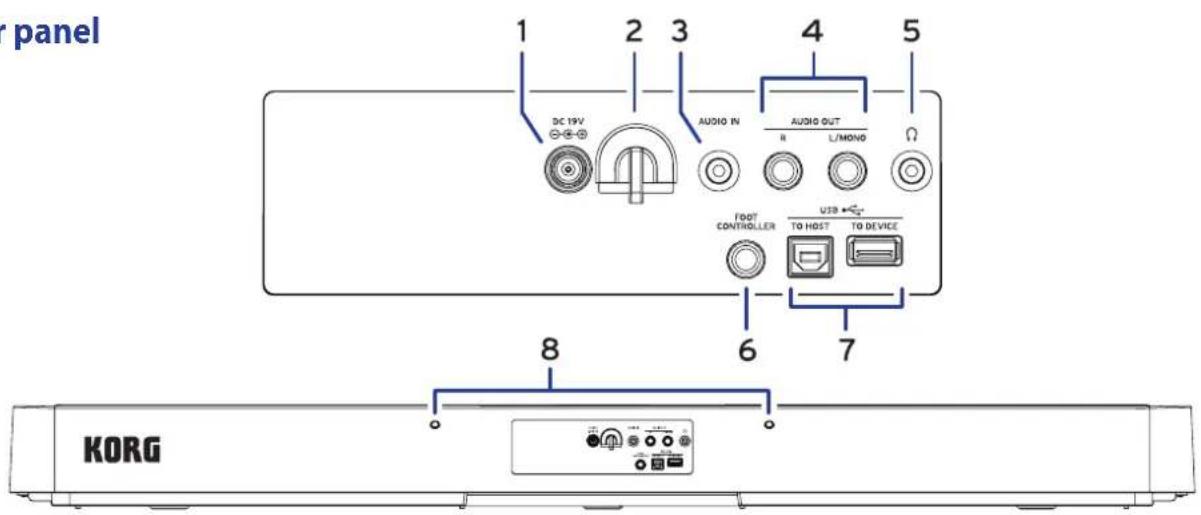
- DC 19V jack ⊕ ⊕ ⊕ ...... page 7
- Cable hook......page 7
- AUDIO IN jack......page 30
-
AUDIO OUT L/MONO and R jacks ...... page 30
-
Headphone jack (Ω) page 7
- FOOT CONTROLLER jack ...... page 8
- USB TO DEVICE port, USB TO HOST port (←)...... page 28, 31
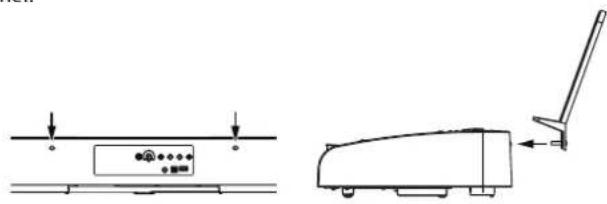
- Music stand holes ...... page 7
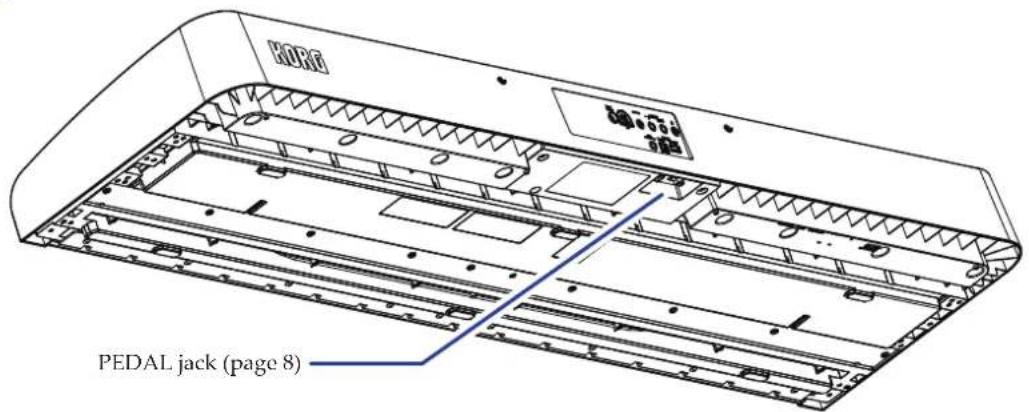
Underside
Control panel
![XE20 1 2 3 4 5 6 7 8 MODE STYLE SONG SETTING MUSIC DEMO MEDIUM SHIFT PART MUTE/ SOUND SELECT LOWER UPPER 1 UPPER 2 UPPER 3 DRUM PERCUSSION BASS OTHER PARTS KORG TEMPO J= 74° CHORD OCT/TRANSPOSE + 1/C BANK A Am 7 STYLE SoftBeat KEYBOARD SET STS GrandPiano + CATEGORY+ ENSEMBLE SPLIT TAP TEMPO BEAT SELECT [TEMPO LOCK] STYLE VARIATION FILL COUNT IN INTRO SYNCHRO SET LIST 1/2 3/4 /BREAK /ENDING // ■ /■ /■ /■ /■ /■ /■ /■ /■ /■ /■ /■ /■ /■ /■ /■ /■ /■ /■ /■ /■ /■ /■ /■ /■ /■ /■ /■ /■ /■ /■ /■ /■ /■ /■ /■ /■ /■ /■ /■ /■ /■ /■ /■ /■ /■ /■ /■ /■ /■ /■ /□ SONG LOOP A-B << >> || >/ ■ ERASE BANK 1 2 3 4 [WRITE] - OCTAVE + 19 18 17 16](/content/2026/05/883167/images/b2baf7a758f8383d8d6bc83881581a50179a1402adde7618782b730cfb14b1f6.jpg)
- Power button (☐) page 7
- VOLUME knob......page 7
- PIANO1/2 button......page 13
- STYLE SET button......page 13
- REVERB button......page 17
- MODE section......page 12
STYLE/[MUSIC STYLE] button ...... page 13, 20
SONG/[DEMO SONG] button...... page 22
- SETTING/[MEDIA] button......page 25, 28
- [SHIFT] button
When setting a function enclosed in white lines for a button, hold the [SHIFT] button down and press that button.
You may sometimes need to hold down the [SHIFT] button and then press another button or turn the dial.
This icon is used in these cases.
-
- button, - button ...... page 12
- Dial page 12
- CATEGORY buttons◀, ▶...... page 12
- ENSEMBLE button......page 16
- SPLIT button......page 14
- TAP TEMPO/[TEMPO LOCK] button.....page 15
- (metronome)/[BEAT SELECT] button.....page 15
-
TRANSPOSE, #/[OCTAVE -, +] buttons......page 16
-
SET LIST section...... page 14, 21
-
BANK/WRITE button
-
Buttons 1–4
-
STYLE/SONG section
STYLE section ...... page 18
• VARIATION 1/2, 3/4 buttons
- FILL button
• COUNT IN/BREAK button
- INTRO/ENDING button
- Start/stop button(▶ / ■
• SYNCHRO START/STOP button
- Record button(●)
SONG section ...... page 22
- LOOP button
- A↔B button (A↔B)
- Rewind button (★)
- Fast-forward button(▶)
- Pause button(11)
- Start/stop button(▶ / ■)
- ERASE button
-
Record button(●)
-
PART MUTE/[SOUND SELECT] section......page 14, 20
Keyboard part ...... page 13
- LOWER button
• UPPER 1 button - UPPER 2 button
• UPPER 3 button
Accompaniment part ...... page 18
- DRUM button
• PERCUSSION button - BASS button
• OTHER PARTS button
Display
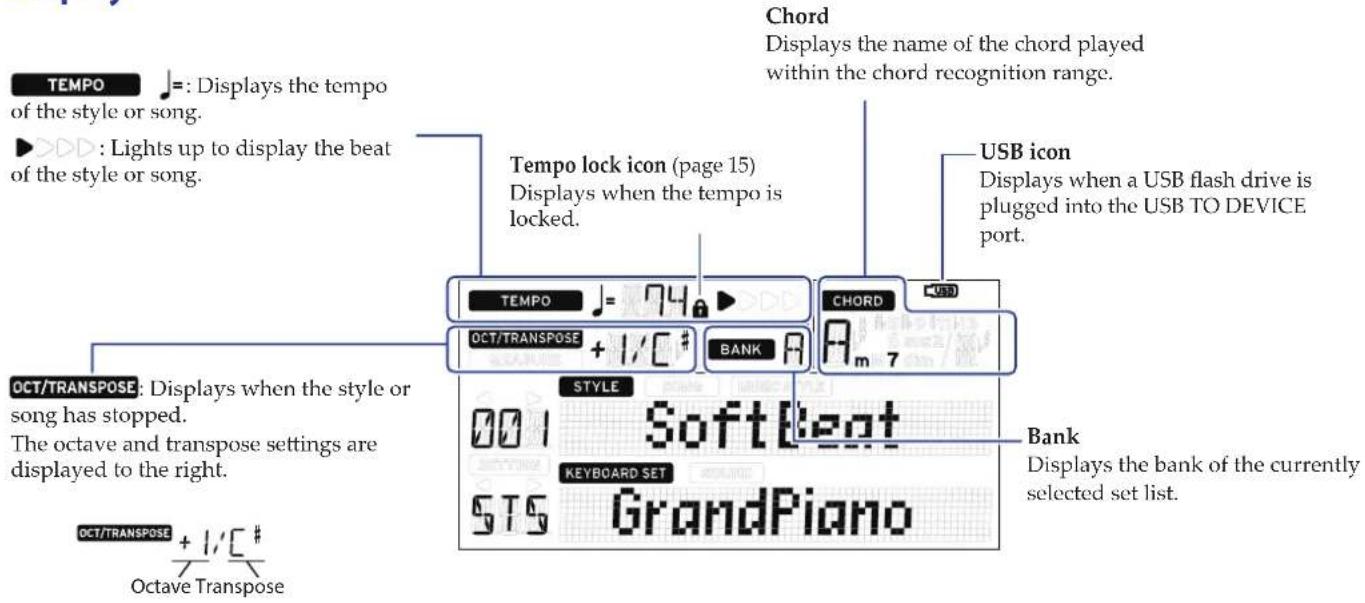
MEASURE : Displays when a style or song is being played back.
The current measure position or remaining number of measures are displayed to the right.
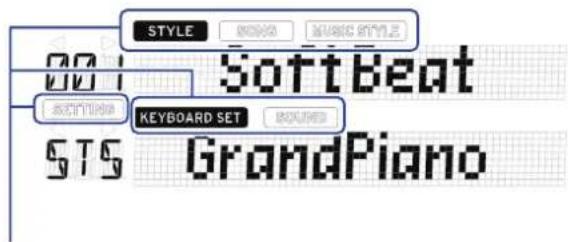
These show the current mode and function. When the display is blinking, the blinking items indicate what operations are in effect.
STYLE : Displays when using style mode. The style name and number appear below on the display.
SONG: Displays when using song mode. The song name and number appear below on the display.
MUSIC STYLE: Displays when a music style is selected. The music style name and number appear below on the display.
KEYBOARD SET: Displays when style mode or song mode are in use. The keyboard set name used by the style or song appear below on the display.
SOUND: Displays when the sound for each part used in the keyboard set is selected. The sound name and number appear below on the display.
SETTING: Displays when accessing the SETTING functions. The parameter name, number, value and so on that are being set appear in the display.
Preparing to Play
The XE20SP includes a stand with pedal unit, for use only with the XE20SP. Follow the steps below after putting the stand together.
Using the AC adapter
- Make sure that the power on this instrument is turned off.
- Connect the DC plug of the included AC adapter to the DC 19V jack located on the rear panel of the XE20.
Be sure to use only the included AC adapter. Using any other AC adapter may cause malfunctions.
Hook the AC adapter cord onto the cord hook. Do not use excessive force when pulling the cord off the hook.
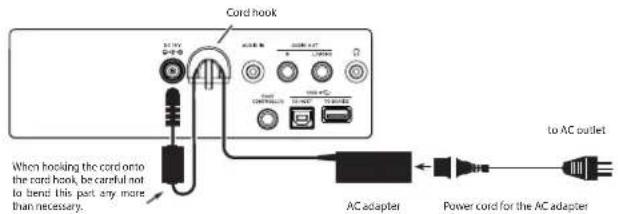
- Connect the plug of the AC adapter to an AC outlet.
Be sure to use an AC outlet of the correct voltage for your adapter.
Turning the power on/off
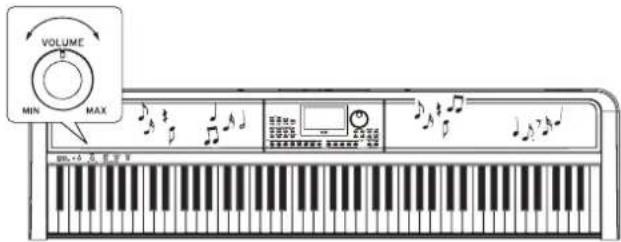
- Turn the VOLUME knob all the way to the left, so that the volume is down.
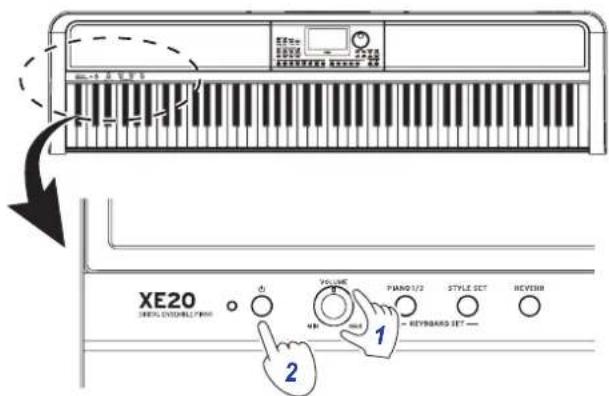
- Press the power button to turn the instrument on.
When turning off the power, hold the power button down until the display shows the message "Power Off".
Note: The XE20 will automatically turn off if it has not been played or operated for a certain amount of time (via the auto power-off function).
The time interval is set to 30 minutes at factory default. This interval can be changed (see page 25 "Changing the auto power-off function").
Adjusting the volume
- Turn the VOLUME knob on the front panel to adjust the sound to the optimum level.
The VOLUME knob sets the volume of sound coming from the built-in speakers, the headphone jack (Ω) and the AUDIO OUT jacks.
Using music stand
Insert music stand into the two holes for the same on the rear panel.
natural_image
Technical line drawing of a mechanical device with mounting base and side view (no text or symbols)Using headphones
- Connect the stereo mini-plug of a pair of commercially available headphones to the headphone jack on the rear panel.
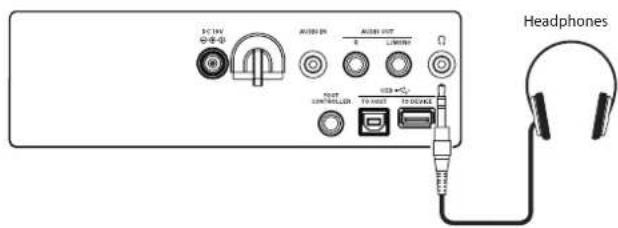
Note: The built-in speakers will not make a sound if a pair of headphones has been connected to the headphone jack (but sound will still be outputted from the AUDIO OUT jacks).
Using headphones at high volume for an extended time may cause hearing damage. Avoid excessively high volume levels.
Using a pedal
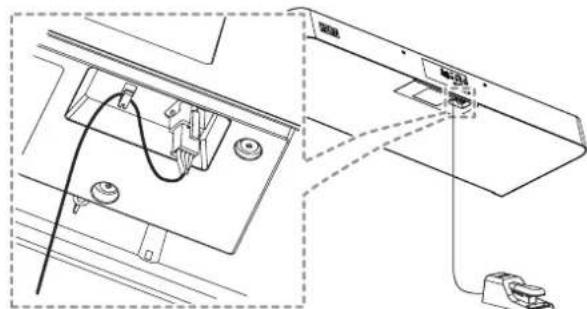
You can plug a pedal into the FOOT CONTROLLER jack on the rear panel or into the pedal jack on the underside of the XE20 to use as a damper pedal, or to control the volume.
Use the SETTING function to make the pedal settings, according to which kind of pedal you will connect (see page 25
"Changing the pedal polarity" and page 25 "Changing the pedal function").
- For the XE20: damper pedal included with the XE20, or the PU-2 pedal unit (sold separately)
- For the XE20SP: pedal unit included with the XE20SP, which attaches to the stand
Connect the pedal to the PEDAL jack on the underside of the keyboard unit.
natural_image
Technical line drawing showing a cable inserted into a device panel, with no visible text or symbolsTip: On German Piano and Italy Piano sounds, the pedal unit included with the XE20SP (or the PU-2, which is sold separately) lets you control the degree of the damper effect (the half-pedal effect) according to how far you press the pedal. For other sounds, this will function as a damper switch. While the pedal is pressed, the notes you play will sustain, even after you take your fingers off the keyboard.
Note: Note that the damper effect does not work on the lower part.
Tip: With the pedal unit included with the XE20SP (or the PU-2, which is sold separately), sostenuto works only on the German Piano and Italy Piano sounds.
- XE20, XE20SP: When using the DS-1H (damper pedal, sold separately) or PS-1/PS-3 (pedal switch, sold separately)
Plug the pedal into the FOOT CONTROLLER jack on the rear panel.
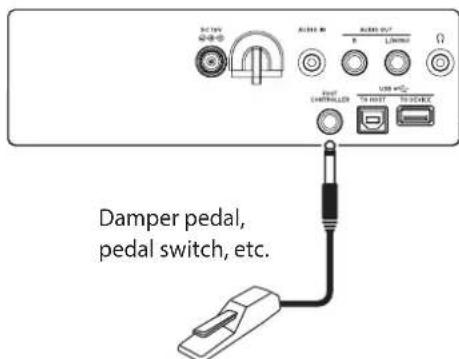
Tip: On German Piano and Italy Piano sounds, the DS-1H damper pedal lets you control the degree of the damper effect (the half-pedal effect) according to how far you press the pedal. For other sounds, this will function as a damper switch. While the pedal is pressed, the notes you play will sustain, even after you take your fingers off the keyboard.
Note: Note that the damper effect does not work on the lower part.
- Connect a Korg EXP-2 foot controller to control the volume of the keyboard part (see page 13 "Selecting sounds in the style set").
Preparing to Play: What is Auto-Accompaniment?
What is auto-accompaniment?
Auto-accompaniment is a function that automatically plays an accompaniment to match the chords that you play in the left hand (the accompaniment part).
1. Playing along with auto-accompaniment
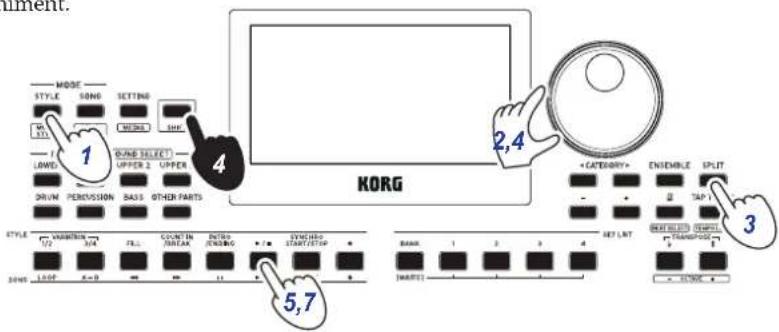
- Press the STYLE/[MUSIC STYLE] button.
- Select a style by turning the dial. In this example, we will select "209:Jazz Brush".
- Press the button to activate the keyboard split when the SPLIT button is off.
What is a keyboard split? Keyboard split is a function that lets you separate the keyboard into two different ranges, one for playing chords and another for playing a melody line.
- Turn the dial while holding down the [SHIFT] button to set the tempo to 100.
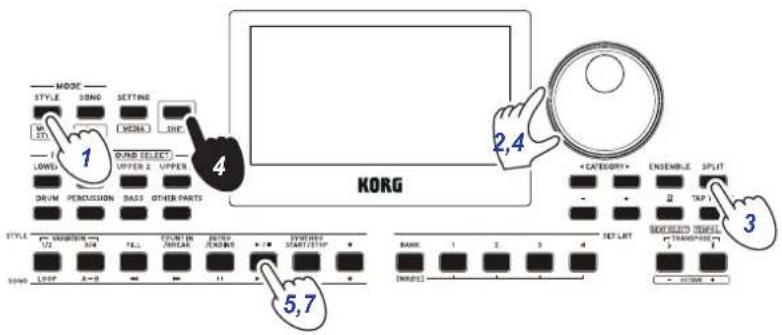

- Press the start/stop button.
The rhythm will play back.
* If a chord has already been recognized, the accompaniment will match that chord when playing.
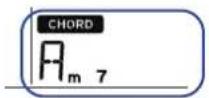
If a chord is recognized If a chord is not recognized
- Play the chords shown below using your left hand. The accompaniment will match the chords that you play.
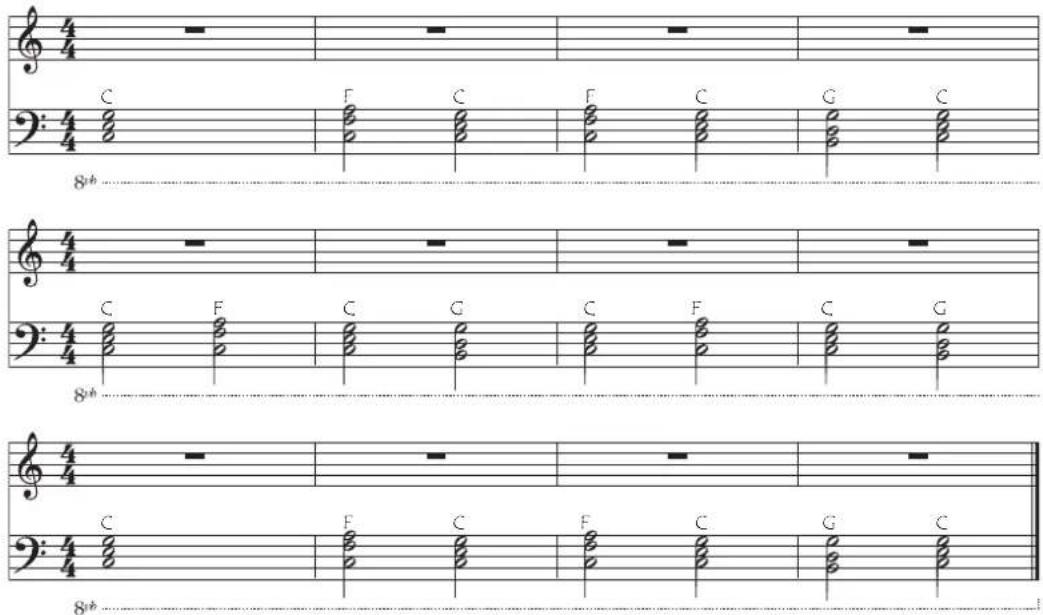
- To stop playback, press the start/stop button.
2. Adding a melody line when playing
Now, try playing a melody line along with the accompaniment.
- Press the STYLE/[MUSIC STYLE] button.
- Select a style by turning the dial. In this example, we will select "209:Jazz Brush".
- Press the button to activate the keyboard split when the SPLIT button is off.
- Turn the dial while holding down the [SHIFT] button to set the tempo to 100.
- Press the start/stop button. The rhythm will play back.
* If a chord has already been recognized, the accompaniment will match that chord when playing.
- Play the music shown below.
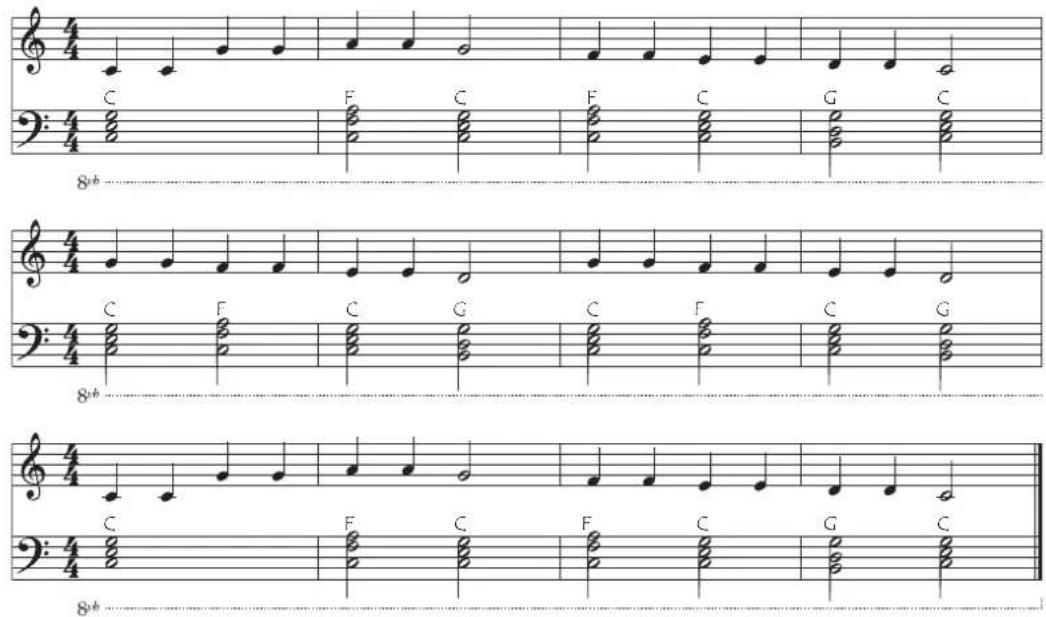
- To stop playback, press the start/stop button.
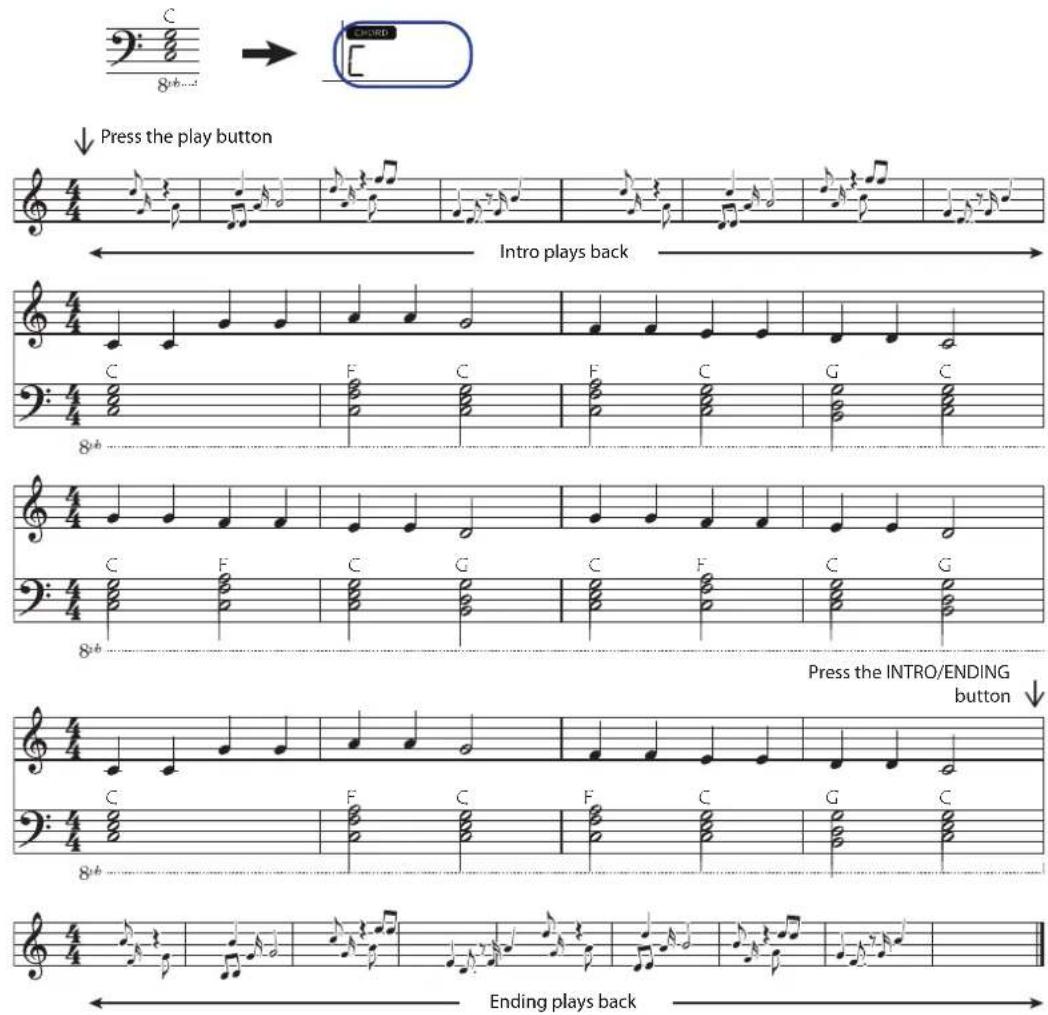
3. Adding an intro and ending to a song
Try adding an intro and ending to finish up the song.
- Press the STYLE/[MUSIC STYLE] button.
- Select a style by turning the dial. In this example, we will select "209:Jazz Brush".
-
Press the button to activate the keyboard split when the SPLIT button is off.
-
Turn the dial while holding down the [SHIFT] button to set the tempo to 100.
-
Press the INTRO/ENDING button.
-
Play the first chord to make the XE20 recognize it.
-
Press the start/stop button. The intro will play back. The display shows the number of measures before the intro will end. Wait for the time to begin playing by checking the number of measures left. You can play chords along with the intro to change the actual chords played back.
-
When the intro ends, you can start playing.
- Press the INTRO/ENDING button when you are finished playing. The ending will play back, and the song will automatically end.
![MODE STYLE 1 SONG SETTING TIME 4 LOAD LOWD WAND SELECT UPPER 2 UPPER DRUM PONS/SSION BASS OTHER PARTS KORG 2,4 STYLE + / = VINTIN 2/3 1/2 3/4 FULL COUNT IN UPPER PONS/ STANDING + / = 2/8/0/0 START/STOP 7 SANS LOOP A=0 - 5,9 SET LIST BASE 1 2 3 4 [WRITE] ENSEMBLE SPLIT TAP 1 GREAT SELECT CTEMP. + TRANSFER - STOP 1 - NONE](/content/2026/05/883167/images/635f4963403fdea8897e2790e5662464b786d3c2bdd4e20f3f2df3c37fd51ed5.jpg)

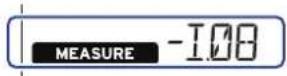
Before playing: press the INTRO/ENDING button. Play the first chord to make the XE20 recognize it.
You can use the other functions of the XE20 to further broaden your performance. We hope you'll enjoy these features, as we explain the details beginning on the next page.
Basic operations
About modes
The XE20 features two different modes, a style mode and a song mode.
Press the appropriate MODE section button on the front panel to enter one of the modes.
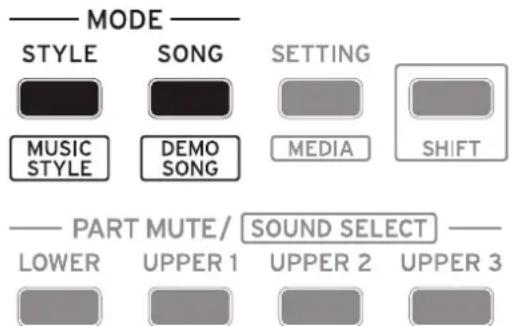
When turning on the XE20, the instrument will automatically enter style mode.
Style mode
Style mode lets you select a sound in this instrument and play it together with another sound you like on the keyboard, as well as play along with auto-accompaniment (style). You can also record your playing when using the auto-accompaniment function.
Song mode
In song mode, you can play back demo songs and user songs as well as music data files (MP3, WAV and SMF), and play along with them. You can also edit the user songs easily.
Other functions
SETTING functions
These functions include global settings for the instrument like keyboard touch, master tune, scale and so on. There are also settings for pedals that you connect, as well as MIDI-related settings.
MEDIA functions
These functions are for saving or loading set lists to/from USB flash drives, as well as for saving user songs. This also includes functions for formatting USB flash drives and for system updates.
Selecting sounds and changing values
Use the dial, the + and - buttons and the CATEGORY buttons ◀/▶ when selecting sounds or changing the values of the settings.
1. Dial
This is used to change numbers and values.
Turn the dial clockwise to increase the value, and turn the dial counter-clockwise to decrease the value.
2. CATEGORY buttons◀,▶
When you press the
CATEGORY button ◀/▶ to
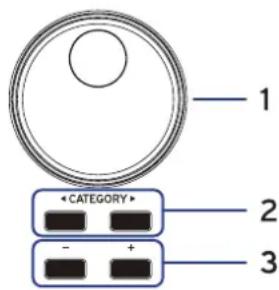
select a style, sound and so on in style mode or song mode, the first digit of the number group corresponding to the category or genre will be selected.
When using the SETTING or MEDIA functions, press the CATEGORY button ◀/▶ to select a page.
3. + and - buttons
- Press either the + or - button once to increment or decrement a number.
- Hold down the + or - button to continually change the number.
Playing the XE20 (style mode)
Selecting a grand piano
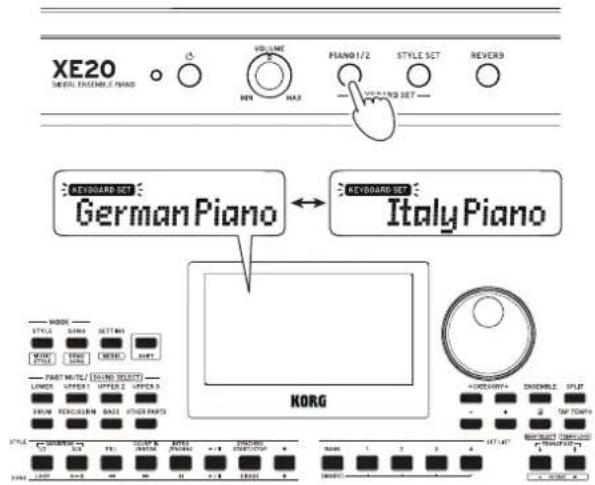
- Press the PIANO1/2 button.
This will quickly select the grand piano sound. You can switch between pianos 1 and 2 with each press of the button.
Piano 1: German Piano
Piano 2: Italy Piano
Selecting sounds in the style set
What is a keyboard set?
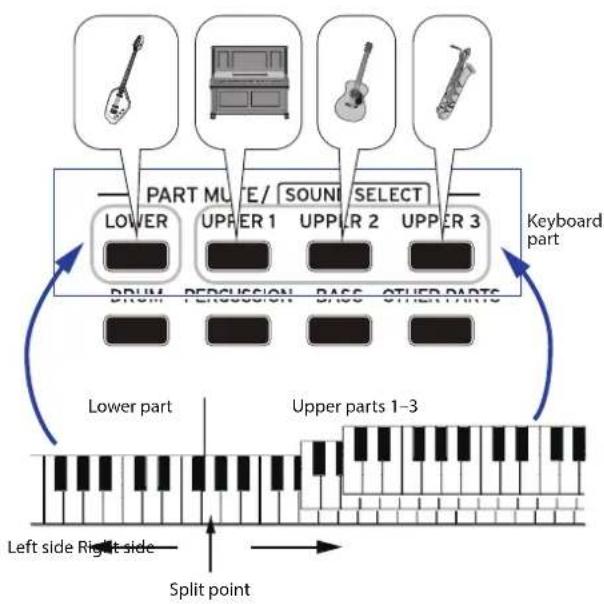
The keyboard set is a group of sounds used in keyboard performance.
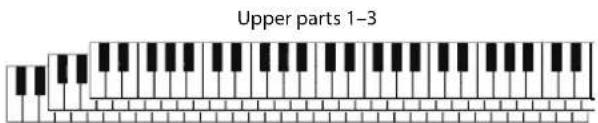
Four parts are allocated to the keyboard set (the lower part and upper parts 1–3), which include sounds like piano, strings, synthesizer, drums and so on. These four parts together are called a keyboard part.
flowchart
graph TD
    A["Top: guitar, piano, guitar, guitar"] --> B["PART MUTE/ SOUND SELECT"]
    B --> C["Keyboard part"]
    C --> D["Lower part"]
    D --> E["DRUM"]
    D --> F["PERCUSSION"]
    D --> G["BASS"]
    D --> H["OTHER PARTS"]
    I["Left side Right side"] --> J["Split point"]
    K["Upper parts 1-3"] --> L["Right side"]
    style A fill:#f9f,stroke:#333
    style B fill:#ccf,stroke:#333
    style C fill:#cfc,stroke:#333
    style D fill:#fcc,stroke:#333
    style E fill:#cff,stroke:#333
    style F fill:#ffc,stroke:#333
    style G fill:#cfc,stroke:#333
    style H fill:#fcc,stroke:#333
    style I fill:#f9f,stroke:#333
    style J fill:#ccf,stroke:#333
    style K fill:#cfc,stroke:#333
Tip: See the "Voice Name List" (PDF) for a list of the keyboard sets and sounds.
What is a style set?
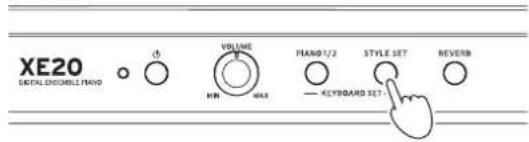
Keyboard sets that are most suitable for each style (accompaniment) are available. These are called "style sets."
- Press the STYLE SET button.
A keyboard set appropriate for the style will be recalled.
Muting parts and changing sounds
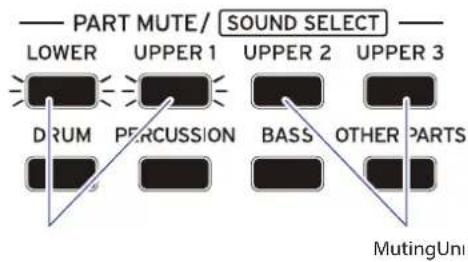
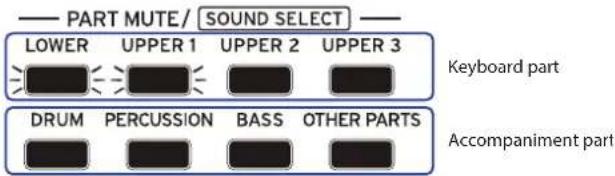
On the keyboard part (upper 1–3 and lower) and on the accompaniment part (drums, percussion, bass and other parts), you can mute (turn off) individual parts, or change the part's sound.
Muting parts
- Pressing the part buttons will mute the respective part(s) (the button will go dark). Pressing the buttons again will cancel muting (the button will light).
Changing sounds
- Press the part button for the part you want to change while holding down the [SHIFT] button (the part button will blink).
SOUND and the sound name will blink on the display. Note: The sounds for "other parts" cannot be changed.
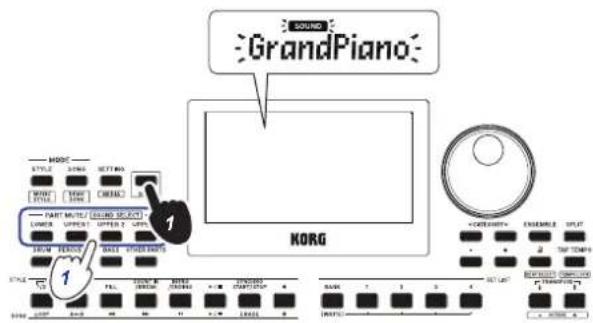
- Use the dial or the +/- buttons to select a sound.
- Press the [SHIFT] button to return to the previous mode.
Selecting a set list
Set lists are used to save and quickly recall your favorite settings (style, tempo, effects and so on; see page 21 "Saving the set list (WRITE)").
The recommended set lists are stored in locations 1–4 of banks A and B. Bank A-1 will be selected right after the power is turned on. The keyboard set will be "German Piano."
- Press the BANK/WRITE button several times to select the bank.
The bank will change in sequential order (A→B→C...J→A...) with each press of the BANK/WRITE button.
Tip: Pressing this button while holding down the [SHIFT] button will select banks in reverse order.
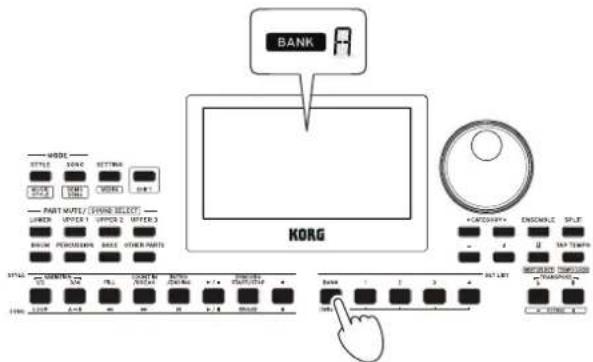
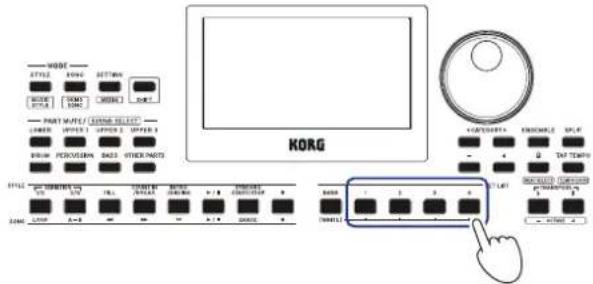
- Use buttons 1-4 to select the set list.
Changing the sounds on the left and right (split)
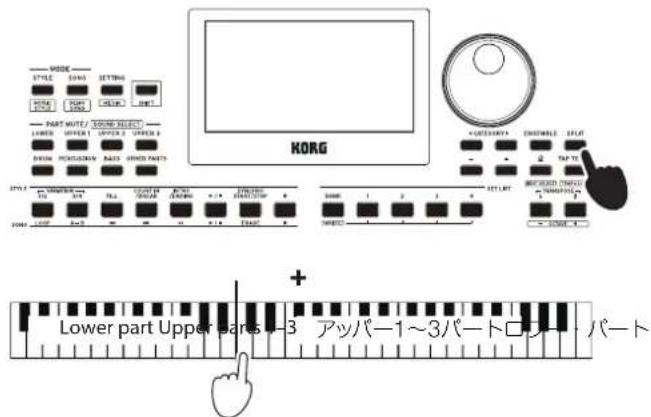
You can divide the keyboard into a high note range (for upper 1–3 parts) and a low note range (for lower part). This is called a split function, and the key where the sound changes (the next note directly below the upper part) is called the split point. Turn the split function on when you want to play different sounds with your left and right hands. You can also change the sounds for each part (see page 13 "Changing sounds").
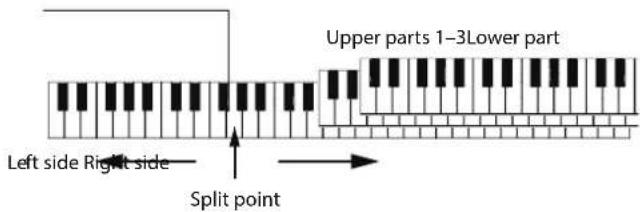
- To turn the split on: Press the SPLIT button to turn the split function on (the button will light). The keyboard will be divided into two ranges.
- To turn the split off: Press the SPLIT button once more to turn the split off (the button will go dark). The entire keyboard range will play upper parts 1–3.
- To change the split point: Press a key on the keyboard while holding down the SPLIT button.
Playing in time with the metronome
You can practice along with the tempo and beat of the metronome.
Setting the metronome
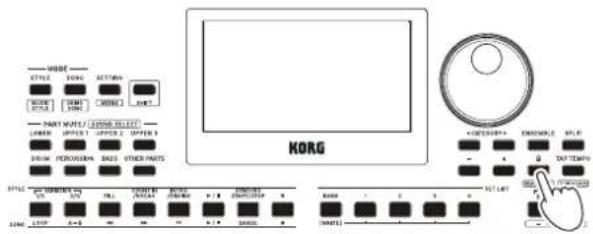
Turning on the metronome: Press the D(metronome)/[BEAT SELECT] button to turn the metronome on (the button will light), and press the button again to make it stop.
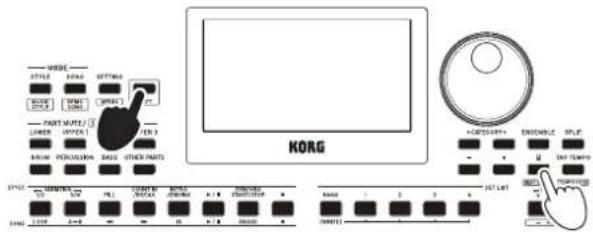
- Setting the beat: Press the (metronome)/[BEAT SELECT] button a number of times while holding down the [SHIFT] button.
$$ 2 / 2 \dots 1 6 / 1 6 \rightarrow \text { Click HI } \rightarrow \text { Click LOW } \rightarrow 2 / 2 \dots $$
2/2, 2/4, 3/4, 4/4, 5/4, 7/4, 6/8, 8/8, 16/16: Beat
Click HI: Accent sound
Click LOW: No accent sound
You cannot change the time signature of the auto-accompaniment.
- Adjusting the volume: Turn the dial while holding down the (metronome)/[BEAT SELECT] button.
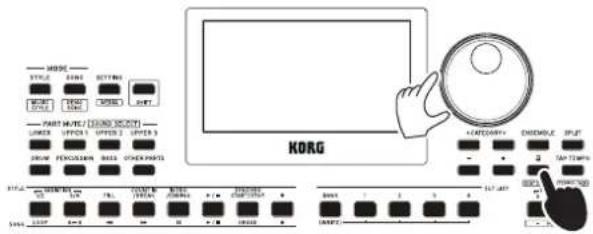
Adjusting the tempo
- Turn the dial while holding down the [SHIFT] button.
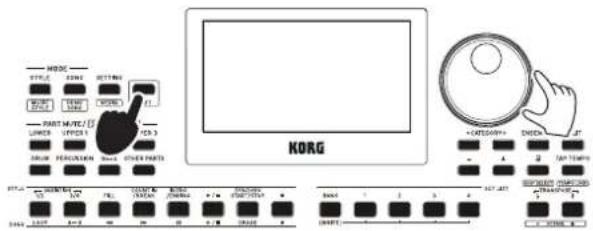
- Press the TAP TEMPO/[TEMPO LOCK] button to match the number of beats of the style at the tempo timing you wish to set. (For instance, if you want to set a 4/4 beat, press the button four times; and for a 3/4 beat, press the button three times.)
Note: Pressing the TAP TEMPO/[TEMPO LOCK] button any more times will start the accompaniment (tap start function). You can turn the tap start function disable (see page 26 "Tap Auto Start").
- Press the TAP TEMPO/[TEMPO LOCK] button while holding down the [SHIFT] button (the tempo lock icon will light on the display).
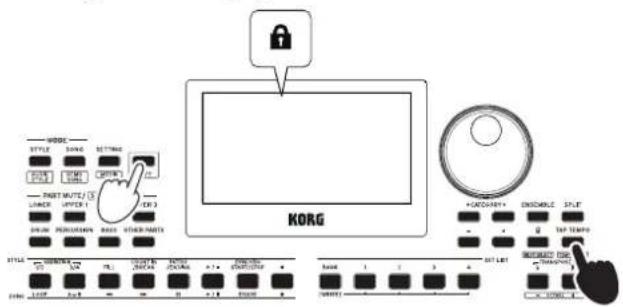
Using the keyboard to set the metronome
You can also change the time signature settings as well as adjust the tempo and volume by pressing a key on the keyboard while holding down the (metronome)/[BEAT SELECT] button.
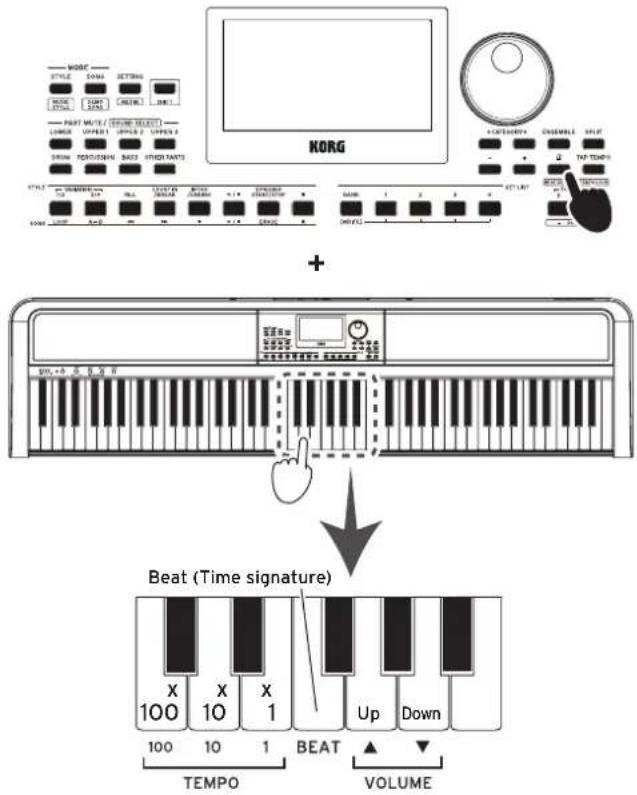
- Specifying the beat: The Beat function provides an accent on the first beat of the measure. Pressing the corresponding Beat key will advance through the Beat options in a cycle: 2/2 16/16 Click HI Click LOW 2/2
You cannot change the time signature of the auto-accompaniment.
- Adjusting the Volume: Pressing the Down key reduces the metronome volume; pressing the Up key raises it. The volume can be increased or decreased in steps of 10. For instance, when the volume is at 93 and you press the key on the keyboard corresponding to "Up," the volume will increase to 103.
- Adjusting the tempo: The Tempo (♪) can be set from 30 to 240 using the corresponding ×100, ×10, and ×1 keys. For Example: To set the Tempo to (♩) = 85, press the ×10 key eight times and the ×1 key five times; to set the Tempo to (♩) = 140, press the ×100 key once and the ×10 four times. The value will be set when you release the ⏻ (metronome)/ [BEAT SELECT] button. The range of settings is from ♩ = 30–240, with values below this being set to ♩ = 30, and values above this being set to ♩ = 240.
Setting the key and octave
Transposing (changing the key)
You can change the key of this instrument in semitones, over a range of ±1 octave.
The key that is currently set is shown in the display.
- To lower the key: Press the TRANSPOSE _b /[OCTAVE -] button.
- To raise the key: Press the TRANSPOSE#/[OCTAVE+] button.
- To reset the key: Press both the TRANSPOSE _n /[OCTAVE -] and TRANSPOSE #/[OCTAVE +] buttons together.
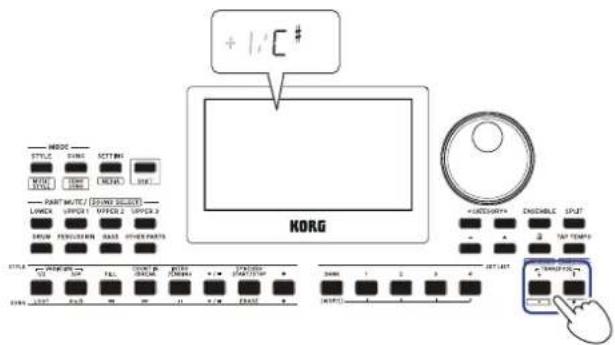
Changing the octave
You can change the pitch of the note that actually sounds when you play a note on the keyboard, up or down in one-octave units. You can set the octave within a range of ±2 octaves.
■ Changing the octave for the entire keyboard part
- To lower the octave: Press the TRANSPOSEb/[OCTAVE -] button while holding the [SHIFT] button.
- To raise the octave: Press the TRANSPOSE#/[OCTAVE+] button while holding down the [SHIFT] button.
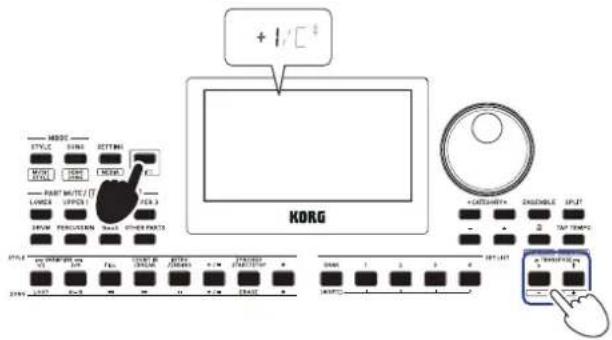
■ Changing the octave for each part
- Press the part button for the part you want to change while holding down the [SHIFT] button (the part button will blink).
SOUND and the sound name will blink on the display.
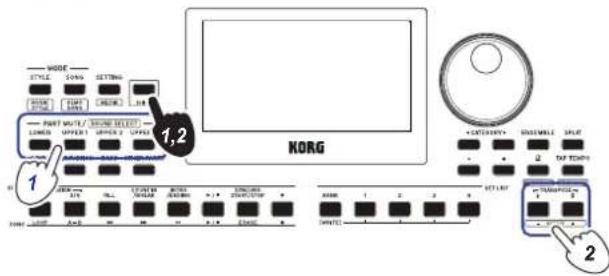
- Press the TRANSPOSE /[OCTAVE -] or TRANSPOSE#/ [OCTAVE +] buttons while holding down the [SHIFT] button.
Tip: You can change the octave for each part by pressing the TRANSPOSE#/OCTAVE -] or TRANSPOSE#/[OCTAVE +] buttons while holding down the respective PART button.
Adding effects and embellishments to your playing
Adding a harmony to the melody
This adds a harmony to the melody you are playing, to match the chord. The harmony will vary depending on the style you have selected.
- Press the ENSEMBLE button.
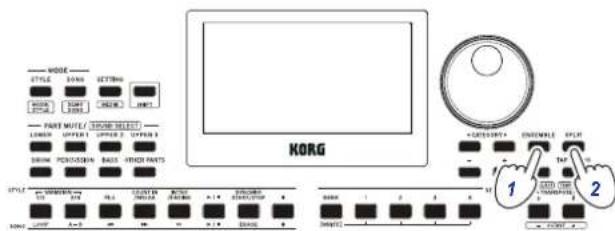
- Press the SPLIT button to activate the keyboard split feature (the button will light).
When you turn the split on, all keys to the left of the split point (the lower part) will become the "chord recognition range."
Turn the split off to make the entire keyboard become the chord recognition range.
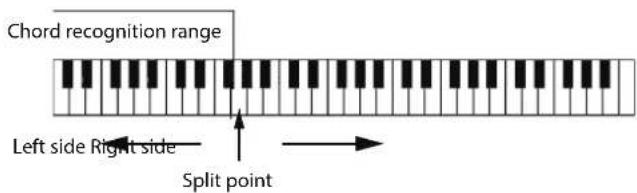
Tip: To change the split point, press a key while holding down the SPLIT button. See page 14 "Changing the sounds on the left and right (split)" for details on the split feature.
- Play a chord within the chord recognition range, and play a melody with your right hand.
Turning the reverb on/off
This switches the reverb (an effect that make the sound linger) on/off.
- Press the REVERB button.
When you press the button while reverb is being applied, the reverb will shut off.
When you press the button while reverb is not being applied, the reverb will be turned on.
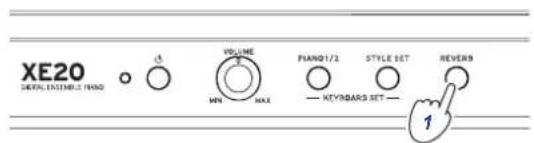
Note: Some keyboard sets do not use a reverb effect, and you will not be able to apply reverb for these sets.

This setting will be lost when the power is turned off.
Applying effects
Each keyboard set contains two effects (effects 1 and 2), which change the final output depending on the amount of sound that is sent through the effects (the send level).
Note: Depending on the type of effect, the change in sound may not be too noticeable.
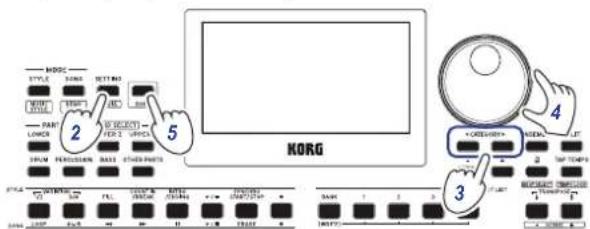
- Press the SETTING/[MEDIA] button.
- Press the CATEGORY button ◀/▶ to select from the P14–21 effects (for effect 1 or 2) and the part to which the effect will be applied (lower, upper 1–3), on the screen.
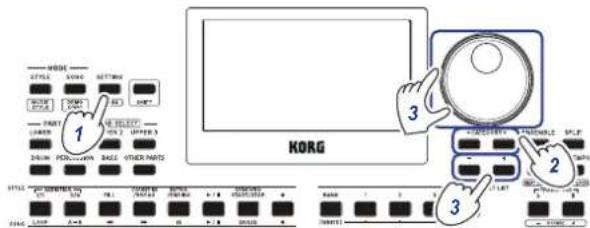
- Use the dial or the +/- buttons to set the effect send level. When the send level is at "0", the effect will not be heard. The greater the send level, the more you will hear the effect.
- Press the [SHIFT] button to return to the previous mode. Tip: If you want to save your settings, save them as a set list.
You can add an equalizer effect to make the sound outputted from the built-in speakers easier to listen to, or to adjust the tonal character of the sound to match the musical genre you are playing.
- Press the SETTING/[MEDIA] button.
- Press the CATEGORY button ◀/▶ to select "P12:Speaker EQ".
-
Select the equalizer using the dial or the +/- buttons.
There are eight types of speaker EQ:
Standard → Bass Boost → Bass Cut → Treble Boost → Treble Cut → Mid Boost → Mid Cut → Loudness → Standard ... (The default setting is "Bass Boost.") -
Press the [SHIFT] button to return to the previous mode.
Tip: If you want to save your setting, save it as a set list.
Auto-accompaniment (style mode)
Playing along with auto-accompaniment
Auto-accompaniment is a function that automatically plays accompaniment to match the chord that you specify. The XE20 features accompaniment patterns in various styles, such as dance, rock, jazz, Latin and so on. These patterns are called styles.
There are over 280 styles, divided into 17 groups.
Playing with a style you choose
The sounds used in a style (auto-accompaniment) are assigned to four parts (drums, percussion, bass and other parts).
Together, these four parts are called an accompaniment part.
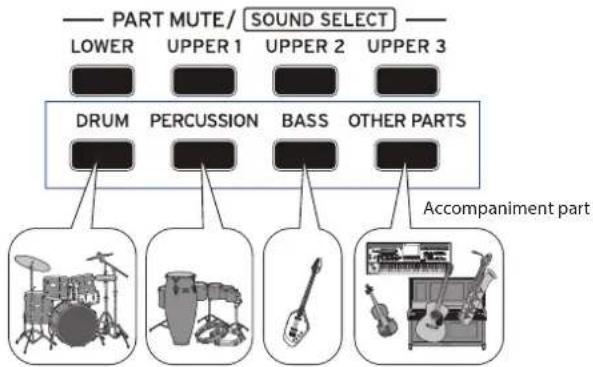
flowchart
graph TD
    A["PART MUTE/ SOUND SELECT"] --> B["LOWER"]
    A --> C["UPPER 1"]
    A --> D["UPPER 2"]
    A --> E["UPPER 3"]
    A --> F["DRUM"]
    A --> G["PERCUSSION"]
    A --> H["BASS"]
    A --> I["OTHER PARTS"]
    J["Accompaniment part"] --> K["Drum: Pie chart; Piano: Pie chart; Violin: Piano; Violin: Piano"]
- Press the STYLE/[MUSIC STYLE] button to enter style mode.
STYLE will blink on the display, and the style name will be shown.
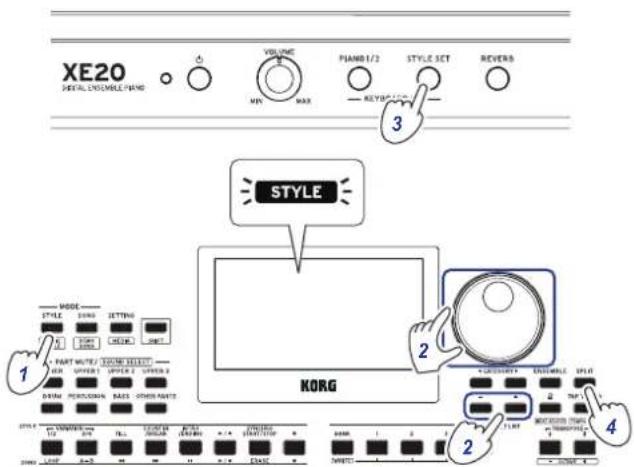
- Select the style using the dial or the +/- buttons.
Use the CATEGORY buttons ◀/▶ to switch the style between different musical genres.
Tip: See the "Voice Name List" (PDF) for a list of musical genres available for the styles.
- Press the STYLE SET button.
A keyboard set that matches the style will be recalled, and "STS" (Style Set) will be displayed before the keyboard set name.
- Press the SPLIT button to activate the keyboard split feature (the button will light).
When you turn the split on, all keys to the left of the split point (the lower part) will become the "chord recognition range."
Turn the split off to make the entire keyboard become the chord recognition range.
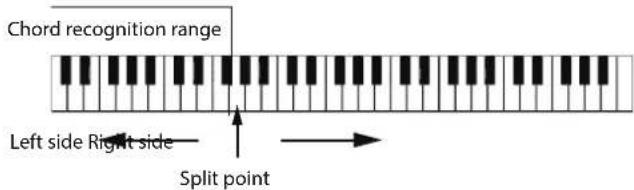
Tip: To change the split point, press a key while holding down the SPLIT button. See page 14 "Changing the sounds on the left and right (split)" for details on the split feature.
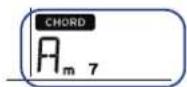
- Play a chord within the chord recognition range.
The chord name that you played is recognized and shown on the display.
Tip: You can change how this instrument recognizes the chords you play, by changing the Chord Detect setting in the SETTING functions (see page 26 "Chord Detect").
- Press the start/stop button.
The auto-accompaniment will begin, and the start/stop button will light up green.
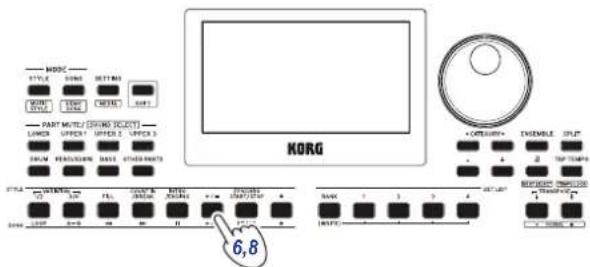
- Play a melody on the right side of the split point on the keyboard, while playing a chord in the chord recognition range.
When you change the chord, the accompaniment will automatically follow along.
Tip: See "List of chords recognized" (page 34) for a list of the chords that this instrument can recognize.
Tip: To change or lock the tempo, see "Adjusting the tempo" (page 15). When you lock the tempo, the tempo will not change when you select a different style.
- To stop the auto-accompaniment, press the start/stop button.
Making changes to the auto-accompaniment
Adding an intro or setting a variation
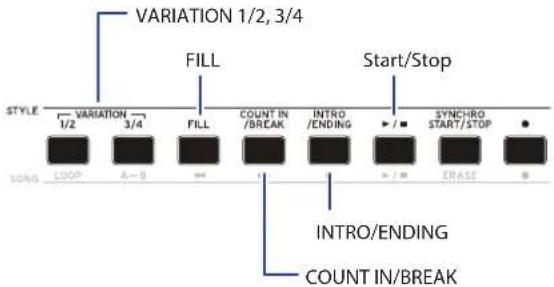
Use the buttons in the STYLE section to make changes to the auto-accompaniment, such as adding an intro, fill-ins and breaks, and an ending.
-
Follow steps 1–4 in "Playing with a style you choose" (page 18).
-
Press VARIATION buttons 1/2 or 3/4 to select a variation. Each press of the buttons will switch between VARIATION 1 and 2, or VARIATION 3 and 4.
| VARIATION | VARIATION button | Button state Variation complexity |
| 1 1/2 Lights green Simple | ||
| 2 | 1/2 | Lights red Slightly complex |
| 3 3/4 Lights green Complex | ||
| 4 | 3/4 | Lights red Advanced, complex |
The arrangement will become progressively more complex as you go up from variation 1 to 4.
- Press the INTRO/ENDING button to select the intro. Each press of the button will switch between intro 1 and 2.
| INTRO/ ENDING | Button state Intro/ending content |
| 1 Lights green | Includes chord changes |
| 2 Lights red | Chord stays the same |
Tip: When you press the INTRO/ENDING button before you start to play, this will select the intro; and when you press the button while you are playing, this will select the ending.
- Play a chord within the chord recognition range.
The chord name that you played is recognized and shown on the display.
- Press the start/stop button.
The intro will begin, and then the variation accompaniment will play back.
-
Play the chords with your left hand and the melody with your right hand.
-
Press VARIATION buttons 1/2 and 3/4, as well as the FILL button and COUNT IN/BREAK button to change the playback of the song while you play.
-
To end the song, press the INTRO/ENDING button and select the ending.
The ending will switch between ending 1 (lights up green) and ending 2 (lights up red) with each press of the button.
The accompaniment will finish after the ending.
Using the SYNCHRO START and SYNCHRO START/STOP functions
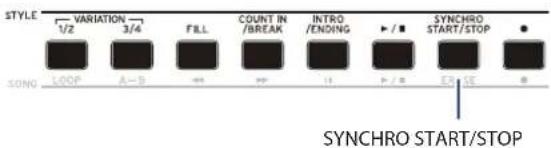
This function allows you to start the accompaniment when you play the keyboard (SYNCHRO START), or accompany you only when you are playing the keyboard (SYNCHRO START/STOP).
SYNCHRO START
-
Press the SYNCHRO START/STOP button. The button will blink green. This turns on the SYNCHRO START function.
-
Play a chord in the chord recognition range to start the accompaniment. The button will change to being continually lit in green.
-
Press the start/stop button to stop the accompaniment.
■ SYNCHRO START/STOP
-
Press the SYNCHRO START/STOP button several times, to make the button start blinking red. This turns on the SYNCHRO START/STOP function on.
-
When you play a chord in the chord recognition range, the accompaniment will start; and when you take your fingers off the keyboard the accompaniment will stop. Playing again will restart the accompaniment. The button will blink green while the accompaniment is playing.
-
To cancel SYNCHRO START/STOP, press the SYNCHRO START/STOP button several times to make the button go dark.
Adjusting the volume of the keyboard and accompaniment parts
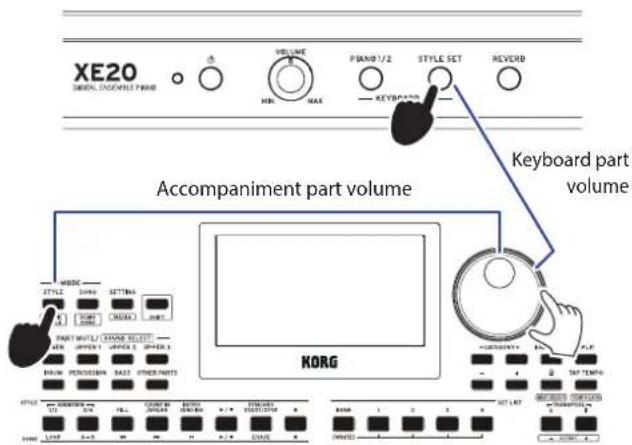
You can adjust the volume balance between the keyboard and accompaniment parts. This is useful for making a solo that you play on the keyboard stand out over the accompaniment, or for simply performing with good sound balance.
- Adjusting the overall volume of the keyboard part (upper 1–3 and lower): Turn the dial while holding down the STYLE SET button.
- Adjusting the overall volume of the accompaniment part (drums, percussion, bass and other parts): Turn the dial while holding down the STYLE/[MUSIC STYLE] button.
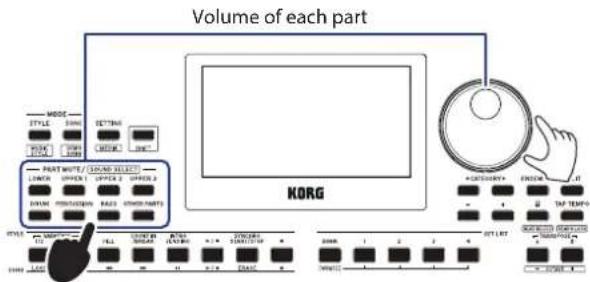
- Adjusting the volume of individual parts: Turn the dial while holding down the respective buttons in the PART MUTE/[SOUND SELECT] section.
Choosing a music style and playing
Instead of choosing a style, you can select a music style and then play or record.
A music style is based on a style, but is optimized to include a keyboard set that easily matches the mood of existing songs, and contains other settings like tempo.
You can use music styles when playing music from your favorite genre.
Note: The music styles cannot be saved to a set list.
- Press the STYLE/[MUSIC STYLE] button while holding down the [SHIFT] button.
The instrument will enter music style mode, and will blink on the display.
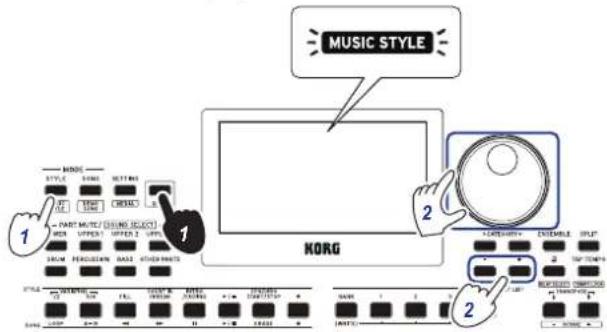
- Use the dial or the +/- buttons to select a music style.
Tip: See the "Voice Name List" (PDF) for a list of music styles available.
- Follow steps 3 and on in "Playing with a style you choose" (page 18), or steps 2 and on in "Adding an intro or setting a variation" (page 19).
Tip: You can also mute the sound or adjust the volume of the part, as shown in "Making changes to the auto-accompaniment" (page 19).
Saving the set list (WRITE)
A set list contains saved settings such as style, tempo, keyboard set and effect settings. Once you have customized the settings for a style, we recommend that you save your settings as a set list.
- In style mode, customize the style such as changing the sound of the keyboard part, changing the octave and so on.
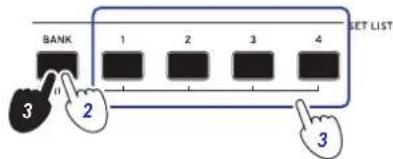
- Press the BANK/WRITE button to select the bank to save to.
The bank will change in sequential order (A→B→C...J→A...) with each press of the BANK/WRITE button.
• Banks A-B: preloaded
- Banks C-J: initialized
flowchart
graph TD
    A["1"] --> B["2"]
    B --> C["3"]
    C --> D["4"]
    D --> E["3"]
    style A fill:#000,stroke:#000,color:#fff
    style B fill:#000,stroke:#000,color:#fff
    style C fill:#000,stroke:#000,color:#fff
    style D fill:#000,stroke:#000,color:#fff
    note1["3"] --> A
    note2["2"] --> B
    note3["3"] --> D
Tip: Press the BANK/WRITE button while holding the [SHIFT] button to reverse the order.
- Press one of buttons 1-4 while holding down the BANK/WRITE button.
Your settings will be saved to the set list, and the button you pressed will light.
Tip: Bank A-1 will be selected right after the power is turned on.
The settings shown below are saved in the set list.
- Styles
Style number, volume, variation, intro - Keyboard sets
Keyboard set number, volume, octave settings
• Part
Sounds assigned to each part, volume, mute, octave settings
- Other settings
Effect selected for effect 1 and 2, send level for effect 1 and 2, tempo, transpose, split on/off, split point, ensemble on/off, metronome volume, speaker EQ
Note: Note that the section may not correctly change when you switch set lists while playing, depending on the set list.
Recording your performance
You can record as you play along with the auto-accompaniment.
- Follow steps 1–5 in "Playing with a style you choose" (page 18), or steps 1–4 in "Adding an intro or setting a variation" (page 19).
Tip: You can also mute the sound or adjust the volume of the part, as shown in "Making changes to the auto-accompaniment" (page 19).
- Press the record button to put the instrument in record standby mode (the button will light red).
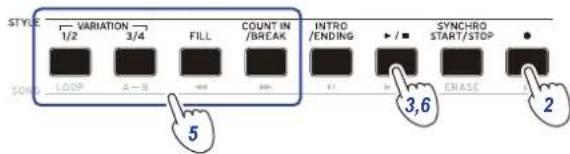
Note: Parts that are muted will not be recorded. To record a part, make sure that muting is canceled (see page 13 "Muting parts and changing sounds").
-
Press the start/stop button to begin recording.
-
Play the chords with your left hand and the melody with your right hand.
-
Press VARIATION buttons 1/2 and 3/4, as well as the FILL button and COUNT IN/BREAK button to change the playback of the song while you play.
-
To finish recording, press the start/stop button or the INTRO/ENDING button.
The data that you recorded will automatically be saved as a user song.
Tip: The name of the user song will be "UserSong," with a sequential number added to the end. Up to 999 songs can be recorded.
Tip: See "Playing along with a song" (page 22) when you want to listen to a user song.
Tip: You can make simple edits to user songs (see page 23 "Editing a song").
Recording
Tip: You can record just the keyboard part (for example, when playing the piano) without using auto-accompaniment. Before pressing the record button as shown in step 2, press each of the buttons for the accompaniment parts (DRUM, PERCUSSION, BASS, OTHER PARTS) to mute them (the buttons will go dark), and then press the SPLIT button to turn the split off.
Refer to "Muting parts and changing sounds" (page 13) for more on how to mute a part.
Song mode
Listening to the demo songs
The XE20 has 21 built-in demo songs. This shows you how to listen to the songs.
Tip: See "Playing along with a song" (page 22) for how to play along with a demo song.
- Press the SONG/[DEMO SONG] button while holding down the [SHIFT] button.
SONG will blink in the display, and the demo songs will start playing back in order from song D01.
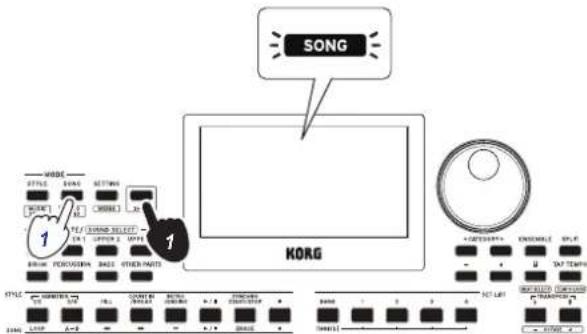
When you want to play back a specific demo song, use the dial or the +/- buttons to select the demo song. The demo songs will play back starting with the song you selected.
- Press the [SHIFT] button to stop.
Playing along with a song
You can play the XE20 while playing back a song.
- To play back an MP3, WAV or standard MIDI file on a USB flash drive, connect the USB flash drive with your data to the USB TO DEVICE port of the real panel on this instrument.
The USB icon (USB) will be shown in the top right of the display.
Tip: See "MEDIA functions" (page 28) for more information on the devices and playback formats supported by the XE20.
- Press the SONG/[DEMO SONG] button to enter song mode.
SONG will blink on the display, and the song name will be displayed.
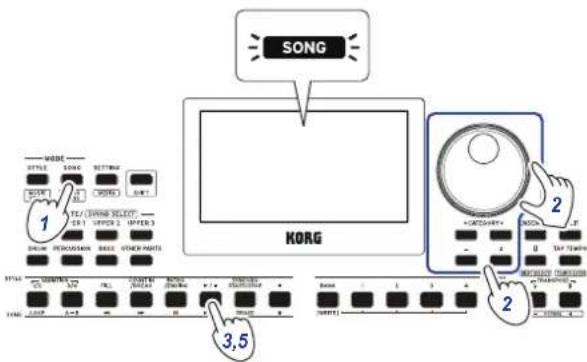
- Select the song type using the CATEGORY buttons ◀/▶, and use the dial or the +/- buttons to select the song.
The song types and SONG/[DEMO SONG] button states are as follows:
D01-D21: Demo song (blinks green)
001-999: User song (blinks red)
M01-M99: Music data (blinks green)
Note: User songs are recordings of songs that you have played on the XE20 (see page 21 "Recording your performance").
-
Press the start/stop button (the button will light up green).
-
Play the keyboard along with the song.
Tip: To change the tempo, see "Adjusting the tempo" (page 15).
- To stop playback of a song, press the start/stop button.
Tip: The user songs can be edited and then saved to USB flash drive (see page 23 "Editing a song" and page 29 "Song Convert").
Playing back using different methods Rewinding, fast-forwarding or pausing a song
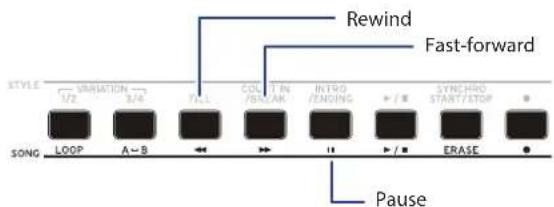
- Rewind button: Press this once to go back one measure. (For MP3 and WAV files, this will go back two seconds.) Hold down the button to continue rewinding.
- Fast-forward button: Press this once to move forward one measure. (For MP3 and WAV files, this will move forward two seconds.)
Hold down the button to continue fast-forwarding.
- Pause button: Press this during playback to pause. Press the button again to resume playback from where you stopped.
Playing back part of a song in a loop
This feature lets you play back part of a song over and over (loop playback).
■ Quick loop playback
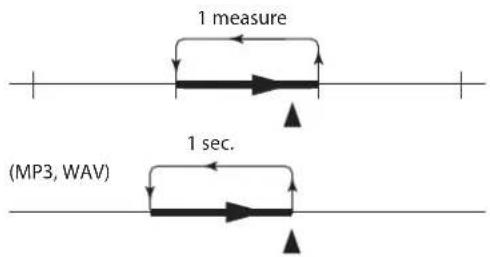
Press the LOOP button to loop the playback of the current measure. (For MP3 and WAV files, playback will be looped from 1 second prior to the point where the LOOP button was pressed.)
- Press the start/stop button to play back the song.
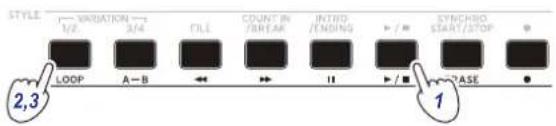
- Press the LOOP button at the measure (position) where playback will loop back (the button will light up green).
Tip: The loop can be extended to play back for a maximum of 9 measures before (or 9 seconds before, in the case of MP3 and WAV files). Use the dial during loop playback to extend the length of the loop.
- To cancel loop playback, press the LOOP button again. The instrument will return to normal playback, and the button will go dark.
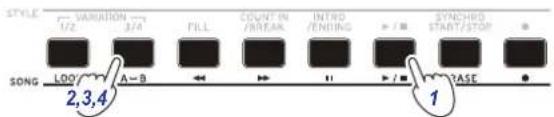
A-B loop playback
Use the A↔B button to specify a part of a song to play back in an A-B loop.
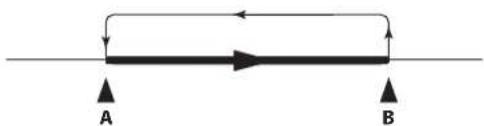
- Press the start/stop button to play back the song.
-
Press the A→B button at the start of where you want to begin the loop (the button will blink green).
-
Press the A→B button again at the end of where you want to end of the loop (the button will light up green). This will play back the song in a loop between points A and B.
-
To cancel the loop playback, press the A→B button. The instrument will return to normal playback, and the button will go dark.
Editing a song
You can edit the user songs.
Erasing part of a recording (erase function)
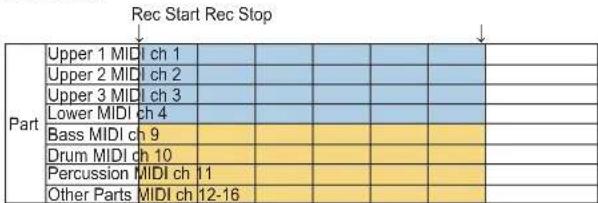
Here's how to erase part of what you played using the keyboard part in a user song.
Note: This will erase a specified range for the keyboard part, whether it is muted or not.
- Select a user song.
- Press the start/stop button to play back the song.
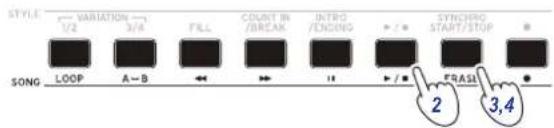
- Press the ERASE button at the point where you want to start erasing (the button will light up red).
- Press the ERASE button again at the point where you want to stop erasing (the button will go dark).
Tip: To erase a different part, press the start/stop button to stop playback, and go to step 2 to erase.
Erase
| Part | Erase On Erase Off | ||||||||
| Upper 1 MIDI ch 1 | |||||||||
| Upper 2 MIDI ch 2 | |||||||||
| Upper 3 MIDI ch 3 | |||||||||
| Lower MIDI ch 4 | |||||||||
| Bass MIDI ch 9 | |||||||||
| Drum MIDI ch 10 | |||||||||
| Percussion MIDI ch 11 | |||||||||
| Other Parts MIDI ch 12-16 | |||||||||
Overlaying parts when recording (overdubbing function)
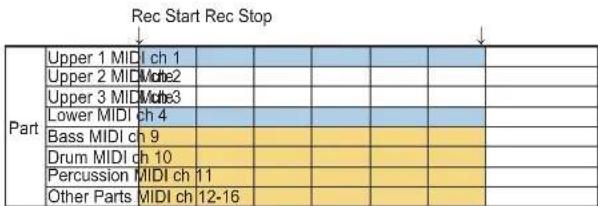
You can overlay parts that you play using the keyboard part when recording a user song. You can also record changes in the sounds used for the keyboard and accompaniment parts.
- Select a user song.
- Press the start/stop button to play back the song.
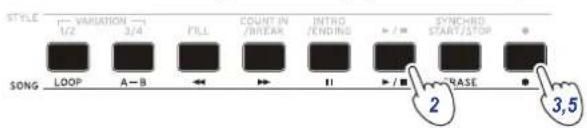
- Press the record button.
The button will light up red, and overdubbing will begin.
- Play the keyboard and make changes to the sounds.
- To change the sounds of a part, press the PART button while holding down the [SHIFT] button, and use the dial or the +/- buttons to select a sound.
When you change the sound, that information is recorded in the part.
Note: During overdubbing, you can mute or unmute the keyboard part, but this will not be recorded.
Note: To record changes to the sound, make the changes while the part is unmuted. Changes to a sound can be made to any part besides the other parts. The changes you make to a sound, as well as your keyboard playing will be recorded while the part is unmuted.
- Press the record button when you are finished changing the notes you recorded.
The button will go dark, and overdubbing will end. The rest of the song will then play back.
Note: To overdub again, press the start/stop button to stop playback, and follow the steps from step 2 on.
• To check the song that you have overdubbed your playing on, press the start/stop button and then unmute the part you overdubbed.
Overdubbing
| Part | Rec Start Rec Stop | ||||||
| Upper 1 MID0derDubbing | |||||||
| Upper 2 MID0derDubbing | |||||||
| Upper 3 MID0derDubbing | |||||||
| Lower MIDI ch/4rdubbing | |||||||
| Bass MIDI ch 9 | |||||||
| Drum MIDI ch 10 | |||||||
| Percussion MIDI ch 11 | |||||||
| Other Parts MIDI ch 12-16 | |||||||
| Song Play Rec Strac Start | |||||||
| Part | Upper 1 MIDI ch 1 | Overdubbing | |||||
| Upper 2 MIDI ch 2 | Overdubbing | ||||||
| Upper 3 MIDI ch 3 | Overdubbing | ||||||
| Lower MIDI ch 4 | Overdubbing | ||||||
| Bass MIDI ch 9 | |||||||
| Drum MIDI ch 10 | |||||||
| Percussion MIDI ch 11 | |||||||
| Other Parts MIDI ch 12-16 | |||||||
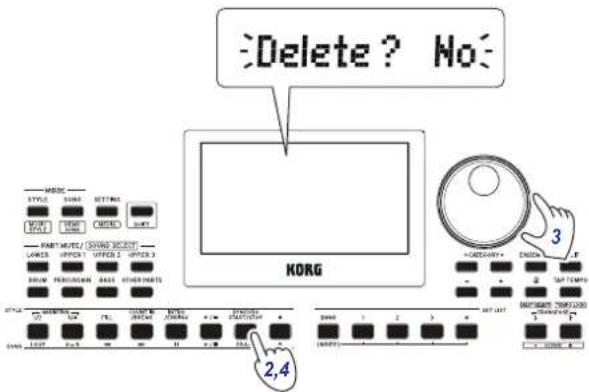
Deleting a user song
This will delete a user song that you have selected.
-
Select a user song.
-
Press the ERASE button.
"Delete? No" will appear on the display.
-
Turn the dial to select "Yes".
-
Press the ERASE button.
The user song will be deleted, and the display will show "Completed".
SETTING functions
Basic methods of use
The basic methods of using the SETTING functions are shown below.
- Press the SETTING/[MEDIA] button.
This will enter the SETTING functions, and SETTING will blink on the display.
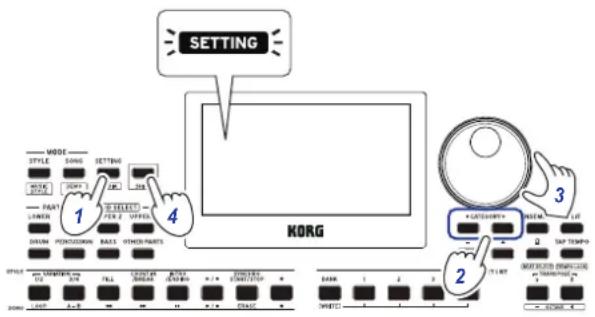
- Press the CATEGORY button ◀/▶ and select the parameter to set.
- Turn the dial to select a value.
- After you are finished, press the [SHIFT] button to return to the previous mode.
Main SETTING functions
Changing the auto power-off function
This instrument has an auto power-off function that automatically turns off the power when the unit has not been played or operated for a certain length of time. The time interval is set to 30 minutes at factory default, but this can be changed.
- In the SETTING functions, press the CATEGORY button ◀/▶ several times to select "P23:Auto PowerOff".
- Turn the dial to select "Disable" or a specific time after which the power will turn off.
- Press the [SHIFT] button to return to the previous mode.
Changing the pedal polarity
If the pedal connected to the FOOT CONTROLLER jack does not sustain the sound even when pressed, and if the sound sustains when you take your foot off the pedal, you will need to change the pedal polarity on this instrument.
- In the SETTING functions, press the CATEGORY button ◀/▶ several times to select "P03:Pedal Polarity".
- Turn the dial to change the polarity.
- (KORG): This is the factory default setting. Use this setting when using a DS-1H, PS-1 or PS-3 pedal.
- (Reverse): Use this setting when the effect of the pedal appears to be reversed.
- Press the [SHIFT] button to return to the previous mode.
Changing the pedal function
Change the pedal function on this instrument to match the type of pedal connected, whether a pedal switch, expression pedal or volume pedal.
- Connect the pedal to the FOOT CONTROLLER jack.
- In the SETTING functions, press the CATEGORY button ◀/▶ several times to select "P02:Pedal Function".
- Turn the dial to select the pedal function.
No Assign: Use this when you are not using a pedal. Damper: This is the factory default setting. Select this when using a damper pedal or a pedal switch like the Korg DS-1H, PS-1 or PS-3. Expression: Select this when using a expression pedal like the Korg EXP-2. - Press the [SHIFT] button to return to the previous mode.
List of SETTING functions
(*: Factory default setting value)
| Page | Parameter | Settings | Contents of settings |
| P.01 Key | Response Soft Touch | Medium Touch*Hard TouchFixed_001...127 | You can specify how the sound changes in response to the force used when you press a key on the keyboard.The “Soft Touch” setting produces a louder sound than usual when you play softly on the keyboard; and the “Hard Touch” setting produces a softer sound than usual, until you play harder. The “Fixed_001” through “Fixed_127” settings produce a set volume like with an organ, regardless of how hard or soft you play the keyboard. |
| P02 Pedal | Function No Assign | Damper*Expression | See page 25 “Changing the pedal function”. |
| P03 Pedal | Polarity -(KORG)* | +(Reverse) | See page 25 “Changing the pedal polarity”. |
| P04 Master | Tuning 427.5 ... 440 | .0* ...452.9 Hz | Sets the overall tuning for the instrument (drums excepted). |
| P05 Chord | Detect Fingered1* | Fingered2Fingered3Fingered3/BassOne Finger | Sets the method of chord recognition.This setting is enabled when the split function is on. When split is off, “Fingered3” is enabled.Fingered1: You can play a single note or multiple notes. When you play a single note, this is recognized as a major chord.Fingered2: You can play a single note or multiple notes. Playing only one note will play back in unison. The root and the 5th will be recognized as a major chord when you play them.Fingered3: You always need to play at least three notes for the chord to be recognized.Fingered3/Bass: The Fingered3 setting is enabled, with the addition of bass inversions. The lowest note of an inverted chord (the lowest note that you play of a chord) is always considered to be the root of the chord. You can use this to make specify composite chords like Am7/G, F/C and so on.One Finger: Chord recognition works as follows.- Single notes played are recognized as major chords.- Play the root of the chord and then the white note to the left of it together for a seventh chord (for example, if you play C3 and B2 together, you will get a C7 chord).- Play the root of the chord and then the black note to the left of it together for a minor chord (for example, if you play C3 and B2 together, you will get a C minor chord).- Play the root of the chord and then the black and white notes to the left of it together for a minor seventh chord (for example, if you play C3, B2 and B2 together, you will get a Cm7 chord). |
| P06 UpperScaleTyp(Upper Scale Type) | KeyboardSet*EqualPureMajorPureMinorArabicPythagoreanWerckmeisterKirnbergerSlendroPelog | “P.06 UpperScaleTyp” sets the scale for the upper part.“P.07 StyleScaleTyp” sets the scale used for the style accompaniment part and the lower part.KeyboardSet: This is the scale set for each style.Equal (equal temperament tuning): This is a widely-used scale in general use, where the difference in pitch between each semitone is uniform.PureMajor (just temperament major scale): This is a scale in which the major chord for the primary overtones selected harmonizes perfectly.PureMinor (just temperament minor scale): This is a scale in which the minor chord for the primary overtones selected harmonizes perfectly. | |
| P07Style | ScaleTyp(Style ScaleType) | Equal*PureMajorPureMinorArabicPythagoreanWerckmeisterKirnbergerSlendroPelog | Arabic: This is a scale that includes quarter tones used in Arabian music.Pythagorean: This is the scale used in ancient Greece, and is effective for playing melodies.Werckmeister: This is an equal temperament tuning used in later-era baroque music.Kirnberger: This was a scale created in the 18th century, mainly used for harpsichord tuning.Slendro: This is a scale used on gamelans in Indonesia, with five notes per octave.Pelog: This is another scale used on gamelans in Indonesia, with seven notes per octave. When the key is set to “C”, use only white notes when playing (the black note pitches use equal temperament tuning). |
| P08 Tap | Auto Start Disable | Enable* | Pressing TAP TEMPO/[TEMPO LOCK] button continuously will set whether performance begins automatically or not. |
| P09 MIDI | Clock Internal*External | External | Sets whether the MIDI clock of this instrument is controlled by the internal clock (Internal) or by an external clock (External). |
| P.10 Local | Control Off | On* | Sets whether the sound generator of this instrument will play or not ("On" to play, "Off" to not play) when the keyboard is played.On: Notes that you play on the keyboard and MIDI data will be sent to the internal sound generator and to the USB TO HOST port.Off: Notes that you play on the keyboard and MIDI data will be sent to the USB TO HOST port, but the internal sound generator will not sound. Turn this setting to "Off" when this instrument is connected to a computer that is set to echo back and when you want to use this instrument as a sound generator, in order to prevent notes from sounding in duplicate. |
| P.11 | Audio In Level | 0 ... 100* ... 127 | Sets the input level from audio devices connected to the AUDIO IN jack. |
| P.12Speaker | EQ Standard, Bass | Boost*,Bass Cut, Treble Boost,Treble Cut, Mid Boost,Mid Cut, Loudness | See page 17 "Selecting an equalizer (EQ)".Standard: Outputs a standard, natural sound.Bass Boost: Boosts the low range.Bass Cut: Cuts the low range.Treble Boost: Boosts the high range.Treble Cut: Cuts the high range.Mid Boost: Boosts the mid-frequency range.Mid Cut: Cuts the mid-frequency range.Loudness: Increases the overall loudness of the sound. |
| P.13Speaker | Off, On* | See page 30 "When you will not be using the built-in speakers". | |
| P.14Fx1 | Send Level Lower | 0...127 | See page 17 "Applying effects". |
| P.15Fx1 | Send Level Upper1 | 0...127 | |
| P.16Fx1 | Send Level Upper2 | 0...127 | |
| P.17Fx1 | Send Level Upper3 | 0...127 | |
| P.18Fx2 | Send Level Lower | 0...127 | |
| P.19Fx2 | Send Level Upper1 | 0...127 | |
| P.20Fx2 | Send Level Upper2 | 0...127 | |
| P.21Fx2 | Send Level Upper3 | 0...127 | |
| P.22 Auto | PowerOff | Disable,5, 10, 30*, 60,120 Minutes | See page 25 "Changing the auto power-off function". |
MEDIA functions
Connecting and removing USB flash drives
- Turn off the power.
- Connect a USB flash drive (commercially available) to the USB TO DEVICE port.
Make sure that the USB flash drive is facing the right direction when you insert it. If you try to push the drive in the wrong way too hard, the port on the instrument or the drive itself may break, or you may lose your data.
- Turn the power back on.
The USB icon (USB) will be shown in the top right of the display.
Note: If [dus] not display, turn off the power and reconnect the USB flash drive.
Note: Be sure to format the USB flash drive before using it for the first time on this instrument.
When removing the USB flash drive, be sure to turn off the power first.
Basic method of use
The basic method of making settings using the MEDIA functions is as shown below.
The MEDIA functions will not work unless you plug a USB flash drive into this instrument.
- Connect a USB flash drive.
See "Connecting and removing USB flash drives" (page 28).
- Press the SETTING/[MEDIA] button while holding down the [SHIFT] button.
This will enter the MEDIA functions.
-
Select the menu to set using the CATEGORY buttons ◀/▶.
-
Press the BANK/WRITE button.
"Cancel [<]" will be displayed.
- Turn the dial to select the next function, and follow the directions shown in the display.
For instance, to select "Yes [WRITE]", press the BANK/ WRITE button to go to the next step. To select "Cancel [<]", press the CATEGORY button ◀ to stop the operation and return to step 2.
- When the operation is finished, the message "Completed!" will be displayed. Press the [SHIFT] button to return to the previous mode.
Formatting a USB flash drive
In order to use a USB flash drive on this instrument, you will need to format (initialize) it first.
- In the MEDIA functions, press the CATEGORY button ◀/▶ and select "Media Format". The message "Enter [WRITE]" will be displayed.
- Press the BANK/WRITE button.
"Cancel [<]" will be displayed.
- Turn the dial to select "Yes [WRITE]", and press the BANK/WRITE button.
"Are You Sure?" will be displayed.
- Turn the dial to select "Yes [WRITE]", and press the BANK/WRITE button.
- When the operation is finished, the message "Completed!" will be displayed. Press the [SHIFT] button to return to the previous mode.
Loading user styles
You can load and use Pa50, Pa50SD and microARRANGER user styles on the XE20.
Copy the user styles (files with an .STY extension) and the user programs (file with a .PCG extension) to a USB flash drive, and then load them into the XE20.
Note: Specifications vary by product, so the sounds that play back on the XE20 may sound different from the instrument on which you created the original data.
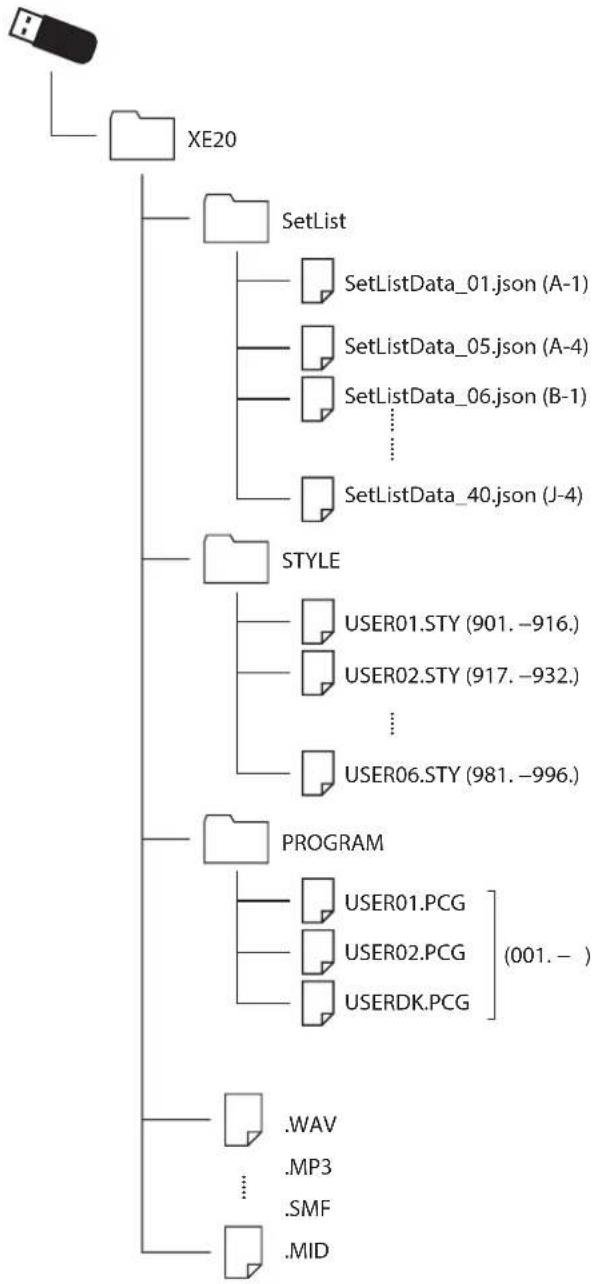
- On your computer, create a folder named "XE20" on the root directory of your USB flash drive, and then make a "STYLE" and "PROGRAM" subfolder in that folder.
- Copy the user styles to the STYLE folder, and the user programs to the PROGRAM folder.
- User styles
From USER01.STY to USER06.STY
- User programs
USER01.PCG, USER02.PCG, USERDK.PCG
Tip: You can select specific data to load for the user styles and user programs.
- Connect the USB flash drive that contains your user style and user program data to the USB TO DEVICE port of the XE20.
- Following the "Basic method of use," select and execute "UserStyleLoad" in the MEDIA function.
- When the operation is finished, the message "Completed!" will be displayed. Press the [SHIFT] button to return to the previous mode.
The user styles will be loaded into the XE20 memory from style 901. onward, and the user programs will be loaded into memory from sound 001. onward. A dot (“.”) will be shown after each number.
Note: If you load a different user style after loading these styles, the previous user styles will be erased.
List of MEDIA functions
| Page Menu Contents of settings | ||
| P.01 Set ListBackUp Saves all | set lists to the USB flash drive. | |
| P.02 | SetListRestore | Loads all set lists from the USB flash drive. |
| P03Song Convert Saves the user songs to the USB flash drive in SMF (Standard MIDI File) format.Current: This saves the user song currently selected in song mode.ALL: This saves all user songs. | ||
| P04 | UserStyleLoad | Loads Pa50, Pa50SD and microARRANGER style data from a USB flash drive.See page 28 "Loading user styles". |
| P05Media Format Format the USB flash drive.See page 28 "Formatting a USB flash drive". | ||
| P06SystemUpdate This updates the system on this instrument. | ||
Storage media that can be used
The XE20 supports the use of USB storage devices such as FAT16 or FAT32-formatted flash drives or disks.
Supported capacities
FAT32: Up to 2 TB (2,000 GB)
FAT16: Up to 4 GB
File and folder structure
When saving data to USB flash drives from this instrument, or when formatting USB flash drive, a folder named "XE20" will automatically be created on the media.
When using the MEDIA functions "SetListBackUp" and "Song Convert", the files shown below will be saved to the folder.
SetList: The "SetList" folder will be created, and a file named "SetListData_#.json" will be saved to the folder. The "##" characters above are a placeholder for the file number, which can be from 01 to 40.
UserSong_###.mid: This represents a user song file on this instrument that has been converted to a MIDI file (SMF format 0). The “###” characters above are a placeholder for the file number.
The WAV, MP3, SMF and MID files in the "XE20" folder can be loaded into this instrument as user songs.
When you insert a USB flash drive into the XE20, the instrument searches for the relevant files in the "XE20" folder, and displays these files as a list from M01 to M99 in song mode.
The supported formats for each file type are as shown below.
WAV: Supported sample rate = 44.1 kHz
MP3: Supported sample rate = 44.1 kHz, VBR compatible
SMF, MIDI: SMF formats 0, 1
flowchart
graph TD
    A["XE20"] --> B["SetList"]
    B --> C["SetListData_01.json (A-1)"]
    B --> D["SetListData_05.json (A-4)"]
    B --> E["SetListData_06.json (B-1)"]
    B --> F["..."]
    B --> G["SetListData_40.json (J-4)"]
    B --> H["STYLE"]
    H --> I["USER01.STY (901. -916.)"]
    H --> J["USER02.STY (917. -932.)"]
    H --> K["..."]
    H --> L["USER06.STY (981. -996.)"]
    B --> M["PROGRAM"]
    M --> N["USER01.PCG"]
    M --> O["USER02.PCG"]
    M --> P["USERDK.PCG"]
    M --> Q[".WAV"]
    M --> R[".MP3"]
    M --> S[".SMF"]
    M --> T["MID"]
Connecting to an external device
Connecting an audio player
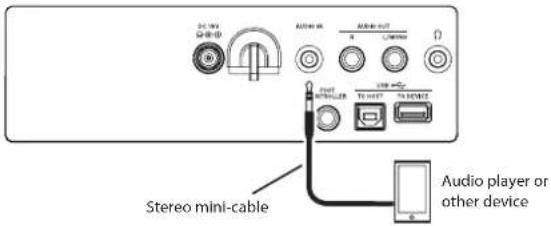
You can connect an audio device such as an audio player to the AUDIO IN jack (stereo mini-phone jack) on the rear panel of this instrument, and hear the sound of the audio device playing back through the built-in speakers of the XE20. This is useful for playing along.
- Turn the volume on this instrument and on your audio device all the way down, and then turn the power off on both units.
- Connect your audio device to the AUDIO IN jack on the rear panel of this instrument using a stereo mini-cable.
- Turn the power of the audio device on, and then turn on the power of the XE20.
- Play back sound on the audio device, slowly turning up the volume. As you raise the volume on the XE20, you should be able to hear the sound coming through the speakers.
- To adjust the volume balance, raise the volume on your audio device while playing the keyboard of the XE20 along with the sound.
To adjust the overall volume level, use the VOLUME knob.
Tip: You can adjust the input level of the audio device using the "Audio In Level" (page 27) parameter in the SETTING functions.
- When turning off the power, stop playback on the audio device, turn off the XE20, and then turn off your audio device, in that order.
Connecting powered monitor speakers
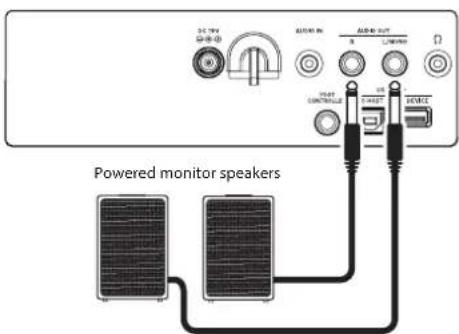
You can connect audio equipment such as powered monitor speakers or a home stereo to the AUDIO OUT jacks on the rear panel of the XE20, which lets you hear what you play on this instrument through your audio equipment.
The audio output on this instrument uses a higher signal level than ordinary home audio equipment like CD players. For this reason, playing at an excessive volume may damage the external audio equipment. Use particular care when setting the volume.
- Turn the volume down all the way on this instrument and on the external audio equipment, and turn off the power on both devices.
- Connect the AUDIO OUT jacks of this instrument to the audio input jack(s) of your external audio equipment or other device.
Tip: When using monaural sound, connect to the L/MONO jack.
- Turn on the power on the XE20, and then on the external audio equipment.
- Turn up the volume of this instrument gradually and play the keyboard. Adjust the volume balance by turning up the volume of both this instrument and the external audio equipment.
- When turning off the power, first turn the power of the external audio equipment off, and then turn off the power of this instrument.
When you will not be using the built-in speakers
You may want to turn off the built-in speakers and output the sound from the AUDIO OUT jacks only, such as when you are playing onstage.
- Refer to "Connecting powered monitor speakers" (page 30) when connecting external audio equipment.
- Press the SETTING/[MEDIA] button.
- Press the CATEGORY button ◀/▶ to select "P13:Speaker".
- Select OFF using the dial or the +/- buttons. The built-in speakers will turn off and will not make a sound.
Tip: Also, if you connect a pair of headphones to the headphone jack, the built-in speakers will shut off.
- Press the [SHIFT] button to return to the previous mode.
- Select "ON" in step 4 when turning on the internal speakers.
This setting will be lost when the power is turned off.
Connecting to a computer
Connect the USB TO HOST port on the back of the XE20 to your computer with a USB cable to exchange MIDI or audio data.
Using USB-MIDI
What is MIDI?
MIDI (Musical Instrument Digital Interface) is a worldwide standard for communicating various information between electronic musical instruments and computers.
■ Connecting to a computer
Connect the USB A port of your Windows PC or Mac to the USB TO HOST port of the XE20 with a USB cable.
For the MIDI-related settings to make after connecting, see "MIDI Clock" (page 26) and "Local Control" (page 27).
When the XE20 is first connected to your Windows computer, the USB-MIDI driver pre-installed with the operating system will be used automatically. This pre-installed USB-MIDI driver will not allow the XE20 to access multiple programs or applications at the same time. To remedy this situation, simply download the KORG USB-MIDI driver at www.korg.com and install the driver as instructed with the supporting documentation.
Even if the XE20 will not be used with multiple applications, we recommend installing the KORG USB-MIDI driver, which should provide improved operating stability.
■ About MIDI channels
The MIDI channels that are used in style mode and song mode when you select a user song are as follows.
Ch01: Upper 1 part
Ch02: Upper 2 part
Ch03: Upper 3 part
Ch04: Lower part
Ch09: Bass part
Ch10: Drum part
Ch11: Percussion part
Ch12-16: Other parts
Note: Note that the MIDI channels used when playing back an SMF will depend on the settings in that file.
Using USB-AUDIO
■ Connecting to a computer
- Turn the volume all the way down on both the XE20 and your computer.
- Connect the computer to the USB TO HOST port on the rear panel using a USB cable.
- Play back sound on the computer while slowly turning up the volume. As you raise the volume on the XE20, you should be able to hear the sound coming through the speakers.
- To adjust the volume balance, raise the volume on your computer while playing the keyboard of the XE20, along with the sound played back from the computer.
When connecting to your computer, you may hear a loud noise depending on the settings, so adjust the volume on your computer.
Appendix
Checking the software version
- Press the power button while holding down the [SHIFT] button.
The software version number of the XE20 will be displayed following the opening screen. - Turn off the power, and then turn it on again.
Restoring the XE20 to factory default settings
This restores the settings of this instrument to the factory defaults. Note that this will initialize (reset) all of your song lists, user songs and the settings you have made in the SETTING functions. For this reason, any user songs you have recorded or any new set lists you may have made will be overwritten and lost. If you want to keep your user songs and set lists, save the data to a USB flash drive using the MEDIA function (see page 29 "SetListBackUp", page 29 "Song Convert").
Do not turn off the power on this instrument while it is initializing. If the initialization fails, you may be unable to use the instrument.
- Turn off the power.
- While holding down the [SHIFT] button and the BANK/WRITE button in the SET LIST section, press the power button.
"FactoryPreload" will be displayed, and the start/stop button in the STYLE/SONG section will blink. - Turn the dial to select "Yes", and press the start/stop button in the STYLE/SONG section.
The initialization will begin. Once the instrument has been restored to the factory default settings, "Completed" will appear in the display. - Turn off the power, and then turn it on again.
Calibrating an expression pedal
Calibrate the expression pedal (such as a EXP-2) that you have connected to the FOOT CONTROLLER jack, and set the pedal's variable range.
- Connect the expression pedal while the XE20's power is turned off.
- Press the power button while holding down button 1 in the SET LIST section.
"Pedal Calib." will be displayed, and the start/stop button in the STYLE/SONG section will blink. - Press the start/stop button in the STYLE/SONG section. "Measuring Min" will appear on the display.
-
Bring the pedal all the way down (towards you), and take your foot off. The value will appear on the display.
-
Press the start/stop button. "Measuring Max" will appear on the display.
-
Press the expression pedal upward all the way (away from you), and take your foot off.
The value will appear on the display.
-
Press the start/stop button. "Completed" will appear on the display, which completes the calibration.
-
Turn off the power, and then turn it on again. Try operating the pedal to make sure that it is working as intended. If the pedal does not work correctly, repeat this process from step 1.
Troubleshooting
If this instrument is not operating as expected, check the following points.
The instrument will not turn on.
Is the AC adapter plug connected to the AC outlet?
Have you pressed the power button?
The power will not go off.
Did you hold down the power button for a while?
The power turns off by itself.
The auto power-off function may be enabled.
No sound is heard from the speakers of this instrument when the keys are played.
Is the instrument's volume turned up?
Is a pair of headphones connected to this instrument?
The speakers will not produce sound when headphones are connected to this instrument.
The part buttons might all be muted.
Is the volume down on the pedal connected to the FOOT CONTROLLER jack?
If sound is not heard when pressing some keys, you may have exceeded the instrument's maximum polyphony.
The local control in the SETTING functions should be set to "On".
Are the speakers set to off?
Is the speaker setting in the setting functions set to "On"?
The keyboard parts might all be muted.
The sound will not stop.
The functions or polarity for the pedal might not be set correctly.
The sound seems to be doubled.
If you are using a DAW, make sure that the local control setting in the SETTING functions is set to "Off".
The sound coming from external audio equipment is distorted.
The inputs of the powered monitor speakers and other equipment might be overloaded. Adjust the volume on this instrument using the VOLUME knob.
The pitch is off.
Is the transpose function set correctly?
Has "MasterTuning" in the SETTING functions been set correctly, as well as the program's octave and tune edit parameters?
Is the scale set correctly?
See "UpperScaleTyp" (page 26) and "StyleScaleTyp" (page 26) for these settings in the SETTING functions
I hear unwanted noise.
When the volume for a part is raised, the digital signal processing may overload the signal, which could cause distortion or other noises. This is not a malfunction. Try lowering the volume on each part button. You may hear distorted or noisy sounds due to input overload with certain effects. This is not a malfunction. In certain electrical environments, you may hear noise due to a ground loop or other factors.
The pedal switch or expression pedal connected to the FOOT CONTROLLER jack doesn't work like it should.
The functions or polarity for the pedal might not be set correctly. See "Pedal Function" (page 26) and "Pedal Polarity" (page 26) for these settings in the SETTING functions. Is the variable range of the expression pedal set correctly? Calibrate as shown on "Calibrating an expression pedal" (page 32).
I cannot record a user song.
The maximum number of user songs is 999. You may need to delete one (see page 24 "Deleting a user song".)
MIDI signals sent to/from this instrument and a computer are not being correctly received.
Is the USB cable connected correctly to the USB TO HOST port?
The instrument does not let me access the MEDIA functions.
Is your USB flash drive correctly plugged in? If the USB flash drive is correctly plugged in, you should see USB in the display.
List of chords recognized
These are the main chords that will be recognized when the chord recognition on this instrument is set to "Fingered2".
Major
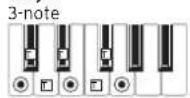
2-note
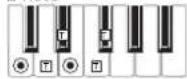
Major 6th
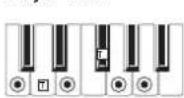
2-note4-note
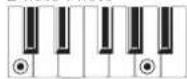
Major 7th
4-note
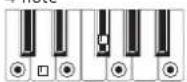
3-note
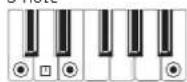
2-note
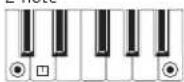
Sus
3-note
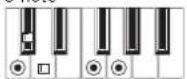
2-note3-note
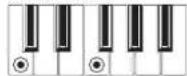
Sus 2
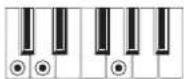
Dominant 7th
4-note
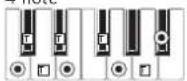
3-note
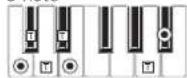
2-note
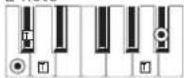
Dominant 7th Sus 4
4-note
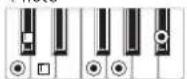
3-note
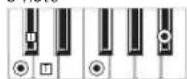
Flat 5th
3-note
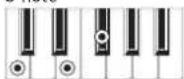
Dominant 7th 5
4-note
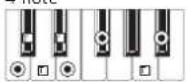
Major 7th '5
4-note
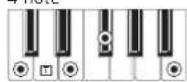
Major 7th Sus 4
4-note
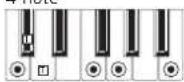
Minor
3-note
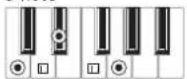
2-note
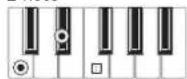
Minor 6th
4-note
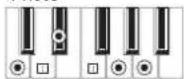
Minor 7th
4-note
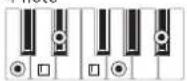
3-note
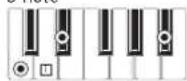
Minor-Major 7th
4-note
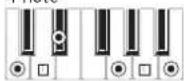
3-note
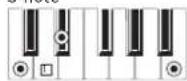
Diminished
3-note
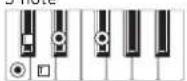
Diminished 7th
4-note
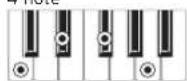
Diminished Major 7th
4-note
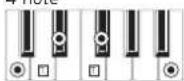
Minor 7th ^b 5
4-note
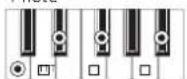
Augmented
3-note
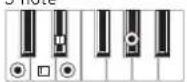
Augmented 7th
4-note
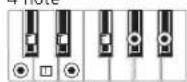
Augmented Major 7th
4-note
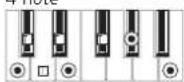

= constituent notes of the chord = can be used as tension
Specifications
| Function XE20/XE20SP | |
| Keyboard NH (Natural Weighted Hammer Action) Keyboard 88 keys (A0-C8) | |
| Touch control Soft (light), medium (standard), hard (heavier), fixed | |
| Sound generator | Stereo PCM sound generator |
| Maximum polyphony | 184 voices (Maximum of 120 voices (German Piano and Italy Piano sounds); maximum of 64 voices (other sounds)) |
| Sounds Over 705 | sounds, 41 drum kits (including GM-compatible sound sets) |
| Effects Accompaniment part: 2 stereo digital multi-effects Keyboard part: 2 stereo digital multi-effects | |
| Styles More than | 280 presets |
| 2 intros, 4 variations, 2 fills, 1 break, 2 endings, synchro start/stop, tap tempo | |
| Music styles More than 64 | |
| Demo songs 21 | |
| Audio player MP3 (44.1 kHz) WAV (44.1 kHz) | |
| Sequencer Record Real-time recording (style mode), maximum of 999 songs (approx. 100,000 notes), 12 tracks (4 keyboard parts + 8 auto-accompaniment parts), original format (can convert to SMF0) | |
| Playback Supports song play (playing on the keyboard during song playback), SMF (Standard MIDI File) format 0 or 1 | |
| Scales (Temperament) | 9 types |
| Controls Power button, VOLUME knob, PIANO1/2 button, STYLE SET button, REVERB button, STYLE/[MUSIC STYLE] button, SONG/[DEMO SONG] button, each button in the PART MUTE/[SOUND SELECT] section, SETTING/[MEDIA] button, [SHIFT] button, ENSEMBLE button, SPLIT button, (metronome)/[BEAT SELECT] button, TAP TEMPO/[TEMPO LOCK] button, TRANSPOSE > and #/[OCTAVE -/+] buttons, dial, CATEGORY buttons ◀/▶, + button, - button, each button in the STYLE/SONG section, each button in the SET LIST section | |
| Set lists | 10 banks × 4 |
| Metronome | Tempo, beat, volume |
| Tempo | 30–240 |
| Transpose | C (-12) to C (0) to C (+12) |
| Tuning | 427.5–452.9 Hz |
| Function XE20/XE20SP | ||
| Input/output jacks | FOOT CONTROLLER jack | 6.3 mm (1/4") phone jack |
| AUDIO IN jack | 3.5 mm (1/8") stereo mini-phone jack | |
| AUDIO OUT L/MONO, R jacks | 6.3 mm (1/4") phone jack (unbalanced) | |
| Headphone jack | 3.5 mm (1/8") stereo mini-phone jack | |
| USB TO DEVICE port | USB Type-A: For connecting USB flash drive and controllers | |
| USB TO HOST port | USB Type-B: For connecting personal computers | |
| PEDAL jack | For connecting damper pedal (included with the XE20), pedal unit (included with the XE20SP), PU-2 pedal unit (sold separately) | |
| Speaker system | Amp: 18 W × 2 | |
| Speakers: 57 mm (2.24") × 126 mm (4.96") Elliptical speakers × 2 (bass reflex box-type) | ||
| Speaker EQ: 8 types | ||
| MIDI | USB MIDI | |
| Display | Custom LCD with backlighting | |
| Power supply | AC adapter (DC19V, ⊙⊕⊕) | |
| Power consumption | 13 W | |
| Dimensions(width × depth × height) | XE20: 1,312 × 336 × 118 mm / 51.65 × 13.23 × 4.65 inches (excluding music stand)XE20SP: 1,312 × 336 × 751 mm / 51.65 × 13.23 × 29.57 inches (excluding music stand) | |
| Weight | XE20: 11.4 kg / 25.13 lbs. (excluding music stand)XE20SP: 21 kg / 46.30 lbs. (excluding music stand) | |
| Included items | Quick Start Guide, AC adapter, sheet music stand, damper pedal (XE20 only), stand with pedal unit (XE20SP only) | |
| Accessories (sold separately) | DS-1H damper pedal (half-pedal effect operates only with German Piano and Italy Piano sounds)PU-2 pedal unit (damper half-pedal effect and sostenuto operate only with German Piano and Italy Piano sounds)PS-1 pedal switchPS-3 pedal switchEXP-2 foot controller | |
* Specifications and appearance are subject to change without notice for improvement.
| Function... | Transmitted Recognized Remarks | |||
| Basic Channel | Default Change | 1 X | 1-16 X | |
| Mode | Default Messages Altered | X X********** | 3 X X | |
| Note Number | True Voice | 0-127********** | 0-127 0-127 | *4 |
| Velocity | Note On Note Off | O 9n, V=1-127 X 8n, V=64 | O 9n, V=1-127 X | |
| After Touch | Key's Channel | O O | X O | *1 *1 |
| Pitch Bend | O | O | ||
| Control Change | 0, 32 1, 2 64 6 7, 11 10, 91, 93 71, 72, 73 74, 75 76, 77, 78 98, 99 100, 101 120, 121 | O O O O O O O O O O O O O O O O O O O O O O O O O O O O O O O O O O O O O O O O O O O O O O O O O O O O O O O O O O O O O O O O O O O O O O O O O O O O O O O O O O O O O O O O O O O O O O O O O O O O O | O O O O O O O O O O O O O O O O O O O O O O O O O O O O O O O O O O O O O O O O O O O O O O O O O O O O O O O O O O O O O O O O O O O O O O O O O O O O O O O O O O O O O O O O O O O O O O O O O O | Bank Select (MSB, LSB) Modulation *1 Damper Data Entry (MSB) *1 Volume, Expression Pan pot, Effect 1/2 send *1 Harmony contents, EG time (Release, Attack) *1 Brightness, Decay time *1 Vibrato rate, Depth, Delay *1 NRPN (LSB, MSB) *1 RPN (LSB, MSB) *1 All sound off, Reset all Controllers *1 |
| Program Change | True Number | O 0-127********** | O 0-127 0-127 | |
| System Exclusive | O | O | *2 | |
| System Common | Song Position Song Select Tune Request | X X X | X X X | |
| System Real Time | Clock Commands | X X | O X | *3 |
| Aux Meassages | Local On/Off All Notes Off Active Sense System Reset | O O X X X | X O (123-127) X X | *1 *1 |
| Notes*1: XE20 will transmits Sequencer data.*2: Includes setting of inquiry and master volume.*3: When the MIDI Clock setting of the Setting function is External, the XE20 will recieve this message.*4: Depending on the selected program, there may be cases in which it is not possible to sound the whole range. | ||||
- Table of Contents
- Main Features ....3
- Part Names....4
- Preparing to Play 7
- Preparing to Play: What is Auto-Accompaniment?......9
- Basic operations 12
- Playing the XE20 (style mode)....13
- Auto-accompaniment (style mode) 18
- Song mode 22
- SETTING functions....25
- MEDIA functions....28
- Connecting to an external device ....30
- Appendix....32
- Specifications....35
- MIDI Implementation Chart....36
- About this manual
- Quick Start Guide (booklet)
- Owner's Manual (this document, PDF)
- Voice Name List (PDF)
- Stand Assembly Guide (printed, XE20SP only)
- ■ Conventions in this manual
- ■ Example screen displays
- Main Features
- High-definition piano sounds
- Playing with different sounds
- Playing along with a style (auto-accompaniment)
- Playing back a sound source from a USB flash drive
- Connecting to an external device and playing back audio
- Adding effects to sounds
- Part Names
- Display
- Preparing to Play
- Using the AC adapter
- Turning the power on/off
- Adjusting the volume
- Using music stand
- Using headphones
- Using a pedal
- Preparing to Play: What is Auto-Accompaniment?
- What is auto-accompaniment?
- Playing along with auto-accompaniment
- Adding a melody line when playing
- Adding an intro and ending to a song
- Basic operations
- About modes
- Style mode
- Song mode
- Other functions
- SETTING functions
- MEDIA functions
- Selecting sounds and changing values
- Dial
- CATEGORY buttons◀,▶
- + and - buttons
- Playing the XE20 (style mode)
- Selecting a grand piano
- Selecting sounds in the style set
- What is a keyboard set?
- What is a style set?
- Muting parts and changing sounds
- Muting parts
- Changing sounds
- Selecting a set list
- Changing the sounds on the left and right (split)
- Playing in time with the metronome
- Setting the metronome
- Adjusting the tempo
- Using the keyboard to set the metronome
- Setting the key and octave
- Transposing (changing the key)
- Changing the octave
- ■ Changing the octave for the entire keyboard part
- ■ Changing the octave for each part
- Adding effects and embellishments to your playing
- Adding a harmony to the melody
- Turning the reverb on/off
- Applying effects
- Auto-accompaniment (style mode)
- Playing along with auto-accompaniment
- Playing with a style you choose
- Making changes to the auto-accompaniment
- Adding an intro or setting a variation
- Using the SYNCHRO START and SYNCHRO START/STOP functions
- SYNCHRO START
- ■ SYNCHRO START/STOP
- Adjusting the volume of the keyboard and accompaniment parts
- Choosing a music style and playing
- Saving the set list (WRITE)
- Recording your performance
- Listening to the demo songs
- Playing along with a song
- Playing back using different methods Rewinding, fast-forwarding or pausing a song
- Playing back part of a song in a loop
- ■ Quick loop playback
- A-B loop playback
- Editing a song
- Erasing part of a recording (erase function)
- Overlaying parts when recording (overdubbing function)
- Deleting a user song
- Basic methods of use
- Main SETTING functions
- Changing the auto power-off function
- Changing the pedal polarity
- Changing the pedal function
- List of SETTING functions
- Connecting and removing USB flash drives
- Basic method of use
- Formatting a USB flash drive
- Loading user styles
- List of MEDIA functions
- Storage media that can be used
- Supported capacities
- File and folder structure
- Connecting to an external device
- Connecting an audio player
- Connecting powered monitor speakers
- When you will not be using the built-in speakers
- Connecting to a computer
- Using USB-MIDI
- What is MIDI?
- ■ Connecting to a computer
- ■ About MIDI channels
- Using USB-AUDIO
- Appendix
- Checking the software version
- Restoring the XE20 to factory default settings
- Calibrating an expression pedal
- Troubleshooting
- The instrument will not turn on.
- The power will not go off.
- The power turns off by itself.
- No sound is heard from the speakers of this instrument when the keys are played.
- The sound will not stop.
- The sound seems to be doubled.
- The sound coming from external audio equipment is distorted.
- The pitch is off.
- I hear unwanted noise.
- The pedal switch or expression pedal connected to the FOOT CONTROLLER jack doesn't work like it should.
- I cannot record a user song.
- MIDI signals sent to/from this instrument and a computer are not being correctly received.
- The instrument does not let me access the MEDIA functions.
- List of chords recognized
- Specifications
Brand : KORG
Model : XE20
Category : Keyboard