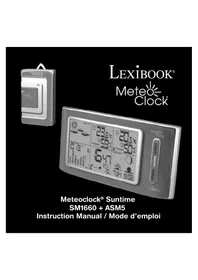
SM180 - Weather Station LEXIBOOK - Free user manual and instructions
Find the device manual for free SM180 LEXIBOOK in PDF.

| Product Type | Indoor Weather Station |
| Brand | LEXIBOOK |
| Model | SM180 |
| Power Supply | 2 LR6/AA 1.5 V batteries (not included) |
| Dimensions (with base) | 166 (H) x 97 (W) x 101 (D) mm |
| Indoor Temperature Range | 0 °C to +50 °C |
| Temperature Accuracy | ±1 °C |
| Indoor Humidity Range | 20% to 99% |
| Main Functions | Weather forecast (symbols), indoor temperature and humidity, alarm with snooze, backlight, time/date display, atmospheric pressure trend, max/min memory, °C/°F selection, 12/24 h format |
| Display | LCD display with backlight (5 seconds) |
| Rotating Base | Detachable, included |
| Weekday Languages | German, French, Spanish, Italian, Dutch, Danish, Russian, English |
| Warranty | 2 years |
| Cleaning and Maintenance | Soft cloth slightly dampened with water, no detergent. Do not expose to sunlight, heat, or humidity. Do not disassemble. |
| Recycling | Used electronic device: do not throw in household waste, deposit at a collection site. |
| Reference | SM180 |
Frequently Asked Questions - SM180 LEXIBOOK
User questions about SM180 LEXIBOOK
0 question about this device. Answer the ones you know or ask your own.
Ask a new question about this device
Download the instructions for your Weather Station in PDF format for free! Find your manual SM180 - LEXIBOOK and take your electronic device back in hand. On this page are published all the documents necessary for the use of your device. SM180 by LEXIBOOK.
USER MANUAL SM180 LEXIBOOK
Copyright © Lexibook 2009
B
C
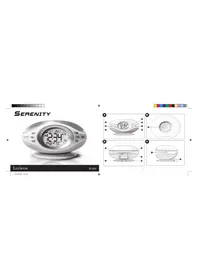
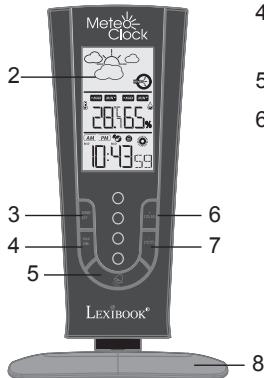
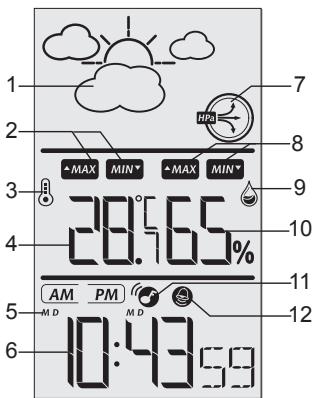
PRÉSENTATION
Résolution: 0.1^
ENTRETIEN
- Animated weather forecast symbols.
- "Maximum/minimum" temperature icons.
- Temperature icon.
- Temperature ^ C / ^
- Day-Month/Month-Day indicators.
- Hour (AM/PM).
- Barometric pressure trend indicator.
- "Maximum/minimum" humidity icons.
- Humidity icon.
- Humidity (%)
- "Alarm" icon.
- "Alarm mode" icon.
UNPACKING THE DEVICE
When unpacking, ensure that the following elements are included:
1 x SM180 MeteorClock® "Evolution Compact" weather station
1 x detachable rotating base
1 x instruction manual
Please keep all packaging in a safe place for future reference. Please keep your sales (till) receipt - this is your guarantee.
POWER SUPPLY
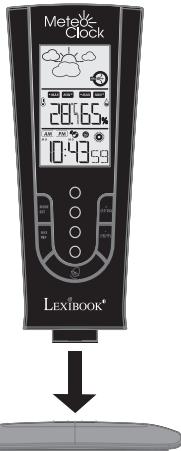
Before first use, attach your weather station to the detachable rotating base provided (refer to image C).
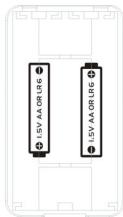
Battery installation
- Open the battery compartment located at the back of the unit.
- Insert 2 × 1.5V = - - - LR6/AA type batteries (not included) indicated in the battery compartment, and as per the diagram shown opposite.
- Close the battery compartment.
Note: When the main unit's LCD display becomes dim, it indicates that the batteries are low and need to be changed.
Non-rechargeable batteries are not to be recharged. Remove the storage batteries before recharging. Recharge storage batteries under adult supervision. Do not mix different types of battery and storage battery, or new and old batteries or storage batteries. Insert batteries and storage batteries according to the polarity. Remove used storage batteries from product. Do not short-circuit the battery or storage battery terminals. Keep batteries away from fire. If the product remains unused for an extended period, remove batteries.
WARNING: Mal-function or loss of memory may be caused by strong frequency interference or electrostatic discharge. Should any abnormal function occur, remove the batteries and insert them again.
WEATHER FORECAST AND DISPLAY
Animated weather forecast symbols
The SM180 weather station is capable of detecting barometric pressure changes, and based on the data collected, predicting the weather for the next 8 to 12 hours.
- When you install or change the unit's batteries, the weather forecast symbol flashes on the LCD screen to indicate that you need to set the current weather status.
- Use the + (12/24) and - (^ C / ^ F) keys to select the symbol corresponding to the current weather status. There are 5 different weather forecast symbols.
| Sunny | Slightly cloudy | Cloudy | Rainy | Cloudburst |
- Press the "MODE/SET" key to confirm your setting.
- To change the weather status again, press and hold the "+ (12/24)" key until the current weather forecast symbol starts flashing on the LCD screen, then repeat steps 2 and 3.
Note:
- If you do not set the current weather status or if the weather symbol selected is incorrect, the unit's weather forecast may not be accurate.
- If the weather station is moved to another location significantly higher or lower than its initial standing point (e.g. from ground floor to 1st floor of a house), the current weather status must be changed as well.
- The weather station will start the first forecast 6 hours after the current weather status has been set. After setting up the weather status, reading for weather forecasts should be discarded for the next 6 hours. This will allow sufficient time for the weather station to operate at a constant altitude and therefore result in a more accurate forecast.
- Absolute accuracy cannot be guaranteed regarding weather forecasting. The weather forecasting feature is estimated to have an accuracy level of about 75% due to the varying areas the weather station has been designed to be used in.
- If there is any inconsistency of weather forecast between your local weather station and this unit, the local weather station's forecast should prevail.
Barometric pressure trend
The trend indicator shows the recent trend of the barometric pressure. Generally, bad weather is associated to a low atmospheric pressure and good weather to a high atmospheric pressure.

The barometric pressure trend is increasing.

The barometric pressure trend is steady.

The barometric pressure trend is decreasing.
CLOCK AND DATE SETTING
- In time display mode, press and hold the "MODE/SET" key until the weather station makes a "beep" sound and the hour's digits start flashing.
- Use the "+" (12/24) and "-" (C/F) keys to increase or reduce the values, then press "MODE/SET" to confirm and adjust the next setting.
- The setting sequence is displayed in the following order:
Hours Minutes Seconds Year DM (Day/Month) or MD (Month/Day) display Month Day Time Zone Day-of-week language.
- Press the "MODE/SET" key to confirm your selection and go back to time display mode.
Note:
- The default setting for the time zone is "0". You can change it when travelling in cities in different time zones.
- The day of the week can be displayed in 8 different languages: German (GE), French (FR), Spanish (ES), Italian (IT), Dutch (NE), Danish (DA), Russian (RU) or English (EN).
- The clock loses its time information when the batteries are removed.
- During the setting, the unit goes automatically back to the time display mode after a few seconds of inactivity.
Date display
In time display mode, press the "MODE/SET" key once to display the date. Once in date display mode, the unit goes automatically back to the time display mode after a few seconds of inactivity.
ALARM SETTING
- In time display mode, press the "MODE/SET" key twice to go the alarm setting. The icon is displayed on the LCD screen when the unit is in alarm mode.
- To set the alarm time, press and hold the "MODE/SET" key until the weather station makes a "beep" sound and the hour's digits start flashing.
- Use the "+" (12/24)" and "-" (°C/°F)" keys to adjust the hour, then press "MODE/SET" to confirm and adjust the minutes.
- Use the "+" (12/24) and "-" (°C/°F) keys to adjust the minutes, then press MODE/SET to confirm and go to the next setting.
- Use the "ALARM" key to switch on or switch off the alarm. The icon is displayed on the LCD screen when the alarm is switched on.
- When the alarm rings, press the "SNOOZE/LIGHT" key to switch on the snooze function. The icon starts blinking and the alarm will ring again 7 minutes later. Press any other key than the "SNOOZE/LIGHT" key to stop it. The alarm will ring again the next day at the same time. If you wish to deactivate the alarm completely, in time display mode, press the "ALARM" key. When the icon disappears from the LCD screen, the alarm is switched off.
Note: In "alarm" mode or during the settings, if you don't press any key, the unit goes automatically back to the time display mode.
TEMPERATURE DISPLAY IN CELSIUS/FAHRENHEIT
In time display mode, press the " (^ / ^)^n key to toggle between temperature display in Celsius (^) or Fahrenheit (^) .
Press the MODE/SET key to confirm your selection and go to the clock setting.
Note: If the temperature is out of the measurable range, "LL.L" (below the minimum measurable temperature) or "HH.H" (beyond the maximum measurable temperature) will be shown on the LCD screen.
This weather station records everyday the maximum/minimum indoor temperature and humidity level.
- In all modes, press the "MAX/MIN" key once to see the maximum recorded indoor temperature and humidity. The MAX icons will be displayed on the LCD screen.
- Press the same key once again to see the minimum recorded indoor temperature and humidity. The MIN' icons will be displayed on the LCD screen.
- Press the "MAX/MIN" key a third time to go back to the current indoor temperature and humidity.
- Press and hold the "MAX/MIN" key for about 3 seconds to clear the recorded temperature and humidity readings. The unit will make a "beep" sound to confirm that the readings have been erased.
BACKLIGHT
Press the "SNOOZE/LIGHT" key to switch on the backlight for 5 seconds.
SPECIFICATIONS
Dimensions: 166 (H) x 97 (W) x 101 (D) mm (weather station with base)
Battery type: 2 × 1,5V - - - LR6 / AA type batteries (not included)
Operation Temp: 0C- +50C
Temp. Range: 0C- +50C
Measurement Accuracy: +- 1C
Measuring range: Indoor Temperature: 0^ +50^
Indoor Humidity: 20% 99%
Resolution: 0.1^
MAINTENANCE
In order to clean the unit, use only a soft cloth moistened with water; do not use any detergent product. Do not dismantle or drop the unit. Remove the batteries if the unit is not going to be used for an extended period of time.
WARRANTY
NOTE: Please keep this instruction manual, it contains important information. This product is covered by our two-year warranty.
To make use of the warranty or the after-sales service, please contact your retailer and supply proof of purchase. Our warranty covers material or installation-related defects attributable to the manufacturer, with the exception of wear caused by failure to respect the instructions for use or any unauthorised work on the equipment (such as dismantling, exposure to heat or damp, etc.).
Reference: SM180
Designed and developed in Europe - Made in China
©2009 LEXIBOOK®
Lexibook UK Ltd,
Unit 10 Petersfield Industrial Estate,
Bedford Road, Petersfield,
Hampshire, GU32 3QA
United Kingdom.
Helpline: 0808 1003015.
www.lexibook.com
C E
Environmental Protection:
Unwanted electrical appliances can be recycled and should not be discarded along with regular household waste! Please actively support the conservation of resources and help protect the environment by returning this appliance to a collection centre (if available).

DESCRIPCION DEL PRODUCTO
Resolution: 0.1^
MANTENIMIENTO
Lexibook Ibérica S.L.
Note: Whenever you want to use the "E" button, press it on the left side of the window.

Copyright © Lexibook 2009
Copyright © Lexibook 2009
Copyright © Lexibook 2009
KLOK- EN DATUMINSTELLING
Copyright © Lexibook 2009
MAXIMUM/MINIMUM TEMPERATUUR EN VOCHTIGHEID
What is your overall impression of the product? / Vous trouvez le produit globalement :
Very satisfactory/Très satisfaisant □ Satisfactory/Satisfaisant □ Average/Moyen
Disappointing/Decevant Very disappointing/Tres decevant
Please feel free to have your comments here (Your survey) reccipt utilities
Find all our new products / Retrouvez toute notreactualite: http://www.lexibook.com