
19005-56 AURA - Kettle RUSSELL HOBBS - Free user manual and instructions
Find the device manual for free 19005-56 AURA RUSSELL HOBBS in PDF.
User questions about 19005-56 AURA RUSSELL HOBBS
0 question about this device. Answer the ones you know or ask your own.
Ask a new question about this device
Download the instructions for your Kettle in PDF format for free! Find your manual 19005-56 AURA - RUSSELL HOBBS and take your electronic device back in hand. On this page are published all the documents necessary for the use of your device. 19005-56 AURA by RUSSELL HOBBS.
USER MANUAL 19005-56 AURA RUSSELL HOBBS
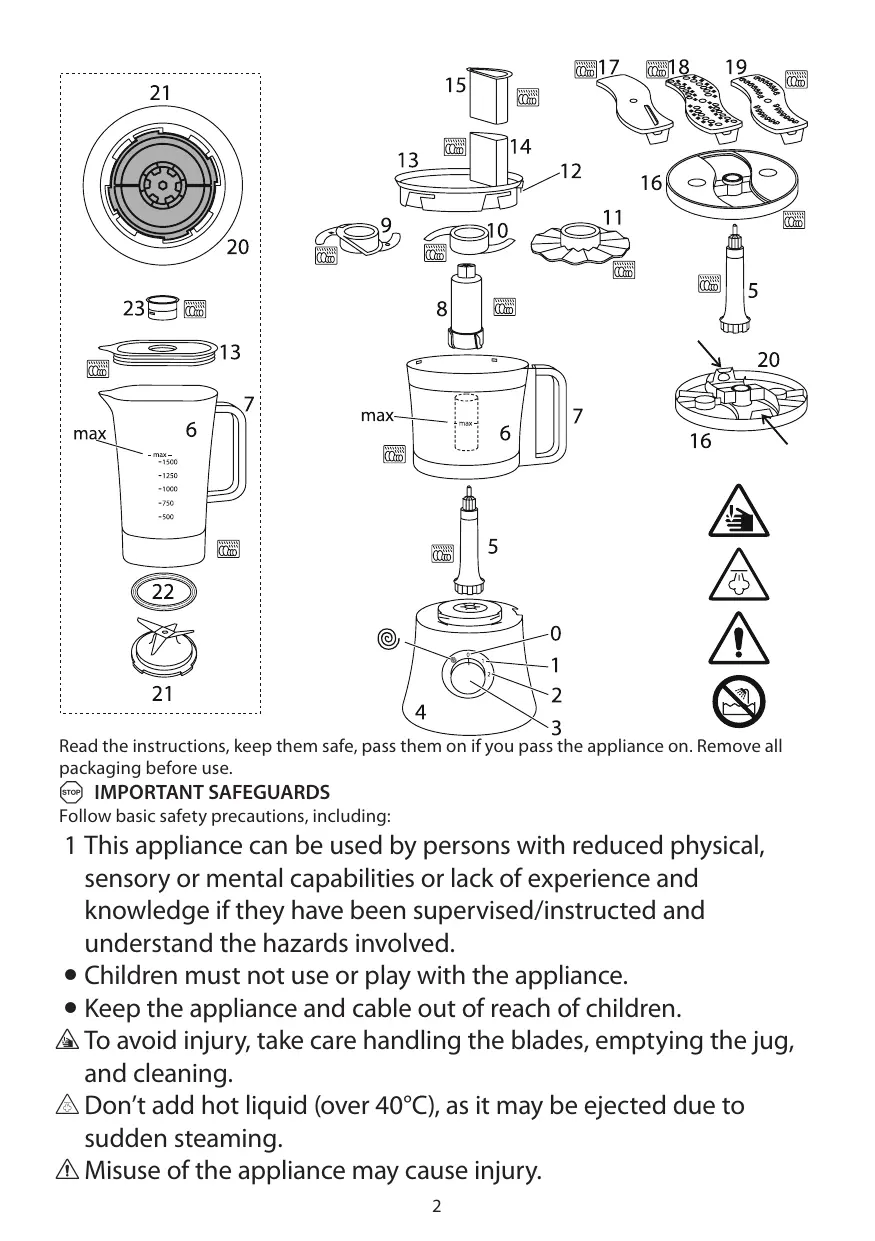
Read the instructions, keep them safe, pass them on if you pass the appliance on. Remove all packaging before use.
IMPORTANT SAFEGUARDS
Follow basic safety precautions, including:
1 This appliance can be used by persons with reduced physical, sensory or mental capabilities or lack of experience and knowledge if they have been supervised/instructed and understand the hazards involved.
Children must not use or play with the appliance.
- Keep the appliance and cable out of reach of children.
To avoid injury, take care handling the blades, emptying the jug, and cleaning.
Don't add hot liquid (over 40^ ), as it may be ejected due to sudden steaming.
Misuse of the appliance may cause injury.
| diagrams | 10 mixer | 18 coarse grater |
| 3 speed control | 11 creamer | 19 fine grater |
| 4 motor unit | 12 tab | 20 underside |
| 5 spindle | 13 lid | 21 blade unit |
| 6 jug | 14 tube | 22 seal |
| 7 handle | 15 pusher | 23 cap |
| 8 support | 16 disc | dishwasher safe |
| 9 chopper | 17 slicer |
2 Unplug the appliance before assembly, disassembly, or cleaning.
3 Don't leave the appliance unattended while plugged in.
4 If the cable is damaged, it must be replaced by the manufacturer, its service agent, or someone similarly qualified, to avoid hazard.
Don't immerse the appliance in liquid.
5 Switch off (0) before fitting the jug to the motor unit.
6 Switch off (0), and wait till the blades come to a stop before removing the lid from the jug, or removing the jug from the motor unit.
7 Don't put utensils into the jug while the appliance is plugged in.
8 Don't use accessories or attachments other than those we supply.
9 Don't use the appliance for any purpose other than those described in these instructions.
10 Don't operate the appliance if it's damaged or malfunctions.
11 Don't run the motor continuously for more than 1 12 minutes, it may overheat. After 1 12 minutes switch off for at least 2 minutes, to recover.
household use only
BEFORE USING FOR THE FIRST TIME
Clean the appliance, to remove manufacturing dust, etc.
HOW IT WORKS - IN BRIEF
1 Sit the motor unit on a stable, level surface.
2 Lower the jug on to the motor unit, then turn the jug clockwise, to lock it in place.
3 Remove the lid.
4 Put the ingredients into the jug.
5 Don't fill past the 1500ml mark.
6 Replace the lid.
SWITCH ON
7 Check that the speed control is set to 0.
8 Put the plug into the power socket.
SPEED CONTROL
9 Turn the speed control to the speed you want (1 = low, 2 = high).
10 Turn the speed control back to 0 to turn the motor off.
11 Generally, large quantities, thick mixes, and a high ratio of solids to liquids suggest longer timings and slower speeds.
12 Smaller quantities, thinner mixes, and more liquids than solids suggest shorter timings and higher speeds.
13 Turning the speed control anti-clockwise to ⑨ will give you a short burst at high speed. In this direction, the knob is spring-loaded. When you let go, it'll return to 0.
USING THE BLENDER
14 Lower the jug on to the motor unit, then turn the jug clockwise, to lock it in place.
15 Remove the lid.
16 Put the ingredients into the jug.
17 Replace the lid.
18 Align the pips on the cap with the slots in the hole in the lid, fit the cap, and turn it clockwise to lock it.
19 Don't run the appliance without fitting the cap.
20 To add ingredients while the blender is working, remove the cap, pour the new ingredients through the hole, then replace the cap.
FINISHED?
21 Switch the appliance off (0) and unplug it.
22 Turn the jug anti-clockwise, and lift it off the motor unit.
CRUSHED ICE
23 For best results, full the jug with between 150ml and 500ml of ice cubes.
24 Put the lid on the blender, then:
25 Turn the speed control to ⑥ for a second or two, then release it.
26 Check the results, and adjust.
USING THE PROCESSOR
27 You may use the processor and disc for cutting/grating for up to 2 minutes. Any other use should be limited to 112 minutes. After this, let the motor rest for 2 minutes.
28 Switch the appliance off (0) and unplug it.
29 Fit the spindle to the top of the motor unit.
30 Lower the jug on to the motor unit, then turn the jug clockwise, to lock it in place.
31 Choose the attachment you need.
WITH THE SUPPORT
32 Use the chopper for pulverizing ingredients.
33 Use the mixer to mix ingredients together.
34 Use the creamer to thicken cream, to beat eggs, and to cream eggs and sugar together.
35 Fit the attachment over the support, and slide it to the bottom.
36 Lower the support into the centre of the jug, over the spindle.
37 Put the ingredients into the jug.
38 Hold the lid with the tube slightly behind the jug handle, set it on the jug, then turn it clockwise, to lock the tab into the top of the handle.
39 To add ingredients while the motor is running:
a) lift the pusher out of the tube
b) add the ingredients via the tube
c) replace the pusher
40 To remove the lid, turn it anti-clockwise to unlock it, then lift it off.
WITH THE DISC
41 Fit the slicer or one of the graters into the disc.
42 Lower the disc over the top of the spindle.
43 Hold the lid with the tube slightly behind the jug handle, set it on the jug, then turn it clockwise, to lock the tab into the top of the handle.
44 Remove the pusher, and drop the ingredients down the tube.
45 Replace the pusher, and use it to push the ingredients gently down the tube.
46 Don't use fingers or cutlery to push food down the tube - only the pusher.
47 The blade(s) on top of the disc will slice or grate the food into the jug.
48 Don't let the jug get more than about half full - stop and empty it.
49 To remove the lid, turn it anti-clockwise to unlock it, then lift it off.
50 Turn the disc over, and press one of the metal ends in and down, to remove the slicer/grater.

FINISHED?
51 Switch the appliance off (0) and unplug it.
52 Turn the jug anti-clockwise, and lift it off the motor unit.

CARE AND MAINTENANCE
53 Switch the appliance off (0) and unplug it.
54 Wipe the outside of the motor unit with a clean damp cloth.
55 Hand wash the removable parts.

You may wash these parts in a dishwasher.
56 If you use a dishwasher, the harsh environment inside the dishwasher will affect the surface finishes.
57 The damage should be cosmetic only, and should not affect the operation of the appliance.

BLADE UNIT
58 You may wish to remove the blade unit for cleaning.
59 Remove the lid.
60 Sit the jug upside down.
61 Grip the jug handle with one hand.
62 Grip the bottom of the blade unit with the other hand.
63 Turn the blade unit clockwise till it comes loose from the jug base.
64 Carefully, lift the blade unit out of the jug.
65 Lift the seal away from the blade unit.
66 Wash the seal and blade unit in warm soapy water, rinse, and air dry.
67 Replace the seal round the blade unit.
68 Replace the blade unit in the jug.
69 Turn the blade unit anti-clockwise to tighten it.

ENVIRONMENTAL PROTECTION
To avoid environmental and health problems due to hazardous substances in electrical and electronic goods, appliances marked with this symbol mustn't be disposed of with unsorted municipal waste, but recovered, reused, or recycled.
recipes are available on our website:
using the blender:
http://www.russellhobbs.com/ifu/550931
smoothies:
http://www.russellhobbs.com/ifu/550941
using the processor:
http://www.russellhobbs.com/ifu/551078
http://www.russellhobbs.com/ifu/550931
Smoothies:
http://www.russellhobbs.com/ifu/550941
http://www.russellhobbs.com/ifu/551078
http://www.russellhobbs.com/ifu/550931
smoothies:
http://www.russellhobbs.com/ifu/550941
http://www.russellhobbs.com/ifu/551078
http://www.russellhobbs.com/ifu/550931
smoothies:
http://www.russellhobbs.com/ifu/550941
http://www.russellhobbs.com/ifu/551078
http://www.russellhobbs.com/ifu/550931
frappe:
http://www.russellhobbs.com/ifu/550941
uso del robot:
http://www.russellhobbs.com/ifu/551078
http://www.russellhobbs.com/ifu/550931
batidos:
http://www.russellhobbs.com/ifu/550941
uso del robot de cucina:
http://www.russellhobbs.com/ifu/551078
http://www.russellhobbs.com/ifu/550931
smoothies:
http://www.russellhobbs.com/ifu/550941
http://www.russellhobbs.com/ifu/551078
http://www.russellhobbs.com/ifu/550931
smoothies:
http://www.russellhobbs.com/ifu/550941
drug af processoren:
http://www.russellhobbs.com/ifu/551078
http://www.russellhobbs.com/ifu/550931
smoothies:
http://www.russellhobbs.com/ifu/550941
anvanda matberedaren:
http://www.russellhobbs.com/ifu/551078
BEHANDLING OG VEDLIKEHOLD
http://www.russellhobbs.com/ifu/550931
smoothies:
http://www.russellhobbs.com/ifu/550941
http://www.russellhobbs.com/ifu/551078
http://www.russellhobbs.com/ifu/550931
smoothies-juomia:
http://www.russellhobbs.com/ifu/550941
http://www.russellhobbs.com/ifu/551078
IpoouTIne IINCTpyKcun, coxpaHnTe INx, npi nepeJaue cOpnoBODIne INHCTpyKcnei. Ipeed npimMeHeHnem I3dJIra CHmInTe C Hero yNaKOBky.

BAXHbIE MEPbI PNEIOCTOPOXHOCTN
CleyuTe OCHOBHbIM INHCTpyKcIyam No 6e3oNaChOcTn, BkIIOUaY cIeDuOuIe:
1 IcnoIb3OBAHne DaHHoro yCTpoiCtBa JInzamn C OrpaHnueHHbIMN Φn3nueCKnMn, CeHCOPHbIMN nJn YmCTBeHHbIMN CnOCo6HOCTaMn, HeIOCTaTKOM ONbITa NJI 3HaHnДOnyCKaeTcR npn YcNoBnKoHTPOJIa NJI INHCTpyKTaJka N OCO3HaHnRA CBraHHbIX pINCKOB.
-ДетамзапpeшенинснольбовыстюгоствиллграТьСнIM.
-Держinte устюишур Вс Дocяамоctи DeTei.
UTo6bI n36eXaTb TpaBM, 6yDbTe oCtOpOxHbI npi o6paUeHN C HoxaMn, OncyCToUeHN KpyKkN OUnCTKe.
He do6abJnTe ropaHyo xndKocTb (Bblwe 40^ ), TaK KaK OHa MOKeT BHe3aHNO BblpBaTbC o6paTHO C napOM.
He npabnblbHoe nCpOJIb3OBaHne np6opa MoKeT npNBecTn K TpaBMe.
2 OtklouhTe np6op ot po3eTKn nepea c60pko, pa360pko nnn oocCTKO.
3 He octabla Te BkIoueHbI np6Op 6e3 npncMoTpa.
4 Ecni Ka6eIb NOBpeJdeH, OH DoJIKeH 6bITb 3aMeHeH npOn3BOiTeJIeM, cepBnCHbIM aReHTOM IJIu DpyTm KBaJINΦUncIPOBaHHbIM IIncOm IInpIpeDOrTbPaUeHnO NaCHOCTN.
He norgykaite npn6op B xnuKoCTb.
5 BbiklouaTe np6op (0),peep TeK KaK npcoeHNHT Kpykky K 6NoKy DnIraTeJia.
6 Праздуем сгьк КршкУс кржи ИИОТоeДинть кржу OTблoka DBIgatena, BbIKHouHTe np6ob (O) ndoJnteCb, KOrda Hoxи NepectaHyT BpaaTaBc.
7 He nomeuaiTe npHaJdxEJxHocTn B KyBxHn pN BkIyueHemPn6ope.
8 IcnoIb3yIte TOnbKO npHnAdJIeXHOCTn HAcadKn OT npOn3BOJntEJa.
9Пибор He moket pa6oTaTb OT BHeIHeRo TaIMepa IINДИCTaHcUOHHO CnCTeMbI ynpabLeHna.
10 He nCnoJIb3yIe npI6Op, ecn OH nobpeXJen nn pa6oTaET c nepe6oAMN.
11 Bo n36exaHne nepepeBaHnna pnp60pa 3anpeaaetc HnpepbBHO nCnoJb3ObaT dBnraTeJIb 6oJIee 1,5 MNHT. IIO nCTeueHn yKa3aHnOr BOpeMeHn OTKlouHte np6Op MHNmym Ha 2 MNHTI dJIy BOCCTaHOBJIeHn erO pa6OTocNOC6HOctn.
TolbKOДЯ6blTOBOrNcNoJb3OBaHnA

IIEPEI IEPBbIM ICIOJIb3OBAHHEM IPIPUBOPA
OuInTe npn6op, yTo6bI ydaJIaNTb 3aBOcKyIO nbIb N T. n.

3AHTA OKPYKAIOUcE CPEbl
ДяТOrO yTo6bI n36eKaTb yrPo3 ДЯЗ 3ДОРOBЯ n OkpykaIOSeJ cpeDbI n3-3aВpeHbIX BeueCTB B 3JIeKTPnueCKINx n 3JIeKTPoHHbIX TOBaPax, npu6Opbl, OTMeueHHbIe DaHHbIM CmBOLOM,ДолЖы tYNJIN3INPOBaTbCЯ He KaK He OTCOPTuPOBaHHbIe 6blTOBbIe OTXObl, a KaK BOCCTaHOBJIeHHbIe IIN NOBtOPHo NcNoJIb3OBAHHbIe.
peuentbMOxHOHaHTNaHaHsEMBe6-caTe:
IcnoJIb3OBAHne 6NeHepa:
http://www.russellhobbs.com/ifu/550931
ΦργΚΤΟΒβε ΚΚΤΕΝΙΝ:
http://www.russellhobbs.com/ifu/550941
NCIOJIb3OBAHnE KOM6aHa:
http://www.russellhobbs.com/ifu/551078
http://www.russellhobbs.com/ifu/550931
smoothie:
http://www.russellhobbs.com/ifu/550941
http://www.russellhobbs.com/ifu/551078
Precitajte siPokyny a odloztak,aby ste ich mohli prilozit pri pripadnom odovzdani vyrobku niekumu inemu.Pred pouzitim odstrante vsetky obaly.

DOLEZITÉ BEZPECNOSTNÉ OPATRENIA
http://www.russellhobbs.com/ifu/550931
ovocné krémy:
http://www.russellhobbs.com/ifu/550941
http://www.russellhobbs.com/ifu/5510781
http://www.russellhobbs.com/ifu/550931
koktajle owocowe:
http://www.russellhobbs.com/ifu/550941
stosowanie robota:
http://www.russellhobbs.com/ifu/551078
http://www.russellhobbs.com/ifu/550931
sadni napitki:
http://www.russellhobbs.com/ifu/550941
http://www.russellhobbs.com/ifu/551078
PIN ANO THN INQTH XPHSEH
KaθaioTe Tn ookεuñ, yia va aφaipéoεTe Tn okov ano Tn φaon kataokεuñc, kλπ.
ΠΩΣ ΛEITOYPREI - EN ΣYNTOMIA
1 TooTheTne Tny KevtpiKn movada navw oStaepn opicovtia eipaveia.
2 ToNoTeTnOte TnV kavata navw Otnv Kevtpikn Movada, Katoniv Nepiotppe Tn _I oToPpa yia va aopaloei.
3 ApaipéoTe to kaπaki.
4 Ipooθεστa ta oʊσṭaɪká μέσα στην kaváta.
5 Mny unepbεite την ενδειξτωv 1500 ml.
6 ToOnoTheTnTo naiTo kanaKi.
ENEPRONOIHsH
http://www.russellhobbs.com/ifu/550931
φρούτοπα:
http://www.russellhobbs.com/ifu/550941
oukeun eEeepyaoiaac trooovv:
http://www.russellhobbs.com/ifu/551078
http://www.russellhobbs.com/ifu/550931
turmix:
http://www.russellhobbs.com/ifu/550941
http://www.russellhobbs.com/ifu/551078
http://www.russellhobbs.com/ifu/550931
smoothie'ler:
http://www.russellhobbs.com/ifu/550941
robotu kullanma:
http://www.russellhobbs.com/ifu/551078
http://www.russellhobbs.com/ifu/550931
smoothies:
http://www.russellhobbs.com/ifu/550941
http://www.russellhobbs.com/ifu/551078
IpooueTe IINCTpykCUNTE,3ana3eTe rN rN npedabaiTe,aKo npedabaTe upea.OTcTpaHete BCNUOaKOBKn ppei ynoTpe6a.

BAXHNI PEPiA3HnMEPKN
CJIeBaiTe OCHOBHNTe MepKn 3a 6e3OnaNCHoT, BKJIIOUHTeJIHO:
1 To3n ypei moKe da ce nol3Ba ot xopa c orpaHnueHn fns3nueckn, CetNBn nn mCTBeHn Bb3MOxHOCTn, nn 6e3 OINT n PO3HaHnA, aKO ca nOJ Ha3Opa/HHCTpyKTIpaHn I Ocb3HaBaT ONaCHOCTnte.
- DeçaTHe Tp86Ba Da n3nOJ3BaT nIi Da nIgpaT C ypeJa.
-Дръктуурази Кабела далец OTdoctbna Ha Deça.
3aДаи36eRHeTe HapaHЯBaHe, BnIMaBaITe npi pa6Ota C octpneTaTAta, n3Ppa3BaHe Ha KaHaTaN ONUCTBaHe.
He do6abryte ropeuata teuhoct (na4 40^ ), Tb' KaTo TOBa MoKe Da IOBeDe Do BHe3aHNO n3nyckaHe Ha npa.
He npabnHaTa ynoTpe6a Ha ypeMa MoKe Da IOBeDe Do HapaHbAHe.
2 I3KJIIOUeTe ypeDa OT KOHTaKTa IIpeDi crIIO6BaHe, pa3rIo6BaHe INI IOuNCTBaHe.
3 He octabraye ypeda 6e3 ha6JIIOHeHne, DOKaTO e BKJIIOUeH B KOHTaKTA.
4 Ako ka6eJIbTe nOBpeDeH, ToI Tp86Ba Da ce NODMeHn OT npOn3BODHTeJIa, HeROB IpeDCTaBNTeI 3a CepBUN3HO O6CnyKBAHe IIN dpyro KBAIIuΦNcnpaHO 3a Ta3N cen IInCe, 3a Da ce IN36eRHe BCRAKaKBbPnCK.
He notanra Te ypea B TeuHOCT.
5 I3kIIOye (O), npedn da noCTaBnte KaHaTa Bbpyx 3aDbNkBaunia 6IoK.
6 I3KlIoUeTe (O) nI3UaKaIte, IOKaTO cnpaT OcTpneTaTa, npEi Da CbAInTe KaNaKa OT KaHaTa, IIu Da CBaInTe KaHaTa OT 3aDbNkBaunr 6Jok.
7 He noctabray Te npnbopn B KaHaTa, KOrato ypeBt E BkIoueH B MpeXaTa.
8 He n3no3BaIte akcecoapn nn npncTbKn, pa3JnUHn OT Te3n, npedocTaBeHN OT Hac.
9 He n3noJI3BaIte ypeDa 3a dpyrI cIeIN, OCBEN Te3N, ONIcaHN B HAcToIaIte INHCTpyKcIIN.
10 He u3noI3BaIte ypeIa, aKo e noBpeIeH uIe He pa6Otn u3PraIHO.
11 He octabraye Idbiratela da pa6oTn Hnpekbcato noboe ot 1,5 MnHyTu, moKe da nperepee. Cnei 1,5 MnHyTu ro n3KJIIOvBaIte 3a haN-MaJko 2 MnHyTu, da Ce Bb3ctaHOBn.
camo 3a domaSHA ynoTpe6a

IPEDNbPBOHAUHNO N3N0JI3BAHE
Iounctete ypeda,3a da npemaxhe Te npo3bOdCTBeH npax np.

BbP3O PbKOBOДCTBO
1 NocTaBete MOTOPHOTo TЯNo Ha Cta6nJaHa, paBaHIONBbpxHOCT.
2 ПocstabTe KaHATA Bbpxy 3aDbNKBaUЯ 6LoK nя 3aBbPTeTe NO yacOBHnKObaTa CTpeIka, 3a daЯ ФнсupaTe.
3 Maxheke kana.
http://www.russellhobbs.com/ifu/550931
CMYTNTa:
http://www.russellhobbs.com/ifu/550941
http://www.russellhobbs.com/ifu/551078
(0) j55 52
aaiia aiai iiaiaiaiaiaiaiaiaiaiaiaiaiaiaiaiaiaiaiaiaiaiaiaiaiaiaiaiaiaiaiaiaiaiaiaiaiaiaiaiaiaiaiaiaiaiaiaiaiaiaiaiaiaiaiaiaiaiaiaiaiaiaiaiaiaiaia
54
a
calbllg 1000 allw 1514 aill 1514 gue 1000 allw piai 151,55
i
56
1
57
58
59
.6j 60
61
62
63
64
J 65
66
aalil 1e 1ayall aai jao

Ailso 4ailll aclll bll alal alal alal alal alal alal alal alal alal alal alal alal alal alal alal alal alal alal alal alal alal alal alal alal alal alal alal alal alal alal alal alal alal alal alal
Aali jill jall jil 30


Cullgalljolaljolal 31
32
33
Jau 45
35
36
37
jgall jll 38
1
aaiill 1
AeJ ai Aaiiie aellw jiae oaii uoe ooi 39


40
. 41
42
aall g
143
144
45
46
a aall aaiiial lal 1
paaie /pa:le i aaiy pi i!i aaiy o jaiy giae iiaiaiaai
iiizai jbiiai gao
A
JlbiJgiliiojI 12, jSll, jlgai Jz
1
y 40 no jsl Jlwl