LCDDVD2TFFR - DVD player LEXIBOOK - Free user manual and instructions
Find the device manual for free LCDDVD2TFFR LEXIBOOK in PDF.
| Product type | DVD player with LCD screen and built-in DVB-T tuner |
| Brand | LEXIBOOK |
| Model | LCDDVD2TFFR |
| Screen size | 55.8 cm (22 inches) |
| Resolution | 1680 x 1050 pixels |
| Brightness | 300 cd/m² |
| Contrast | 700:1 |
| Power supply | DC 12V power adapter, consumption 48W |
| Dimensions (with stand) | 345 x 380 x 175 mm |
| Net weight | 2.5 kg |
| Speakers | 2 x 2.5 inches, 2.6 W + 2.6 W |
| Disc compatibility | DVD, Super VCD, VCD, audio CD, HD-CD, MP3, JPEG, DivX, DVD-R, CD-R, CD-RW |
| Regional code | 2 (Europe, Japan, South Africa, Middle East) |
| Connectors | HDMI, VGA, SCART, S-Video, Composite video, Audio L/R, Digital coaxial, Antenna, Headphone output |
| TV functions | DVB-T, teletext, EPG guide, parental control |
| DVD functions | Play/Pause, stop, search, slow motion, zoom, angle, subtitles, audio, repeat, program, photo slideshow |
| Remote control | Yes, with supplied AAA batteries |
| Warranty | 2 years |
| Maintenance and cleaning | Soft, dry, lint-free cloth. Do not use chemical products. |
| Safety | Class 1 laser, safety instructions detailed in the manual |
| Spare parts and repairability | Repair by qualified technician only. No user-serviceable parts. |
| General information | Manual available in multiple languages. Technical support: 0892 23 27 26 |
Frequently Asked Questions - LCDDVD2TFFR LEXIBOOK
User questions about LCDDVD2TFFR LEXIBOOK
0 question about this device. Answer the ones you know or ask your own.
Ask a new question about this device
Download the instructions for your DVD player in PDF format for free! Find your manual LCDDVD2TFFR - LEXIBOOK and take your electronic device back in hand. On this page are published all the documents necessary for the use of your device. LCDDVD2TFFR by LEXIBOOK.
USER MANUAL LCDDVD2TFFR LEXIBOOK
MODE D'EMPLOI INSTRUCTION MANUAL
LEXIBOOK
www.lexibook.com
LCDDVD2TFFR
A
B
TABLES DES MATIERES
Balayage avant/arrive 17
Menu de lecture DVD 17
Titre 17
CLASSE 1 - PRODUIT LASER
Balayage Avant/Arriere
©2009 Hasbro. All rights reserved.
©2009 LEXIBOOK®
Safety instructions 25
LCD display 25
Remote control 26
RC battery Installation 26
Effective distance of remote control 27
Installation 27
Unpacking 27
Setup 27
Antenna connection 27
Computer connection 27
HDMI connection 27
Mains connection 27
Disc types 28
Disc handling and maintenance 28
Regional codes 29
TV functions 29
Switching on/off 29
Volume setting 29
Channel setting 29
Recall 29
Selecting source mode 29
LCD settings menu 29
Picture mode 30
Sound mode 30
LCD menu 30
Sleep 30
Display 30
Subtitles (TNT function) 30
NICAM button (TNT function) 30
Language (TNT function) 30
Image aspect 30
Electronic program guide 30
TV mode settings 31
SCART/CVBS/S-VIDEO/HDMI/DVD modes
settings 34
VGA mode settings 34
DTV mode settings (TNT) 35
Electronic program guide 35
Teletext 36
DVD Functions 36
Switching on/off 36
Disc insertion and ejection 36
Play/Pause 36
Stop 37
Previous/next 37
Forward/reverse scan 37
DVD mode 37
Repeat modes 37
A-B repeat 37
Subtitles 37
Audio 37
Slow motion 37
Angle 37
Search 38
Display 38
Zoom 38
DVD menu settings 38
System settings 38
Language settings 39
Audio settings 39
Dolby Digital settings 39
DVD special features 40
INTRO key 40
Programming mode 40
Picture CD 40
Troubleshooting 42
Specifications 42
Maintenance 42
Guarantee 42
SAFETY INSTRUCTIONS


CAUTION: TO REDUCE THE RISK OF ELECTRIC SHOCK. DO NOT REMOVE COVER (OR BACK). NO USER SERVICEABLE PARTS INSIDE. REFER SERVICING TO QUALIFIED SERVICE PERSONNEL.
The graphic symbols on the back cover of the set mean the following:

The lightning flash with arrowhead symbol within an equilateral triangle is intended to alert the user to the presence of uninsulated "dangerous voltage" within the product's enclosure that may be of sufficient magnitude to constitute a risk of electric shock to persons.

The exclamation point within an equilateral triangle is intended to alert the user to the presence of important operating and maintenance (servicing) instructions in the literature accompanying the appliance.
WARNING:
- To reduce the risk of fire or electric shock, do not expose this appliance to rain or moisture.
- The apparatus shall be placed on the apparatus.
- The mains plug is used as the disconnect device, the disconnect device shall remain readily operable.
- In order to disconnect the apparatus from the mains completely, the mains plug should be disconnected from the mains socket outlet completely.

DANGER
LASER SAFETY
This unit employs an optical laser beam system in the CD mechanism, designed with built in safeguards. Do not attempt to disassemble, refer to qualified service personnel. Exposure to this invisible laser light beam may be harmful to the human eye.
THIS IS A CLASS-1 LASER PRODUCT. USE OF CONTROLS, OR ADJUSTMENTS OR PROCEDURES OTHER THAN THOSE SPECIFIED HEREIN, MAY RESULT IN HAZARDOUS LASER LIGHT BEAM EXPOSURE.
Invisible laser radiation when open and interlock failed or defeated. Avoid direct exposure to laser beam.

Manufactured under license from Dolby Laboratories "Dolby,"Pro Logic" and the double-D symbol are trademarks of Dolby Laboratories. Confidential unpublished works. © 1992-1997 Dolby Laboratories, Inc. All rights reserved.
This product incorporates copy protection technology that is protected by U.S. and foreign patents, including patent numbers 5,315,448 and 6,836,549, and other intellectual property rights. The use of Macrovision's copy protection technology in the product must be authorized by Macrovision. Reverse engineering or disassembly is prohibited.
IMPORTANT SAFETY INSTRUCTIONS
- Read these instructions.
- Keep these instructions.
- Heed all warnings.
- Follow all instructions.
- Do not use this unit near water.
- Clean only with a dry cloth.
- Do not block any ventilation openings. Install in accordance with manufacturer's instructions.
- Do not install near any heat sources such as radiators, heat registers, stoves or other apparatus (including amplifiers) that produce heat.
- Do not defeat the safety purpose of the polarized or grounding-type plug. A polarized plug has two blades with one wider than the other. A grounding-type plug has two blades and a third grounding prong. The wide blade or the third prong is provided for your safety. If the provided plug does not fit into your outlet, consult an electrician for replacement of the obsolete outlet.
- Protect the power cord from being walked on or pinched particularly at plugs, convenience receptacles, and the point where they exit from the unit.
- Only use attachments/ accessories specified by the manufacturer.
- Unplug this unit during lightning storms or when unused for long periods of time.
- Refer all servicing to qualified service personnel. Servicing is required when the unit has been damaged in any way, such as the following: the power-supply cord or plug has been damaged; liquid has been spilled or objects have fallen into the unit; and/or the unit has been exposed to rain or moisture, does not operate normally, has changed its performance or has been dropped.
- Do not overload wall outlet. Use only power source as indicated.
- Use replacement parts as specified by the manufacturer.
- The product may be mounted to a wall only if recommended by the manufacturer.
- Upon completion of any service or repairs to this product, ask the service technician to perform safety checks.
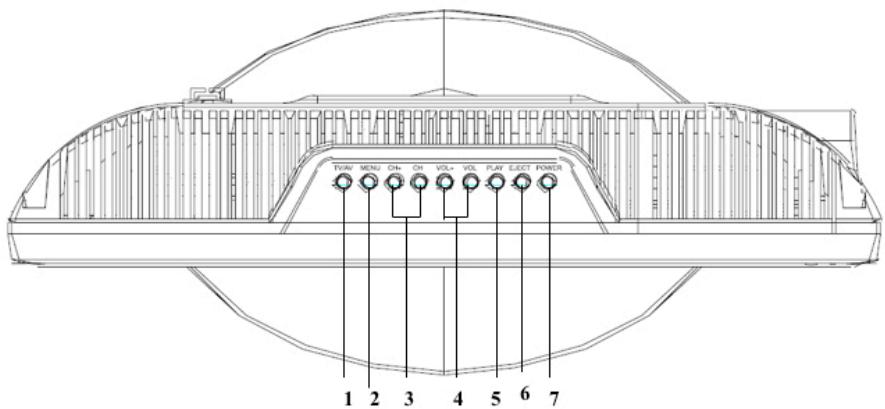
LCD Display
A
- TV/AV button
- MENU button
- CH + / - buttons
- VOL+/- buttons
- PLAY button
- EJECT button
- POWER button
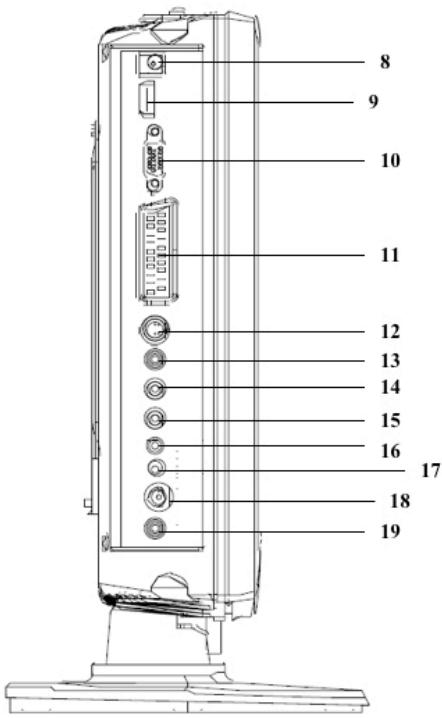
B
- DC 12V input
- HDMI "High Definition Multimedia Interface" port
- VGA input
- SCART connector
- S-video input
- Video input
- Left audio input
- Right audio input
- Line input
- Earphone jack
- RF input
- COAX OUT input
PRECAUTION WITH THE LCD SCREEN WHEN DISPLAYING A STILL IMAGE
A still image may cause permanent damage to the LCD screen.
- Do not display a still image on the LCD panel for more than 2 hours as it can cause screen image retention. This image retention is also known as "screen burn". To avoid such image retention, reduce the degree of brightness and contrast of the screen when displaying a still image.
- Watching the LCD TV in 16:9 format for a long period of time may leave traces of borders displayed on the top, bottom and centre of the screen caused by the difference of light emission on the screen. Playing a DVD or a game console may cause a similar effect to the screen. Damages caused by the above effect are not covered by the Warranty.
- Displaying still images from Video games and PC for longer than a certain period of time may produce partial after-images. To prevent this effect, reduce the "brightness" and "contrast" when displaying still images.
REMOTE CONTROL
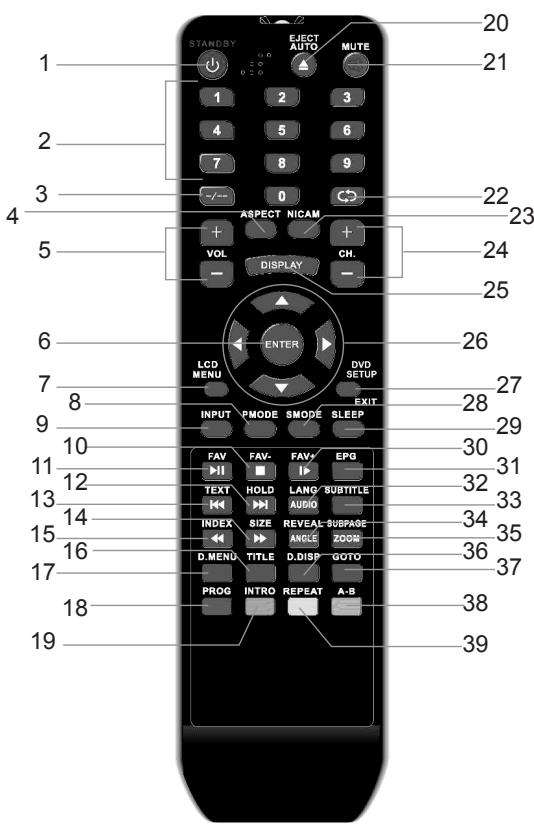
- STANDBY button
- Number keys
- Channel buttons +10/2
- ASPECT button
- VOL+/VOL- buttons
- ENTER button
- LCD MENU button
- PMODE button
- INPUT button
- STOP/FAV- button
- PLAY/PAUSE/FAV button
- Next /HOLD button
- Previous/TEXT button
- Forward scan/SIZE button
- Reverse scan/INDEX button
- TITLE button
- D.MENU button
18.PROG/RED button - INTRO / GREEN button
- EJECT AUTO button
- MUTE button
- Recall
- NICAM buttons
- CH+/CH- button
- DISPLAY button
- Arrow buttons
27.DVD SETUP/EXIT button - SMODE button
- SLEEP button
- SLOW/STEP/FAV+ button
- EPG button
- AUDIO/LANG
- SUBTITLE
- ANGLE/REVEAL
35.ZOOM/SUBPAGE - D.DIS
- GOTO (direct access)
- A-B repeat /BLUE
- REPEAT/YELLOW
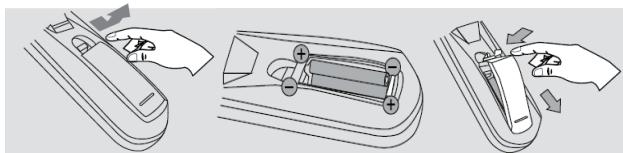
Battery installation
- Open the battery compartment cover.
- Insert 2 AAA 1.5V batteries --- as illustrated and replace the battery cover.
Corrosion, oxidation, battery-leakage and any other gradually acidic defect of this nature will invalidate the guarantee.
Non-rechargeable batteries are not to be recharged. Rechargeable batteries are to be removed from the product before being charged. Rechargeable batteries are only to be charged under adult supervision. Different types of batteries or new and used batteries are not to be mixed. Only batteries of the same or equivalent type as recommended are to be used. Batteries are to be inserted with the correct polarity. Exhausted batteries are to be removed from the product. The supply terminals are not to be short circuited. Do not throw batteries into a fire. Remove the batteries if you are not going to use the product for a long period of time.
WARNING: Mal-function or loss of memory may be caused by strong frequency interference or electrostatic discharge. Should any abnormal function occur, reset the unit or remove the batteries and insert them again, or unplug the AC/DC adapter from the mains socket and replug it again.
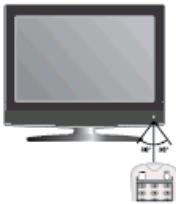
Effective distance of the remote control: within 7 metres.
Note: when there is an obstacle between the TV and the transmitter, the transmitter may not operate. When direct sunlight, an incandescent lamp, fluorescent lamp or any other strong light shines on the remote sensor of the unit, the remote operation may be unstable.
INSTALLATION
Unpacking the device
When unpacking, ensure that the following elements are included:
1 LCD display with integrated DVD player and DTV tuner
1 remote control
2 AAA/LR03 batteries
1 adapter
1 AC power cord
1 instruction manual
WARNING: All packaging materials, such as tape, plastic sheets, wire ties and tags are not part of this TV set and should be discarded.
Setting up the TV
Place the unit on a sturdy, horizontal, vibration-free surface. The set must not be subjected to vibrations or shocks. Please observe the conditions in the safety instructions.
To operate the TV, you can use the keys on the right side and on the top of the LCD screen, or the remote control's keys. Use the input and output connections on the left side of the screen to connect other devices to the unit.
Antenna connection
Connect your antenna to the antenna socket located on the left side of the unit.
Computer connection
You may use your LCD display as a monitor/oudspeaker by connecting the S-video or VGA standard interface to the video/audio interface of your PC. Then select the corresponding source ("VGA" source, please refer to the section "Video source selection" on p.30).
HDMI connection
Your LCD display has an HDMI port, which allows you to connect directly High Definition equipments (camcorder, satellite receptors, HD DVD player, computer or game console). Then select the corresponding source ("HDMI" source, please refer to the section "Video source selection" on p.30).
Mains connection
Do not connect your TV to the mains supply before finishing all other connections. Use the AC/DC adapter (AC 220V- 240V~ 50Hz) provided with the unit to connect the TV to a main socket.
DISC TYPES
| Disc types | Disc size (diameter) | Recorded time |
| DVD VIDEO | 12cm | Single sided: 120mn approx. Double sided: 240mn approx. |
| Super VCD (MPEG2) | 12cm | 45mn approx. |
| VCD (MPEG1) | 12cm | 74mn approx. |
| COMPACT DISC DIGITAL AUDIO | 12cm | 74mn approx. |
| HD-CD | 12cm | 74mn approx. |
| MP3/JPEG | 12cm | 600mn approx. |
Note: the DVD player is also compatible with DVD-R, CD-R and CD-RW.
WARNING: DO NOT INSERT 8CM DISCS. THEY MAY DAMAGE THE SYSTEM!
DISC MAINTENANCE
Caring for discs (A)
- Never use solvents such as benzene or other strong chemical cleaners since these could damage the unit's finish.
- It is important that no liquid reaches the inside of the unit.
- Remove the disc from the case by holding it at the edges while pressing the centre hole lightly.
- Do not touch the shiny surface of the disc or bend the disc.
- A dirty disc may not play correctly. If a disc becomes dirty, wipe it with a soft cloth in a straight line from centre to edge.
- Avoid exposure to direct sun light, temperature extremes, and moisture.
- CAUTION: Do not use any solvent (e.g.: record sprays, thinner, benzene, etc.) to clean a disc.
- Treat the disc carefully. Handle the disc only by its edges. Never allow your fingers to contact with the shiny, unprinted side of the disc.


Clean the discs (B)
- Do not attach adhesive tape, stickers, etc. to the disc label.
- Clean the disc periodically with a soft, lint-free, dry cloth. Never use detergents or abrasive cleaners to clean the disc. If necessary, use a CD cleaning kit.
- If a disc skips or gets stuck on a section of the disc, it is probably dirty or damaged (scratched).
- When cleaning the disc, wipe in straight lines from the centre of the disc to the outer edge of the disc. Never wipe in circular motions.

(B)
Correct

Incorrect
- Discs should be stored in their cases after each use to avoid damage.
- Do not expose discs to direct sunlight, high temperatures or dust, etc.
- Prolonged exposure or extreme temperatures con warp the disc.
- Do not stick or write anything on either side of the disc. Sharp writing instruments, or ink, may damage the surface.
- Lieux exposés à la lumière directe du soleil.
- Lieux humides ou poussiéreux
- Lieux directement exposés à une source de chaleur ou un apparéil de chauffage.
REGION MANAGEMENT INFORMATION
This DVD Player is designed and manufactured to respond to the Region Management Information that is recorded on a DVD disc. If the Region number described on the DVD disc does not correspond to the Region number of this DVD Player, this DVD player cannot play that disc.
This Region number of this DVD player is (Japan, Europe South Africa and Middle-East).
TV FUNCTIONS
Power ON/OFF
Once connected to the mains power, the unit automatically enters into standby mode and the power indicator on the front panel of the LCD screen turns red.
- Press the POWER button on the LCD display or the STANDBY button on the remote control to switch on the TV.
- The power indicator turns green and after a few seconds, the LCD screen will light up.
- Press again the POWER or STANDBY button to switch back to standby mode.
Note: the unit will automatically enter into standby mode after a few minutes of inactivity.
Volume setting
- Press the VOL+ / VOL- keys on the TV or the VOL+/VOL- keys on the remote control to turn the volume up or down.
- To turn the sound off completely, press MUTE on the remote control.
- Press MUTE again or a volume key to turn the sound back on.
Program selection
- Press the CH+/CH- keys on the TV or the CH+/CH- on the remote control to toggle the channels upwards or downwards.
-
The numeric keys of the remote control can be used to enter the channel number directly:
-
For a 1-digit program number, simple enter the required number.
- For a 2-digit program number, press the key, then the program number.
RECALL
Press the RECALL key to toggle between the last viewed channel and the current channel.
Video source selection
Press the INPUT button on the remote control to access the "Source Menu". Use the and buttons to select the desired source: "TV", "SCART", "CVBS (AV)", "S-VIDEO", "VGA" (PC), "HDMI", "DVD", "DTV". Press ENTER to confirm.
Note: Make sure all audio/video cables are connected.
LCD settings menu
In any mode, press the LCD-MENU button to access the LCD settings menus: "PICTURE" menu, "SOUND" menu, "PARAMETERS" menu, "TIMER" menu, "FUNCTION" menu (refer to the section "LCD MENU").
Note: The available settings depend on the selected source.
Picture mode (PMODE button)
Repeatedly press the PMODE button to select one of the following picture modes:

Sound mode (SMODE button)
Repeatedly press the PMODE button to select one of the following sound modes:
Personnel Voice Music Theater
SLEEP
The SLEEP button allows you to program an automatic standby of your LCD display.
Repeatedly press the SLEEP button to select the desired delay time (in minutes): 0 Min., 15 Min., 30 Min., 45 Min., 60 Min., 75 Min., 90 Min., 105 Min. or 120 Min.
To deactivate the sleep timer, repeatedly press SLEEP to select "0 Min."
DISPLAY
In TV mode, press once the DISPLAY button on the remote control to display information about the current program (channel number, audio system, signal type, etc.). Press once again to remove the information.
Subtitles (TNT function)
In DTV mode, press SUBTITLE to activate or deactivate the subtitles for the current program.
Note: The availability of this function depends on the program.
NICAM button (TNT function)
In TV mode, press the NICAM button to switch between a stereo and mono audio system.
Language (TNT function)
Repeatedly press the AUDIO/LANG button to change the audio language of the current program.
Note: The availability of this function depends on the program.
Image aspect
Repeatedly press the ASPECT button to directly change the format or video display type: "Full screen", "Zoom1", "Zoom2", "Auto", "4:3", "14:9", "16:9" or "Subtitle".
Electronic program guide
The electronic program guide (or EPG) allows you to display a program guide (up to one week).
LCD MENU
Press the LCD-MENU button to access the configuration menu.
- Use the and buttons to select the desired menu ("IMAGE" menu, "AUDIO" menu, "PARAMETERS" menu, "TIMER" menu or "FUNCTION" menu).
- Use the and buttons to select an option.
- Press the and buttons to modify the settings, activate and deactivate the functions.
Note: When the icon is displayed near a function, press or ENTER to access the corresponding submenu or activate the function.
- Press the LCD-MENU or DVD SETUP/EXIT buttons to go back to the previous step or exit the configuration menu.
Note:
- Your settings will be automatically saved when you leave the configuration menu.
- After 10 seconds of inactivity, the device will automatically exit the configuration menu.
- The available settings depend on the selected source.
TV MODE SETTINGS
Press the INPUT button on the remote control, then use the and buttons to set the video source to "TV", and press ENTER to confirm.
IMAGE menu
Picture mode
- Press the LCD-MENU button, then use the and buttons to select the "IMAGE" menu.
- Use the and buttons to select the "Image Mode" option.
- Use the and buttons to select a picture mode: "Standard", "Personal", "Movie", "Sport", "Soft" or "Game".
Contrast, Brightness, Color, Tint, Sharpness, Color temperature, DNR
- Press the LCD-MENU button, then use the and buttons to select the "IMAGE" menu.
-
Use the and buttons to select the desired option, then press the and buttons to carry out the settings:
-
"Contrast": Adjust the picture contrast.
"Brightness": Adjust the picture brightness.
Color": Adjust the color intensity. - "Tint": To change this setting, you need to use an NTSC system.
- "Sharpness": Adjust the picture sharpness ("Normal", "Sharp", "Sharpest", "Softest" or "Soft").
- "Color temperature": The default setting of this option is "Normal", you cannot change it in TV mode.
- "DNR" (Digital Noise Reduction): The DNR allows you to improve the image quality by reducing interference. You may select one of the following settings: "Off", "Low", "Mid" or "High".
Note: After a few seconds of inactivity, you will automatically exit the menu.
AUDIO menu
- Press the LCD-MENU button, then use the and buttons to select the "AUDIO" menu.
- Use the and buttons to select the desired option: "Volume", "Sound mode" ("Personal", "Voice", "Music" or "Theater"), "Bass", "Treble" or "Balance". Press the and buttons to carry out the settings.
Note: After a few seconds of inactivity, you will automatically exit the menu.
PARAMETERS menu
Country
- Press the LCD-MENU button, then use the and buttons to select the "PARAMETERS" menu.
- Use the and buttons to select the "COUNTRY" option.
Automatic scan for radio stations
- Press the LCD-MENU button, then use the and buttons to select the "PARAMETERS" menu.
- Use the and buttons to select the "Automatic Search" option. Press ENTER or to start the automatic channel scan.
- Press ENTER to confirm and start the automatic scan of radio stations. When the search is finished, the device will broadcast the channel 1.
- You may press ENTER to display the list of preset stations. Then use the and buttons to select a radio station and press ENTER to view it.
Note:
- If you wish to cancel the scanning process, you can press LCD-MENU or DVD SETUP/EXIT at any time.
- If the preset stations are not displayed in the desired order, you can use the option "Change Station Name" to change the order.
Manual scan for radio stations
- Press the LCD-MENU button, then use the and buttons to select the “PARAMETERS” menu.
- Use the and buttons to select the "Manual Search" option, then press ENTER or to access the menu of manual channel setting.
Channel
Use the and buttons to select the "Channel" option, then use the and to select an available channel number.
Audio system ("Sound system")
Use the and buttons to select the "Sound system" option, then press the and buttons to select the desired sound system ("I" for the UK, "DK" for Eastern Europe, "L/L" for France or "BG" for Western Europe).
Video system ("Color system")
Use the and buttons to select the "Color system" option, then press the and buttons to select the desired video system ("SECAM", "Auto" or "PAL").
Note: For France, select SECAM.
Channel name
Depends on the selected channel.
AFT
If the image is not sharp (that can be caused by interference), use the and buttons to select the "AFT" option, then set the option to "On" using the and buttons. The reception will be automatically improved until the image is sharp again.
Manual search
- Use the and buttons to select the "Manual Search" option, then press and hold the or button for about 2 seconds to start the channel search upwards or downwards.
- When the desired channel is found, press LCD-MENU or DVD SETUP/EXIT to exit and save the channel.
- You may press ENTER to display the list of preset stations. Then use the and buttons to select a radio station and press ENTER to view it.
Note:
- You may also press or repeatedly to increase or reduce the frequency by 0,06MHz.
- If the preset channels are not displayed in the desired order, you can use the option "Change Channel Name" to change the order.
- If you wish to cancel the search process, you can press LCD-MENU or DVD SETUP/EXIT at any time.
Organizing the channel list ("Change Channel Name")
- Press the LCD-MENU button, then use the and buttons to select the "PARAMETERS" menu.
- Use the and buttons to select the option "Change Channel Name", then press ENTER or to access the list of preset channels.
Changing the order of channels (radio stations only)
- Use the and buttons to select the channel you wish to move and press ENTER.
- Use the and buttons to select the channel you want to switch its position with the first one, then press ENTER to confirm the move.
Favorite channels
To create a list of your favorite channels:
1. Use the and buttons to select the channel you wish to add to your favorite list, and press the INTRO/GREEN button.
2. The star icon will appear near the channel number in the "Flags" column.
3. To remove a channel from the favorite list, select it using the and buttons, then press the INTRO/ GREEN button. The star icon will disappear.
4. To display the list of your favorite channels, you may press the /FAV at any time while watching TV. Use the and buttons to select a channel and press ENTER to view it.
6. If you want to directly access your favorite channels without browsing the favorite list, you can use the /FAV- and /FAV+ buttons.
Skipping channels (radio stations only)
This option allows you to skip channels while browsing the programs by pressing the CH + and CH- buttons.
- Use the and buttons to select the channel you wish to skip, and press the REPEAT/YELLOW button.
- The cross icon will appear near the channel number in the "Flags" column.
Note: The channel will be skipped when you press the CH + / CH - buttons, but you can still view it by directly entering the number with the number keys.
3. To deactivate the option, select the desired channel and press again the REPEAT/YELLOW button.
The cross icon × will disappear.
Channel lock ("Lock")
DTV only.
Note: After a few seconds of inactivity, you will automatically exit the menu.
TIMER menu
- Press the LCD-MENU button, then use the and buttons to select the "TIMER" menu.
-
Use the and buttons to select the desired option:
-
"Standby timer": Adjust the standby delay time (between 0 and 120 minutes).
- "OSD Timer": Adjust the display time of the messages (5, 10, 15, 20, 25 or 30 seconds).
Note: After a few seconds of inactivity, you will automatically exit the menu.
FUNCTION menu
- Press the LCD-MENU button, then use the and buttons to select the "FUNCTION" menu.
- Use the and buttons to select the desired option, then press the and buttons to carry out the settings.
Language
Use this option to adjust the OSD language.
Video format
Use this option to adjust the image format.
Blue screen
Use this option to activate ("On") or deactivate ("Off") the blue background.
Child Lock
- Use the and buttons to select the "Child Lock" option then press ENTER or to access the parent control menu.
- Use the and buttons to select the desired option.
PIN code ("Change PIN Code")
This option allows you to change the PIN code and to activate the parent control function.
- Use the and buttons to select the option "Change PIN Code" then press ENTER or to access the PIN code menu.
-
On the line "Old PIN Code", enter the old code with the number keys on the remote control, then press . Note: There is no default code. When setting the code for the first time, leave the first line empty and press to skip directly to the next step.
-
On the line "New PIN Code", enter the new code and press . Reenter the code on the line "Enter again" and press ENTER to confirm the change.
Note: Press to delete the last digit.
Child Lock
The child lock function allows parents to control access to digital channels with inappropriate content after locking them. This function also allows parents to lock the settings of the configuration menu.
Use the and buttons to select "Child Lock" option, then use the and buttons to set the option to "On" (activated) or "Off" (deactivated).
Key lock
When the key lock function is activated, the keys of the LCD display become inoperative. Only the keys of the remote control are operative.
Use the and buttons to select the "Key Lock" function, then use the and buttons to set the option to "On" (activated) or "Off" (deactivated).
Reset
Select this option with the and buttons and press ENTER to reset the default settings.
SCART/CVBS/S-VIDEO/HDMI/DVD MODES SETTINGS
- Press the INPUT button on the remote control, then use the and buttons to set the video source to "TV", "SCART", "CVBS (AV)", "S-VIDEO", "VGA" (PC), "HDMI" or "DVD", and press ENTER to confirm.
- Press the LCD-MENU button, then use the and buttons to select the desired menu.
IMAGE Menu (same as "IMAGE" menu in TV mode).
AUDIO Menu (same as "AUDIO" menu in TV mode).
PARAMETERS Menu (not available).
TIMER Menu (same as "TIMER" menu in TV mode).
FUNCTION Menu (same as "FUNCTION" menu in TV mode).
VGA MODE SETTINGS
Press the INPUT button on the remote control, then use the and buttons to set the video source to «VGA», and press ENTER to confirm.
IMAGE Menu
Same as the "IMAGE" menu in TV mode, but you cannot change the "Color" option. The "Color temperature" option is available and can be set to "Norma", "Warm" and "Cold".
AUDIO Menu (same as "AUDIO" menu in TV mode).
PC Position
Auto Sync
- Press the LCD-MENU button, then use the and buttons to select the "PC-position" menu.
- Use the and buttons to select the "Auto Sync" option then press ENTER to start the automatic parameter configuration.
Phase
Use the and buttons to select the "Phase" option then use the and buttons to set the phase and stabilize the image.
Clock
Use the and buttons to select the "Clock" option then use the and buttons to optimize the image size.
H position
Use the and buttons to select the "H position" option then use the and buttons to set the horizontal position of the image.
V position
Use the and buttons to select the "V position" option then use the and buttons to set the vertical position of the image.
Reset
Select this option with the and buttons and press ENTER to reset the default settings.
TIMER Menu (same as "TIMER" menu in TV mode).
DTV MODE SETTINGS
Press the INPUT button on the remote control, then use the and buttons to set the video source to «DTV», and press ENTER to confirm.
IMAGE Menu (same as "IMAGE" menu in TV mode).
AUDIO Menu (same as "AUDIO" menu in TV mode).
PARAMETERS Menu
Country (same as in TV mode).
Automatic search for digital channels (same as automatic search for radio stations).
Manual search for digital channels
Use the and buttons to select the "Manual search" option, then press ENTER or to access the menu of manual channel setting.
Channel
Use the and buttons to select the "Channel" option, then use the and to select the channel number you wish to find.
Manual search ("Start Search")
- Use the and buttons to select the "Start Search" option, then press ENTER or to start the search.
- When the desired channel is found, press LCD-MENU or DVD SETUP/EXIT to exit and save the channel.
Organizing the channel list ("Change Channel Name")
- Press the LCD-MENU button, then use the and buttons to select the “PARAMETERS” menu.
- Use the and buttons to select the option "Change Channel Name", then press ENTER or to access the list of preset channels.
Changing the order of channels (radio stations only)
Favorite channels (same as in TV mode).
Skipping channels (radio stations only)
Locking/deleting digital channels
This option allows you to lock access to digital channels with inappropriate content, and to delete channels.
- Use the and buttons to select the channel you wish to lock and press the A-B / BLUE button.
- The lock icon will appear near the channel number in the "Flags" column.
- To unlock a channel, select it and press again the A-B / BLUE button. The lock icon will disappear.
- To delete a channel, use the and buttons to select it and press the REPEAT/YELLOW button.
List of radio stations
Press the PROG/RED button to switch between the list of digital TV channels and digital radio stations.
TIMER Menu (same as "TIMER" menu in TV mode).
FUNCTION Menu (same as "FUNCTION" menu in TV mode).
Note: After a few seconds of inactivity, you will automatically exit the menu.
ELECTRONIC PROGRAM GUIDE
In "DTV" mode, this function allows you to display an electronic program guide.
- Press the INPUT button on the remote control, then use the and buttons to set the video source to "DTV", and press ENTER to confirm.
- Press the EPG button to display the program guide and use the CH+/CH- buttons of the LCD screen on the CH+/CH- buttons on the remote control to select the desired channel.
- Use the and buttons to select the day, then use the and buttons to select the desired program. Information about the program will be displayed in the upper right corner of the screen.
- If the desired program is currently being broadcast, press ENTER to view it.
- If the desired program is to be broadcast later, press ENTER to program an automatic recall: The device will warn you at the starting time of the desired program and will automatically switch to the corresponding channel.
Note: You may exit the electronic program guide at any time by pressing the EPG button.
TELETEXTE
TV Mode
- Press the INPUT button on the remote control, then use the and buttons to set the video source to "TV", and press ENTER to confirm.
- Press once the Previous/TEXT button to display the teletext index. Press the same button once again to display the teletext index while continuing to view the current program.
- Use the number keys to enter the number of the desired page or use the quick access keys (RED, GREEN, YELLOW and BLUE buttons on the remote control) corresponding to the colored text at the bottom of the page.
- To increase the text size or display the upper part of the page, press the Forward scan/SIZE button. Press the same button once again to display the lower part of the page.
- To freeze the current page, press the Next/HOLD page. Press the same button once again to exit the function.
- To reveal hidden texts (e.g. answers to a quiz), press the ANGLE/REVEAL button. Press the same button once again to exit the function.
- To access a subpage of the current page, press the ZOOM/SUBPAGE button. Press the same button once again to exit the function.
- To access or go back to the main index, press the Reverse scan/INDEX button.
Note: You may exit the Teletext function at any time by pressing the DVD SETUP/EXIT button.
DTV Mode
- Press the INPUT button on the remote control, then use the and buttons to set the video source to "DTV", and press ENTER to confirm.
- Press once the Previous/TEXT button to display the teletext index of the current program. The program stays displayed in a small window on the left of the screen, and the index is displayed on the right.
- Use the and buttons to select the desired issue and press ENTER to confirm. Use the same buttons to select a "sub-index".
- If there is more than one page, use the and to access the previous or following page.
- You may press the Previous/TEXT button at any time to go back to the current program.
DVD FUNCTIONS
Switch ON the DVD player
- Press the POWER button on the LCD display or the STANDBY button on the remote control to switch on the TV set.
- The power indicator turns green and after a few seconds, the LCD screen will light up.
- Press the INPUT button on the remote control, then use the and buttons to set the video source to "DVD", and press ENTER to finish.
Load/eject a disc
- Insert a disc in the disc slot with the label facing towards the front panel of the LCD screen. After a few seconds it will start playing automatically. If it is a DVD disc, the Menu/Title page will be displayed. If it is a CD, the first track will play automatically.
- To eject the disc, press the EJECT key on the LCD screen or on the remote control.
Note:
- Hold the disc without touching either of its surfaces.
- Some discs may not start automatically. In that case, press the key on the LCD screen or on the remote control.
- Make sure to insert the disc with the printed side facing the front of the LCD screen. Otherwise, you may damage the DVD mechanism.
Play/pause
- During playback, press the key on the LCD screen or on the remote control to pause the playback.
- Press once again to resume playback.
WARNING: the Pause function may cause permanent damage to the LCD screen. Do not display still images for a long moment.
Stop
- Press the key on the LCD screen or on the remote control to stop the disc playback.
- You can resume playback by pressing . Playback will resume at the location where you have pressed (Resume Play).
- Press twice to completely stop the disc.
Previous/Next
- During playback, press the key to return to the beginning of the previous chapter or track.
- During playback, press the key to move to the beginning of the next chapter or track.
Scan Forward/backward
- During playback, press the on the remote control to search forward. Press this key repeatedly to change the search speed: "FAST FORWARD x 2" → "FAST FORWARD x 4" → "FAST FORWARD x 8" → "FAST FORWARD x 20" → "PLAY".
- Press on the remote control to search backward. Press this key repeatedly to change the search speed: "PLAY" "REWIND x 20" "REWIND x 8" "REWIND x 4" "REWIND x 2".
- Press at any time to resume normal playback. Note: the sound is turned off when scanning forward or backward.
DVD Play Menu
Press the MENU key during playback to return to the Menu/Title page.
Note: this function is only applicable for a DVD disc.
Title
- During a DVD disc playback, press the TITLE key and use the / / keys to select a title.
- Press ENTER to access directly the desired title.
Repeat mode
This function is applicable for DVD and CD audio but with different effects.
- For DVD disc playback, press the REPEAT key once to repeat the current chapter; twice to repeat the current title, and 3 times to repeat the entire disc. Press the same key repeatedly to display "REP: OFF" and turn off the repeat function.
- For CD playback, press the REPEAT key once to repeat the current track, and press twice to repeat the whole disc (Repeat All).
Repeat AB
You can specify the repeating interval by marking the starting point and the end point.
- Press the AB key to mark the starting point (playback will continue).
- Press the AB key to mark the end point (the marked part will be repeated automatically).
Note: Pressing the AB key during repetition will disable the Repeat mode.
Subtitle
Press the SUBTITLE key on the remote control to change the subtitle language shown onscreen.
Note:
- Number of subtitles available depends on the DVD disc.
- This function is available only for DVD and super VCD discs.
Audio
- During DVD playback, press the AUDIO key on the remote control to change the audio language of the DVD disc (if the disc offers that function).
- During audio CD playback, press the AUDIO key on the remote control to change the audio channel between "MONOL", "MONOR" and "STEREO".
Slow Play
- Press the SLOW/STEP key on the remote control to use the slow play function.
- Press repeatedly the key to change the speed level: "SLOW FORWARD 1/2", "SLOW FORWARD 1/3", "SLOW FORWARD 1/4", "SLOW FORWARD 1/5", "SLOW FORWARD 1/6", "SLOW FORWARD 1/7", "PLAY".
- Press to resume normal playback.
Note: The sound turns to mute in SLOW mode.
Angle
If a DVD disc contains multi-angle feature, viewing angles may be selected.
During playback, press the ANGLE key on the remote control repeatedly to select the desired viewing angle.
Note: the number of angle of view depends of the disc.
Search
You can jump to a specific time location, track, chapter or title.
- Press the GOTO key on the remote control.
- Use the or keys to select the chapter, title or time.
- Use the number keys to enter the desired chapter number, title number or target time, and then press ENTER.
- The player will access the desired parameter immediately.
Display
Press the DISPLAY key on the remote control once or twice to show information on the screen (disc type, time, audio language, subtitle language...). Press repeatedly to exit the information display mode.
Zoom
This function enlarges or reduces a still picture or a moving picture. Press the ZOOM key on the remote control to select the zooming levels: "ZOOM 2", "ZOOM 3", "ZOOM 4", "ZOOM 1/2", "ZOOM 1/4", "ZOOM: OFF".
Note: Use the direction keys ( / / ) to navigate within the image.
DVD MENU SETTING
To enter the setup menu of the integrated DVD player, press the DVD-SETUP key on the remote control when you are in DVD mode. Use the and keys on the remote control to select the available options: "SYSTEM SETUP", "LANGUAGE SETUP", "AUDIO SETUP", and "DIGITAL SETUP".
System setup
Use the and keys on the remote control to select "SYSTEM SETUP". Then use the / / keys to select the menu options.
Note: To exit the menu, select "EXIT SETUP" and press ENTER or press the DVD-SETUP key at any moment.
TV system
You do not need to change this setting. In the event you need to change the TV system output (moving the TV to another country etc...), you can select "NTSC", "PAL" (default setting), or "AUTO".
TV type
You have the option to change the TV type setting between: "4:3PS ("Pan Scan) / "4:3LB" (Letter Box) / "16:9" (Wide screen).
Password
This option allows you to enable the parental control feature.
- To change the password, use the numeric keys of the remote control to enter the code (the default code is 4711), then press the ENTER key to confirm. The open lock icon will be displayed on screen.
- Key in the new password and press ENTER. The closed lock icon will be displayed on screen to confirm that the new code has been stored. When the "password" function is enabled, you can't change the settings in the "RATING" option.
Rating (parental control)
The parental control feature allows parents to prevent their children from watching inappropriate material on a DVD. They can choose the ratings for programming, and the player will deny access to the DVD contents. There are 8 different rating categories. To use the parental control function:
- Select the "password" option, enter the 4-digit code (the default password is 4711), then press ENTER to unlock the ratings.
- Select the "RATING" option, then use the and keys on the remote control to select the desired rating. Press ENTER to confirm.
Default (restore original settings)
To return all the setup options to their default settings, select "DEFAULT". Then, press the key followed by ENTER.
Language setup
Use the and keys on the remote control to select "LANGUAGE SETUP". Then use the / / / to select the menu options.
Note: To exit the menu, select "EXIT SETUP" and press ENTER or press the DVD-SETUP key at any moment.
OSD language selection
The menu language used in these instructions is English. You can also set the OSD (on-screen display) to other languages.
- Use the and keys on the remote control to highlight "OSD LANGUAGE", then press .
- Use the and keys on the remote control to select the desired on-screen display language. Press ENTER to confirm your selection. The available languages are English, German, Spanish, French, Portuguese and Italian.
Other language settings
In the "LANGUAGE SETUP" menu, you can also set the default language for the audio ("AUDIO LAN"), subtitles ("SUBTITLE LANGUAGE") and the menu language of your DVD player ("MENU LANGUAGE"). These settings will only take effect if the DVD disc being played supports the language selected. If so, the language selected will be displayed first during audio, subtitle and menu language settings. Use the / / / and ENTER keys to adjust the settings.
Audio setup
Use the and keys on the remote control to select "AUDIO SETUP". Then use the / / / keys to select the menu options.
Note: To exit the menu, select "EXIT SETUP" and press ENTER or press the DVD-SETUP key at any moment.
Audio output
You can change the "AUDIO OUT" setting between: "SPDIF / OFF", "SPDIF / RAW" and "SPDIF / PCM".
- SPDIF / RAW
Choose this setting if your DVD player is connected to a power amplifier with a coaxial cable or an optical cable. When playing a disc recorded with Dolby Digital, DTS and MPEG audio formats, the corresponding digital signals will be output from the Coaxial Output jack. This player's digital output jacks are designed for a connection to a Dolby Digital, DTS or MPEG receiver or decoder.
- SPDIF / PCM
Choose this setting if your DVD player is connected to a 2-channel digital stereo amplifier. When playing a disc recorded with Dolby Digital and MPEG audio formats, audio signal will be modulated into a 2-channel PCM signal and it will be output from the Coaxial Output jack or Optical Output jack.
Tone
Use the and keys to adjust the tone.
Digital setup
Use the and keys on the remote control to select "DIGITAL SETUP". Then use the / / keys to select the menu options.
Note: To exit the menu, select "EXIT SETUP" and press ENTER or press the DVD-SETUP key at any moment.
Dynamic range
When "SPDIF / RAW" is selected, you can set the line out ratio to get a different effect. Use the and keys on the remote control to adjust the settings. If adjusting to "FULL", the audio signal peak volume will be the minimum; while adjusting to "OFF", the volume will be at its maximum. You can also select "6/8", "4/8" or "2/8".
Dual mono
Use this option to select the audio output type: "STERO", "MONO L", "MONO R" or "MIX MONO".
SPECIAL DVD FUNCTIONS
INTRO key
When listening to an audio CD, press the INTRO key on the remote control to playback the first 15 seconds of each track.
Note: this function is available only for audio CD.
Program mode
This function is applicable for DVD and CD audio discs. You may assign the playback sequence according to your preference.
CD/CDG
- Press the PROGRAM key on the remote control. The program sequence table will be shown on screen.
- With the numeric keys (0-9) of the remote control, enter the track numbers according to your preference.
- After assigning the playback sequence, move the highlight cursor to the "PLAY" option by using the / / / keys. Press the ENTER or keys to confirm and launch the sequence.
DVD
- Press the PROGRAM key on the remote control. The program sequence table will be shown on screen.
- Enter the title number using the numeric keys.
- Enter the chapter number of the title selected in the last step.
- Repeat the last 2 steps to input the sequence.
- After assigning the playback sequence, use the / / keys to select "PLAY". Press the ENTER or keys to confirm and launch the sequence.
- To cancel a program, move the cursor to "CLEAR" and press ENTER.
Note: press the PROGRAM key on the remote control at any time to exit the program mode.
Picture CD
- Insert a picture CD into the tray. If the disc is identified, the player will display a list of the pictures (JPG) stored on the CD.
- Use the / / / keys to select a picture and press the ENTER key to display the image.
- Press the key to launch/pause/resume a slide show of the pictures.
- Press the key to display the next picture. Press the key to display the previous picture.
Note: depending on the files size, it may take a few seconds before the pictures are displayed on the LCD screen.
- Press the PROGRAM key to select one of the 17 transition effects for the slide show.
- You can use the / / keys to flip or rotate the pictures.
- Press the key to stop the slide show and go back to the photo list.
TROUBLESHOOTING
| Problem | Solution |
| No sound and no picture | - Check that the main plug is connected to an outlet. - Check that the unit has been switched on by pressing the POWER button of the LCD display or the STANDBY button of the remote control. - Check the brightness and contrast settings. |
| Normal picture but no sound | - Sound level may be too low or muted, increase the sound level. - Try other channels. - Make sure the audio cables are properly connected. |
| The remote control doesn't operate properly | - Make sure there are no obstacles between the LCD screen and the remote control. - Check if the batteries were installed according to the polarity (+/- signs). - Try to install new batteries. |
| The power indicator is on but the buttons of the LCD display do not work. | Check if the "Key Lock" function is deactivated and switch on the LCD display with the remote control. |
| The power indicator is green but there is no image. | Wrong mode, select the "TV" or "DTV" mode. |
| No image, blue screen | - Check the antenna connection. - No channel is preset, start an automatic search. |
| No picture, low quality picture, low quality colour | - Try to adjust the colour setting in the video menu. - Try other channels. - Make sure the video cables are properly connected. |
| Picture with snow/noise | - Make sure there are no electronic appliances near the LCD screen. They could cause interferences. - Check the antenna connection. |
| You forgot or you lost your PIN code. | - In TV mode, enter 4711. |
| No audio output from one of the speakers | - Try to adjust the audio balance in the audio menu. |
SPECIFICATIONS
TV SECTION
Screen size: 55.8 cm
Definition: 1680 X 1050 pixels
Brightness: 300 cd/m2
Contrast: 700:1
DVD SECTION
Laser Wave length 650mm
Laser power: Class 1
Signal System: PAL
Audio in, RF in, Coax in, S-video in, VGA in, Video in, PC Audio in, Scart
Stereo in DVD mode
Mono in TV mode
GENERAL SECTION
Power Input: DC12V
DC Power Consumption: less than 48W
Speaker 2.5" 4ohm x 2
Audio Output: 2.6W + 2.6W
Dimensions: H: 345mm x W: 380mm x D: 70mm (without stand) / H: 345mm x W: 380mm x D: 175mm (with stand)
Net Weight: 2.5kg
MAINTENANCE
To prevent fire or shock hazard, disconnect your unit from the AC power source when cleaning. The finish on your unit may be cleaned with a dust cloth and cared for as other furniture. Use a soft, clean cloth moistened with plain, lukewarm water to clean the exterior of the unit. Use caution when cleaning and wiping the plastic parts. Mild soap and a damp cloth may be used on the front panel.
WARRANTY
This product is covered by our 2-year warranty.
For any claim under the warranty or after sale service, please contact your distributor and present a valid proof of purchase. Our warranty covers any manufacturing material and workmanship defect, with the exception of any deterioration arising from the non-observance of the instruction manual or from any careless action implemented on this item (such as dismantling, exposition to heat and humidity, etc.). It is recommended to keep the packaging for any further reference.
In a bid to keep improving our services, we could implement modification on the colours and the details of the product shown on the packaging.
NOTE: Please keep this instruction manual, it contains important information.
Reference: LCDDVD2TFFR
©2009 Hasbro. All Rights Reserved.
©2009 LEXIBOOK®
Designed and developed in Europe - Made in China
LEXIBOOK UK Ltd,
Unit 10 Petersfield Industrial Estate,
Bedford Road, Petersfield, Hampshire,
GU32 3QA, United Kingdom
Helpline: 0808 100 3015
http://www.lexibook.com
Environmental Protection
Unwanted electrical appliances can be recycled and should not be discarded along with regular household waste! Please actively support the conservation of resources and help protect the environment by returning this appliance to a collection centre (if available).
INDICE
Control parental (Child Lock)
Modo de television (TV)
Sistema de television
No le seranecessaryarcombarisaconfiguracion.Situvieraquecantiarelformatode salida delsystema de television (debidoabersedesplazadoaunpaisdiferente,etc.),podraSeleccionarentrelasopciones "NTSC",PAL"(selectionaciondopestico),o"AUTO" (automatico).
©2009 Hasbro. All rights reserved.
©2009 LEXIBOOK®
Lexibook Ibérica S.L.
Audio in, RF in, Coax in, S-video in, VGA in, Video in, PC Audio in, Scart (21 pinos)
©2009 Hasbro. All rights reserved.
©2009 LEXIBOOK®
4:3PS ("Pan Scan) / "4:3LB" (Letter Box) / "16:9" (Wide screen).
Password
Audio in, RF in, Coax in, S-video in, VGA in, Video in, PC Audio in, Scart
©2009 Hasbro. All rights reserved.
©2009 LEXIBOOK®
Lexibook Italia S.r.l.
Via Eustachi, 45,
ELEKTRONISCHER PROGRAMM FuHRER
©2009 Hasbro. All rights reserved.
©2009 LEXIBOOK®
Stroom ON/OFF (AAN/UIT)
Audio setup (Audio-installing)
Gebruik de en\nknuppen op de afstandsbediening om "AUDIO SETUP" te selecteren. Gebruik verzolgens de // knuppen om de menuopties te selecteren.
Audio in, RF in, Coax in, S-video in, VGA in, Video in, PC Audio in, Scart
Stereo in DVD modus
Mono in TV modus
ALGEMENE SECTIE
©2009 Hasbro. All rights reserved.
©2009 LEXIBOOK®