H510 - Remote control EMTEC - Free user manual and instructions
Find the device manual for free H510 EMTEC in PDF.

User questions about H510 EMTEC
0 question about this device. Answer the ones you know or ask your own.
Ask a new question about this device
Download the instructions for your Remote control in PDF format for free! Find your manual H510 - EMTEC and take your electronic device back in hand. On this page are published all the documents necessary for the use of your device. H510 by EMTEC.
USER MANUAL H510 EMTEC
m = 311
(Macro)
function
m = 311 ;
www.emtec-international.com
English 3
Français 27
Deutsch 51
Italiano 75
Espanol 99
Nederlands 123
ENGLISH
Table of Contents
Introduction 3
Hard Key Functions 4
Setup 6
Using the Wizard 6
Setting Up Your Devices 7
Setting Up Your Favourites 8
Using The Remote 10
QuickPower 11
Sleep 11
Macros 12
Setting up more Devices 12
Setting up more Favourites 13
Setting up more Macro 16
Advanced Settings 18
Learning 21
Learning Main Keys 22
Learning Side Keys 23
Troubleshooting 25
Introduction
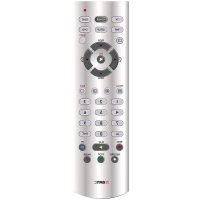
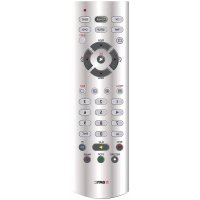
Congratulations on your purchase of this H510 Emtec Universal Remote Control. Emtec Universal Remotes let you replace a broken or lost remote or combine more than one remote into one. But this remote is really unique, having a high quality colour screen, like the kind you see on cell phones. This screen depicts coloured icons that you easily set up to represent your favourite channels. You can then easily select any channel you want by simply pressing the key next to the icon that represents that channel.
This remote control operates the common features of most but not all models and brands of Infrared (IR) Controlled devices. This remote may provide functions that are not available on your device. Some functions of your particular device (e.g. menu functions) may not be controlled by this remote. In such cases, you can learn the commands from your original remote. Please use this manual to become familiar with your EMTEC Universal Remote. After you are familiar with this owner's manual, the first thing you need to do is to install batteries and setup your remote following the on-screen instructions.
Thank you for buying this Emtec remote and we hope it will give you many years of service.
All trademarks or registered trademarks used in this product are trademarks or registered trademarks of their respective owners.
Hard Key Functions
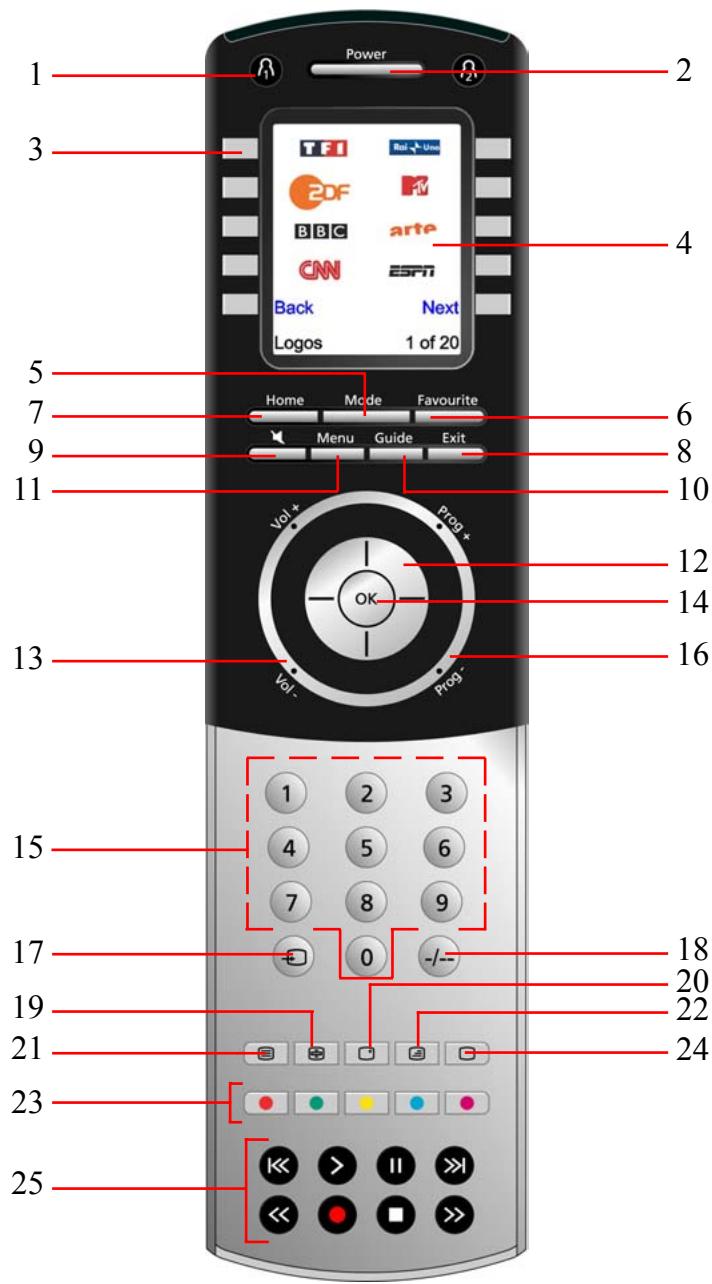
Hard Key Functions, cont.
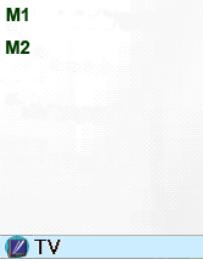
- _1 / _2 - Quick access keys for favourites stored under _1 / _2 groups.
- POWER - Turns current device On or Off.
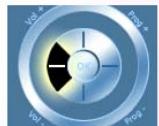
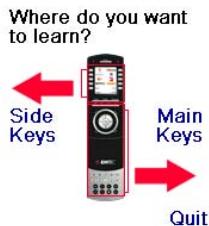
- SIDE KEYS - Used to access on-screen features.
- LCD - (Liquid Crystal Display).
- MODE - Selects mode (TV, VCR, etc.) for the remote.
- FAVOURITE - Used to access favourites groups on the LCD.
- HOME - The starting screen on the LCD for most operations.
- EXIT - Exits On-Screen Menus/Returns to previous On-Screen selection.
- MUTE - Turns the Volume on/off, normally the TV.
- GUIDE - Displays on-screen program or channel guides.
- MENU - Brings up the Menu screen.
- UP, DOWN, LEFT & RIGHT - Used to Navigate menus.
- VOLUME UP/DOWN - Changes the volume level of the device, normally the TV.
- OK - Selects menu items for the device you are controlling, or confirms selections on the screen.
- NUMBERS - Enter numbers for direct program channel selection.
- PROG UP/DOWN - Changes the program channels.
- AV - Selects input source.
- -- (Enter) - Accesses program channels >9 or Enter function.
- TEXT HOLD - holds current Teletext page.
- INFO - displays program channel information.
- TEXT ON - Turns Teletext feature on.
- TEXT MIX - Shows both Teletext and TV picture.
- TELEXT - Colour buttons.
- TEXT OFF - Turns Teletext feature off.
- SKIP +/-, RECORD, PLAY, PAUSE, STOP, REW, FF, - Operates your VCR, DVR, or DVD Player. Note, the Record key needs pressed twice to operate.
Setup
Battery Installation
- On the back of the remote, push down on the tab and lift the cover off.
- Match the batteries to the + and - marks inside the battery case, then insert 4 AAA Alkaline batteries.
- Press the battery cover back into place.
Make sure you use new batteries. You can have problems with learning codes if your batteries are old.
Battery Saver
Your remote automatically turns off if the keys are depressed for more than 30 seconds. This will save your batteries should your remote get stuck in a place where the keys remain depressed (e.g., between the sofa cushions). Also, the screen turns off a short time after no keys have been pressed for a while (or a short time after a key has been stuck for 30 seconds). The duration before the screen turns off can be adjusted from about 2 seconds to about 35 seconds, from the Setup, Advanced, Options menu, see page 18
Permanent Memory
All the devices you set up, their codes, punchthrough settings, and all your favourites, etc., are stored in permanent memory while you are changing batteries so you will not lose any codes or settings stored in the remote while you are changing batteries.
Using the Wizard
After you insert the batteries the Language screen (1) appears. Choose the language you want by pressing on the side key next to the choosen language.
The Setup Wizard screen (2) appears. You can exit the Wizard at any time by pressing the HOME key (located just below the screen). Press any key at screen (2) to continue and follow the instructions on the screens.
Pressing OK at screen (3) takes you to the next screen (4). Pressing the Left navigation key (Back key) on the remote at screen (4) takes you to screen (5) that has 10 yellow arrows. This is an exception to the rule because we're teaching you how to use the remote. But pressing Back again at this point does take you "back."
(1)

(2)
Welcome!

This Wizard will help you get started.
Press any key to continue.
Press Home to exit.
(3)
The OK key always takes you to the next step.

Try it now!
Try pressing the Back key a few times to go back through the Wizard and then follow the instructions on the screens again to familiarize yourself with how to step through the screens and go back. You can go back and forth through the Wizard but once you've set up your devices and quit to save the settings, you won't see the Wizard again unless you do a Master Reset.
To do a Master Reset: Press the HOME key, then select Setup, then select Advanced, then select Clear Settings, then select Master Clear. Note this will erase everything you have set up in the remote.
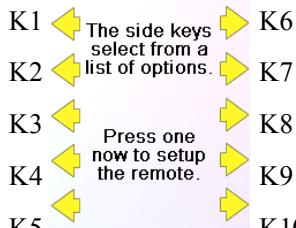
Pressing any of the 10 Side Keys (K1 thru K10) at screen (5) takes you to the screen where you set up your first device (TV). See next page.
Setting Up Your Devices
How to set up a TV
After you've been through the Wizard for the first time, the screen (1) shown to the right appears. This is the start of the Wizard to set up your devices (TV being the first one). Manually turn on the device(s) to be set up (TV, VCR, etc.).
If you know your brand of TV, select Yes which results in a faster search for your TV's code. (Selecting No searches the complete library of TV codes, rather than just the codes for your brand of TV).
Pressing the Side Key next to Yes at screen (1) takes you to a screen (2) where the most common brands are shown next to the Side Keys. If your brand isn't shown you can press the Side Key adjacent to Next to show more brands, (shown alphabetically) or press the Side Key adjacent to Back to go back to the previous screen of brands. Note, on the very first screen of brands, the Side Key adjacent to Back takes you to the last screen of brands (so you can go back through the list instead of forward through it if you prefer). In this case we selected Sony.
Screen (3) tells you to point the remote directly at your TV and repeatedly press (but not hold) Power (or Chan Up/Down, or Play for VCRs etc.) until your device responds. Pressing Power sends the Power command to your TV and screen (4) shows that you've selected code 1 of xx (xx will vary by brand). Keep pressing Power until your TV responds and then press Save.
(4)
Go back at any time by pressing the left arrow key.
Give it a go!
(5)
(1)
TV

Do you know what brand you have? Yes
No
Change Type
Quit
(2)
Philips Grundia
Panasonic
Grundig
Samsung
.
Sony
Back
Next
Pic
our brand
(3)
Point the remote at your TV and press Power until it turns on or off.
Sony
Save
Last Code
Quit
(4)
Point the remote at your TV and press Power until it turns on or off.
Sony
1 of 12
Save
Last Code
Quit
Setting Up Your Devices, cont.
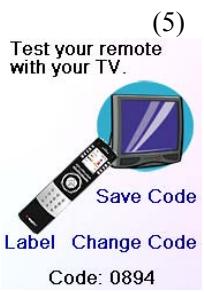
Pressing Save shows screen (5) that instructs you to try a few other keys on the remote to make sure you've found the correct code. Tip: try keys like Menu, and Guide. Power might work yet you still might not have the correct code. If several keys seem to work fine, press Save Code. If some keys don't work, select Change Code (or press Back) to go back and find another code that works better. Selecting Label lets you rename the device, e.g. you could call it My TV. You can ignore this for now and try it later if you like. See pages 9, and 24 for more details on entering text to change labels.
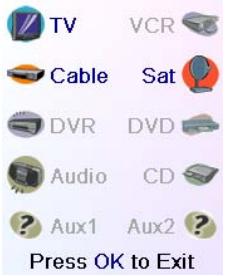
Pressing Save Code at screen (5) takes you to screen (6) where you set up a Cable box. You can quit at this point and set up other devices later, or you can continue and set up other devices - SAT, DVR, DVD, VCR, Audio, CD Player, or either of the 2 AUX devices.

Let's assume for now that you go ahead and set up a TV, Cable, and SAT.
If you select No at screen (1) on the previous page the procedure will be similar to the above, except that you will be searching through the entire library of codes for your device to find the one that works best (instead of just searching through the codes for your brand of device, e.g., Sony).
If you say Yes when asked if you know your Brand, but subsequently don't find a code that works, you are asked if you want to try again (in case you missed it), or try all the codes for your device. If you try all codes for your device type, and still don't find a code that works, you can skip it.
Setting Up Your Favourites
Once you've gone through the Wizard and set up at least a TV, and set up more devices, or skipped the rest of them, you arrive at screen (1) to the right.
Press any digit key, say digit 4, to enter a channel number. This takes you to screen (2). You can enter more digits if desired. The channel number can include -/--, or OK, if your device requires it to change channels, e.g. 472Ok, or -/--55.
(1)
Now let's setup your Favourites!
Enter a favourite channel, pick a logo, a device, and then press Save.
Hint: some devices may need 3 digits, Enter or OK.

(2)
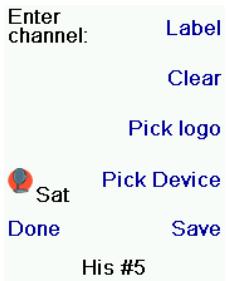
Enter channel: Label 4
4 Pick logo
Sat Pick Device Done Save
Set Favorite 1 of 10
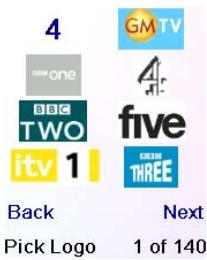
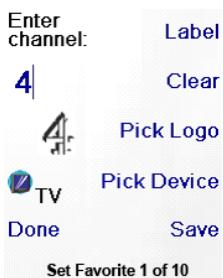
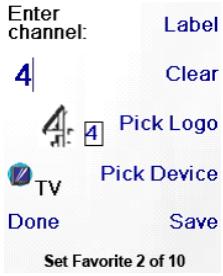
Now you press the Side Key next to Pick Logo on screen (2). You are shown a screen (3) of popular channel logos. You can select Next (Side Key 10) or Back (Side Key 5) to see more logos. In this example we pressed the 4 logo (Side Key 7). Screen (4) now shows that we've chosen channel 4 and the 4 logo. Note, you could also select the top left position which would display "4" as the favourite rather than a logo.
The Default device is this case was Sat, but you can select Pick Device to change it. In this case we changed it to TV. Make sure you select the device that you want each favourite to control, e.g. TV, Cable, or Sat.
If you want to add a label to the logo press the Side Key next to Label. This is optional so if you don't want to add a label to the logo you can just select Save to save the setting for this favourite. If you save this favourite, Set Favourite 2 of 10 is now shown at the bottom of the screen to indicate that you can add another favourite channel. Again just press a channel number key on the remote, choose a logo and change the Device Type (if you want to). Add a few more favourites (up to 10). You can add more later, or delete or edit them later, or even reorder their positions. Select Done when you're finished setting up favourites.
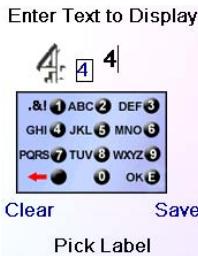
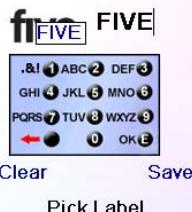
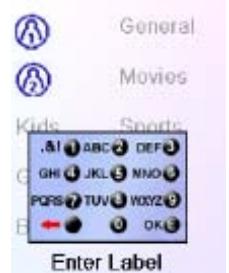
If you select Label, you see the screen to the right with a small label on top of the logo. Initially the label will be the channel number for that logo. If you Save this, the logo will have a small label representing the channel number for that logo in it's bottom right hand corner, see screen (5).
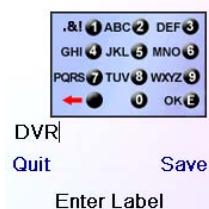
But you can type in a new label if you want one. You enter the new name for the key using the numeric keys on the remote, in a similar fashion to typing in text on a cell phone.
E.G. in this example we pressed the 3 key 3 times to enter the letter F. Then we waited a second and pressed the 4 key repeatedly until the letter I was displayed. Then we waited a second and pressed 8 to select V. Then we waited a second and pressed the 3 key to select E. See below.
Note: "Triple tap" name entry works in a similar fashion to text entry on a cell phone. Tap each numeric key to cycle through ALL caps, numbers, and lower case letters. E.G., repeatedly pressing the number 2 key cycles through A, B, C, 2, a, b, c. Pressing the 9 key cycles through W, X, Y, Z, 9, w, x, y, z. A "space" can be selected with the 0 (zero) key. The number 1 key selects 1. @ ?! - & and : You can backspace an entry with the key to the left of the 0 (zero) key. Press OK (or the side key next to Save) to confirm your new name.
(3)
(4)
(5)
Enter Text to Display
Setting Up Your Favourites, cont.
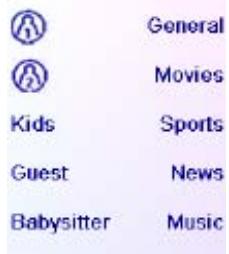
You can continue to add favourites, up to a total of 10 (you can add more later, see page 13). At screen (6) you choose if the favourites you just set up are stored in the _1 group or the _2 group. Later you can set up favourites in lots of different Groups, not just _1 and _2 . Selecting _1 takes you to screen (7) showing that you now have 4 sets as the first favourite in the _1 Group (at the location next to Side Key K1), as well as any other favourites you set up. (Note, you can reorder, i.e., move the positions of the logos later).
When you're finished setting up your favourites, press the HOME key (located to the left below the screen) to go back to the Home screen.
At any time you can press the FAVOURITE key and then select _1 or press the _1 key at the top left hand side of the remote to go to screen (7) above. Then pressing the key next to the 4 logo will (in this case) change the channel on your Cable to 4 (in this case channel 4).
Congratulations! You're done!
Do you want to assign the favourites you've just created to the key or the key?
(6)

(7)
Using The Remote
Assuming you followed the steps on the previous pages and have set up some devices and some favourites you can now use the remote. See the sections that follow to set up more devices and/or favourites, and to set up other functions.
Using the remote
Press the or key at any time to access the favourites you've set up. Or press the FAVOURITE key, then select your favourites group. Then press the Side Key next to the logo to change your device to that channel. Selecting a favourite group that has not yet been set up, takes you to the setup Wizard.
Important: Make sure you point the remote at your device until the channel changes. Pressing a favourite key might send the commands for say channel 162, but if you don't point the remote at your device until all three digits are sent you might just get channel 16, or even channel 1. Watch the flickering halo at the bottom left of the screen, it flickers for each digit sent. It also shows what device is being controlled.
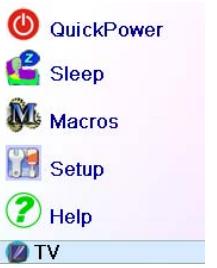
Press the HOME key at any time to access the screen where you can set things up, or access other features.
Press the MODE key, then select a device type to change the mode that the remote is in. E.G., if the remote is in Cable mode then the hard keys such as Channel Up/Down, Volume Up/Down, numbers, etc., operate your cable box.
Also, when you select a mode, any extra keys for that mode, and any keys you've learned for that mode are displayed. The current mode that the remote is in is displayed with an icon in the lower left of the screen. In the above example it's in TV mode. Press _1 or _2 to return to your favourites screen.
Before you continue, press Side Key K5 next to the Help icon and follow the prompts to get an idea of how to use the remote.
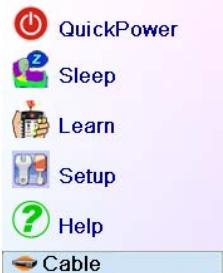
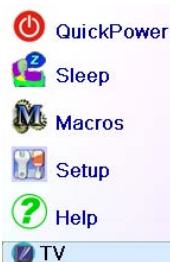
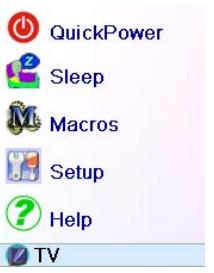
QuickPower
QuickPower is a way of quickly turning all your devices on or off from one easy to use screen.
Press the HOME Key to go to the Home screen.
Then press the Side Key next to QuickPower.
Only Devices you've previously set up are displayed. The others are grayed out.
Press any key that isn't grayed out to send the "Power" command for that device.

Sleep
Sleep lets you set any device to turn off a preset time from now. You can set the off time in increments of 15 minutes, up to a Maximum of 90 minutes.
Press the HOME key to go to the Home Screen, then press the Side Key next to Sleep.
You can set a sleep timer for any or all of the devices that you've set up, i.e., any that are not grayed out.
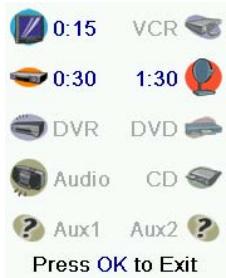
In this example we only have a TV, Cable Box and Satellite Receiver set up.
Below, we pressed Side Key K1 next to the TV icon once, to set a sleep timer of 15 minutes.
We pressed Side Key K2 next to the Cable Box icon twice, to set a sleep timer of 30 minutes.
And we press Side Key K7 next to the Sat icon five times to set a sleep timer of 1 hour and 30 minutes.
Sleep, cont.
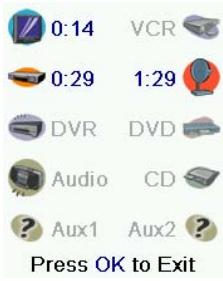
Pressing OK takes you back to the Home screen with your sleep timers saved. The next time you select the Sleep screen you'll see that the sleep timers have started to count down.
Make sure you leave the remote pointing at the device(s) you've set Sleep Timers for so it can send the Power command to the device(s) at the time(s) you've set.
(for example) to set up a second TV. Selecting Label, on screen (2) lets you rename the device, e.g. you could call it Den TV, and have another called Liv Rm TV.
(2)
Test your remote with your DVR.

Label Change Code Code:0905
Macros
The Macros allow storing sequences of commands. You can program and store up to 27 sequences of successive keystrokes for several keys of your choice. By pressing one the respective Macro key already programmed, this sequence of successive keystrokes (IR commands) is sent. Any sequence of successive keystrokes performed frequently may be reduced to only 2 commands (MACRO side key from the Home Menu and then the choosen macro).
For example, by pressing MACRO and then the choosen Macro, you can turn on your TV set, display your favourite channel, turn on your DVD recorder and start a recording, etc.
You can store a sequence of 99 commands for each Macro.
If no macro were programmed, the remote control will invite you to set up one (See page 16)
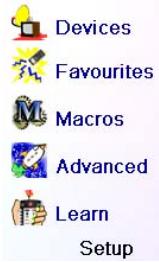
Setting up more Devices
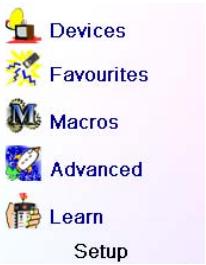
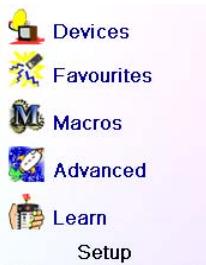
When you first inserted the batteries in the remote you likely went through the Wizard and set up a few devices. Here's how to set up more devices. Press the HOME key to display the Home screen. Then press the Side Key next to Setup. Then press the Side Key next to Devices.
Then pick a device you want to set up. Note, it doesn't have to be a device that is grayed out. You can also select any device that's already set up (not grayed out) and change its settings. From this point, setting up a device is the same as you learned in the Wizard. See pages 7 and 8. Note, you can select Aux 1 or Aux 2 from the Devices screen and then select any type of device to set up under either Aux key.
Or you could select any device, and then press Change Type repeatedly, on screen (1) above, to scroll through the devices and change to TV
You have no macros. Let's setup a macrol!
You can use macros to make it easy to watch a movie or turn off all your devices with a single keypress. Press OK to setup a macro now.
DVR

Do you know what brand you have? Yes No Change Type Quit
Note: "Triple tap" name entry works in a similar fashion to text entry on a cell phone. Tap each numeric key to cycle through ALL caps, numbers, and lower case letters. So at screen (3) you could press the 6 key to enter M, then the 9 key 8 times for a lower case y, then the zero key twice for a space, then the 8 key for T, then the 8 key three times for a V, to enter My TV. See pages 9, and 17 for more details on entering text to change labels.
(3)
Edit the label for your DVR
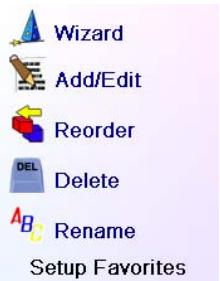
Setting up more Favourites
Setting up more Favourites
When you first inserted the batteries in the remote you likely went through the Wizard and set up a few favourites. You could only set up 10 favourites at that time. Here's how to set up more favourites. Press the HOME key to display the Home screen. Then press the Side Key next to Setup.
Then press the Side Key next to Favourites.
Then press the Side Key next to Wizard.
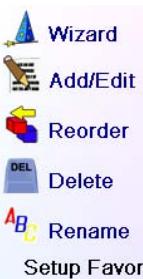
Then pick the group that you want to set up favourites in, (or add more favourites to). If you pick an existing group that you previously set up favourites in, say 1 , any new favourites will be added to the ones you already set up. If you already set up 10 favourites a new page will be added (you can have 10 pages of favourites).
Groups that have not yet had any favourites added to them are grayed out, but can still be selected. From this point adding favourites is the same as you learned in the Wizard, so follow the directions on the screen (see also pages 8-10).

Setting up more Favourites, cont.
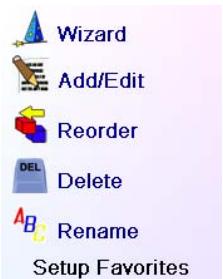
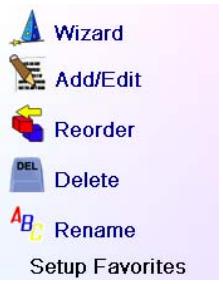
Adding/Editing Favourites
This lets you add favourites to an existing group, edit favourites in an existing group, or add favourites to a new group.
Press the HOME key, select Setup, and then select Favourites. Then at the screen to the right select Add/Edit.
Select any group to add favourites to, or to edit existing favourites in.
Pressing the Side Key next to an existing group (in this case ) shows the favourites that you previously set up in that group.

You can press a Side Key next to an existing logo (to edit/change it), or press a Side Key next to a blank location to add a new favourite, or press More to add or edit icons on a new page. For example, you might only want to have four favourites on this page and put some other favourites on their own separate page. Or you can fill up this page and add more to the next page (up to 10 pages of favourites). From this point on adding favourites is the same as you learned in the Wizard, so follow the directions on the screen (see also pages 10-12).

Reordering Favourites
This lets you move the favourites that you previously set up in a group, to different locations on the screen, i.e., reorder them.
Press the HOME key, select Setup, and then select Favourites. Then at the screen to the right select Reorder.

Pick the group in which you want to reorder the favourites. Groups that don't have any favourites in them yet are grayed out, and can't be selected.
When your favourites are displayed, select the one you want to move, e.g., ABC. It is then marked with a green box.
Press the Side Key next to the location you want to move the favourite to. The favourite moves to the new location. Try moving favourites around to see how this works. Note, if you move a favourite to a location that already has a favourite there, the two favourites swap locations.
Deleting Favourites
This lets you delete favourites that you previously set up in a group.
Press the HOME key, select Setup, and then select Favourites. Then at the screen to the right select Delete.
Pick the group in which you want to delete the favourites. Groups that don't have any favourites in them yet are grayed out, and can't be selected.
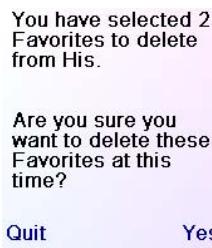
When your favourites are displayed, select the one(s) you want to delete, e.g., FOX and ABC. The favourites are marked for deletion with a red X.
You can press the Back key if you change your mind, otherwise pressing OK deletes the selected favourites. (There is a warning displayed first allowing you to change your mind).


Setting up more Favourites, cont.
Renaming Favourite Groups
This lets you Rename the groups that you save your favourites in. For example you might want to rename _1 to Dave, or _2 to Isabel.
Press the HOME key, select Setup, and then select Favourites. Then at the screen to the right select Rename.
Note, none of the groups are grayed out so you can even rename groups that don't yet have any favourites set up in them. Pick the group that you want to Rename, e.g. .
You enter the new name for the favourites group using the numeric keys on the remote, in a similar fashion to typing in text on a cell phone. E.G. in this example we pressed the 3 key on the remote to enter the letter "D." Then we pressed the 2 key repeatedly until the letter "a" was displayed. Then we waited a second and repeatedly pressed 8 to select "v." Then we waited a second and repeatedly pressed the number 3 key until "e" was selected.
When you've entered the new name, press OK to save the new name for the favourites group.
Setting up more Macro
The Macros allow storing sequences of commands. You can program and store up to 27 sequences of successive keystrokes (max 99) for several keys of your choice.
Press the HOME key to go to the Home Screen, then press the Side Key next to Setup then select Macro.
The next screen displays all the names per default of the Macros you can setup.
NOTE: The existing Macros already Programmed are in green colour.
Press the screen key next to the name of the Macro you want to setup. (M1, M2....)
NOTE: It will be possible to rename later on the name of the macro (name limited to 6 characters to avoid conflict with screen display).


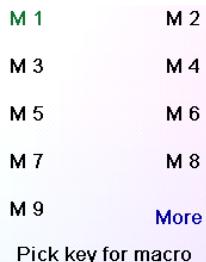
Tip: Set up your macro on a sheet of paper by writing down the series of keystrokes that is composed of.
If you press the button Mode or Favourite or Home, you'll exit from Setup Macro screen.
Select the device that will receive the command by pressing successively on the side key next to Pick Device. In the screen at the right we have selected TV
To define the first command assigned to the device selected press the key of your choice, if you want to choose a side key, press first on the side key next to Pick key and then on the side key of your choice. (the keys Mode, Favourite and Home can not be entered in a Macro).
Press each of the keys in the order you want for your macro.
You can change the Device you will send the command to by pressing the key next to Pick Device.
You can add a delay between each command, just press the side key next to Set delay (1 to 9s delay).
When you have finished all the actions associated to the Macro you can store it by pressing the side key next to Save.
To clear a Macro press the screen key next to Delete, than you have to confirm in pressing the Side key next to Yes or pressing the side key next to Quit you return to the previous state.
To leave push the screen key next to Done.
Note: IT is possible to define up to 27 Macros of 99 series of keystrokes that is composed.
To rename your Macro press the side key next to Rename (no more than 6 characters to avoid display problems).
Note: "Triple tap" name entry works in a similar fashion to text entry on a cell phone. Tap each numeric key to cycle through ALL caps, numbers, and lower case letters. So at screen to the right you could press the 6 key to enter M, then the 9 key 8 times for a lower case y, then the zero key twice for a space, then the 8 key for T, then the 8 key three times for a V, to enter My TV. See pages 11, 12, and 23 for more details on entering text to change labels.
Press the key(s) to send, or use Pick Key. Use Pick Device to send keys in a different mode. Then press Save
Pick Device
Pick Key
Quit
TV

Move

PIP Ch.

Pick Key

Pick Device
Pick Key Set Delay
Quit
TV

Delay 1 S
Pick Device
Pick Key Set Delay
Quit
TV
Macro M 1
TVC

IV图
Delete
Rename
Done
dd Key
Create
Macro M 1
Done
Save
Press OK to Save
Advanced Settings
Press the HOME key, then select Setup, then select Advanced.
The screen to the right lets you change the backlight delay; enter codes for devices directly from the printed code list that came with the remote; set up punchthrough for various devices; limit the channels that young children can access and clear (erase) various things you've set up in the remote.
Display Options
Select Options, then press a Side Key to the left or the right of the option to adjust the setting. Then press OK. Backlight adjusts how long it takes before the screen goes black (approx 2-35 seconds) if you don't press any keys.
Key Transmit Time changes the delay between digits when sending favourites, e.g. 1-6-2. This can be used in situations where the channels are not accepted by the set-top box.
Press the side key next to Default to reconfigure these 2 functions to their original setting.
Press the side key next to Language to choose a different language, then at the screen to the right select the language you want.
Device Codes
Select Device Codes. Then Select a device. Devices that have not yet been set up are grayed out. You can select them here and set them up by entering the device code from the printed code list. Or you can change the code for a device that had already been set up by simply entering the new code.
This screen also lets you view the codes for any device that's been set up. In the above example you can see the codes that are set for TV, Cable, and SAT. We've selected CD and can then enter its 4 digit code from the code list, using the number keys on the remote. The above also shows that we've learned codes under the AUX1 key in DVD mode.
You can also change the device type by pressing the key on screen (1) next to the device that you are editing the code for. Pressing this key repeatedly cycles through all available device types.
Programming Combo Device Codes
Some Combo devices (e.g. TV/VCR, TV/DVD, DVD/VCR, etc.) will require you to set up two different Mode keys to control both parts of the Combo device. For example, if you have a TV/DVD Combo, you might need to set up one code under the TV key to control the TV part AND a separate code (under any other Mode key) to control the DVD part. Other Combo

Options

Device Codes

Punchthrough

KidSafe

Clear Settings
Advanced

Options

cklight Delay

English

Deutsch

Espanol

Italiano Netherlands


VCR 3


0259


0259


DVD


Aux2 ?

ss OK to Exit
devices have one code that will control both parts of the device. See separate code list.
To set up a combo device, press the HOME key, then select Setup, then select Advanced then Device Codes, as described on previous page.
Punchthrough
This lets you set up how various keys on the remote operate in various modes. For example you might want the Volume Up/Down and Mute keys to ALWAYS operate your TV, no matter what mode the remote is in. Or you might want the Play, Stop, Pause REW, FF, and Record keys to ALWAYS operate your VCR no matter what mode the remote is in.
Press the HOME key, then select Setup, then select Advanced, then Punchthrough.
Then select the device you want to set up Punchthrough for. E.G., TV.

TV

Cable Sat

Cable


DVR


Audio


Aux1

Pick Device
At this screen you set how you want the Volume Up/Down and Mute keys to operate when the remote is in TV mode.
Then you select how you want the Channel Up/Down keys to operate when the remote is in TV mode.
Then you select how you want the Play, Stop, Pause REW, FF, and Record keys to operate when the remote is in TV mode.

T

For example, here we've set the Volume and Mute keys to operate the TV in TV mode (i.e. Punchthrough Not Set); Prog Up/Down to operate the Cable Box; and Play, Stop, Pause, etc., to operate the DVD Player - even though the remote is in TV mode.

me


nel


Device Punchthrough
Here we've set the Volume and Mute to operate the TV; and Prog Up/Down to operate the Cable Box; - even though the remote is in DVD mode. Play, Stop, Pause, etc., will operate the DVD (i.e. Punchthrough Not Set for Play, etc.)
You need to set up Punchthrough for each device you've set up in the remote. I.E., you need to set up how you want the "Volume Up/Down and Mute" "Prog Up/Down" and "Play, Stop, Pause REW, FF, and Record" keys to operate for each device that you have set up, i.e., for whatever mode the remote is set to.

TV

me


nel


m = 311


m = 311 ;

Device Punchthrough
Note also that if you want some other keys to operate in a different mode from what they normally operate in, you can "learn" the key(s). E.G. if you want your AV key to still switch the TV's input when you're in cable mode, you can learn your TV's AV key under cable mode.

DVD

me


nel


Device Punchthrough
Advanced Settings, cont.
KidSafe
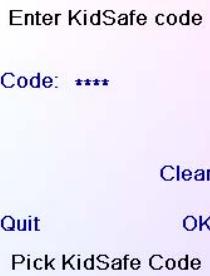
Press the HOME key, then select Setup, then select Advanced, then KidSafe.
The first time you access the KidSafe menu you are asked if you want to set up a KidSafe Code. If you select Yes, you see this screen. You enter a 4 digit code that you will easily remember, but that your Kid(s) won't guess.
After you enter a 4 digit code and press OK you see a screen that lets you pick a new KidSafe code, i.e., change it. And/or set the group of favourites that your Kids have access to (the default group is Kids but will be grayed out if you haven't set that group up yet).
You can press the Side Key next to Pick Favourites and choose a different favourites group that you want your Kids to have access to, e.g., any other favourites group you've set up.
After you've done this you now have the option to Turn KidSafe On. If you turn KidSafe On everything in the remote except access to the KidSafe group (and Volume/Mute keys) is locked out. No settings can be changed, and Prog Up/Down, and number keys don't work.
If you try to access any other favourite group, change a setting, or access any forbidden menu, you are asked to enter the KidSafe code. You cannot continue unless you enter the correct KidSafe code. See the Troubleshooting section if you forget your KidSafe code - but don't let your kids read this owner's manual!
Clearing Settings in the Remote
This lets you clear (erase) various things you've set up in the remote.
Press the HOME key, select Setup. Then at the screen to the right select Clear Settings.
Pressing the Side Key next to Devices lets you clear the settings, i.e. codes, for various Devices (TV, VCR, etc.). After selecting Devices, you select the device you want to clear. Only devices that you have set up are shown. All other devices that have not been set up are grayed out.
Pressing the Side Key next to Favourites lets you select a group, e.g. _1 , _2 , etc., and then clear ALL the favourites you had set up in that group of favourites. Only groups that you have set up favourites in are shown. All other groups are grayed out.


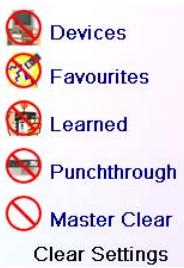
Pressing the Side Key next to Learned lets you select a device (TV, VCR, etc.) that you had previously learned commands under and clear everything that was learned. Only devices that you have learned commands under are shown. All other devices are grayed out.
Pressing the Side Key next to Punchthrough lets you clear any Punchthrough commands you had set up for a device. Only devices that you have set up Punchthrough for are shown. All other devices are grayed out.
Pressing the Side Key next to Master Clear lets you clear EVERYTHING in the remote. Be careful when selecting this. Note however that ALL the sections above display a warning screen allowing you to change your mind before actually clearing anything.
Learning
Tips On Learning
a. Some functions from some types of remotes might not be able to be learned.
b. No functions may be learned under the HOME, MODE, FAVOURITE, or (hard) keys.
c. Use fresh batteries for both the H510 remote and your Original Remote.
d. Keep at least 1 meter away from incandescent or low-energy lights when learning.
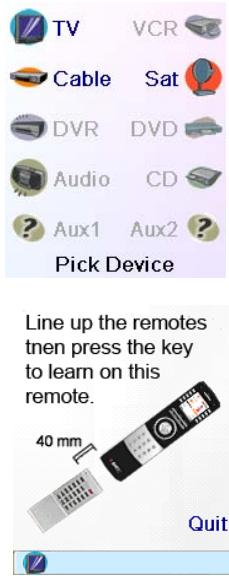
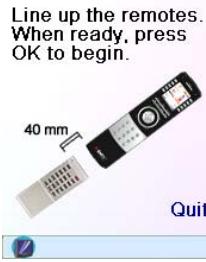
e. Place the original remote end-to-end with the H510 remote so the IR transmitter (at the top) on your original remote points at the IR learning device on the bottom of the H510 remote.
f. Keep the distance between the two remotes to approximately 3cm
g. Line up the remotes and then press the key you want to learn. To get the correct range, press the key on the remote you are learning and you will see a "red halo" around the transmit icon at the bottom left of the screen starts to flicker. The best range for learning is when it flickers most rapidly. Move the position of the 2 remotes to achieve this. Do not change this "best distance" between the two remotes until you have learned all the required keys.
h. When Learning, you should normally not release the key being learned until the display prompts you to do so. However, some keys might be learned multiple times if you do this. If this happens just "tap" the key you want to learn, rather than press and hold it. For example, keys that you normally hold down for a while (like volume up or down) will likely require a long press when learning. Keys that you normally give a quick press (like the numbers, and channel up/down) will likely require a quick press when learning. If after learning say the channel up key, you find that it changes multiple channels when pressed once, try relearning it with a short keypress.
i. If learning the first or second keys results in continuous errors then try the following:
- Check the IR transmitters/sensors are correctly aligned between the two remotes.
- Adjust the distance between the two remotes to be closer (e.g. 0.5cm ) or a further away (e.g. 5cm ) from each other.
- Try learning the original remote keys again.
- If problems reoccur with the same key, check the original remote key being learned - does it transmit? Does it operate the target device?
- Clear all learned settings and try learning again.
Learning, cont.
You can learn commands from an existing remote and store them under the "Main" keys on the H510 remote, or learn commands from an existing remote and store them under any of the 10 Side Keys.
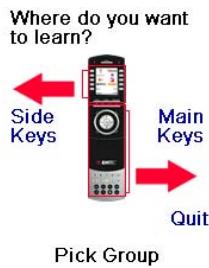
At the Home screen press the Side Key next to Setup and then on the side key next to Learn.
At this screen you press any of the 5 Side Keys K1-K5 on the left to learn commands under a Side Key, or press any of the top 4 Side Keys K6-K9 on the right to learn commands under the main keys on the remote.
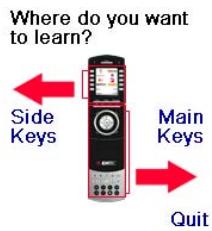
Pick Group
If you press a right Side Key (to select Main Keys) you are going to learn, say, the Prog Up key from an existing remote and store it under the Prog Up key on the H510 remote. Or learn the Power key from an existing remote and store it under the Power key on the H510 remote, etc.
If you press a left Side Key (to select Side Keys) you are going to learn, say, the "DVD Zoom" function from an existing remote and store it under a Side Key on the H510 remote. You will then be able to name the key "DVD Zoom" and access this "DVD Zoom" function from the Mode screen when the remote is in the mode that you selected when you learned this "DVD Zoom" command.
Learning Main Keys
At the Home screen press the Side Key next to Setup and then on the Side key next to Learn.
Then press one of the top 4 Side Keys K6-K9 to the right of the screen.
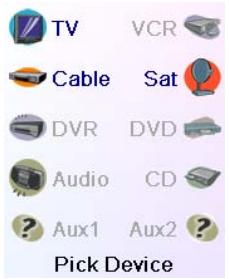
Select the Device you want to learn keys for. In this example we only have a TV, Cable Box and Satellite Receiver set up, so the rest are grayed out, but you can still select any of the devices to learn commands for. You are then instructed to line up the remotes, and press the key on the H510 remote that you want to learn.
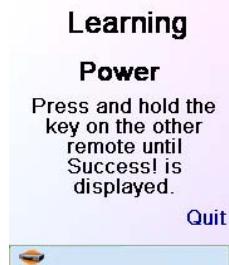
You then point the remote you want to learn commands from at the bottom of the H510 remote, and press the key on the H510 remote that you want to learn a command under, e.g., the Power key.
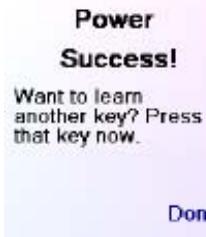
You then press and hold (in this example) the Power key on the other remote, until the display shows that the command has been successfully learned. Note for some types of key you might need to hold the key pressed, but for other types a quick press is sufficient. Experiment a bit. If keys you learn are sent multiple times try learning them with just a quick press. (See Tips on Learning on page 21).
If the screen says Failure, you can press the key and try again.
You can continue learning more individual keys by following the instructions on the screen, and then press Done when you're finished.
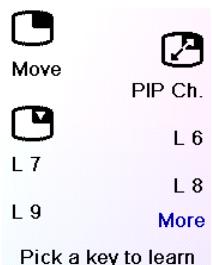
Learning Side Keys
At the Home screen press the Side Key next t to Setup and then on the Side key next to Learn.
Learning Keys
Pick Group
Select the device you want to learn keys for. In this example we only have a TV, Cable Box and Satellite Receiver set up, so the rest are grayed out, but you can still select any of the devices to learn commands for. In this case we selected TV.
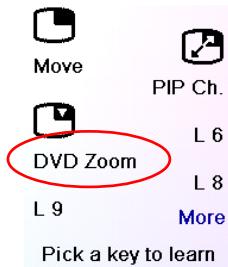
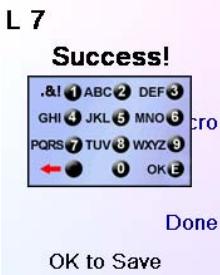
Some typical "extra" keys are already set up, (depending on the Mode you selected), the rest of them are called L6, L7, L8, etc., 27 keys in total. (You can rename them later). Press the Side Key that you want to learn a command under. (Note can choose one that already has a name, so as to "learn over it" and then later rename it). Let's select L7.
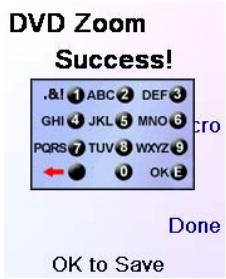
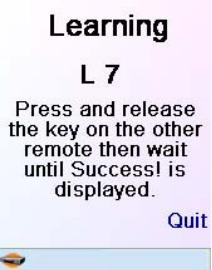
Next point the remote you want to learn commands from at the bottom of the H510 remote, and press OK when you're ready. (See Tips on Learning on page 21).
Next press the key (on the other remote) for the function you want to learn. Hold the key pressed until the screen says that the command was successfully learned. Note for some types of key you might need to hold the key pressed, but for other types a quick press is sufficient. Experiment a bit. If keys you learn are sent multiple times try learning them with just a quick press.
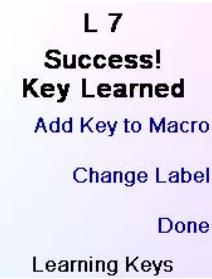
You can change the label for the key (in this case L7). If you select Change Label, by pressing Side Key K9, you can change the name to anything you want. For example you'll likely want to rename it with the name of the function that you learned.
After you select Change Label you see the screen to the right. You enter the new name for the key using the numeric keys on the remote, in a similar fashion to typing in text on a cell phone. See next page.
E.G. in this example we pressed the 3 key on the remote to enter the letter D. Then we pressed the 8 key repeatedly until the letter V was displayed. Then we waited a second and pressed 3 to select D. Then we pressed the 0 (zero) key twice until we selected a space. We continued this process until we had "DVD Zoom" displayed.
Then we pressed OK to save the new label for the key we had learned.
The next time you set the remote to the mode that you learned this key under you'll see a screen where you can select this, and any other functions you've learned under that mode.
Pressing the MODE key and then selecting a device type shows the "extra" keys and learned keys for that mode. Note, you can learn keys from any kind of remote under any mode. You could for example learn the power keys for your TV, and your audio system and extra keys for your DVD player under the DVD mode. Then when you press the MODE key and select DVD, you'll be able to turn on your TV, turn on your audio system, and control your DVD player, all from the Side Keys on this one screen.
Note: “Triple tap” name entry works in a similar fashion to text entry on a cell phone. Tap each numeric key to cycle through ALL caps, numbers, and lower case letters. E.G., repeatedly pressing the number 2 key cycles through A, B, C, 2, a, b, c. Pressing the 9 key cycles through W, X, Y, Z, 9, w, x, y, z. A “space” can be selected with the 0 (zero) key. The number 1 key selects 1. @?! - & : and back to 1. And you can backspace an entry with the key to the left of the 0 (zero) key. Press OK (or the Enter “E” key) to confirm your new name.
Troubleshooting
The Favourites you set up don't operate your device.
- Make sure you selected the correct device (TV, Cable, Sat, etc., when you set up each favourite. See Add/Edit Favourites page 14 to change the device type for your favourite(s).
- Change the key Transmit Time, see Display Options on page 18.
The Remote's hard keys do not operate your product.
- Make sure the remote is set to the correct Mode by pressing the MODE key follow by the appropriate Side Key for the device mode you desire.
- Program the remote with a new code.
- The remote may not contain the code for your device. Try learning the codes you need from your old remote.
Install new batteries.
The remote does not operate some features of your product.
- Program the remote with a new code.
- The remote may not be able to operate all features of your product or key names might be
different than your product. Try learning codes from your old remote.
Having problems with learning?
See Learning Tips on page 21.
- If some learned keys transmit multiple times, e.g. if a learned Channel Up key changes more than one channel when you press it, or Up/Down/Left/Right navigation keys move more than one step when you press the learned key; try just giving the key to be learned a quick press (when you learn it) rather than holding the key pressed until the screen displays Success.
Your TV turns on when you press a Favourite key.
- Some types of TV, e.g. Philips flat panel TVs turn on and go to the selected channel when you press a channel number while the TV is off. So for this type of TV pressing a favourite key will do the same thing (but it might not work for 3 digit channels, e.g. 550).
Forgot your KidSafe code?
- Just remove and reinsert the batteries to reset KidSafe (but don't let your Kids see this Owner's Manual).
Equipment Warranty 2 years
EMTEC will repair or replace, as it decides, a defective EMTEC product if it is returned within the warranty period, along with proof of purchase, to the dealer who sold the product to the user.
The manufacture warranty cannot be called to perform in the event of damages caused by incorrect or unsuitable utilization of this kit.
Battery Disposal
Do not mix different types of batteries or new and old batteries.
Do not use rechargeable batteries.
In order to avoid any risk of explosion, observe polarities indicated inside the battery compartment.
Replace only with the type of batteries specified.
Do not throw batteries into a fire, do not recharge them.
If you are not using the remote control for a long period of time, remove the batteries.
Please respect the environment and prevailing regulations. Before you dispose of batteries, ask your dealer whether they are subject to special recycling and if they will accept them for disposal.
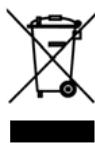
This symbol means that your electronic appliance must be collected separately and not mixed with the household waste. If you are the owner of the appliance, you must deposit it at the appropriate local collection point or leave it with the vendor when buying a new appliance. If you are a professional user, please follow your supplier's instructions. If the appliance is rented to you or left in your care, please contact your service provider

H510-8/07
FRANCAIS
Table des matieres
Introduction 27
You've aublié your Code Parental?
1 + u8 = 1.5
Thomson
Zuruck
Weiter
Indstilling of apparatus, forts.
m = 311

B DVD

m = 311


m = 311

N Aux2?
OK para salir
m = 311