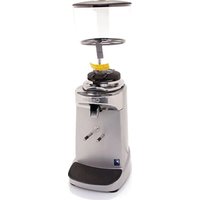
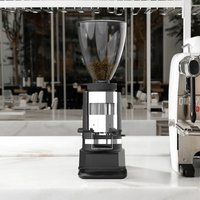
E92 - Coffee grinder Ceado - Free user manual and instructions
Find the device manual for free E92 Ceado in PDF.


| Product type | Professional coffee grinder |
| Brand | Ceado |
| Model | E92 |
| Dimensions (W × D × H) | 200 × 300 × 500 mm |
| Weight | 15 kg |
| Electrical supply | 230 V / 50 Hz |
| Power | 350 W |
| Burr type | Flat steel burrs |
| Burr diameter | 83 mm |
| Doser capacity | 360 g |
| Grind adjustment | Stepped micro-adjustment |
| Main functions | Programmable double dose, automatic stop, grind on demand |
| Maintenance and cleaning | Regular cleaning of burrs and doser with a brush |
| Safety | Emergency stop button, thermal protection, housing lock |
| Spare parts and repairability | Burrs, doser, switches available; repair possible by a technician |
| General information | Intensive use recommended for cafes and restaurants |
Frequently Asked Questions - E92 Ceado
User questions about E92 Ceado
0 question about this device. Answer the ones you know or ask your own.
Ask a new question about this device
Download the instructions for your Coffee grinder in PDF format for free! Find your manual E92 - Ceado and take your electronic device back in hand. On this page are published all the documents necessary for the use of your device. E92 by Ceado.
USER MANUAL E92 Ceado
E92

MACINACAFFÈE37SeE92
It is essential to read these instructions carefully before using the appliance and to follow the safety recommendations.
ItispossibletoobtaintheCEdeclarationofconformitybycontactingthemanufactureratthe addressshownontheproductdataplate.

Donotusetheapplianceifyouhavenotreadandunderstoodtheseinstructions!
GB
Page20
MOULINÀCAFÉE37SetE92
![graph TD A["LED"] --> B["SET"] C["12"] --> B D["13"] --> B E["12"] --> B F["14"] --> B G["15"] --> H["SET"] I["11"] --> H J["Teak/Box"] --> H](/content/2026/07/1408530/images/fdd1312b83f5d55f6531cdba282f3b0e418637c3331f863612c55215e49231a0.jpg)
Fig.3
NORMEDISICUREZZA AVVERTENZEGENERALI
Fig.5
AVVERTENZEESUGGERIMENTI

GRIGLIADISICUREZZAE92
Fig.8
MANUTENZIONE

SpecialfeaturesofmodelE37S
18 SCCSystem(seealsoFig.5)
SpecialfeaturesofmodelE92
19 Safetygrid
20 Magneticsensor
21 Safetyarm


![graph TD A["LED"] --> B["SET"] B --> C["12"] B --> D["13"] B --> E["12"] B --> F["14"] B --> G["15"] B --> H["11"]](/content/2026/07/1408530/images/fd5e41ff9a18301955a640aa4199f009655c77ae1da97f1acf56913c285101da.jpg)
Fig.3
SAFETYRECOMMENDATIONS GENERALINSTRUCTIONS
-
Read the following instructions carefully before using the appliance.
-
Installation and maintenances should be carried out by qualified personnel only.
-
This appliance is intended for professional use, and should therefore be used by adults and qualified personnel only.
CLOSEADULTSUPERVISIONISNECESSARYWHENCHILDRENARENEARTHE APPLIANCE.
-
This appliance is not intended for use by persons (including children) with reduced physical, sensory or mental abilities, or without experience and knowledge, unless they have been instructed in the use of the appliance and are under the supervision of a person who is responsible for their safety. Children must be supervised to ensure that they don't play with the appliance.
-
Never use this appliance for purposes other than grinding coffee beans. Any other use is dangerous. Donotoperatewithouthopperandlidinplace.
-
Alwaysworkundersafeconditions: donotusetheappliance with wethandsorfeet. Donot useoutdoors.
-
Keep the original package for possible future use. It is most suitable protection against damaged during transport.
8.IncaseoffireuseCO 2 extinguishers.Donotusewaterorpowderextinguishers.
-
Never placethe appliance in water!
-
Donotdisassembletheapplianceorattempttoperformanyrepairsinsideit.
-
Always unplug the appliance before performing an annual maintenance or cleaning and when it is not in use.
-
Never pull the appliance by the cord to move it. Never unplug it by pulling the cord or touching it withwethands.

If the powercable is damaged it must bere placed by the manufacturer or by the technical assistance service, or at any rate by person with similar qualifications, so astopreventall risks.
-
WARNING: Never place any utensils, metal or other hard materials, in the bean hopper. This is dangerous and could cause damage.
-
Do not use the appliance if it is damaged or has loose parts. Immediately contact an authorized ServiceCenter.
The appliance complies with European regulation CE1935/2004 and subsequent updates.
Note: Duetostatisticaltestsontheproductinthefactory, somecoffeegroundsmaybefoundintheappliance.
SAVETHESEINSTRUCTIONS!
CE
The EC declaration of conformity for this appliance is available in the Products section of our website www.ceado.com.
INSTALLATION
ComplywiththeSafetyrecommendationsindicatedaboveandhereafterwheninstallingthe appliance.
Fortheinstallationoftheappliance,qualifiedpersonnelmustbepresentwhoareabletocheckthe finenessofthegrind.
-
Makesurethatthemainsvoltageisasindicatedontheratinglabeloftheapplianceandthat theelectricalsystemisgroundedandequippedwithaswitch.
-
Install the appliance in a DRY, PROTECTED place, far from water sprays or splashes, heat sources, openflames and inflammables substances.
Placetheapplianceonaflat, horizontal, stablesurfacewhereitcannottipover.
- Putthetrayinitshousingtokeeptheworkareaascleanaspossible.

Before connecting the plug to the power socket, make sure that the ON-OFF switch (16Fig.2) is in position "O" (OFF).
-
Plug the power cable into asocket protected by asuitably rated circuit breaker (MCB) or fuses. Donot use an adaptor plug.
-
Stretch the power cable out to full length. Do not let it pass over sharp edges or hot surfaces. Do not let oil spill on it. Do not let the power cable hang loose from the counter on which the appliancestands.
-
Make sure that the bean hopper is correctly positioned and that its shutter (5 Fig. 2) is completely open (tothelastclick).
PREPARATIONANDUSE
SwitchingON
1 Fillthehopperwithcoffeebeansandclosethelid.
2 TurntheON-OFFswitch(16Fig.2)toposition“I”. Whentheapplianceisswitchedonthedisplaywillshow:
Coffee Grinder CEADO
Automaticoperation
3 Togrindtheamountofcoffeeforasingleshotpressthebutton.TherespectiveLED
willlightupandthedisplaywillshow:
Single shot 2.0 READY
meaning that the appliance is ready to grind for 2 seconds. With this factory setting, the grinder will distribute about 8 gram of medium-graing ground coffee.
Note: The quantity of ground coffee which is distributed with this setting may noticeably change, according to the kind of coffee blend and origin, the size of the coffee beans and the type of roast, besides the weather conditions, the grinding settings and themains frequency.
Togrindtheamountofcoffeeforadoubleshotpressthebutton.Inthiscase

respectiveLEDwilllightupandthedisplaywillshow:
Double shot 4.0 READY
meaning that the appliance is ready to grind for 4 seconds. With this factory setting, the grinder will distribute about 16 gram of medium-graing ground coffee.
Note: The quantity of ground coffee which is distributed with this setting may noticeably change, according to the kind of coffee blend and origin, the sizeof the coffee beans and the type of roast, besides the weather conditions, the grinding settings and themains frequency.
Whenever the grinding coarseness is regulated by you must set an new operating times to distribute the right amount of coffe required (see Par. Setting the grinding times, page 27).
Manualoperation
3 Togrindcoffeecontinuously, without any timesetting, pressthebuttons and simultaneously.


BothLEDswilllightupandthedisplaywillshow:
Manual dose READY
Takingoutthecoffee
4 When the appliance is READY, to start grinding press the start button (7 Fig. 1) with the filter holder and keep the filter holder in position until distribution is ended. During operation the respective LED flashes and the message WORKING appears on the display.
Note: Only in automatic operation, the display will also show the time remaining to complete distribution.
AttheendofdistributiontheappliancereturnstoitsinitialREADYstatus,waitingtogrindanewshot thesameasthelastoneset.
Note: When the motor is running without grinding coffee beans, it may happen that a metallic noise isheardcomingfromthespout.Itisnormalanditisduetothevibrationoftheinsideflap, anditwillstopwhenstartinggrindingcoffeebeans.
DISTRIBUTEDSHOTCOUNTERS
The coffee grinder has a general counter in which it stores the number of shots distributed since it left the factory (this value cannot be reset) and a partial counter for the number of shots distributed since it was last reset by the user. Foreachtypeofcounter, adistinctionism made between the number of single and double shots.
Note: Due to statistical tests on the product in the factory, some of the counters may be different from zero.
- Readingthecounters
Pressthebutton. The display will show first the partial counter of the total shots (single shots + double shots + manual doses):
Total shots from reset XXX
By pressing the button 📋 or 📋 you can also distinguish between the single or double shots distributedsincethelastreset:
Sing. shots from reset XXX
or
Doub. shots from reset XXX
Note: The value of the total shots may be different from the sum of the value of the single shots plusdoublethevalueofthedoubleshots, becauseitalsoallowsfortheshotsdistributedwith manualoperation.
To reset a counter, hold down the button SET for 3 seconds until you hear a double beep.
Toreadthemaincounter, pressthebuttonagain. The displaywillshow:
Total shots ground XXX
Inthiscasetoo, bypassingthebuttonorcanalsodistinguishbetweenthesingleordouble shotsdistributedsincethelastreset:
Single shots ground XXX
or
Double shots ground XXX
Note: After 5 seconds without being used the system automatically leaves the counterscreen and returnstonormaloperation.
SETTINGS
Inordertoachieveaproperoverallsettingoftheespressocoffeegrinder,alwaysproceedasfollows:
- Set the grinding adjustment (coarse-fine, see Par. Regulating grinding, page 25).
- Adjust the appearance of the ground coffee (using, if necessary, the SCC system-see Par.SCC system, page 26).
- Set the dose weight, adjusting the grinding time (see Par. Setting the grinding times, page 27).
Note: Adjustmentsatpoints1 and2 affect the weight of the shot.
REGULATINGGRINDING
When it leaves the factory the machine has a standard setting, but it may be necessary to adjust grinding further due to various external factors such as the type of mixture used, the humidity, temperature, or the particular distribution requirement of the espresso machine.
The degree of grinding may be further corrected by shifting the special lever (4Fig.1) at the base of the hopper (see Fig.4).

Alwaystakecaretomovetheleverwiththemotorturningandempty(withoutcoffeebetweentheburrs).
Todothisyoucanoperatetheshutter(5Fig.2)atthebaseofthehoppertostoporresumethe droppingofthecoffeebeansintothegrindingmechanism.
• Toobtainafinergrind, movetheleverinacounter-clockwisedirection.
• Toobtainacoarsergrind.movetheleverinaclockwisedirection.
Remember that the grind is related to the coffee extraction time which must be 25-30 seconds for a cup of 25-30 ml. If the extraction time is too long, the grind must be coarser; if it is too short, the grind must be finer.
NOTE!Itisrecommendedtogrindsmallamountsofcoffee,lettingtheburrempty withevery regulatingattempt,byopeningandclosingtheshuttereachtime.

SCCSYSTEM(availableonlyonmodelE37S)
SCC(StaticandClumpingControl)systemisdesignedtoenabletheslightesttweaksofthe appearanceofthegroundcoffee,and,whennecessary,toworkonissueslikestaticandclumping, whichareinconnectionwithhumidity,temperature,compositionofthecoffeeeblendetc.
Note: Some coffee blends or origins are more pronounced than other stethis kind of phenomenon.
SCCsetting
InordertoadjusttheappearanceofthecoffeeusingtheSCCsystem,useasmallslotted screwdriverandact,bysmalldegrees,ontheadjustingscrewinthefront-rightsideofthehead (seeFig.5).
Followthisprocedure:
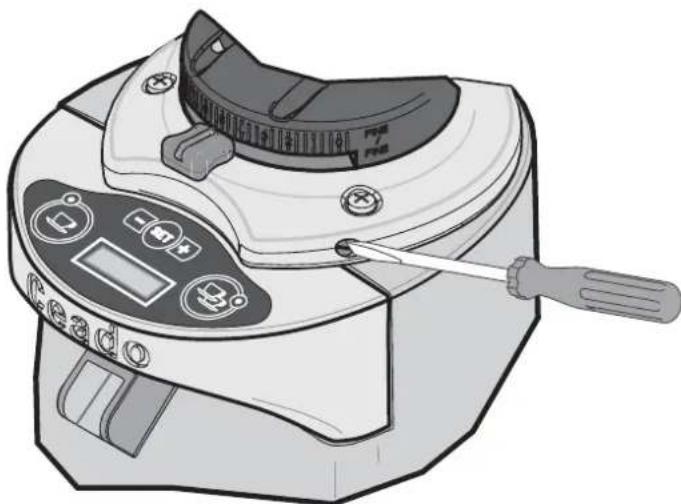
Fig.5
- Closecompletelytheflap(turningcounter-clockwisetheslottedscrewdriver)tocompactthe remaininggroundcoffee.
- Pulladoubleshot.
• Thoroughlycleanthedischargeopeningwithabrush. - AdjusttheSCCsystemthroughtheadjustingscrew, untilreachingthedesiredappearanceof thegroundcoffee; notethat, asitalwayshappenswhenchanginganysetting, theveryfirstshots won'timmediatelyconformtothenewadjustments.
-Adjusttheweightofthedose.
Note: From anhalfway/neutral position of the SCC system: turning the adjustingscrew clockwise you open the flap and reduce clumping; turning the adjustingscrew counter-clockwise you closethe flap and reduce static.
Inordertoachieveabetteradjustment, it'sadvisabletousethedoubleshot.
SETTINGTHEGRINDINGTIMES
Note: Due to the shape and design of the burrs particularly in model E92, for the first use only, a shortrun-inperiodofgrindingcoffeebeansisnecessarytoobtainaconsistentweightofthe dose.
- Singleshot
Tochangethegrindingtimeforboththesingleandthedoubleshot,youhavetoenterthesettings menubyholdingdownthebuttonfor3secondsuntilyouhearabeepandthedisplaywillshow:
Set time single shot
Tosethetimeforthesingleshotpress. Thedisplaywillshowthecurrentlysettime:
Use button + - t. single 2.0
Pressthebuttonorofchangethistimewithaprecisionof0.1seconds,thenconfirmyour choicewiththebutton.Ifnbuttonispressedfor10seconds,nochangewillbemade.
Note: The minimum settable time is 0.1 second while the maximum, for the single shot, is 99.9 seconds.
●● Doubleshot
Tochangethegrindingtimeforthedoubleshot,youhavetoenterthesettingsmenuand,whenthe displayshows:
Set time single shot
Pressthebuttononce Thedisplaywillshow:
Set time double shot
Atthispoint, bypassing the button you can set the grinding time for the doubleshot, in the same was as explained above for the single shot.
Note: The minimum settable time is still 0.1 second while the maximum, for the double shot, is 99.9 seconds.
Leavingthesettingsmenu
ToleavethesettingsmenuandreturntoREADYstatus,whenyouareononeofthetwoscreens forsettingtheshotime:
Set time single shot
Set time double shot
pressthebuttonuntilousee:
Exit
Pressthebuttonontoconfirm.
OTHERSETTINGS
Holddownthebuttonfor3secondstoenterthesettingsmenu,asdescribedintheprevious paragraph. Thedisplaywillshowthefirstscreen:
Set time single shot
Startingfromthisscreen,youcanperformthefollowingoperations:
- Selectingthemenulanguage
Pressthebuttontwicetodisplaythepage:
Set Language
Pressthetoc confirm. Thedisplaywillshowthescreen:
Use buttons + - Language English
Pressthebuttonortoselectoneofthe5languages:Italian,English,Spanish,German andFrench.Pressthebuttonontoconfirm.
Startbuttonsetting
According to the factory setting, the appliance distributes coffee only as long as the start button (7 Fig.1) is held down.
If this button is released during distribution of a flash, the motor stops, the system goes into a pause status and the display show that the timer remains to complete the shot and the message "WORKING". In addition, to highlight the fact that the distributed shot has not been completed, the LED fortheshot selected flashes. At this point, to complete the dose just press the start button (7 Fig. 1) again with the filter-holder and keep it pressed until the shot is completed.
Instead, if you on longer wisht o completeth dose, press one of the two shot buttons

ortocancelthecurrentshotandreturnthesystemtoREADYposition.
However it is possible to change this function by programming the start button (7 Fig. 1) in pulse mode. With this setting the distribution of coffee will begin with the simple pressing of the start button(7Fig.1)andwillendonlyattheendofthetimesetforthedistributionoftherequiredshot.
To change the operating mode of the start button, press the button five times until this screenisdisplayed:
Set start button
Presstoconfirm.Thedisplaywillshow:
Use buttons + - pulse OFF
PressthebuttonortosetthefunctionONorOFF.
Leavingthesettingsmenu
ToleavethesettingsmenuandreturntoREADYstatus,pressthebuttonsixtimesuntthis screenisdisplayed:
Exit
Pressthebuttontoconfirm.
FILTER-HOLDERSUPPORT
Toinstallthefilter-holdersupport(optional)insertit inthetwosupportpins(see8Fig.1)andtightenthe two socket-head screws on the bottom of the support(1Fig.6)untilitissecured.
Note: Takecarethatthesupportispositioned completelyincontactwiththebody.
Slacken the two socket-head screws on the top (2 Fig. 6), position the filter-holder on the support and adjust the height of the top in such a way as to keep the holder horizontal, then tighten the two screwstomaintainthedesiredposition.

WARNINGSANDSUGGESTIONS

Neveroperatewithouthopperandlidinplace.

Makesurethatshutteriscompletelyopen(tothelastclick)(seeFig.7).
Donotletthecoffeegrinderrunlongwithoutcoffee beansinthehopper;ifthisweretohappenitwould causetrippingofthemotorthermaloverload protection.Inthatcaseitisnecessarytowaituntil theoverloadprotectionisresetbeforestartingto grindcoffeeagain.
Forthisreason,neverleavethepackofcoffee beansittinginthehopperasthispreventsyou seeinghowmanycoffeebeansareleft.
Whenthecoffeegrinderisnottobeusedduringthe timewhenthebusinessisclosed,itshouldalways beswitchedoffwiththemainswitch.

Putonlycoffeebeansinthehopper,not ready-groundcoffeeorother substances.
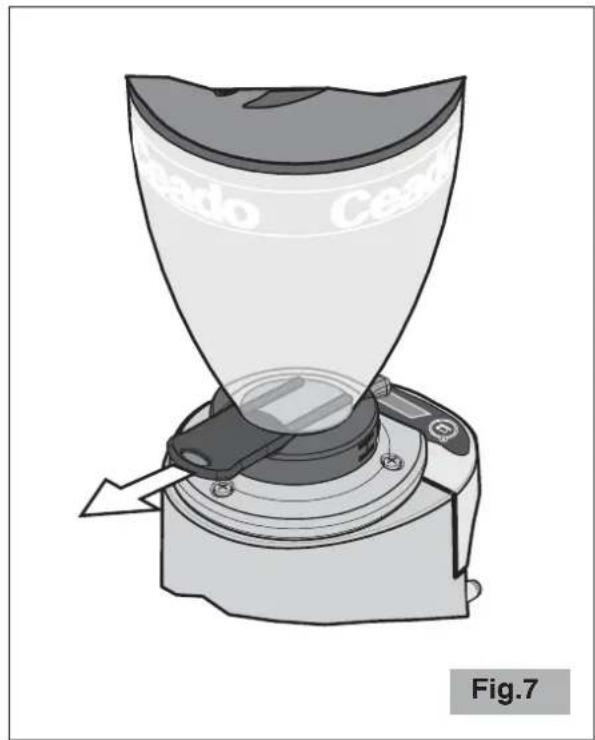
SAFETYGRIDE92
ElectronicspressocoffeegrindermodelE92isequippedwitharemovablesafetygrid(19Fig.1). Beforeoperatingthegrinder, placethesafetygridinsidethebeanhopper, slottingitintotheonly positionsothatthemagneticsensor(20Fig.1)isincontactwiththeendofthesafetyarm(21Fig.1).
Note: Coffeegrinderwillnotstartifsafetygridisnotproperlyinplace.

Anyattempttoby-passthesafetydeviceandusethecoffeegrinderwithoutitssafety gridinplacemaycausepersonalinjuryand/ordamagetotheappliance.
CLEANING
It is important to keep the appliance clean and good working order to ensure optimum quality of the products and long life of the appliance.

Alwaysdisconnecttheplugoftheappliancefromthepowersocketbeforecleaningit.
Cleanthemotorhousingandthetraywithaclothdampenedwithwateroralcoholwithasprayneutralsolution.
Wipewithadrycloth.

Neverputtheapplianceunderrunningwaterandneverimmerseinwater.
Oncethehopperhasbeenremoveditcanbewashedwithlukewarmwaterandneutralsoap, thenrinseitanddrywell.
Useabrushorapaintbrush(Fig.8)tocleanthemosthiddenareasinsidetheunitandadry clothfortheothersurfaces.

Fig.8
MAINTENANCE

Maintenancemustbecarriedoutexclusivelybyqualifiedtechnicalpersonnel.
Careforthemechanicalandelectricalpartsoftheapplianceisindispensableinordertoguarantee theirsafetyandefficiency.Ifanypartsneedreplaced,authenticsparepartsmustalwaysbeused.
Theburrsaresubjecttonormalwearandthemanufacturerrecommendsreplacingthemroughly every600kgformodelE37Sandevery1000kgformodelE92.Thisquantitymaynoticeably changeaccordingtothekindofcoffeeblend/originandthetypeofroast.
Theefficiencyoftheburrisimportantinordertoguaranteethequalityofthegrindasregardssize andthetemperatureofthegroundproduct;theseparametersmayhaveaconsiderableinfluenceon thesuccessofagoodespressocoffee.
TROUBLESHOOTING
(SeeTableonthenextpage)
In caseofanymalfunction, defectoftheapplianceorifyoususpectanybreakageafterafall, unplug theapplianceimmediately.
If you are unable to solve the problem referring to the table below, contact an Authorized Service Centre.
Onlyqualifiedexpertsshouldrepairtheappliance.
We are not liable for any damage caused by repairs not made correctly and/or unauthorized personnel. In these cases the warranty does not apply.
| Problem | Solution |
| Theappliancedoesnotturn on. | Makesureitispluggedin.Makesurethesafetycircuitbreakerisclosed.CheckthatthemainswitchoftheapplianceisON.Iftheproblemoccursitselfafteralongperiodofintensive useoroverfilling,themotorcouldbeinthermalprotection lock!Waitatleast20minutesandtryagain.Thewaiting timecanbereducedbyputtingtheapplianceinacool place. |
| Thecoarsenessofthegrind isnotuniform. | Trygrindingverycoarselyforafewseconds,thenreturn to thecorrectsetting.CalltheTechnicalAssistanceServicetocheckandchange theburrs. |
| Thecoffeeisnotcomingout ofthedischargeopening correctly. | Checkthatthecaffeedischargeopeningisfree. |
| Themotorgetsblocked. | Ifthemotorgetsblockedduetoincorrectregulationof grindingortothepresenceofaforeignbodyintheburrs, tryincreasingtothecoarsestgrainsizebyturningthe regulatingleverclockwise(4Fig.1).Ifthisisnotenough,switchofftheappliance,disconnect theplugfromthesocketandconsulttechnicallyqualified personnel. |
| Thecoffeegrinderdoesn’t start(onlymodelE92). | Checkthecorrectpositionofthesafetygrid. |
DISPOSAL
Correctdisposalofthisproduct(wasteelectricalandelectronicequipment)
(Applicable in the European Union and other countries with separate collections systems in conformity with European Directive 2002/96/EC)
Thisproducthasbeenmadefromhigh-qualitypartsandmaterials,which canbere-usedandrecycled.
Therefore, donotthrowtheproductawaywithnormalhouseholdwaste attheendofitsworkinglife.Takeittoacollectionpointforrecycling electricalandelectronicdevices.Thisisindicatedbythissymbolonthe productandintheoperatingmanual.
Please contact your local government office for information about the exact location of the closer collection point.

WARRANTY
Thisproducthasbeenmanufacturedtoahighqualitystandard.
Thisproductisguaranteedagainstfaultymaterialsandworkmanshipforaperiodofthreeyearsfrom thedateofpurchasewhenitisusedaccordingtotheinstructionsinthisinstructionandmaintenance manual.
Pleaseretainanyreceiptasproofofpurchase.
During the warranty period, this product can either berepaired or replaced, at the manufacturer's discretion, at no additional cost.
If the products needsmaintenance or repairs during the warranty period, contact your retailer for shipping instructions. The product should be shipped in its original package or others suitable packing.
Thewarrantydoesnotapplyincaseofneglect,misuse,abuseorunauthorizedrepairs.This warrantydoesnotapplytopartssubjecttodeteriorationthroughnormalusesuchastheburrs.This warrantydoesnotapplytodamagecausedbyforeignobjects,substancesoraccident.
Thewarrantyislimitedtothecostsofrepairorreplacementoftheproductoritsdefectiveparts,or anamountequivalenttothepricepaidforitspurchase.Noadditionalrequestsofdamageswillbe availabletothepurchaser.
Thisguaranteeisinadditiontoanddoesnotaffectyourstatutoryrights.
Themanufacturerwillnotacceptanyliabilityandthewarrantywillbeinvalidatedifthereisa failuretofollowtheseinstructionsandthetechnicaland/orsafetystandardsinthecountrywhere theapplianceistobeused.
Inanycasetheseinstructionscannotcovereverypossibleeventandtheuserisrecommendedto usetheapplianceresponsibly.
THEMANUFACTURERRESERVESTHERIGHTTOMAKEANYALTERNATIONSTO THEAPPLIANCEWITHOUTNOTICE
MOULINÀCAFÉE37SetE92
Composantsprincipaux(Fig.1, Fig.2, Fig.3)
![graph TD A["LED"] --> B["SET"] B --> C["CO Box"] C --> D["Coffee Cup"] D --> E["CO Box"] E --> F["CO Box"] F --> G["CO Box"] G --> H["CO Box"] H --> I["CO Box"] I --> J["CO Box"] J --> K["CO Box"] K --> L["CO Box"] L --> M["CO Box"] M --> N["CO Box"] N --> O["CO Box"] O --> P["CO Box"] P --> Q["CO B…](/content/2026/07/1408530/images/cbd8b2bb4713eeb8d0dcded825eba62a17d320c2711ed6c8ac7931f9ef05f09f.jpg)
Fig. 3
NORMES DE SÉCURITÉ INSTRUCTIONS GÉNÉRALES
Fig.5
AVERTISSEMENTSETCONSEILS

GRILLEDESÉCURITÉE92
Fig.8
ENTRETIEN

CONDITIONSDEGARANTIE
Abb.5
SICHERHEITSGITTERE92
Abb.8
WARTUNG

GARANTIEBEDINGUNGEN
![graph TD A["LED"] --> B["SET"] B --> C["CO Box"] C --> D["CO Box"] D --> E["CO Box"] E --> F["CO Box"] style A fill:#f9f,stroke:#333 style B fill:#ccf,stroke:#333 style C fill:#cfc,stroke:#333 style D fill:#fcc,stroke:#333 style E fill:#cff,stroke:#333](/content/2026/07/1408530/images/2064687ec8c5beb049a59ef0c2ca273863d2a1df0722748c4fd0190ae42c5b7e.jpg)
Fig.3
Fig.5
Regular pulsador start
Confirmarpulsando.Eldisplayvisualizará:
PARRILLADESEGURIDADE92
ElmolinillodecaféexpresomodeloE92estádotadodeunaparrilladeseguridaddesmontable (19Fig.1)situadaenelinteriordelatolva.
Fig.8
MANTENIMIENTO

CONDICIONESDEGARANTÍA



- MACINACAFFÈE37SEE92
- MOULINÀCAFÉE37SETE92
- NORMEDISICUREZZA AVVERTENZEGENERALI
- AVVERTENZEESUGGERIMENTI
- GRIGLIADISICUREZZAE92
- MANUTENZIONE
- SPECIALFEATURESOFMODELE37S
- SPECIALFEATURESOFMODELE92
- SAFETYRECOMMENDATIONS GENERALINSTRUCTIONS
- CLOSEADULTSUPERVISIONISNECESSARYWHENCHILDRENARENEARTHE APPLIANCE
- SAVETHESEINSTRUCTIONS
- CE
- INSTALLATION
- PREPARATIONANDUSE
- SWITCHINGON
- AUTOMATICOPERATION
- MANUALOPERATION
- TAKINGOUTTHECOFFEE
- DISTRIBUTEDSHOTCOUNTERS
- READINGTHECOUNTERS
- SETTINGS
- REGULATINGGRINDING
- SCCSYSTEM(AVAILABLEONLYONMODELE37S)
- SCCSETTING
- SETTINGTHEGRINDINGTIMES
- SINGLESHOT
- ●● DOUBLESHOT
- LEAVINGTHESETTINGSMENU
- OTHERSETTINGS
- SELECTINGTHEMENULANGUAGE
- STARTBUTTONSETTING
- FILTER-HOLDERSUPPORT
- WARNINGSANDSUGGESTIONS
- SAFETYGRIDE92
- CLEANING
- ALWAYSDISCONNECTTHEPLUGOFTHEAPPLIANCEFROMTHEPOWERSOCKETBEFORECLEANINGIT
- NEVERPUTTHEAPPLIANCEUNDERRUNNINGWATERANDNEVERIMMERSEINWATER
- MAINTENANCE
- MAINTENANCEMUSTBECARRIEDOUTEXCLUSIVELYBYQUALIFIEDTECHNICALPERSONNEL
- TROUBLESHOOTING
- ONLYQUALIFIEDEXPERTSSHOULDREPAIRTHEAPPLIANCE
- DISPOSAL
- CORRECTDISPOSALOFTHISPRODUCT(WASTEELECTRICALANDELECTRONICEQUIPMENT)
- WARRANTY
- THEMANUFACTURERRESERVESTHERIGHTTOMAKEANYALTERNATIONSTO THEAPPLIANCEWITHOUTNOTICE
- COMPOSANTSPRINCIPAUX(FIG.1, FIG.2, FIG.3)
- NORMES DE SÉCURITÉ INSTRUCTIONS GÉNÉRALES
- AVERTISSEMENTSETCONSEILS
- GRILLEDESÉCURITÉE92
- ENTRETIEN
- CONDITIONSDEGARANTIE
- SICHERHEITSGITTERE92
- WARTUNG
- GARANTIEBEDINGUNGEN
- PARRILLADESEGURIDADE92
- MANTENIMIENTO
- CONDICIONESDEGARANTÍA
Brand : Ceado
Model : E92
Category : Coffee grinder