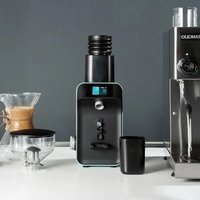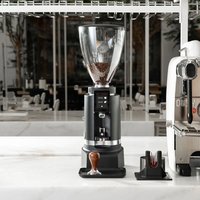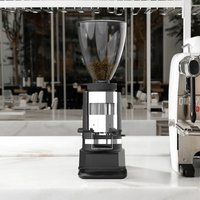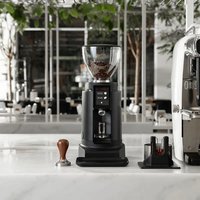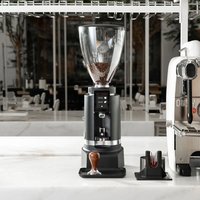
Life WAM - Coffee grinder Ceado - Free user manual and instructions
Find the device manual for free Life WAM Ceado in PDF.


| Product type | Professional coffee grinder |
| Brand | Ceado |
| Model | Life WAM |
| Intended use | Grinding and dispensing of coffee beans for professional use |
| Hopper capacity (bell) | Approximately 1.5 kg (estimate based on typical dimensions) |
| Grind adjustment | Rotary knob, continuous adjustment from fine to coarse (clockwise for finer, counterclockwise for coarser) |
| Operating modes | Automatic (programmable doses), Manual (continuous) |
| Control panel | Color touchscreen with customizable interface |
| Load sensor (scale) | Integrated, for dosing in grams (WAM model), calibratable |
| Power supply | 220-240 V ~ 50/60 Hz (standard estimate) |
| Noise level | ≤ 70 dB |
| Materials in contact with food | Stainless steel (burrs), food-grade plastic (hopper and lid) |
| Safety | Mandatory grounding, residual current device recommended, motor thermal protection, prohibition of use without hopper |
| Cleaning | Clean external surfaces with a damp cloth; wash the hopper with warm water and mild soap; use specific cleaner (GRINDZ™) for the grinding chamber |
| Maintenance | Periodic burr cleaning, burr replacement by a qualified technician |
| Warranty | Warranty against material or manufacturing defects (duration varies by country) |
| Spare parts available | Burrs, hopper, shutter, filter holder support, etc. (original parts recommended) |
| Technical support | Ceado authorized service center |
| Installation requirements | Flat, stable, horizontal surface; ambient temperature between 10°C and 32°C; dry and protected location |
| Compliance | CE (EC Regulation 1935/2004, Directive 2012/19/EU) |
Frequently Asked Questions - Life WAM Ceado
User questions about Life WAM Ceado
0 question about this device. Answer the ones you know or ask your own.
Ask a new question about this device
Download the instructions for your Coffee grinder in PDF format for free! Find your manual Life WAM - Ceado and take your electronic device back in hand. On this page are published all the documents necessary for the use of your device. Life WAM by Ceado.
USER MANUAL Life WAM Ceado
The coffee grinders model and are professional machines for grinding coffee and distributing it through a discharge opening.
Like all appliances, they should be used with particular care to avoid injury to personnel and damage to the appliance.
It is essential to read these instructions carefully before using the appliance and to follow the safety recommendations.

Do not use the appliance if you have not read and understood these instructions!
GB
Page 34
MOULIN À CAFÉ eLifeXTOUCH LifeWAM
text_image
Dettaglio A life. Fig. 2 10
text_image
Dettaglio A 6a Fig. 3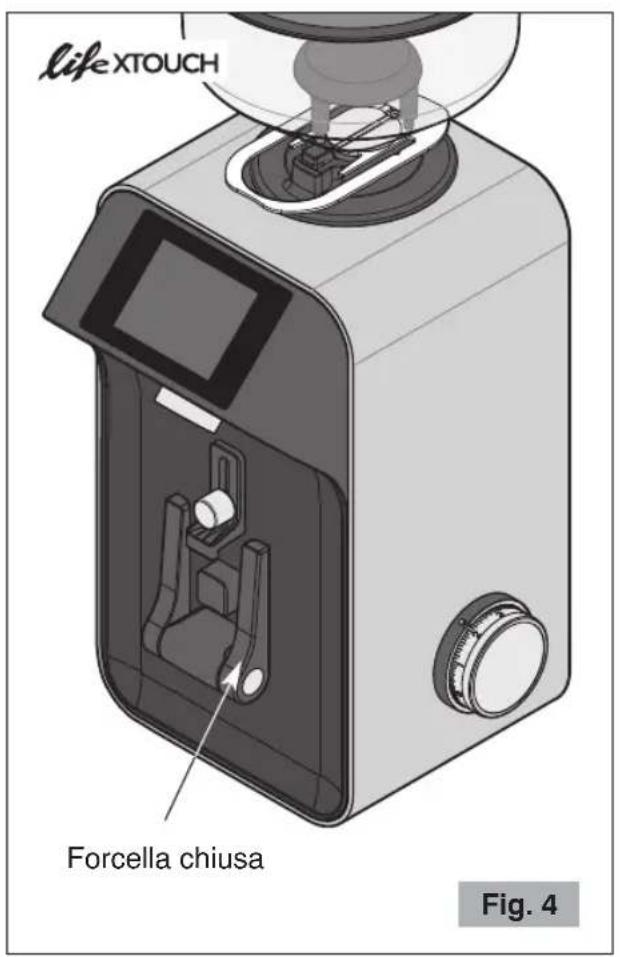
text_image
lifeXTOUCH Forcella chiusa Fig. 4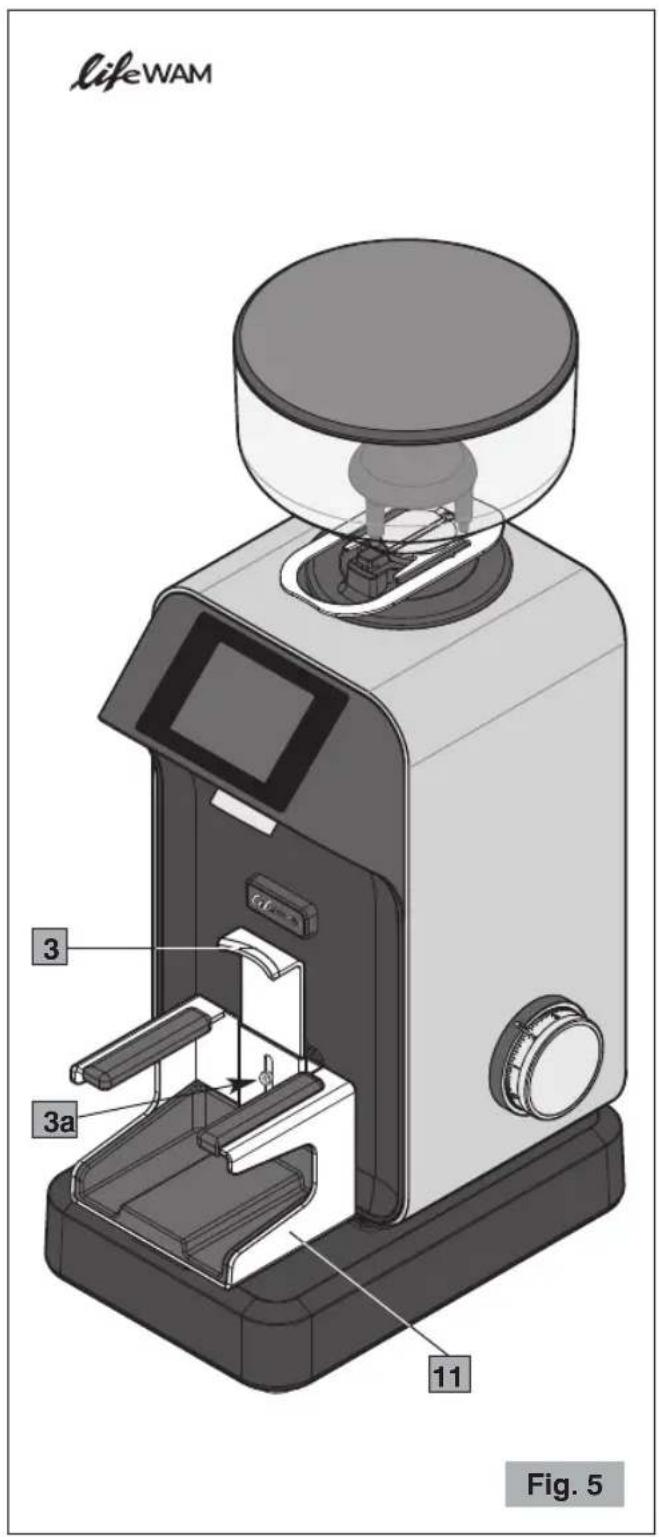
text_image
lifeWAM 3 3a 11 Fig. 5PANNELLO DI CONTROLLO
text_image
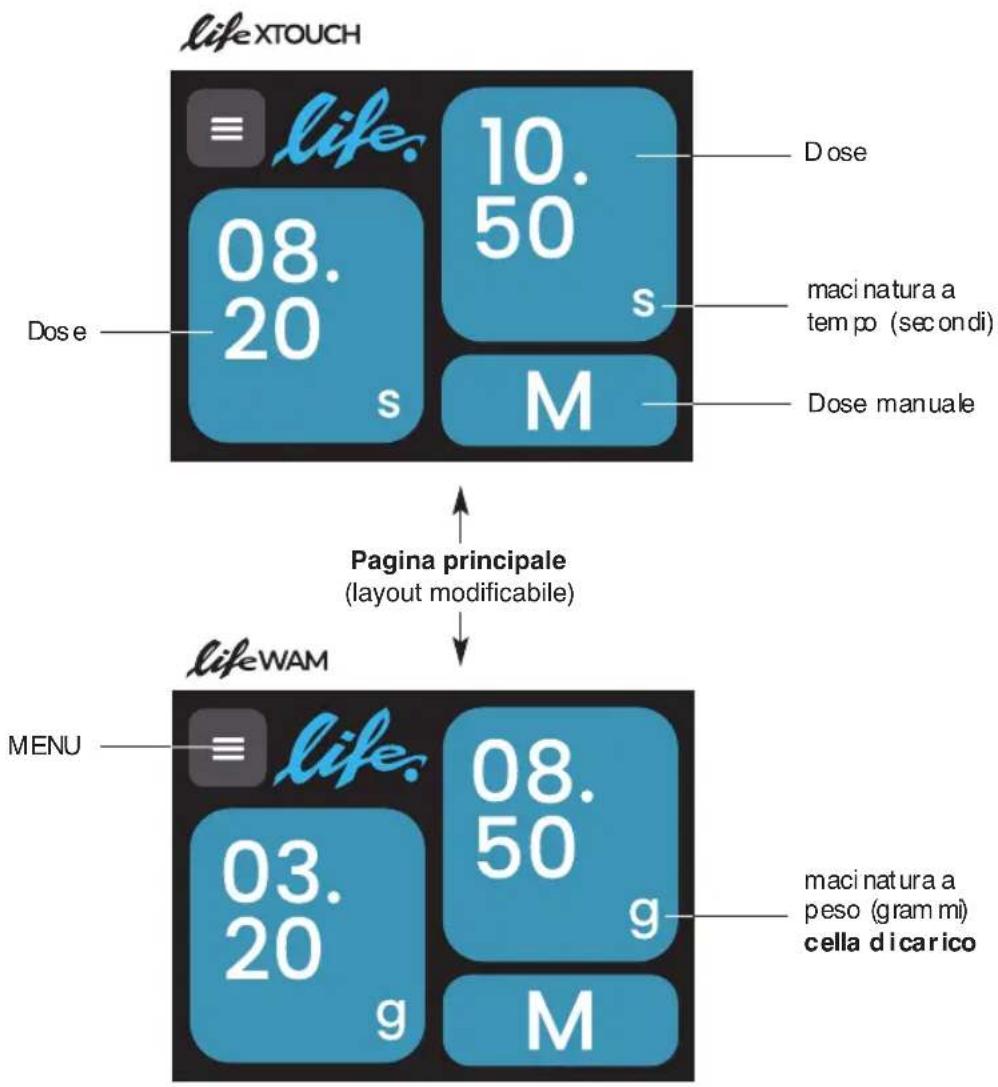
lifeXTOUCH ≡ life. 08. 20 s 10. 50 s Dose maci natura a tempo (secondi) Dose manuale Dose e M Pagina principale (layout modificabile) lifeWAM MENU ≡ life. 03. 20 g 08. 50 g muci natura a peso (gram mi) cella dicarico M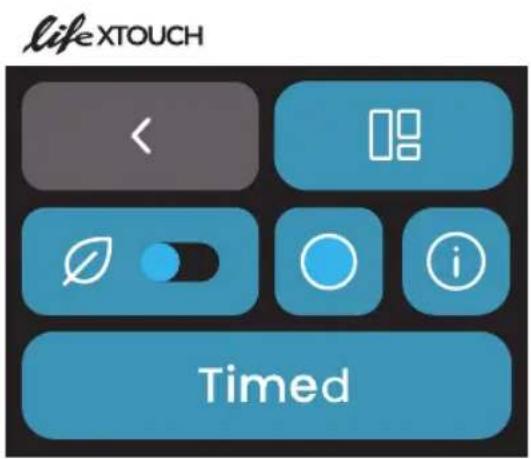
text_image
lifeXTOUCH Timed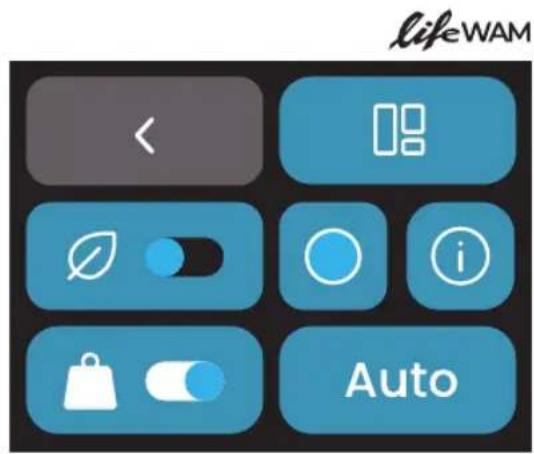
text_image
lifeWAM Autotext_image
lifeWAM ≡ life. 06. 50 g 08. 50 g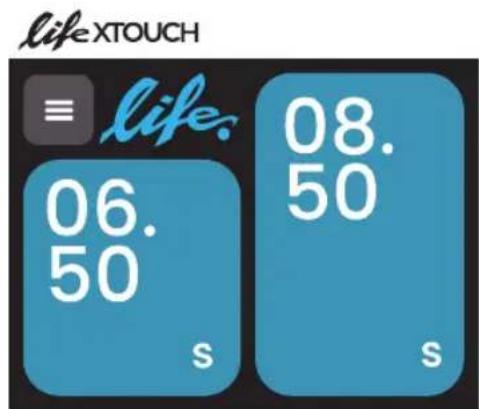
text_image
lifeXTOUCH ≡ life. 06. 50 s 08. 50 sFig. 7
text_image
lifeWAM Autotext_image
≡ life. 03. 20 g 08. 50 g MlifeWAM
text_image
lifeXTOUCH Timed
text_image
≡ life. 03. 20 g 08. 50 g
text_image
≡ life. M 08. 50 g
text_image
≡ life. 08. 20 s
Fig. 14
text_image
< 08 Ø i Timed Timednatural_image
Diagram of a device with directional arrows indicating movement or rotation, no text or symbols presentFig. 21
lifeWAM
natural_image
Illustration of a microwave oven with a tool inserted, showing internal components and a speed shift indicator (no text or symbols present)Fig. 21a
AVVERTENZE E SUGGERIMENTI

natural_image
Mechanical device with rotating components and directional arrows, labeled Fig. 22 (no text or symbols on the device itself)PULIZIA
natural_image
Illustration of a hand using a tool to adjust or install a device into a machine (no text or symbols visible)
text_image
Prohibition sign depicting a trash bin crossed out by a diagonal line, indicating no waste or discharge.2 Support fork (with two positions)
3 Filter-holder support
3a Support retaining screw
4 Discharge opening
5 Control panel
6 Bean hopper
6a Bean hopper fixing screw
7 Hopper lid
8 Bean hopper shutter
9 Grinding adjustment knob
10 ON-OFF (I-O) switch
lifeWAM
text_image
Detail A life. 10 Fig. 2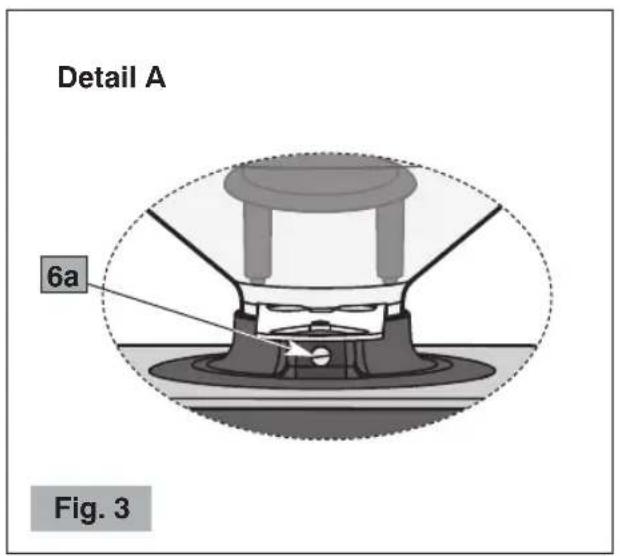
text_image
Detail A 6a Fig. 3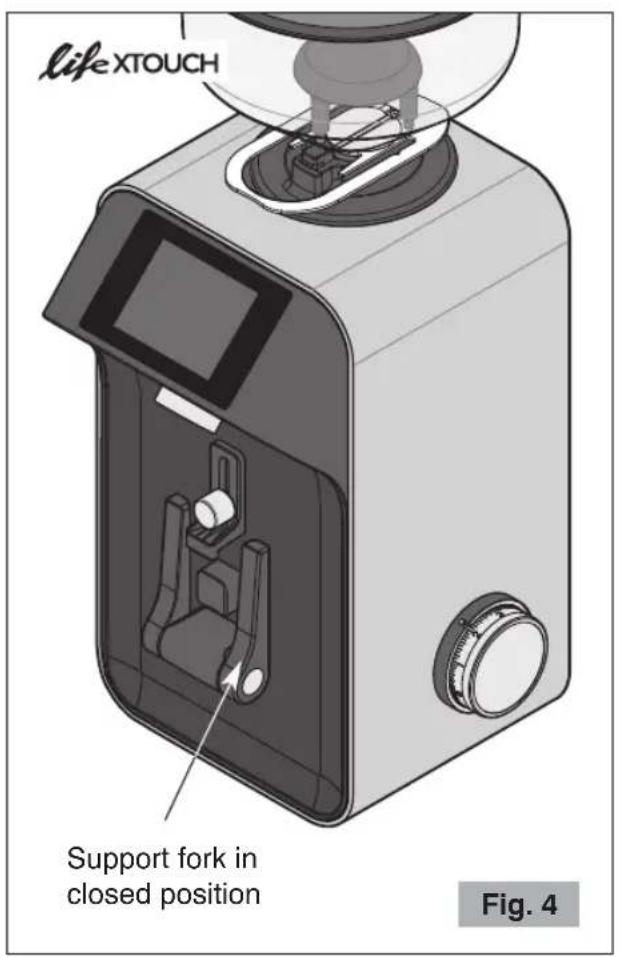
text_image
lifeXTOUCH Support fork in closed position Fig. 4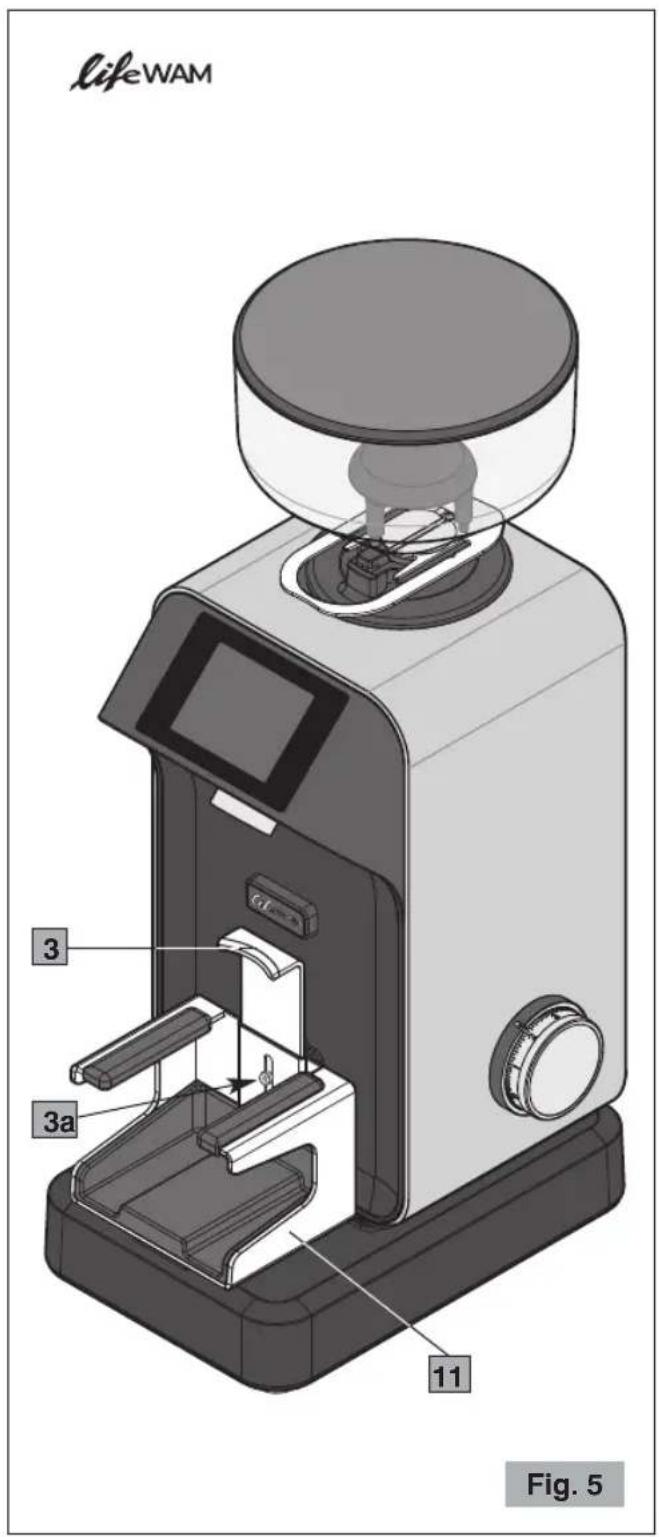
text_image
lifeWAM 3 3a 11 Fig. 5CONTROL PANEL
text_image
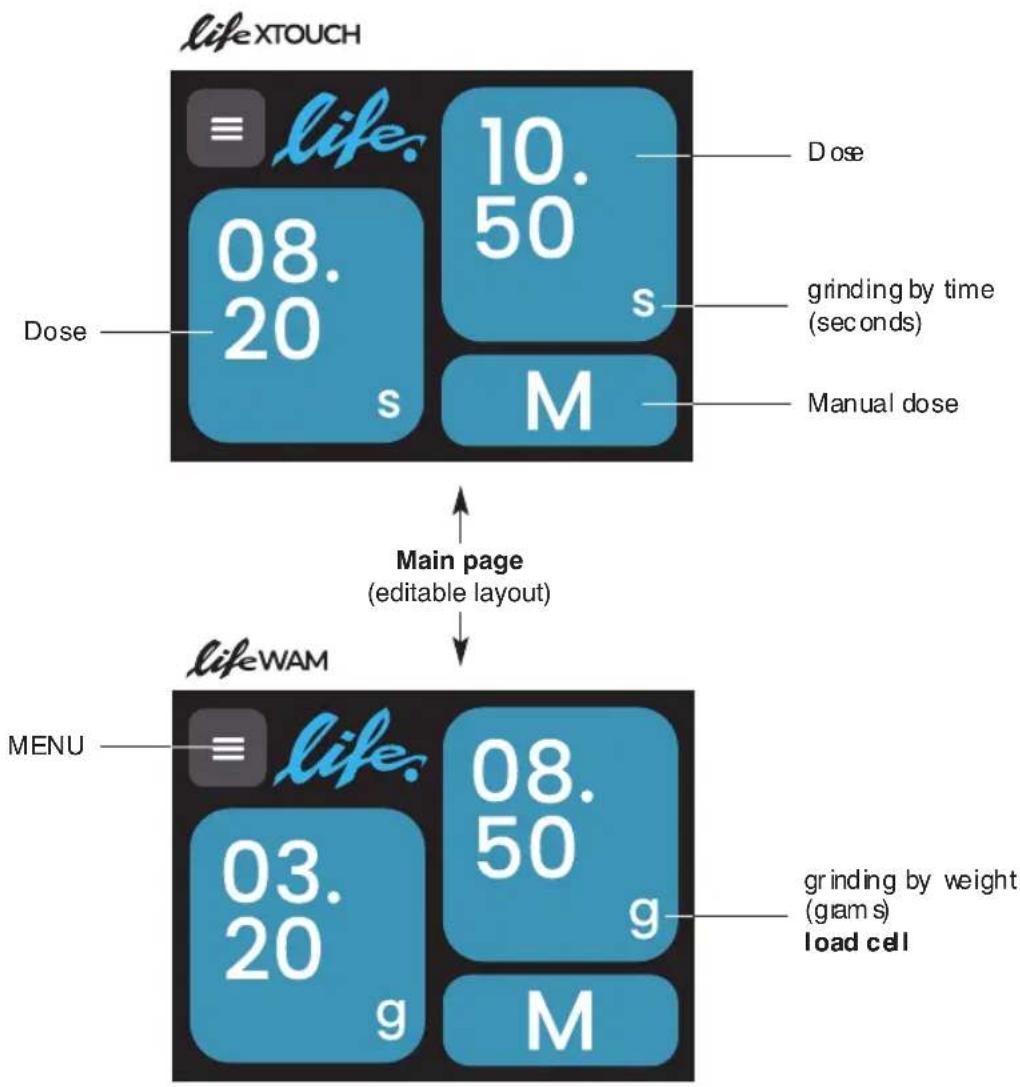
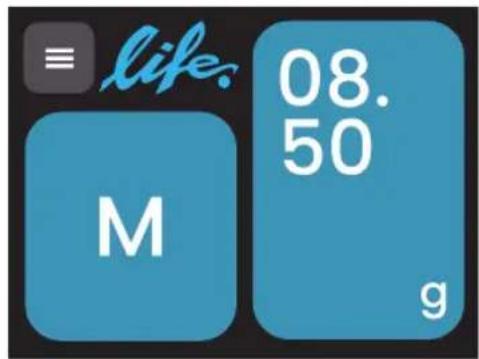
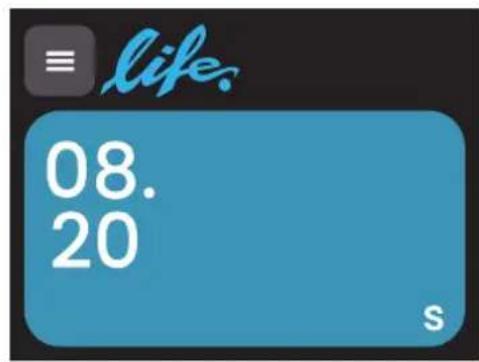
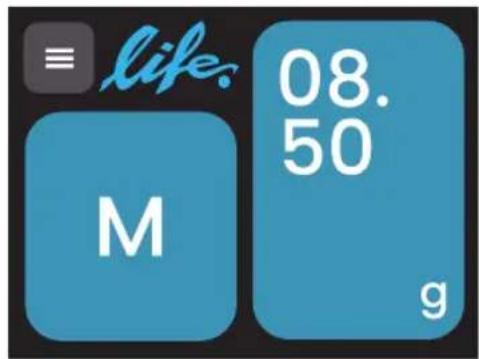
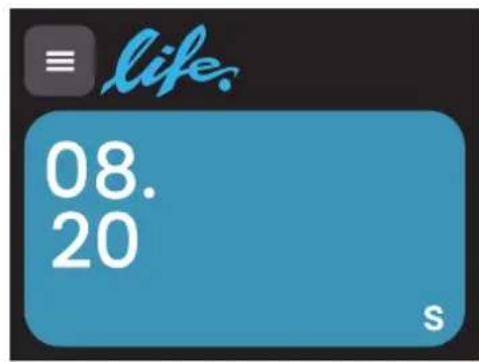
lifeXTOUCH ≡ life. 08. 20 s 10. 50 s Dose grinding by time (seconds) Manual dose Main page (editable layout) lifeWAM MENU ≡ life. 03. 20 g 08. 50 g M grinding by weight (gram s) load cell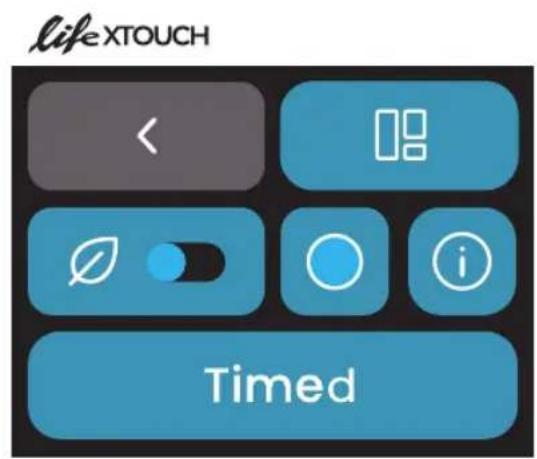
text_image
lifeXTOUCH < Timed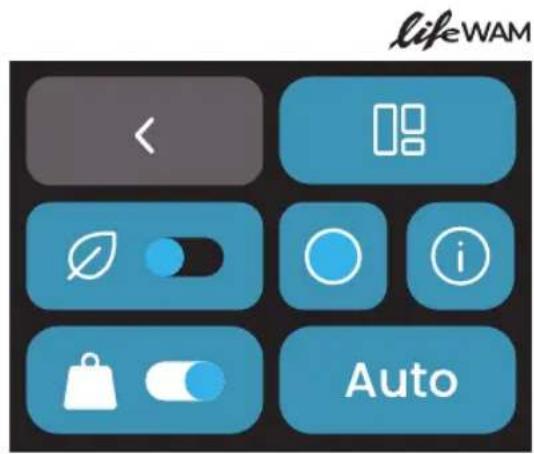
text_image
lifeWAM <Fig. 6
Menu Pages
SAFETY RECOMMENDATIONS GENERAL INSTRUCTIONS
- Read the following instructions carefully before using the appliance.
- This appliance is intended for internal use only.
- The maximum and minimum room temperature for correct operation of the appliance are respectively 32^ C and 10^ C.
- Installation and maintenance should be carried out by qualified personnel only who are authorized for such tasks.
- Make sure that the mains voltage is as indicated on the rating label of the appliance and that the electrical system is grounded and equipped with a switch.
- Plug the power cable into a socket protected by a suitably rated circuit breaker (MCB) or fuses.
Do not use an adaptor plug.
-
Install the appliance in a DRY, PROTECTED place, far from water sprays and jets, heat sources, open flames and inflammable substances.
-
Place the appliance on a flat, horizontal, stable surface where it cannot tip over. The highest resting surface (bean hopper) must be at a height of not less than 1.5 m.
-
This appliance is intended for professional use, and should therefore be used by experienced personnel only who are trained for this purpose. This appliance is NOT intended for industrial food processing in mass production.
-
This appliance is not intended for use by persons (including children) with reduced physical, sensory or mental abilities, or without experience and knowledge, unless they have been instructed in the use of the appliance and are under the supervision of a person who is responsible for their safety.
CHILDREN SHOULD BE SUPERVISED SO AS TO ENSURE THAT THEY DO NOT PLAY WITH THE APPLIANCE.
-
Never use this appliance for purposes other than grinding coffee beans. Any other use is dangerous. Do not operate without hopper and lid in place.
-
Always work under safe conditions: do not use the appliance with wet hands or feet. Do not use outdoors.
- Keep the original package for possible future use. It is the most suitable protection against damage during transport.
- In case of fire use CO_2 extinguishers. Do not use water or powder extinguishers.
- Never place the appliance in water!
- Do not disassemble the appliance or attempt to perform any repairs inside it.
- Always unplug the appliance before performing any maintenance or cleaning and when it is not in use.
- Never pull the appliance by the cord to move it. Never unplug it by pulling the cord or touching it with wet hands.

If the power cable is damaged it must be replaced by the manufacturer or by the technical assistance service, or at any rate by a person with similar qualifications, so as to prevent all risks.
-
WARNING: Never place any utensils, metal or other hard materials, in the bean hopper. This is dangerous and could cause damage.
-
Do not use the appliance if it is damaged or has loose parts. Immediately contact an authorized Service Center.
-
Noise: the appliance does not exceed 70 dB.
The appliance complies with European regulation CE 1935/2004 and subsequent updates.
Note: Due to statistical tests on the product in the factory, some coffee grounds may be found in the appliance.
SAVE THESE INSTRUCTIONS!
To consult these instructions on-line, visit the site www.ceado.com
CE
The EC declaration of conformity for this appliance is available in the Products section of our website www.ceado.com.
INSTALLATION
Comply with the safety recommendations indicated above and hereafter when installing the appliance.
For the installation of the appliance, qualified personnel must be present who are able to check the fineness of the grind.
- Make sure that the mains voltage is as indicated on the rating label of the appliance and that the electrical system is grounded and equipped with a switch.
- Install the appliance in a DRY, PROTECTED place, far from water sprays and jets, heat sources, open flames and inflammable substances.
Place the appliance on a flat, horizontal, stable surface where it cannot tip over.
To ensure correct operation of the WAM module (scale), make sure that the work surface is stable and does not transmit vibrations to the device.

Before connecting the plug to the power socket, make sure that the ON-OFF switch (10 Fig. 2) is in position "0" (OFF).
-
Plug the power cable into a socket protected by a suitably rated circuit breaker (MCB) or fuses. Do not use an adaptor plug.
-
Stretch the power cable out to full length. Do not let it pass over sharp edges or hot surfaces. Do not let oil spill on it. Do not let the power cable hang loose from the counter on which the appliance stands.
-
Make sure that the bean hopper is correctly positioned and that its shutter (8 Fig. 1) is completely open (to the last click). Tighten, without forcing excessively, the bean hopper fixing screw (6a, Detail A Fig. 3).
PREPARATION AND USE

Before first use: rinse all of the parts that will have contact with food in running water i.e.: bean hopper, lid, shutter, bellows, bean pusher, support of the single dosing kit.
SWITCHING ON
1 Fill the hopper with coffee beans and close the lid.
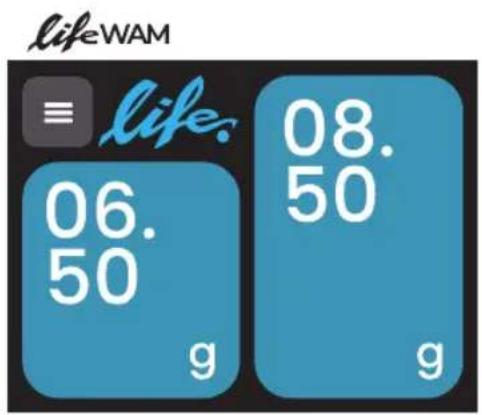
2 Put the ON-OFF switch to position "I" (10 Fig. 2). The control panel display (5 Fig. 1) lights up (see Fig. 7).
3 Depending on the model, position the filter-holder on the fork (2 Fig. 1) or over the load cell (11 Fig. 5) blocking it under the support (3 Fig. 1 - 3 Fig. 5) adjusted beforehand according to the model of filter-holder used.
Main screen
text_image
lifeWAM ≡ life. 06. 50 g 08. 50 g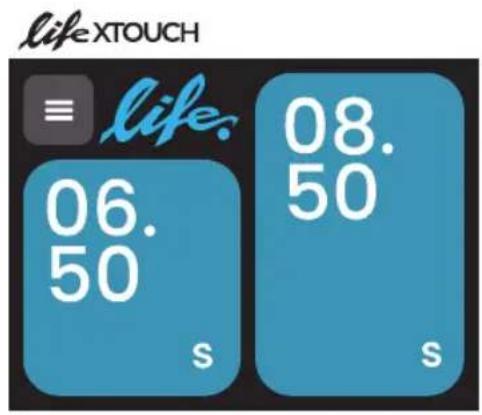
text_image
lifeXTOUCH ≡ life. 06. 50 s 08. 50 sFig. 7
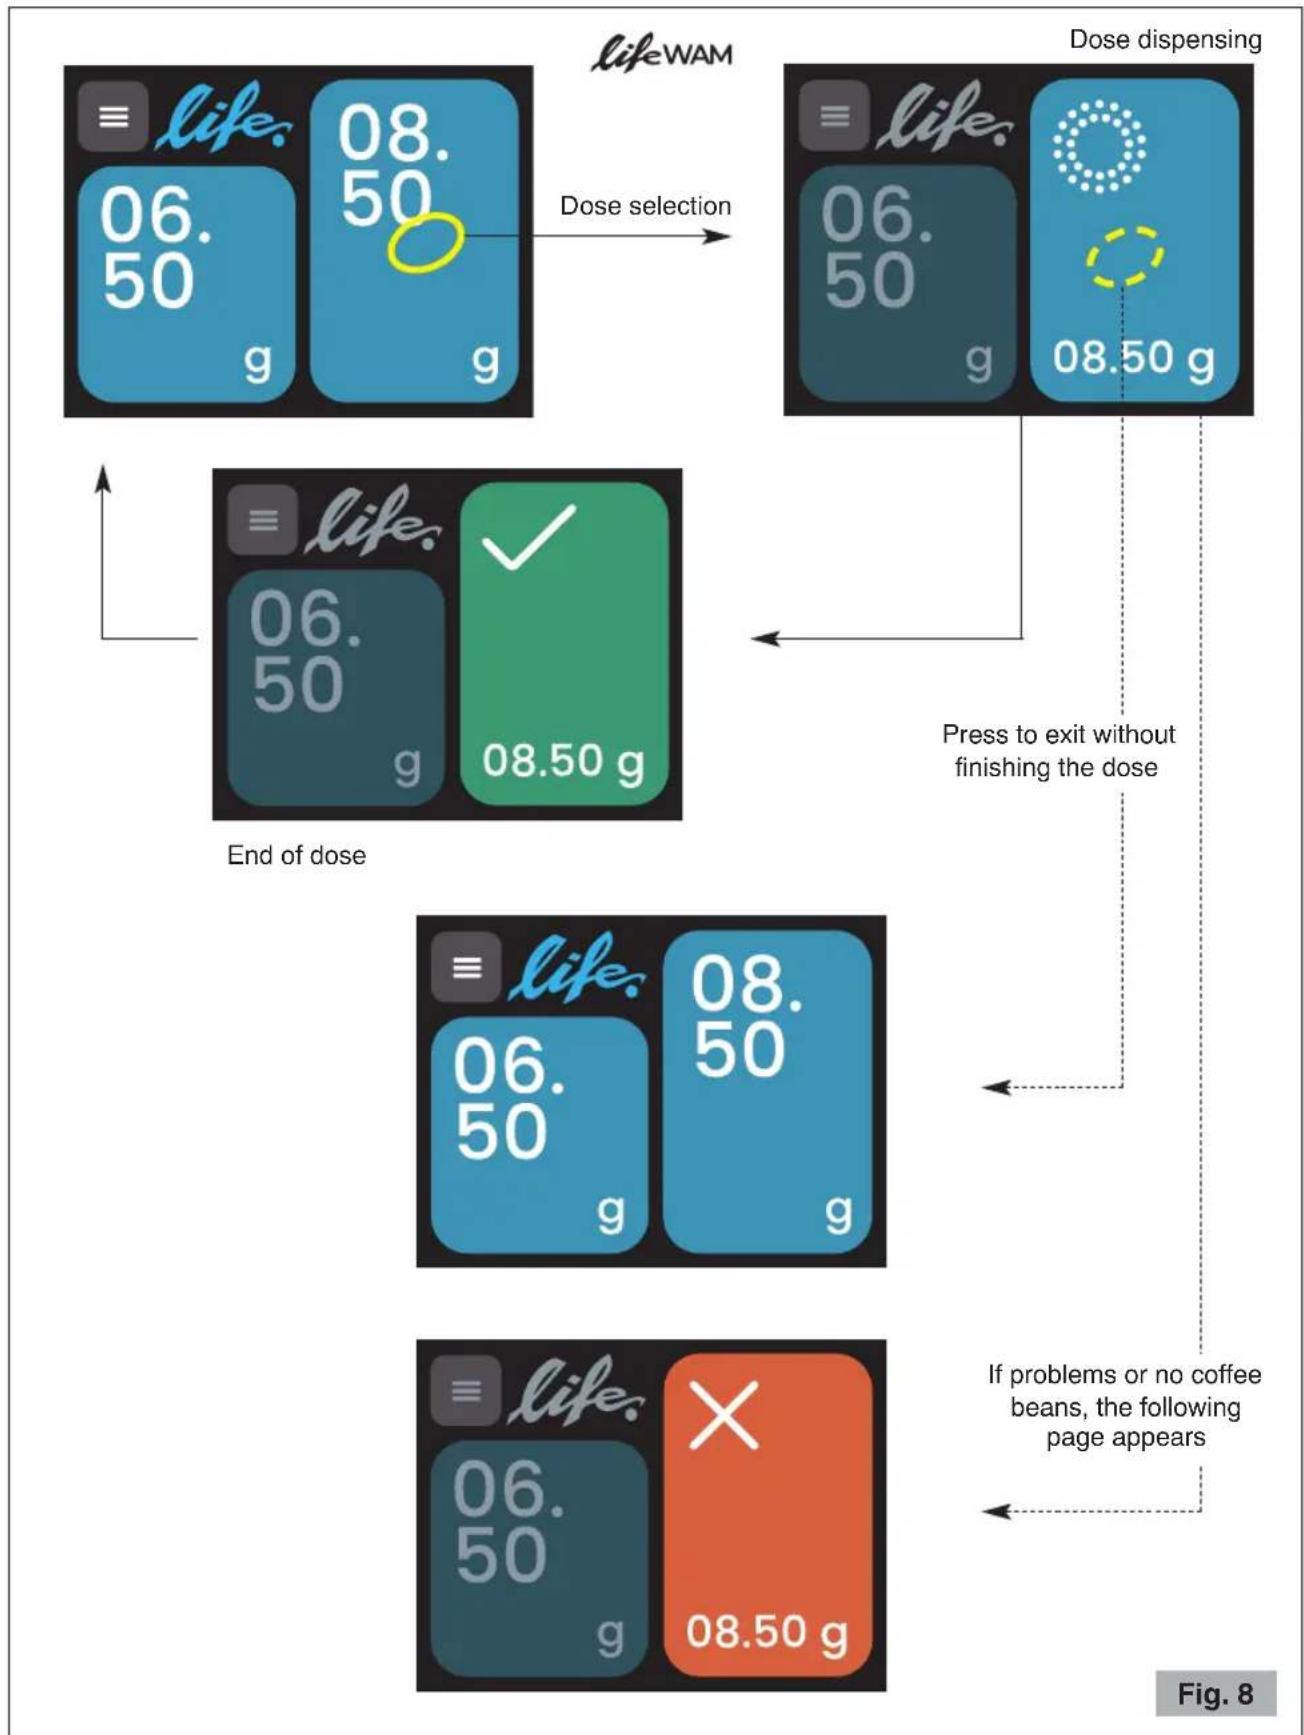
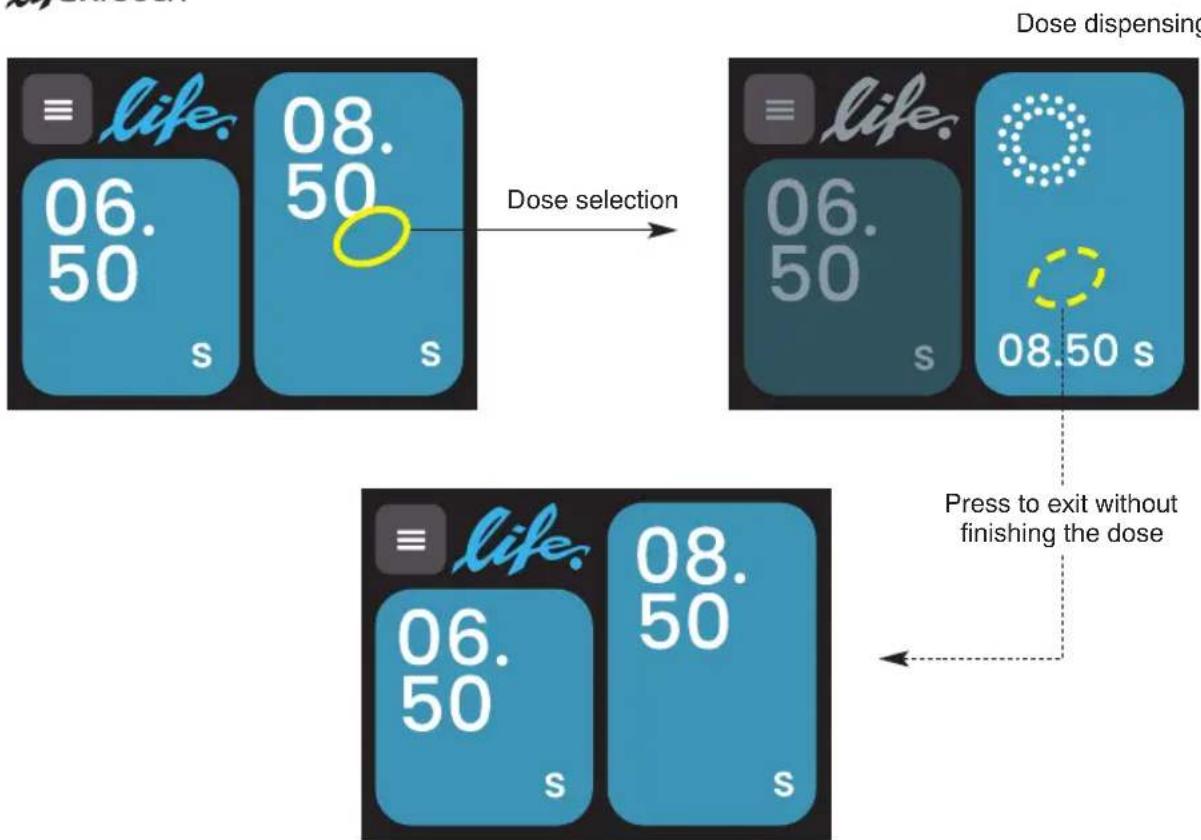
Automatic operation (see Fig. 8 and Fig. 9)
4 Press on the desired dose (Fig. 8 and Fig. 9) to grind the relative amount of coffee.
flowchart
graph TD
    A["lifeWAM"] --> B["Dose selection"]
    B --> C["Dose dispensing"]
    C --> D["Press to exit without finishing the dose"]
    D --> E["End of dose"]
    E --> F["If problems or no coffee beans, the following page appears"]
lifeXTOUCH
flowchart
graph TD
    A["≡ life. 06.50 s"] -->|Dose selection| B["≡ life. 06.50 s"]
    B --> C["08.50 s"]
    C -->|Press to exit without finishing the dose| D["≡ life. 06.50 s"]
    D --> E["08.50 s"]
Fig. 9
NOTE! Keep the filter-holder in position until dispensing is completed!
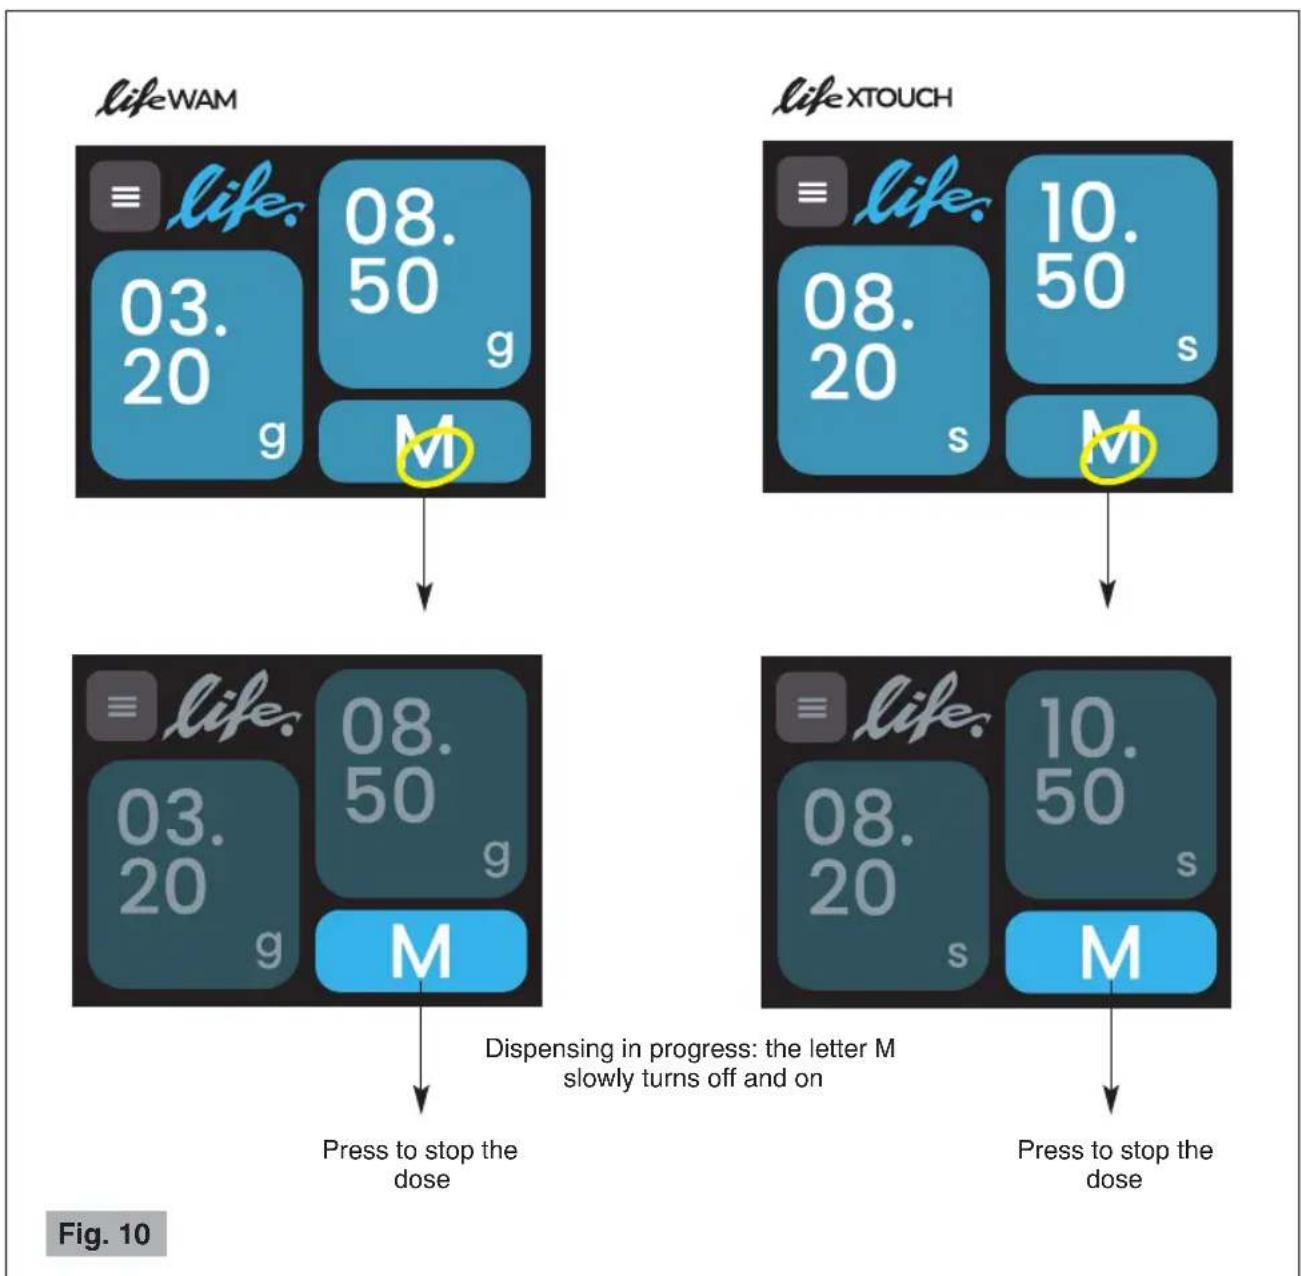
Manual operation (see Fig. 10)
4 To grind coffee continuously, without any time or weight setting, press the button

(Fig. 10).
5 When the desired amount of coffee has been ground, press the button again.
NOTE! Keep the filter-holder in position until dispensing is completed!
flowchart
graph TD
    A["lifeWAM: 03.20 g → M"] --> B["08.50 g"]
    C["lifeXTOUCH: 08.20 s → M"] --> D["10.50 s"]
    E["lifeXTOUCH: 03.20 g → M"] --> F["08.50 g"]
    G["lifeXTOUCH: 08.20 s → M"] --> H["10.50 s"]
    I["lifeXTOUCH: 03.20 g → M"] --> J["Press to stop the dose"]
    K["lifeXTOUCH: 08.20 s → M"] --> L["Press to stop the dose"]
    style A fill:#99ccff,stroke:#333
    style C fill:#99ccff,stroke:#333
    style E fill:#99ccff,stroke:#333
    style G fill:#99ccff,stroke:#333
    style I fill:#99ccff,stroke:#333
    style K fill:#99ccff,stroke:#333
REGULATING GRINDING
When it leaves the factory the machine has a standard setting, but it may be necessary to adjust grinding further due to various external factors such as the type of mixture used, the humidity, temperature, or the particular distribution requirements of the espresso coffee machine.
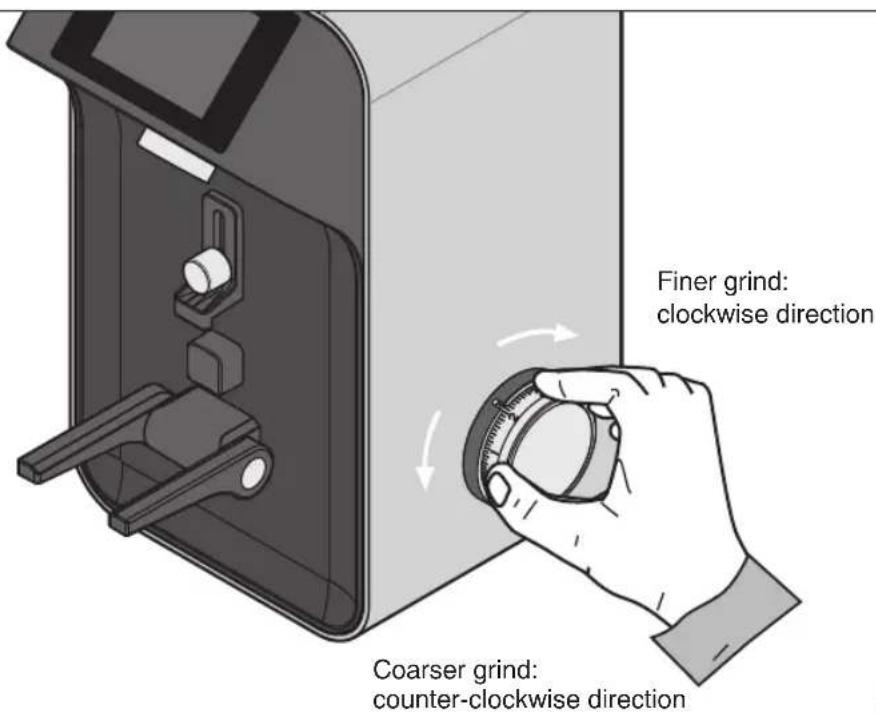
The degree of grinding may be further corrected by shifting the grinding adjustment knob (9 Fig. 1) (see Fig. 11).
• To obtain a finer grind, move the grinding adjustment knob in a clockwise direction.
• To obtain a coarser grind, move the grinding adjustment knob in a counter-clockwise direction.

Always take care to move the knob with the motor turning and empty (without coffee between the burrs).
NOTE! It is recommended to grind small amounts of coffee, letting the burrs empty with every regulating attempt, by opening and closing the shutter (8 Fig. 1) each time.
text_image
Finer grind: clockwise direction Coarser grind: counter-clockwise directionFig. 11
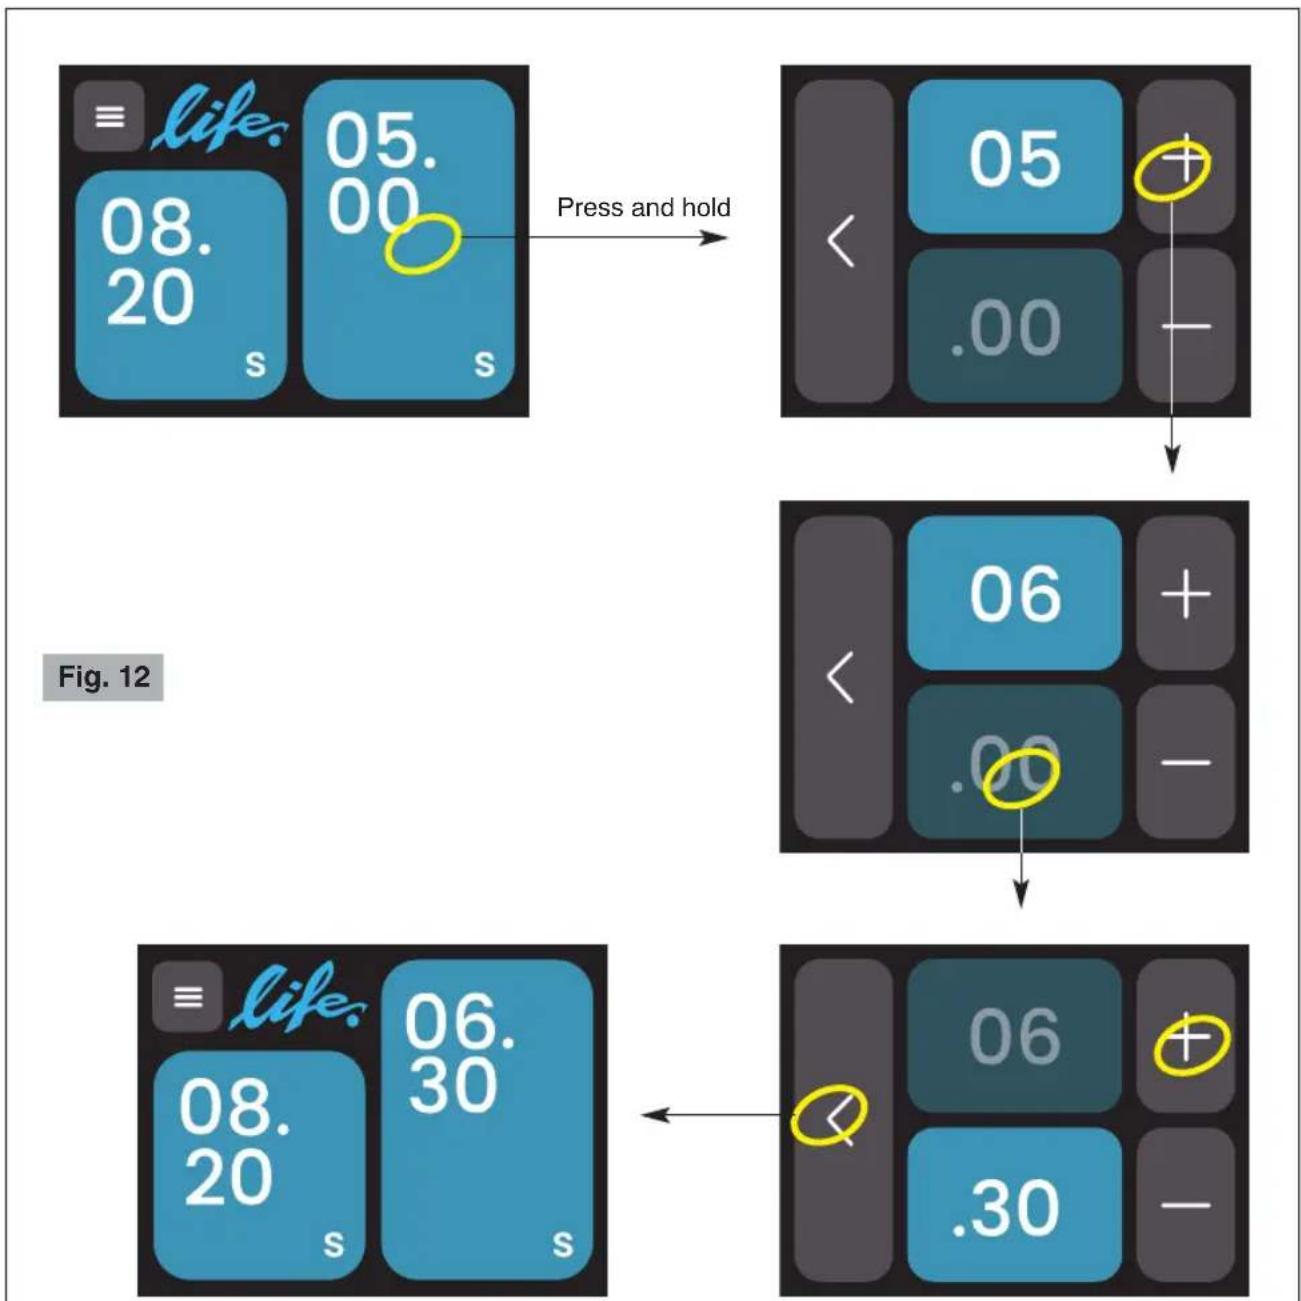
SETTING THE GRINDING TIME OR DOSE WEIGHT - see Fig. 12
Note: Due to the shape and design of the burrs, for the first use only, a short run-in period of grinding coffee beans is necessary to obtain a consistent weight of the shot.
To change the grinding time or the weight in grams of the doses, on the main screen, hold down the dose whose value you want to change (Fig. 12) until the setup page appears.
In the setup page, pressing the button for the button increases or decreases the
units value by one unit at each touch and the decimal value by 10 units.
To exit the page, press the button
flowchart
graph TD
    A["≡ life. 08.20 s 05.00 s"] -->|Press and hold| B["05 < .00 +"]
    B --> C["06 < .00 +"]
    C --> D["06 < .30 +"]
    D --> E["≡ life. 08.20 s 06.30 s"]
MENU (Fig. 13)
To enter the Menu from the main page, press

To return to the main page, press
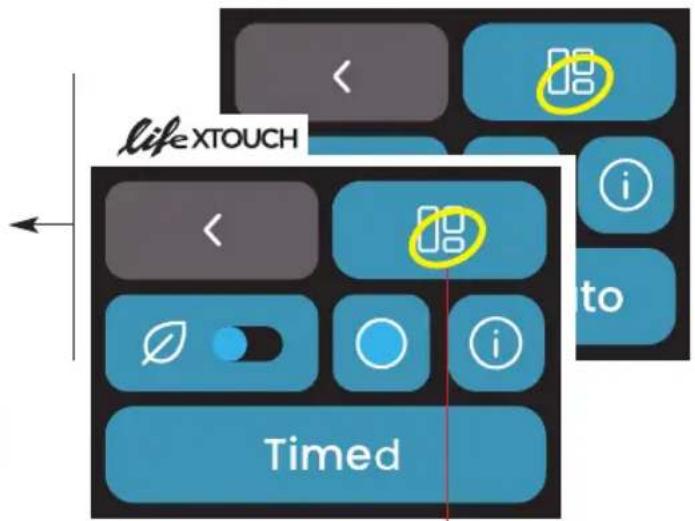
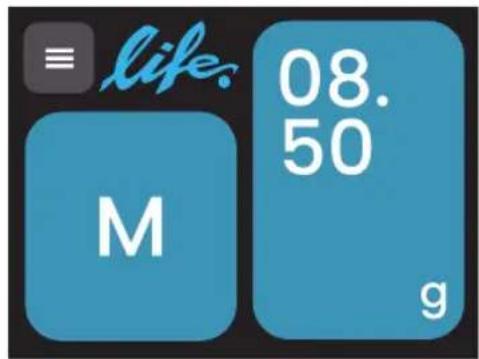
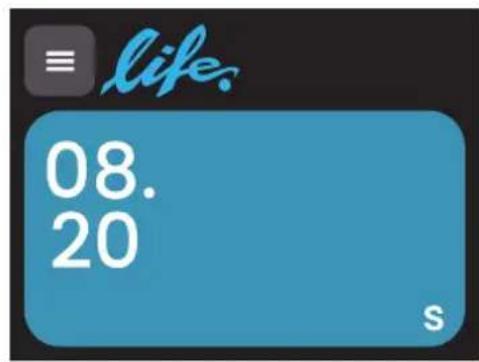
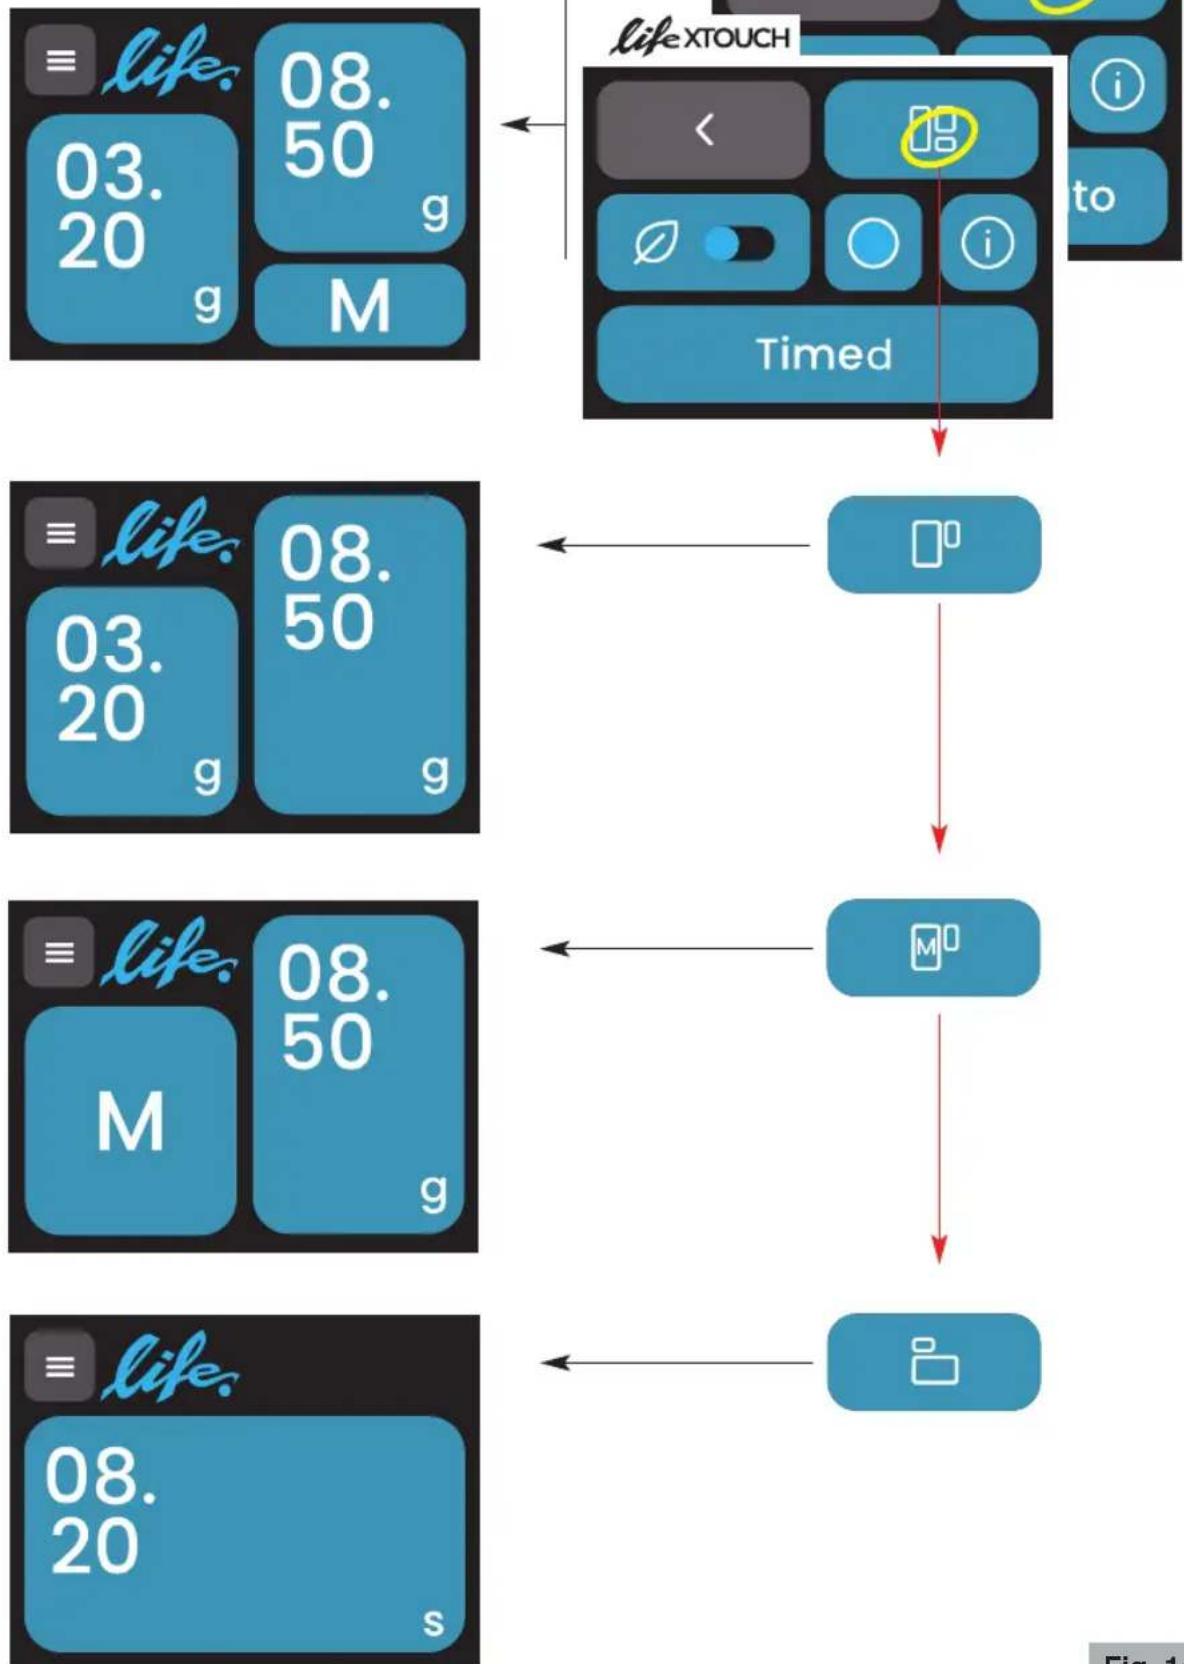
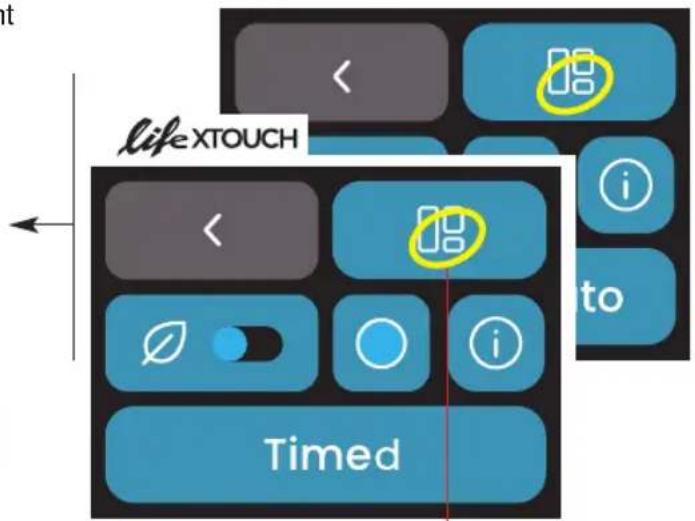
Display layout: customization of the main page (see Fig. 14)
text_image
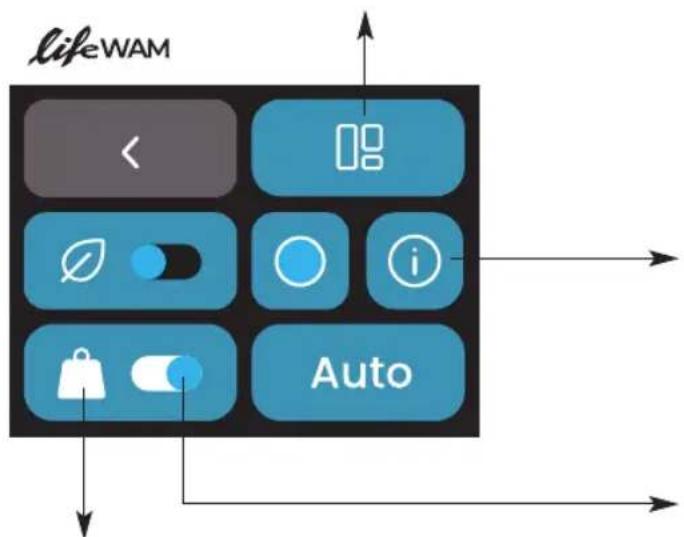
lifeWAM AutoCalibration: load cell calibration(see Fig. 17)
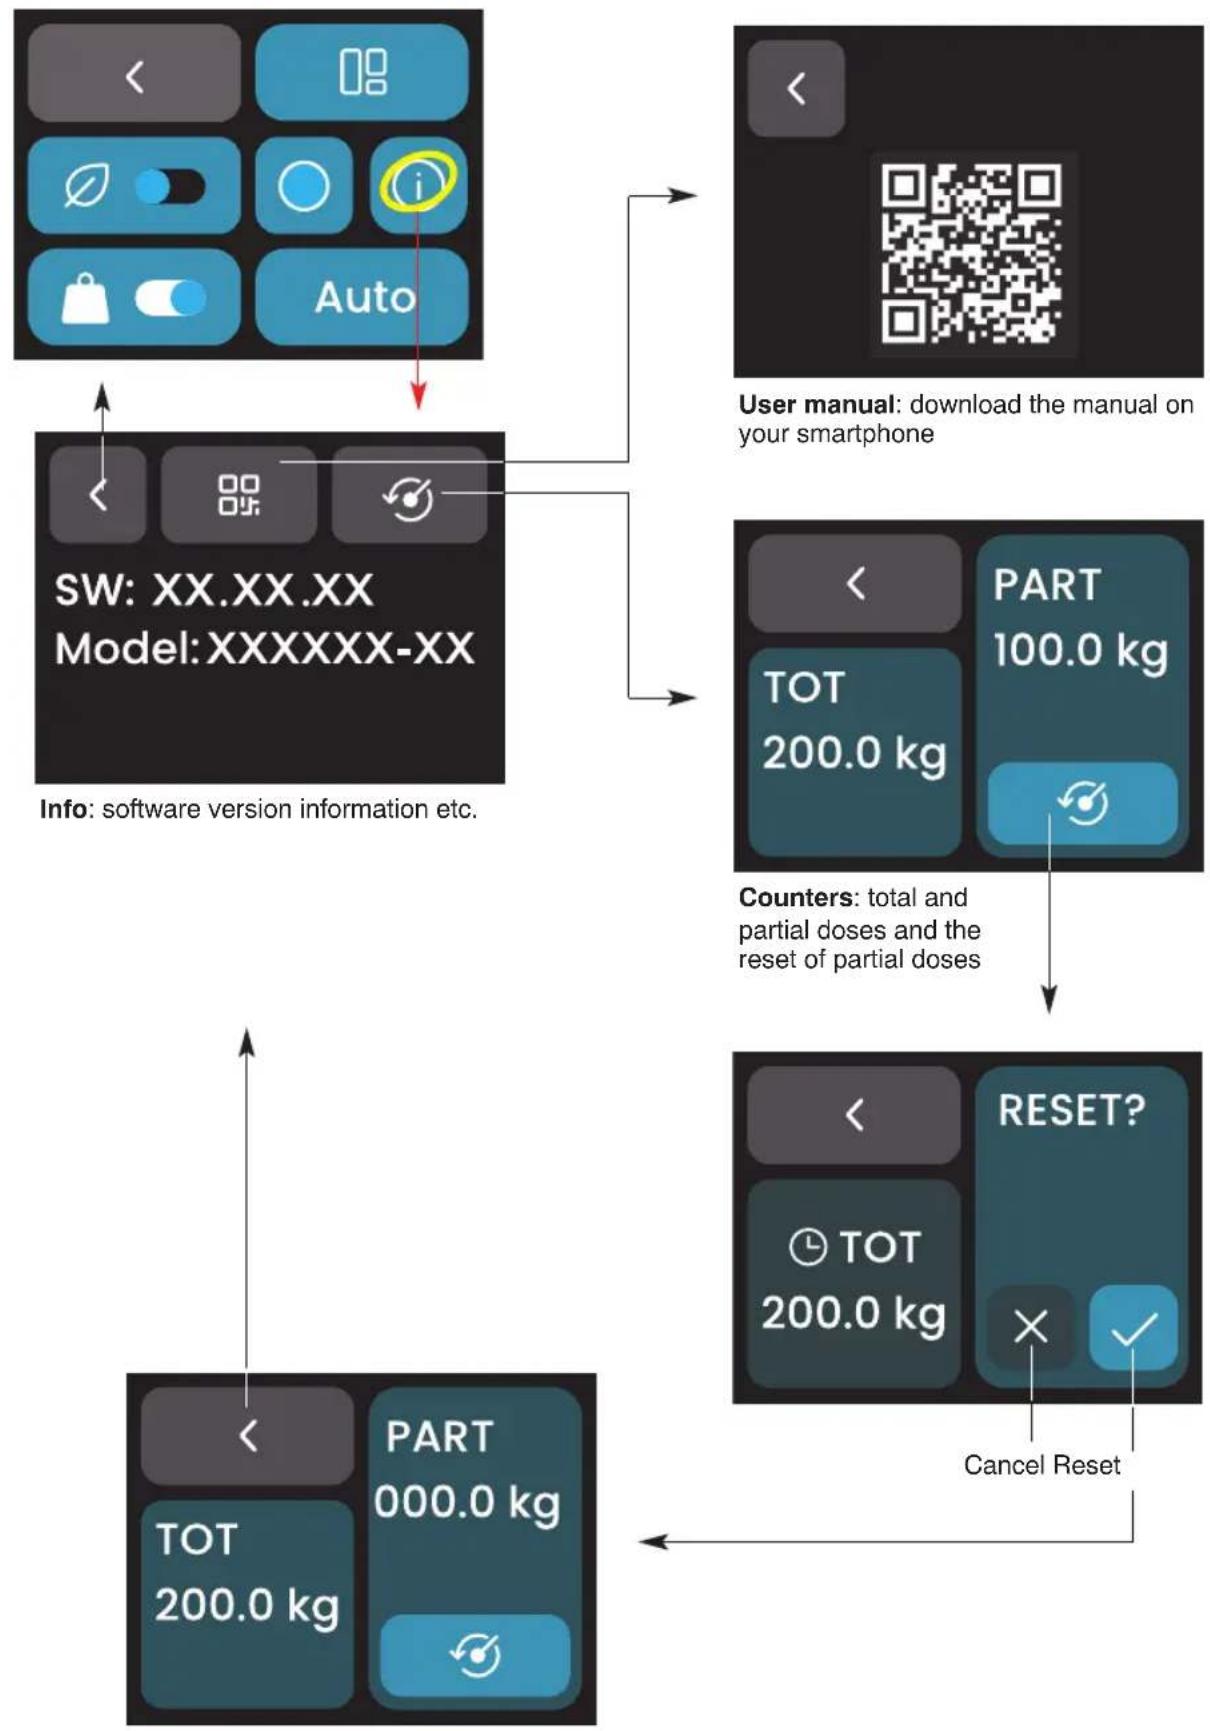
Info: software version information etc.
User manual: download the manual on your smartphone
Counters: total and partial doses and the reset of partial doses
(see Fig. 19)
Mode: selection between time and weight mode and between Auto and Select (see Fig. 16)
Interface colour: selection of the desired color (see Fig. 18)
text_image
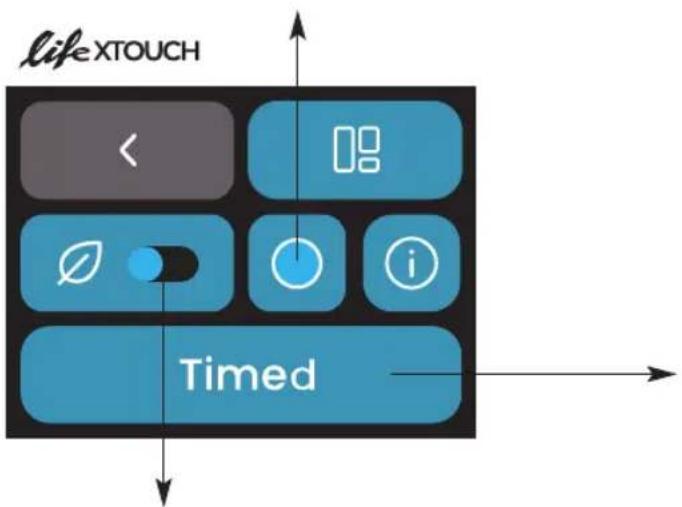
lifeXTOUCH TimedDisplay stand-by: activation of inactivity time to switch to stand-by (default time)
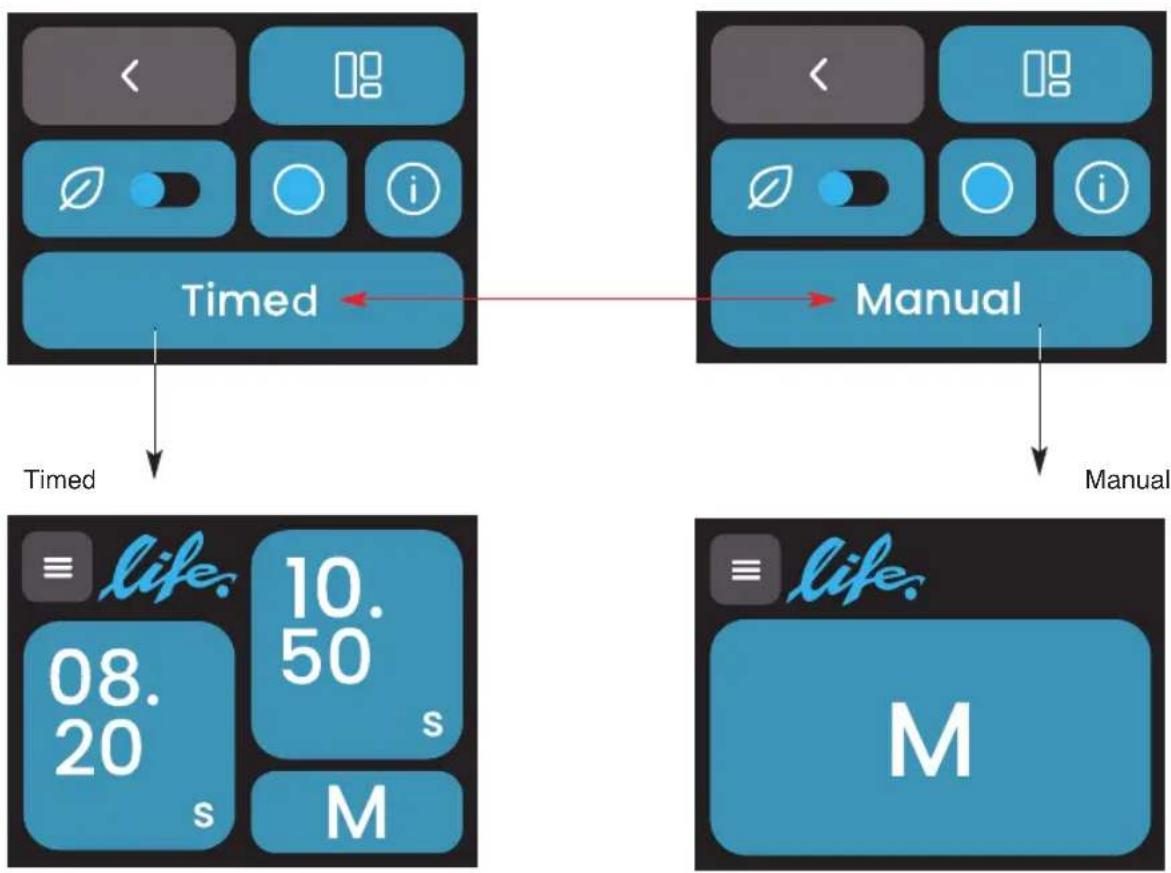
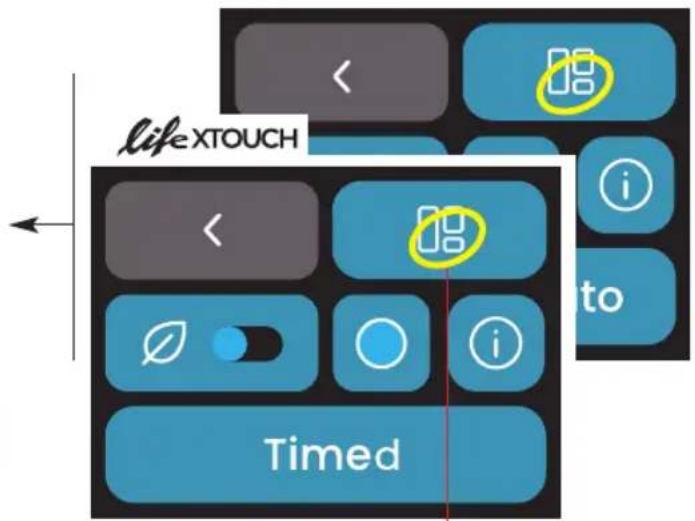
Mode: selection between Timed and Manual (see Fig. 15)
Fig. 13
Display layout:
press the relevant button to change layout
flowchart
graph TD
    A["08.50g"] --> B["08.50g"]
    B --> C["08.50g"]
    C --> D["M"]
    D --> E["08.20s"]
    style A fill:#4CAF50,stroke:#388E3C
    style B fill:#4CAF50,stroke:#388E3C
    style C fill:#4CAF50,stroke:#388E3C
    style D fill:#4CAF50,stroke:#388E3C
    style E fill:#4CAF50,stroke:#388E3C
Fig. 14
Mode of operation (Fig.15)UCH
To enter the Menu from the main page, press

Select Timed or Manual mode by pressing the relevant button (see Fig. 15).
To return to the main page, press

Mode: selection between Timed and Manual
flowchart
graph TD
    A["Timed"] --> B["Manual"]
    B --> C["Life"]
    style A fill:#333,stroke:#000,color:#fff
    style B fill:#333,stroke:#000,color:#fff
    style C fill:#333,stroke:#000,color:#fff
Fig. 15
Mode of operation (Fig.16)
To enter the Menu from the main page, press .
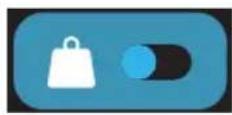
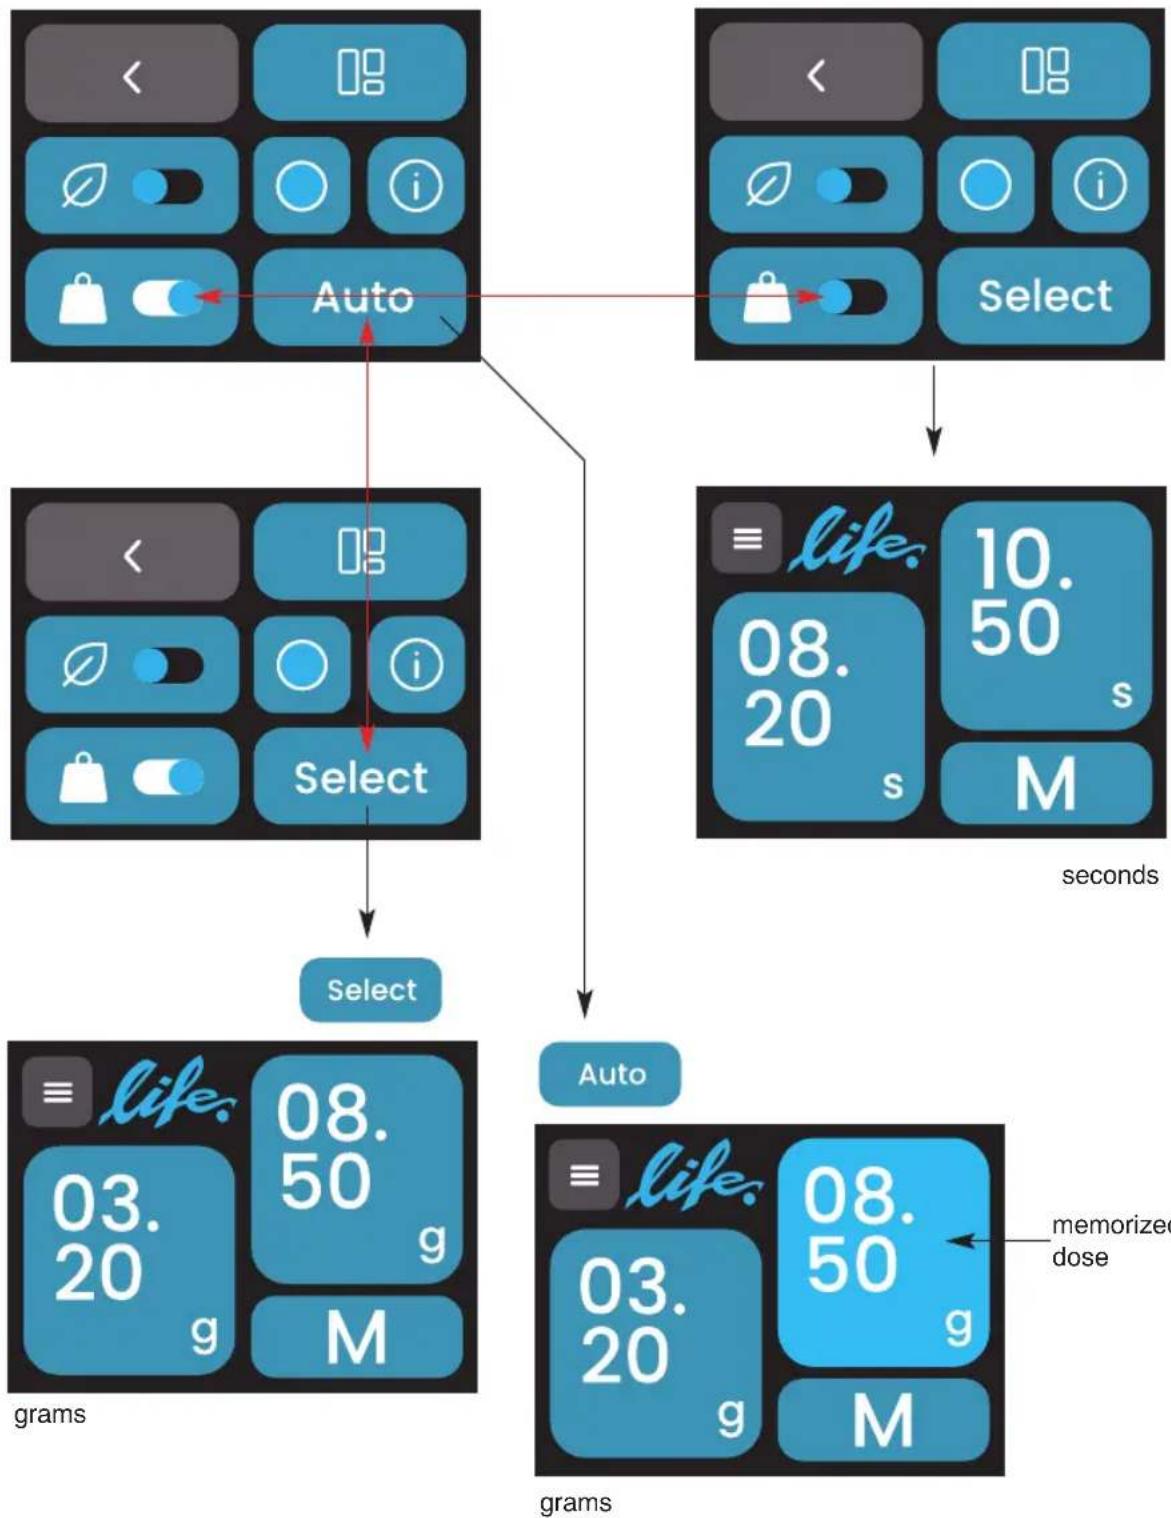
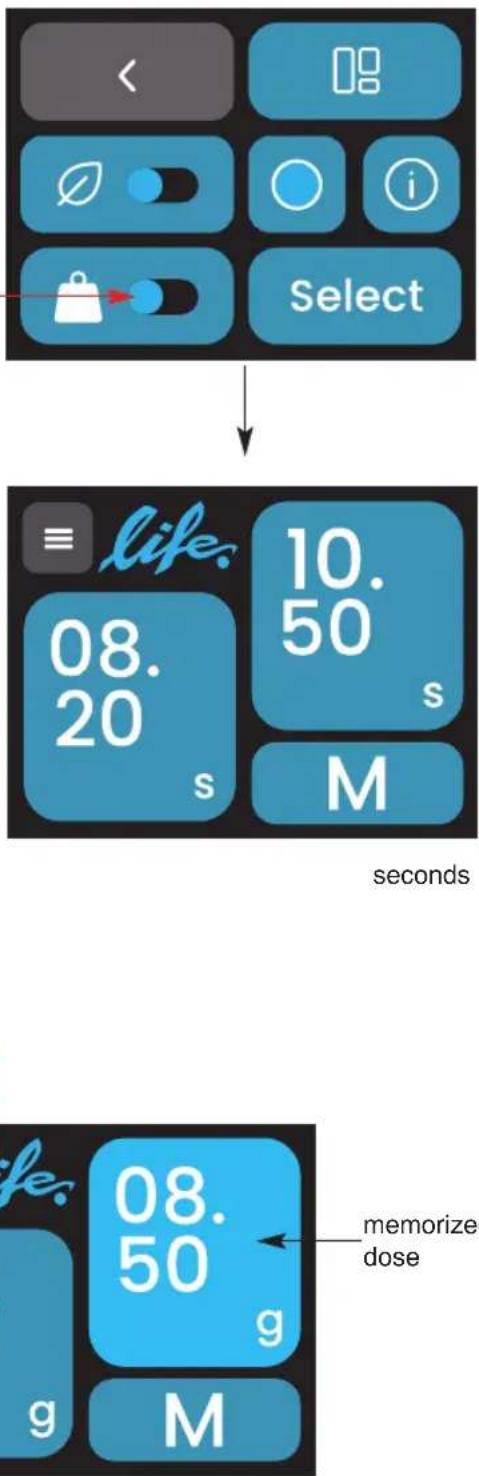
- Time mode (seconds): to select this mode, move the selector of the button
to the left (see Fig. 16). The button on the right will be
- Weight mode (grams): to select this mode, move the selector of the button
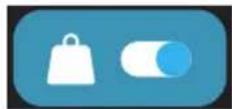
to the right.
In this mode, there are two options: Select and Auto, which determine how the doses are started.
With Select you always have to press the button for the chosen dose to grind, while with Auto the selection remains memorized and you just have to place the filter-holder on the support to start the motor.
To switch from one option to another, simply press the button or
and vice versa.
To memorize the dose, simply press the desired dose (see Fig. 16).
To return to the main page, press
Weight mode: selection between Auto and Select
flowchart
graph TD
    A["Auto"] --> B["Select"]
    B --> C["Select"]
    C --> D["grams"]
    D --> E["memorized dose"]
    F["Select"] --> G["seconds"]
    H["Auto"] --> I["seconds"]
    J["grams"] --> K["03.20 g"]
    J --> L["08.50 g"]
    J --> M["M"]
    N["08.50 s"] --> O["10.50 s"]
    P["Select"] --> Q["Select"]
    R["Select"] --> S["Select"]
    T["Select"] --> U["Select"]
    V["Select"] --> W["Select"]
    X["Select"] --> Y["Select"]
    Z["Select"] --> AA["Select"]
    AB["Select"] --> AC["Select"]
    AD["Select"] --> AE["Select"]
    AF["Select"] --> AG["Select"]
    AH["Select"] --> AI["Select"]
    AJ["Select"] --> AK["Select"]
    AL["Select"] --> AM["Select"]
    AN["Select"] --> AO["Select"]
    AP["Select"] --> AQ["Select"]
    AR["Select"] --> AS["Select"]
    AT["Select"] --> AU["Select"]
    AV["Select"] --> AW["Select"]
    AX["Select"] --> AY["Select"]
    AZ["Select"] --> BA["Select"]
    BB["Select"] --> BC["Select"]
    BD["Select"] --> BE["Select"]
    BF["Select"] --> BG["Select"]
    BH["Select"] --> BI["Select"]
    BJ["Select"] --> BK["Select"]
    BL["Select"] --> BM["Select"]
    BN["Select"] --> BO["Select"]
    BP["Select"] --> BQ["Select"]
    BR["Select"] --> BS["Select"]
    BT["Select"] --> BU["Select"]
    BV["Select"] --> BW["Select"]
    BX["Select"] --> BY["Select"]
    BZ["Auto"] --> CA["03.20 g"]
    BZ --> CB["M"]
    CC["Auto"] --> CD["08.50 g"]
    CC --> CE["M"]
    CF["Auto"] --> CG["08.50 g"]
    CF --> DH["M"]
Time mode: Select
flowchart
graph TD
    A["Start"] --> B["Select"]
    B --> C["08.20s"]
    C --> D["08.50g"]
    D --> E["M"]
    F["Before"] --> G["Time: 10.50s"]
    G --> H["After"]
    I["After"] --> J["Memorize dose: 08.50g"]
Fig. 16
Load cell calibration (Fig. WAM)

First of all, place the device on a stable support base that does not transmit vibrations to the WAM module (scale).
To enter the Menu from the main page, press

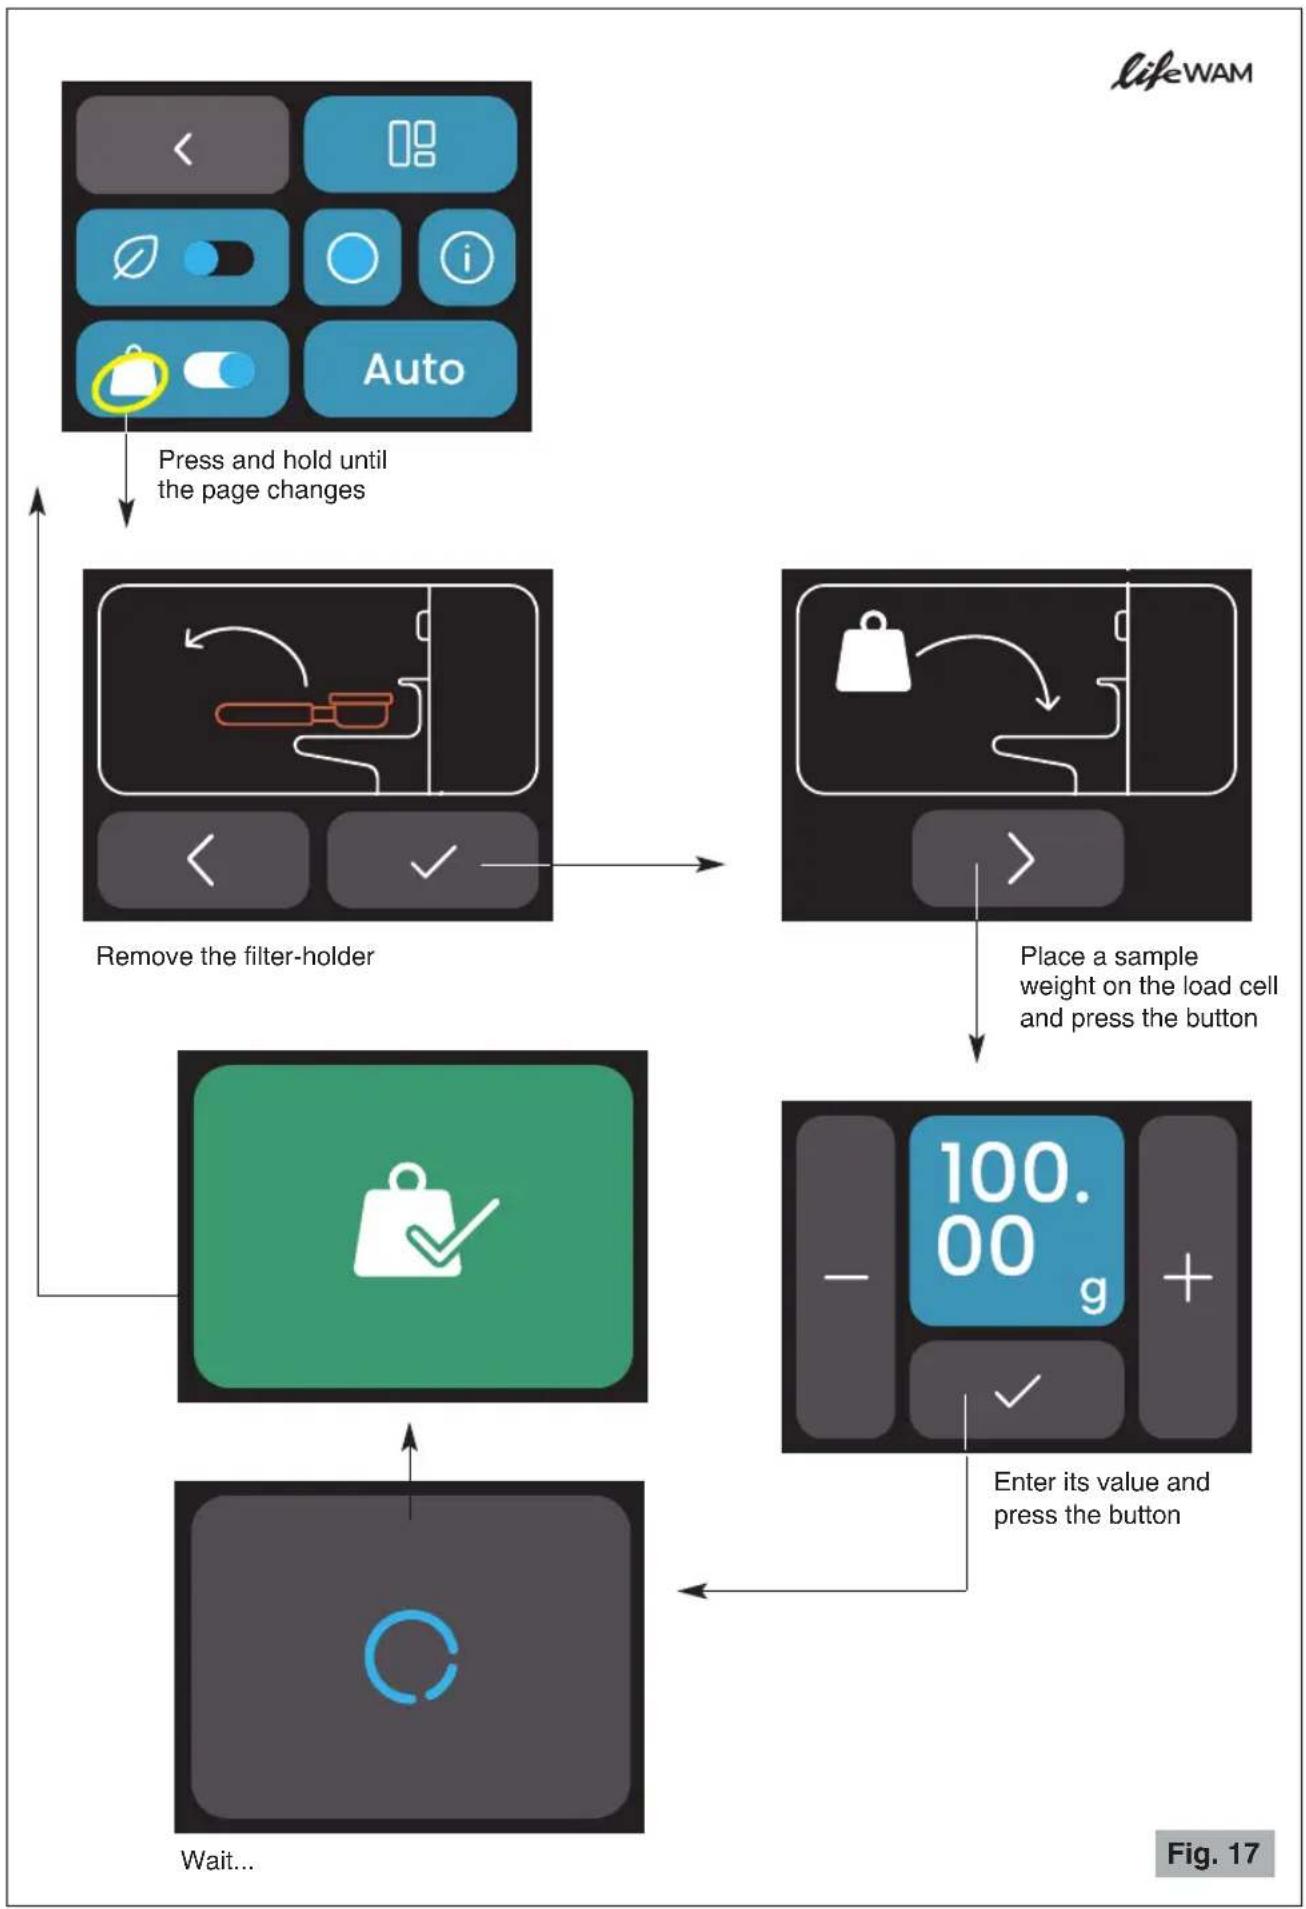
Press and hold the weight icon until the first calibration page appears (see Fig. 17).
To return to the Menu page, press

To continue, follow the instructions on the pages:
-
Remove the filter-holder and confirm with to proceed to the next step.
-
Place a sample weight (previously weighed with a precision scale) on the load cell and press the
button to proceed to the next step.
The sample weight can be a maximum of 1 kg.
- Enter its value and press the button to confirm.
Wait for the load cell to calibrate (until the Menu page appears).
To return to the main page, press

flowchart
graph TD
    A["Press and hold until the page changes"] --> B["Remove the filter-holder"]
    B --> C["Place a sample weight on the load cell and press the button"]
    C --> D["Enter its value and press the button"]
    D --> E["Wait..."]
Interface colour (Fig. 18)
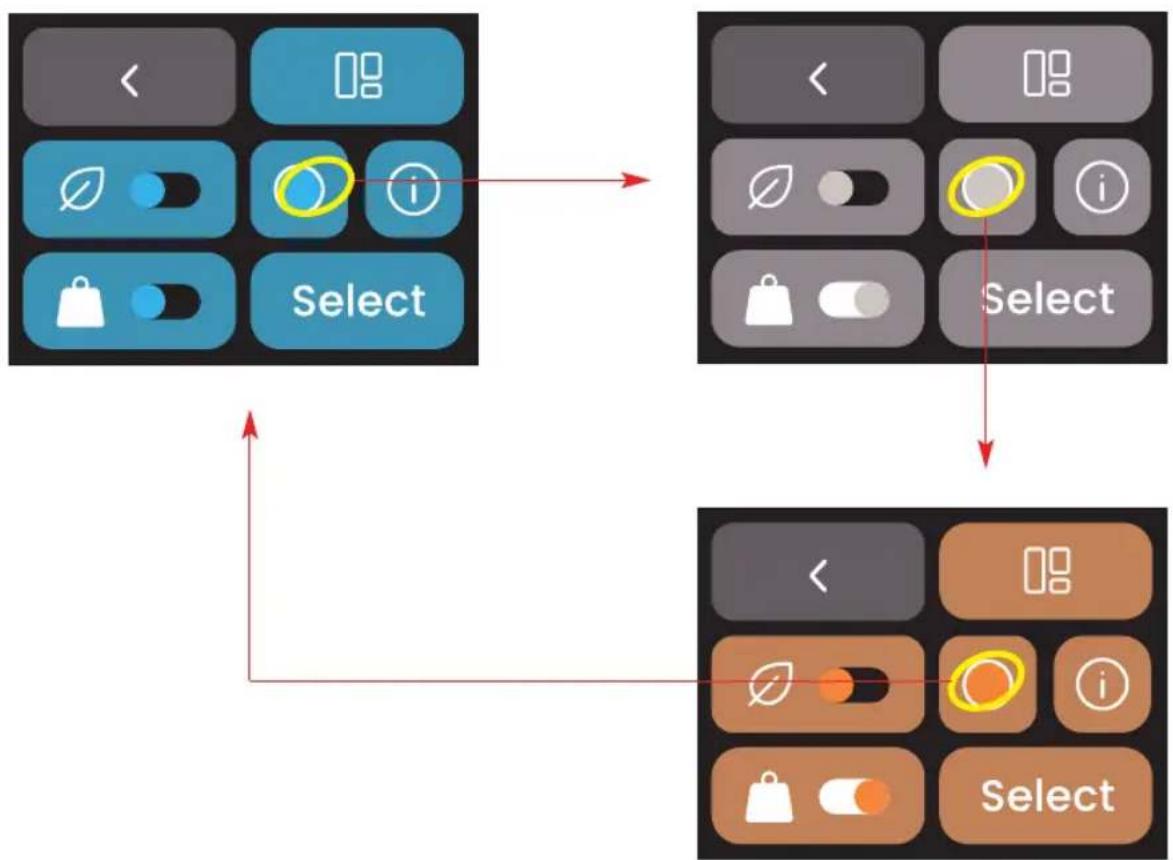
To enter the Menu from the main page, press

Press to switch between colors (see Fig. 18).
To return to the main page, press .
Interface colour: selection of the desired color
flowchart
graph TD
    A["Start Button"] --> B{Selection}
    B -->|Yes| C["Action Button"]
    B -->|No| D["End Button"]
    C --> E["Control Signals"]
    E --> F["Next Step"]
    style A fill:#333,stroke:#fff,color:#fff
    style B fill:#333,stroke:#fff,color:#fff
    style C fill:#333,stroke:#fff,color:#fff
    style D fill:#333,stroke:#fff,color:#fff
Fig. 18
Info (Fig. 19)
To enter the Menu from the main page, press

Premere

the Info page (see Fig. 19).
On the Info page, press
QR code page to download the user manual in
PDF format.
To go back, press
Distributed shot counters - see Fig. 19
The coffee grinder has a general counter in which it stores the number of shots distributed since it left the factory (this value cannot be reset) and a partial counter for the number of shots distributed since it was last reset by the user.
Note: Due to statistical tests on the product in the factory, some of the counters may be different from zero.
- Reading the counters
On the Info page, press
counters page (see Fig. 19).
The display will show the total shot counter (TOT) and the partial counter of shots dispensed since the last reset (PART).
To reset the partial counter press
Confirm the reset with the button
with the button ).

After resetting, return to the main page by pressing the buttons

flowchart
graph TD
    A["User manual: download the manual on your smartphone"] --> B["SW: XX.XX.XX\nModel: XXXXXX-XX"]
    B --> C["Info: software version information etc."]
    C --> D["TOT 200.0 kg"]
    D --> E["PART 000.0 kg"]
    E --> F["Reset?"]
    F --> G["Cancel Reset"]
    style A fill:#f9f,stroke:#333
    style B fill:#ccf,stroke:#333
    style C fill:#cfc,stroke:#333
    style D fill:#fcc,stroke:#333
    style E fill:#cff,stroke:#333
    style F fill:#ffc,stroke:#333
    style G fill:#cfc,stroke:#333
Fig. 19
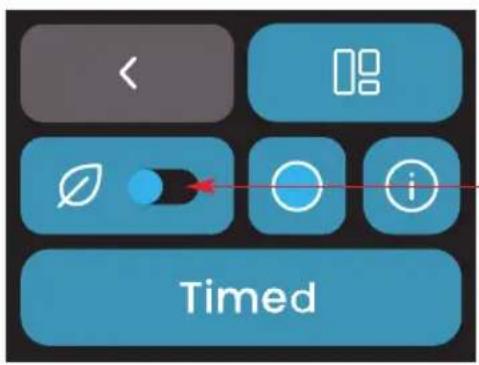
Energy saving (Fig. 20)
To enter the Menu from the main page, press

To activate energy saving (see Fig. 20) move the selector of the button
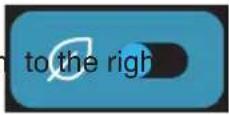
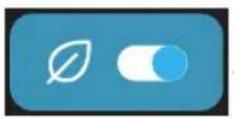
To return to the main page, press

text_image
< Ø Timed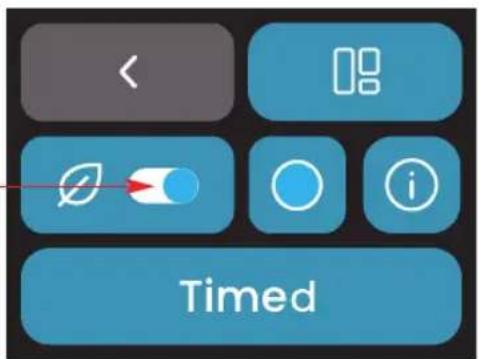
text_image
< 08 TimedDisplay stand-by: activation (deactivation) of the inactivity time to switch to stand-by (default time)
Fig. 20
ADJUSTING THE FILTER-HOLDER SUPPORT
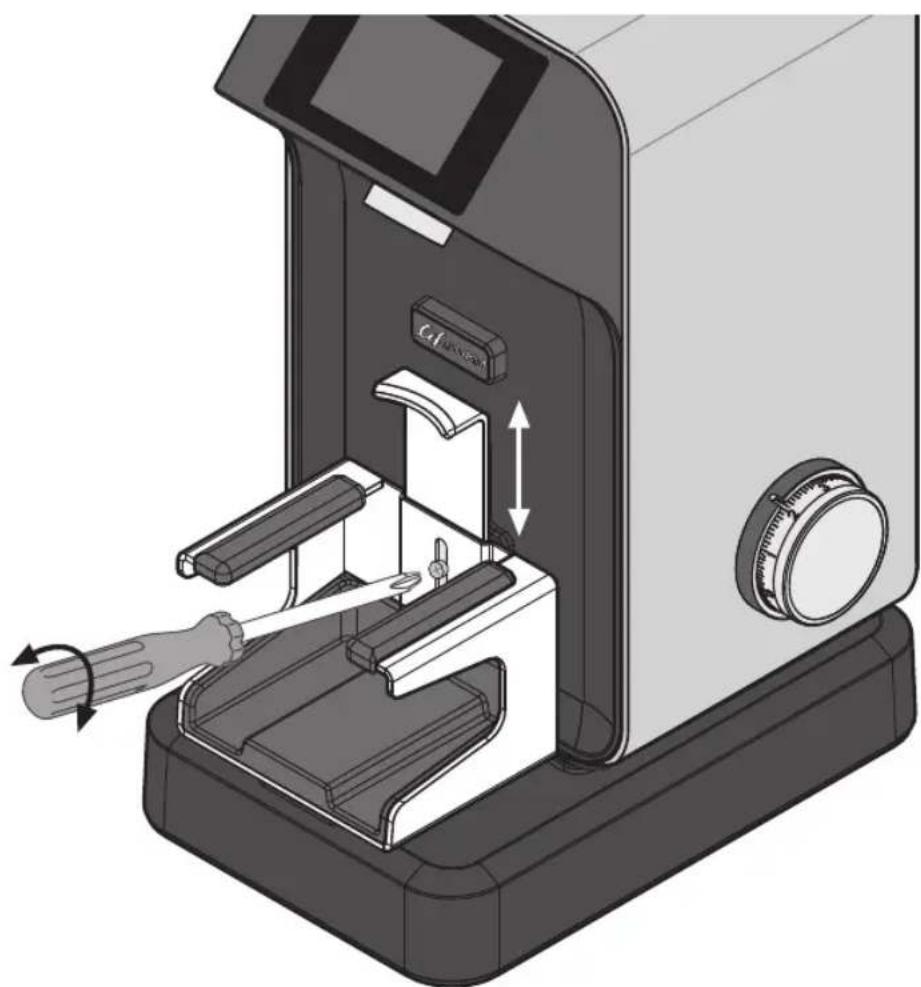
The filter-holder support has been designed to work with the different holders found on the most widespread coffee machines on the market and, in the "filter coffee" versions, it allows you to hook the special container provided.
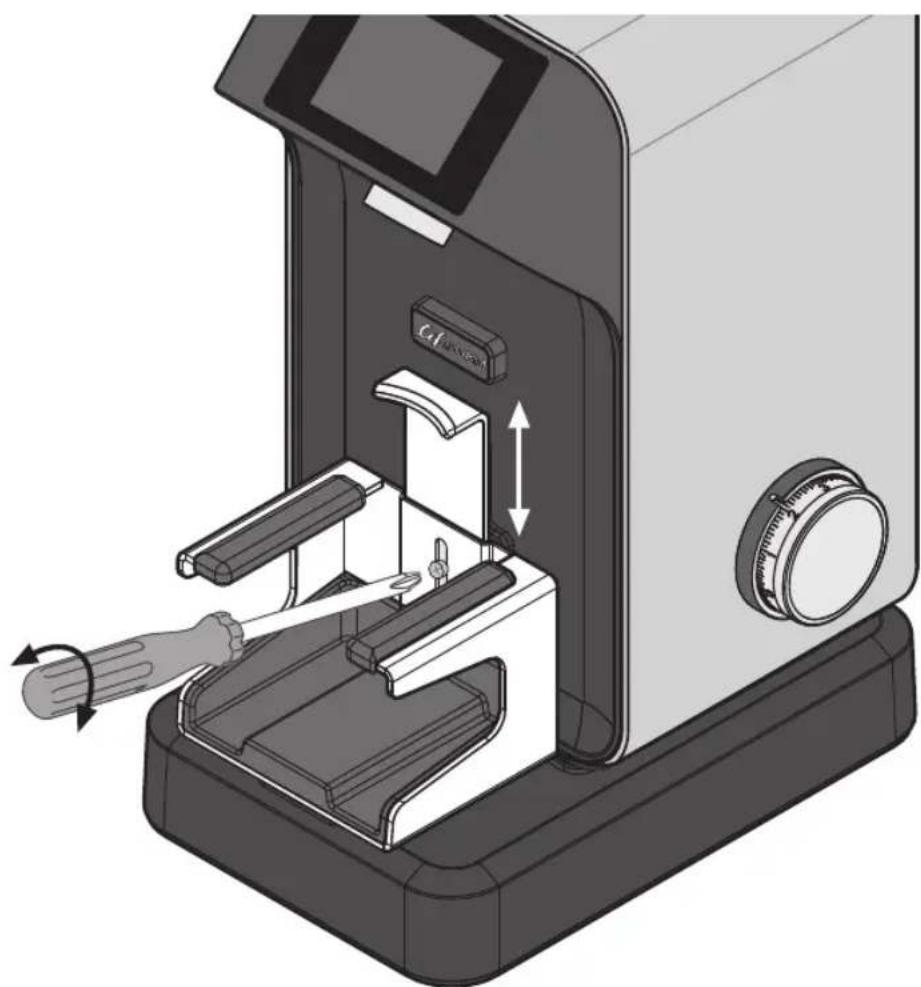
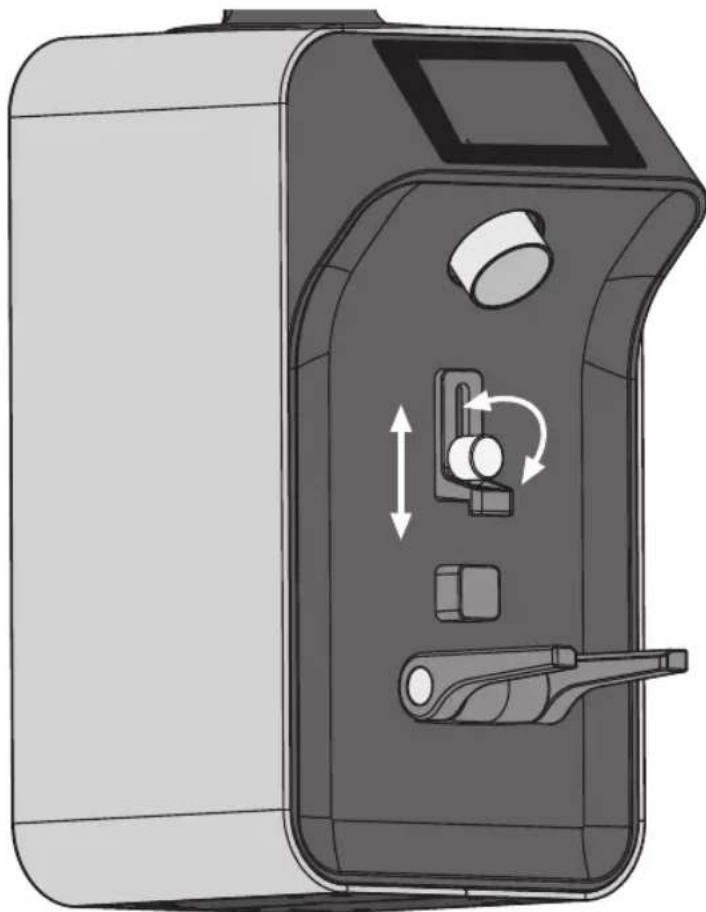
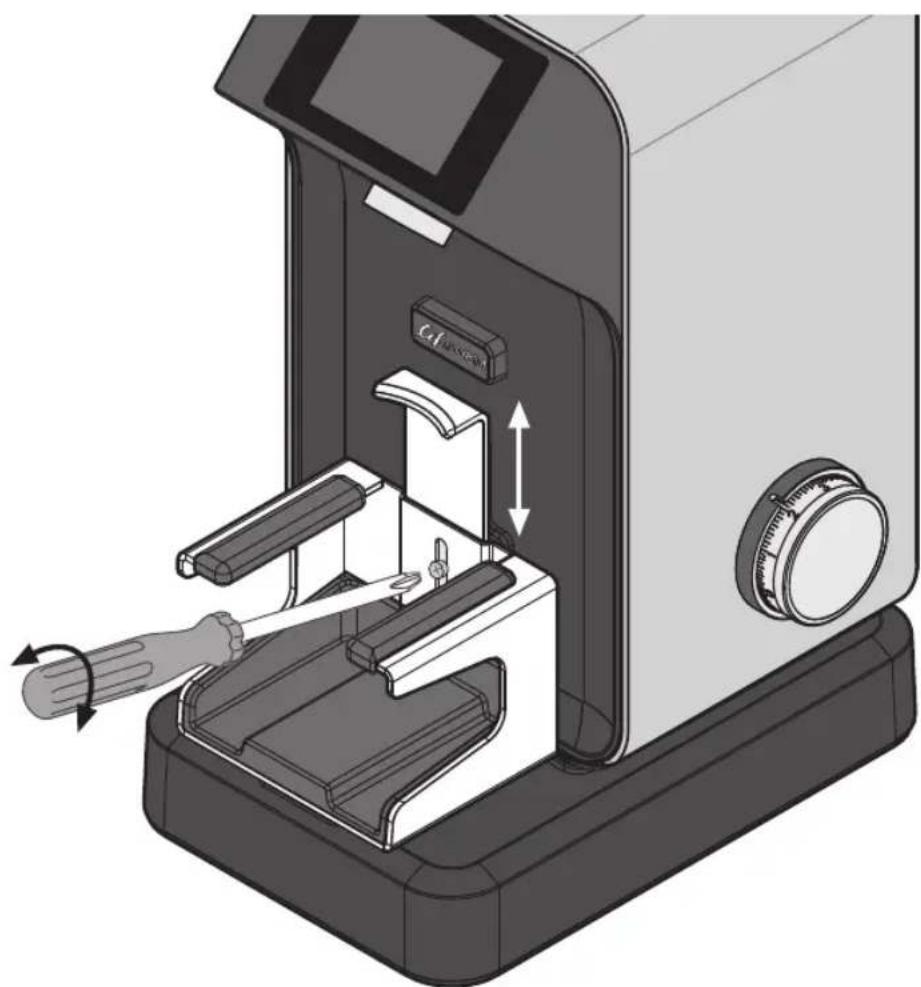
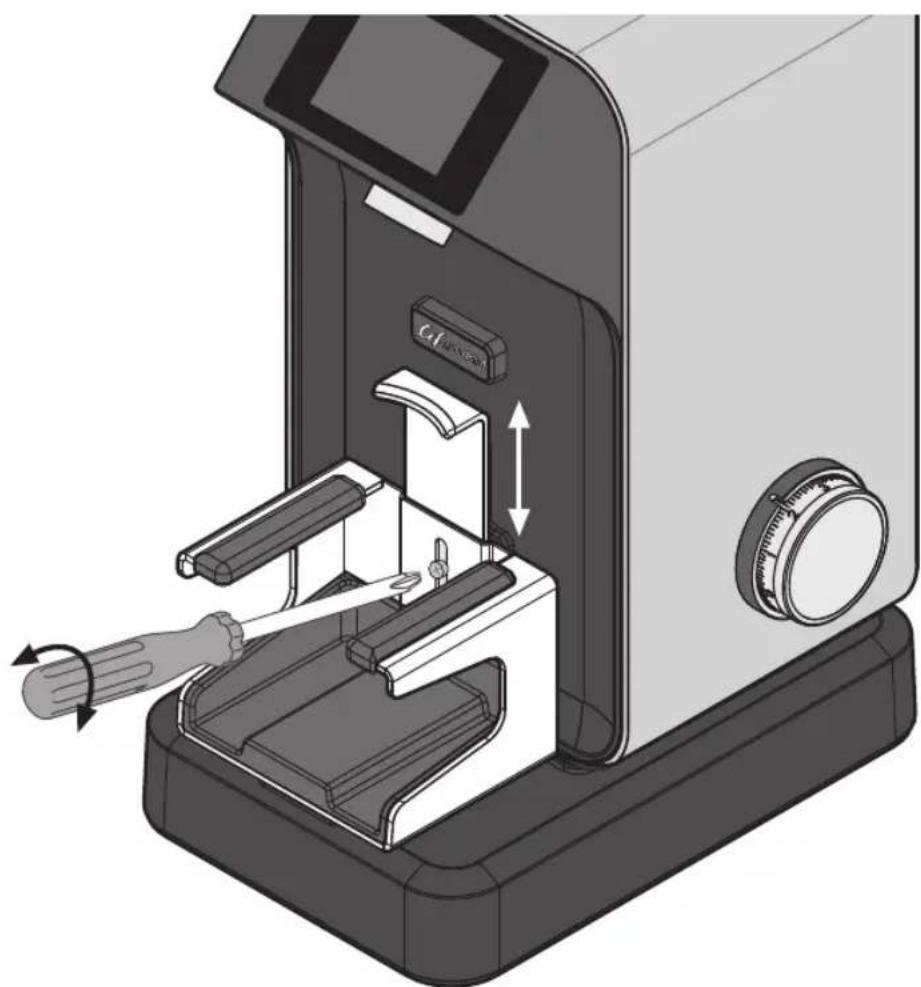
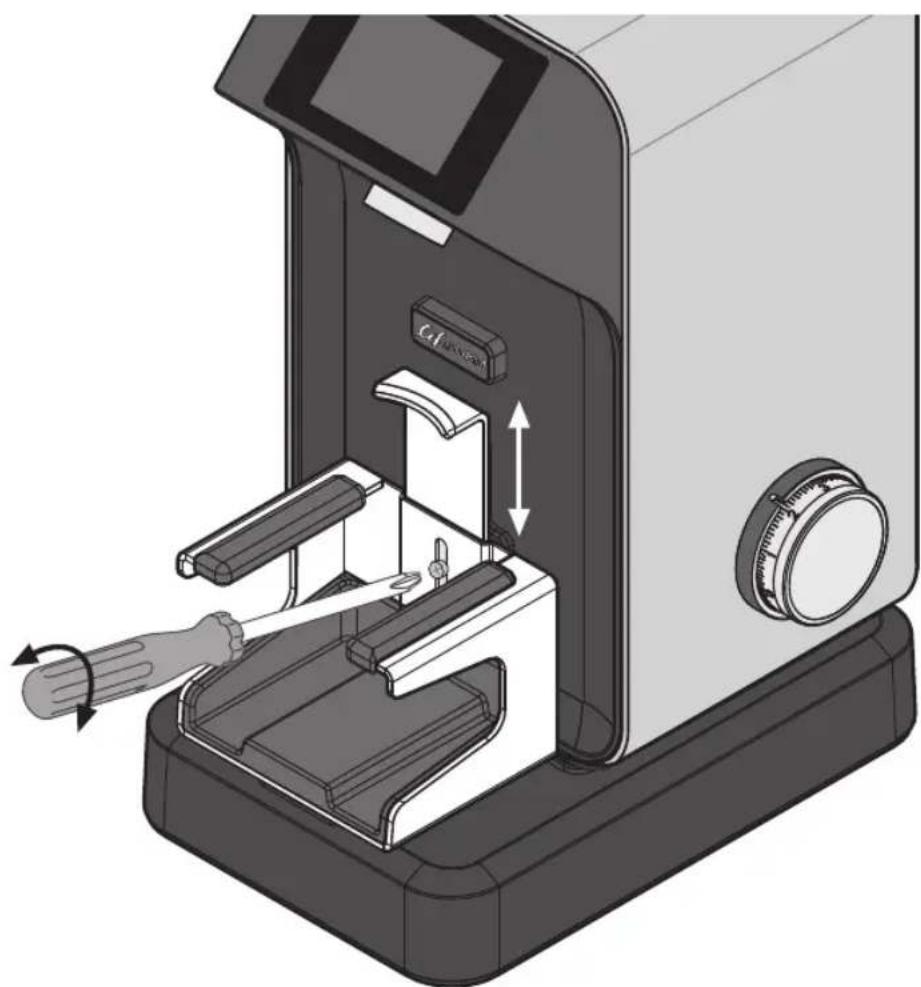
Slacken the support retaining screw (3a Fig. 1 - 3a Fig. 5), adjust its height and then tighten the screw again (see Fig. 21 and Fig. 21a).
The optimum adjustment is the one that supports the filter-holder in a perfectly horizontal position.
lifeXTOUCH
natural_image
Technical illustration of a device with directional arrows indicating movement or rotation (no text or symbols present)Fig. 21
lifeWAM
natural_image
Illustration of a microwave oven with a hand operating the base and a scroll wheel, showing internal components and motion arrows (no text or symbols)Fig. 21a
WARNINGS AND SUGGESTIONS

Never operate without the hopper fixed by the appropriate screw (6a, Detail A Fig. 3).

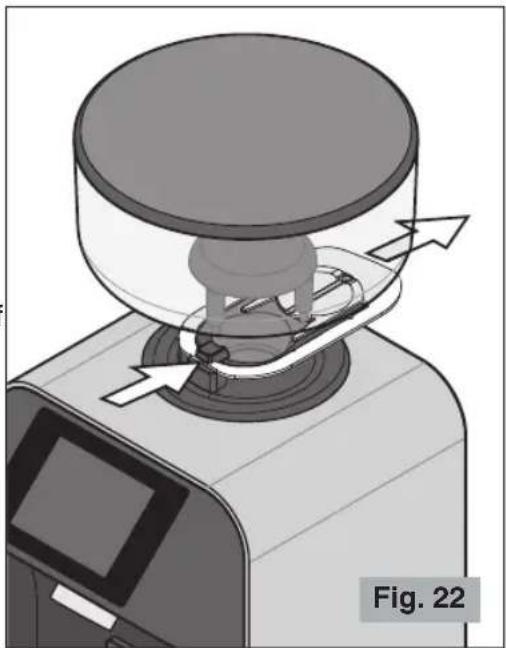
Make sure that shutter is completely open (to the last click) (see Fig. 22).
When the grinder is not to be used during the time when the business is closed, it should always be switched off with the main switch.

Put only coffee beans in the hopper, not ready-ground coffee or other substances.
natural_image
Mechanical device with rotating components and directional arrows, labeled Fig. 22 (no text or symbols on the device itself)CLEANING
It is important to keep the appliance clean and in good working order to ensure optimum quality of the products and long life of the appliance.
Cleaning of the appliance must be carried out by persons with knowledge and practical experience of the appliance.
Cleaning the grinding chamber
To remove oily residues from the coffee and avoid premature wear of the burrs (with consequent variation in the dose of the ground coffee), it is recommended to frequently clean the grinding chamber using the special GRINDZ™ coffee grinder cleaner or other similar products.
Cleaning the other components
At the end of each working day, clean the outer surfaces dirty with coffee (motor housing, discharge opening, single dosing kit etc.). Clean the appliance completely at least once a week.

Always disconnect the plug of the appliance from the power socket before cleaning it.
natural_image
Illustration of a hand using a tool to adjust or install a device into a machine (no text or symbols visible)- Clean the motor housing with a cloth dampened with water or alcohol. Wipe with a dry cloth.

Never put the appliance under running water and never immerse in water.
Once the hopper has been removed it can be washed with lukewarm water and neutral soap, then rinse it and dry well.
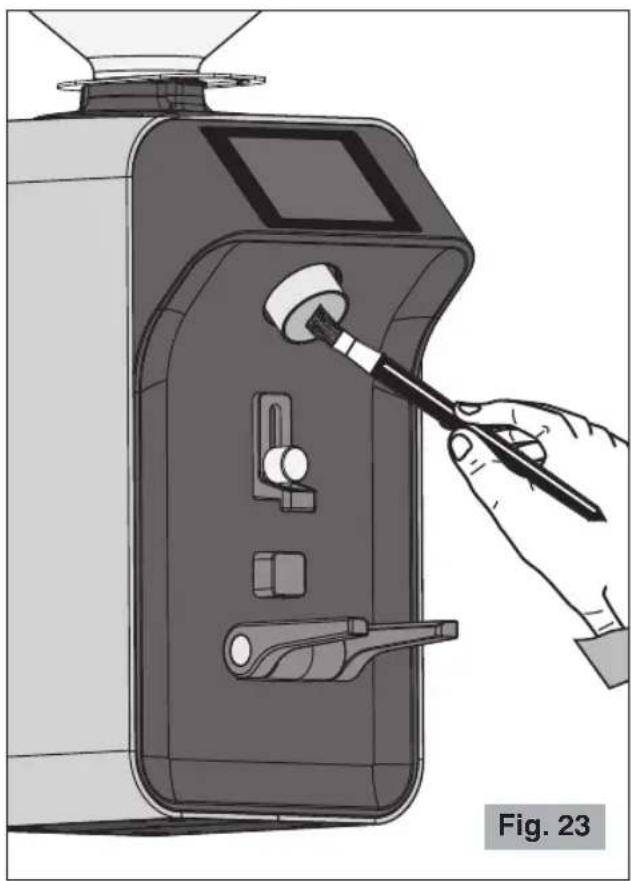
- Use a brush or a paintbrush (Fig. 23) to clean the most hidden areas inside the unit and a dry cloth for the other surfaces.
MAINTENANCE

Maintenance must be carried out exclusively by qualified technical personnel.
Care for the mechanical and electrical parts of the appliance is indispensable in order to guarantee their safety and efficiency. If any parts need replaced, authentic spare parts must always be used.
TROUBLESHOOTING
(See Table on the next page)
In case of any malfunction, defect of the appliance or if you suspect any breakage after a fall, unplug the appliance immediately.
If you are unable to solve the problem referring to the table below, contact an Authorized Service Centre.
Only qualified experts should repair the appliance.
We are not liable for any damage caused by repairs not made correctly and/or by unauthorized personnel. In these cases the warranty does not apply.
| Problem | Solution |
| The appliance does not turn on. | Make sure it is plugged in.Make sure the safety circuit breaker is closed.Check that the main switch of the appliance is ON.If the problem occurs itself after a long period of intensive use or overfilling, the motor could be in thermal protection lock! Wait at least 20 minutes and try again. The waiting time can be reduced by putting the appliance in a cool place. |
| The coarseness of the grind is not uniform. | Try grinding very coarsely for a few seconds, then return to the correct setting.Call the Technical Assistance Service to check and change the burrs. |
| The coffee is not coming out of the discharge opening correctly. | Check that the coffee discharge opening is free. |
| The motor gets blocked. | If the motor gets blocked due to incorrect regulation of grinding or to the presence of a foreign body in the burrs, try increasing to the coarsest grain size by turning the grinding adjustment knob counter-clockwise (9 Fig. 1). If this is not enough, switch off the appliance, disconnect the plug from the socket and consult technically qualified personnel. |
DISPOSAL
Correct disposal of this product (waste electrical and electronic equipment)
(Applicable in the European Union and other countries with separate collection systems in conformity with European Directive 2012/19/EU and subsequent updates)
This product has been made from high-quality parts and materials, which can be re-used and recycled.
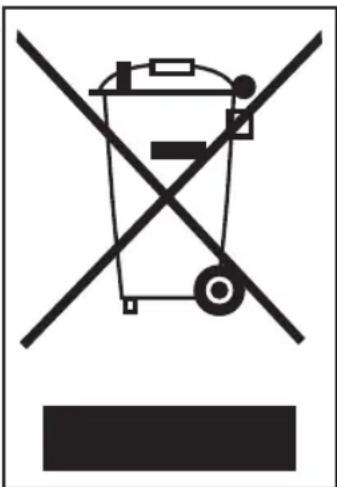
Therefore, do not throw the product away with normal household waste at the end of its working life. Take it to a collection point for recycling electrical and electronic devices. This is indicated by this symbol on the product and in the operating manual.
Please contact your local government office for information about the exact location of the closer collection point.
text_image
Prohibition sign depicting a trash bin crossed out by a diagonal line, with a blank rectangular base below.WARRANTY
This product is guaranteed against faulty materials and workmanship.
The warranty period may vary according to local laws or commercial uses of the country where the product is marketed. Therefore, please contact the retailer from whom the product was purchased.
During the warranty period, this product can either be repaired or replaced, at the manufacturer's discretion, at no additional cost only if it has been used according to the instructions in this use and maintenance manual.
If the products needs maintenance or repairs during the warranty period, contact your retailer for shipping instructions. The product should be shipped in its original package or other suitable packing.
The warranty does not apply in case of neglect, misuse, abuse or unauthorized repairs. This warranty does not apply to parts subject to deterioration through normal use such as wear to the burrs and to the electrical parts.
The warranty is limited to the costs of repair or replacement of the product or its defective parts, or an amount equivalent to the price paid for its purchase. No additional requests of damages will be available to the purchaser.
The manufacturer will not accept any liability and the warranty will be invalidated if there is a failure to follow these instructions and the technical and/or safety standards in the country where the appliance is to be used.
In any case these instructions cannot cover every possible event and the user is recommended to use the appliance responsibly.
THE MANUFACTURER RESERVES THE RIGHT TO MAKE ANY ALTERATIONS TO THE APPLIANCE WITHOUT NOTICE
MOULIN À CAFÉ lifeXTOUCH lifeWAM
Composants principaux (Fig. 1, Fig. 2, Fig. 3, Fig. 4, Fig. 5, Fig. 6)
1 Socle-moteur
text_image
lifeWAM AutoGARDER CES INSTRUCTIONS!
text_image
lifeWAM ≡ life. 06. 50 g 08. 50 g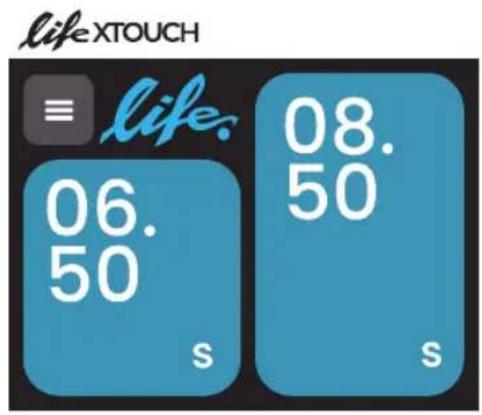
text_image
lifeXTOUCH ≡ life. 06. 50 s 08. 50 sFig. 7
text_image
lifeWAM Autotext_image
≡ life. 03. 20 g 08. 50 g MlifeWAM
text_image
lifeXTOUCH to Timed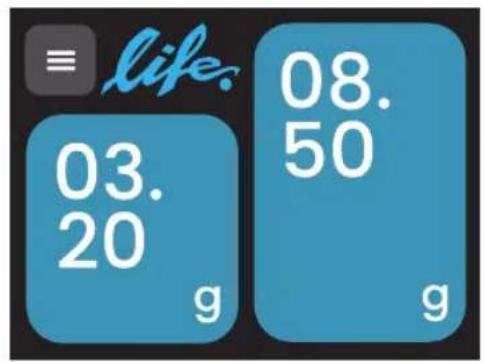
text_image
≡ life. 03. 20 g 08. 50 g
text_image
≡ life. M 08. 50 g
text_image
≡ life. 08. 20 s
Fig. 14
flowchart
graph TD
    A["Start"] --> B["Speed: 08.20s"]
    B --> C["Time: Timed"]
    C --> D["Speed: 10.50s"]
    D --> E["Time: Manual"]
    E --> F["Speed: 08.20s"]
    F --> G["Time: Manual"]
    G --> H["Speed: 10.50s"]
    H --> I["Time: Manual"]
    I --> J["Speed: 08.20s"]
    J --> K["Time: Manual"]
Fig. 15
text_image
< 08 TimedFig. 20
RÉGLAGE SUPPORT COUPE PORTE-FILTRE
natural_image
Technical illustration of a device with internal components and directional arrows indicating motion (no text or symbols)Fig. 21
lifeWAM
natural_image
Illustration of a microwave oven with a tool inserted, showing internal components and a speed shift indicator (no text or symbols present)Fig. 21a
AVERTISSEMENTS ET CONSEILS

natural_image
Mechanical device with rotating components and directional arrows, labeled Fig. 22 (no text or symbols on the device itself)NETTOYAGE
natural_image
Illustration of a hand using a screwdriver to adjust or install a device into a control panel (no text or symbols visible)
text_image
Prohibition sign with crossed-out trash bin and no text, indicating no waste or dischargeCONDITIONS DE GARANTIE
text_image
Detail A life. 10 Abb. 2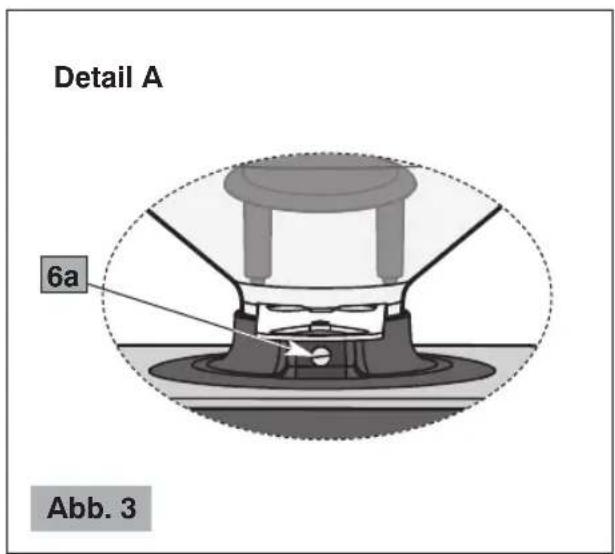
text_image
Detail A 6a Abb. 3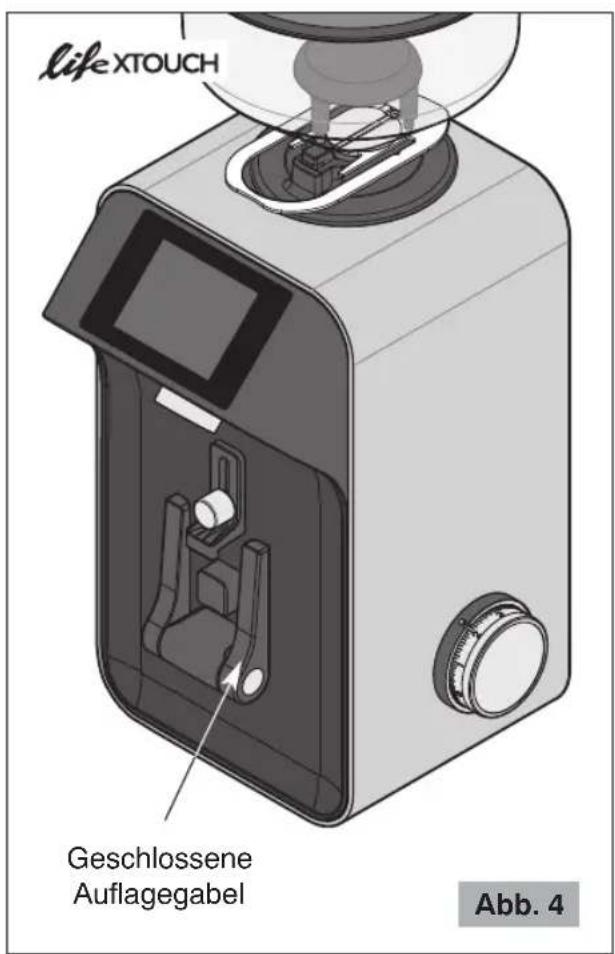
text_image
lifeWAM <Abb. 6
Menüseiten
text_image
lifeWAM ≡ life. 06. 50 g 08. 50 g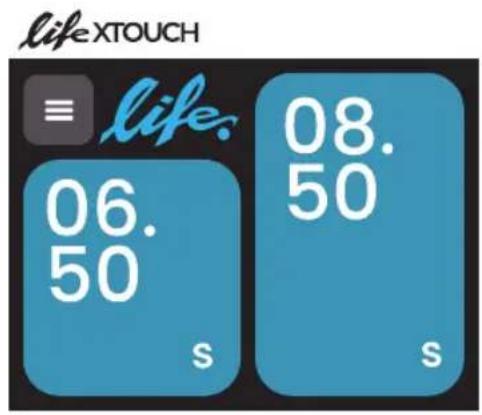
text_image
lifeXTOUCH ≡ life. 06. 50 s 08. 50 sAbb. 7
flowchart
graph TD
    A["08.20s = life"] -->|Gedrückt halten| B["05.00s = 05"]
    B --> C["06.30s = 06"]
    C --> D["06.30s = .30"]
    style A fill:#4CAF50,stroke:#333
    style B fill:#4CAF50,stroke:#333
    style C fill:#4CAF50,stroke:#333
    style D fill:#4CAF50,stroke:#333
MENÜ (Abb. 13)
text_image
lifeWAM Autotext_image
≡ life. 03. 20 g 08. 50 g MlifeWAM
text_image
lifeXTOUCH Timed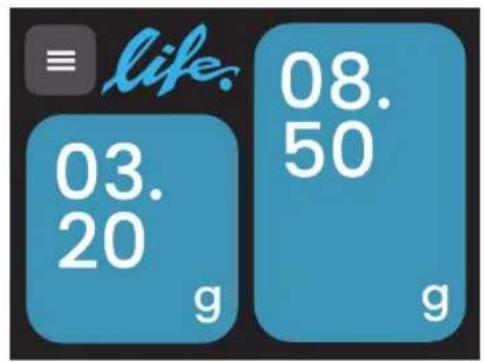
text_image
≡ life. 03. 20 g 08. 50 g
text_image
≡ life. M 08. 50 g
text_image
≡ life. 08. 20 s
Abb. 14
flowchart
graph TD
    A["Auto"] --> B["Select"]
    B --> C["Select"]
    C --> D["Gramm"]
    D --> E["Gramm"]
    F["Select"] --> G["Gramm"]
    H["Auto"] --> I["Gramm"]
    I --> J["Gramm"]
    style A fill:#4CAF50,stroke:#388E3C
    style F fill:#4CAF50,stroke:#388E3C
    style H fill:#4CAF50,stroke:#388E3C
    style B fill:#2196F3,stroke:#71B472
    style C fill:#2196F3,stroke:#71B472
    style D fill:#2196F3,stroke:#71B472
    style I fill:#2196F3,stroke:#71B472
    style E fill:#2196F3,stroke:#71B472
    style F fill:#2196F3,stroke:#71B472
    style G fill:#2196F3,stroke:#71B472
    style H fill:#2196F3,stroke:#71B472
    style I fill:#2196F3,stroke:#71B472
text_image
< 08 Ø i Timed Timednatural_image
Technical illustration of a device with directional arrows indicating movement or rotation (no text or symbols present)Abb. 21
lifeWAM
natural_image
Illustration of a coffee maker with a tool and directional arrows indicating motion (no text or symbols)Abb. 21a
WARNUNGEN UND TIPPS

natural_image
Mechanical device with rotating components and directional arrows, labeled Abb. 22 (no text or symbols on the device itself)REINIGUNG
natural_image
Illustration of a hand using a screwdriver to adjust or install a machine component (no text or symbols visible)
text_image
Prohibition sign depicting a trash bin crossed out by a diagonal line, with a blank rectangular base below.GARANTIEBEDINGUNGEN
text_image
Detalle A life. 10 Fig. 2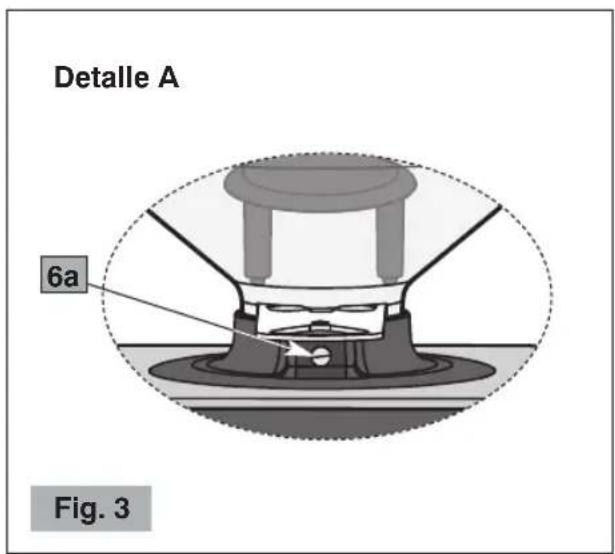
text_image
Detalle A 6a Fig. 3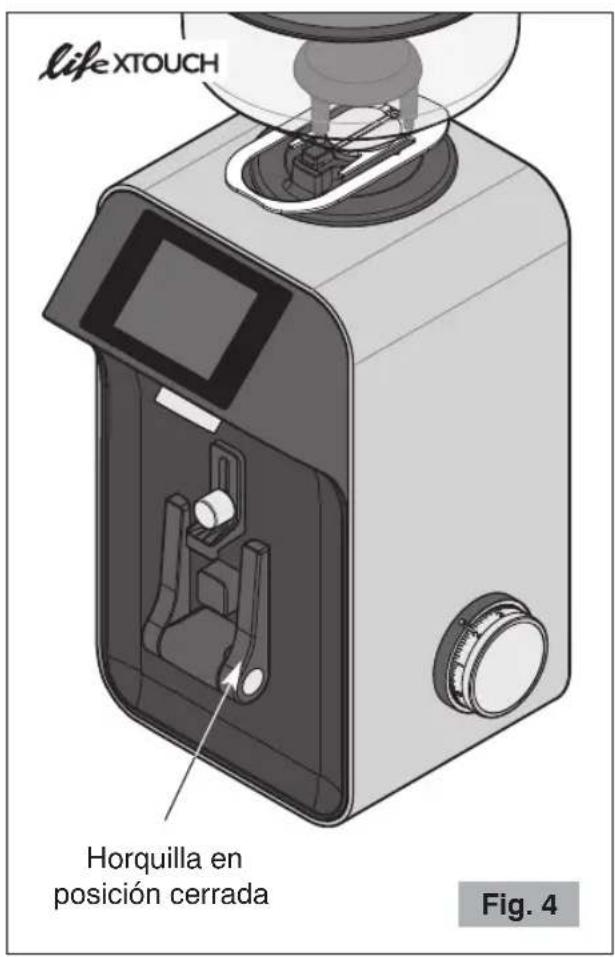
text_image
lifeWAM Autotext_image
lifeWAM ≡ life. 06. 50 g 08. 50 g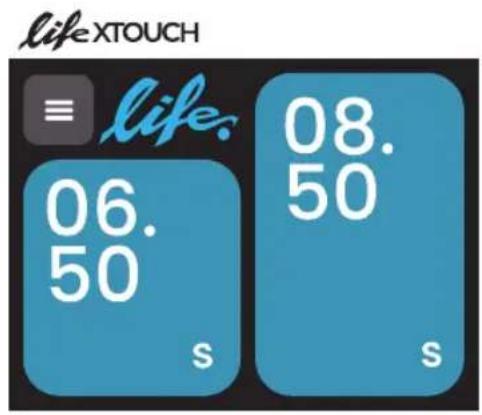
text_image
lifeXTOUCH ≡ life. 06. 50 s 08. 50 sFig. 7
flowchart
graph TD
    A["08.20s, 05.00s"] -->|Mantenga pulsado| B["05.00s, +"]
    B --> C["06.00s, -"]
    C --> D["06.30s, +"]
    D --> E["06.30s, -"]
MENÚ (Fig. 13)
text_image
lifeWAM Autoflowchart
graph TD
    A["= life. 08.50 g 03.20 g"] --> B["Timed"]
    C["= life. 08.50 g 03.20 g"] --> B
    D["= life. 08.50 g 08.50 g"] --> E["Timed"]
    F["= life. 08.50 g"] --> G["Timed"]
    H["= life. 08.50 g"] --> I["Timed"]
    J["= life. 08.50 g"] --> K["Timed"]
    L["= life. 08.50 g"] --> M["Timed"]
    N["= life. 08.50 g"] --> O["Timed"]
    P["= life. 08.50 g"] --> Q["Timed"]
    R["= life. 08.50 g"] --> S["Timed"]
    T["= life. 08.50 g"] --> U["Timed"]
    V["= life. 08.50 g"] --> W["Timed"]
    X["= life. 08.50 g"] --> Y["Timed"]
    Z["= life. 08.50 g"] --> AA["Timed"]
Fig. 14
text_image
< 08 0 i TimedFig. 20
natural_image
Technical illustration of a device with internal components and directional arrows indicating motion (no text or symbols)Fig. 21
lifeWAM
natural_image
Illustration of a coffee maker with a tool and directional arrows indicating motion (no text or symbols)Fig. 21a
natural_image
Mechanical device with rotating components and directional arrows, labeled Fig. 22 (no text or symbols on the device itself)LIMPIEZA
natural_image
Illustration of a hand using a screwdriver to adjust or install a machine component (no text or symbols visible)