
YOO MOVE 3001 - Treadmill YOO DIGITAL - Free user manual and instructions
Find the device manual for free YOO MOVE 3001 YOO DIGITAL in PDF.
| Brand | YOO DIGITAL |
| Model | YOO MOVE 3001 |
| Product type | Digital audio player / Portable media player |
| Display | TFT screen 3.0 inches, resolution 400x240 (WQVGA) |
| Supported audio formats | MP3, WMA, FLAC, APE, AAC |
| Supported video formats | AVI (max 720x576), RM/RMVB (max 800x480), FLV (max 720x576) |
| Supported image formats | JPG, BMP, GIF |
| Battery | Lithium polymer 3.7V, 700mAh |
| Audio playback time | Approximately 12 hours |
| Video playback time | Approximately 3 hours |
| Charging time | Approximately 4 hours (8 hours recommended for the first two charges) |
| Internal memory | 4GB (capacity for voice recording) |
| FM Radio | Built-in FM receiver with auto and manual search |
| Voice recorder | Recording in WAV format, sampling rate 8kHz/16kHz |
| Connectivity | USB 2.0 High Speed, plug-and-play removable disk |
| Compatible operating systems | Windows 2000, XP, Vista |
| Special features | G-Sensor (shake selection), multi-tasking, LRC lyrics display, ebook bookmarks |
| Available languages | Multilingual (20 languages to choose from) |
| Cleaning and maintenance | Clean with a soft dry cloth. Do not use chemical or abrasive products. |
| Safety | Do not expose to moisture, shocks, or extreme temperatures. Do not disassemble the device. |
| Spare parts and repairability | No user-replaceable parts. Disassembly voids warranty. Contact customer service in case of problems. |
Frequently Asked Questions - YOO MOVE 3001 YOO DIGITAL
User questions about YOO MOVE 3001 YOO DIGITAL
0 question about this device. Answer the ones you know or ask your own.
Ask a new question about this device
Download the instructions for your Treadmill in PDF format for free! Find your manual YOO MOVE 3001 - YOO DIGITAL and take your electronic device back in hand. On this page are published all the documents necessary for the use of your device. YOO MOVE 3001 by YOO DIGITAL.
USER MANUAL YOO MOVE 3001 YOO DIGITAL
Options dispensibles: mode 3D, Bass, LEQ.
Main Functions 35
Precautions 35
About the Player 37
Display Description 38
Basic Operations 38
Music 42
Video 46
PHOTO 47
Ebook 48
Record 50
Radio 51
EXTRAS 52
EXPLORER 53
USB and Charge 54
Firmware Update 55
Troubleshooting 55
Technical Specifications 58
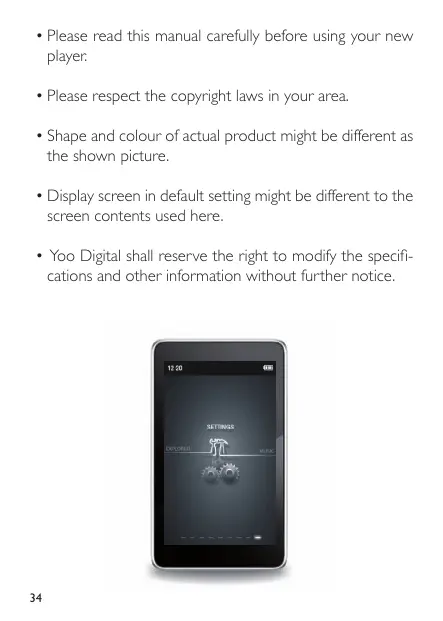
- Please read this manual carefully before using your new player.
- Please respect the copyright laws in your area.
- Shape and colour of actual product might be different as the shown picture.
- Display screen in default setting might be different to the screen contents used here.
- Yoo Digital shall reserve the right to modify the specifications and other information without further notice.
MAIN FUNCTIONS
- 3.0 inch large screen with touch and true colour TFT display, resolution : 400x240
- Support MP3 / WMA /FLAC/APE/AAC music format, support PLAY FX
Support MPEG-4 (AVI) RM,RMVB,FLV - Support picture auto browse in JPG/BMP/GIF format
- Support auto and adjusting the screen by G-Sensor function
- Energy-saving setting, brightness control, auto power off
Built-in MIC, ultra long record - Multi languages, choose from up to 20 languages
Support Win2000 /Win XP/Vista system no drivers required - USB2.0 high speed transfer
- Support E-book and bookmark setting
- Portable disk
- Multi task handling function, you can listen to music while reading E-book or viewing pictures
In built FM radio transceiver -
Support for firmware upgrade
-
All warranty information, product features and specifications are subject to change without notice.
PRECAUTIONS
This manual contains important safety measures and the proper use of products. Please read the manual before using the product.
- Do not use the player in extremely hot, cold, dusty or damp environments.
2.Do not drop the player when using it, user will be held responsible for any damage caused by fall or impact.
3. The service life of the battery is subject to the use of the player, manufacturer and production date.
4. During the formatting or uploading/downloading, do not disconnect the player from the PC. Disconnection during updating or data transfer may damage files or the player.
5. Do not use alcohol, Diluent or other Chemical to clean products surface , those Chemical may Corrosion products .
6. Charging cause the player temperature rise is acceptable, it doesn't effect your use.
7. Company takes no responsibility for player files missing , please backup your data in time
8. The memory capacity identified by player may be different as it by the computer, it according to firmware version and flash species.
9. Computer virus may damage your files and firmware, please take more care of computer virus protection. When player doesn't work because of infected with the virus, you can update firmware by connect with a computer without the virus, then format player.
10. This player contains no user serviceable parts. Disassembling the player may damage the player and will void the warranty. Please check the trouble shooting section of this manual if experiencing problems.
11. Our company reserves the right to improve the product. Different software and hardware versions might influence the product performance and functions, therefore the product shall be subject to change without further notice.
12. The memory capacity identified by player may be different as it by the computer, it according to firmware version and flash species.

Music Playing
Video Playing
Record

e-Book
BASIC OPERATIONS
Power On/Off
-
Power On : Push power switch toward the red sign and hold for 3 seconds, the player will start and display the main interface.
-
Power Off :
a. In the boot state, push power switch toward the red sign and hold for 3 seconds to power off.
b. In case of low battery the player will automatically power off.
- Lock Switch
you can lock the player's touch screen to prevent unintentional operation.
- Lock: In Manu interface mode, Touch Settings icon menu and select the Key Lock Time into setting option, when the screen top right corner appearing a lock sign, this time the screen can not be controlled and has been locked
- Unlock : in the locked mode , push power switch toward the red sign to unlock.
Power Monitoring
You can monitor the battery power at any time by means of watch the battery icon. With the increased time of using player, The battery icon in the grid will be a corresponding reduction in the number. Battery life relative to the type of document you played, the state of the screen display, Operating frequency and voice grade. You can save electricity by setting options such as "Light time", "Brightness" and "Auto Shutdown time" etc.
When the battery icon shows the number of cells for space-time, please charge the player in time.
- Power Reset
If your player hangs or locks up and touches un-control during playback, push power switch toward the red sign and hold about 8 seconds until the player turns off. The player can be restarted again as described earlier. This may return all settings to default.
- Connect to Computer and File Transfer
Player support USB2.0 interface. Start your computer and connect the player using the supplied USB cable. The player will be detected as standard removable disks by your computer and allows the transfer and management of files on the player without the need for the instillation of 3rd party software.
- Charging the Player
You can choose two ways to charging the player :
a. Connecting player to your PC with the supplied USB cable.
b. Use the charger for the player
In the charging time, battery icon will show process of pulse. After charging complete, battery icon will display the full battery cell.
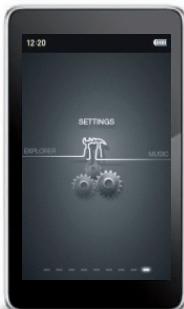
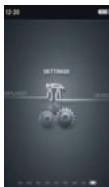
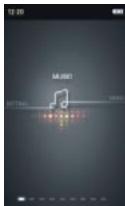
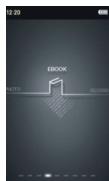
- Main Interface
The main interface is displayed when the player is turned on. Touch and Scroll left or right of the screen to select your required function icon menu (Music /Video /Photo /Ebook /Record /Radio /Extras/ Explorer/Settings).
- Setting
From the main menu, scroll left or right of the screen to touch : Settings icon enter to the setting interface (including: Backlight time, Brightness , Light Mode, Keyboard lock time, Auto shut time, Restoreable, Language, system information, Time setting, AutoShut, G- Sensor), you drag up or down the middle of screen to select your required sub item and touch to enter and set. Touch 值 icon in any submenu to exit to the previous menu or directory.
a. Light Time
5 seconds, 10 seconds, 15 seconds, 20 seconds, 30 seconds,
Always On Click on an option to select and set up, click on the icon to exit this interface.
b.Brightness
There are one, Two, Three, Four, five all five settings for the option of using, select and click an option to set up (with the screen brightness increase in the number of light will gradually change), then click on the icon out of this interface.
c. Light Mode
Touch the sub item can select All Dark or Penumbra option for your required. Adjusting these settings will impact on battery duration, then Click on the icon out of this interface.
d. Keyboard Lock Time
Touch the option can select 10Seconds, 30 Seconds, 5Minutes, 10 Minutes, No Locking for your required , then click on the icon out of this interface.
Lock the keyboard, the key is to prevent innocently. When the screen is locked, you will not make any operation.
e.Auto Shut Time
Sets the period of time, the player will automatically turn off after the last operate if no play back is occurring.
Touch "Auto Shut Time" sub item will showing the set option on the middle of the screen directly. (30Seconds, 1 Minutes, 3 Minutes, 5 Minutes, 10 Minutes, No automatic shutdown) Then drag up or down the middle of screen to select and touch to set for your required. Click on the
icon to exit this interface.
f. Restorable
Touch the sub item will showing a restorable dialog box, touch YES to confirm the player settings to default, touch NO to close dialog box without change.
g. Language
Select the desired language for the player. Simplified Chinese,
English and other languages available. Click on an option to select and set up, click on the icon to exit this interface.
h. System information
Click «System Information» screen will display information about the machine: product name, MajorVersion ID, Local Memory Size. Click the icon is to exit this interface.
i. Time setting
Touch the sub item will showing clock setting box. You can adjust year, month, data, hour, minute by click corresponding icon or icon, then click the coin to save setting and exit this interface.
Click the icon is to exit this interface.
j. Auto shut (Sleeping time)
Sets the period of time, the player will automatically turn off.
Touch "Auto Shut" sub item will showing the set option on the middle of the screen directly. (10 Minutes, 30 Minutes, 60 Minutes, 90 Minutes, 120 Minutes, No automatic shutdown) Then drag up or down the middle of screen to select and touch to set for your required.
Click on the icon out of this interface.
k.G-Sensor
Touch sub item enter Sensor setting interface, you can choose off or on this function.
Click on the icon out of this interface.
MUSIC
Detailed Operation
From the Main Menu scroll left or right of the screen to select and touch [Music] icon to enter Secondary menu interface(Current
Play/Resume PLAY, All music, Dir list, My Favorites, Artist, Album, Genre, Record, Medialib Update). Click the option to enter your choice. Touch icon to exit to the main interface.
1) All music
For the preservation of music files in all, you can select a music by touch this music.
- Click on the icon to show dialog box, touch select «Add to Favorites» will be your current choice of songs added to the Favorites folder or touch choose «Exit» then close the dialog box.
- You can review music you added in «My Favorite » under the secondary menu. Sliding up and down the touch-screen can browse all the music.
- Touch and click on a music to enter playing interface.
- Touch icon back to the previous interface.
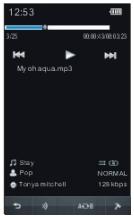
Music play (in play interface)
Touch ou icon once to select Previous or next music play. Touch and hold ou icon to fast forward or fast reverse through the current file.
In play mode, Touch icon to stop music play , Touch ▷icon tocontinue starting music play .
Touch icon will showing volume control icon, click + or - icon to increase or decrease the volume. Click icon to close volume regulator after complete setting.
Play Settingsx
Click on the icon will display the setup menu, repeat Mode, play
Mode, User EQ setting, EQ Sel, you can click the settings option of a confirmation to enter.
- Repeat Mode :
I. Once: Stops after playing current song.
2. Repeat : Repeats the selected single song.
3.ALL : Plays all songs in current selection once.
4.ALL Repeat : Plays and repeats all files in current selection.
5. Intro : Plays all songs in current folder for 10 seconds in sequence (After listening, the system will return to normal playback mode.
- Play Mode :
Set the playback of selected files form in order or Shuffle (random).
- User EQ Setting :
Set User EQ mode 3D, Bass, LEQ.
EQ Sel:
Select from 7 preset equaliser settings Normal / User EQ / Rock Pop / Classic / Bass / Jazz. Repeat function.
Player support repeat function
Touch the ADR icon, this time the screen showing ADR icon which confirms the starting repeat point, then touch the ADR icon again to display ADR. This confirms the ending repeat point. When ADR icon is now displayed and the A-B Repeat mode is set. The player will continue to repeat the selection between the starting point and the ending point. To stop A-B Repeat mode, touch the ADR icon again.
Memory play
In playing state, click icon can exit play interface, the music will continue to played in background.
Memory play
In playback music mode, when the music quit playing, the player will
automatically to remember this music quit time, then you want to play this music file again, select and touch resume play item from music Media Library menu, the player will automatically skip to the last moment and continue the music play
Shake by G-sensor function
The player has shake to select songs by G-sensor function, in music playback mode, when you shake the player to left or right side can select Previous or next music to play.
2) Dir List
In music Media Library menu, click Directory listing to show all the local directory file in the player. You can sliding the screen up and down to browse the directory folder. When a folder is clicked and Confirmed, it will show all the file under this folder. In this state, click any music in the folder to start play the file. Touch the icon under screen, and "delete file?" dialog box will be displayed to ask whether to delete the file, touch YES to delete, touch NO to exit.
Touch icon can back to the previous interface.
3) My Favorites
My Favorites include the local collection of all music files, you can slide up and down touch-screen browsing. In this state, click and confirm a music will enter play interface and start playing the file. Also if you select a music and touch the icon will show dialog box, you can touch delete file(delete single music file), clear up(delete all the music in My Favorites) or exit to operate according to your choice.
will be displayed to ask whether to delete the file, touch YES to delete, touch NO to exit.
Will show delete box ask you whether or not to delete this file.
Touch icon can back to the previous interface
Note 1: The lyrics user may from WWW. 51LRC Websites and so on COM downloads the song correspondence the LRC lyrics, or through software's manufactures the lyrics voluntarily. Then preserves into your player with the MP3 song same name, might realize the lyrics synchronization to demonstrate.
Note 2: A very small number of very special MP3/WMA encoded audio files may not play on the player, please use audio converter tool for converting and then copy to the player to play. Only support 3.95,3.97,3.98,3.99 version APE files of Compressed by normal and fast mode.
VIDEO
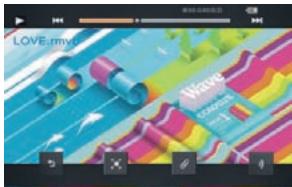
From the main menu, scroll left or right of the screen to touch [Video] icon enter to the video explorer interface, drag up or down the middle of screen to select the video file and touch to play the selected file.
Touch icon will start play the file the last time you played, and will show a reminding block, select and touch YES option that the player will continue to play which remembered automatic the point of Previous video play or NO option for your required,
Touch icon in any submenu to exit to the previous menu or directory.
Touch icon will showing "Delete File" dialog box,
select and touch YES option to delete selected file or NO option to exit.
a) Touch icon to stop video play
b) Touch icon to continue starting video play
c) Touch or icon once to select Previous or next video play, touch and hold or icon to fast forward or fast reverse through the current file
d) Touch icon will showing volume control icon, click on + or - icon to increase or decrease the volume, touch icon again to exit voice setting.
e) Touch icon to expand the current file of playing screen, touch icon again to resume previous play mode.
f) Touch icon will showing "Select time play" block, then touch or icon to select "Hour" or "Minute" option and touch or icon to set the time for your required and touch YES option to confirm to play or NO option to exit to the setting
g) In video playing mode, touch icon will exit Player interface.
h) The player has video memory function, In video playback mode, when the file quit playing ,the player will automatically to remember this file quit time ,if you want continue to
play this video file again, select this file will showing a reminding block, select and touch YES option that the player will continue to play which remembered automatic the point of Previous video play or NO option for your required,
PHOTO
From the main menu, scroll left or right of the screen to touch [Photo] icon enter to the photo explorer interface, drag up or down
the middle of the screen to navigate your required folder or picture file in listing display mode, select and touch to commence playback the selected file. Select the image file and touch icon will showing "Delete File" dialog box, select and touch YES option to delete selected file or NO option to exit Touch icon in any submenu to exit to the previous menu or directory.

a. Touch icon to select time (2Sec,5Sec, 10Sec,Turn Off) to slide show images in current folder.
b. Touch icon or icon to Rotate the image Left or right
c. Touch anywhere on the screen can display or hide toolbars.
d. Touch the screen left or right of the showing photo to play the previous or next photo.
e. Touch icon to exit picture Browser interface
Note : A very small number of JPEG image files in Apple Computer Systems can not be browsed by player. Please use windows built-in drawing tools to convert and then copy the image on the player.
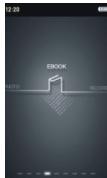
EBOOK
From the main menu, scroll left or right of the screen to touch [eBook] icon enter to the ebook explorer interface, drag up or down the middle of screen to select your required folder or the ebook file and touch to play the selected file.
Touch icon will showing "Delete File" dialog box, select and touch YES option to delete selected file or NO option to exit.
Touch icon will open the last time opened ebook file, and show
the page before you exit.
Touch icon in any submenu to exit to the previous menu or directory.
Ebook reading interface
I. Touch icon will showing the font size and colour setting interface, touch your required icon and touch YES option to confirm your set or NO option to exit the set.
2.Drag up or down the middle of screen to select your required page, touch icon Select the bookmark Storage location to save it, touch icon to exit to the previous menu.
3. In ebook playback mode, touch and drag up or down the middle of the screen to read previous or next page.
4. Touch icon to horizontal view or vertical view.
5. Touch icon to exit to main menu.
6. Touch icon will displaying the playback options menu(Page Jump, LoadMark, Flip Time),drag up or down the middle of the screen to select and touch to set for your required sub item.
Page Jump
Touch the sub item will showing page set interface, then touch or icon to select page band and touch or icon to set the page for your required , after finish setting touch icon to confirm to display.
- Load Mark
Touch LoadMark sub item to select the open bookmark for your required, the screen will jump to the original page of this mark directly to play. You can select the LoadMark sub item then touch icon to delete it you want.
- Flip Time
Sets the time the next page will be displayed automatically. Time can be set in 5 second increments from 10 to 20 seconds.
Note: This player on supports files saved as“.TXT” or“.LRC” files in ANSI code. Files with format code will not be displayed. Format codes should be removed from file prior to being copied to the player.
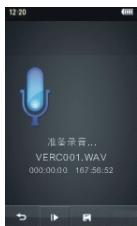
RECORD
From the main menu, scroll left or right of the screen to touch
[Record] icon enter to the record ready interface.
Touch picon in any submenu to exit to the previous menu or directory.
- The recorder will start in "Ready" mode, to begin recording touch icon to start voice recording and icon change to icon. Retouch icon change to icon, and then touch icon to continue starting voice recording.
- When recording has been completed, touch icon to save the file and exit to record ready interface. Files names are generates automatically in sequence. Please see the

time and date feature to ensure the correct time and date stamp are recorded on the files when saved.
- When recording has been completed, touch icon will show save record files dialog box, touch YES to save, touch NO to exit to the previous menu without save.
- Recorded files can be played back using the Music Playback feature by selecting Record sub item in the main MediaLib menu.
From the main menu, scroll left or right of the screen to touch [Radio] icon enter to the radio interface, Touch icon in any submenu to exit to the previous menu or directory.
a) Touch icon will showing volume control icon, click on + or - icon to increase or decrease the volume, touch icon again to exit voice setting.
b) Touch or picon to move up or down the range in 0.1MHZ increments to fine tune the radio.
c) Touch picon will displaying the features options menu(Search by hand, Auto search, Preset mode, Save channel, Delete channel, Receive area),drag up or down the middle of the screen to select and touch to set for your required sub item.
Search by hand
Touch the sub item to change the receiver frequency manually.
- Auto search
When selected, the player will automatically search for radio stations broadcasting in your area. When found each station will be saved.
- Preset mode
Touch the sub item to enter Preset mode, touch or icon to select the channel previous saved.
- Save channel
Touch the sub item to save the current station.
- Delete channel
Touch the sub item and select the channel to delete from saved list.
Receive area
Touch the sub item to set the FM frequency range used in your area

options are Korea / Japan / China / Europe.
I. Touch icon will enter FM Record interface start to record from received FM broadcast for later playback.
2. In recorder mode, touch icon to pause voice recording, and icon change to icon . Retouch to continue starting voice recording.
3. When recording has been completed, touch icon to save the file and exit to record ready interface. Files names are generates automatically in sequence. If touch icon after recording will show save record file dialog, touch YES to save, touch NO to exit without save.
4. Recorded files can be played back using the Music Playback feature by selecting Record sub item in the main MediaLib menu.
EXTRAS
From the main menu, scroll left or right of the screen to touch [Extras] icon enter to the extra interface which included features of this player include a Stop Watch and Calendar.Touch icon in any submenu to exit to the previous menu or directory.
1. Stop Watch
Touch Stopwatch icon to enter the Stopwatch interface. Touch icon to start to begin the timer, touch icon to stop the timer, touch icon to sampling (can be sampling four times), touch icon to clear the time.
2. Calendar
Touch Calendar 05 icon to display the Calendar interface. Touch Year icon will showing a year setting block, then touch < or > icon to

select your required year to set, touch Month icon will showing a month setting block, then touch < or > icon to select your required month to set, touch Date icon will showing a date setting block, then touch < or > icon to select your required date to set.
Touch icon in any submenu to exit to the previous menu or directory.
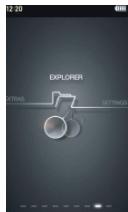
EXPLORER
From the main menu, scroll left or right of the screen to touch [Explorer] icon enter to the MediaLib interface, Touch icon in any submenu to exit to the previous menu or directory.
- Play file
In the explorer interface, drag up or down the right slipper block of screen to select and touch your required folder to enter to the folder, and then drag up or down the right slipper block of screen to select your required file and touch to play, Touch icon to return to the previous menu.
- Delete File
In the explorer interface, drag up or down the
right slipper block of screen to select and touch your required folder to enter to the folder, and then drag up or down the right slipper block of screen to select your required file, then touch icon will showing "Delete File" dialog box, select and touch YES option to delete selected file or NO option to cancel.
- USB Display Mode
This player has a high-speed USB2.0 port, with standard portable disk function for Windows 2000/XP/Vista systems without the need for driver instillation. After connecting the player to the PC via USB port with supplied cable, the player will display "Online" mode icon. The player will be displayed in the "My Computer" window and be assigned the next available drive letter by your system. Double click on this icon to open and display the contents of the player. Files and folders can moved, copied or deleted to and from this drive as you would on any other drive on your computer.
Charge Display Mode
If the battery is too low, the player will display "Low battery to power off", then the player will be turned off automatically. The player should be charged by using the supplied USB cable to connect to a PC.
Charging time is approximately 4 hours from fully discharged.
Playback duration is approximately 3 to 3.5 hours for Video and 12 hours for Audio playback. Battery duration is dependent on several factors including backlight brightness and duration, Auto off settings and battery condition.
Note : It is recommended that for the first 2 charges the player is charged for 8 hours to help condition the battery.
FIRMWARE UPDATE
- Users can also download the latest firmware update (YooMove 3001) in download centre of our website (http://www.yoodigital.com).
- You can download the YooMove 300I firmware copy into the flash disc of the machine. Disconnect the computer, again start-up a machine.
3.From main Interface, touch [Settings] option to enter system setting interface, select Upgrade option to select YES option to start. (Show as following picture). - When enter to the second interface of firmware update, all operate had been screened. The installation interface will showing the current state of installation.
- When the firmware update has been finished, the player will re-start automatically. The whole process will be finished after the system installation.
Note : During the installation, the power should not be cut off directly.
TROUBLESHOOTING
The player cannot be turned on
Check if the battery is low or flat recharge the play if required by connecting to your PC with the USB cable. Ensure that the computer is on during the charging process.
If the player still cannot be turned after charge, please contact with our dealers.
-
No sound can be heard from the earphones
-
Check if the volume is set as 0. Adjust the volume as required.
- Check the volume of the file attempting to be played.
-
Confirm the earphone is properly connected.
-
Noise through earphones
-
Check if the earphone plug is clean, foreign particles can cause static to be heard through the earphone during playback.
- Check if the music file is damaged. Confirm by playing other music. The damaged file might create serious noises or voice dithering.
Incorrect language displayed
Please make sure that you have selected the correct language. Set language in (Settings) => (Language Selection).
- Files cannot be downloaded
I.Make sure the proper connection between computer and player.
2. Check if the memory is full.
3. Check if the USB cable is damaged and replace if necessary.
- Audio files not playable
This player cannot play audio files that are copy protected. Please ensure that only files that contain no copy protection are transferred to the player.
- Video files not playable
Please check that the video files transferred to the player are in the correct size and format. Some file may need to be re encoded to be played on this player.
- Play song No lyrics show
Please confirm whether or not to play songs with the lyrics of the corresponding documents, and make sure Store in the same directory.
Make sure LRC lyrics document format, name same as the song file
| Display | Screen Type Resolution | 3.0-inch TFT, resolution: 400x240 (WQVGA) |
| Input/Output | USB | High speed USB2.0 mini socket |
| Audio Playback | Formats MAX Output SNR / Distortion Freq Response Bit Rate | MP3,WMA,FLAC,AAC,APE (L) 10mW+(R) 10mW(32Ω) S/N:≥85dB 20HZ~20KHZ MP3-32kbps~320kbps WMA 32kbps~384kbps |
| Video Playback | Formats | AVI (Maximum support Resolution 720x576) RM1/RMVB (Maximum support Resolution 800x480), FLV (Maximum support Resolution 720x576) |
| Power,Play Time | Battery Video Audio | 3.7V 700mAh lithium polymer battery Video play for about 3 hours Audio play for about 12 hours |
| Voice Record | Sampling Rate | 8KHz/1.6KHz |
| MIC.Record Format MAX RecordTime | WAV 190 hours (4GB capacity) | |
| Supportable Systems | Windows 2000/XP/Vista |
YOOMOVE
3001
Inhalt
b. Brightness (Helligkeit)
Search by hand (Manuelle Suche)
- Save channel (Sender speichern)
Copyright Yoo DigitalTM 2009.
All rights reserved.


- MAIN FUNCTIONS
- PRECAUTIONS
- BASIC OPERATIONS
- - Connect to Computer and File Transfer
- - Charging the Player
- - Main Interface
- - Setting
- a. Light Time
- b.Brightness
- c. Light Mode
- d. Keyboard Lock Time
- e.Auto Shut Time
- f. Restorable
- g. Language
- h. System information
- i. Time setting
- j. Auto shut (Sleeping time)
- k.G-Sensor
- MUSIC
- Detailed Operation
- 1) All music
- Music play (in play interface)
- Play Settingsx
- - Repeat Mode :
- - Play Mode :
- - User EQ Setting :
- EQ Sel:
- Player support repeat function
- Memory play
- Shake by G-sensor function
- 2) Dir List
- 3) My Favorites
- VIDEO
- PHOTO
- EBOOK
- Ebook reading interface
- Page Jump
- - Load Mark
- - Flip Time
- RECORD
- EXTRAS
- Stop Watch
- Calendar
- EXPLORER
- - Play file
- - Delete File
- - USB Display Mode
- Charge Display Mode
- FIRMWARE UPDATE
- TROUBLESHOOTING
- The player cannot be turned on
- - Play song No lyrics show
- YOOMOVE
- 3001
- Inhalt
- Search by hand (Manuelle Suche)
Brand : YOO DIGITAL
Model : YOO MOVE 3001
Category : Treadmill