
Pulsee Compact V1400 - Vacuum Cleaner YOO DIGITAL - Free user manual and instructions
Find the device manual for free Pulsee Compact V1400 YOO DIGITAL in PDF.
| Product Type | Canister Vacuum Cleaner |
| Brand | YOO DIGITAL |
| Model | Pulsee Compact V1400 |
| Power Supply | 220-240 V ~ 50 Hz |
| Power | 1200 W |
| Dust Bin Capacity | 1 L |
| Suction Power | ≥ 30 kPa |
| Noise Level | ≤ 66 dB |
| Weight (estimated) | 5.5 kg |
| Power Cord Length | 5 m (approx.) |
| Filter Type | Washable front filter, replaceable rear filter (HEPA) |
| Main Nozzle | Floor nozzle with integrated 2-in-1 brush |
| Extension Tube | Metallic telescopic |
| Power Adjustment | Air vent button on handle |
| Motor Protection | Auto-cut thermostat in case of overheating |
| Auto Shut-off | Yes, via thermal protection |
| Restart after Overheating | Wait 30 minutes for cooling |
| Dust Bin Cleaning | Unlock button for quick emptying |
| Filter Maintenance | Wash with cold water, dry 24 hours |
| Storage | Storage hook for the nozzle |
| Energy Class (estimated) | A (according to old standard) |
Frequently Asked Questions - Pulsee Compact V1400 YOO DIGITAL
User questions about Pulsee Compact V1400 YOO DIGITAL
0 question about this device. Answer the ones you know or ask your own.
Ask a new question about this device
Download the instructions for your Vacuum Cleaner in PDF format for free! Find your manual Pulsee Compact V1400 - YOO DIGITAL and take your electronic device back in hand. On this page are published all the documents necessary for the use of your device. Pulsee Compact V1400 by YOO DIGITAL.
USER MANUAL Pulsee Compact V1400 YOO DIGITAL
Important safeguards 04
Parts and Features 06
Assembly Instructions 07
Operation Instructions 09
Maintenance of the Cleaner 10
Storage of the Cleaner 10
Storage of the cleaner 11
Caution : Please read this manual carefully before using this product.
- Be sure to use the cleaner in compliance with the contents of this manual, and use the fittings designated by the manufacturer.
- Please do not leave the cleaner when it is powered on. Turn off the power switch and pull out the power plug when not using or before maintenance.
- Please do not pull or carry the cleaner by the power cord, or nip it when closing a door; keep the cord free from the press of the cleaner.
- Please do not let children take the cleaner as a toy, and close attention is necessary when the cleaner approaches children.
- Please do not use the cleaner when its power cord or plug is damaged. Send it to the appointed service center. Please do not unplug by pulling the cord or plug. To unplug, grasp the plug, not the cord.
- Never pull the power plug or use the cleaner with wet hands.
- When using the cleaner, pay attention to prevent any hair roll or other rubbish block up the air inlet (including the hose and the splice), otherwise motor failure and housing distortion may be caused. If the matters absorbed in forms a blockage, stop the cleaner by pulling out the power plug immediately to clean the blockage.
- When using the cleaner, don't plug up the air outlet by towel or other matters, otherwise the efficiency of dust absorbance will be influenced. and the motor will be at high risk of being burnt out.
- Never use the cleaner at uneven floor or ground; and be very careful when cleaning stairs to prevent the cleaner from falling down.
- Never absorb live stumps with the cleaner, otherwise the motor may be damaged.
- The cleaner should be kept far away from heat sources (such as central heating, oven, etc) to avoid the distortion of plastic parts as well as the influence caused by such distortion.
-
Before using the cleaner, please remove big and sharp matters on the floor to avoid damaging the plastic parts, filter gauzes and motor.
-
Never absorb water or other liquid with this cleaner, otherwise, the motor will be damaged.
- This appliance is not intended for use by persons (including children), with reduced physical, sensory or mental capabilities, or lack of experience and knowledge, unless they have been given supervision or instruction concerning use of the appliance by a person responsible for their safety.
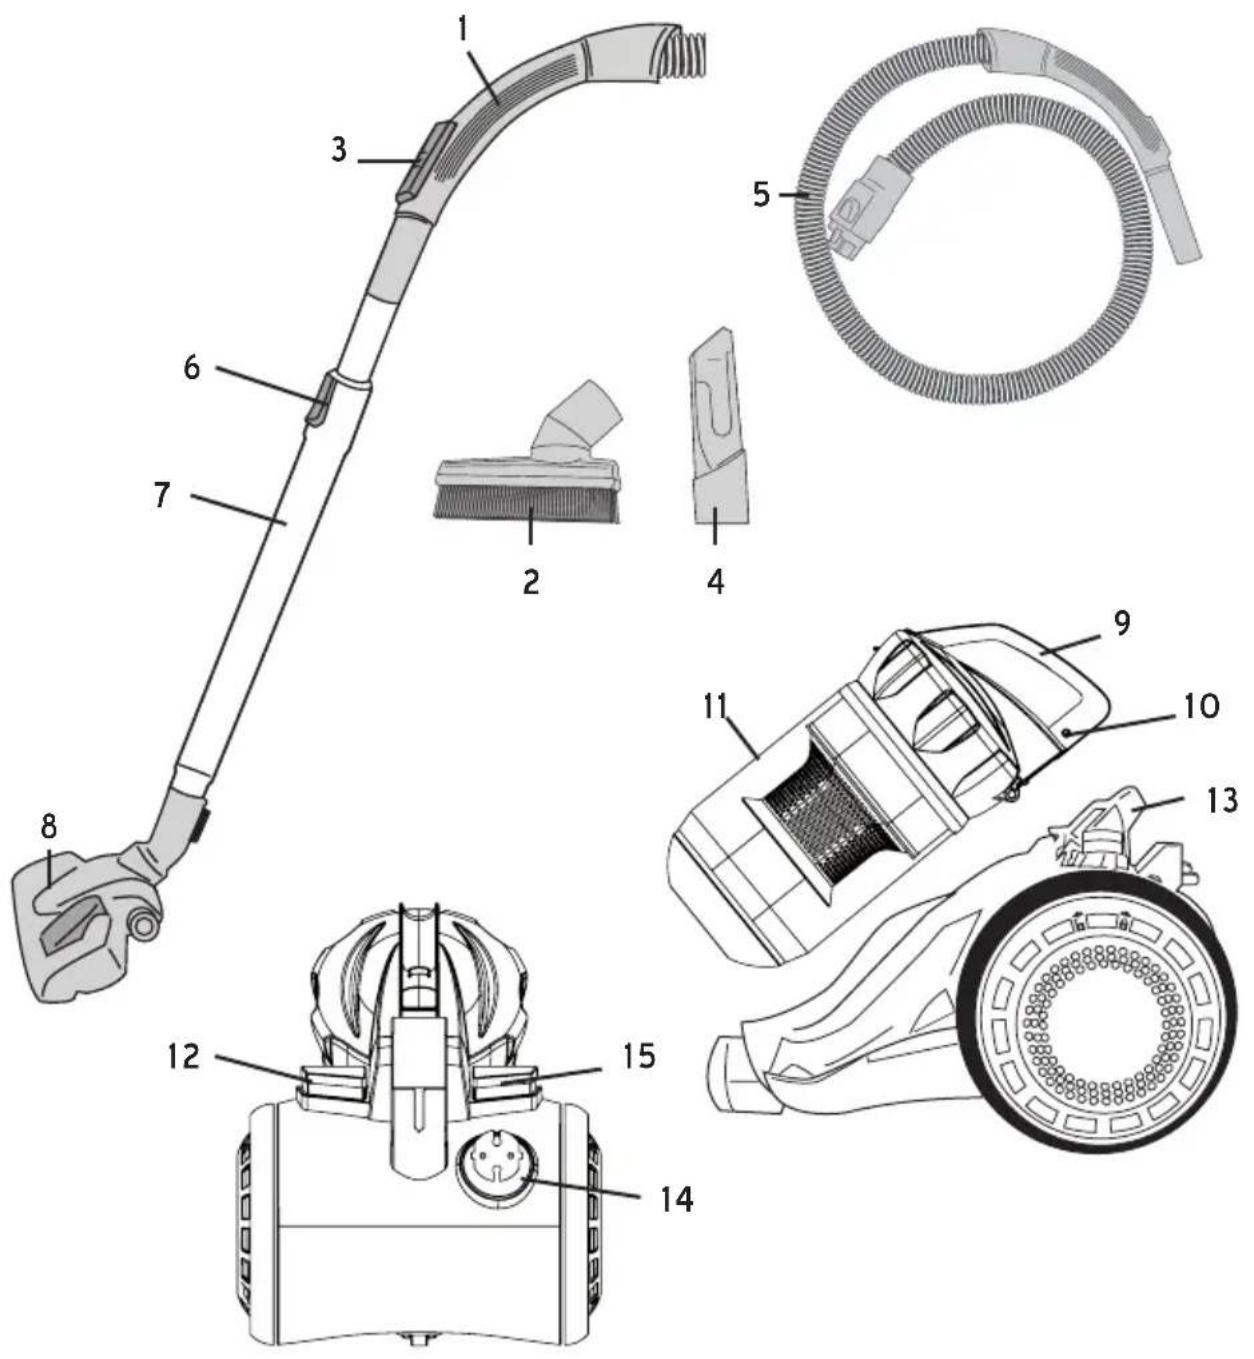
- Handle
- 2-in-1 Tool
- Air Escape Pushbutton
- Crevice Tool
5.Hose - Release Button
- Telescopic Tube
-
Floor brush
-
Handle Of Dust
- Release Button Of Dust
- Cyclone dust container
- Switch Pedal
- Tube Support
- Power plug
- Cord reeling pedal
ASSEMBLY INSTRUCTIONS
- Before assembling the cleaner, please confirm all parts and components for the cleaner are received by referring to Parts and Components List.
Please remember to cut off the power supply before assembly.
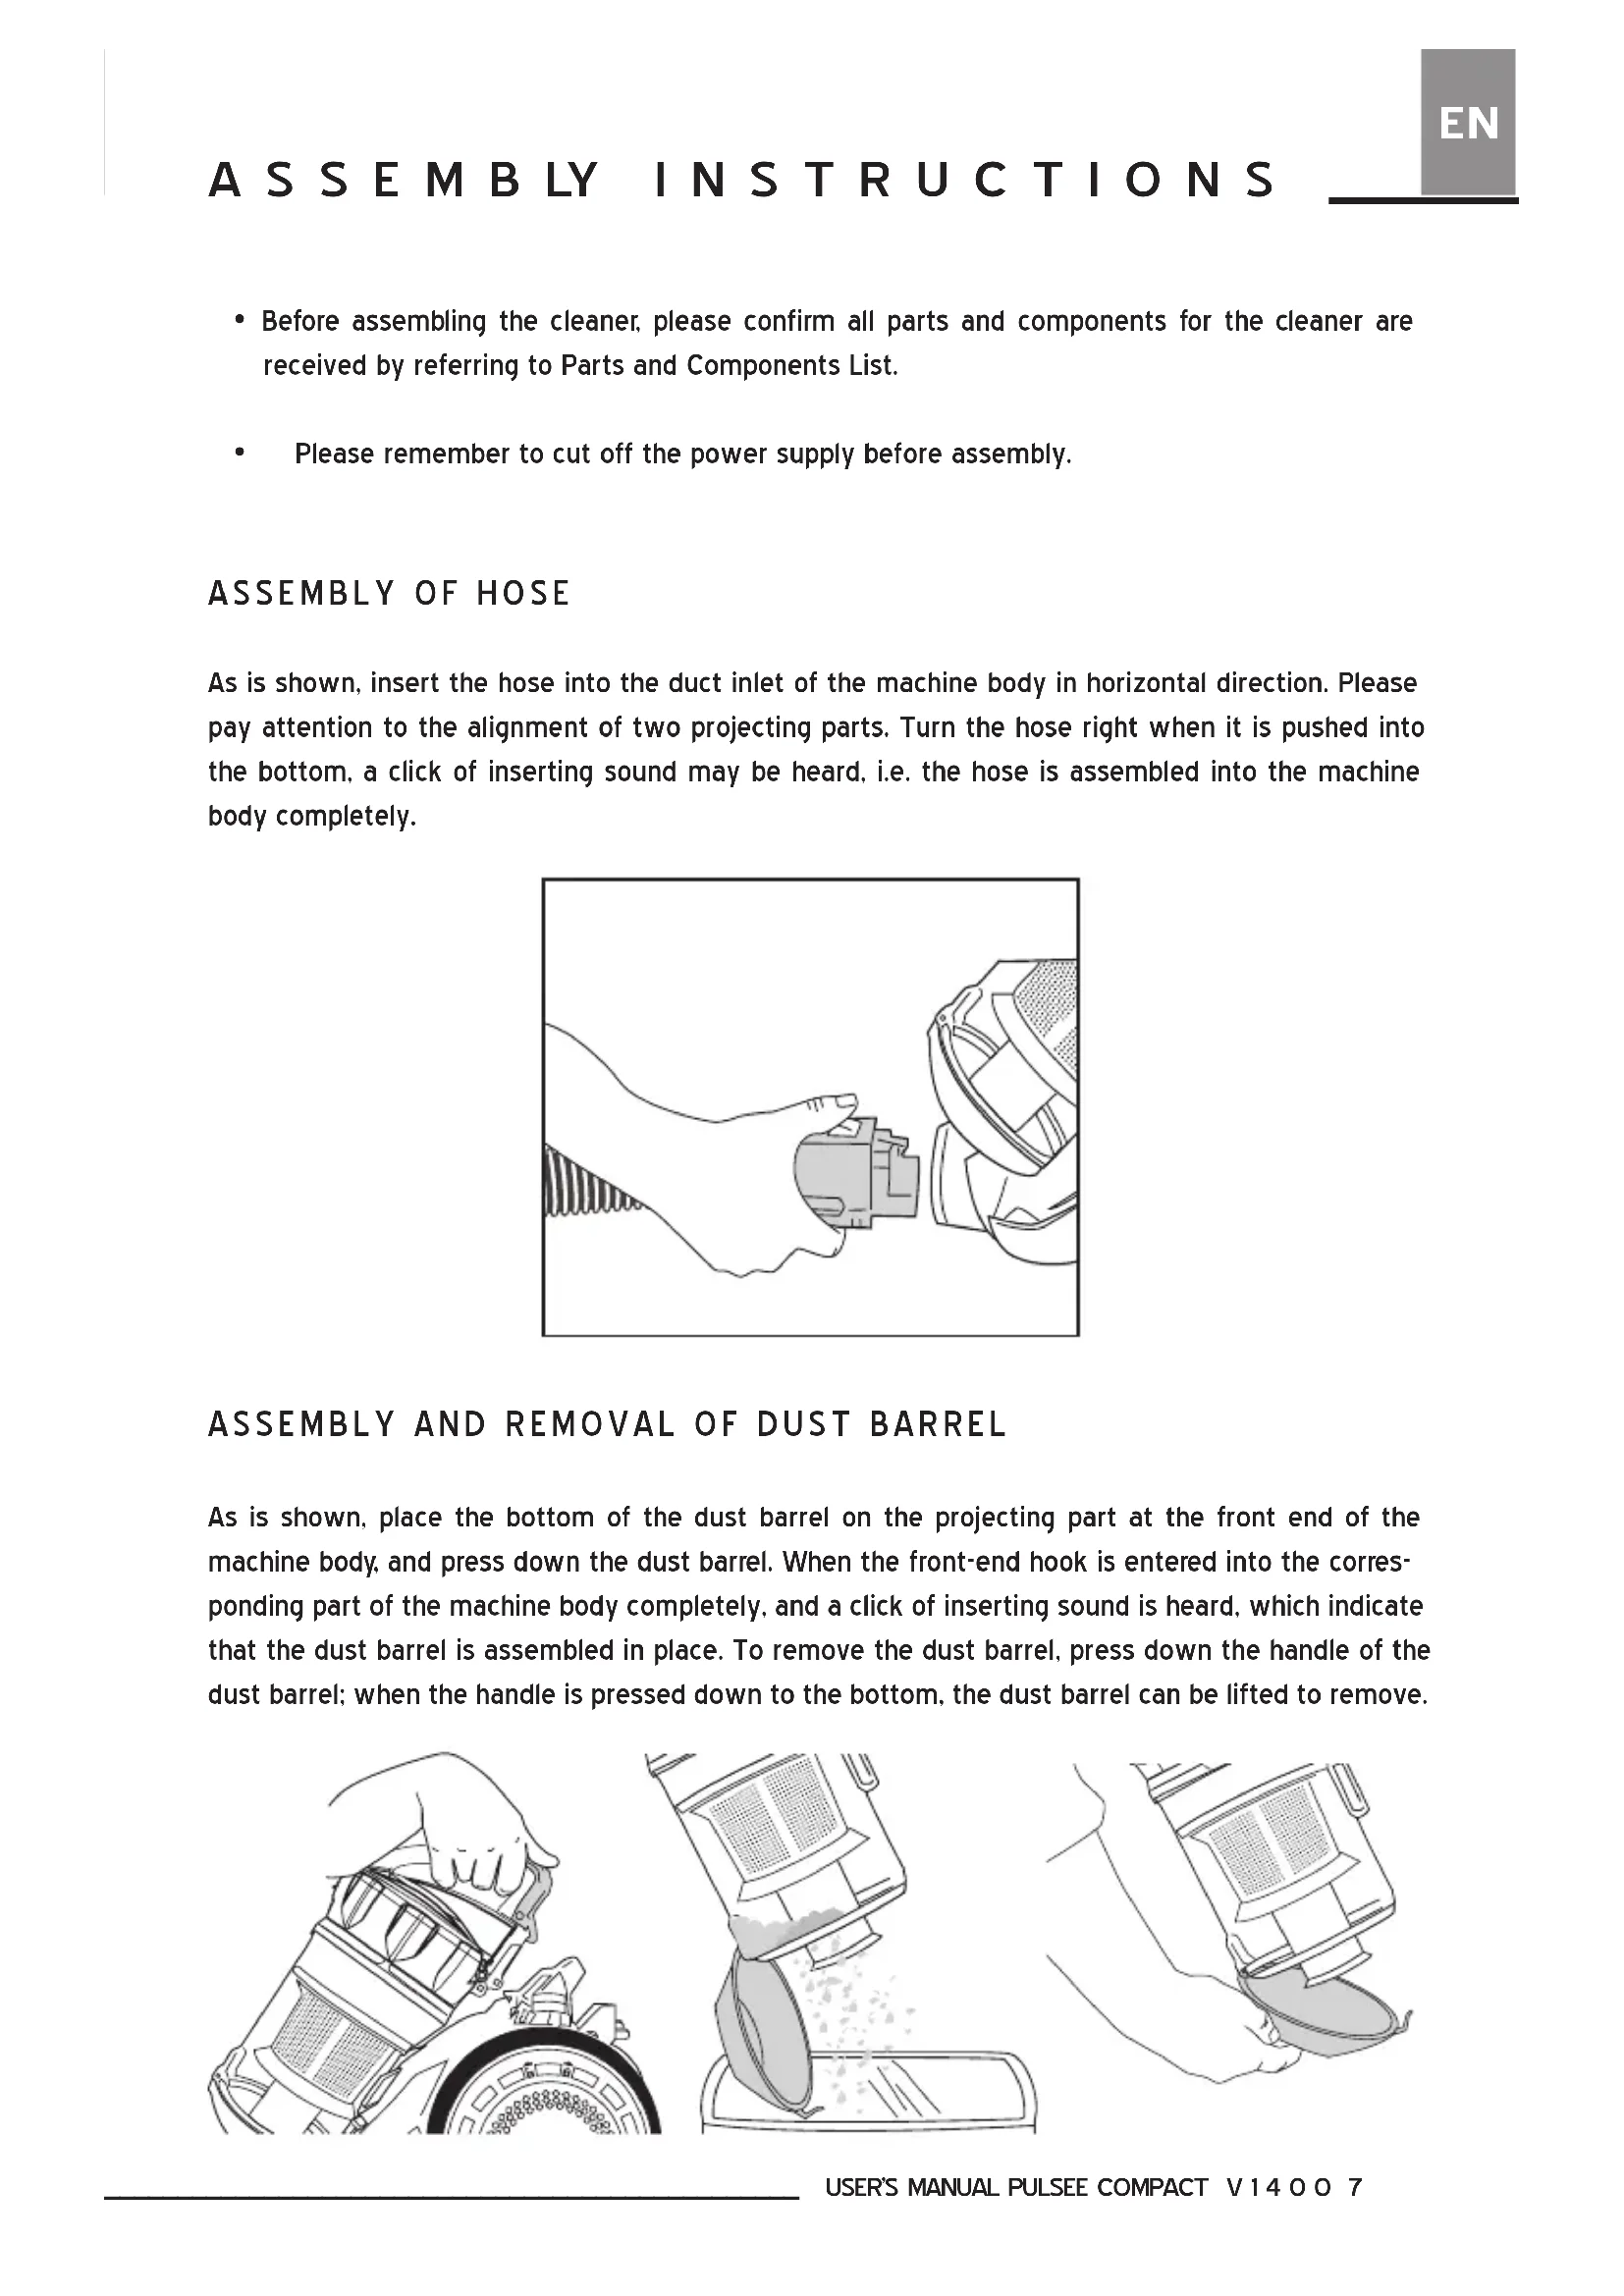
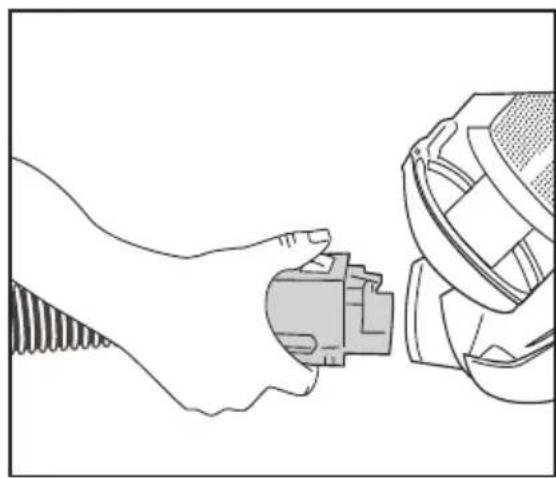
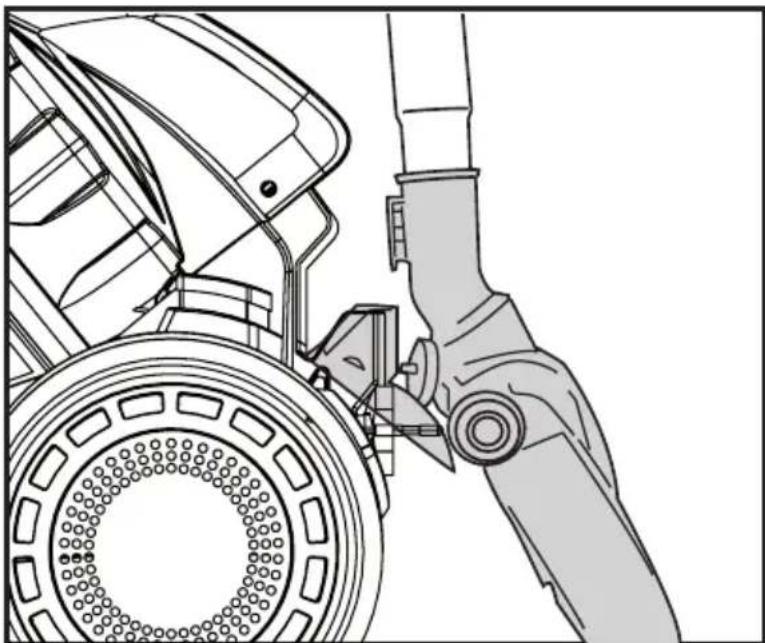
ASSEMBLY OF HOSE
As is shown, insert the hose into the duct inlet of the machine body in horizontal direction. Please pay attention to the alignment of two projecting parts. Turn the hose right when it is pushed into the bottom, a click of inserting sound may be heard, i.e. the hose is assembled into the machine body completely.
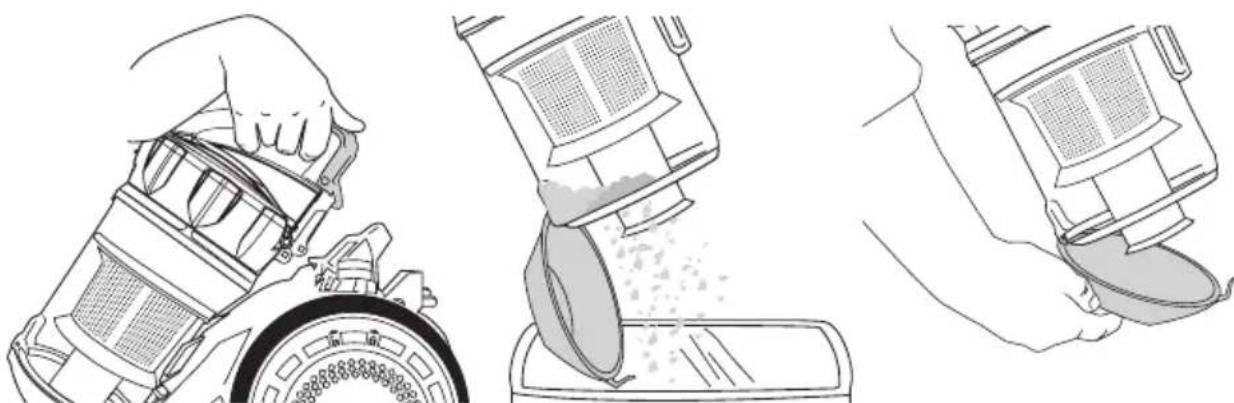
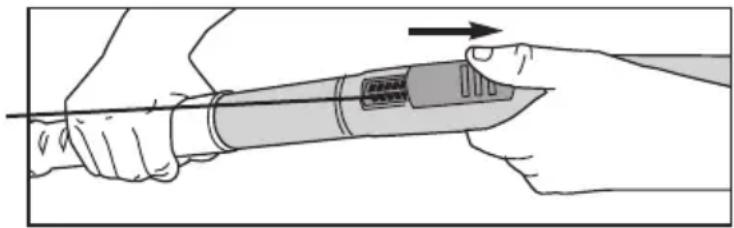
ASSEMBLY AND REMOVAL OF DUST BARREL
As is shown, place the bottom of the dust barrel on the projecting part at the front end of the machine body, and press down the dust barrel. When the front-end hook is entered into the corresponding part of the machine body completely, and a click of inserting sound is heard, which indicate that the dust barrel is assembled in place. To remove the dust barrel, press down the handle of the dust barrel; when the handle is pressed down to the bottom, the dust barrel can be lifted to remove.
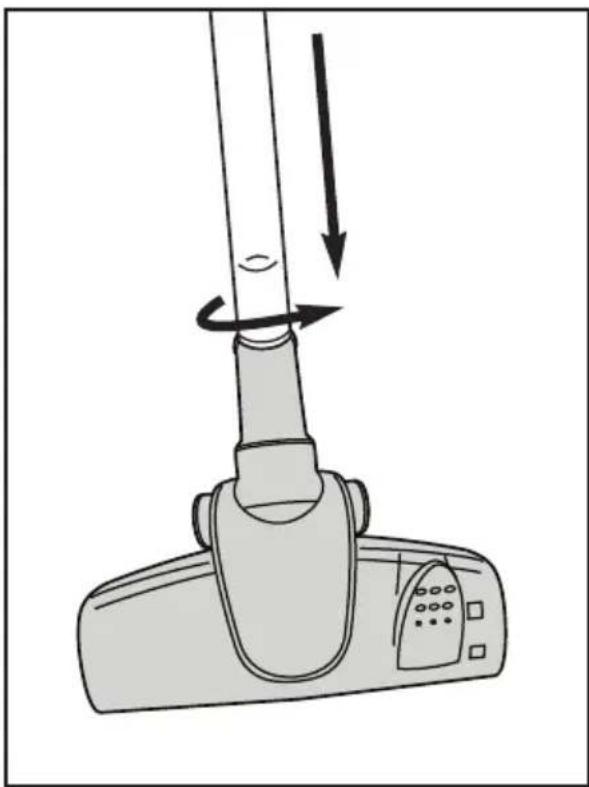
ASSEMBLY OF METAL EXTENSION PIPE AND FLOOR BRUSH
Insert the front end of the hose handle into the metal extension pipe according; then insert the other end of the metal extension pipe into the rounded inlet of the floor brush, and adjust to the proper direction. At this time, the assembly of the whole machine is completed.
HOW TO START
- First of all, pull out the power cord from the cord reel to the needed length; insert the power cord plug into the power socket, and press down the power switch button with finger or step on it with foot; then you can control the start and stop of the cleaner.
- The yellow mark on the power cord indicates its desired length. Never pull out the power cord to the length exceeding the red mark.
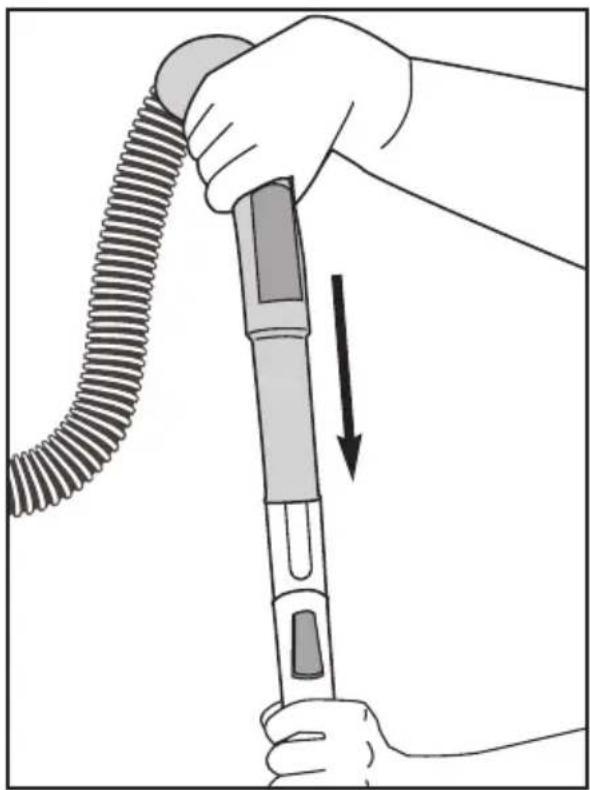
CONTROL OF SUCTION FORCE
When the suction inlet is jammed by some cloth due to the over-large suction force, you can adjust the air escape pushbutton on the hose handle to control the suction force at the suction inlet, as is shown.
Air escape push button
PROTECTIVE DEVICES OF MOTOR
- There is a temperature controller designed in the body of cleaner motor, which can automatically cut off the power supply of motor to prevent overheating. When the air-inlet or air-outlet pipe is overloaded or blocked, the temperature of motor rises, then the temperature controller cuts off the power supply of motor automatically to make the motor cool, preventing the cleaner from being damaged.
- If the temperature controller is cut off, stop the cleaner immediately and pull out the power plug to make the cleaner cool, and check and remove the hair roll or other roll-like rubbish blocking the air inlet (including the hose and the splice), and replace the filter HEPA or filter gauze when necessary.
- After cooling the motor for 30mins, plug in the power plug and check whether the temperature controller has been reset. If the power supply of the cleaner hasn't been cut off, the temperature controller of the motor won't be reset even when the motor has become cool.
MAINTENANCE OF THE CLEANER
- All the day-to-day maintenance and repair jobs should be done after the power plug has been pulled out.
- Frequently remove the rubbish from the dust barrel, so as to avoid the failure of the cleaner.
- Never wipe the surface of the cleaner with gasoline or oily liquid. Wipe it with water or neutral detergent. Caution: be sure to wring out the wiping cloth dry for wiping, it is prohibited for water to infiltrate into electrical elements of the cleaner.
- When the cleaner is placed idle not in use, it should not be put directly in the sun or in a damp place.
STORAGE OF THE CLEANER
Upon the completion of the operation of the cleaner, turn off its power supply, and pull the power plug out of the power socket, then step on the cord reeling button to reel in the power cord fully. Hang the floor brush onto the floor brush hook, as is shown in Figure (7).

Place the cleaner in the dry indoor environment.
Remove the rubbish in the dust barrel frequently to avoid the failure of the cleaner.
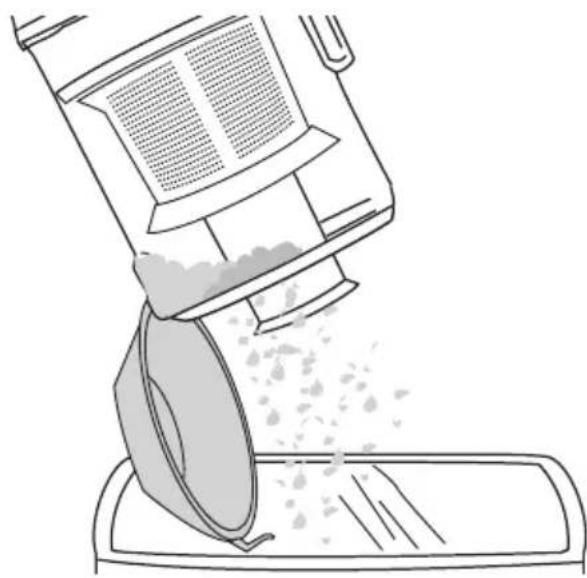
- Clean the dust barrel only after the power plug of the cleaner has been pulled out;
- Put the dust barrel over the rubbish bin (bag), press down the releasing button of the dust barrel, the bottom cover of the dust barrel will automatically fall down, and clear and empty the dust barrel, as is shown.
CLEANING OF FRONT FILTER FOR MOTOR
Warning
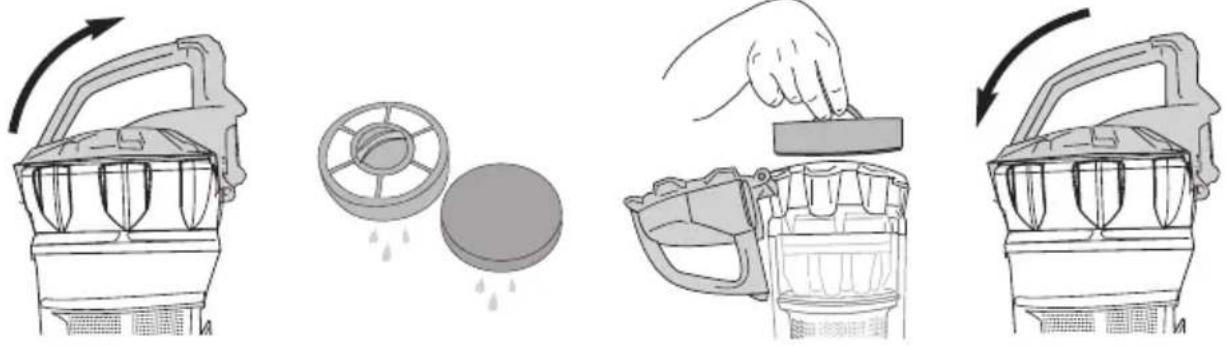
Please make sure the power supply of the cleaner has been cut off before carrying out the following steps :
- Pull out the power cord plug of the cleaner from the power socket.
- Press down the handle of the dust barrel to remove the dust barrel, and remove the cover of the front filter for motor, and then use the brush to clean the filter (sponge and filter gauze with composite coating) or place it under the cock to clean, as is shown in Figure (9/10).
Caution
It is normal that the white central filter in the dust barrel may change color, which cannot affect its filtration performance. If the hose and the central filter are difficult to clean, we recommend that you use water to flush them; however, please be sure to place them in the dry air for at least 24 hours after they are flushed by water.
Key Points
Please note : when the dust collecting barrel or the filter cover is not installed in place, the operation status will be invalid, and the cleaner will have no dust absorption capacity. At this time, you need to check carefully whether the dust collecting barrel and the filter cover have been installed in place.
Caution : please keep the suction passage unobstructed, otherwise the motor may become overheating or even be damaged.
REPLACEMENT OF REAR FILTER FOR MOTOR
The rear filter for motor is installed behind the air outlet grid, which can be washed due to the materials used. When the surface is jammed seriously by dust, the filter should be replaced by a new one or washed by water to maintain enough suction force. (Figure 11/12)
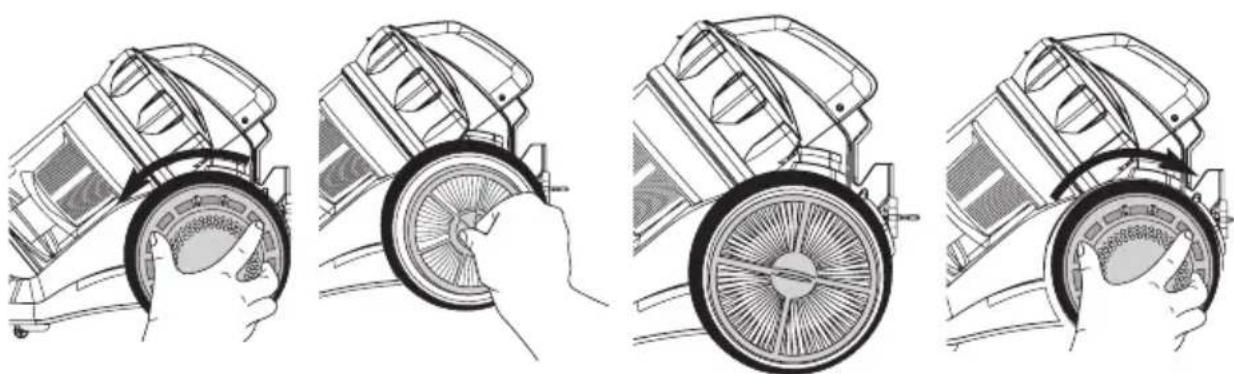
It is usually necessary to clean and replace the filters for motor only after they have been used for 6 months to 12 months. Please remember to confirm that all filters have been correctly installed into the machine before turning on the cleaner to use.
Key Points
The power supply of the cleaner must be cut off before replacing any filter!
In case of abnormality with this product, please treat it in the way as stated hereinafter; if the cleaner still refuses to work normally, please contact the stop from where this product was bought or with the appointed service point
| Fault Treatment | |
| The cleaner cannot operate. | Check whether the power plug is inserted securely ; pull out the plug and then reinsert it in the power socket. |
| Check whether the power socket is electrified. | |
| Check whether the switch of the cleaner is in “ON” position. | |
| The suction force is reduced. | Check whether the floor brush, the hose and the splice are jammed, and remove any blockage immediately. |
| Check whether the air-inlet filter gauze is dusty; frequently clean rubbish or replace air-inlet and air-outlet HEPA. | |
| There is abnormal sound when the motor is under operation. | Stop the cleaner immediately. |
| Check whether the floor brush, the hose and the splice are jammed, and remove any blockage immediately. |
AFTER-SALE SERVICE
When abnormalities or problems are found with the product in use, please contact the appointed service point for consultation or repair.
TECHNICAL PARAMETERS
| Model | Dust collection capacity | Rated voltage | Rated frequency | Rated input power | Maximum vacuum degree | Noise |
| PULSEECompact V1400 | 1L 220-240V 50Hz 1200W ≥30kPa ≤66dB | |||||
All information subject to change without notice!
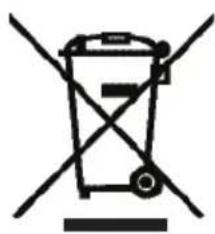
Recycling
This symbol is a symbol of sorting garbage electrical and electronic equipment (WEEE). This means that this product should be treated in accordance with European Directive 2002/96/EC to be recycled or dismantled to minimize its impact on the environment.
For more information, contact your local or regional authorities.
Pulsee COMPACT V1400
FRANÇAIS


- ASSEMBLY INSTRUCTIONS
- ASSEMBLY OF HOSE
- ASSEMBLY AND REMOVAL OF DUST BARREL
- ASSEMBLY OF METAL EXTENSION PIPE AND FLOOR BRUSH
- HOW TO START
- CONTROL OF SUCTION FORCE
- PROTECTIVE DEVICES OF MOTOR
- MAINTENANCE OF THE CLEANER
- STORAGE OF THE CLEANER
- CLEANING OF FRONT FILTER FOR MOTOR
- Warning
- Caution
- Key Points
- REPLACEMENT OF REAR FILTER FOR MOTOR
- AFTER-SALE SERVICE
- TECHNICAL PARAMETERS
- Recycling
- Pulsee COMPACT V1400
Brand : YOO DIGITAL
Model : Pulsee Compact V1400
Category : Vacuum Cleaner