
CS-322 - Turntable LENCO - Free user manual and instructions
Find the device manual for free CS-322 LENCO in PDF.
| Product Type | Car stereo with FM/MW tuner, CD/MP3/WMA player, USB/SD/AUX input |
| Brand | LENCO |
| Model | CS-322 |
| Power Supply | 12 V DC (vehicle) |
| Output Power | Max 4 x 50 W (estimated) |
| Speaker Impedance | 4 - 8 ohms |
| FM Frequency Range | 87.5 - 108 MHz |
| MW Frequency Range | 522 - 1620 kHz |
| FM Sensitivity | 4 µV (S/N = 30 dB) |
| FM Signal-to-Noise Ratio | 50 dB |
| Stereo Separation | >25 dB |
| FM Frequency Response | 40 Hz - 12 kHz |
| MW Frequency Response | 80 Hz - 2.2 kHz |
| MP3/WMA Frequency Response | 20 Hz - 16 kHz, 60 dB S/N |
| Supported Audio Formats | MP3, WMA (via CD, USB, SD) |
| Max USB Device Capacity | 8 GB |
| Max SD Card Capacity | 8 GB |
| Radio Functions | RDS (AF, TA, PTY), auto/manual memory of 18 FM stations (3 banks) + 12 MW (2 banks) |
| Audio Functions | Equalizer (Classic, Pop, Rock), balance, treble/bass, DSP, local/distant mode, stereo/mono |
| Connectivity | Front AUX input (3.5 mm), USB, SD, ISO connector |
| Display | LCD screen |
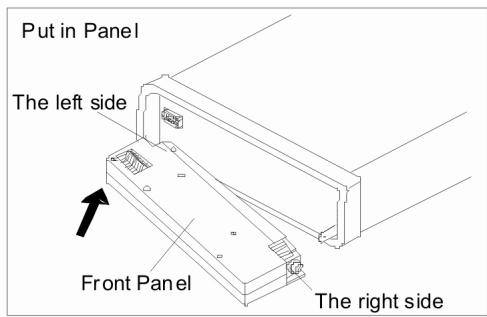
| Front Panel | Detachable (backlight, release button) |
| Remote Control | Included (wired or infrared depending on version) |
| Dimensions (approx.) | 1 DIN standard (178 x 50 x 160 mm) |
| Weight (approx.) | 1.2 kg |
| Maintenance | Clean with a soft dry cloth, avoid solvents |
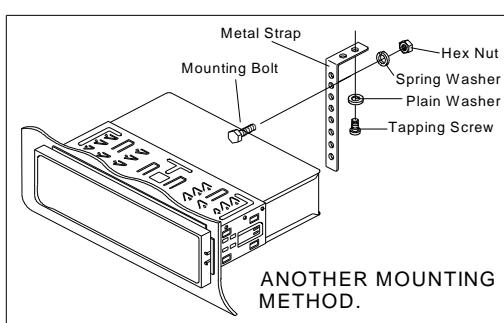
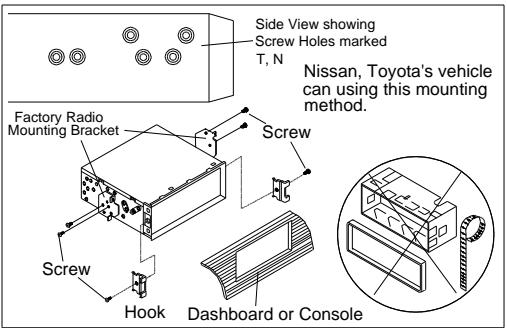
| Safety | Protective fuse, professional installation recommended |
| Spare parts / repairability | Remote control, wiring, fuse, front panel (parts available via Lenco after-sales service) |
| Warranty | 2 years (subject to legal conditions) |
Frequently Asked Questions - CS-322 LENCO
User questions about CS-322 LENCO
0 question about this device. Answer the ones you know or ask your own.
Ask a new question about this device
Download the instructions for your Turntable in PDF format for free! Find your manual CS-322 - LENCO and take your electronic device back in hand. On this page are published all the documents necessary for the use of your device. CS-322 by LENCO.
USER MANUAL CS-322 LENCO
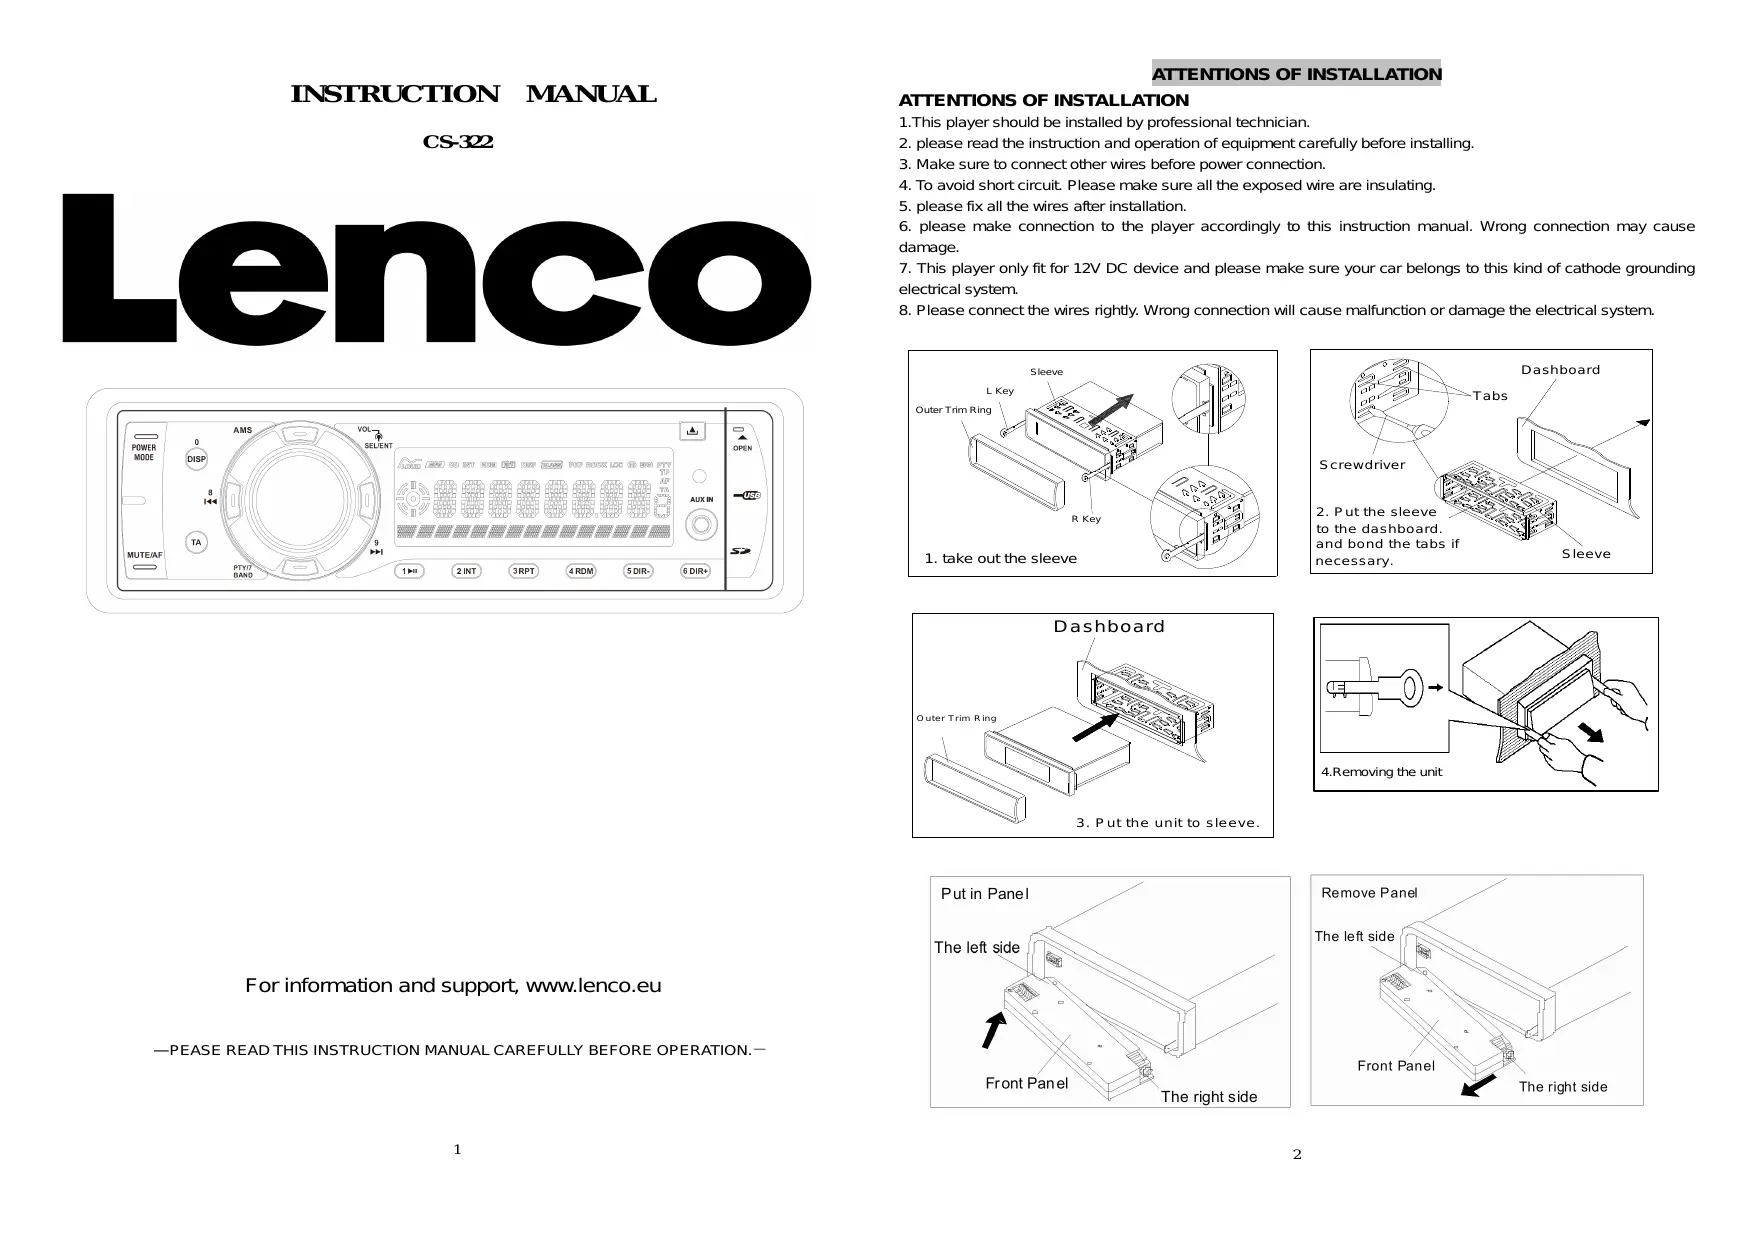
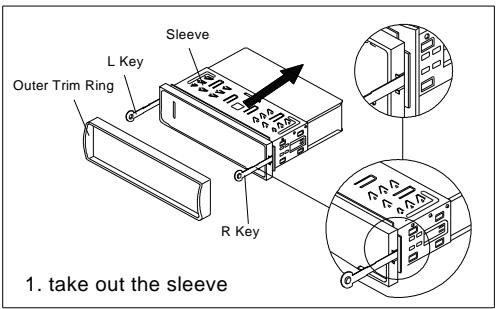
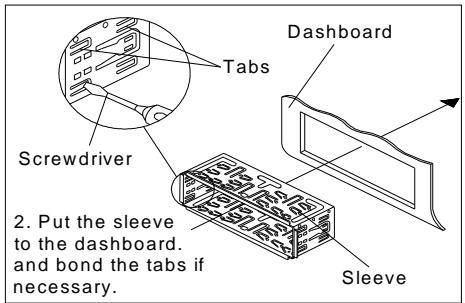
ATTENTIONS OF INSTALLATION
ATTENTIONS OF INSTALLATION
- This player should be installed by professional technician.
- please read the instruction and operation of equipment carefully before installing.
- Make sure to connect other wires before power connection.
- To avoid short circuit. Please make sure all the exposed wire are insulating.
- please fix all the wires after installation.
- please make connection to the player accordingly to this instruction manual. Wrong connection may cause damage.
- This player only fit for 12V DC device and please make sure your car belongs to this kind of cathode grounding electrical system.
- Please connect the wires rightly. Wrong connection will cause malfunction or damage the electrical system.

For information and support, www.lenco.eu
—PEASE READ THIS INSTRUCTION MANUAL CAREFULLY BEFORE OPERATION.—
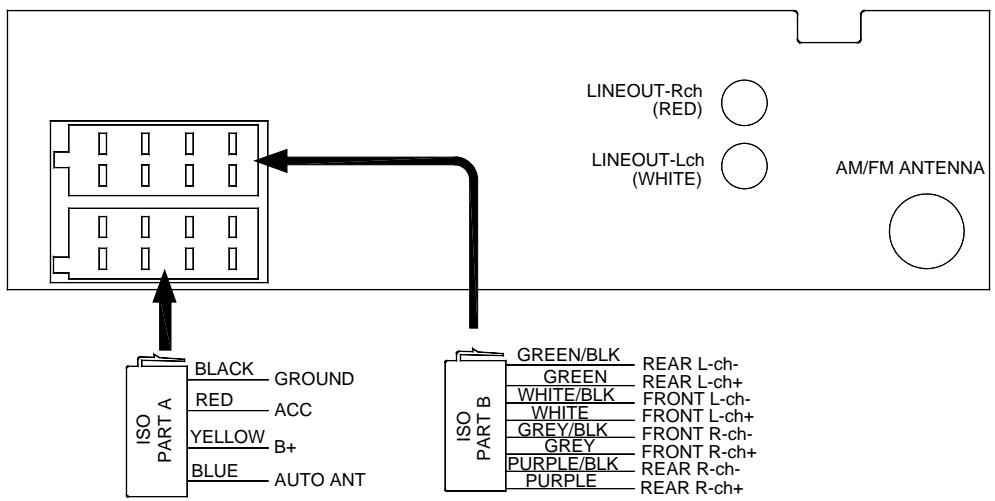
WIRING DIAGRAM
- This player can only be used by the 12V DC cathode grounding electrical system.
- Don't connect the terminals of the car battery until the player is absolutely with well erection joint.
- Please make sure to connect the yellow wire to the positive of the battery (+) .
- When change the fuse. Please make sure the specifications are same.
- Using good quality speaker with 4-8 ohm can result in the best effect of the equipment.
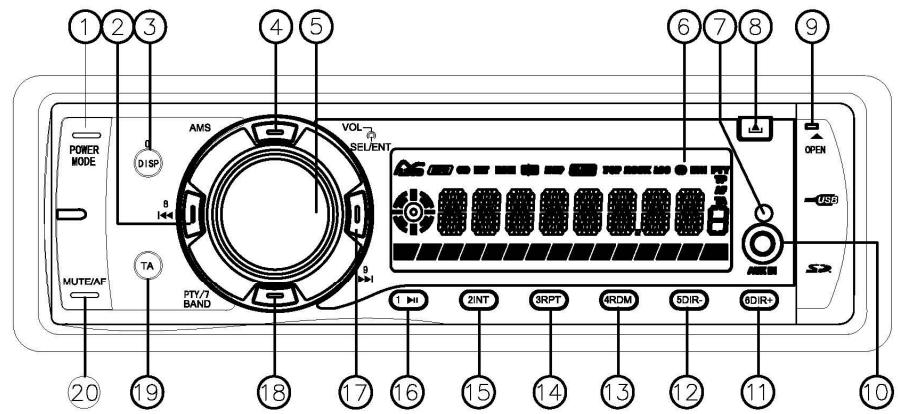
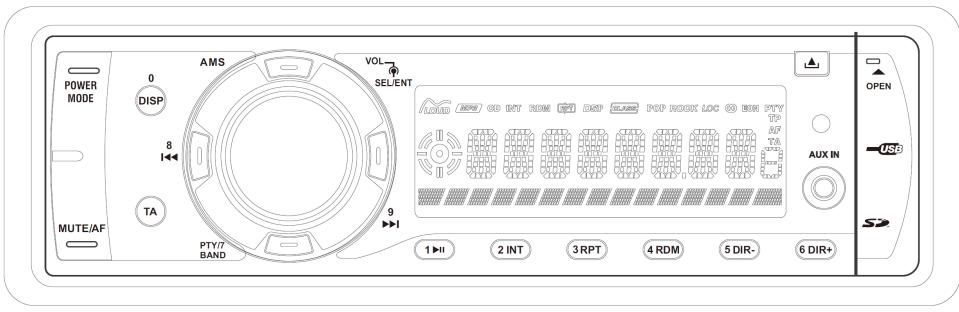
CONTROL PANEL AND FUNCTIONS
OPERATION
- POWER/MODE 13.4/RDM
2.8 14 3/RPT
3.DISP/0 15.2/INT
4.AMS 16.1/ - VOL/SEL/ENT 17.9
- LCD Display 18.BAND/PTY/7
- REMOTE SENSOR 19. TA
- (Release Button)
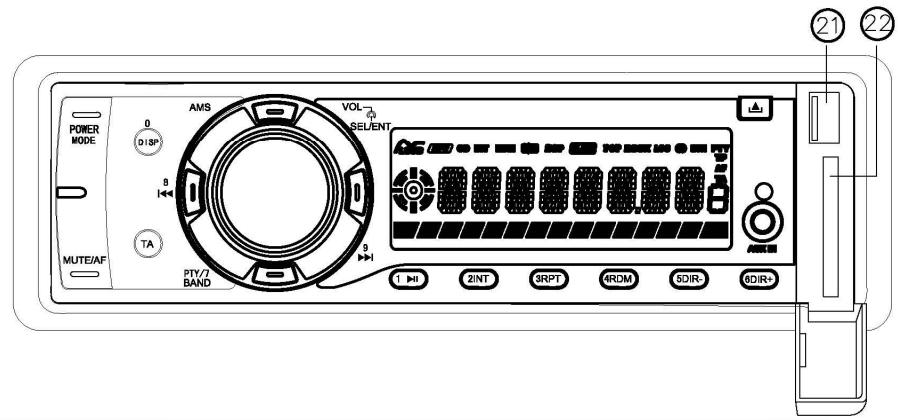
- OPEN 21. USB
- Auxiliary input 22. SD CARD SLOT
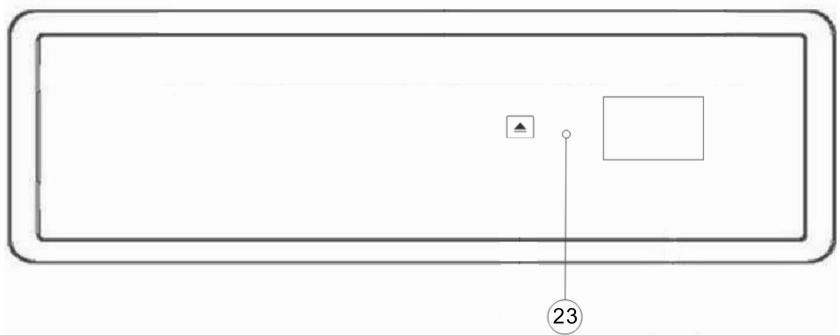
11.6/DIR+ 23. Reset Button
12.5/DIR-
GENERAL OPERATION
1. Switching on/off the unit
Press any button to turn on the unit. Long press "POWER" button to turn the unit off.
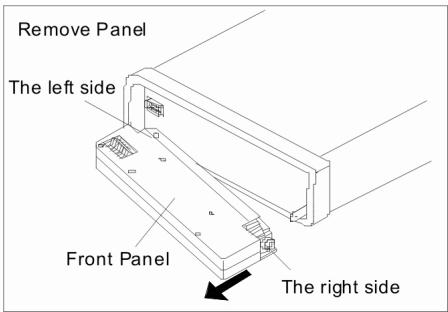
2. Remove the panel
Press button(8) to fold down and Remove the panel.
3. Sound adjusting
Press SEL button (5) shortly to select the desired adjustment mode. The adjustment mode will change in the following order: VOL---BASS---TREBLE---BALANCE---FADER---LOUD---DSP OFF---DX---STEREO.
By rotating the audio knob (5) clockwise or counter-clockwise, it is possible to adjust the sound setting.
4. LOUDNESS on/off
In above menu. Keeping pressing SEL to enter LOUD setting. Then rotating VOL to turn it on/off.
5. SELECT EQ
In above menu. Keeping pressing SEL to enter DSP OFF setting. Then rotating VOL to select desired EQ function as below: DSP OFF---CLASSIC---POP---ROCK
6. LOCAL/DISTANCE
In above menu. Keeping pressing SEL to enter DX setting. Then rotating VOL to select DX/LOC mode. In LOC mode. During scanning. to reduce the sensitive of searcher and only receive the local stronger signals.
7. STEREO/MONO
In above menu. Keeping pressing SEL to enter STEREO setting. Then rotating VOL to select STEREO/MONO mode. In STEREO mode. In stereo mode, when stereo broadcasting station is received, the "OO" icon will appear upon the display.
8. LIQUID CRYSTAL DISPLAY
Exhibit current frequency and activated functions on the display.
9. AUXILIARY INPUT
The unit can be connected to a portable audio player through the AUX IN jack (10) on the front panel. After finishing the connection, you can press MOD button (1) on the front panel to switch the mode to AUX IN mode.
10. RESET FUNCTION
RESET button (25) must be activated with either a ballpoint pen or thin metal object. The RESET button has to be activated for the following reasons:
- Initial installation of the unit when all wiring is completed.
- All the function buttons do not operate.
- Error symbol on the display.
Note: if press RESET button, All the memory will be lost!
OPERATION
RADIO OPERATION
1. SWITCHING TO RADIO MODE
Keep pressing MOD button (1) shortly till the radio mode appears in the display.
2. SELECTING THE FREQUENCY BAND
In radio mode, press BANDbutton (18) shortly to select the desired band.
The reception band will change in the following order: FM1--FM2--FM3--AM1(MW1)--AM2(MW2).
3. SELECTING STATION
Press 9▶ button (17) or 8 | ← button (2) shortly to activate automatic seek function. It will search the station automatically. Press for several seconds until "MANUAL" appears on the display, the manual tuning mode is selected. Every time 9▶ or 8 | ← is pressed the frequency will change with 0,05 MHz.
4. AUTOMATIC MEMORY STORING & PROGRAM SCANNING
Automatic memory storing
Press AMS button (4) for 2 seconds, the radio searches the signal strength until one cycle search is finished.
And then the 6 strongest stations are stored into the corresponding preset number button.
- Program scanning
Press AMS button (4) shortly to preview all the preset stations.
5. MANUAL STORING A STATION
To receive a station and press one of the preset button(11/12/13/14/15/16) for several seconds, current station is stored into the number button.
6. ANS (Announcement Name Station) OPERATION
- Setting AF mode
Long press AF button (20) to switch off or on AF mode.
Whenever AF is switch on, symbol "AF" appears on the display.
Program name is displayed on receiving a ANS station.
"AF" starts blinking if the broadcasting signal getting worse. And when the signal is too bad due a frequency change. AF will automatically switch to the new frequency.
Regional Program Operation
Press DISP/0 button (3) for several seconds to switch on or off region mode.
Some broadcasting stations change their program from normal broadcasting to regional broadcasting for a certain time period. When region is on, the current listening program remains unchanged. When region is off, it allows the reception moves to the regional station.
Using PTY to Select Program
PTY button (20) 1 time. then press preset button(12/13/14/15/16/17). You can select the program type as below:
1# button: NEWS/AFFAIR/INFORM
2# button: EDUCATIO/DRAMA/SPORT
3# button: VARIORED/CULTURE/SCIENCE
4# button: ECONOMY/CHILD PR/WEATHER
5# button:PHONE IN/SOCIAL/RELIGION
6# button: TRAVEL/LEISURE/DOCUMENT
PTY button (20) 2 time. then press preset button(12/13/14/15/16/17). You can select the program type as below:
1# button: ROCK MUS/POP MUSIC
2# button: LIGHT MU/EASY MUS
3# button: OTHER MU/CLASSICS
4# button: COUNTRY/JAZZ MUS
5# button: NATIONAL/OLDIES
6# button: FOLK MUS - Listening to Traffic Announcement
OPERATION
TA button (19) is operated as follows:
When pressed, it is engaging whether TA mode on or off.
When TA mode, is on and a traffic announcement is transmitted:
When the unit was in CD (MP3) ESB/MEMORY CARD mode or AUX IN mode, it will switch temporarily to radio mode. If the volume level was under the threshold point it will be raised to the threshold point. But when changed the volume level, which was more than the threshold point (min. TA volume level), it will be set to the last level.
When TA mode is on, TA of individual segment is turned on. When a TP station is received, TP of individual segment is turned on. TA interruption function
The current traffic announcement is cancelled by pressing this key.
But the TA mode will not be off.
Broadcast station name data expressed in alphanumeric characters
AF: Alternative Frequencies
Frequency list of broadcasting stations transmitting the same program
TP: Traffic Program Identification
Identification data for traffic information-broadcasting station
TA: Traffic Announcement Identification
Identification data showing traffic information is being transmitted or not
PTY: Program Type Code
Contents of programs such as news, light music, sports etc
USB PLAY OPERATION
In the front panel of the unit, there is an USB interface (21). You can connect an USB driver through this interface.
When you connect an USB driver through the interface, the unit will search the MP3/WMA files in the USB driver and start to play MP3/WMA files automatically.
If in other mode, you can also press MOD button (1) to select USB mode.
SELECTING FILE
Press button (2) or button (17) to move to the previous file or the following file. file number shows on display.
Hold | ← button (2) or > button (17) to fast reverse or fast forward. USB play starts from when you release the button.
PAUSING PLAYING
Press 1/>II button (16) to pause USB player. Press it again to resume play.
PREVIEWING ALL FILES
Press 2/INT button (15) to play first 10 seconds of each file. Press again to stop intro and listen to file.
REPEATING THE SAME FILE
Press 3/RPT button (14) to continuously repeat the same track. Press it again to repeat all files.
PLAYING ALL TRACKS IN RANDOM
Press 4/RDM button (13) to play all files in random order. Press again to cancel the function.
SELECTING DIRECTORY UP/DOWN
Press 5/DIR- button (12) or 6/DIR+ button (11) to select directory downward or upward. If the USB/SD does not contain any directory, there is no function of pressing 5/DIR- button (12) or 6/DIR+ button (11).
SELECTING FILE BY FILE NO.
Press "AMS"(4) button. It is track searching. It will show "TRK ***" on LCD. Using 1/2/3/4/5/6/7(BAND) /8(
19()/0(DISP) button to enter the track number. After finished. Press SEL/ENT
button to start to play. Or use vol/ Sel (5) to scroll to the desired track number then press SEL/ENT button to play.
TAKARA's auto radio RDU 310(TAKARA) can support USB drivers with a capacity up to 8GB.
In the front panel of the unit, there is an memory card interface (22). When you insert a memory card in the memory card interface, the unit will search the MP3/WMA files in the card and start to play MP3/WMA files automatically. The operation is the same with the MP3/WMA operation described above. If in other mode, you can also press MOD button (1) to select memory card mode.
TAKARA's auto radio RDU 310(TAKARA) can support memory cards with a capacity up to 8GB.
PERFORMANCE
| FM | MW | MP3/WMA | |
| Tuning range | 87.5~108.0 MHz | 522~1620KHz | --- |
| Sensitivity | 4uV(S/N=30dB) | --- | --- |
| S/N ratio | 50 dB | 50 dB | 60 dB |
| Stereo separation | >25 dB | --- | 50dB |
| Freq. Response | 40Hz~12KHz | 80Hz~2.2KHz | 20Hz~16KHz |
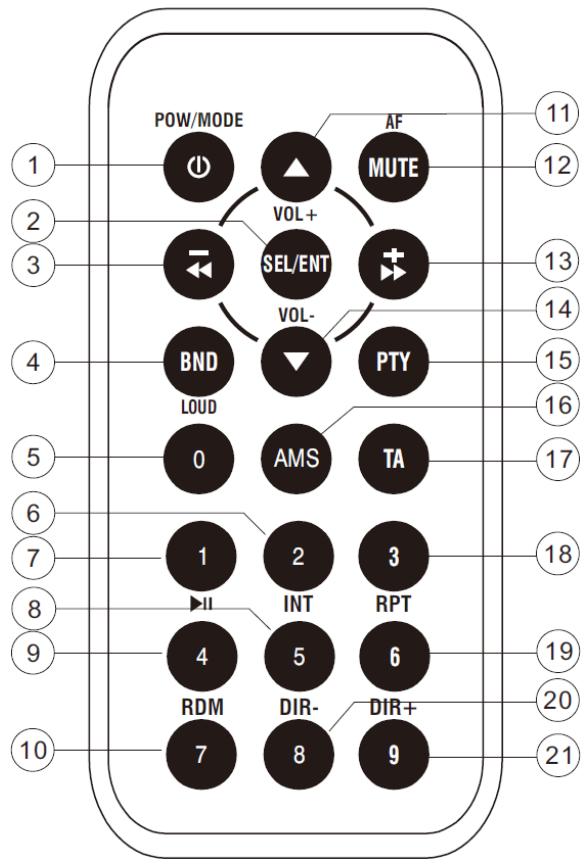
REMOTE CONTROL
- POWER/MODE: Short press for Power on/ MODE change. Long press for power off.
- SEL/ENT: Short press for audio adjusting: VOL/BASS/TREBLE/BALANCE/FADER DSP OFF/DX/STEREO
In USB/SD searching mode. Short press it for ENTER function.
- -<<: Short press for PREVIOUS / auto Searching searching down.
Long press for RF / manual searching down.
- BND / LOU: Short press for band change. Long press for LOUDNESS function.
5 0: Number 0 for MP3 searching.
-
2/INT: 2# preset station/intro playing/number 2 for MP3 searching.
-
1/▶/III:1# preset station/pause/play/number 1 for MP3 searching.
-
5/DIR:- 5# preset station /enter previous folder playing/number 5 for MP3 searching.
-
4/RDM: 4# preset station / random playing / number 4 for MP3 searching.
-
7: number 7 for MP3 searching.
-
VOL: turn up volume.
-
MUTE/AF: Short press for mute on/off. Long press for AF on/off.
-
+: Short press for NEXT / auto Searching searching up. Long press for FF / manual searching up.
-
VOL: turn down volume
-
PTY: turn on/off PTY function.
-
AMS: Short press for preset scan / MP3(WMA)file searching. Long press for auto store.
-
TA: turn on/off TA function.
-
3/RPT: 3# preset station / repeat playing/ number 3 for MP3 searching.
-
6/DIR+: 5# preset station / enter next folder playing / number 6 for MP3 searching.
-
8: number 8 for MP3 searching.
- 9: number 9 for MP3 searching.

If at any time in the future you should need to dispose of this product please note that: Waste electrical products should not be disposed of with household waste. Please recycle where facilities exist. Check with your Local Authority or retailer for recycling advice. (Waste Electrical and Electronic Equipment Directive)
BEDIENUNGSANLEITUNG
CS-322
Lenco
Taste 3: OTHER MU/CLASSICS
Taste 4: COUNTRY/JAZZ MUS
Taste 5: NATIONAL/OLDIES
Taste 6:FOLK MUS
- Verkehransagen
TP: Traffic Program Identification
TA: Traffic Announcement Identification
PTY: Program Type Code
| FM | MW | MP3/WMA | |
| Afstembereik | 87.5~108.0 MHz | 522~1620KHz | --- |
| Gevoeligheid | 4uV(S/N=30dB) | --- | --- |
| S/N ratio | 50 dB | 50 dB | 60 dB |
| Stereoscheiding | >25 dB | --- | 50dB |
| Freq. Respons | 40Hz~12KHz | 80Hz~2.2KHz | 20Hz~16KHz |
REMOTE CONTROL
Touche 1: ACTUALITES/AFFAIRES/INFORMATIONS
Touche 2 : EDUCATION/RIRE/SPORTS
Touche 3 : VARIETES/CULTURE/SCIENCE
Touche 4 : ECONOMIE/ENFANTS/METEO
Touche 5: MODE/SOCIAL/RELIGION
Touche 6 : VOYAGES/DIVERTISSEMENT/DOCUMENTAIRES
Boton 3#: OTHER MU/CLASSICS
Botón 4#: COUNTRY/JAZZ MUS
Botón 5#: NATIONAL/OLDIES
Botón 6#: FOLK MUS
Oir annunciés de tráfico
Przycisk #4: MUZYKA COUNTRY/JAZZ
Przycisk #5: MUZYKA KRAJOWA/STARE PRZEBOJE
Przycisk #6: MUZYKA FOLKOWA


- ATTENTIONS OF INSTALLATION
- OPERATION
- GENERAL OPERATION
- Switching on/off the unit
- Remove the panel
- Sound adjusting
- LOUDNESS on/off
- SELECT EQ
- LOCAL/DISTANCE
- STEREO/MONO
- LIQUID CRYSTAL DISPLAY
- AUXILIARY INPUT
- RESET FUNCTION
- RADIO OPERATION
- SWITCHING TO RADIO MODE
- SELECTING THE FREQUENCY BAND
- SELECTING STATION
- AUTOMATIC MEMORY STORING & PROGRAM SCANNING
- MANUAL STORING A STATION
- ANS (Announcement Name Station) OPERATION
- Broadcast station name data expressed in alphanumeric characters
- USB PLAY OPERATION
- SELECTING FILE
- PAUSING PLAYING
- PREVIEWING ALL FILES
- REPEATING THE SAME FILE
- PLAYING ALL TRACKS IN RANDOM
- SELECTING DIRECTORY UP/DOWN
- SELECTING FILE BY FILE NO.
- REMOTE CONTROL
- BEDIENUNGSANLEITUNG
- Lenco
Brand : LENCO
Model : CS-322
Category : Turntable