
DCD-F101 - CD Player DENON - Free user manual and instructions
Find the device manual for free DCD-F101 DENON in PDF.
| Product Type | CD Player |
| Brand | DENON |
| Model | DCD-F101 |
| Number of Channels | 2 |
| Frequency Response | 2 – 20,000 Hz |
| Dynamic Range | 95 dB |
| Signal-to-Noise Ratio | 102 dB |
| Harmonic Distortion | 0.005% (1 kHz) |
| Separation | 95 dB (1 kHz) |
| Output Voltage | 1.8 V |
| Compatible Disc Formats | CD, CD-R (finalized), CD-RW (finalized) |
| Digital Output | Optical (DIGITAL OUT OPTICAL) |
| Playback Functions | Normal playback, pause, forward/reverse search, repeat one track or entire disc, random playback, programmed playback (30 tracks max.) |
| System Functions (with D-F101 series) | Auto power on, auto function select, synchronized recording, editing functions, timer |
| D/A Converter | Multi-level noise-shaping amplifier |
| Power Consumption | 10 W |
| Power Supply | 230 V AC, 50 Hz |
| Dimensions (W × H × D) | 250 × 81.5 × 265 mm |
| Weight | 2.6 kg |
| Included Accessories | Stereo audio cable, system connector cable, instruction manual, list of service centers |
| Disc Care | Clean from center outward with a soft cloth; do not use solvents |
| Safety | Unplug power cord before moving the unit; use AC outlets only for audio equipment |
Frequently Asked Questions - DCD-F101 DENON
User questions about DCD-F101 DENON
0 question about this device. Answer the ones you know or ask your own.
Ask a new question about this device
Download the instructions for your CD Player in PDF format for free! Find your manual DCD-F101 - DENON and take your electronic device back in hand. On this page are published all the documents necessary for the use of your device. DCD-F101 by DENON.
USER MANUAL DCD-F101 DENON
WARNING: TO PREVENT FIRE OR SHOCK HAZARD, DO NOT EXPOSE THIS APPLIANCE TO RAIN OR MOISTURE.

The lightning flash with arrowhead symbol, within an equilateral triangle, is intended to alert the user to the presence of uninsulated "dangerous voltage" within the product's enclosure that may be of sufficient magnitude to constitute a risk of electric shock to persons.

The exclamation point within an equilateral triangle is intended to alert the user to the presence of important operating and maintenance (servicing) instructions in the literature accompanying the appliance.
- DECLARATION OF CONFORMITY
We declare under our sole responsibility that this product, to which this declaration relates, is in conformity with the following standards:
EN60065, EN55013, EN55020, EN61000-3-2 and EN61000-3-3.
Following the provisions of 73/23/EEC, 89/336/EEC and 93/68/EEC Directive.
CLASS 1 LASER PRODUCT
LUOKAN 1 LASERLAITE
KCLASS 1 LASERAPPARAT
ADVARSEL: USYNLIG LASBTRALING VED ABNING, NAR SIKKERHEDSAFBRYDERE ER UDE AF FUNKTI. UNDGÅ USDSAETTELSE FOR STRALING.
VAROITUS! LAITTEEN KÄYTTÄMINEN MUULLA KUIN TÄSSÄ KÄYTTOOHJEESSA MAINITULLA TAVALLA SAATTAA ALTISTAA KÄYTTÄJÄN TURVALLISUUSLUOKAN 1 YLITTVALLE NAKYMÄTTOMÄLLE LASERSÄTEILYLE
VARNING- OM APPARATEN ANVÄNDS PÀ ANNAT SÄTT ÄN I DENNA BRUKSANISNING SPECICERATS, KAN ANVÄNDAREN UTSÄTTAS FÜR OSYNLIG LASERSTRÄLNING SOM ÖVERSKRIDER GRÄNSEN FÜR LASERKCLASS 1.
- The ventilation should not be impeded by covering the ventilation openings with items, such as newspapers, table-cloths, curtains, etc.
- No naked flame sources, such as lighted candles, should be placed on the apparatus.
- Please be care the environmental aspects of battery disposal.
- The apparatus shall not be exposed to dripping or splashing for use.
- No objects filled with liquids, such as vases, shall be placed on the apparatus.
CLASS 1 ASER PRODUCT"
TO PREVENT FIRE OR SHOCK HAZARD, DO NOT EXPOSE THIS APPLIANCE TO RAIN OR MOISTURE.
NOTE:
This CD player uses the semiconductor laser. To allow you to enjoy music at a stable operation, it is recommended to use this in a room of 5^ (41^) 35^ (95^)
Please, record and retain the Model name and serial number of your set shown on the rating label.
Model No. DCD-F101 Serial No.
Thank you for purchasing this DENON Compact Disc Player. Please read the operation instructions thoroughly in order to acquaint yourself with the CD player and achieve maximum satisfaction from it.
TABLE OF CONTENTS
1 MAIN FEATURES 4
2 BEFORE USING 4
3 CAUTIONS ON INSTALLATION 4
4 CONNECTIONS 5
5 PART NAMES AND FUNCTIONS 6
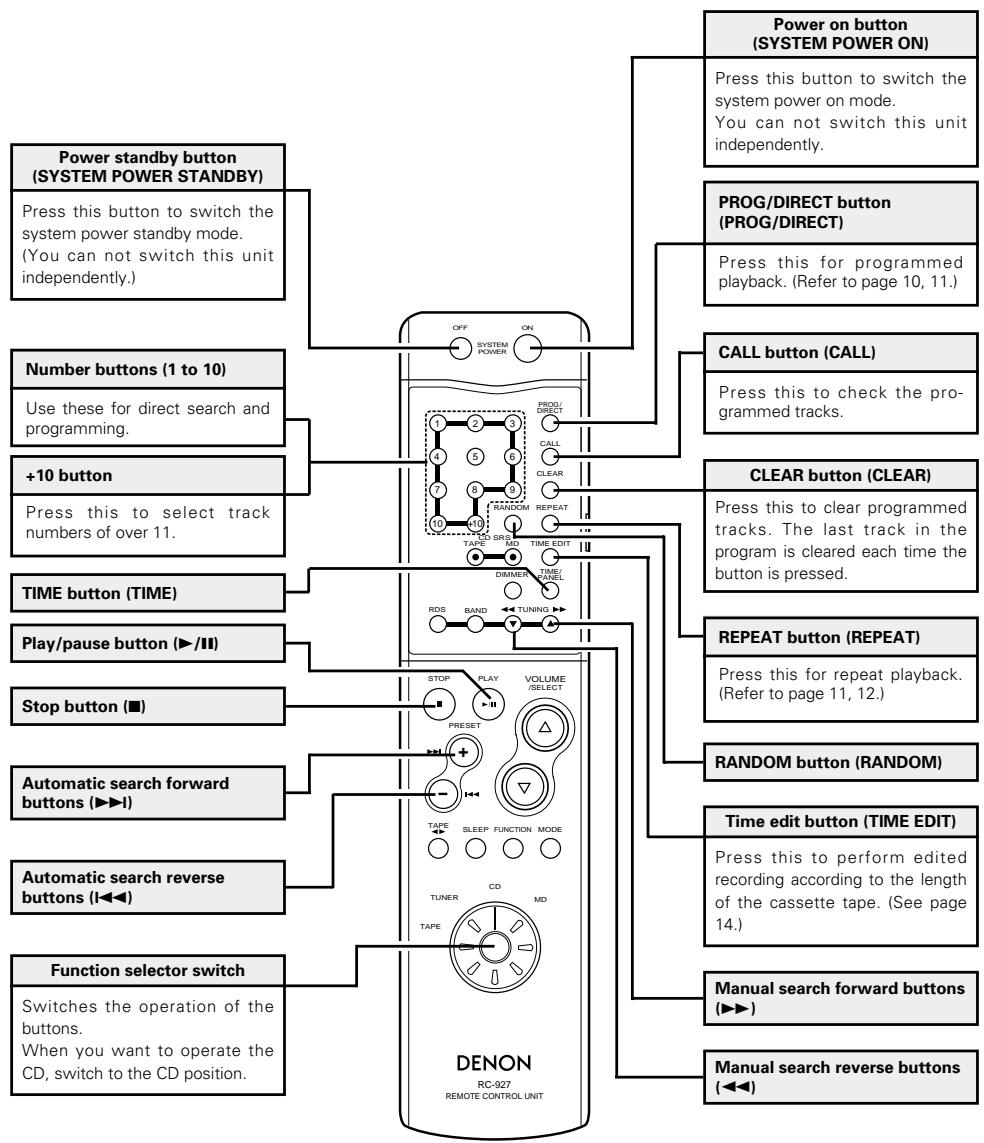
6 REMOTE CONTROL
7 CAUTIONS ON HANDLING DISCS 7,8
CAUTION
1. Handle the power supply cord carefully
Do not damage or deform the power supply cord. If it is damaged or deformed, it may cause electric shock or malfunction when used. When removing from wall outlet, be sure to remove by holding the plug attachment and not by pulling the cord.
2. Do not open the top cover
In order to prevent electric shock, do not open the top cover.
If problems occur, contact your DENON DEALER.
3. Do not place anything inside
Do not place metal objects or spill liquid inside the CD player.
Electric shock or malfunction may result.
1 MAIN FEATURES
1. Enhanced Multilevel - D/A converter
Enhanced Multilevel noise shaping/Δ-Σ D/A converters with superior resolution offers reproduction of the original sound field with rich musical expression.
2. CD-R/RW playback
This set can play finalized CD-R/RW discs. Note however that depending on the recording quality, it may not be able to play certain CD-R/RW discs.
3. Optical digital output terminals
The DCD-F101 is equipped with optical digital output terminals for digital signal transfer, allowing digital-to-digital recording onto MDs and DATs with little deterioration of sound quality.
4. Convenient system functions
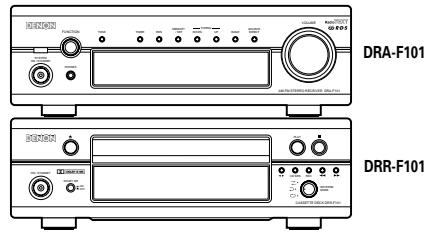
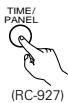
The DCD-F101 is equipped with such system functions as CD synchronized recording, auto function selection and auto power on that simplify operation when connected in a system with the D-F101 series. In addition, the major operations of each the system units can be performed with the system remote control unit (RC-927) included with the receiver. (DRA-F101)
2 BEFORE USING
Read the following before using the set.
- Before turning on the power
Check again that all connections are correct and that there are no problems with the connection cords. Be sure to unplug the power cord before connecting or disconnecting the connection cords.
- Moving the set
To prevent short-circuits or damage to the connection cords, always unplug the power cord and disconnect the connection cords between all other audio components when moving the set.
- Condensation (dew)
Condensation (water droplets) may be produced on internal optical lenses or discs in the following cases:
- Directly after a heater is turned on.
- When the set is in a steamy or humid room.
- When the set is moved abruptly from a cold place (room) to a warm room.
- Should condensation occur:
The signals on the disc cannot be read and the set will not function properly. Remove the disc then let the set set with the power on. The condensation will evaporate in one hour or less, at which time the set will function normally.
- Store this instructions in safe place
After reading, store this instructions along with the warranty in a safe place. Also fill in the items on the back paper for your convenience.
- Illustrations in this manual
Note that some of the illustrations used for explanations in this manual may differ from the actual set.
- Do not set TVs (even small ones) or other objects on top of this unit.
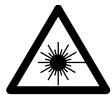
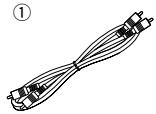
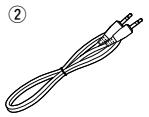
- ACCESSORIES
Check that the following parts are included in the package aside from the main unit:
① Stereo Audio Cord 1
② System Connector Cable
③ Operating Instructions. 1
④ Service Station List
②
3 CAUTIONS ON INSTALLATION
The CD player uses a microcomputer for controlling internal electronic circuits.
In the event that the player is used while a near-by tuner or TV is turned on, although unlikely, interference could occur either in the sound from the tuner or the picture of the TV. To avoid this, please take the following precautions.
- Keep the CD player as far away from the tuner or TV set as possible.
-
Keep the power cable and connecting cable of the CD player separate from the antenna wires of the tuner and TV.
-
Interference is particular likely to occur when an indoor antenna or a 300 / ohms feeder cable is used. Thus, use of an outdoor antenna and 75/ ohms coaxial cable is strongly recommended.
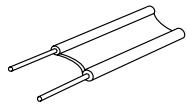
300 Ω/ohms feeder cable
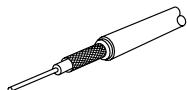
75 Ω/ohms coaxial cable
4 CONNECTIONS
Connecting to the D-F101 Series
■ When connecting to a receiver other than the one in the D-F101 series, there is no need to make connection 2. Note that in this case none of the system functions (auto power on, etc.) will work.
- System operations such as the auto power on function can only be used if stereo audio cords and system cords are connected between all the system components. Be sure to securely connect all the connection cords between all the units.
- Disconnecting a system cord during system operation may result in malfunction. Be sure to unplug the power cords before changing the connections.
- Install the components in such a way that the ventilation holes of the receiver (DRA-F101) are not obstructed.
- Use the AC OUTLET for audio equipment only. Do not use them for hair driers, etc.
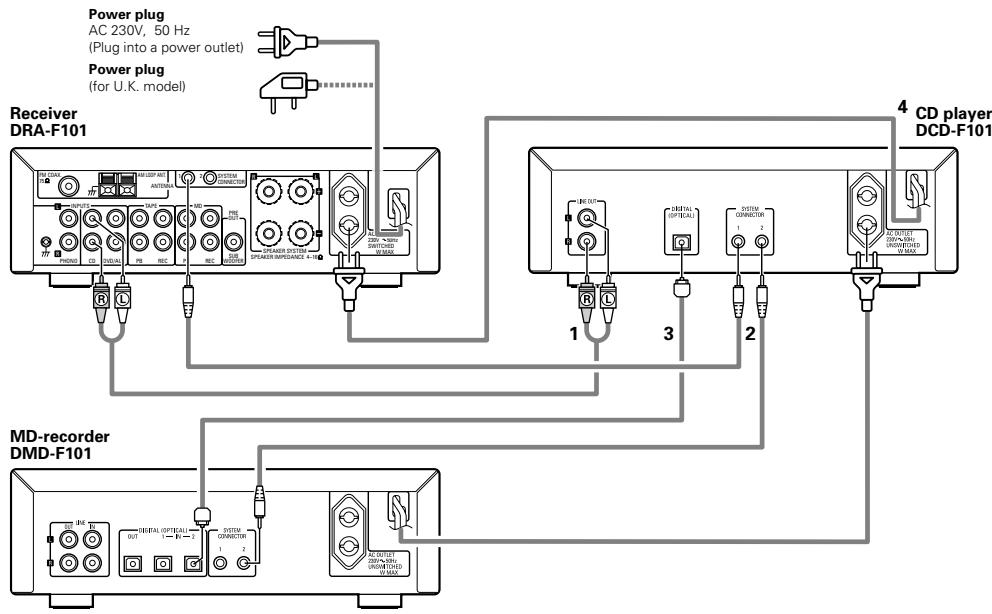
| 1 | Connect the DCD-F101's LINE OUT jacks to the receiver's CD input jacks using the included stereo audio cord. |
| 2 | Connect the DCD-F101's SYSTEM CONNECTOR jack (1 or 2) to the SYSTEMCONNECTOR jack (1 or 2) of one of the other components using the included system cord. |
| 3 | Connect the DCD-F101's optical digital output terminal (DIGITAL OPTICAL OUT) to the digital input terminal (DIGITAL OPTICAL IN 1 or 2) of the MD recorder using optical connection cords. |
| 4 | Connect this unit's power cord to the AC outlet on the Receiver (DRA-F101) or one of the other components. |
| * The DCD-F101 can also be used when connected to a receiver other than the one in the D-F101 series. In this case, none of the system functions (auto power on, etc.) will work. | |
- Do not place another component directly on top of the receiver (DRA-F101).
- For stability, do not stack more than three components on top of each other.
NOTES:
- Do not plug power cords into power outlets until all connections have been completed.
- Check the left and right channels and be sure to interconnect them correctly (R to R, L to L).
- Plug in the power cords securely. Incomplete connections will result in noise.
- Clasping the power cords and connection cords together may result in humming or noise.
- After unplugging the power cord, wait at least 5 seconds before plugging it back in.
Recommended System Installation
To ensure performance and stability, install the D-F101 series as shown below.
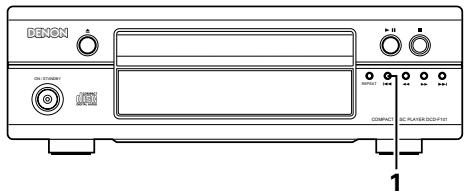
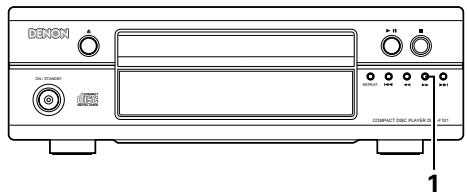
PART NAMES AND FUNCTIONS
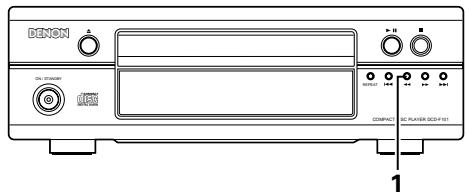
(1) Front Panel
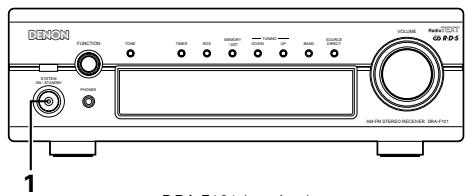
1 Power operation switch (ON/STANDBY)
- When pressed once, the power turns on and the display lights.
- When pressed again, the standby mode is set.
- The LED color changes as follows, according to the condition:
During power ON: green
During STANDBY: red
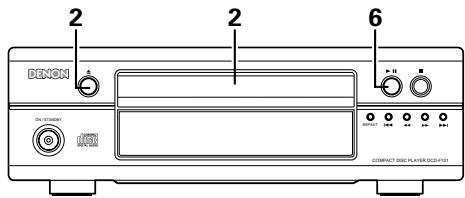
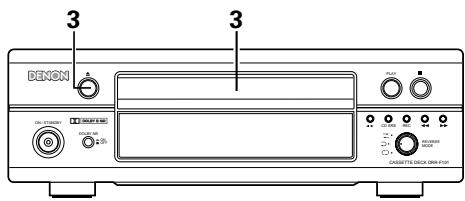
2 Disc holder open/close button ( )
- Press this button to open and close the disc holder.
- When pressed in the standby mode, the power turns on automatically and the disc holder opens.
3 Display
Refer to page 3.
Repeat button
- Press this for repeat playback. (Refer to page 11.)
Automatic/reverse button (I<
- Use this button to find the beginning of the desired track. (Refer to page 9.)
6 Manual search reverse button (▲)
- Press this button to reverse the disc. (Refer to page 10.)
7 Manual search forward button (▶▶)
- Press this button to forward the disc. (Refer to page 10.)
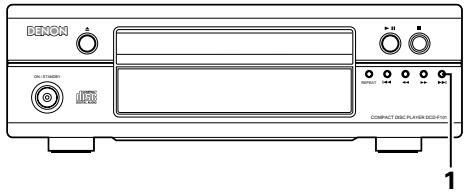
Automatic/manual search forward button ( I)
- Use this button to find the beginning of the desired track. (Refer to page 9.)
Stop button (■)
- Press this button to stop playback.
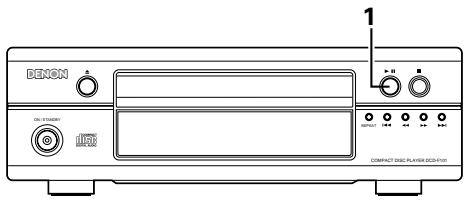
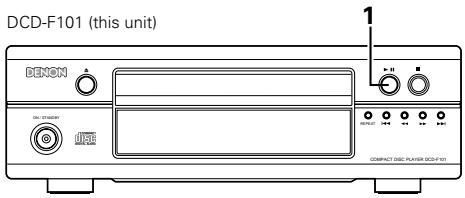
10 Play/Pause button (▶/II)
- Press this button to start playing the disc.
- When pressed while the disc holder is open, the disc holder closes and playback starts.
- Press this button to stop playback temporarily.
- To resume playback, press either the pause button (■) or the play button (▶).
11 Disc holder
- Press the disc holder open/close button (▲) to open and close the disc holder.
- The disc holder can also be closed by press the pause button (■) or the play button (▶).
(2) Rear Panel
12 Output jacks (LINE OUT)
- Connect these to the CD input jacks on the amplifier.
- When connecting the DCD-F101 in a system with the D-F101 series, be sure to connect these jacks to the CD input jacks on the receiver (DRA-F101).
13 Digital output jack (DIGITAL OUT OPTICAL)
- Digital data is output in optical form from this jack.
Refer to page 5.
14 System connectors (SYSTEM CONNECTOR 1 and 2)
- When connecting the DCD-F101 in a system with the D-F101 series, connect these to the system connectors on other components using the included system cords.
15 Power cord
- Connect this unit's power cord to the AC outlet on the Receiver (DRA-F101) or the MD recorder (DMD-F101).
(3) Display
16 Mode indicators
These indicate the various modes.
- REPEAT:
These indicators light as follows each time the repeat button is pressed:

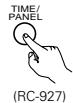
(RC-927)
- EDIT:
(Editing operations are performed from the system remote control unit (RC-927) included with the receiver (DRA-F101). They can only be performed when the components are connected in a system.)
- This lights when performing editing operations on a cassette tape. (Refer to page 14.)
PROG:
This lights during programming and programmed playback.
#
lights during playback.
flashes during manual search in the play mode.
.
lights during the pause mode.
flashes during manual search in the pause mode.
- RANDOM:
This lights in the random play mode.
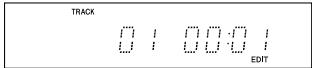
17 Track number display section
- When a disc is loaded
- In the stop mode:
Total number of tracks on disc - In the play and programmed play modes: Number of track currently playing
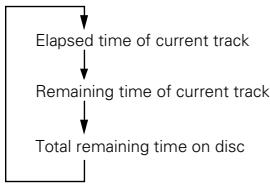
18 Time display
- When a disc is loaded
In the stop mode:
Total disc playing time
- In the play and pause modes: Elapsed time of current track
-
In the play and pause modes: Elapsed time of current track
-
When no disc is loaded or when the disc data cannot be read properly, "00:00" is displayed.
- The display switches as follows each time the time button is pressed:
6 REMOTE CONTROL
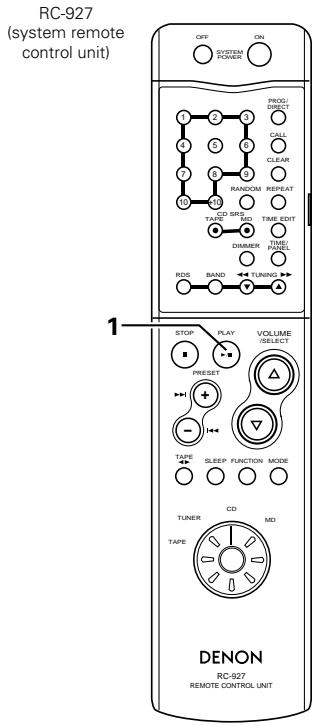
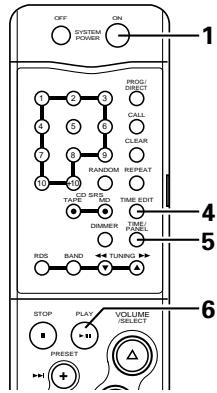
Names and Functions of System Remote Control Unit Buttons (The RC-927 is included with the DRA-F101.)
The CD related buttons on the system remote control unit included with the receiver are explained below.
- Buttons not explained here function in the same way as the corresponding buttons on the main unit.
(Refer to pages 3 and 6.)
7 CAUTIONS ON HANDLING DISCS
- The types of discs listed on the table below can be used on the DCD-F101.
The marks are indicated on the disc labels or jackets.
| Usable discs | Mark (logo) | Recorded signals | Disc size |
| CD CD-R CD-RW (NOTE 1) | COMPACT DIGITAL AUDIO COMPACT DIGITAL AUDIO Recordable | Digital audio | 12 cm |
| 8 cm |
NOTE 1: According to recording quality, some
CD-R/RW cannot be played.
Discs
Only the discs including the marks shown on page 7 can be played on the DCD-F101.
Note, however, that discs with special shapes (heart-shaped discs, hexagonal discs, etc.) cannot be played on the DCD-F101. Do not attempt to play such discs, as they may damage the player.


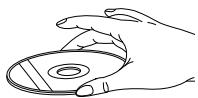
Holding Discs
Avoid touching the surface of discs when loading and unloading them.
Be careful not to get fingerprints on the signal surface (the side which shines in rainbow colors).
Cleaning Discs
Fingerprints or dirt on the disc may lower sound and picture quality or cause breaks in playback. Wipe off fingerprints or dirt.
Use a commercially available disc cleaning set or a soft cloth to wipe off fingerprints or dirt.
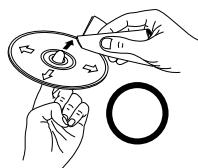
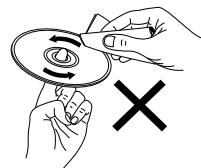
Wipe gently from the middle outwards.
Do not wipe with a circular motion.
NOTE:
- Do not use record spray or antistatic. Also do not use volatile chemicals such as benzene or thinner.

Record Thinner Benzene spray
Cautions on Handling Discs
- Do not get fingerprints, grease or dirt on discs.
- Be especially careful not to scratch discs when removing them from their cases.
- Do not bend discs.
- Do not heat discs.
- Do not enlarge the center hole.
- Do not write on the labeled (printed) side with a ball-point pen or a pencil.
- Water droplets may form on the surface if the disc is moved suddenly from a cold place to a warm one. Do not use a hairdryer, etc., to dry the disc.
Cautions on Storing Discs
Always eject discs after playing them.
- Keep discs in their cases to protect them from dust, scratches and warping.
- Do not put discs in the following places:
- Places exposed to direct sunlight for long periods of time
- Humid or dusty places
- Places exposed to heat from heaters, etc.
Cautions on Loading Discs
- Only load one disc at a time. Loading one disc on top of another may result in damage or scratch the discs.
- Load 8 cm discs securely in the disc guide, without using an adapter. If the disc is not properly loaded, it may slip out of the guide and block the disc tray.
- Be careful not to let your fingers get caught when the disc tray is closing.
- Do not place anything but discs in the disc tray.
- Do not load cracked or warped discs or discs that have been fixed with adhesive, etc.
- Do not use discs on which the adhesive part of cellophane tape or glue used to attach the label is exposed, or discs with traces of tape or labels that have been peeled off. Such discs may get stuck inside the player, resulting in damage.
8 OPENING AND CLOSING THE DISC HOLDER AND LOADING DISCS
| 1 | Turn on the power. | ON / STANDBY (Main unit) |
| 2 | Press the disc holder open/close button. ·The disc holder opens. | Main unit (The main unit) |
| 3 | Being careful not to touch the disc's data surface, set the disc in the disc tray with the labeled side facing up. ·Make sure the disc holder is fully open when loading discs. ·Set 12 cm discs in the outer disc guide (Fig. 1), 8 cm discs in the inner disc guide (Fig. 2). Make sure the disc is flat. | The main unit |
| 4 | Press the disc holder open/close button to close the disc holder. ·When the disc holder closes, the total number of tracks on the disc and the total playing time appear on the display, and the numbers on the music calendar light up to the number of tracks on the disc. | Main unit (The main unit) |
| * When the play button is pressed after a disc is set on the disc tray, the disc holder closes and playback starts. | Main unit (The main unit) | |
Figure 1
Figure 2
NOTES:
- If your finger or another object should get caught in the disc holder, stay calm and press the disc holder open/close button (▲).
- Do not put foreign objects in the disc holder. Doing so could result in damage.
- Do not press on the disc holder when the power is turned off. Doing so could damage it.
- To not press buttons with pencils, etc.
9 NORMAL PLAYBACK
(1) Starting Playback
| 1 | Turn on the power. | ON / STANDBY (@) (Main unit) |
| 2 | Load the disc. | (Main unit) * For instructions on loading discs, refer to "OPENING AND CLOSING THE DISC HOLDER AND LOADING DISCS" (Page 9) |
| 3 | Press the play button. • Playback starts. | (Main unit) * |
(2) Stopping Playback
| 1 | During playback, press the stop button. • Playback stops. *Playback also stops automatically after the last track on the disc has been played. |
NOTES:
- Zeros are displayed if no disc is loaded or if the disc is loaded upside-down.
- The total remaining time and the remaining time per track are not
displayed if the disc data cannot be read properly due to scratches or dirt on the disc. In this case, some time may be required for finding the beginnings of tracks, etc.
- Do not use discs with cellophane tape on them, rental discs on which there is glue seeping out from under the label, or discs on which there are traces of labels that have been peeled off. If such discs are loaded, they may get stuck inside the player and cause damage.
10 VARIOUS PLAYBACK FUNCTIONS
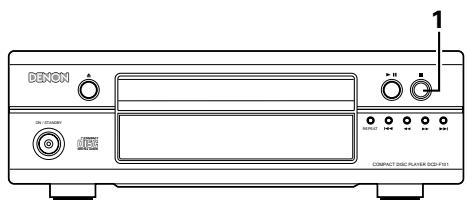
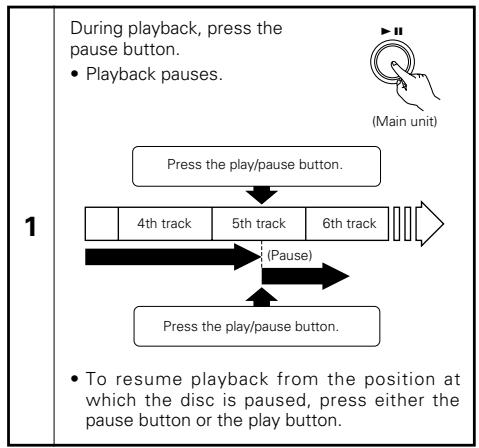
(1) Stopping playback temporarily [Pause]
Use this function to stop playback temporarily then resume playback from that point.
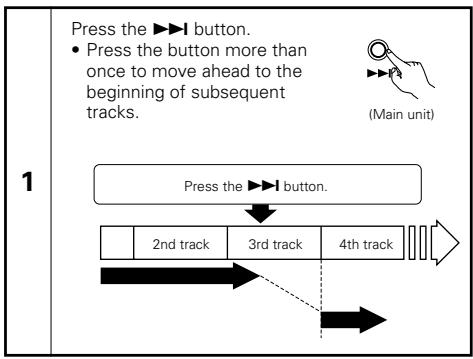
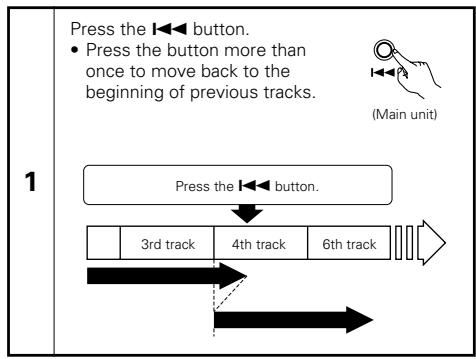
(2) Automatic Search
Moving ahead to the beginning of the next track
Moving back to the beginning of the current track
(3) Finding the desired spot while listening to the sound [Manual Search]
Use this function to skip forward or backward while listening to the sound. This function comes in handy for finding the desired spot in the middle of long tracks.
Searching forward
±b Searching backward
1
During playback, press and hold in the button.
- When the button is released, normal playback resumes from that point.

(Main unit)
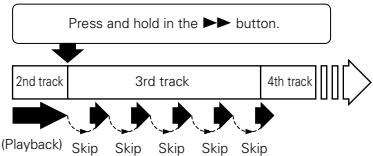
* If the end of the last track on the disc is reached while pressing the button, " ] appears on the display and the manual search mode is canceled.
To resume playback, press and hold in the button until "J" turns off and the track number reappears, then perform another operation.
* To move ahead at high speed without listening to the sound, press the▶ button while in the pause mode.
1
During playback, press and hold in the button.
- When the button is released, normal playback resumes from that point.

(Main unit)
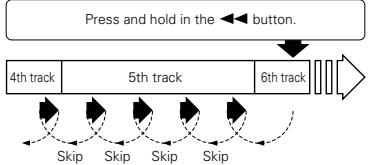
1
* If the beginning of the first track on the disc is reached while pressing the button, " appears on the display and the manual search mode is canceled.
To resume playback, press and hold in the button until "CC" turns off and the track number reappears, then perform another operation.
* To move backward at high speed without listening to the sound, press the button while in the pause mode.
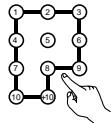
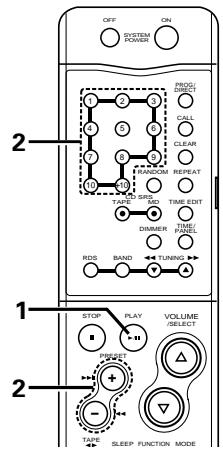
(4) Selecting the desired track (remote control unit) [Direct Play]
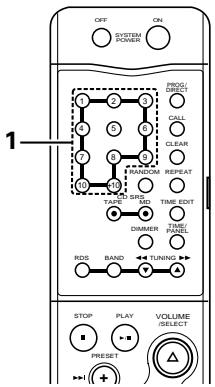
Use the number buttons and the +10 button to select the desired track.
1
Ex.: To select track 4:
To select track 12:
To select track 30:
Playback starts from the selected track.
- To perform the direct play operation during programmed playback, first press the direct button to cancel the programmed play mode.
k.

(RC-927)
(5) Playing the tracks in the desired order (remote control unit) .... [Programmed Play]
Use this function to select the desired tracks on the disc and play them in the desired order.
Up to 30 tracks can be programmed.
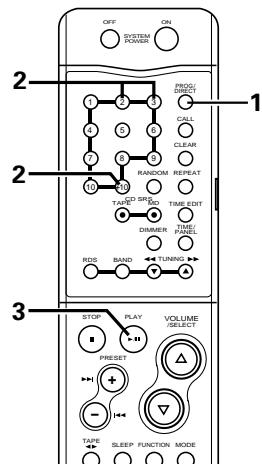
2
Press the number and +10 buttons to select the track to be programmed.
- For example, to program the 3rd track and the 12th track, press 3 , +10 , and 2 .

Displays when the 3rd track is set at the first place.


Displays the total number of programmed tracks and total playing time.

Displays when the 12th track is set at the second place.


Displays the total number of programmed tracks and total playing time.
3
Press the / (play/pause) button. The tracks are played in the programmed order.
NOTE:
-
The sound may be interrupted momentarily when resuming normal playback from the manual search mode. This is not a malfunction.
-
Press the PROG/DIRECT button again to resume normal playback during the stop mode.
- To cancel the entire program, press the PROG/DIRECT button or cancel the program one by one using the CLEAR button.
- If you program the wrong track, press the CLEAR button then program the right track. (The last track in the program is erased each time the CLEAR button is pressed.)
- To confirm the programmed playing order, press the CALL button. The programmed playing order appears in the display.
Press the CLEAR button with a track number appearing in the display automatically erases that specific track from Program Play.
Other operations possible during programmed playback.
Such operations as quick search, pause and skip monitor are also possible during programmed playback.
For the quick search function, press the automatic search reverse button (▶) to move back to the beginning of the track, then press it again while the time display reads "00:00" to move back to the beginning of the preceding track.
To move ahead to the beginning of the next track, press the automatic search forward button (▶▶) regardless of the time display.
NOTES:
- The entire program is canceled when the (open/close) button is pressed.
- Set the stop mode when cancelling tracks from the program. To cancel the program mode, press the PROG/DIRECT button.
(6) Playing the tracks in random order (remote control unit) [Random Play]
Use this function to play all the tracks on the disc once in random order.
![DENON DCD-F101 - Playing the tracks in random order (remote control unit) [Random Play] - 1](/content/2020/04/135569/images/4cebd1372dc529e151aef988d63a6c238e9b16f0e072b944229a9658937045b4.jpg)
| 1 | In the stop mode, press the random button. ·The “RANDOM” indicator lights. * If pressed during playback, random play starts from that track. |
| 2 | Press the play button. ·A track is selected automatically and playback starts. ·During programmed playback: The programmed tracks are played in random order. ·During repeat playback: The tracks are played once in random order, then played again in a different order, and this is repeated. |
| * To cancel random playback, press the random button again. Normal playback resumes. | |
NOTES:
- The total remaining time is not displayed during random playback.
- Random playback is not possible in the editing mode when the DCD-F101 is connected in a system with the F101 series.
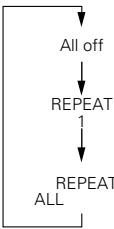
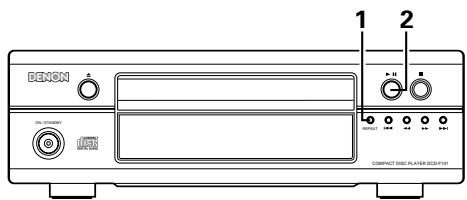
(7) Repeat Play
1 Playing tracks repeatedly
[One-track Repeat]
![DENON DCD-F101 - [One-track Repeat] - 1](/content/2020/04/135569/images/1f5a68ddab9b2c2bfdf6f7e583c67aded7d0eb7a7b758f55441b64aff43126ae.jpg)
![DENON DCD-F101 - [One-track Repeat] - 2](/content/2020/04/135569/images/6847749da169f9785efa4115d1b1c385e2d84d5ba53bcdc1d9c476d4e9648dc2.jpg)
| 1 | Press the repeat button once. ·The “REPEAT” indicator lights. | |
| (REPEAT) (Main unit) | (REPEAT) (RC-927) | |
| 2 | Select the track to be repeated. (Main unit) PRESET or (RC-927) | ||
| 3 | Press the play button. •Playback starts. •Once the selected track is played, the pickup moves back to the beginning of that track and the track is repeated. (Main unit) Press the repeat button once. 2nd track | 3rd track | 4th track |
NOTE:
- The one-track repeat mode cannot be set during programmed or random playback.
2 Playing all the tracks repeatedly [All-track Repeat]
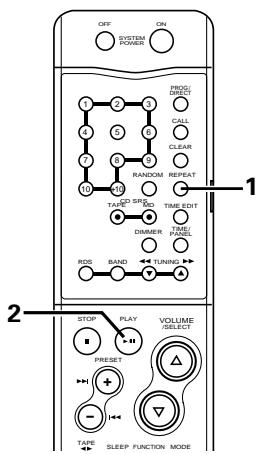
| 1 | Press the repeat button twice. ·The “REPEAT” indicator lights. (Main unit) (RePEAT (REPEAT (REPEAT (REPEAT (REPEAT (REPEAT (REPEAT (REPEAT (REPEAT (REPEAT (REPEAT (REPEAT (REPEAT (REPEAT (REPEAT (REPEAT (REPEAT (REPEAT (REPEAT (REPEAT (REPEAT (REPEAT (REPEAT (REPEAT (REPEAT (REPEAT (REPEAT (REPEAT (REPEAT (REPEAT (REPEAT (REPEAT (REPEAT (REPEAT (REREAT (REREAT (REREAT (REREAT (REREAT (REREAT (REREAT (REREAT (REREAT (REREAT (REREAT (REREAT (REREAT (REREAT (REREAT (REREAT (REREAT (REREAT (REREAT (REREAT (REREAT (REREAT (REREAT (REREAT (REREAT (REREAT (REREAT (REREAT (REREAT (REREAT (REREAT (REREAT (REREAT (REREAT\(\cdot\)REPEAT (主用) |
| 2 | Press the play button. (Main unit) (RePEAT (RePEAT (RePEAT (RePEAT (RePEAT (RePEAT (RePEAT (RePEAT (RePEAT (RePEAT (RePEAT (RePEAT (RePEAT (RePEAT (RePEAT (RePEAT (RePEAT (RePEAT (RePEAT (RePEAT (RePEAT (RePEAT (RePEAT (RePEAT (RePEAT (RePEAT |
| * The all-track repeat mode can also be set by pressing the repeat button twice during playback. * If the repeat button is pressed during programmed playback, the programmed tracks are played repeatedly. * To cancel the all-track repeat mode, press the repeat button until the “REPEAT” indicator turns off. | |
(8) Setting the pause mode at the beginning of a certain track (remote control unit) [Pause]
Finding the beginning of a track directly
Use this function to set the pause mode at the beginning of a track with the direct search operation, for example when you want to record that track onto a cassette tape or mini-disc.
Finding the beginning of a track using the programmed play mode
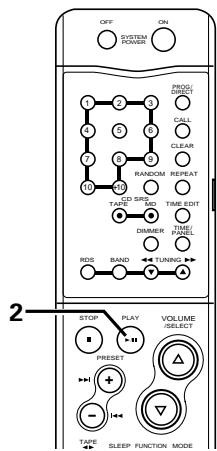
| 1 | Press the pause button. | PLAY (RC-927) |
| 2 | Select the track to be played. RESET or (RC-927) | SELECT the track to be played. RESET or (RC-927) |
| * To start playback, press the play button. | * To start playback, press the play button. | PLAY (RC-927) |
| * To perform this operation during programmed playback, first press the direct button to cancel the programmed play mode. | * To perform this operation during programmed playback, first press the direct button to cancel the programmed play mode. | PROG/DIRECT (RC-927) |
| 1 | Set the programmed play mode. * Refer to page 10. |
| 2 | Press the pause button. * The beginning of the first programmed track is found and the pause mode is set. |
| * To start playback, press the play button. | |
SYSTEM FUNCTIONS
(1) System connection
■ Operation is even easier when the components in the D-F101 series are connected to the DCD-F101 with system connections. (For instructions on connections, refer to the respective operating instructions of receiver (DRA-F101).
The system functions will only work when the components of the D-F101 series are connected. They will not work with other components.
The system function signals for operating the components in the D-F101 series are all output from the receiver (DRA-F101). Thus, when making system connections, be sure to connect the receiver (DRA-F101).
(2) Auto power on function (when connected to the D-F101 series components)
■ When the system is set to the standby mode, you can start the playback of disc simply by pressing the play/pause button.

| 1 | Set the function select switch on the remote control to "CD" position. | TUNER CD TAPE MD (RC-927) |
| 2 | Press the play/pause button. • System's power turn on and the function of receiver automatically switches to "CD". And then, the CD starts playing. | PLAY (RC-927) |
| * When a CD is loaded with the DCD-F101 in the standby mode, CD playback can be started simply by pressing the DCD-F101's play button. | ||
(3) Auto function selection (when connected to the D-F101 series)
Use this function to switch the function to "CD" and start playing the disc simply by pressing a single button.
1
Press the play/pause button while a unit other than the DCD-F101 (MD recorder or cassette deck) is playing.

(Main unit)

(RC-927)
- Playback on the currently playing unit stops. At the same time, the receiver's function switches to "CD" and the CD starts playing.
- To perform this operation from the system remote control unit, first turn the remote control unit's function select switch and set the function to "CD".
(4) Editing functions (when connected to the DRA-F101 and DRR-F101)
Use this function to automatically edit the tracks on the CD to fit on the tape to be used for recording.
The editing function is set from system remote control unit (RC-927) included with the receiver (DRA-F101).
Example: Recording a disc containing 18 tracks with a playing time of 56 minutes onto a 60-minute cassette tape
DRA-F101 (receiver)
DCD-F101
DRR-F101 (Cassette deck)
RC-927 (system remote control unit)
| 1 | Turn on the power of the receiver. * The system's power turns on. SYSTEM ON/STANDBY (DRA-F101) | SYSTEM ON POWER (RC-927) |
| 2 | Load the CD, then close the disc holder. | (DCD-F101) |
| 3 | Load the cassette tape onto which you want to record into the cassette deck, then close the cassette holder. | (DRR-F101) |
| 4 | Set the function select switch to "CD" position. Press the edit button and select the length of the tape. TIME EDIT (RC-927) For example, when using a 60-minute (C-60) tape, press the edit button (EDIT) four times. (The tape length is the total length of sides A and B.) * The display switches as follows each time the edit button (EDIT) is pressed: C 45 C 50 C 54 C 60 C 120 C 180 C 90 C 74 ↓ ↓ ↓ ↓ ↓ ↓ ↓ ↓ ↓ ↓ ↓ ↓ ↓ ↓ ↓ ↓ ↓ ↓ ↓ ↓ ↓ ↓ ↓ ↓ ↓ ↓ ↓ ↓ ↓ ↓ ↓ ↓ ↓ ↓ ↓ | Approximately 3 seconds after the tape length is set, the remaining time on side A or B of the tape appears by turns. |
5
Press the time button.
- The remaining time on side B of the tape appears.
- The display switches between sides A and B each time the button is pressed. (Use this to check the remaining time for side B).
$$ \begin{array}{c c c c c} I & I ^ {\prime \prime} & \dots & I & \overset {1} {\underset {I ^ {\prime \prime}} {\backslash}} \ I & I ^ {\prime \prime} & \dots & I & \overset {m} {\underset {I ^ {\prime \prime}} {\backslash}} \ \vdots & \vdots & \ddots & \vdots & \overset {m} {\underset {I ^ {\prime \prime}} {\backslash}} \end{array} $$
Press the play button on the DCD-F101.
- Playback on the DCD-F101 and recording on the cassette tape start simultaneously.
6

(Main unit)

(RC-927)
- To cancel the editing mode, press the stop button (■) on the DCD-F101 or the cassette deck to stop playback of the CD.
The editing mode is not canceled if other buttons are pressed.
NOTES:
- The editing function will not work with discs containing more than 21 tracks.
- Load the cassette tape onto which you want to record into the cassette deck's cassette tray with side A facing up before starting edited recording. The beginning of the tape is automatically found before recording starts.
- When using a recorded cassette tape for edited recording, recording stops and a blank section is left on side B of the tape if the tape is longer than the set time, so erase the tape beforehand.
- When the editing function is used for recording, the reverse mode is automatically set to even if the cassette deck's reverse mode switch is set to , and recording continues on side B after recording on side A is completed.
- In some cases it may not be possible to record all the tracks on the disc, even if the tape is longer than the disc's recorded time (because of how the tracks are divided onto sides A and B of the tape). The "OVER" indicator flashes if there are tracks that cannot be recorded.
- Only the stop button (■), time mode button (TIME) and power buttons (ON/STANDBY or POWER) will function during editing.
- When recording using the editing function, the auto space function is activated and blank spaces of approximately 4 seconds are automatically created between tracks. Because of this, when recording CDs containing for example recordings of concerts without spaces between tracks, blank spaces will be created in the middle of the piece. In this case, do not record using the editing function.
(5) CD synchronized recording (when connected to the D-F101 series)
This function allows easy recording of CDs.
This function allows easy recording from CD to MD, from CD to Tape. Refer to the respective operating instruction of each model.
(6) Timer functions (when connected to the DRA-F101)
The timer functions of the receiver (DRA-F101) can be used to play CDs at set times.
Refer to the operating instruction included with the DRA-F101.
12 TROUBLESHOOTING
If a problem should arise, first check the following:
- Are the connections correct?
- Have you operated the receiver according to the Operating Instructions?
- Are the speakers, turntable, and other components operating properly?
If this unit is not operating properly, check the items listed in the table below. Should the problem persist, there may be a malfunction.
Disconnect the power immediately and contact your store of purchase.
| Symptom | Cause | Remedy | Refer to page |
| Disc holder does not open and close. | • Is the power turned on? | • Turn on the power. | 8~9 |
| Zeros are displayed when a disc is loaded. | • Is the disc loaded properly? | • Load the disc properly. | 9 |
| Play mode is not set when play button (▶) is pressed. | • Is the disc dirty or scratched? | • Wipe the dirt off the disc or replace the disc. | 9 |
| No sound is produced, or sound is distorted. | • Are the output cords properly connected to the amplifier? • Is the amplifier adjusted properly and set to the CD function? | • Check the connections. • Adjust the amplifier's controls. | 5 — |
| Specified position of disc is not played. | • Is the disc dirty or scratched? | • Wipe the dirt off the disc or replace the disc. | 9 |
| Programmed play function does not work. | • Have you set the program properly? | • Reset the program. | 10 |
| Set does not work properly when operated from the remote control unit. | • Are the batteries worn? • Is the remote control unit too far from the set? | • Replace the batteries with new ones. • Move the remote control unit closer to the set. | 7 7 |
13 SPECIFICATIONS
AUDIO
Number of Channels: 2 channels
Frequency Response: 2 20,000Hz
Dynamic Range: 95 dB
Signal-to-noise Ratio: 102 dB
Harmonic Distortion: 0.005 % (1 kHz)
Separation: 95 dB (1 kHz)
Wow and Flutter: Below measurable limit:
(±0.001 % W. peak)
Output Voltage: 1.8 V
DISCS
Compact Disc format
GENERAL CHARACTERISTICS
Power Supply: AC 230 V, 50 Hz
Power Consumption: 10 W
Dimensions: 250 (W) x 81.5 (H) x 265 (D)
Mass: 2.6 kg
* Design and specifications are subject to change without notice in the course of product improvement.
INHALTSVERZEICHNIS
DRR-F101 (Cassetten Deck)
4 REPEAT-toets (REPEAT)
Zie pagina 71.
③ Bruksanvising. 1
④ Listoverservicestallen 1

1 EGENSKAPER
1. Optiska digitala utgangar
Denna indicator lyser under slumpvalsavspeling.
17 Visningsdel for spãrnummer
Harmonisk distortion: 0,005% (1 kHz)
Kanalseparation: 95 dB (1 kHz)
Svaj: Under matgransen (± 0,001%) Vegt top
Utgangsspanning: 1,8 V
SKIVOR Compact Disc-format
ALLMÄNT
Stromforsorjning: 230 V vaxelstrom, 50 Hz
Strömforbrukning: 10 W
Yttermatt: 250 (B) × 81,5 (H) × 265 (D)
Vikt: 2,6 kg


- - DECLARATION OF CONFORMITY
- CLASS 1 LASER PRODUCT
- CLASS 1 ASER PRODUCT"
- NOTE:
- TABLE OF CONTENTS
- CAUTION
- Handle the power supply cord carefully
- Do not open the top cover
- Do not place anything inside
- MAIN FEATURES
- Enhanced Multilevel - D/A converter
- CD-R/RW playback
- Optical digital output terminals
- Convenient system functions
- BEFORE USING
- Read the following before using the set.
- - Before turning on the power
- - Moving the set
- - Condensation (dew)
- - Should condensation occur:
- - Store this instructions in safe place
- - Illustrations in this manual
- - ACCESSORIES
- CAUTIONS ON INSTALLATION
- CONNECTIONS
- Connecting to the D-F101 Series
- NOTES:
- Recommended System Installation
- PART NAMES AND FUNCTIONS
- Front Panel
- Power operation switch (ON/STANDBY)
- Disc holder open/close button ( )
- Display
- Repeat button
- Automatic/reverse button (I<
- Manual search reverse button (▲)
- Manual search forward button (▶▶)
- Automatic/manual search forward button ( I)
- Stop button (■)
- Play/Pause button (▶/II)
- Disc holder
- Rear Panel
- Output jacks (LINE OUT)
- Digital output jack (DIGITAL OUT OPTICAL)
- System connectors (SYSTEM CONNECTOR 1 and 2)
- Power cord
- Display
- Mode indicators
- - EDIT:
- PROG:
- #
- .
- - RANDOM:
- Track number display section
- Time display
- REMOTE CONTROL
- CAUTIONS ON HANDLING DISCS
- Discs
- Holding Discs
- Cleaning Discs
- Cautions on Handling Discs
- Cautions on Storing Discs
- Cautions on Loading Discs
- OPENING AND CLOSING THE DISC HOLDER AND LOADING DISCS
- NORMAL PLAYBACK
- Starting Playback
- Stopping Playback
- VARIOUS PLAYBACK FUNCTIONS
- Automatic Search
- Other operations possible during programmed playback.
- Playing the tracks in random order (remote control unit) [Random Play]
- Repeat Play
- Playing tracks repeatedly
- [One-track Repeat]
- SYSTEM FUNCTIONS
- System connection
- Auto power on function (when connected to the D-F101 series components)
- Auto function selection (when connected to the D-F101 series)
- 1
- Editing functions (when connected to the DRA-F101 and DRR-F101)
- 5
- 6
- CD synchronized recording (when connected to the D-F101 series)
- Timer functions (when connected to the DRA-F101)
- TROUBLESHOOTING
- If a problem should arise, first check the following:
- SPECIFICATIONS
- AUDIO
- GENERAL CHARACTERISTICS
- INHALTSVERZEICHNIS
- REPEAT-toets (REPEAT)
- EGENSKAPER
- Optiska digitala utgangar
- Visningsdel for spãrnummer
- ALLMÄNT
Brand : DENON
Model : DCD-F101
Category : CD Player