USER MANUAL TU-245 DENON
TO PREVENT FIRE OR SHOCK HAZARD, DO NOT EXPOSE THIS APPLIANCE TO RAIN OR MOISTURE.
"SERIAL NO."
PLEASE RECORD UNIT SERIAL NUMBER ATTACHED TO THE REAR OF THE CABINET FOR FUTURE REFERENCE"
CAUTION:
- The ventilation should not be impeded by covering the ventilation openings with items, such as newspapers, tablecloths, curtains, etc.
- No naked flame sources, such as lighted candles, should be placed on the apparatus.
- Please be care the environmental aspects of battery disposal.
- The apparatus shall not be exposed to dripping or splashing for use.
- No objects filled with liquids, such as vases, shall be placed on the apparatus.

CAUTION
RISK OF ELECTRIC SHOCK DO NOT OPEN

CAUTION:
TO REDUCE THE RISK OF ELECTRIC SHOCK, DO NOT REMOVE COVER (OR BACK). NO USER SERVICEABLE PARTS INSIDE. REFER SERVICING TO QUALIFIED SERVICE PERSONNEL.

The lightning flash with arrowhead symbol, within an equilateral triangle, is intended to alert the user to the presence of uninsulated “dangerous voltage” within the product’s enclosure that may be of sufficient magnitude to constitute a risk of electric shock to persons.

The exclamation point within an equilateral triangle is intended to alert the user to the presence of important operating and maintenance (servicing) instructions in the literature accompanying the appliance.
We declare under our sole responsibility that this product, to which this declaration relates, is in conformity with the following standards: EN60065, EN55013, EN55020, EN61000-3-2 and EN61000-3-3. Following the provisions of 73/23/EEC, 89/336/EEC and 93/68/EEC Directive.
NOTE ON USE / HINWEISE ZUM GEBRAUCH/OBSERVATIONS RELATIVES A L'UTILISATION NOTE SULL'USO / NOTAS SOBRE EL USO / ALVORENS TE GEBRUIKEN / OBSERVERA OBSERVAÇÕES QUANTO AO USO
natural_image
Cartoon illustration of a sad sun and a cracked box with falling water (no text or symbols)
- Avoid high temperatures.
Allow for sufficient heat dispersion when installed on a rack.
- Vermeiden Sie hohe Temperaturen.
Beachten Sie, daß eine ausreichend Luftzirkulation gewährleistet wird, wenn das Gerät auf ein Regal gestellt wird.
- Eviter des températures élevées
Tenir compte d'une dispersion de chaleur suffisante lors de l'installation sur une étagère.
- Evitate di esporre l'unità a temperature alte. Assicuratevi che ci sia un'adeguata dispersione del calore quando installate l'unità in un mobile per componenti audio.
- Evite altas temperaturas.
Permite la suficiente dispersión del calor cuando está instalado en la consola.
- Vermijd hoge temperaturen.
Zorg voor een degelijk hitteafvoer indien het apparaat op een rek wordt geplaatst.
- Undvik höga temperaturer.
Se till att det finns möjlighet till god värmeavledning vid montering i ett rack.
- Evite temperaturas altas.
Conceda suficiente dispersão de calor quando o equipamento for instalado numa prateleira.
- Handle the power cord carefully.
Hold the plug when unplugging the cord.
- Gehen Sie vorsichtig mit dem Netzkabel um. Halten Sie das Kabel am Stecker, wenn Sie den Stecker herausziehen.
- Manipuler le cordon d'alimentation avec précaution.
Tenir la prise lors du débranchement du cordon.
- Manneggiate il filo di alimentazione con cura. Agite per la spina quando scollegate il cavo dalla presa.
- Maneje el cordón de energía con cuidado. Sostenga el enchufe cuando desconecte el cordón de energía.
- Hanteer het netsnoer voorzichtig.
Houd het snoer bij de stekker vast wanneer deze moet worden aan- of losgekoppeld.
- Hantera nätkabeln varsamt.
Håll i kabeln när den kopplas från el-uttaget.
- Manuseie com cuidado o fio condutor de energia.
Segure a tomada ao desconectar o fio.

natural_image
Cartoon illustration of a distressed rectangular object with eyes and nose, surrounded by small waves (no text or symbols)
- Keep the set free from moisture, water, and dust.
- Halten Sie das Gerät von Feuchtigkeit, Wasser und Staub fern.
- Protéger l'appareil contre l'humidité, l'eau et lapoussière.
- Tenete l'unità lontana dall'umidità, dall'acqua e dalla polvere.
- Mantenga el equipo libre de humedad, agua y polvo.
- Laat geen vochtigheid, water of stof in het apparaat binnendringen.
- Utsätt inte apparaten för fukt, vatten och damm.
- Mantenha o aparelho livre de qualquer umidade, água ou poeira.
- Unplug the power cord when not using the set for long periods of time.
- Wenn das Gerät eine längere Zeit nicht verwendet werden soll, trennen Sie das Netzkabel vom Netzstecker.
- Débrancher le cordon d'alimentation lorsque l'appareil n'est pas utilisé pendant de longues périodes.
- Disinnestate il filo di alimentazione quando avete l'intenzione di non usare il filo di alimentazione per un lungo periodo di tempo.
- Desconecte el cordón de energía cuando no utilice el equipo por mucho tiempo.
- Neem altijd het netsnoer uit het stopkontakt wanneer het apparaat gedurende een lange periode niet wordt gebruikt.
- Koppla ur nätkabeln om apparaten inte kommer att användas i lång tid.
- Desligue o fio condutor de força quando o aparelho não tiver que ser usado por um longo período.

natural_image
Cartoon illustration of a book character with eyes and tears, standing on a surface with legs above (no text or symbols)
* (For sets with ventilation holes)
- Do not obstruct the ventilation holes.
- Die Belüftungsöffnungen dürfen nicht verdeckt werden.
- Ne pas obstruer les trous d'aération.
• Non coprite i fori di ventilazione.
- No obstruya los orificios de ventilación.
- De ventilatieopeningen mogen niet worden beblokkeerd.
- Täpp inte till ventilationsöppningarna.
- Não obstrua os orifícios de ventilação.

- Do not let foreign objects in the set.
- Keine fremden Gegenstände in das Gerät kommen lassen.
- Ne pas laisser des objets étrangers dans l'appareil.
- E' importante che nessun oggetto è inserito all'interno dell'unità.
- No deje objetos extraños dentro del equipo.
- Laat geen vreemde voorwerpen in dit apparaat vallen.
- Se till att främmande föremål inte tränger in i apparaten.
- Não deixe objetos estranhos no aparelho.

natural_image
Illustration of a spray bottle pouring liquid into a container with a cartoon face (no text or symbols)
- Do not let insecticides, benzene, and thinner come in contact with the set.
- Lassen Sie das Gerät nicht mit Insektiziden, Benzin oder Verdünnungsmitteln in Berührung kommen.
- Ne pas mettre en contact des insecticides, du benzène et un diluant avec l'appareil.
- Assicuratevvi che l'unità non venga in contatto con insetticidi, benzolo o solventi.
- No permita el contacto de insecticidas, gasolina y diluyentes con el equipo.
- Laat geen insektenverdelgende middelen, benzine of verfverdunner met dit apparaat in kontakt komen.
- Se till att inte insektsmedel på spraybruk, bensen och thinner kommer i kontakt med apparatens hölje.
- Não permita que inseticidas, benzina e dissolvente entrem em contacto com o aparelho.

natural_image
Cartoon illustration of a car with expressive eyes and motion lines, no text or symbols present
- Never disassemble or modify the set in any way.
- Versuchen Sie niemals das Gerät auseinander zu nehmen oder auf jegliche Art zu verändern.
- Ne jamais démonter ou modifier l'appareil d'une manière ou d'une autre.
- Non smontate mai, né modificate l'unità in nessun modo.
- Nunca desarme o modifique el equipo de ninguna manera.
- Nooit dit apparaat demonteren of op andere wijze modifiëren.
- Ta inte isär apparaten och försök inte bygga om den.
- Nunca desmonte ou modifique o aparelho de alguma forma.
ENGLISH
Please check to make sure the following items are included with the main unit in the carton:
(1) Operating Instructions ....1
(2) Power Supply Cord....1
(3) Connecting Cord ....1
(4) AM Loop Antenna 1
(5) FM Indoor Antenna....1
(6) Service Station List....1
DEUTSCH
The characters are input in the order shown below. Use the TUNING/PRESET control ⑦ to select the desired characters.
Zeichentabelle
- Please keep away AM loop antenna from the metal parts of the back panel.
Hinweis:
DESIGNATIONS AND FUNCTIONS OF PANEL CONTROLS (Refer to Page 3.)
FRONT PANEL
The unit works 2-3 seconds after this switch is turned on. Whenever the power operation switch is in the STANDBY state, the apparatus is still connected on AC line voltage. Please be sure to unplug the cord when you leave home for, say, a vacation.
2 Remote control sensor (REMOTE SENSOR)
This sensor receives the infrared light transmitted from the wireless remote control unit.
For remote control, point the wireless remote control unit to the sensor.
Some of the functions can be operated with the remote control units included with DENON pre-main amplifiers and AV surround amplifiers.
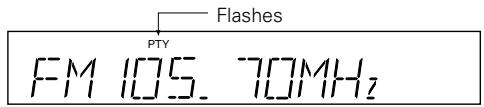
This button is used to select the display mode.
The mode changes as follows each time the button is pressed:
- Tuning frequency
- Input character
• Programme service name (PS)
- Programme type (PTY)
- Clock time (CT)
The following may be displayed if the signals are weak or no RDS service is available. This is not a malfunction.
"NO PS"
"NO PTY"
"NO TIME DATA"
NOTE: The programme type, programme service name and clock time are not displayed in the MW (AM) band.
"NO TIME DATA" may be displayed within the first minute after a station is tuned in, but this is not a malfunction. If time data is being broadcast, the time can be displayed after one minute has passed.
Selects FM or MW.
Use this button to select the memory blocks, A (1 to 8), B (1 to 8), C (1 to 8), D (1 to 8), or E (1 to 8).
For PTY search, use this button to select the program type. When writing station names, use this button to set the writing position.
Frequencies and station names can be stored in the memory. When this button is pressed, the "MEMO" and "CH" indicator on the display flashes for 10 seconds. Use the SHIFT/PTY button and the preset channel buttons during this time to designate the desired preset channel.
7 TUNING/PRESET control
This control is used in conjunction with the TUNING/PRESET button 8.
In the TUNING mode, the reception frequency is tuned up or down. Turning the control in the clockwise direction tunes the frequency up. Turning the control in the counterclockwise direction tunes the reception frequency down.
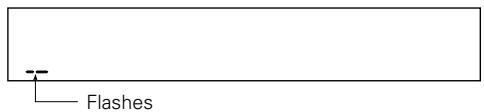
In the PRESET mode (when "PRESET" 13 is lit in the display), the selection of the preset channel is moved up or down. The AUTO TUNING operation cannot be used when in this mode. When writing station names, use this control to select the letters. (Refer to Page 5.)
Each press of this button toggles the operation mode of the TUNING/PRESET control ⑦.
In the PRESET mode, the "PRESET" ⑬ indication of the display is lit.
This button is used to turn EON TA mode on or off. (Refer to Page 11.)
10 Radio Text button (RT)
This button is used for displaying radio text messages.
When this button is pressed while the station currently tuned in is offering a radio text message service, the message scrolls on the display.
This mode turns on and off each time the button is pressed.
This button is used for the RDS search (refer to Page 10), PTY search (refer to Page 11) and TP search (refer to Page 11) operations, and to input the station name (refer to Page 10).
This switches between auto and manual tuning.
Auto tuning: (The "AUTO" indicator lights.)
When the TUNING/PRESET control ⑦ is turned in this mode, auto tuning starts and tuning stops automatically when a broadcast station is found.
Auto tuning is used to receive FM broadcasts in stereo. Depending on the mode of the broadcast and the strength of the signal, auto tuning will automatically switch the receiving mode to stereo or monaural. During tuning, the frequency is automatically tuned up or down.
Manual tuning:
When the TUNING/PRESET control ⑦ is turned in this mode, manual tuning is performed until the control is released.
CAUTION:
- Whenever the ON/STANDBY button is in the STANDBY positon, the unit is still connected on AC line voltage.
Please be sure to unplug the cord when you leave home for, say, a vacation.
- Noise may be generated if a near-by television set is on during MW, FM broadcasting reception. The tuner should be used as far away from a television as possible.
- Effective period of memory back-up is about a week under normal temperature.
The broadcast is received in monaural regardless of the mode of the FM broadcast. The reception mode should be set to “MANUAL” when there is noisy reception of stereo broadcasts (which are indicated by the lighting of “AUTO”) and also when the signal is weak.
During tuning, the reception frequency is tuned up or down only when the TUNING/PRESET control knob is operated.
Use these when presetting and recalling stations. Also use these with the SHIFT/PTY button to use a total of 40 preset channels, A (1 \~ 8), B (1 \~ 8), ... E (1 \~ 8).
REAR PANEL
14 FM antenna terminals (ANTENNA TERMINAL FM)
75 Ω/ohm coaxial cables can be connected to these terminals. For the connection procedure, see the section "CONNECTIONS". (Refer to Page 6.)
15 AM antenna terminals (ANTENNA TERMINAL AM/ 1TTT )
Connect the included AM loop antenna. (Refer to Page 6 for connections.)
Connect with this terminal when a AM outdoor antenna is used.
16 Output terminals (OUTPUT)
Connect these to the TUNER input terminals on the pre-main amplifier.
17 AC Inlet
Connect the included power supply cord here.
DISPLAY
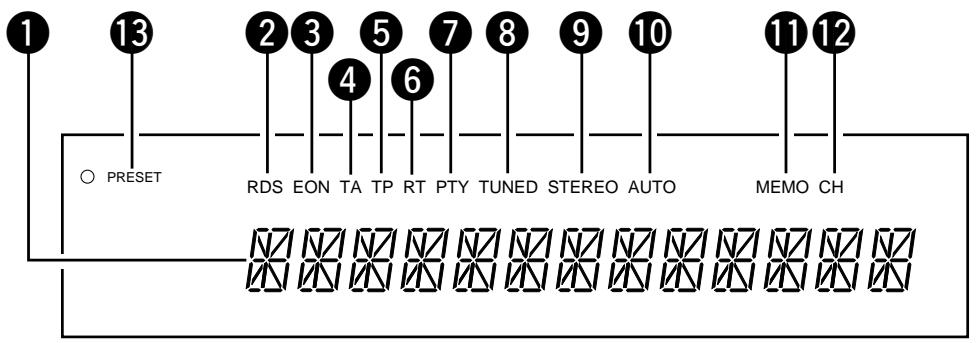
1 16-segment display
This displays the frequency, station name, program type, etc.
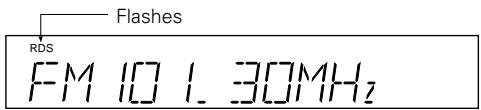
2 RDS indicator
This lights when receiving RDS broadcasts, and flashes during the RDS search.
③ EON indicator
This lights when receiving EON information.
4 TA indicator
This lights when the EON TA button is pressed and when a traffic announcement is being received.
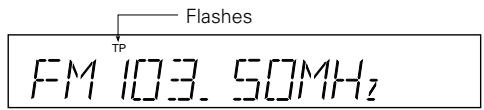
5 TP indicator
This lights when receiving a station broadcasting traffic announcements and flashes during the TP search operation.
6 RT indicator
This lights when the RT button is pressed.
7 PTY indicator
This flashes during the PTY search operation.
8 TUNED indicator
This lights when a station is properly tuned in.
9 STEREO indicator
This lights when receiving stereo broadcasts. It remains off when receiving AM (MW) broadcasts.
10 AUTO indicator
This indicates the tuning mode. It lights in the auto mode, and remains off in the manual mode.
11 MEMO indicator
This flashes for 10 seconds when the MEMORY button 6 is pressed, and flashes during the auto preset memory operation.
12 CH indicator
This lights when the preset channel number is displayed, and flashes during the auto preset memory operation and memory operation.
13 TUNING/PRESET indicator
This displays the operation mode of TUNING/PRESET control ⑦.
Using the Various Functions
1. Using the auto preset memory function
This function automatically stores the FM stations which can be received in the area in which the set is being used in the preset memory. Use this function so that the RDS functions can be used more effectively. Also note that the channel memories can be changed at will even after the preset stations have been stored with this function.
Operation
- Connect the FM antenna and set it so that FM stations can be received.
- Press the ON/STANDBY button to turn on the power while holding in the MEMORY button.
- Searching begins automatically, and stations are stored in the preset memory in order, beginning from channel A1. (The operation automatically stops once 40 stations have been set in the memory.)
2. Storing new stations at the preset channels
The reception frequency, RDS service information, Tuning mode and input characters can be stored at the different channel memories. When this operation is performed, the station already stored in that channel memory using the auto preset memory function is cleared.
Operation
- Press the MEMORY button. (The MEMO indicator flashes.)
- Use the SHIFT/PTY button to select the block, A to E.
- Use buttons 1 to 8 to select the channel at which the station is to be stored.
3. Recalling preset channels
Use the following operation to recall preset channels:
Operation
- Use the SHIFT/PTY button to select the block, A to E.
- Use buttons 1 to 8 to select the channel at which to store the station.
Any characters can be input (up to 8 characters).
The input characters can be stored at the preset channels.
Operation
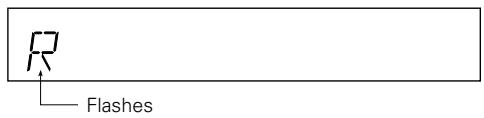
- Press the SEARCH/CHARACTER button four times. (The cursor flashes at the first place.)
- Use the TUNING/PRESET control to select the character for the first place.
(The selected character flashes.)
- Press the SHIFT/PTY button to move the cursor to the next place.
(The cursor flashes at the second place.)
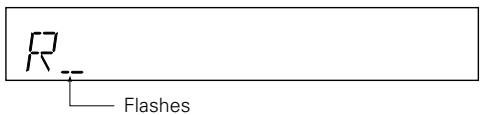
- Repeat steps 2 and 3 above to input up to 8 characters.
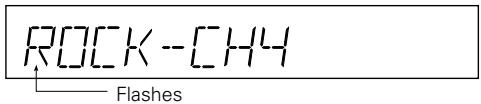
- The characters are set five seconds after the input procedure is finished. The input characters can be stored in the memory.
To keep the input characters, be sure to store them in a channel memory.
-
Clearing characters
-
Recall the character you want to clear.
- Press the SEARCH/CHARACTER button 4 times until the character at the first place flashes.
- Then press the SHIFT/PTY button for at least 2 seconds. The current character will then be cleared.
Using the RDS Functions (for FM only)
1. RDS Search
Use this to automatically search and stop at stations offering RDS services.
Operation
- Press the SEARCH/CHARACTER button once.

- Turn the TUNING/PRESET control clockwise or counterclockwise.
(Searching begins.)
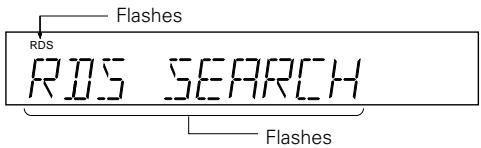
- Searching starts again when the TUNING/PRESET control is turned clockwise or counterclockwise while the RDS indicator is flashing.
- If no other RDS station is found when all the frequencies are searched, "NO RDS" is displayed.
2. PTY Search
Use this to automatically search and stop at stations broadcasting the specified programme type (PTY).
Operation
- Press the SEARCH/CHARACTER button twice.
PTY SEARCH
- Use the SHIFT/PTY button to select the programme type.
INFORMATION
- Turn the TUNING/PRESET control clockwise or counterclockwise.
(Searching begins.)
- Searching starts again when the TUNING/PRESET control is turned clockwise or counterclockwise while the PTY indicator is flashing.
- If no other station broadcasting the designated programme type is found when all the frequencies are searched, "NO PROGRAMME" is displayed.
List of PTY (Programme Type) Displays
- NEWS 9. VARIED
- AFFAIRS 10. POP MUSIC
- INFORMATION 11. ROCK MUSIC
- SPORT 12. M.O.R. MUSIC
- EDUCATION 13. L-CLASSICS (Light classics)
- DRAMA 14. S-CLASSICS (Serious classics)
- CULTURE 15. OTHER MUSIC
- SCIENCE 31. ALARM
NOTE: ALARM cannot be selected during the PTY search operation.
3. TP Search
Use this to automatically search and stop at stations which broadcast traffic announcements (even if the station is not currently broadcasting a traffic announcement.)
Operation
- Press the SEARCH/CHARACTER button three times.

- Turn the TUNING/PRESET control clockwise or counterclockwise.
(Searching begins.)
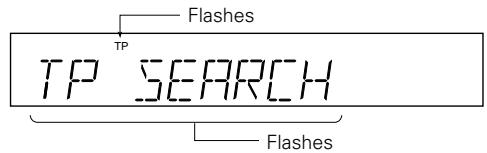
- Searching starts again when the TUNING/PRESET control is turned clockwise or counterclockwise while the TP indicator is flashing.
- If no other TP station is found when all the frequencies are searched, "NO PROGRAMME" is displayed.
4. Radio Text (RT)
When this button is pressed while the station currently tuned in is offering a radio text message service, the message scrolls on the display.
(The RT indicator lights when the RT button is pressed.)
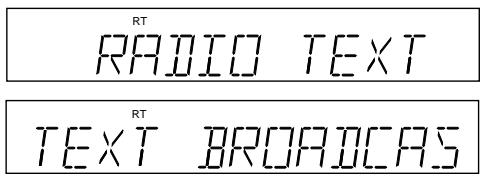
("NO TEXT DATA" is displayed if no radio text message is being broadcast.)
5. EON TA
When an RDS station is broadcasting RDS information on other stations within the same network and a traffic announcement begins on another station in the same network based on this information (EON = Enhanced Other Network), that network station is automatically tuned in. The previous station is tuned back in once the traffic announcement is over.
Operation
- Press the EON TA button.
(The TA indicator lights.)

(STATION A)
(When a traffic announcement starts, that station is automatically tuned in.)

(STATION B)
(When the traffic announcement is over, the previous station is tuned back in.)

(STATION A)
NOTE:
If the station switches from the current station to the network station when this mode is on but the network station cannot be received properly due to weak signals, the previous station is immediately tuned back in.
TROUBLESHOOTING
Check the following before assuming there is a problem with the set.
- Are all connections proper?
- Is the set being operated as described in the operating instructions?
- Are the speakers and input components being operated properly?
If the set does not seem to be operating properly, check the points listed below. If these points do not apply, the set may be damaged. Turn off the power immediately and contact your store of purchase.
| Symptom | Cause | Measures | Page |
| Power does not turn on when ON/STANDBY button is pressed. | Power supply cord's plug is not plugged in to wall outlet. | Plug the power supply cord in properly. | 6 |
| FM broadcast is not received clearly. | Antenna cable is not properly connected.Antenna is not pointing in the right direction.Radio waves are weak. | Connect the leads properly.Point the antenna in the right direction.Install an outdoor antenna. | 666 |
| AM broadcast is not received clearly. | Noise from a TV or interference from near broadcast station.There may be noise from power supply cord. | Turn off the TV.Change the position of the loop antenna.Install an outdoor antenna. | 666 |
• How to clear all data stored in memory.
While pressing the preset channel button 1 and 7 simultaneously, insert the plug of power supply cord into wall outlet.
NOTA: