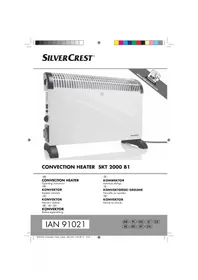
SKT 2000 B1 - Frying Pan SILVERCREST - Free user manual and instructions
Find the device manual for free SKT 2000 B1 SILVERCREST in PDF.


| Product Type | Electric Frying Pan |
| Brand | SilverCrest |
| Model | SKT 2000 B1 |
| Power Consumption | 2000 W |
| Voltage | 220-240 V ~ 50/60 Hz |
| Dimensions (W x D x H) | Approx. 45 x 30 x 10 cm |
| Weight | Approx. 2.5 kg |
| Body Material | Aluminum |
| Coating | Non-stick (PTFE) |
| Capacity | 3.5 L |
| Temperature Range | 80 °C – 220 °C |
| Thermostat | Adjustable with knob |
| Power Indicator Light | Yes |
| Handle | Bakelite, heat-insulated |
| Detachable Cord | Yes |
| Non-slip Feet | Yes |
| Safety Feature | Overheat protection |
| Cleaning | Wipe with damp cloth; do not immerse |
| Spare Parts Available | Power cord, thermostat |
Frequently Asked Questions - SKT 2000 B1 SILVERCREST
User questions about SKT 2000 B1 SILVERCREST
0 question about this device. Answer the ones you know or ask your own.
Ask a new question about this device
Download the instructions for your Frying Pan in PDF format for free! Find your manual SKT 2000 B1 - SILVERCREST and take your electronic device back in hand. On this page are published all the documents necessary for the use of your device. SKT 2000 B1 by SILVERCREST.
USER MANUAL SKT 2000 B1 SILVERCREST
CONVECTION HEATER SKT 2000 B1
GB
CONVECTION HEATER
Operating instructions
HU
KONVEKTOR
Kezelési útmutató
CZ
KONVEKTOR
Návod k obsluze
DE AT CH
KONVEKTOR
Bedienungsanleitung
PL
KONWEKTOR
Instrukcja obstugi
SI
KONVEKTORSKI GRELNIK
Navodilo za uporabo
SK
KONVEKTOR
Návod na obsluhu
IAN 91021





Contents
- Description....2
- Names of parts (see fold-out page).... 3
- Technical data.... 3
- Safety instructions....3
- Unpacking and setting up 6
- Operation....7
- Cleaning....9
- Troubleshooting 9
- Disposal....10
- HOYER Handel GmbH Warranty.... 10
Congratulations on the purchase of your new product.
You have selected a high-quality product. The operating instructions are a constituent part of this product. They contain important information about safety, use and disposal.
Familiarize yourself with all the operating and safety instructions before using the product. Use the product only as described and for the stated spheres of application.
If you pass the product on to a third party, always pass on all the documentation as well.
1. Description
1.1 Intended purpose
This SilverCrest SKT 2000 B1 convector heater may be used to heat dry rooms.
This appliance is intended for private use and is not suitable for commercial purposes. The appliance is suitable for providing auxiliary heating. It is not suitable for use on its own to heat large spaces.
The appliance is floor-standing only or can be wall-mounted using the wall brackets also supplied.
1.2 Scope of supply
- 1 convector heater
- 2 feet
• 4 screws for feet
• 4 wall hooks
• 4 wall plugs with screws for wall hooks
• 1 set of operating instructions
1.3 Symbols on the appliance

The adjacent symbol 3 warns against covering the appliance as this could cause a build up of heat leading to damage and the risk of fire.
2 GB

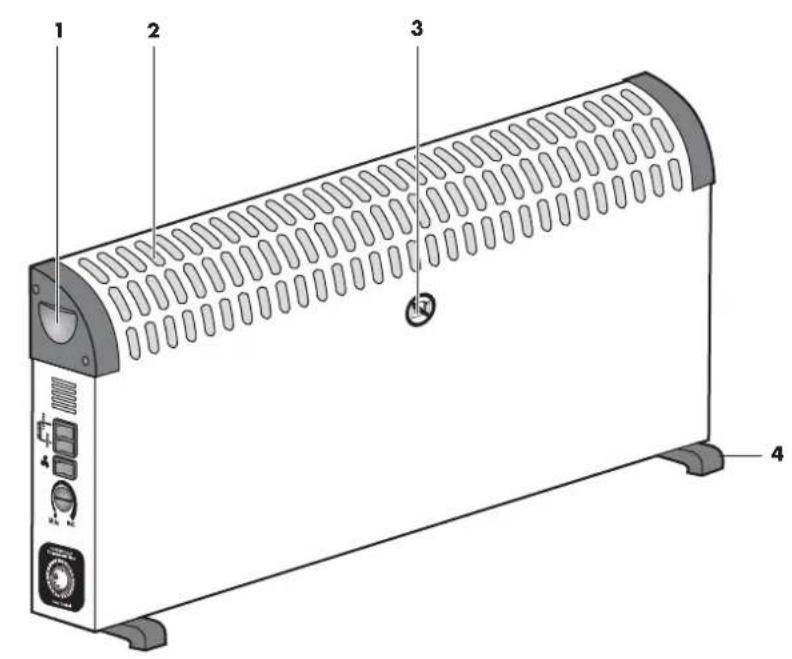
2. Names of parts (see fold-out page)
1 Carry handles
2 Air outlet
3 Warning symbol - "Do not cover"
4 Feet
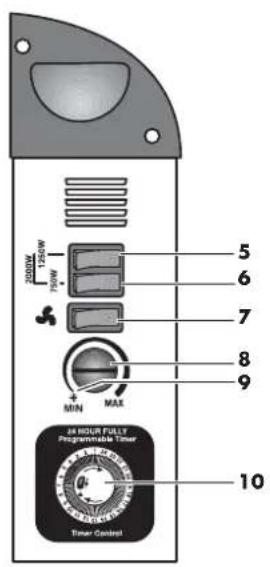
5 Switch 1250W
6 Switch 750W
7 Fan switch
8 Temperature selector
9 Frost symbol
10 Timer
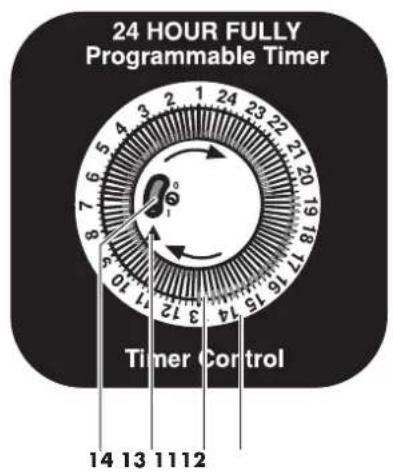
11 Scale for time
12 Control segments
13 Hourly markings
14 Main switch
3. Technical data
Power supply: 220 - 240 V \~/50 Hz
Maximum power: 2,000 watts
Protection class: I
CE
4. Safety instructions
4.1 Terms used
The following signalling terms are found in these Operating Instructions:

Warning!
High risk. Disregarding the
warning may cause injury to life and limb.
Caution!
Medium risk. Disregarding the warning may cause damage to property.
Note:
Low risk. Circumstances that should be taken into account when dealing with this appliance.
4.2 General information
- Before using the appliance, be sure to read these Operating Instructions carefully. They are a component part of
the appliance and must be available at all times.
- Use the appliance only for the purpose described (see "1.1 Intended purpose" on page 2).
- Check whether the mains voltage (see type plate on the appliance) agrees with your mains voltage.
- This device is not intended to be used by individuals (including children) with limited physical, sensory or mental capabilities or with a lack of experience and/or lack of knowledge, unless supervised by a person responsible for their safety or they have received instructions from such a person as to how to use the device. Children should always be supervised to ensure that they do not play with the device.

If there should be any malfunctions, the appliance may only be repaired by our Service Centre. The contact data can be found in "Service Centre" on page 11.
- The appliance must only be set up on a firm, level, dry and non-flammable surface.
- Check that the power socket is easily accessible so that you can pull out the mains plug quickly if necessary.
4.3 Protection against electric shock

Warning! The following safety information is intended to protect you against electric shock.
- Only plug the appliance into a correctly installed, earthed wall socket.
- Do not use the appliance if it has fallen on the floor, received a hard blow or fallen into water. In this contact our Service Centre. The contact data can be found in "Service Centre" on page 11.
- The appliance must not under any circumstances be used if it is damaged. Have the device repaired in such cases by a qualified specialist. The contact data can be found in "Service Centre" on page 11.
- If the mains cable for this appliance is damaged, it must be replaced by the manufacturer or a person with similar qualifications in order to avoid a hazard.
- Never use the appliance in the immediate vicinity of a sink, bath tub, shower or swimming pool as might enter the appliance.
• Water or other liquids must never be allowed to enter the appliance. For this reason: - never use outdoors;
- never place containers filled with liquid, such as drinking glasses, vases etc. on the appliance;
If nonetheless liquid does enter the appliance, unplug the mains plug immediately and have the appliance repaired by a qualified specialist. The contact data can be found in "Service Centre" on page 11.
- Never insert fingers or any objects through the protective guards into the inside of the appliance.
- Never touch the appliance, the mains cord or the mains plug with moist hands.
• Always pull the mains cord out by the plug. Never pull it by the cord itself. - Ensure that the mains cable is not kinked, twisted or crushed.
- Ensure that the mains cable is not damaged on sharp edges.
case please keep the mains cord away from hot surfaces (such as stove eyes).
- If you are not using the appliance for a prolonged period of time, remove the plug from the wall socket. Only then is the appliance completely free of current.
- You should avoid using extension cords. This is only allowed under very particular conditions:
- The extension cord has to be suited for the appliance's amperage.
- The extension cord must not be installed "loose": it must not be possible to trip over it or within the reach of children.
- The extension cord must not by any means be damaged.
No other devices other than this appliance must be connected to the mains socket, as otherwise overloading of the power supply network could occur (multiple sockets are not allowed!).
4 GB




- The appliance must not be operated with an external time switch or separate remote control system, such as a wireless remote control socket.
4.4 Protection against the danger of fire

Warning! As the appliance works at high temperatures, please observe the following safety information to prevent fire.
- While the appliance is operating, there must be no flammable objects (e.g. curtains, paper) in the immediate vicinity of the appliance.
- Never use the appliance to dry textiles or other items on, over or in front of the appliance.
• To avoid overheating, the appliance must never be covered.
- When deciding where to place the appliance on the floor, maintain a minimum distance of 0.5 m from other appliances or the wall.
- If you are mounting the appliance on the wall, only the wall hooks supplied should be used. It must then be ensured that air can circulate freely around the convector. The minimum distance between the floor and the lower edge of the appliance is 10 cm.
- If you are mounting the appliance on the wall, it must not be flammable and should be strong enough for this purpose.
- Never operate the appliance in rooms where there is a risk of explosion or in the vicinity of flammable gases or liquids.
- The appliance must never be placed immediately beneath a wall socket, as the heat it generates could damage the electrical installation.
• Always check that air can freely enter and escape. Heat might otherwise build up inside the appliance.
4.5 Protection against injury

Warning! To avoid injury, please observe the following information.
- Ensure that it is not possible for anyone to trip over or to get caught up in or step on the mainscable.
- Once hot, if you wish to transport the appliance, switch it off, pull out the mains plug, and wait until the appliance has cooled down. Otherwise you could burn yourself on the hot surface.
4.6 For the safety of your child

Warning! Children often cannot assess dangers correctly and are injured as a result. Please therefore observe the following:
- This product may only be used under adult supervision to ensure that children do not play with the appliance.
• Always take care to ensure the appliance is kept out of the reach of children at all times.
- Ensure that the packing foil does not become a deadly trap for a child. Packing foils are not toys.
4.7 Material damage
Caution! To avoid material damage, please observe the following conditions.
- When setting up on the floor, check that the feet are fitted correctly (see "5.1 Assembling the appliance for setup on the floor" on page 6) - otherwise the floor might be scratched or scorched.




5. Unpacking and setting up
- Unpack the appliance from the packaging.
- Remove the transport packaging.
- Check that the appliance shows no signs of damage.
5.1 Assembling the appliance for set-up on the floor
- Screw the feet 4 to the underside of the convector using the short screws provided. 2 screws are inserted diagonally per foot.

Warning! Check that there is sufficient distance from the wall, fixtures and other appliances. When setting up on the floor, the distance must be at least 0.5 m to exclude the risk of fire.
The distance to the wall must always be observed unless you are using the wall hooks supplied. The wall should not be flammable.
- Select a location in compliance with the safety information (see "4. Safety instructions" on page 3).
5.2 Mounting the appliance on a wall
Caution!
- The wall must not be flammable and should also be strong enough.
- The appliance must be at least 10 cm above the floor so air can circulate freely.
Note: If you are mounting the appliance on a wall, the feet must not be screwed on.
- Screw the wall hooks supplied securely to a wall suitable for this purpose:
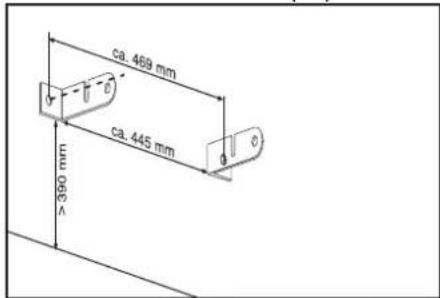
- Mark the position of the two drill holes so that the space between the wall hooks matches the space between the two slots on the rear of the appliance.
- Make sure that the two drill holes are absolutely horizontal.
- Drill a hole around 40 mm deep using an 8 mm bit.
- Insert a wall plug in each hole.
-
Screw the two wall hooks in place using the long screws.
-
To ensure the appliance hangs vertically on the wall, the two other wall hooks are used here as spacers:
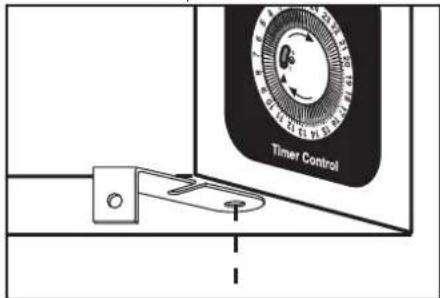
- Screw the two remaining wall hooks to the underside of the appliance.
-
Use the short screws for this purpose.
-
Hang the appliance from the wall hooks.
6 GB




- You can also screw the two spacers to the wall to make the appliance even more stable.
6. Operation
Notes:
- As the appliance and heating coils are supplied with a thin film of grease, there might be a small amount of smoke and odour the first time the appliance is used. This is not harmful and will stop after a short time. Ensure adequate ventilation during this process.
- If you have plugged other power consumers into the same circuit, check that the maximum load for the installed fuse is not exceeded, as otherwise the fuse will trip.
The appliance has three heating settings:
- Level 1: 750 watts: Press switch 6;
- Level 2: 1250 watts: Press switch 5;
- Level 3: 2000 watts: Press switches 5 and 6.
If you want the appliance to heat up particularly quickly, select level 3. If you only want it to heat up slowly, select level 1.
A red indicator lights up in the activated switches as soon as the appliance starts to heat up.
If no switch is pressed, the appliance will not produce any heat.
6.1 Using the appliance for the first 6th Selecting the temperature and switching off
-
Insert the mains plug into a mains socket that complies with the technical data (see "3. Technical data" on page 3).
-
Set the ma switch 14 to "I" to switch on the power supply.
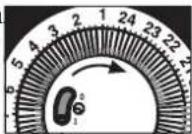
The appliance is now ready to use.
- Set the ma switch 14 to "0" to switch off the power supply.
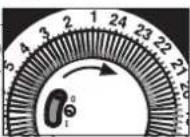
Set the required temperature with the temperature selector 8.
- When the required room temperature is reached, slowly turn down the temperature selector 8 until you hear a quiet "click".
The red indicators in the switches 5 and 6 will be extinguished.
The current room temperature will be maintained.
As soon as the appliance needs to heat up again to maintain the temperature, the red indicators in the switches 5 and 6 will light up once again in the meantime.
6.2 Setting the heating setting
The heating settings are used to select how quickly the appliance heats up.
SKT 2000 B1 7
GB

6.4 Fan function
The appliance is equipped with a fan to distribute the air more quickly in the room. To switch on the fan, press the fan switch 7. A red indicator in the fan switch 7 will then light up.
Note: The appliance can also be operated without the fan being switched on. The heat will then be concentrated more around convector and will not be distributed so quickly in the room.
6.5 Setting the heating time
The appliance has a timer with which you can set the required heating time.
- Switch the timer on by setting the main switch 14 to the Clocksymbol.
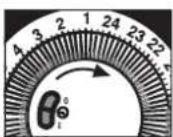
- Turn the scale for the time 11 with the control segments 12 until the current time points to the hourly marking 13. In this example the time is 09.15 am.

- Select the times when the appliance is to function by pulling all control segments 12 to the outside from the beginning to the end according to the scale for the time 11.
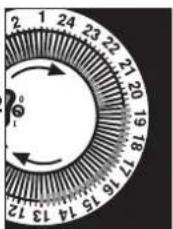
In this example the heating time runs from 01.00 pm to 07.15 pm.
- To switch off the timer, move the main switch 14 to "I" (continuous) or "0" (appliance switched off).
6.6 Thermal cut-out
For your safety the appliance has a thermal cut-out.
If the temperature inside the appliance becomes too high, the appliance switches off automatically:
-
Set the main switch 14 to "0" to switch off the power supply.
-
Make sure that the air can enter and escape freely.
If you cannot establish a cause and the fault occurs repeatedly, have the appliance repaired or else take it out of use.
-
Wait for the appliance to cool down.
-
You can then continue to operate it normally.
6.7 Frost protection setting
With this function, the appliance prevents the room temperature falling below the frost line.
-
Turn the temperature selector 8 to the Frost symbol 9.
-
Set the main switch 14 to "I" to switch on the power supply.
-
Use the switches 5 and 6 to select a heating level (see "6.2 Setting the heating setting" on page 7).
-
Switch on the fan by pressing the fan switch 7 (see "6.4 Fan function" on page 8).
6.8 Transporting the appliance
If you wish to transport the appliance, always carry it by the carry handles 1.




7. Cleaning
To ensure your appliance gives you lasting service, you should clean it regularly.

Warning! To avoid the danger of an electric shock or burning:
- remove the mains plug before each clean;
- allow the appliance to cool down;
- never immerse the appliance in water;
-
never allow water or cleaning agent to run into the appliance.
-
Carefully remove major dust deposits with a vacuum cleaner.
- Clean the outside of the appliance with a damp cloth. You could also use a little washing-up liquid.
Caution! Never use caustic or abrasive cleaning agents, as this could damage your appliance. - Wipe the appliance with a cloth moistened with clear water.
- Do not use the appliance again until it has dried completely.
8. Troubleshooting
| Fault Cause | Remedy | |
| Appliance cannot be switched on | Faulty fuse or wall socket Select another wall socket | |
| Faulty appliance Have repairs carried out at a specialist workshop or dispose of the appliance. You will find the service address in "Service Centre" on page 11. | ||
| Appliance switches off automatically | Thermal cut-out has triggered | Allow the appliance to cool down (see "6.6 Thermal cut-out" on page 8) |
| Clean the appliance (see "7. Cleaning" on page 9) | ||
| Selected temperature has been reached | Heating switches on again automatically as soon as the room temperature falls | |
| Select a higher required temperature | ||

The symbol with the crossed-out rubbish bin on wheels means that within the European Union, the product must be disposed of to a sorted rubbish collection. This applies to the product and all accessories which are marked with this symbol. Marked products must not be disposed of via the regular domestic waste but must be handed in to a recycling centre for electrical or electronic
devices. Recycling helps to reduce the use of raw materials and to relieve the environment. It is therefore imperative that you follow the disposal regulations applicable in your country.
9.2 Packaging
If you would like to dispose of the packaging, please observe the corresponding environmental regulations in your country.
You have a warranty on this product which is valid for 3 years from the date of purchase. In the event of this product being defective, you have statutory rights against the seller of the product. These statutory rights are not limited by our warranty as set out below.
Warranty conditions
The warranty period begins with the date of purchase. Please keep the original till receipt in a safe place. This is required as your proof of purchase.
If a defect in materials or workmanship occurs within three years of the date your product was purchased, we will repair or replace the product at our discretion at no charge to you. This service under warranty assumes that the defective product and the
proof of purchase (till receipt) are submitted within the three-year period and that a brief description in writing is provided of what the defect is and when it occurred.
If the defect is covered by our warranty, the repaired product or a new one will be sent back to you. There is no new warranty period following repair or replacement of the product.
Warranty period and statutory claims relating to defects
The warranty period is not extended when a service is provided under warranty. This also applies to replaced and repaired parts. Any damage or defects present at purchase must be reported immediately the product is unpacked. Repairs incurred once the warranty period has expired are chargeable.
10 GB

Scope of warranty
The product has been carefully manufactured in accordance with strict quality guidelines and was thoroughly checked before being delivered.
The warranty applies to defective materials or workmanship. This was extend to product parts exposed to normal wear and tear (and which can therefore be considered wear parts) or to damage to fragile parts such as switches, batteries or parts made of glass.
This warranty is void if the product is damaged or if it is not used or maintained properly. All the information in the operating instructions should be observed precisely to ensure that the product is used properly.
It is essential to avoid intended uses and actions which are discouraged or warned against in the operating instructions.
The product is intended for only private use and not for commercial purposes.
The warranty is void in the event of misuse, incorrect treatment, use of force or interference by anyone other than our authorized service centre.
Warranty process
Please follow the instructions below to ensure that your claim is processed quickly.
• In case of any enquiry, please keep the article number (for this product: IAN 91021) and the till receipt as proof of purchase.
- The article number can be found on the rating plate, as an engraving, on the cover sheet of your instructions (bottom left) or as a label on the back or underside of your appliance.
- If malfunctions or any other defects should occur, in the first instance contact
the Service Centre mentioned below by telephone or e-mail.
- Once a product has been recorded as defective, you can then send it Freepost to the service address you are given, enclosing the proof of purchase (till receipt) and quoting what the defect is and when it occurred.
You can download these instructions and many other manuals, product videos and software from www.lidl-service.com.

Service Centre
GB Service Great Britain
Tel.: 0871 5000 720 (£ 0.10/Min.)
E-Mail: hoyer@lidl.co.uk
IR Service Ireland
Tel.: 1890 930 034
(0,08 EUR/Min., (peak))
(0,06 EUR/Min., (off peak))
E-Mail: hoyer@lidl.ie
CY Service Cyprus
Tel.: 8009 4409
E-Mail: hoyer@lidl.com.cy
MT Service Malta
Tel.: 80062230
E-Mail: hoyer@lidl.com.mt
IAN: 91021
Please note that the address below is not a service address. In the first instance, contact the service centre mentioned above.
HOYER Handel GmbH
Kühnehöfe 5
D-22761 Hamburg
Germany
12 GB

Spis treści

The image is too blurry to recognize any text content.



Vsebina
- Pazite, da embalažna folija ne bi postala smrtno nevarna past za otroke. Embalažna folija ni igrača.
4.7 Materialna škoda
- Označite obe izvrtini tako, da bo razdalja stenskih kavljev enaka razdalji obeh zarez na zadnji strani naprave.
- Poskrbite, da bosta izvrtini vodoravno poravnani.
- S svedrom debeline 8 mm izvrtajte pribl. 40 mm globoko luknjo.
- Vstavite zidne vložke.
- Privijte stenska kavlja, določene z dolgimi vijaki.
6.3 Izbira temperature
S temperaturnim regulatorjem 8 nastavite želeno temperaturo.
HOYER HANDEL GMBH
Kühnehöfe 5
D-22761 Hamburg


- CONVECTION HEATER SKT 2000 B1
- CONVECTION HEATER
- KONVEKTOR
- KONWEKTOR
- KONVEKTORSKI GRELNIK
- CONTENTS
- CONGRATULATIONS ON THE PURCHASE OF YOUR NEW PRODUCT
- DESCRIPTION
- 1.1 INTENDED PURPOSE
- 1.2 SCOPE OF SUPPLY
- 1.3 SYMBOLS ON THE APPLIANCE
- NAMES OF PARTS (SEE FOLD-OUT PAGE)
- TECHNICAL DATA
- SAFETY INSTRUCTIONS
- 4.1 TERMS USED
- WARNING
- CAUTION
- NOTE
- 4.2 GENERAL INFORMATION
- 4.3 PROTECTION AGAINST ELECTRIC SHOCK
- 4.4 PROTECTION AGAINST THE DANGER OF FIRE
- 4.5 PROTECTION AGAINST INJURY
- 4.6 FOR THE SAFETY OF YOUR CHILD
- 4.7 MATERIAL DAMAGE
- UNPACKING AND SETTING UP
- 5.1 ASSEMBLING THE APPLIANCE FOR SET-UP ON THE FLOOR
- 5.2 MOUNTING THE APPLIANCE ON A WALL
- OPERATION
- NOTES
- 6.1 USING THE APPLIANCE FOR THE FIRST 6TH SELECTING THE TEMPERATURE AND SWITCHING OFF
- 6.2 SETTING THE HEATING SETTING
- 6.4 FAN FUNCTION
- 6.5 SETTING THE HEATING TIME
- 6.6 THERMAL CUT-OUT
- 6.7 FROST PROTECTION SETTING
- 6.8 TRANSPORTING THE APPLIANCE
- CLEANING
- TROUBLESHOOTING
- 9.2 PACKAGING
- WARRANTY CONDITIONS
- WARRANTY PERIOD AND STATUTORY CLAIMS RELATING TO DEFECTS
- SCOPE OF WARRANTY
- WARRANTY PROCESS
- SERVICE CENTRE
- SPIS TREŚCI
- VSEBINA
- 4.7 MATERIALNA ŠKODA
- 6.3 IZBIRA TEMPERATURE
- HOYER HANDEL GMBH
Brand : SILVERCREST
Model : SKT 2000 B1
Category : Frying Pan