
SHH 1200 D2 - Frying Pan SILVERCREST - Free user manual and instructions
Find the device manual for free SHH 1200 D2 SILVERCREST in PDF.


| Product Type | Fan Heater |
| Brand | SilverCrest |
| Model | SHH 1200 D2 |
| Power | 1200 W |
| Voltage | 220-240 V ~ 50 Hz |
| Dimensions (W x D x H) | Approx. 20 x 15 x 28 cm |
| Weight | 1.5 kg |
| Heating Element | PTC ceramic |
| Thermostat | Adjustable thermostat |
| Fan Speeds | 2 fan speeds (low/high) plus fan-only mode |
| Safety Features | Overheat protection, tip-over switch, cool-touch housing |
| Noise Level | Approx. 45 dB(A) |
| Room Coverage | Up to 25 m² |
| Operation | Manual controls with rotary dials |
| Maintenance | Clean air inlet/outlet grilles with soft cloth; do not use water |
| Spare Parts | Replacement filter (if applicable) available |
| Repairability | Repair by qualified personnel only; no user-serviceable parts |
| Certifications | CE, GS |
| Included Accessories | Instruction manual |
Frequently Asked Questions - SHH 1200 D2 SILVERCREST
User questions about SHH 1200 D2 SILVERCREST
0 question about this device. Answer the ones you know or ask your own.
Ask a new question about this device
Download the instructions for your Frying Pan in PDF format for free! Find your manual SHH 1200 D2 - SILVERCREST and take your electronic device back in hand. On this page are published all the documents necessary for the use of your device. SHH 1200 D2 by SILVERCREST.
USER MANUAL SHH 1200 D2 SILVERCREST
natural_image
White SilverCrest portable electric heater with mesh grille and circular base (no visible text or symbols on body)
HALOGEN HEATER SHH 1200 D2

IEGB NI CYGRY
HALOGEN HEATER
Operating and Safety Instructions

This product is only suitable for well insulated spaces or occasional use.

ATDECH
HALOGEN-HEIZSTRAHLER
Before reading, fold out the page with the images and familiarise yourself with all the features of the device.
GRCY
GB/IE/NI/CY Operating and Safety Instructions Page 5
Technical Data Page 6
Safety Page 8
Safety information for household appliances Page 8
Specific safety information for portable heaters Page 8
Supplementary safety instructions for portable heaters ...... Page 9
Information for radiant heaters with visibly glowing heating elements ...... Page 9
Additional safety information Page 9
Assembly Page 11
Preliminary measures before start up ...... Page 11
Unit setup Page 11
Start up Page 12
Switching on/off Page 12
Heating levels Page 12
Oscillation Page 12
Overheating protection Page 12
Tip-over protection Page 12
Maintenance, Cleaning and Storage Page 12
ROWI Electronics GmbH warranty Page 13
Service Page 14
Disposal Page 14
HALOGEN HEATER SHH 1200 D2
Introduction

We congratulate you on your new device purchase. You have thus opted for a high quality product. These Directions for Use is an integral part of this product. They contain important information for safety, use and disposal. Prior to the product use, make yourself familiar with all instructions for use and safety. Use the product only as described and only for the specified fields of use. If you hand on the product to third parties, also hand over all the product documents.
IntendedUse
This device is only intended for heating of closed and dry rooms during transitional periods. The device is not intended for use in special conditions, for example, in a corrosive or explosive area (dust, vapour or gas). Do not use the device out doors. Any other use or modification of the device is deemed to be an improper use and means a considerable risk of accidents. For damage caused by the improper use, no liability will be accepted by us. This device is meant only for private use and not for commercial use. This heating unit is solely intended for use in private households. Do use it for commercial purposes.
Equipment
1 Oscillation switch
2 Lower heating element heating level switch
3 Upper heating element heating level switch
4 Heating level switch
for the central heating element as well as
4 On/off switch
5 Safety guard
6 Upper heating element
7 Central heating element
8 Lower heating element
9 Base
10 Ventilation slots
11 Recessed grip
12 Connection cable
13 Tommy screws
14 Tip-over protection
15 Recess for connection cable
- Delivered contents
1 Halogen heater SHH 1200 D2
1 Base
2 Fixing screws
1 Instruction manual
- Technical data
Input voltage: 220-240 V \~
Mains frequency: 50-60 Hz
Rated power
consumption: 1200 W
Power consumption
Heating level 1: 400 W
Heating level 2: 800 W
Heating level 3 1200 W
Protection class:
Dimensions: c. 36 × 26 × 48 cm
(L × H × W)
Weight: c 1.25 kg
Information requirements for electric local space heaters
Item Symbol Value Unit
Heat output
| Nominal heat output P | nom | 1.2 kW | |
| Minimum heat output (indicative) | Pmin | 0 | kW |
| Maximum continuous heat output | Pmax,c | 1.2 kW |
Auxiliary electricity consumption
| At nominal heat output elmax | 0 kW |
| At minimum heat output elmin | 0 kW |
| In standby mode elSB | 0 kW |
Item Unit
Type of heat input, for electric storage local space heaters only (select one)
| single stage heat output and no room temperature control | [no] |
| Two or more manual stages, no room temperature control | [no] |
| with mechanic thermostat room temperature control | [no] |
| fan assisted heat output [no] |
Type of heat output/room temperature control (select one)
| single stage heat output and no room temperature control | [no] |
| Two or more manual stages, no room temperature control | [yes] |
| Room temperature control with mechanical thermostat | [no] |
| with electronic room temperature control | [no] |
| electronic room temperature control plus day timer | [no] |
electronic room temperature control plus [no] week timer
Other control options (multiple selections possible)
room temperature control, with presence [no] detection
room temperature control, with open window detection [no]
with distance control option [no]
with adaptive start control [no]
with working time limitation [no]
with black bulb sensor [no]
ROWI Electronics GmbH
Augartenstraße 3
⚠ WARNING! Please read all safety information and instructions. Failure to comply with the safety instructions and precautions may result in serious injury and/or property damage. FOR THE FUTURE, KEEP ALL SAFETY INSTRUCTIONS AND PRECAUTIONS IN A SAFE PLACE!

Danger to life by electrical current!
●Safety information for household appliances
This device can be used by children aged from 8 years and above and by physically, sensory or mentally restricted persons if they are supervised or given instructions on safe use and understand the hazards involved as it does not require any experience or knowledge. This device is not a toy for children to play with! Cleaning and user maintenance shall not be carried out by children without supervision.
■If the power supply cable of this device is damaged it should be replaced by the manufacturer or by its customer service or a
similarly qualified person, to avoid danger.
The device is only intended for indoor use.
●Specific safety information for portable heaters
WARNING!d
overheating of the device, never cover it with anything.
■ Do not place the device directly under or above a wall socket.
■ Do not use this heater if the heating element is damaged!
- Do not connect this heater to a program switch, time switch, separate telecontrol system or any other device which automatically switches on the heater due to the fire hazard if the heater is covered or set up incorrectly.
■ Never use the device in the direct vicinity of a bath tub, shower or swimming pool.
WARNING is not
equipped with an adjustable thermostat. The device should not be used in small rooms if there are people in there that cannot leave the room independently, unless constant supervision is ensured.
• Supplementary safety instructions for portable heaters
■ Children under the age of 3 are to be kept away unless they are continually supervised.
Children between the age of 3 and 8 are only allowed to switch the device on or off if they are supervised or given instructions on safe use and understand the hazards involved, provided that it has been placed or installed in its intended normal operating position. Children between the age of 3 and 8 shall not plug in, regulate and clean the heater or perform user maintenance.
Caution! Some parts of the appliance may become very hot and cause burns. Take particular care when children and vulnerable people are present.
• Information for radiant heaters with visibly glowing heating elements
■ The fire grate on this heater is intended to prevent direct access to the heating elements and must be installed in the designated location when using the heater.
■ The fire grate does not offer adequate protection for toddlers or infirm persons.
●Additional safety information
If the mains cable or plug is damaged, do not use the device! Do not restart the device before having a new mains cable or plug installed by an authorised specialist.
■ Never open the housing of the device. Touching the live cables and connections and/or modifying the electrical and mechanical installation means danger to your life by electric shock!
■ Before you connect the appliance, compare the electrical connection parameters on the nameplate (voltage and frequency) with the data of your electric network. Make sure that all the data match so that no damage may occur to the device.
- Do not use extension cords or a power strip.
■ Make sure that the power supply cable is not damaged and not laid on hot surfaces and/or sharp edges.
■ Make sure that the power cable is not buckled or got jammed.
■ Repair of electrical equipment may only be carried out by experts who are specially trained by the manufacturer. Improper repair can cause considerable danger for the device users.
FIRE RISK!
Therefore, never place the device near or under curtains or other combustible materials.
- Avoid contacting the device by combustible materials (e.g. textiles).
■ Before using the device, check it for visible damage. If the device fell down or got damaged, do not start it.
If the power supply cable of this device is damaged it should be replaced by the manufacturer or by its customer service or a similarly qualified person, to avoid danger.
BEWARE OF HOT SURFACES!
■ Some parts of the product can become very hot and cause burns. Pay particular attention when children and vulnerable people are present.
■ Repair of the device shall only be done by authorised companies
qualified in this field or by the after-sales service. Improper repair can cause considerable danger for the device users. Moreover, it will void all warranty claims.
■Defective components may only be replaced with original spare parts. Only if original spare parts are used, it is ensured that the security requirements are met.
■Protect the device against humidity and penetration of liquids.
When disconnecting, pull the power cable from the wall socket by the power plug only, do not jerk out the cable.
- Do not use the device in the vicinity of open flames.
In the case of faults or during a thunderstorm, pull out the connector plug from the wall socket.
Use the device only when the power cable is completely run out. Never wind the power cable around the device. Make sure that the power cable does not contact hot surfaces. Route the cable so that nobody can stumble over it.
Assembly
■ Remove all packaging material and all transport protection locks from the unit.
natural_image
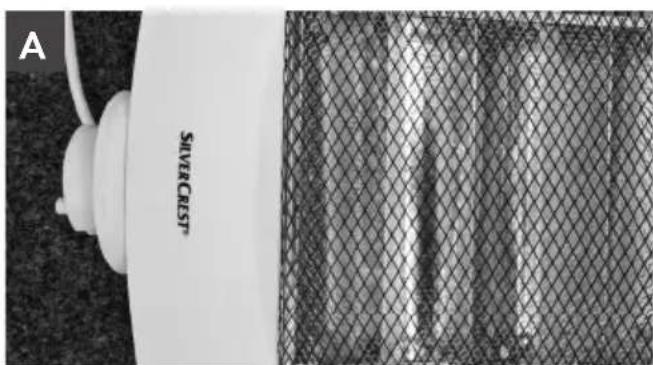
Close-up of a silver crest device with mesh mesh background (no visible text or symbols)■ Place the halogen heating unit on its rear side.
natural_image
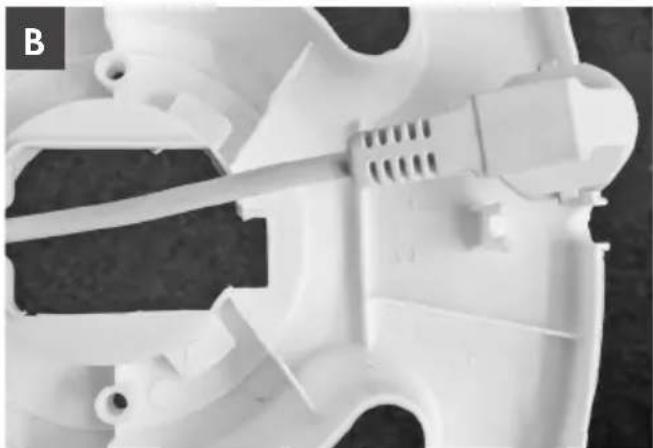
Close-up of a white plastic mechanical component with internal channels and mounting holes (no visible text or symbols)■ Guide the connecting cable through the recess 15 in the base 9.

natural_image
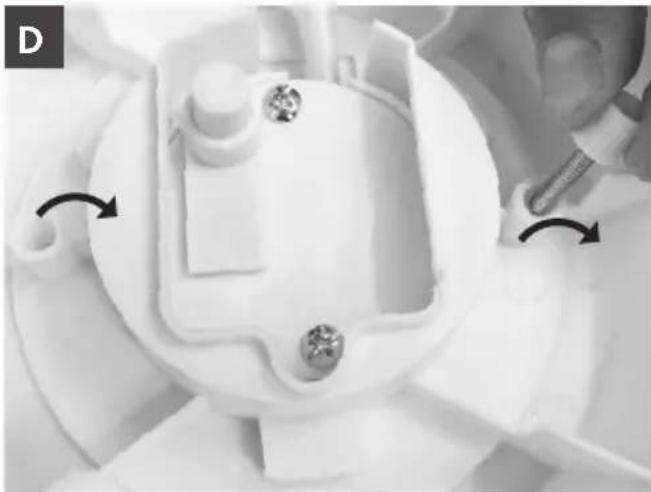
Close-up of a mechanical component with dashed circular features and bolted joints (no visible text or symbols)■ Loosen the two tommy screws 13 from the base 9. Place the base 9 so that the three screws fit perfectly into the three cavities. Ensure that the connecting cable is routed 12 through the lower recess.
natural_image
Close-up of a white plastic mechanical component with internal components and a tool, showing no visible text or symbols.Attach the base to the halogen heating unit using the two tommy screws provided.

natural_image
Close-up of a white plastic container with a curved neck and side slots (no text or symbols visible)Guide the connecting cable through the cable clamp 12 and the recess in the base 15.
● Preliminary measures before start up
Unit setup
To guarantee safe and trouble-free unit operation, choose a setup location which meets the following requirements:
- The floor should be firm, flat and horizontal. - Observe the following minimum clearances from the unit housing: 50 cm from its lateral side, 50 cm above, 50 cm from its rear side and 50 cm from its front side.
- Do not place the unit in a hot and wet or very humid environment or near combustible materials. - The socket should be easily accessible so that the mains connection cable can be easily disconnected if necessary.
Please note: The unit may produce a slight odour for a short time when used for the first time.
Start up
- Switching on/off
■ Make sure that the three heat level switches 2, 3 and 4 are set to "0". Then connect the heater to a grounded socket protected by a residual-current device with overload protection. The heating unit must be freely rotatable.
Now switch on the unit by switching the on/off switch 4 to the "1" position. To turn off the unit, switch the on/off switch 4 to the "0" position.
Please note: When the unit is switched on, the middle heating element is activated.
● Heating levels
The halogen heating unit has three different heating levels: 400W, 800W and 1200W.
The first heating level (400W) is reached when the unit is switched on. In the process, the central-heating element is put into operation (see chapter Switching on/off).
The second heating level (800W) is reached by additionally switching one of the heating level switches to on (2 & 3).
Please note: The heating level switch 2 switches the lower heating element on. The heating level switch 3 switches the upper heating element on.
The third heating level (1200W) is reached by additionally switching both of the heating level switches to on (2 & 3).
Oscillation
- Set the oscillation switch 1 to "I" to activate the function. The heater fan will begin to move from side to side.
- To disable the oscillation, switch the oscillation switch 1 to "0".
● Overheating protection
This unit is equipped with an overheating protection device. If the unit is too hot, the heating element switches off automatically. Turn the unit OFF by turning the heating level switch to "0" and pull the power plug out of the socket. Please note: If the overheating protection is triggered you should turn OFF the unit and contact the service hotline (see chapter "Service").
Tip-over protection
This unit is equipped with a tip-over protection device. This is located in the base of the unit. If the unit is inadvertently knocked over or tilted heavily during operation, it will switch off automatically. The unit is only functional in an upright position.
● Maintenance, Cleaning and Storage
■ Always disconnect the power plug when the device is not in use and before any cleaning or in the event of operating faults!
- Clean the device only when it is turned OFF and in a cooled condition.
- Ensure that no moisture penetrates into the device in order to avoid irreparable damage.
- Clean the housing with a soft dry cloth only. Do not use aggressive and/or abrasive cleaning agents.
■ Remove dust deposits from the protective grille with a vacuum cleaner.
■ Store the device in a dry room.
ROWI Electronics GmbH warranty
Dear Customer,
This appliance has a 3-year warranty valid from the date of purchase. If this product has any faults, you, the buyer, have certain statutory rights. Your statutory rights are not restricted in any way by the warranty described below.
Warranty conditions
The validity period of the warranty starts from the date of purchase. Please keep your original receipt in a safe place. This document will be required as proof of purchase.
If any material or production fault occurs within three years of the date of purchase of the product, we will either repair or replace the product for you at our discretion. This warranty service is dependent on you presenting the defective appliance and the proof of purchase (receipt) and a short written description of the fault and its time of occurrence.
If the defect is covered by the warranty, your product will either be repaired or replaced by us. The repair or replacement of a product does not signify the beginning of a new warranty period.
Warranty period and statutory claims for defects
The warranty period is not prolonged by repairs effected under the warranty. This also applies to replaced and repaired components. Any damage and defects present at the time of purchase must be reported immediately after unpacking. Repairs carried out after expiry of the warranty period shall be subject to a fee.
Scope of the warranty
This appliance has been manufactured in accordance with strict quality guidelines and inspected meticulously prior to delivery.
The warranty covers material faults or production faults. The warranty does not extend to product parts subject to normal wear and tear or fragile parts such as switches, batteries, baking moulds or parts made of glass.
The warranty does not apply if the product has been damaged, improperly used or improperly maintained. The directions in the operating instructions for the product regarding proper use of the product are to be strictly followed. Uses and actions that are discouraged in the operating instructions or which are warned against must be avoided.
This product is intended solely for private use and not for commercial purposes. The warranty shall be deemed void in cases of misuse or improper handling, use of force and modifications/repairs which have not been carried out by one of our authorised Service centres.
Warranty claim procedure
To ensure quick processing of your case, please observe the following instructions:
- Please have the till receipt and the item number (IAN 322112_1901) available as proof of purchase.
- You will find the item number on the type plate, an engraving on the front page of the instructions (bottom left), or as a sticker on the rear or bottom of the appliance.
If functional or other defects occur, please contact the service department listed either by telephone or by e-mail. - You can return a defective product to us free of charge to the service address that will be provided to you. Ensure that you enclose the proof of purchase (till receipt) and information about what the defect is and when it occurred.

NOTICE: At www.lidl-service.com you can download this manual as well as many other manuals, product videos and software. This QR code will take you directly to the Lidl service page (www.lidl-service.com) and allow you to open your operating instructions simply by entering the article number (IAN 322112_1901).
Service
If any problems occur during use of your ROWI Electronics product, please proceed as follows:
Contact us
You can contact the service team of ROWI Electronics at:
ROWI Electronics GmbH
Augartenstr. 3 76698 Ubstadt-Weiher, Germany Ld-services@rowi-electronics.com Service hotline: +800 7694 7694 (free call from a German landline)
IAN 322112\_1901
Most problems can be resolved by speaking to our expert technical service team.
- Disposal
The device packaging is made of environmentally friendly materials that you can dispose of at your local recycling centres.

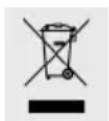
Do not dispose of the product with the regular household garbage! Bring it to a municipal collection points for recycling! In case of doubt, ask your municipality or city administration how to dispose of the old device.

Observe the marking of the packaging materials for waste separation, which are marked with abbreviations and numbers with following meaning: 1-7: plastics/20-22: paper and fibreboard/80-98: composite materials.
natural_image
Close-up of a silver cast iron device with mesh mesh background (no visible text or symbols)natural_image
Close-up of a white plastic mechanical component with internal channels and mounting holes (no text or symbols visible)natural_image
Close-up of a mechanical component with dashed circular features and internal components (no visible text or symbols)natural_image
Close-up of a white plastic mechanical component with bolted joints and a tool, showing directional arrows (no text or symbols)natural_image
Close-up of a white plastic basin with a curved pipe and plastic clips (no text or symbols visible)natural_image
Close-up of a silver cast fan with mesh grille (no visible text or symbols)natural_image
Close-up of a white plastic mechanical component with internal channels and mounting holes (no visible text or symbols)natural_image
Close-up of a mechanical component with internal wiring and mounting holes (no visible text or symbols)natural_image
Close-up of a white plastic mechanical component with bolted joints and a screwdriver, showing a curved arrow indicating rotation (no text or symbols)natural_image
Close-up of a white plastic container with a curved pipe inserted (no text or symbols visible)Ld-services@rowi-electronics.com
Service-Hotline: +800 7694 7694
Last Information Update



- HALOGEN HEATER SHH 1200 D2
- HALOGEN HEATER
- HALOGEN-HEIZSTRAHLER
- Safety Page 8
- Assembly Page 11
- Preliminary measures before start up ...... Page 11
- Start up Page 12
- Maintenance, Cleaning and Storage Page 12
- ROWI Electronics GmbH warranty Page 13
- Service Page 14
- Disposal Page 14
- Introduction
- IntendedUse
- Equipment
- - Delivered contents
- - Technical data
- Information requirements for electric local space heaters
- Type of heat input, for electric storage local space heaters only (select one)
- Type of heat output/room temperature control (select one)
- Other control options (multiple selections possible)
- ROWI Electronics GmbH
- ●Safety information for household appliances
- ●Specific safety information for portable heaters
- WARNING!d
- FIRE RISK!
- BEWARE OF HOT SURFACES!
- Assembly
- ● Preliminary measures before start up
- Unit setup
- Start up
- - Switching on/off
- ● Heating levels
- Oscillation
- ● Overheating protection
- Tip-over protection
- ● Maintenance, Cleaning and Storage
- ROWI Electronics GmbH warranty
- Warranty conditions
- Warranty period and statutory claims for defects
- Scope of the warranty
- Warranty claim procedure
- Service
- Contact us
- IAN 322112\_1901
- - Disposal
Brand : SILVERCREST
Model : SHH 1200 D2
Category : Frying Pan