
SSKT 900 A1 - Frying Pan SILVERCREST - Free user manual and instructions
Find the device manual for free SSKT 900 A1 SILVERCREST in PDF.


| Product Type | Electric Pressure Cooker |
| Model | SSKT 900 A1 |
| Brand | SilverCrest |
| Capacity | 4.8 liters (max cooking quantity: 4 liters) |
| Power Consumption | 900 W |
| Voltage | 220–240 V ~ 50 Hz |
| Working Pressure | Max. 60 kPa |
| Safety Pressure | 100 kPa |
| Inner Bowl Coating | ILAG Corflon non-stick coating (removable aluminum bowl) |
| Functions | Pressure cooking (programs: Rice, Meat, Potatoes, Fish, Soup, Vegetables), Keep warm, Timer (delay up to 24h), Automatic keep warm after cooking |
| Accessories Included | Measuring cup, Spoon, Power cord with plug, Condensation container |
| Safety Features | Safety valve (upper/lower), Locking pin, Pressure regulator with steam release, Automatic pressure release prevention, Overheat protection |
| Cleaning and Care | Inner bowl, measuring cup, spoon dishwasher safe; lid and sealing plate hand wash only; wipe exterior with damp cloth; do not immerse in water |
| Spare Parts | Sealing ring, sealing plate, pressure regulator parts available via service (IAN 274422) |
| Warranty | 3 years (valid from date of purchase, private use only) |
Frequently Asked Questions - SSKT 900 A1 SILVERCREST
User questions about SSKT 900 A1 SILVERCREST
0 question about this device. Answer the ones you know or ask your own.
Ask a new question about this device
Download the instructions for your Frying Pan in PDF format for free! Find your manual SSKT 900 A1 - SILVERCREST and take your electronic device back in hand. On this page are published all the documents necessary for the use of your device. SSKT 900 A1 by SILVERCREST.
USER MANUAL SSKT 900 A1 SILVERCREST
ELECTRIC PRESSURE COOKER SSKT 900 A1
GB
ELECTRIC PRESSURE COOKER
Operating instructions
SK
ELEKTRICKÝ, RÝCHLOVARNÝ HRNIEC
Návod na obsluhu
CZ
ELEKTRICKÝ RYCHLOVARNÝ HRNEC
Návod k obsluze
DE AT CH
Before reading, unfold the page containing the illustrations and familiarise yourself with all functions of the device.
CZ
Information concerning these operating instructions 2
Copyright. 2
Intended use 2
Warning notes 2
Safety....3
Basic safety guidelines....3
Operating components 8
Unpacking and installation 9
Safety instructions 9
Package contents and transport inspection 9
Unpacking 10
Disposal of packaging materials 10
Handling and operation....10
Before first use 10
Operation 11
Keep warm function 18
Timer function 18
Tips and tricks 19
Cleaning and care 19
Storage 20
Storage/disposal 21
Storage 21
Disposal of the appliance 21
Appendix 21
Technical data 21
Warranty 22
Service....22
Importer 22
Introduction
Information concerning these operating instructions
Congratulations on the purchase of your new appliance.
You have selected a high-quality product. The operating instructions are part of this product. They contain important information on safety, usage and disposal. Before using the product, familiarise yourself with all operating and safety instructions. Use the product only as described and for the specified areas of application. Please also pass on these operating instructions to any future owner.
Copyright
This documentation is protected by copyright.
Any copying or reproduction, including in the form of extracts, or any reproduction of images (even in a modified state), is permitted only with the written authorisation of the manufacturer.
Intended use
This pressure cooker is designed for cooking food. The appliance is not intended for any other purpose, nor for use beyond the scope described. The appliance is not intended for use in commercial or industrial environments.
The manufacturer accepts no responsibility for damage caused by failure to observe these instructions, improper use or repairs, unauthorised modifications or the use of unapproved replacement parts. The operator bears sole liability.
Warning notes
The following warning notice types are used in these operating instructions:

DANGER
A warning notice at this hazard level indicates an imminently hazardous situation.
If the hazardous situation is not avoided, it could result in death or serious physical injury.
▶ Follow the instructions in this warning notice to avoid the risk of death or serious injury.
WARNING
A warning notice at this hazard level indicates a potentially hazardous situation.
Failure to avoid this hazardous situation could result in injury.
▶ Follow the instructions in this warning notice to prevent injury.
CAUTION
A warning notice at this hazard level indicates a potential for property damage.
Failure to avoid this situation could result in property damage.
▶ Follow the instructions in this warning notice to prevent property damage.
NOTE
▶ A note provides additional information that will assist you in using the appliance.
Safety
This section contains important safety instructions for using the appliance.
This appliance complies with statutory safety regulations. Improper use may result in personal injury and property damage.
Basic safety guidelines
To ensure safe operation of the appliance, follow the safety guidelines set out below:
- Check the appliance for visible external damage before use. Do not operate an appliance that has been damaged or dropped.
■ This appliance may not be used by children.
■ The appliance and its connecting cable must be kept away from children.
■ Children must not use the appliance as a toy.
■ This appliance may be used by persons with limited physical, sensory or mental capabilities or lack of experience and knowledge, provided that they are under supervision or have been told how to use the appliance safely and are aware of the potential risks.
■ The channels in the pressure regulator through which the steam escapes must be checked regularly to ensure that there are no blockages.
■ The lid should not be opened until the pressure inside the container has been released.
■ All repairs must be carried out by authorised specialist companies or by the Customer Service department. Improper repairs may put the user at risk. It will also invalidate any warranty claims.
■ Repairs to the appliance during the warranty period may only be carried out by a customer service department authorised by the manufacturer. Otherwise, no warranty claims will be held for any subsequent damages.
■ Defective components must always be replaced with original replacement parts. Compliance with safety requirements can only be guaranteed if original replacement parts are used.
■ Do not allow the power cable to come into contact with hot appliance parts. NEVER use the appliance near naked flames, a hotplate or a heated oven.
■ After use, allow the appliance to cool down completely before cleaning it. Risk of burns!
■ Install the appliance as close as possible to an electrical power socket. Ensure that the power plug is easily accessible in case of emergency, and that there is no risk of tripping over the cable.
■ Provide a stable location for the appliance.

RISK OF ELECTRIC SHOCK!
The appliance should only be connected to correctly installed and earthed mains power sockets. Ensure that the rating for your local power supply corresponds with the details on the rating plate of the appliance.
- Arrange for customer service to repair or replace power cables and/or appliances that are not functioning properly or have been damaged.
▶ Do not expose the appliance to rain, and never use it in a humid or wet environment.
▶ Ensure that the power cable never becomes wet or moist during use.

RISK OF ELECTRIC SHOCK!
▶ NEVER immerse the appliance in water or other liquids! There is a risk of a potentially fatal electric shock if residual moisture comes into contact with live components during operation.
▶ Always take hold of the plug when handling the power cable. Do not pull on the cable itself and never touch the power cable with wet hands, this could result in either a short circuit or an electric shock.
- Do not place the appliance, furniture items or similar objects on the power cable, and ensure that it cannot become jammed or trapped in any way.
▶ Do not open the appliance housing or attempt to repair or modify the appliance. If the housing is opened or improper modifications are made, you run the risk of receiving a potentially fatal electric shock and the warranty will be void.
▶ Protect the appliance from drips or splashes of water. Do not place any vessels containing liquid (e.g. flower vases) on or near the appliance.
▶ Always pull the plug out of the power socket during each break in use, as well as after use and before any cleaning.

RISK OF BURNS!
▶ CAUTION! Hot surfaces!
The surface of the appliance can become extremely hot during use. Touch the appliance only by the black handles while in use.

CAUTION! MATERIAL DAMAGE!
▶ Never operate the appliance if it is standing on soft materials such as carpeting. Blockages to the air inlets/outlets on the bottom of the appliance can leading to overheating and the risk of fire!
▶ Do not operate this appliance using an external time switch or a separate remote control system.
▶ Never leave the appliance unattended during operation.
▶ Ensure that the appliance, the power cable and the plug do not come into contact with heat sources such as hotplates or naked flames.
▶ Do not use charcoal or similar fuels to operate the appliance!
To protect the non-stick coating in the interior, do not use metallic tools such as knives, forks, etc. If the non-stick coating is damaged, stop using the appliance.
▶ Operate the appliance only with the original accessories supplied.
▶ Do not use the inner bowl with other cooking appliances.
▶ Never operate the appliance without food inside it.
Operating components
(For illustrations see fold-out pages)
Figure A:
① Safety valve (upper part)
② Control for the pressure regulator
③ Lid handle
4 Appliance handles
5 Lid
6 Base
⑦ Control panel with buttons and display
8 Mains connection
9 Spoon holder
10 Locking pin
⑪ Container for water condensation
Figure B:
10 Locking pin
⑫ Safety valve (lower part)
⑬ Channels for the pressure regulator
14 Guide pin
15 Sealing plate
16 Guide hole in the sealing plate
⑰ Heating element
Figure C:
18 Inner bowl
19 Measuring cup
20 Spoon
21 Power cord with plug
Unpacking and installation
Safety instructions
WARNING
During the first use of the appliance there is a risk of injury and/or damage to property!
To avoid risks, observe the following safety instructions:
▶ Do not allow children to play with packaging materials. There is a risk of suffocation.
▶ Please follow the instructions regarding the electrical connection of the appliance to avoid damage to property.
Package contents and transport inspection
The appliance is supplied with the following components (see fold-out pages):
• Electric Pressure Cooker
- Removable aluminium inner bowl ⑬ with ILAG Corflon non-stick coating and a capacity of 4.8 litres (max. cooking quantity: 4 litres)
- Accessories:
Measuring cup 19
Spoon 20
Power cord with plug 21
Operating instructions
NOTE
▶ Check the package for completeness and for signs of visible damage.
If the delivery is incomplete or damage has occurred as a result of defective packaging or during transport, please contact the Service hotline (see section Service).
Unpacking
◆ Remove all parts of the appliance and the operating instructions from the box.
◆ Remove all packaging material.
Disposal of packaging materials
The packaging protects the appliance from damage during transport. The packaging materials have been selected for their environmental friendliness and ease of disposal, and are therefore recyclable.

Returning the packaging into the material cycle conserves raw materials and reduces the amount of waste generated. Dispose of packaging materials that are no longer needed in accordance with applicable local regulations.
NOTE
If possible, keep the original packaging of the appliance for the entire duration of the warranty period so that the appliance can be packed properly for return shipment in the event of a warranty claim.
Handling and operation
This section provides you with important information on handling and using the appliance.
Before fi rst use
◆ Read these operating instructions carefully.
◆ Install the appliance in accordance with the safety instructions.
◆ Always carry the appliance by the two appliance handles ④ on the base ⑥. Do not carry the appliance by the lid handle ③.
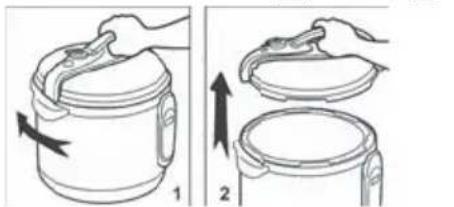
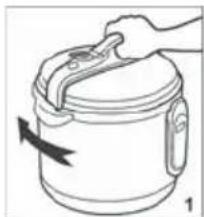
Turn the lid ⑤ around 25° clockwise by the lid handle ③ to the stop and remove it upwards. The locking pin ⑩ must point to the opened lock symbol on the appliance handle ④
Remove the inner bowl 18. Clean the appliance, the inner bowl 18 and all accessories as described in "Cleaning and care" to remove any possible production residues.
Fill the inner bowl 18 with around 0.5 litres of water and place it back inside the appliance.
Replace the lid ⑤ in the position it was in when you removed it. Turn the lid ⑤ anticlockwise by the handle ③ until the stop.
Use the supplied power cord 21 to connect the mains connection socket 8 with a properly connected and grounded power socket that supplies the voltage specified in the section "Technical data".
Allow the appliance to heat up for about 6 minutes. Proceed as described in the section "Operation".
NOTE
The first time the appliance heats up, a small amount of smoke and odour may be generated due to production-related residue. This is normal and is completely harmless. Ensure sufficient ventilation; for example, by opening a window.
At the end of the cooking phase, the appliance emits 3 beeps. Then pull the plug of the power cord 21 out of the mains socket and allow the appliance to cool down for at least 30 minutes.
- Clean the appliance and the inner bowl ⑬ again.
Operation
Turn the lid ⑤ around 25° clockwise by the lid handle ③ to the stop and remove it upwards. The locking pin ⑩ must point to the opened lock symbol on the appliance handle ④
natural_image
Illustration of a hand placing a lid into a container with an arrow indicating rotation (no text or symbols)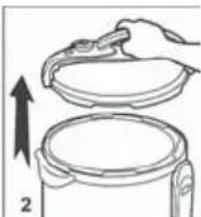
natural_image
Illustration of a hand holding a lid above a container with an upward arrow, no text or symbols present.Remove the inner bowl 18 and add the food you wish to cook, together with the amount of water specified in the following tables, to the inner bowl 18.
NOTE
The information in the table is intended as a guideline and can vary depending on the ripeness, size or condition of the food! If necessary, adjust the cooking time/amount of water/food.
| Vegetables (500 g - 1 kg) Quantity of water | Approx. duration | Button | |
| Whole asparagus, thin | 1.5 measuring cups 19 | 7-10 min. |  |
| Green beans | 1.5 measuring cups 19 | 6-8 min. |  |
| Broccoli, pieces | 1.5 measuring cups 19 | 7 min. |  |
| Brussels sprouts | 1.5 measuring cups 19 | 9 min. |  |
| Carrots, approx. 2.5 cmø | 1.5 measuring cups 19 | 9 min. |  |
| 2 - 3 Corncobs | 1.5 measuring cups 19 | 9 min. |  |
| Whole pearl onions | 1.5 measuring cups 19 | 7 min. |  |
| Halved, peeled potatoes, approx. 1 kg or whole new potatoes, approx 1 kg | 1.5 measuring cups 19 | 10 - 12 min. |  |
| Pumpkin, quartered | 1.5 measuring cups 19 | 10 min. |  |
| Courgettes | 1.5 measuring cups 19 | 10 min. |  |
| Meat (1–1.5 kg pieces) Quantity of water | Approx. duration | Button | |
| Beef/veal, roast or brisket | 4–8 measuring cups 19 | 60–80 Min. |  |
| Pork joints | 2 measuring cups 19 | 70–90 Min. |  |
| Pork ribs | 5 measuring cups 19 | 40 min. |  |
| Meat (1-1.5 kg pieces) Quantity of water | Approx. duration | Button | |
| Leg of lamb | 3-6 measuring cups 19 | 60-80 Min. |  |
| Whole chicken | 4-6 measuring cups 19 | 35-45 Min. |  |
| Chicken parts | 4-6 measuring cups 19 | 15-25 Min. |  |
| Meat or poultry soup/broth | 5-8 measuring cups 19 | 20-30 Min. |  |
| Fish/seafood Quantity of water | Approx. duration | Button | |
| Mussels | 1.5 measuring cups 19 | 5-9 Min. |  |
| Shrimps | 1.5 measuring cups 19 | 6 min. |  |
| Fish soup or broth | 2-6 measuring cups 19 | 10-12 Min. |  |
NOTE - COOKING RICE
▶ Add rice and water in a ratio of 1:2 (2 measuring cups ⑲ of rice to 4 measuring cups ⑬ of water) to the pressure cooker. Make sure that the content reaches at least the 1/5 marking in the inner bowl ⑱.
Cook the rice for about 10 minutes using the programme "Rice"
◆ Portion the food so that the fi ll level is between the 1/5 and 4/5 marking on the scale in the inner bowl ⑬. For foods that expand during cooking, the fi ll level must not exceed the 3/5 mark.
Check that the heating element 17 and the outside of the inner bowl 18 are free of contamination and food residues.
Replace the inner bowl 18 into the appliance. Twist the inner bowl 18 briefly on the heating element 17 to ensure that is properly in place.
Make sure that the sealing plate 15 and its guide 16 are firmly seated on the guide pin 14 in the lid 5.
Replace the lid ⑤ in the position it was in when you removed it. Turn the lid ⑤ anticlockwise by the handle ③ until stop.
◆ Re-insert the plug of the power cord 21 into the mains socket.
Press the ⏻ button to switch on the device. The display will show "0000".
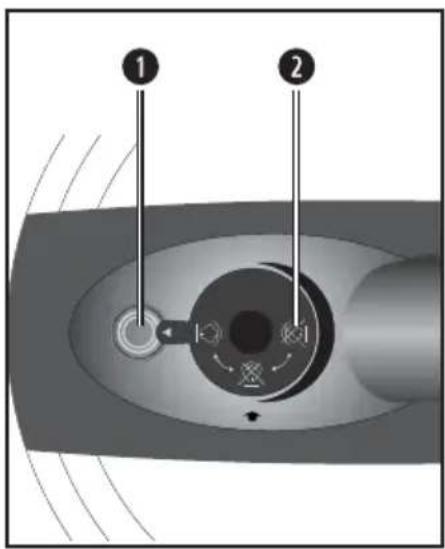
◆ Ensure that the control for the pressure regulator ② is closed. The arrow must point to the ⚙ symbol on the pressure regulator ②:
◆ Press one of the buttons described in the following tables depending on which food you are cooking:
Food Button Preset duration Min. duration Max. duration
Rice 12 minutes 10 minutes 15 minutes

Meat dishes

35 minutes 15 minutes 90 minutes
Potatoes

12 minutes 10 minutes 20 minutes
Fish dishes

6 minutes 5 minutes 20 minutes
Soup

30 minutes 5 minutes 180 minutes
Food Button Preset duration Min. duration Max. duration
Vegetables 3 minutes 2 minutes 10 minutes
Average cooking times are pre-programmed for various different foods. The respective pre-set cooking time will flash on the display for 5 seconds and the LED on the button for the selected cooking function will light up.
To extend the cooking time, press the food button repeatedly during this time. To reduce the cooking time, press the food button over the maximum value. The display will then jump to the minimum duration.
NOTES
When experimenting with cooking times, start with low values and increase them until you find the correct cooking time.
Changes to the cooking time will not be stored in the appliance and must be re-entered later.
Afterwards, the appliance will start heating up and building up pressure. During this process, the first two digits on the display show a spiral pattern until the required pressure has built up. The selected cooking time will be displayed permanently and counted down after the required pressure has been reached.
NOTE
It can take up to 15 minutes for the pressure to build up! The cooking time will only then start counting down.
NOTE
The increasing pressure will cause the upper part of the safety valve ① to rise up. This will prevent the locking pin ⑩ from being moved and thus ensures that the lid ⑤ cannot be accidentally opened during operation.
You can cancel entering parameters, the heating and cooking functions and also the time-delayed cooking at any time by pressing the button.
If steam escapes and condenses during the cooking process due to minor leaks in the lid ⑤, the water will be collected in the container ⑪ on the side of the appliance.
After the cooking time elapses, you will hear three beeps and the appliance automatically switches to the keep warm function. The LED on the button lights up. The display shows "and shows the elapsed minutes of the keep warm function.
Press the ⏻ button to turn off the keep warm function. Press the ⏻ button to switch off the device.

RISK OF BURNS!
Hot, high-pressure steam flows out of the opening of the control of the pressure regulator ②. To prevent scalding your hand, touch the control ② only on the sides, not on the top!
Use oven gloves when you let off steam!
We recommend using a kitchen utensil, for instance, a wooden spoon, to open the pressure regulator ②.
Always wear oven gloves as a safety measure.
Move the control of the pressure regulator ② carefully to the side to let off pressure from within the appliance. The arrow points to the 🔒 symbol on the pressure regulator ② when the pressure regulator ② is fully open and the pressure can escape.
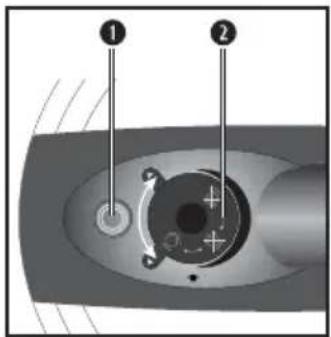
Once the pressure in the appliance has dropped far enough that the upper part of the safety valve ① sinks back down, you can carefully open the lid ⑤.

RISK OF BURNS!
- When you open the lid after a cooking process, very hot air streams out of the interior of the appliance.
The inner bowl ^18 with the cooked food is very hot. Use gloves!
▶ Never touch the heating element ^17 !
NOTE
Especially when preparing foods with a high liquid content, you should not reduce the pressure via the control on the pressure regulator ② directly after using the keep warm function. Otherwise, small pieces of food could get into the channels of the pressure regulator ⑬ and block it. Pieces of food could also escape and soil the appliance and the area around it.
To clean the channels of the pressure regulator 13, remove the sealing plate 15 (see section "Cleaning and care"). Pull the cap of the pressure regulator off and clean it in warm water. If necessary, take a washing-up brush and use its bristles to clean the narrow openings.
To clean the control of the pressure regulator ②, pull it firmly upwards out of the lid ⑤. Clean the control of the pressure regulator ② in warm water with a little washing up liquid. If necessary, take a washing-up brush and use its bristles to clean the narrow openings. Rinse off any detergent residue. Replace the control of the pressure regulator ② in the recess in the lid ⑤. Ensure that the control of the pressure regulator ② is pushed far enough down and sits correctly in the recess.
Remove the hot inner bowl 18 with the cooked food. Use the supplied spoon 20 to remove food from the inner bowl 18.
CAUTION
Damage to the appliance!
▶ Do not use pointed or sharp objects to remove the cooked food. These could damage the coating of the inner bowl 18!
Remove the plug of the power cord 21 from the mains socket.
Remove the container for water condensation ⑪ downwards from its fitting and empty it. Then replace it.
Keep warm function
- After cooking, the appliance switches automatically into the keep warm function. The LED above the button lights up.
You can start the keep warm function even without a previous cooking programme: Press the ⏻ button to switch on the appliance. Then press the ⏱ button. The appliance starts the keep warm function. You can stop the keep warm function at any time by pressing the ⏱ button. The maximum time for the keep warm function is 24 hours.
Timer function
CAUTION - PROPERTY DAMAGE
▶ Never leave the appliance unattended while the pressure is building up or during cooking!
If you want to delay the start of the desired cooking process by up to 24 hours, press the button repeatedly before selecting the programme. Each press delays the start by a further 30 minutes. The display shows the time until the beginning of cooking and the LED above the lights up.
After selecting the required time delay, proceed with selecting the programme as described in the section "Operation".
Tips and tricks
To make meat more tender, you can marinate it beforehand. An ideal basis for this can be sour cream, red wine, vinegar, buttermilk or fresh papaya or pineapple juice, for example. Add herbs and spices according to taste. Ideally, leave it overnight. Do not add salt as this can draw water out of the meat and make it dry.
■ You can also cook frozen food. This may increase the cooking time.
Cleaning and care

WARNING! DANGER TO LIFE DUE TO ELECTRIC SHOCK!
Risk of injury when cleaning the appliance!
To avoid risks, observe the following safety instructions:
Before cleaning, pull out the plug of the power cord and wait until the appliance has completely cooled down. Risk of injury!
▶ Never clean the appliance under running water and never immerse it in water. The appliance could be irreparably damaged!
CAUTION
Damage to the appliance!
▶ To avoid irreparable damage to the appliance, ensure that no moisture can penetrate the appliance during cleaning.
- When cleaning the surfaces use neither abrasive or chemical cleaners, nor sharp or scratchy objects.
The lid ⑤ and the sealing plate ⑮ are not dishwasher-safe.
Wipe the inner bowl 18 with a damp cloth. For stubborn soiling use a mild detergent on the cloth. Do not use any abrasive cleaning agents, rough sponges or sharp objects for cleaning as these could damage the non-stick coating.
■ For stubborn crusting, lay a wet cloth on the baked-on residues to soften them.
You can also clean the inner bowl 18, the measuring cup 19 and the spoon 20 in the dishwasher.
CAUTION - PROPERTY DAMAGE!
The sealing plate 15 is very sensitive and bends easily. Handle it with great care.
To clean the sealing plate 15 and the sealing ring that encircles the sealing plate 15, remove both from the lid 5:
- First, pull the sealing ring from the sealing plate 15.
- You can now grip the sealing plate ⑮ and pull it off the guide pin in the middle of the lid ⑤.
- Clean the sealing ring and the sealing plate 15 in warm water containing a mild detergent.
- Rinse both parts off with clear water and then dry them well.
- Fit the sealing ring around the sealing plate 15.
Before you reassemble the lid ⑤ with the sealing plate ⑮, clean it with a damp cloth. If required, use a mild detergent on the cloth. If you do so, make sure you clean off all surfaces with a cloth dampened only with water to ensure that no traces of detergent remain. Dry the lid ⑤.
Insert the sealing plate ⑮ together with the sealing ring into the lid ⑤ so that the guide pin in the lid ⑤ slides through the guide hole in the sealing plate ⑯.
A damp cloth is sufficient for cleaning the exterior surfaces of the appliance. Ensure that all parts are completely dry before re-using the appliance.
NOTE
Contact our service department if you need spare parts, such as a new sealing ring. Have the IAN number of this item to hand. You will find the IAN on the front of these operating instructions and directly under the service numbers.
Storage
Store the cleaned appliance in a dry location.
Storage/disposal
Storage
If you plan not to use the appliance for a long period, store it in a clean, dry place away from direct sunlight.
Disposal of the appliance
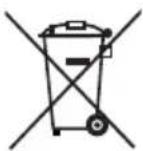
Do not dispose of the appliance in your normal domestic waste. This product is subject to the provisions of European Directive 2012/19/EU-WEEE (Waste Electrical and Electronic Equipment).
Dispose of the appliance via an approved waste disposal company or your municipal waste disposal facility. Please comply with all applicable regulations. Please contact your waste disposal facility if you are in any doubt.
Appendix
Technical data
| Pressure cooker | |
| Voltage supply 220 - 240 V | ~ | 50 Hz |
| Power consumption 900 W | |
| Storage capacity 4.8 litres | |
| Max. cooking quantity 4 litres | |
| Working pressure max. 60 kPa | |
| Safety pressure 100 kPa | |
 | All of the parts of this appliance that come into contact with food are food-safe. |
Warranty
This appliance is provided with a 3-year warranty, valid from the date of purchase. The appliance has been manufactured with care and inspected meticulously prior to delivery.
Please retain your receipt as proof of purchase. In the event of a warranty claim, please contact your Customer Service unit by telephone. This is the only way to guarantee free return of your goods.
NOTE
The warranty only covers claims for material and manufacturing defects, not for damage sustained during carriage, components subject to wear and tear or damage to fragile components such as switches or batteries.
This appliance is intended solely for private use and not for commercial purposes. The warranty shall be deemed void in cases of misuse or improper handling, use of force and modifications/repairs which have not been carried out by one of our authorised Service centres.
Your statutory rights are not restricted by this warranty. The warranty period is not prolonged by repairs effected under the warranty. This also applies to replaced and repaired components.
Any damage and defects present at the time of purchase must be reported immediately after unpacking, but no later than two days after the date of purchase.
Repairs carried out after expiry of the warranty period shall be subject to charge.
Service
GB Service Great Britain
Tel.: 0871 5000 720 (£ 0.10/Min.)
E-Mail: kompernass@lidl.co.uk
IAN 274422
Importer
KOMPERNASS HANDELS GMBH
BURGSTRASSE 21
44867 BOCHUM
GERMANY
www.kompernass.com
Obsah
Úvod....24
natural_image
Illustration of two steps of a cooking pot with arrows indicating rotation (no text or symbols)natural_image
Illustration of a hand holding a lid with a handle, lifting an arrow (no text or symbols)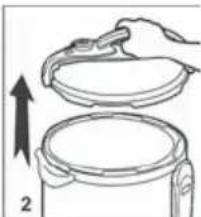
natural_image
Illustration of a hand holding a lid above a cylindrical container, with an upward arrow indicating motion (no text or symbols)POZOR - HMOTNÉ ŠKODY!
POZOR - HMOTNÉ ŠKODY!
KOMPERNASS HANDELS GMBH
BURGSTRASSE 21
44867 BOCHUM
GERMANY
www.kompernass.com
Obsah
Úvod....46
natural_image
Illustration of two hands holding a container with arrows indicating rotation (no text or symbols)KOMPERNASS HANDELS GMBH
BURGSTRASSE 21
44867 BOCHUM
GERMANY
www.kompernass.com
Inhaltsverzeichnis
Einführung 68
natural_image
Illustration of two steps of a container being handled, showing the left panel with a hand holding a lid and the right panel with an open lid (no text or symbols present)natural_image
Illustration of a hand holding a lid with arrows indicating rotation or movement (no text or symbols)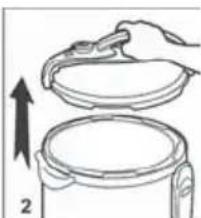
natural_image
Illustration of a hand holding a lid above a container with an upward arrow, no text or symbols presentKOMPERNASS HANDELS GMBH
BURGSTRASSE 21
44867 BOCHUM
GERMANY
www.kompernass.com
KOMPERNASS HANDELS GMBH
BURGSTRASSE 21
44867 BOCHUM
DEUTSCHLAND / GERMANY
www.kompernass.com
Last Information Update · Stav informací · Stav informácií
- ELECTRIC PRESSURE COOKER SSKT 900 A1
- CZ
- Safety....3
- Operating components 8
- Unpacking and installation 9
- Handling and operation....10
- Keep warm function 18
- Timer function 18
- Tips and tricks 19
- Cleaning and care 19
- Storage 20
- Storage/disposal 21
- Appendix 21
- Introduction
- Information concerning these operating instructions
- Copyright
- Intended use
- Warning notes
- DANGER
- A warning notice at this hazard level indicates an imminently hazardous situation.
- WARNING
- CAUTION
- NOTE
- Safety
- Basic safety guidelines
- RISK OF ELECTRIC SHOCK!
- RISK OF BURNS!
- ▶ CAUTION! Hot surfaces!
- CAUTION! MATERIAL DAMAGE!
- Operating components
- (For illustrations see fold-out pages)
- Figure A:
- Figure B:
- Figure C:
- Unpacking and installation
- Safety instructions
- During the first use of the appliance there is a risk of injury and/or damage to property!
- Package contents and transport inspection
- Unpacking
- Disposal of packaging materials
- Handling and operation
- Before fi rst use
- Operation
- NOTE - COOKING RICE
- Food Button Preset duration Min. duration Max. duration
- NOTES
- Damage to the appliance!
- Keep warm function
- Timer function
- CAUTION - PROPERTY DAMAGE
- Tips and tricks
- Cleaning and care
- WARNING! DANGER TO LIFE DUE TO ELECTRIC SHOCK!
- Risk of injury when cleaning the appliance!
- CAUTION - PROPERTY DAMAGE!
- Storage
- Storage/disposal
- Disposal of the appliance
- Appendix
- Technical data
- Warranty
- Service
- Importer
- Obsah
- Úvod....24
- POZOR - HMOTNÉ ŠKODY!
- Úvod....46
- Inhaltsverzeichnis
- Einführung 68
Brand : SILVERCREST
Model : SSKT 900 A1
Category : Frying Pan