
VS120E - Vacuum packaging machines GORENJE - Free user manual and instructions
Find the device manual for free VS120E GORENJE in PDF.


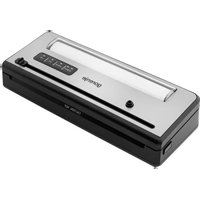
| Product Type | Vacuum packaging machine |
| Brand | Gorenje |
| Model | VS120E |
| Dimensions (W x D x H) | Approx. 400 x 200 x 100 mm |
| Weight | Approx. 3.5 kg |
| Power Supply | 220-240 V, 50/60 Hz |
| Power Consumption | 110 W |
| Vacuum Pressure | Up to -0.8 bar |
| Sealing Width | 30 cm |
| Max Bag Width | 30 cm |
| Functions | Vacuum sealing, pulse vacuum, seal only, external vacuum hose |
| Control Type | Electronic touch buttons |
| Material | Stainless steel top, plastic body |
| Suction Time | Adjustable |
| Sealing Time | Automatic |
| Bag Storage | Internal roll compartment and cutter |
| Accessories Included | 5 vacuum bags, external hose for canisters |
| Maintenance | Clean with damp cloth; dry thoroughly |
| Safety | Automatic shut-off, overheat protection |
| Spare Parts Available | Sealing strip, vacuum pump, gaskets |
| Warranty | 2 years |
| Certifications | CE, RoHS |
Frequently Asked Questions - VS120E GORENJE
User questions about VS120E GORENJE
0 question about this device. Answer the ones you know or ask your own.
Ask a new question about this device
Download the instructions for your Vacuum packaging machines in PDF format for free! Find your manual VS120E - GORENJE and take your electronic device back in hand. On this page are published all the documents necessary for the use of your device. VS120E by GORENJE.
USER MANUAL VS120E GORENJE


II. Vacuum sealing in a bag
- Place the items you want to vacuum seal into the bag. Use only bags specifically designed for vacuum sealing, supplied by the manufacturer, equipped with vacuum channels.

- Clean and flatten the open end of the bag. Make sure that part of the bag is free of dust and is not wrinkled or creased in the area that needs to be sealed.
- Insert the open end of the bag into the opening of the vacuum chamber. Make sure the air vent is not covered by any part of the bag. – Figure 1.
- Press the lid down on both sides using both hands until you hear it click securely closed on both sides – Figure 2.
- Check the status of the LED indicator lights on the "FOOD" button and the "Vacuum pressure" button to confirm the sealing time depending on the moisture of the items you are packing (moist or dry), as well as the desired vacuum level (Normal/Turbo), according to the type of food.
- Now press the "Vacuum & Seal" button – vacuum and seal. The device automatically starts vacuuming and sealing the bag – Figure 3.


NOTE: This device produces a very high vacuum pressure in the bag during the vacuuming process. To avoid crushing more delicate foods in case of excessive vacuum pressure, carefully monitor the vacuum pressure level in the bag, and when the desired pressure level is reached, immediately press the "SEAL" button. The device immediately stops the vacuum pump and proceeds to the bag sealing process.
- Vacuum sealing is complete. Simultaneously press the release buttons on both sides of the device to open the lid, and remove the sealed vacuum bag – Figure 4.
NOTE:
For optimal results, pause between two cycles and allow the device to cool for 1 minute before using it again. After each vacuuming and sealing cycle, we recommend wiping away any possible liquid or food residue from the vacuum chamber opening.
Do not seal multiple bags in succession, one right after another, to avoid overheating the heating element or sealing strip. The device will not start after pressing the "seal" button unless at least 15 seconds have passed since the previous sealing.


NOTE: This appliance creates a very high vacuum pressure inside the bag during the vacuuming process. To avoid crushing delicate foods in case of excessive vacuum pressure, closely monitor the vacuum pressure level in the bag, and as soon as the desired pressure level is reached, immediately press the "SEAL" button. The appliance immediately stops the vacuum pump and proceeds to the bag sealing process.
- Vacuum packaging is complete. Simultaneously press the release buttons on both sides of the appliance to open the lid, and remove the sealed vacuum bag – Figure 4.
NOTE:
For optimal results, pause between two cycles and allow the appliance to cool for 1 minute before using it again.
After each vacuuming and sealing cycle, we recommend wiping away any possible liquid or food residue from the vacuum chamber opening.
Do not seal multiple bags in succession, one right after another, to avoid overheating the heating element or sealing strip. The appliance will not start after pressing the "seal" button unless at least 15 seconds have passed since the previous sealing.


When using this electrical appliance, always observe the safety precautions including the following:
READ ALL INSTRUCTIONS!
- Before using this appliance, carefully read the entire instruction manual and save it for future reference.
- Before plugging the power cord into or disconnecting from a wall outlet, make sure that the appliance cover is in unlocked position. Always unplug the appliance from the power outlet when not in use or before cleaning.
- This appliance is not a toy. Close attention is necessary when used by or near children. Store this appliance in a safe place out of reach of children.
- Do not use any bags or attachments not recommended or approved by the appliance manufacturer, and do not use this appliance for any other purpose except its intended use.
- Stop using the appliance immediately if the cord is damaged. Have the cord replaced by a professional.
- Keep the appliance and the power cord away from moving parts.
- Do not touch the hot sealing element located on the edge of the top cover of the appliance. It is hot and touching it may result in severe burns.
- Do not try to repair this appliance yourself.
- Do not hit or drop the appliance. Do not use the appliance if it has been dropped or if it appears to be damaged.
- Avoid doing the following: pulling or carrying by the cord, using the cord as a handle, closing a door on the cord, or pulling the cord around sharp edges or corners. Do not operate the appliance if the cord or the plug is wet.
- Keep away from hot cookers, ovens, electric burners or any other hot surfaces or sources of heat. Do not use this appliance on a wet or hot surface or near a heat source.
- Use of an extension cord with this unit is not recommended. However, if one is used, it must have a rating equal to or exceeding the rating of this appliance.
- When disconnecting, to avoid any injury, please hold the plug rather than the cord.
- Before plugging in or operating the appliance, make sure your hands are dry and safe to operate the appliance.
- When the appliance is "ON" or during operation, always keep it on a stable surface such as a table or a counter.
- There is no need to use any lubricants, such as lubricating oils or water, on this appliance.
- Do not immerse any part of this appliance, power cord or plug in water or any other liquid.
- Do not use this appliance outdoors or on a wet surface. It is intended for indoor household use only.
- This appliance is not intended for use by persons (including children) with reduced physical, sensory or mental capabilities, or lack of experience and knowledge, unless they have been given supervision or instruction concerning use of the appliance by a person responsible for their safety.
- Children should be supervised to ensure that they do not play with the appliance.
- If the supply cord is damaged, it must be replaced by the manufacturer, the manufacturer's service agent or a similarly qualified person, in order to avoid hazard.
CAUTION:
SAVE THESE INSTRUCTIONS.
CONSTRUCTION AND FUNCTIONS
1. VACUUM & SEAL / CANCEL:
This button has two functions, depending on appliance status:
- In stand-by, it starts the automatic operation of vacuuming the bag and automatic sealing of the bag when vacuuming is complete;
- If pressed during operation (vacuuming or sealing), it stops the appliance.
- FOOD: Used for choosing the best bag sealing time
- Dry setting: for dry bags and items without moisture, with a shorter heat sealing time;
- Moist setting: for wet bags or foods with moisture, with extended heat sealing time.
- Default setting is for dry bags and normal sealing time.
- PRESSURE: Allows adjusting the vacuum pressure:
● Normal setting: for regular items stored under normal vacuum pressure - Turbo setting: for more vacuum with higher pressure - Default setting is normal vacuum pressure.
- SEAL: This button provides two functions:
- Manual sealing of the open end of a bag, without air suction operation, to make a bag from a bag roll
- When the automatic "Vacuum & seal" function is in operation, this button stops the motor pump and immediately starts sealing the bag. This way,
the user can control the vacuum pressure inside the bag and avoid crushing any delicate food or items.
![graph TD A["1: VACUUM SEAL CANCEL"] --> B["2: Food"] B --> C["3: Normal Tone PRESSURE"] C --> D["4: SEAL"]](/content/2026/06/1332441/images/754c1025dd10d862379e85523869896f23e1a9d7b5ad8c1d6189a3b1dbc77c5a.jpg)

- LED Indicators: Indicate the status of vacuuming or sealing process and current appliance settings.
- Vacuum container switch: To start vacuuming with vacuum food containers, jar lids, wine stoppers or other accessories through a hose.
- Release button: There are two release buttons, one on each side. Press both release buttons to open the cover and release the vacuum pressure inside the appliance.
- Air intake: Air intake connecting the vacuum chamber and the pump. For vacuum food containers, wine stoppers etc., attach the hose to this air intake.
- Sealing strip: Place the bag to be sealed over this strip.
- Vacuum chamber: Position the open end of the bag inside the chamber. Air is drawn out of bag and any liquid overflow from the bag is caught in the chamber.
- Lower gasket: Aligns with the upper gasket to seal the vacuum chamber. Keep the gasket clean and dry, and replace it when deformed or damaged.
- Upper gasket: Aligns with the lower gasket to seal the vacuum chamber. Keep the gasket clean and dry, and replace it when deformed or damaged.
- Sealing element: Teflon-coated heating element. It heats up and seals the bag.
- Hook: Locks the cover to the base.
- Hose storage: Used for storing the accessory hose (provided as an optional accessory, only with vacuum food container).
OPERATING INSTRUCTIONS
I. Making a bag with a bag roll
- Connect the unit to a power outlet.
- Use scissors to cut a bag from the bag roll to desired length – Fig. 1.
- Place one end of the bag on top of the sealing strip, but do not insert it into the vacuum chamber – Fig. 2.
- Close the upper lid and press tightly till you hear it click into place on both sides – Fig. 3.
- Press the seal button to start sealing the bag.
- Fig. 4
- Press the release button to open the cover and take the bag out of the machine. The bag is done and is ready for vacuum sealing – Fig. 5.


II. Vacuum packaging with a bag
- Place the items inside the bag. Use only special-purpose vacuum bags supplied by the manufacturer, with vacuum channels.
- Clean and straighten the open end of the bag. Make sure there are no dust, wrinkles or ripples where the bag is to be sealed.
- Insert the open end of the bag into the vacuum chamber area. Make sure the air intake is not covered by the bag. – Fig. 1.
- Press the cover down on both sides using both hands until click sounds are heard on both sides – Fig.2
- Check the LED status of the "FOOD" button and the "Vacuum Pressure" button to confirm sealing time depending on the moisture of the items being packed (moist or dry) and desired vacuum pressure (Normal/Turbo) according to the type of food.
- Then press the Vacuum & Seal button. The unit will start the vacuuming and sealing operation automatically – Fig. 3.
NOTE: This product provides very high vacuum pressure during vacuum packaging in the bag. In order to avoid crushing any delicate item with high vacuum pressure, observe the status of the vacuum pressure inside the bag and press the “SEAL” button immediately when the desired vacuum pressure is achieved. The appliance will then stop the pump and proceed to bag sealing operation.


- The vacuum packaging is done. Simultaneously press the release buttons on the both sides of the appliance to open the cover and take out the sealed bags – Fig. 4.
NOTE:
- For best sealing effect, it is better to let the appliance cool down for 1 minute before using it again. Wipe out any excess liquid or food residue in the vacuum chamber after each vacuuming and sealing operation.
- Do not seal several bags one immediately after another to avoid overheating the sealing element. The appliance will not start if the "seal" button is activated within 15 seconds of the last activation.
- Your appliance can work only with the specific bags provided by us. Do not attempt to use any other bags not intended for vacuum packaging. ● To open a sealed bag, cut it straight across with scissors.
- When vacuuming food with high moisture, the bag may be sealed twice to make sure the seal is tight. After completing the first seal, press the seal button again without opening the appliance cover. This method is only suitable for the foods with high moisture content. When packing food with little moisture, there is no need to seal the bags twice. Liquids or foods in liquid cannot be vacuum sealed. When vacuuming the bags with very moist contents, please clean the bag mouth before vacuuming and sealing.
III. Vacuum packaging in a food container (optional)
- Wipe the food container cover and base and make sure they are clean and dry.
- Put the items into the food container and leave at least one inch of space between the food and the cover rim. Clean the cover rim of the food container and bottom seal gasket of the food container cover.


- Open the appliance cover. Connect one end of the hose to the air intake in the vacuum chamber area and fit the other end of the hose into the center hole of the food container cover. Make sure the food container cover knob is turned to "SEAL" position – Fig. 1&2.
- Press the food container switch (just above the air intake) to start vacuuming – Fig. 3. To ensure there is no leaking of air between the cover and the food container, use your hand to push down the cover knob at the beginning of the vacuuming process. The appliance will stop automatically when enough vacuum pressure is achieved.
- Please press the food container cover steady when you pull off the hose accessory, press the release button to open the cover.

Opening the food container after vacuum packaging
To open the food container, release the air first by turning the knob switch from "Seal" to "open" position.
Note:
● Make sure the food container cover knob is turned to SEAL position before vacuuming. - At the beginning of the vacuuming process in a vacuum food container, slightly press down on the food container cover or on the hose adaptor for a few seconds to make sure the hose is attached tightly and to avoid air leaking through the gap between the cover and the food container top rim. - To test the vacuum and seal, simply tug on the cover. It should not move.
Note:
After finishing the vacuum packing, please always leave the appliance cover open. Do not fasten the cover as this will deform the foam gaskets and affect the appliance function.
CLEANING AND MAINTENANCE
Vacuum sealer
- Always unplug the unit before cleaning.
- Do not immerse in water or any other liquid.
- Avoid using abrasive products or materials to clean the unit as they will scratch the surface.
- Use a mild dishwashing soap and a warm damp cloth to wipe away any food residue.
- Dry thoroughly before using again.
Note: The foam gaskets around the vacuum chamber should be dried thoroughly before re-assembling. When re-assembling the appliance, take care to prevent any damage, and assemble to original position to ensure a tight seal.
Accessories
Wash all vacuum accessories in warm water with a mild dishwashing soap, but do not immerse the cover in water.
- Vacuum container bases (not lids) are top rack dishwasher-safe. However, vacuum container covers should only be wiped with a damp cloth.
- Make sure the accessories are dried thoroughly before using them again.
- Vacuum containers and covers may not be used in a microwave oven or a freezer.
Storing Your Vacuum Sealer:
- Keep the unit on a flat surface and in a safe place out of reach of children.
- Make sure the lid of the appliance is unlocked when not in use and in storage. Keeping the cover locked will deform the foam gaskets which in turn will cause leaking.
This appliance is marked according to the European directive 2012/19/EU on Waste Electrical and Electronic Equipment (WEEE). This guideline is the frame of a European-wide validity of return and recycling on Waste Electrical and Electronic Equipment.
FOOD PRESERVATION GUIDELINES
| Classification | Food Items | Temperature | Normal Preservation | Vacuum Preservation |
| Refrigerator | Fresh Raw Meat | 5 ± 3 °C | 2~3 days | 8~9 days |
| Fresh fish/ Seafood | 5 ± 3 °C | 1~3 days | 4~5 days | |
| Cooked Meat | 5 ± 3 °C | 4~6 days | 10~14 days | |
| Vegetables | 5 ± 3 °C | 3~5 days | 7~10 days | |
| Fruit | 5 ± 3 °C | 5~7 days | 14~20 days | |
| Eggs | 5 ± 3 °C | 10~15 days | 30~50 days | |
| Freezer | Meat | -16~-20 °C | 3~5 months | >1 years |
| Fish | -16~-20 °C | 3~5 months | >1 years | |
| Sea Food | -16~-20 °C | 3~5 months | >1 years | |
| Normal conditions (room temperature) | Bread | 25 ± 2 °C | 1~2 days | 6~8days |
| Biscuits | 25 ± 2 °C | 4~6 months | >1 years | |
| Rice/ Flour | 25 ± 2 °C | 3~5 months | >1 years | |
| Peanuts/Legumes | 25 ± 2 °C | 3~6 months | >1 years | |
| Medical supplies | 25 ± 2 °C | 3~6 months | >1 years | |
| Tea | 25 ± 2 °C | 5~6 months | >1 years |
Guarantee & service
If you need information or if you have a problem, please contact the Gorenje Customer Care Centre in your country (you find its phone number in the worldwide guarantee leaflet). If there is no Customer Care Centre in your country, go to your local Gorenje dealer or contact the Service department of Gorenje domestic appliances.
For personal use only!
GORENJE WISHES YOU A LOT OF PLEASURE WHEN USING YOUR APPLIANCE
We reserve the right to any modifications !!


IMPORTANT SAFETY INSTRUCTIONS


- Then press the "Vacuum & Seal" button.


WE WISH YOU A LOT OF PLEASURE WITH YOUR NEW APPLIANCE
STRUCTURE AND FUNCTIONS
1. VACUUM & SEAL / CANCEL (VACUUM & SEAL / CANCEL):


- VACUUM SEALING IN A BAG
- NOTE
- WHEN USING THIS ELECTRICAL APPLIANCE, ALWAYS OBSERVE THE SAFETY PRECAUTIONS INCLUDING THE FOLLOWING
- READ ALL INSTRUCTIONS
- CAUTION
- CONSTRUCTION AND FUNCTIONS
- VACUUM & SEAL / CANCEL
- OPERATING INSTRUCTIONS
- MAKING A BAG WITH A BAG ROLL
- VACUUM PACKAGING WITH A BAG
- VACUUM PACKAGING IN A FOOD CONTAINER (OPTIONAL)
- OPENING THE FOOD CONTAINER AFTER VACUUM PACKAGING
- CLEANING AND MAINTENANCE
- VACUUM SEALER
- ACCESSORIES
- STORING YOUR VACUUM SEALER
- GUARANTEE & SERVICE
- GORENJE WISHES YOU A LOT OF PLEASURE WHEN USING YOUR APPLIANCE
- IMPORTANT SAFETY INSTRUCTIONS
- WE WISH YOU A LOT OF PLEASURE WITH YOUR NEW APPLIANCE
- STRUCTURE AND FUNCTIONS
- VACUUM & SEAL / CANCEL (VACUUM & SEAL / CANCEL)
Brand : GORENJE
Model : VS120E
Category : Vacuum packaging machines