
STMS 2219 A1 - Keyboard SILVERCREST - Free user manual and instructions
Find the device manual for free STMS 2219 A1 SILVERCREST in PDF.


| Product Type | Wireless Keyboard |
| Model | STMS 2219 A1 |
| Brand | SilverCrest |
| Connectivity | 2.4 GHz wireless via USB nano receiver |
| Layout | QWERTY (US/UK variant) |
| Number of Keys | 104 (full-size with numeric keypad) |
| Multimedia Keys | 12 dedicated multimedia and shortcut keys |
| Power Source | 2x AAA alkaline batteries (not included) |
| Battery Life | Up to 24 months under normal use |
| Wireless Range | Up to 10 meters |
| Dimensions (L x W x H) | 440 x 135 x 20 mm |
| Weight | Approx. 500 g (without batteries) |
| Cable Length | Not applicable (wireless) |
| Key Switch Type | Scissor-switch or membrane (user manual does not specify) |
| Key Rollover | 2-key rollover (standard) |
| LED Indicators | Battery status and Caps Lock/Num Lock indicators |
| Operating Temperature | 0°C to 40°C |
| Storage Temperature | -20°C to 60°C |
| Humidity (Operating) | 10% to 80% (non-condensing) |
| Compatible Operating Systems | Windows 7/8/10/11, macOS, Chrome OS |
| Cleaning Instructions | Use a soft, dry cloth to clean the surface. Do not use liquids or abrasive cleaners. |
| Safety Warnings | Keep away from liquids, heat sources, and open flames. Do not disassemble. |
| Battery Safety | Remove batteries if not used for extended periods; do not mix old and new batteries. |
| Spare Parts Availability | Contact SilverCrest customer service for replacement dongle or batteries; keyboard is not user-serviceable. |
| Repair Information | Refer to the user manual for troubleshooting; no user-replaceable parts inside. |
| Environmental Disposal | Dispose of device and batteries according to local electronic waste regulations. |
Frequently Asked Questions - STMS 2219 A1 SILVERCREST
User questions about STMS 2219 A1 SILVERCREST
0 question about this device. Answer the ones you know or ask your own.
Ask a new question about this device
Download the instructions for your Keyboard in PDF format for free! Find your manual STMS 2219 A1 - SILVERCREST and take your electronic device back in hand. On this page are published all the documents necessary for the use of your device. STMS 2219 A1 by SILVERCREST.
USER MANUAL STMS 2219 A1 SILVERCREST
natural_image
Black desktop computer keyboard and mouse (no visible text or labels)Wireless Keyboard & Mouse Set STMS 2219 A1
TARGA GMBH
Coesterweg 45 SPJ04 5OIST
GERMANY
Wireless Keyboard & Mouse Set
User manual and service information
(2)
English....2
Magyar....23
Čeština 44
Slovensky 65
Deutsch 86
Table of Contents
Trademarks.... 3
Introduction.... 3
Intended Use 3
Package Contents...... 4
Technical Specifications .... 5
System Requirements 5
Safety Instructions....6
Operating Environment 8
Copyright 8
Storing When Not Using the Product 8
Overview 9
Before Getting Started 11
Inserting the Batteries....11
Connecting the USB Nano Receiver....12
Installing the Software.... 13
Icons in the Task Bar 14
Getting Started.... 15
Changing the Operating Mode.... 15
Configuring the Wireless Optical Mouse.... 15
Configuring the Wireless Keyboard 16
Environmental Considerations and Recycling 19
Conformity Notice 19
Troubleshooting 20
Warranty Information.... 21
Trademarks
Microsoft Windows is a registered trademark of Microsoft Corporation, USA.
Intel and Pentium are registered trademarks of Intel Corporation, USA.
AMD® and AMD Athlon are registered trademarks of Advanced Micro Devices, Inc.
USB is a registered trademark.
Other names and product can be trademarks or registered trademarks of their respective owners.
Introduction
Thank you for purchasing this wireless keyboard with wireless mouse STMS 2219 A1. The devices feature a SmartLink technology that makes any manual synchronisation obsolete. The multiple function buttons of the devices let you customise the mouse and keyboard according to your needs. The mouse features a tilt wheel (4-way scroll wheel) to allow horizontal scrolling besides the usual vertical scrolling.
Intended Use
This Keyboard and Mouse Set, consisting of a wireless keyboard, wireless mouse and wireless receiver, is an IT device. This set has been designed for data input and for controlling a computer. The device may not be used outdoors or in tropical climates. This product has not been designed for corporate or commercial applications. Use the product in domestic environments for private applications only. Any use other than that mentioned above does not correspond to the intended use. This device fulfills all standards and directives listed in the Declaration of Conformity. Any modifications to the device other than recommended changes by the manufacturer may result in these standards no longer being met. The manufacturer is not liable for any damage or interference caused by unauthorized modifications. Only use the accessories recommended by the manufacturer.
Please observe the regulations and laws in the country of use.
Package Contents
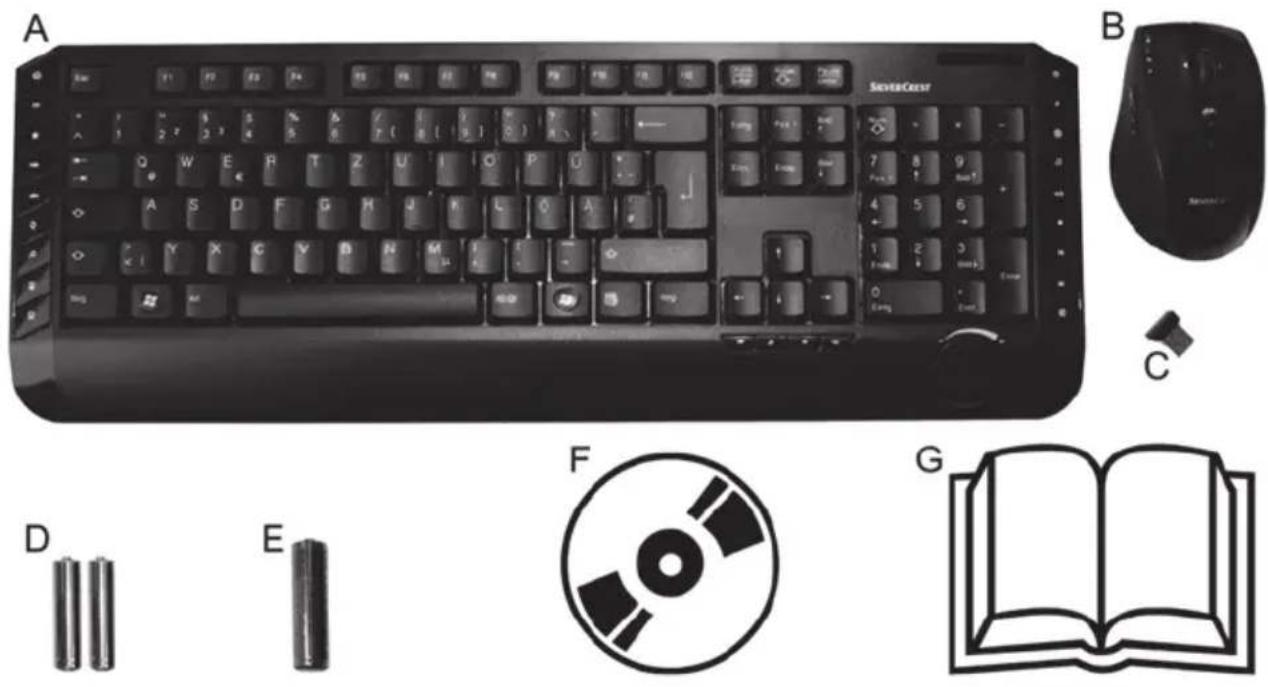
A Wireless Keyboard STMS 2219 A1-K
B Wireless Mouse STMS 2219 A1-M
C USB nano receiver STMS 2219 A1-R
(inserted into the wireless mouse)
D 2 AAA-type batteries, 1.5V (Micro) for wireless keyboard
E 1 AA-type battery, 1.5V (Mignon) for wireless mouse
F CD-ROM with software (Lineart illustration)
G User's manual (Lineart illustration)
Technical Specifications
General technical data
- 2.4 GHz radio frequency
- SmartLink technology (no more need to establish connections between receiver and mouse/keyboard manually)
- Range up to 5 m (15 feet)
- Operating temperature, humidity: 5 to 40°C, max. 90 % relative humidity
- Storage temperature, humidity: 5 to 40°C, max. 90% relative humidity
Keyboard
- 22 function keys (hotkeys), of which 19 are programmable
- Volume adjustment dial knob
- 47.4 × 16.9 × 2.5 cm (L × W × H)
- 613 g (without batteries)
- 2 batteries type AAA, 1.5 V (Micro)
Mouse
- Optical sensor with selectable resolution between 800 cpi and 1600 cpi, LED Class 1
- 8 hotkeys, of which 7 are programmable
- Tilt Wheel (4-way scroll wheel)
- 10.8 × 7.0 × 4.0 cm (L × W × H)
- 73 g (without battery)
- 1 Battery type AA, 1.5 V
USB nano receiver
- 1.8 × 1.5 × 0.7 cm (L × W × H)
- 2 g
The technical data and design may be changed without notification.
System Requirements
- Intel ^ Pentium ^ III / AMD Athlon ^TM or higher
- 1 free USB 2.0 port
- Microsoft ^ Windows ^ XP, Windows Vista ^ or Windows ^ 7/8
- CD-ROM or DVD-ROM Drive for installing the software
Safety Instructions
Before you use this device for the first time, please read the following notes in this manual and heed all warnings, even if you are familiar with handling electronic devices. Keep this manual safe for future reference. If you sell the device or pass it on, it is essential that you also hand over this manual, as it is part of the product.

DANGER! This symbol and the word "Danger" alert you to a potentially dangerous situation. Ignoring it can lead to severe injury or even death.

WARNING! This symbol and the word "Warning" denote important information required for the safe operation of the product and for the safety of its users.

This icon alerts about a strong light source.

This icon denotes further information on the topic.

Avoid damage to your eyes!
Never look into the LED beam.

DANGER! Children and Persons with Disabilities
Electrical devices do not belong in the hands of children. Also persons with reduced physical, sensory or mental capabilities should only use electrical devices in appropriate circumstances. Do not allow children or persons with disabilities to use electrical devices when not under supervision. Unless they are instructed accordingly and supervised by a competent person responsible for their safety. Children should always be supervised to ensure that they do not play with the product. Small parts can represent choking hazards. Keep the packaging away from children and persons with disabilities too as there is danger of suffocation.

DANGER! Danger of suffocation

DANGER! Batteries
Insert the batteries with the correct polarity. Never try to recharge the batteries and under no circumstances throw them into fire. Do not mix battery types (old and new or carbon and alkaline, etc.). Batteries are not toys! If a battery is swallowed, seek medical help immediately. Batteries must never be opened or deformed. Otherwise there is a risk of leaking chemicals. If the chemicals become in contact with your skin or eyes, rinse with plenty of fresh water immediately and seek medical aid. Remove the batteries when the device is not to be used for a long time. Improper use may cause explosions and danger to life.

DANGER! RF Interface
Turn the device off when onboard an aircraft, in a hospital, in an operating theatre or in the vicinity of medical electronic equipment. The RF signals may interfere with the functionality of sensitive devices. Keep the device at least 20cm (8 inches) away from pacemakers, as the RF signals may interfere with the functionality of the pacemaker. The transmitted RF signals can cause interference with hearing aids. Do not place the device with the wireless adapter turned on near flammable gases or in a potentially explosive area (e.g. a paint shop), as the transmitted RF signals may cause explosions or fire. The range of the radio wave signals depends on environmental conditions. When data is transmitted via a wireless connection it may also be received by unauthorized parties. Targa GmbH is not liable for any interference caused to RF or TV signals through unauthorized modification to this device. Furthermore, Targa accepts no liability for replacing any devices that have not been specifically approved by Targa GmbH. The user is solely responsible and liable for troubleshooting any interference caused by unauthorized modification of this device and for replacing appliances.

WARNING! Maintenance / Cleaning
Repairs are required when this device has been damaged in any way, for example when liquid has entered the product, when the product has been exposed to rain or moisture, when the product does not work normally or if the product has been dropped. If smoke, unusual noises or smells are noticed, power off the device immediately and remove the batteries. In these cases the device should no longer be used and should be inspected by authorized service personnel. Please contact qualified personnel when repair is needed. Never open the housing of the device, or the accessories. Only use a clean, dry cloth for cleaning. Never use any corrosive liquids.

WARNING! Please remember:
- no direct heat sources (e.g. radiators) can affect the device
- the device is not exposed to direct sunlight or bright artificial light
- contact with spray, dripping water and corrosive liquids is avoided and the device is never operated near water; in particular the device may never be immersed in liquids (do not place any objects containing liquids, such as vases or drinks, near the device)
- the device is never placed in the immediate vicinity of magnetic fields (e.g. loudspeakers)
- no fire hazards (e.g. burning candles) are placed on or near the device
- no foreign bodies are introduced into the device
- the device is not subject to any extreme temperature changes as this may cause moisture through condensation and cause short-circuits; If the device has been exposed to strong temperature variations anyway, wait (approx. 2 hours) before turning it on, so it has reached the ambient temperature
- the device is not subject to excessive shocks and vibrations
- that working with the keyboard for a long time can cause health problems. We recommend you to make breaks at regular intervals.
Operating Environment
Position the device on a stable, flat surface and do not place any objects on the device. The device is not designed for use in environments with high temperatures or humidity (e.g. bathrooms), and must be kept free of dust. Operating temperature and operating humidity: 5 °C to 40 °C, max. 90% RH.
Copyright
The entire content of this User's Manual is copyrighted and is provided to the reader for information purposes only. Copying data and information without prior written and explicit authorization from the author is strictly forbidden. This also applies to any commercial use of the contents and information. All texts and figures are up-to-date as per the date of print release. We assume no liability for any changes.
Storing When Not Using the Product
When leaving unused for a long period of time, remove the batteries from the wireless keyboard and from the wireless mouse. Remove the USB nano receiver from your computer's USB port and insert it into the storage compartment of the mouse. Please note that the USB nano receiver fits into the storage compartment in only one direction, without the need to apply any force. Also make sure that the storage temperature is maintained between 5°C and 40°C. Humidity must not exceed 90% RH.
Overview
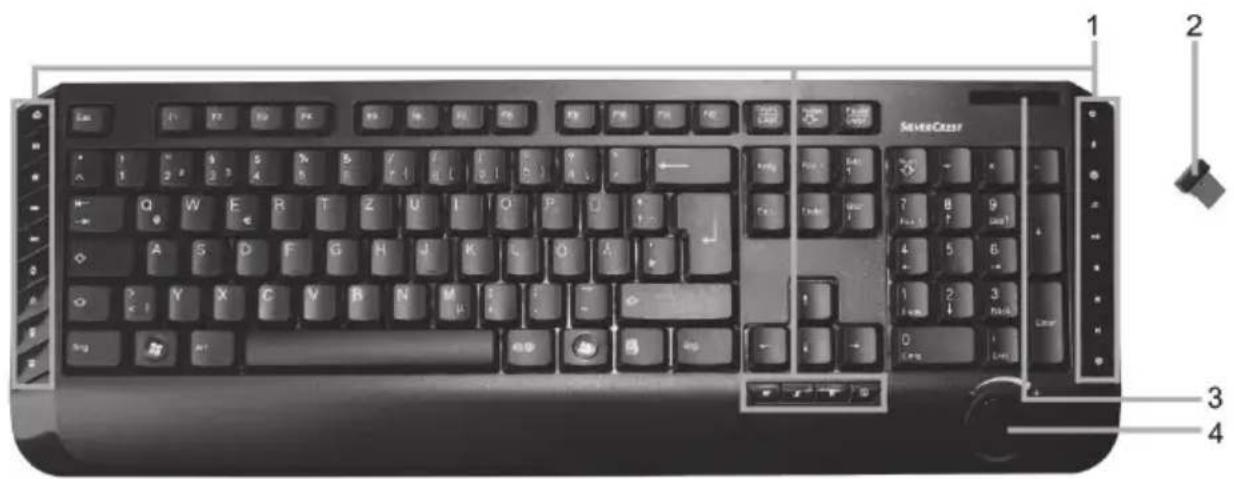
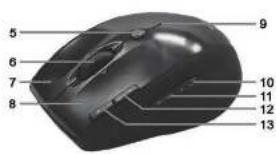
1 Special keys (hotkeys)
2 USB nano receiver (inserted into the wireless mouse)
3 Battery level indicator*
4 Volume control
* The LED on the keyboard front panel will light-up briefly when inserting the batteries to indicate functionality.
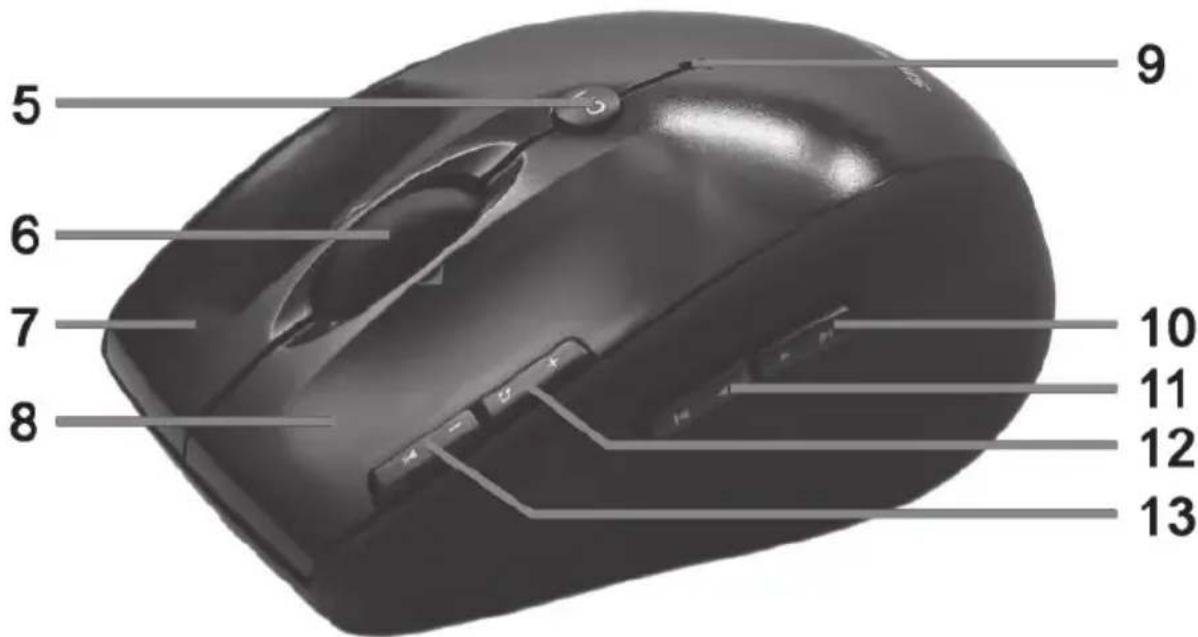
5 800/1600 cpi toggle switch (press briefly)
Standard / media mode toggle switch
(keep pressed for 3 seconds)
6 Tilt wheel (4-way scroll wheel)
Volume control and mute (media mode)
7 Right mouse button
8 Left mouse button
9 Status indicator
flashing continuously = battery empty
one short flash = standard operating mode
one long flash = media operating mode
multiple short flashes = 1600 cpi resolution
multiple long flashes = 800 cpi resolution
10 Forward (default)
Next title (media mode)
11 Back (default)
Previous title (media mode)
12 Zoom + (default mode)
Launch Media Player (media mode)
13 Zoom - (default mode)
Before Getting Started
Unpack all the devices and use the package contents checklist on page 4 to verify that you have received all items listed. Next remove all package material. If you find anything missing or damaged, please contact the Customer Service.
Inserting the Batteries
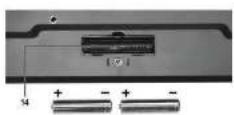
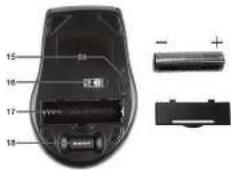
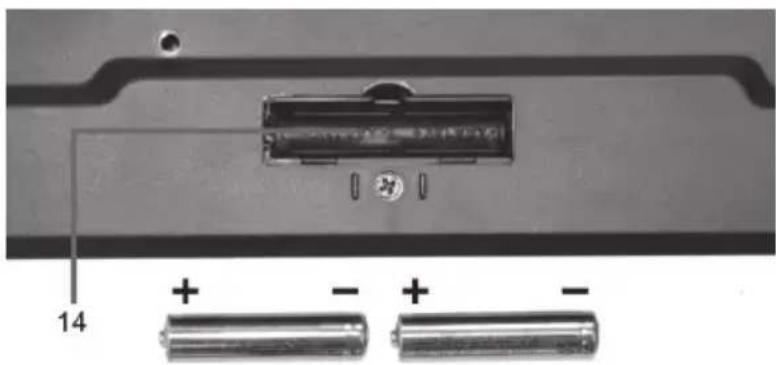
First insert the batteries into the wireless mouse and wireless keyboard, as shown in the figures below. Take care to insert the batteries into the device observing the correct polarity (+ and -) then press the On/Off button (15) to power the wireless mouse on. The wireless mouse features a battery level indicator (9) on its top panel. If it blinks orange, the battery is empty.
natural_image
Close-up of a computer RAM module with two batteries and a connector, labeled with pin number 14 (no text or symbols on the main subject)Fig.: Detailed view of bottom of the keyboard
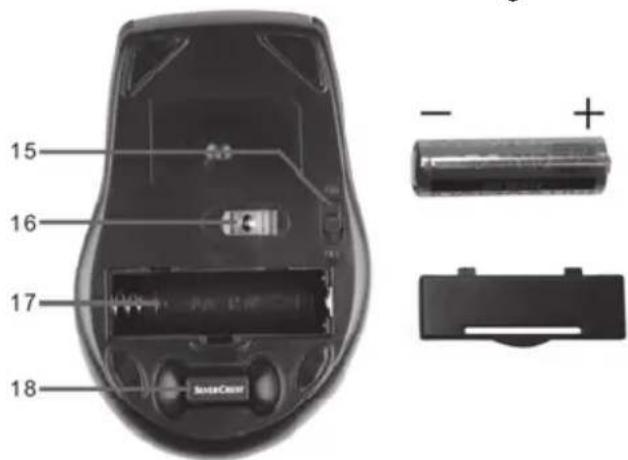
Fig.: Detailed view of bottom of the mouse
14 Keyboard battery compartment
15 On/off button of the mouse
16 Optical sensor
17 Mouse battery compartment
18 USB nano receiver

The wireless mouse features an automatic standby function. When not using the wireless mouse for a certain amount of time, it will power off. Move the wireless mouse or press any mouse button to power it back on (the drivers must be installed).
The devices feature a battery level indicator (3 and 9). Whenever it blinks, the batteries of the respective device are exhausted. When this happens, replace the batteries with new batteries of the same type.
Connecting the USB Nano Receiver
If you still have your old keyboard and mouse connected to the computer, please shut down your computer, disconnect the corresponding devices from the PC and restart the computer.
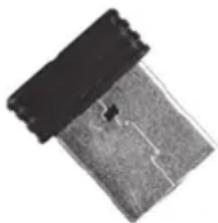
Plug the USB nano receiver (inserted into the wireless mouse) into a free USB port on your powered-on computer.
natural_image
Close-up of a black rectangular electronic component with a textured surface (no visible text or symbols)Fig.: USB nano receiver
The operating system will detect the new hardware and will automatically install the corresponding drivers. Depending on the operating system, one of the following messages will appear:
Under Windows ^® 8
When connecting the receiver for the first time, the installation process runs in background and no message will be displayed.
Under Windows Vista ^® , Windows ^® 7
When connecting the receiver for the first time, the operating system will prompt "Installing device driver software". Wait until the message "Your devices are ready to use" appears. Your mouse and keyboard have been successfully configured and can now be used.
Under Windows ^® XP
When connecting the receiver for the first time, the operating system will prompt "Found New Hardware". Wait until the message "Your new hardware is installed and ready to use" appears before using the mouse and keyboard.

If the connection to the nano receiver is interrupted or if it is not possible to establish a connection, remove the batteries from the mouse and keyboard and re-insert them.
Installing the Software
In order to be able to use the full function-capabilities of your wireless keyboard and wireless mouse, you must install the supplied software. To do this, insert the supplied CD-ROM into the CD-ROM drive of your computer. The setup process should start automatically, otherwise double-click on the "setup.exe" file on the CD-ROM to start manually.
Under Windows Vista® and Windows® 7/8 only the setup will be temporarily blocked and a message "Do you want to allow the following program from an unknown publisher to make changes to this computer?" appears. To continue setup, click "Yes".
The following setup screens correspond to the Windows ^® 8 operating system. For Windows ^® XP / Windows Vista ^® / Windows ^® 7 these screens will slightly vary but their content is the same.
To launch setup, click "Next".
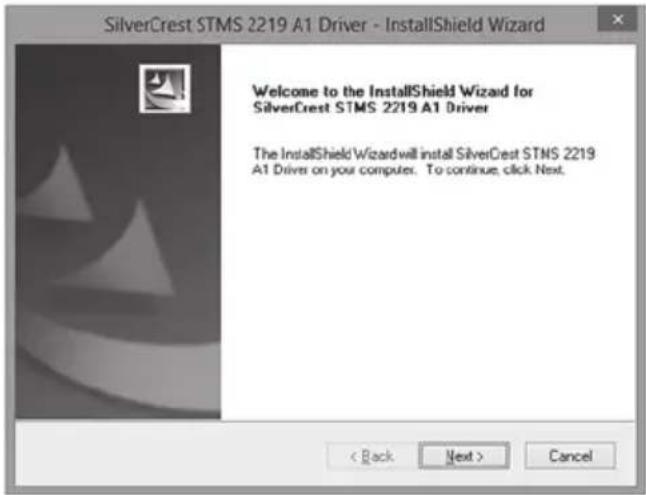
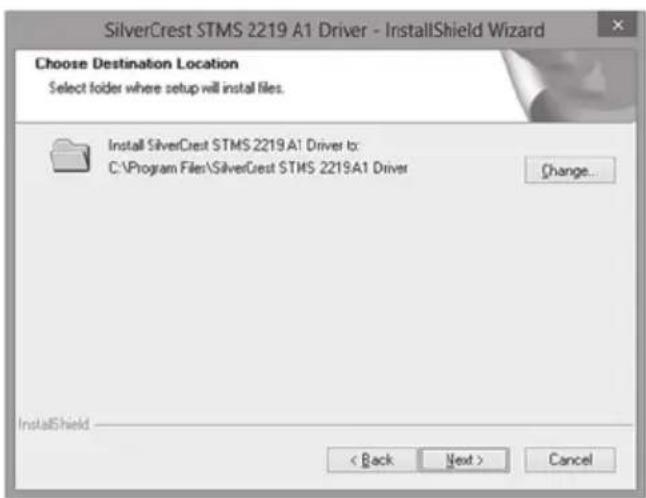
Here you can select the destination folder for the installation with the "Change" button or use the suggested folder. To proceed click "Next".
Click "Finish" to finish the setup programme.
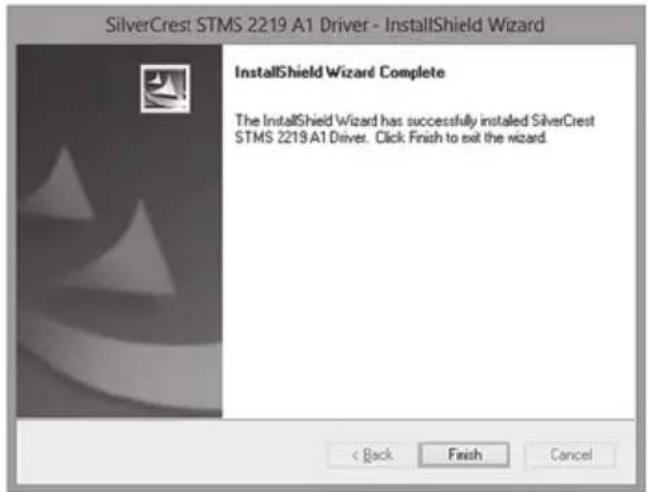

If you are prompted to restart your computer, restart it before using the software.
Icons in the Task Bar
Double-clicking on this icon opens the configuration menu for the optical mouse (See page 15 - Configuring the Wireless Optical Mouse for details).
Double-clicking on this icon opens the configuration menu for the keyboard (See page 16 - Configuring the Wireless Keyboard for details).

This icon indicates that the function "Num Lock" is enabled. Clicking again on the "Num Lock" button will disable this function again.

This icon indicates that the function "Caps Lock" is enabled. Clicking again on the "Caps Lock" button will disable this function again.

This icon indicates that the function "Scroll Lock" is enabled. Clicking again on the "Scroll Lock" button will disable this function again.

Right-click on the corresponding icon to open a menu showing the following options:
Open Opens the configuration menu of the corresponding device.
Info Shows information about the version of the installed driver.
Exit Exits the function. If necessary, you can open the applications again from the Start menu of your operating system.

The operating systems default settings will hide disabled icons in the task bar. It is recommended that you disable the "Hide inactive icons" option in task bar properties.
Getting Started
Changing the Operating Mode
Use the CPI button (5) to quickly toggle between 800 cpi and 1600 cpi resolution for optical tracking. Tracking at 1600 cpi offers a higher accuracy.
To toggle between standard and media operating mode of your optical mouse, press and hold the CPI button (5) for at least 3 seconds until the indicator (9) flashes up once for a longer time. The available functions for media mode can be found on page 10 – Overview. In media operating mode you can press the tilt wheel (6) to the left or right to adjust the sound volume. Or you can press it downwards to mute or resume the sound output. In standard operating mode you can press the tilt wheel (6) to the left or right or turn the wheel to adjust the Windows sound volume, whenever the volume icon is enabled in the system bar.
Configuring the Wireless Optical Mouse
Double-click on the icon in the task bar (lower-right corner on your screen, near the system clock) or right-click on the icon and select "Open" from the context menu. The mouse configuration menu will appear.
Here you can assign a function for the highlighted mouse buttons. Click on the radio button corresponding to the mouse button and select the desired function from the menu.
By using "Restore to default" you can return all settings to factory default.
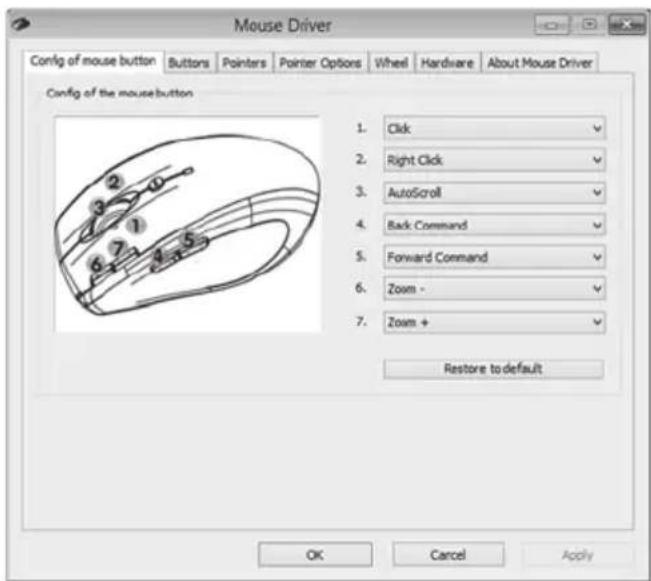

All selected options apply to the default mode. The button assignments for media mode cannot be modified.
Enable changes by clicking the "Apply" button (the window remains open) or by clicking on the "OK" button (the window closes).
Click the "About Mouse Driver" tab to display information about the mouse driver. As all other tabs are provided by your operating system, please read the corresponding OS documentation or online help for more information
Configuring the Wireless Keyboard
The wireless keyboard features 22 hotkeys (quick access keys) plus a volume adjustment button. Once the software has been installed, the function keys have the following default assignments. Additionally, there are 19 programmable functions keys.
Hotkey Description
| 1 | Default Internet Browser (e.g. Internet Explorer) | |
| 2 | Default E-mail programme (e.g. Microsoft® Outlook) | |
| 3 | ★ | Internet Browser favourites |
| 4 | → | Next (e.g. Internet Explorer) |
| 5 | ← | Previous (e.g. Internet Explorer) |
| 6 | Refresh page | |
| 7 | Search for ... | |
| 8 | Launch the Calculator | |
| 9 | Opens My Computer | |
| 10 | W | Launches Microsoft® Word (must have been installed) |
| 11 | X | Launches Microsoft® Excel (must have been installed) |
| 12 | P | Launches Microsoft® PowerPoint (must have been installed) |
| 13 | L | Launches the default calendar (e.g. Microsoft® Outlook, must have been installed) |
| 14 | Mute on/off | |
| 15 | Next title | |
| 16 | Previous title | |
| 17 | Stops playback | |
| 18 | Playback/Pause | |
| 19 | Launch the default media player (e.g. Microsoft® Media Player) | |
| 20* | Resume from Hibernation mode * | |
| 21* | Switch to Hibernation or Standby mode * | |
| 22* | Computer On/Off * | |
| Many computer mainboards have a BIOS setting such as "Boot on USB", "Power on by USB", or similar. Enable this function to be able to power the computer on or off via the keyboard. Please also read the documentation for your computer or motherboard in order to adjust the BIOS setup. |
* not programmable
In order to program the programmable function keys, double-click on the 📄 icon in the task bar (lower-right corner of your screen, near the system clock) or right-click on the 📄 icon and select "Open" from the context menu.
The following menu will appear:
Here you can assign a function for the highlighted keyboard keys. Click on the radio button corresponding to the special function key and select the desired function from the menu.
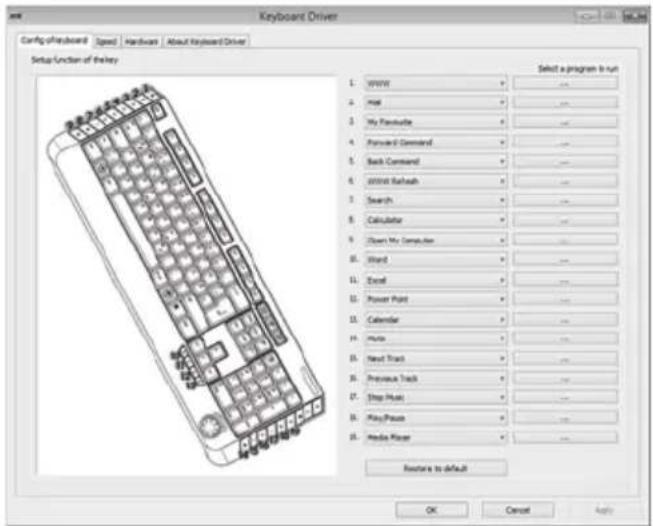
The following option "Select a program to run" ([ ... ] button) lets you select any executable file on the hard disk of your computer which will be run by pressing the corresponding function button.
To do this, click the [ ... ] button next to the desired function button. The program browse dialog box will open. Browse for the desired executable file and confirm the settings. This procedure depends on the operating system.
Enable changes by clicking the "Apply" button (the window remains open) or by clicking on the "OK" button (the window closes).
By using the "Restore All To Default" you can return all modified functions to factory default.
Click the "About Keyboard Driver" tab to display information about the keyboard driver. As all other tabs are provided by your operating system, please read the corresponding OS documentation or online help for more information.
Environmental Considerations and Recycling
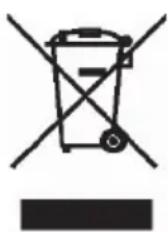
Devices marked with this symbol are subject to European Directive 2012/19/EU. All electric and electronic devices must be disposed of separately from household waste at official disposal centres. Also the USB nano receiver is an electronics device and needs to be disposed of properly. Avoid hazards to the environment and dangers to your personal health by disposing of the device properly. For further information about proper disposal, contact your local government, disposal bodies or the shop where you bought the device.
Respect the environment. Old batteries do not belong in the domestic waste. They must be handed in to a collection point for waste batteries. Please note that batteries must be disposed of fully discharged at appropriate collection points for old batteries. If disposing of batteries which are not fully discharged, take precautions to prevent short circuits. To prevent any short circuits cover the battery poles with insulating tape.
Recycle the packaging material properly too. Cardboard packaging can be taken to paper recycling containers or public collection points for recycling. Any film or plastic contained in the packaging should be taken to your public collection points for disposal.
Conformity Notice
CE
The mouse/keyboard set complies with the basic and other relevant requirements of R&TTE Directive 1999/5/EC and the RoHs Directive 2011/65/EU. The corresponding Declaration of Conformity can be found at the end of this User's Manual.
Troubleshooting
If after installation the wireless keyboard and the wireless mouse do not respond, please test the following:
☑ Please check the polarity of the batteries (see the chapter "Inserting the batteries").
☑ Check that the receiver unit has been connected properly to your computer (see page 12 - Connecting the USB Nano Receiver).
☑ Try a different USB port.
☑ Please note that when using multiple sets the different components such as the wireless mouse, wireless keyboard and USB nano receiver cannot be swapped.
☑ Check the charging level of the batteries (if necessary, insert new batteries).
☑ Please note that you should use a pad (e.g. mouse pad) when using the mouse on a glass or glossy surface.
If the icons for "Num Lock", "Caps Lock" and/or "Scroll Lock" do not appear in the task bar, please try the following:
☑ Check the taskbar settings to see if inactive icons are hidden. Disable this function to show all icons at all times.
When typing on the wireless keyboard unexpected characters appear, please check the following:
☑ Check if the proper input language has been set in Control Panel.
☑ Restart your computer and check the keyboard input again.
Warranty Information
Warranty of TARGA GmbH
Dear Customer,
This device is sold with three years warranty from the date of purchase. In the event of product defects, you have legal rights towards the seller. These statutory rights are not restricted by our warranty as described below.
Warranty conditions
The warranty period commences upon the date of purchase. Please keep the original receipt in a safe place as it is required as proof of purchase. If any material or manufacturing faults occur within three years of purchase of this product, we will repair or replace the product free of charge as we deem appropriate.
Warranty period and legal warranty rights
The warranty period is not extended in the event of a warranty claim. This also applies to replaced and repaired parts. Any damage or defects discovered upon purchase must be reported immediately when the product has been unpacked. Any repairs required after the warranty period will be subject to charge.
Scope of warranty
The device was carefully manufactured in compliance with stringent quality guidelines and subjected to thorough testing before it left the works. The warranty applies to material and manufacturing faults. This warranty does not cover product components which are subject to normal wear and which can therefore be regarded as wearing parts, or damage to fragile components such as switches, rechargeable batteries or components made of glass. This warranty is void if the product is damaged, incorrectly used or serviced. To ensure correct use of the product, always comply fully with all instructions contained in the user manual. The warnings and recommendations in the user manual regarding correct and incorrect use and handling of the product must always be observed and complied with. The product is solely designed for private use and is not suitable for commercial applications. The warranty is rendered void in the event of incorrect handling and misuse, if it is subjected to force, and also if any person other than our authorised service technicians interfere with the device. No new warranty period commences if the product is repaired or replaced.
Submitting warranty claims
To ensure speedy handling of your complaint, please note the following:
Before using your product for the first time, please read the enclosed documentation carefully. Should any problems arise which cannot be solved in this way, please call our hotline.
- Always have your receipt, the product article number as well as the serial number (if available) to hand as proof of purchase.
- If it is not possible to solve the problem on the phone, our hotline support staff will initiate further servicing procedures depending on the fault.

Service

Phone: 0207 - 36 50 744
E-Mail: service.GB@targa-online.com

Phone: 01 - 242 15 83
E-Mail: service.IE@targa-online.com

Phone: 800 - 62 175
E-Mail: service.MT@targa-online.com

Phone: 800 - 92 496
E-Mail: service.CY@targa-online.com
IAN: 113892

Manufacturer
Please note that the following address is not a service address. First contact the service point stated above.
TARGA
GmbH
Coesterweg 45
59494 SOEST
GERMANY
Tartalomjegyzék
Védjegyek 24
Bevezetés....24
natural_image
Close-up of a battery rear panel with two batteries and a 14-pin connector (no text or symbols visible)natural_image
Close-up of a black rectangular electronic component with a metallic surface (no visible text or symbols)Ábra: USB nanovevő
natural_image
Symbol of a trash bin crossed with no text or numbers, representing waste sorting or disposal (no text present)natural_image
Close-up of a battery rear panel with two batteries and a 14-pin connector (no text or symbols visible)natural_image
Close-up of a black rectangular electronic component with a textured gray surface (no visible text or symbols)natural_image
Close-up of a battery rear panel with two batteries and a 14-pin connector (no text or symbols visible)natural_image
Close-up of a black rectangular electronic component with a metallic surface (no visible text or symbols)Obr.: USB nanoprijímač
natural_image
Symbol of a trash bin crossed with no text or numbers, representing waste sorting or disposal (no text present)natural_image
Close-up of a black rectangular electronic component with a metallic body and a small cross-shaped feature (no visible text or symbols)EU - Declaration of Conformity
Address:
Targa GmbH
Coesterweg 45
59494 Soest, Germany
Product:
Mouse Keyboard Set
Model:
SILVERCREST STMS 2219 A1
Identification number:
IAN 113892
The product complies with the requirements of the following European directives:
1999/5/EC
R&TTE
2011/65/EU
Restriction of the use of certain hazardous substances in electrical and electronic equipment
Compliance was proved by the application of the following standards:
RF:
EN 300 440-2 V 1.4.1
EMC:
EN 301 489-1 V 1.9.2
EN 301 489-3 V 1.4.1
Safety:
EN 60950-1:2006 +A11:2009 +A1:2010
+A12:2011
Human exposure:
EN 62479:2010
ROHS:
EN 50581:2012
Year of CE marking:
2015

natural_image
Abstract sketch of a stylized bird or wing-like shape with curved lines (no text or symbols)Soest, 21th of April 2015
Authorised signature
Matthias Klauke, Managing Director



- Wireless Keyboard & Mouse Set STMS 2219 A1
- Table of Contents
- Trademarks
- Introduction
- Intended Use
- Package Contents
- Technical Specifications
- General technical data
- Keyboard
- Mouse
- USB nano receiver
- System Requirements
- Safety Instructions
- DANGER! Children and Persons with Disabilities
- DANGER! Danger of suffocation
- DANGER! Batteries
- DANGER! RF Interface
- WARNING! Maintenance / Cleaning
- WARNING! Please remember:
- Operating Environment
- Copyright
- Storing When Not Using the Product
- Overview
- Before Getting Started
- Inserting the Batteries
- Connecting the USB Nano Receiver
- Installing the Software
- Icons in the Task Bar
- Getting Started
- Changing the Operating Mode
- Configuring the Wireless Optical Mouse
- Configuring the Wireless Keyboard
- Hotkey Description
- Environmental Considerations and Recycling
- Conformity Notice
- Troubleshooting
- Warranty Information
- Warranty of TARGA GmbH
- Warranty conditions
- Warranty period and legal warranty rights
- Scope of warranty
- Submitting warranty claims
- Service
- Manufacturer
- Tartalomjegyzék
- EU - Declaration of Conformity
- Address:
- Product:
- Model:
- Identification number:
- 1999/5/EC
- R&TTE
- 2011/65/EU
- RF:
- EMC:
- Safety:
- Human exposure:
- ROHS:
- Year of CE marking:
Brand : SILVERCREST
Model : STMS 2219 A1
Category : Keyboard