
RUN'N' DRIVE 3-IN-1 RUMBLE FORCE - Video game accessory THRUSTMASTER - Free user manual and instructions
Find the device manual for free RUN'N' DRIVE 3-IN-1 RUMBLE FORCE THRUSTMASTER in PDF.
| Product type | 3-in-1 universal game controller with force feedback |
| Brand | Thrustmaster |
| Model | RUN'N' DRIVE 3-IN-1 RUMBLE FORCE |
| Compatible platforms | PlayStation® 1, PlayStation® 2, PlayStation® 3, PC (Windows®) |
| Connectivity | Gameport (PS2), USB (PC and PS3) |
| Power | Via the console port or USB port (no batteries required) |
| Dimensions (approx.) | ~25 x 10 x 8 cm |
| Weight (approx.) | ~350 g |
| Analog axes | 2 progressive mini-sticks + 1 progressive optical wheel |
| Progressive triggers | 2 (left and right) |
| Action buttons | 8 digital + digital cross |
| Vibration | 2 independent motors (on PS2 and PC) |
| Control buttons | MAPPING, MODE (with LED), PRESET (with LED) |
| Operating modes | PS1, PS2, PS3, PC 4 axes, PC 5 axes, PC 7 axes |
| Programming | Automatic presets and manual programming of buttons, sticks and triggers |
| Memory | Integrated EEPROM chip: retains profiles even when unplugged |
| Wheel sensitivity | Normal and High (adjustable) |
| Function inversion | Possible between buttons, sticks and digital cross |
| Cable length | ~2 meters |
| Maintenance and cleaning | Soft, dry cloth; do not use solvents |
| Safety | Unplug in case of malfunction due to static electricity; avoid moving the sticks when connecting |
| Spare parts and repairability | Not provided by the manufacturer; contact technical support |
| Warranty | 2 years (material and manufacturing defects) |
| General information | Made in China; regulatory information on packaging; end-of-life recycling (WEEE) |
Frequently Asked Questions - RUN'N' DRIVE 3-IN-1 RUMBLE FORCE THRUSTMASTER
User questions about RUN'N' DRIVE 3-IN-1 RUMBLE FORCE THRUSTMASTER
0 question about this device. Answer the ones you know or ask your own.
Ask a new question about this device
Download the instructions for your Video game accessory in PDF format for free! Find your manual RUN'N' DRIVE 3-IN-1 RUMBLE FORCE - THRUSTMASTER and take your electronic device back in hand. On this page are published all the documents necessary for the use of your device. RUN'N' DRIVE 3-IN-1 RUMBLE FORCE by THRUSTMASTER.
USER MANUAL RUN'N' DRIVE 3-IN-1 RUMBLE FORCE THRUSTMASTER
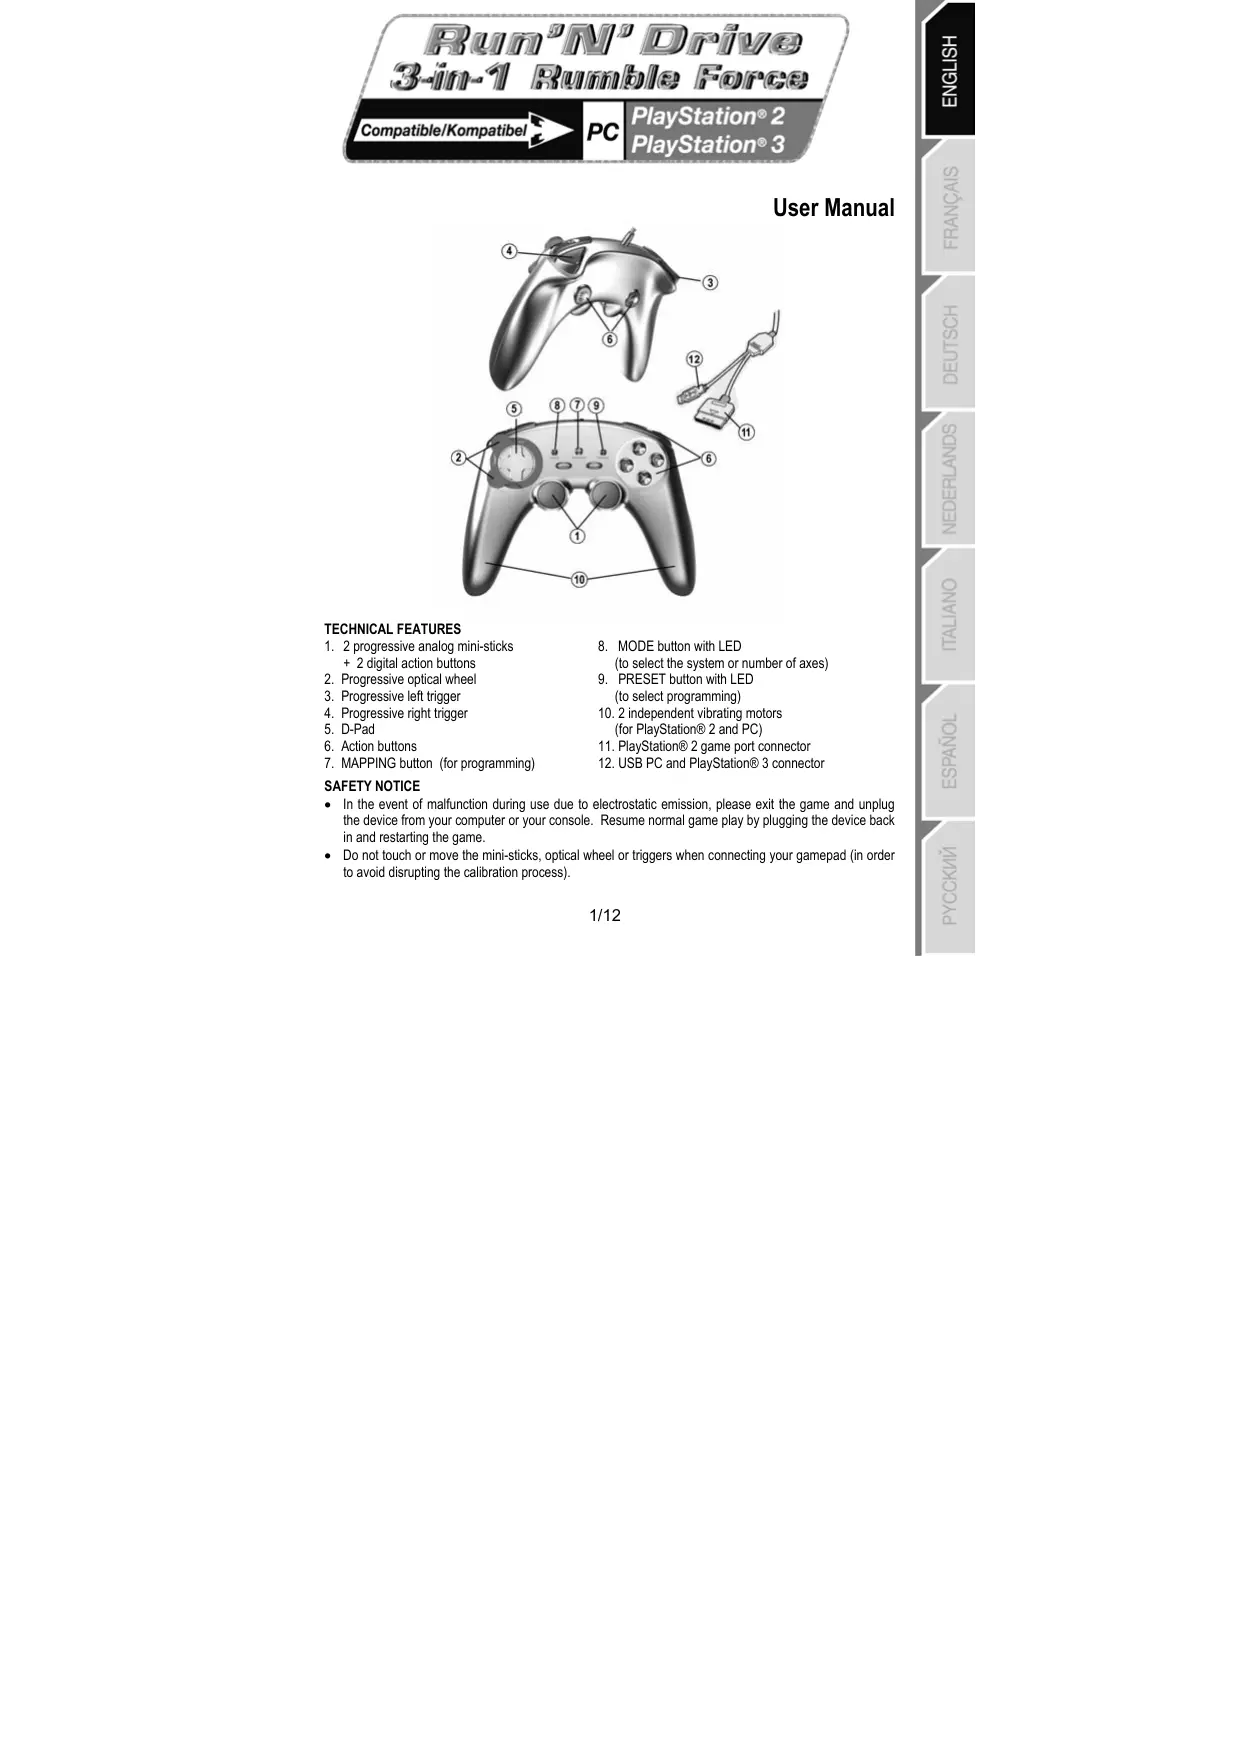
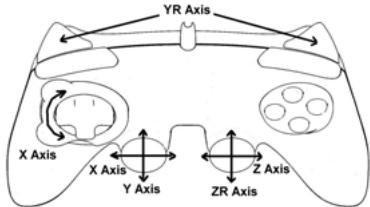
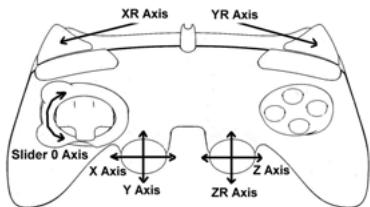
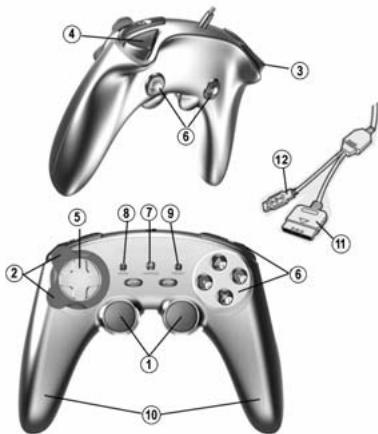
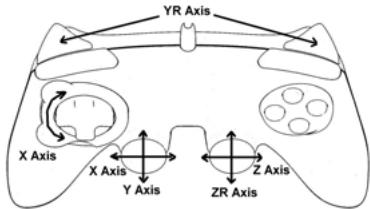
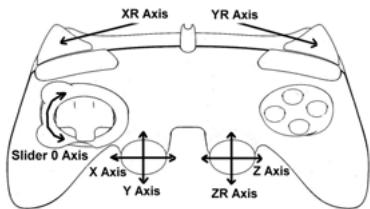
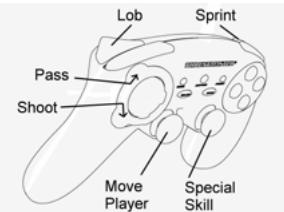
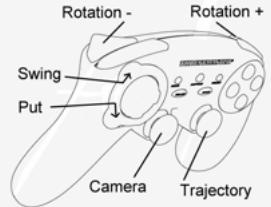
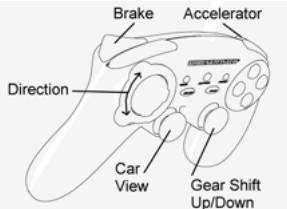
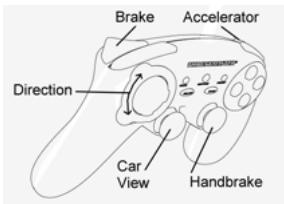
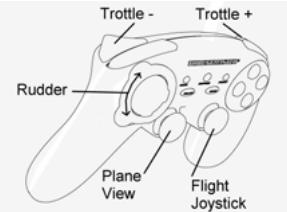
- 2 progressive analog mini-sticks + 2 digital action buttons
- Progressive optical wheel
- Progressive left trigger
- Progressive right trigger
- D-Pad
- Action buttons
-
MAPPING button (for programming)
-
MODE button with LED (to select the system or number of axes)
- PRESET button with LED
(to select programming)
10.2 independent vibrating motors
(for PlayStation® 2 and PC)
11. PlayStation® 2 game port connector
12. USB PC and PlayStation® 3 connector
SAFETY NOTICE
- In the event of malfunction during use due to electrostatic emission, please exit the game and unplug the device from your computer or your console. Resume normal game play by plugging the device back in and restarting the game.
- Do not touch or move the mini-sticks, optical wheel or triggers when connecting your gamepad (in order to avoid disrupting the calibration process).
TABLE OF SUPPORTED MODES
| System | MODE | Color of MODE button (8) |
| PLAYSTATION® 1 | "PS1" | OFF |
| PLAYSTATION® 2 | "PS2" | GREEN |
| PLAYSTATION® 3 | "PS3" | OFF |
| PC | "4 AXES" | OFF |
| "5 AXES" | RED | |
| "7 AXES" | GREEN |
PLAYSTATION® 2
INSTALLATION ON PLAYSTATION® 2
- Connect the PS2 game port connector (11) to a game port on your console.
- Turn on your console and launch the game.
You are now ready to play!
ATTENTION: NEVER CONNECT THE USB CONNECTOR (12) TO YOUR PLAYSTATION® 2 (to avoid the risk of damaging your gamepad and/or your console)
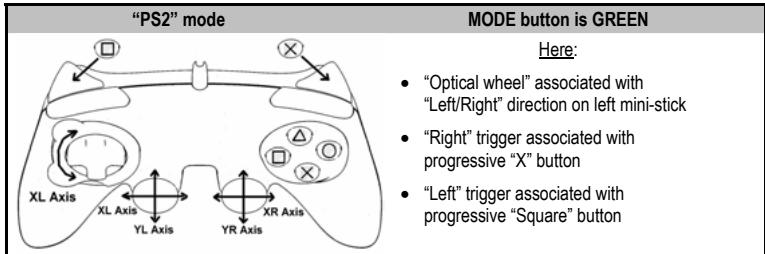
"PLAYSTATION® 2" MODE
- "PS1" mode: the MODE button is Off (exclusively reserved for "PlayStation® 1" games)
- "PS2" mode: the MODE button is Green (exclusively reserved for "PlayStation® 2" games)
"AUTOMATIC PRESET" CONFIGURATION - PLAYSTATION® 2
PLAYSTATION® 3
INSTALLATION ON PLAYSTATION® 3
- Connect the USB connector (12) to a USB port on your console.
- Turn on your console.
- Switch your gamepad to "PS3" mode = the MODE button should be Off. (to do so, if necessary, press the button until it switches off).
- Launch the game.
You are now ready to play!
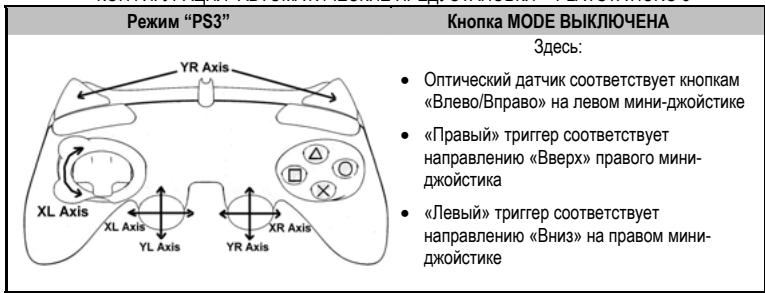
"PLAYSTATION® 3" MODE
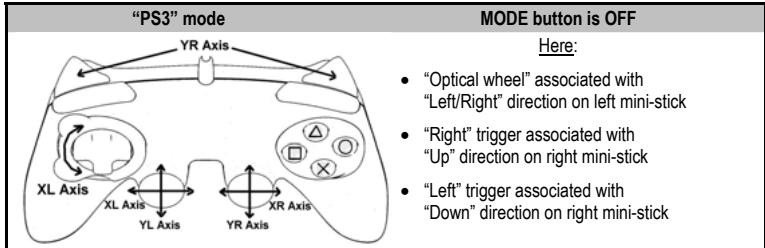
"AUTOMATIC PRESET" CONFIGURATION - PLAYSTATION® 3
Important notes for "PlayStation® 3":
-
On "PlayStation® 3", the MODE button must absolutely be "OFF" (and not red or green). To do so, press the button if necessary.
-
The "Run'N' Drive" gameplay does not feature a "motion sensor" or "PS" button, as does the official gameplay included with your console.
-
In "1 Player" mode: if your official gameplay is powered on, you must switch it to "controller port 2" for your "Run'N' Drive" gameplay to be functional.
-
On "PlayStation® 3", the "Run'N' Drive" gameplay is only compatible with "PlayStation® 3" games (and will not function with "PlayStation® 2" games).
-
To exit your "PlayStation® 3" games, use the "PS" button on your official gamepad.
PC
INSTALLATION ON PC
The CD-ROM included with this product allows you to install the Force Feedback drivers.
- Insert the installation CD-ROM into your CD-ROM drive. Follow the on-screen instructions to install the Force Feedback drivers. Once installation is complete, click Finish and restart your computer.
- Once your computer has restarted, connect the USB connector (12) to one of your computer's USB ports. Windows 98/Me/2000/XP/Vista will automatically detect the new device.
- The drivers are installed automatically. Follow the on-screen instructions to complete the installation.
- Select Start/Settings/Control Panel and then double-click Game Controllers (or Gaming Options, depending on your operating system).
The Game Controllers dialog box displays the gamepad's name with OK status.
-
In the Control Panel, click Properties to configure your gamepad:
-
Test device: allows you to test and view the buttons, D-pad and axes for the 2 mini-sticks, for the optical wheel and for the 2 triggers.
- Test forces: allows you to test 8 vibration effects and configure vibration effect settings.
You are now ready to play!
SELECTING THE NUMBER OF AXES ON PC
- Selection of axes via "Software": On page 1 of the Control Panel, click the number of axes you wish to use and then click OK.
- Selection of axes via "Hardware": Press the MODE button (8) to select the number of active axes.
3 "AXES" MODES AVAILABLE ON PC
"AUTOMATIC PRESET" CONFIGURATION - PC
"4 AXES" mode
MODE button is OFF
Here:
- "Optical wheel" associated with "Left/Right" direction on left mini-stick
- "Right" trigger associated with "Up" direction on right mini-stick
- "Left" trigger associated with "Down" direction on right mini-stick
"5 AXES" mode
MODE button is RED
Here:
"Optical wheel" associated with "Left/Right" direction on left mini-stick
- "Right" and "Left" triggers are now independent but combined between themselves
"7 AXES" mode
MODE button is GREEN
Here:
- "Optical wheel" is now independent
- "Left" trigger is now independent
- "Right" trigger is now independent
For a better idea of all the possibilities offered on PC, try them out in the Windows "Game Controllers" section
ADVANCED FUNCTIONS
ADJUSTING THE OPTICAL WHEEL'S SENSITIVITY
The optical wheel (2) has 2 sensitivity modes:
- Normal sensitivity (default mode)
-
High sensitivity (must be adjusted)
-
Adjustment for "High sensitivity" mode:
| Steps | Action | Color of MODE button |
| 1 | Raise and hold the “UP” direction on the optical wheel | Flashes Red 2 seconds |
| 2 | Press and release the MAPPING button (7) |
The optical wheel is now more sensitive
(Repeat this procedure each time you restart your console or disconnect the gamepad)
- Adjustment to return to "Normal sensitivity" mode:
| Steps | Action | Color of MODE button |
| 1 | Lower and hold the “DOWN” direction on the optical wheel | Flashes Green 2 seconds |
| 2 | Press and release the MAPPING button (7) |
The optical wheel has now returned to normal sensitivity (the default mode)
2 PROGRAMMING MODES
The PRESET button and LED (9) allows you to view the type of programming selected:
AUTOMATIC (preprogrammed) or MANUAL (programmed by yourself). A single press of this button allows you (even during the course of a game) to switch from one programming mode to another.
- "AUTOMATIC PRESET" (PRESET button OFF)
This represents the default programming: The functions of the optical wheel and the triggers are preprogrammed, as are the positions of the buttons and the directions of the mini-sticks and of the D-Pad.
PLEASE REFER TO THE "AUTOMATIC PRESET" CONFIGURATION DIAGRAMS
- "MANUAL PRESET" (PRESET button GREEN)
This represents your own personal programming:
- The buttons, directions of the mini-sticks and of the D-Pad can either be:
- Programmed on the optical wheel and on the triggers; or
- Switched between themselves.
- You can modify the programming to your liking and whenever you wish.
- The programming is automatically saved inside your gamepad (even when disconnected).
- When your "MANUAL PRESET" is clear, it is identical to the "AUTOMATIC PRESET".
PROGRAMMING THE OPTICAL WHEEL AND TRIGGERS
The 2 directions of the optical wheel and the 2 progressive triggers can be programmed using the MAPPING button (7).
Examples of possible applications:
Programming a button, direction of a mini-stick or of the D-Pad:
- onto the "up" or "down" direction of the optical wheel
- onto the "right" trigger or "left" trigger
- Programming procedure on optical wheel and triggers:
| Steps | Action | Color of PRESET button |
| 1 | Enable “MANUAL PRESET” (9) by pressing the button | Lit up Green |
| 2 | Press and release the MAPPING button (7) | Lit up Red |
| 3 | Press and release the button or direction to program | Flashes Red |
| 4 | Raise or lower the direction on the optical wheel Or press the trigger onto which you wish to place your function | Lit up Green |
Your "MANUAL PRESET" is now enabled and up to date (with your programming applied to the optical wheel or triggers)
SWITCHING BUTTONS/MINI-STICKS/D-PAD
All progressive buttons (on PS2 and PS3) or digital buttons (on PC), as well as directions of the mini-sticks and of the D-Pad can be switched using the MAPPING button (7).
Examples of possible applications:
- Switch buttons between themselves
- Switch the 2 mini-sticks
(in this case, you will to have to map the 4 directions of the first mini-stick to the 4 directions of the second mini-stick)
- Switch the D-Pad with a mini-stick
(in this case, you will have to map the 4 D-Pad directions to the 4 directions of the mini-stick in question).
- Procedure for switching buttons, mini-sticks and D-Pad
(does not work with the optical wheel and triggers, except for on PC in "7 axes" mode)
| Steps | Action | Color of PRESET button |
| 1 | Enable “MANUAL PRESET” (9) by pressing the button | Lit up Green |
| 2 | Press and release the MAPPING button (7) | Lit up Red |
| 3 | Press and release the button or direction to switch | Flashes Red |
| 4 | Press and release the button or direction onto which you wish to place your function | Lit up Green |
Your "MANUAL PRESET" is now enabled and up to date (with the 2 functions switched)
EEPROM MEMORY
- Your gamepad features an internal chip which serves to retain all of your "MANUAL PRESET" programming in memory (even when the gamepad is switched off or disconnected for a long period of time).
- You can save 1 different "MANUAL PRESET" for each system used (PS1, PS2, PS3, PC 4 Axes, PC 5 Axes or PC 7 Axes). The exception is for "PS3" and "PC 4 Axes", which use the same "MANUAL PRESET" (modifying or erasing one of these will have the same effect on the other).
TO ERASE A "MANUAL PRESET"
| Steps | Action | Color of PRESET button |
| 1 | Enable your “MANUAL PRESET” (9) | Lit up Green |
| 2 | Press and hold the MAPPING button (7) for 2 seconds | Flashes Green 2 seconds |
Your "MANUAL PRESET" has now been erased (and is identical to the "Automatic Preset")
TO RETURN TO "FACTORY SETTINGS"
You can erase all of your programming and settings with a single step:
| Steps | Action | Color of PRESET button |
| 1 | Press the MAPPING + SELECT + START buttons simultaneously | Flashes Green and Red 2 seconds |
All of your "MANUAL PRESETS" (= PC + PS2 + PS3) or settings have now been erased
Note: On PC, we recommend that you do not carry out this step while in a game.
POSSIBLE USES IN GAMES
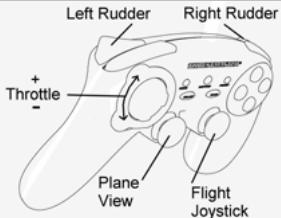
The optical wheel (thanks to its technology and degree of rotation greater than that of any mini-stick) offers unparalleled precision and stability in all types of games: racing (ultra-precise steering), flying (rudder), action and FPS (progressive zoom), sports (measured shot, strength of hit), etc.
The triggers (thanks to their progressive action and range of mechanical travel greater than that of any button) offer extremely precise control in all types of games: racing (progressive and independent acceleration and braking, handbrake), action and FPS (rate of fire, lateral movement), sports (measured pass or shot, strength of hit or jump, running speed), etc.
SOME EXAMPLES AND TIPS:
- There are numerous configuration possibilities, depending on the game you are playing.
- On PC, if a game does not accept your programming (undesired effects) in "5 or 7 axes" mode, switch your gameplay to "4 axes" mode (the standard mode).
- In certain (racing style) games, don't hesitate to test out the 2 sensitivity modes for the optical wheel (Normal or High) in order to optimize its precision and responsiveness.
DIFFERENT EXAMPLES ACCORDING TO TYPE OF GAME
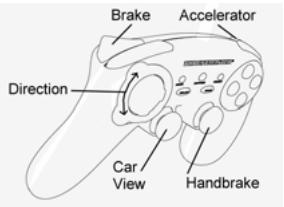
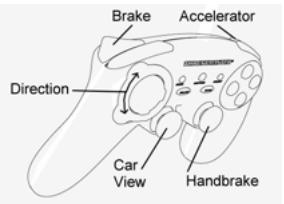
Action/Adventure ("Car" mode)

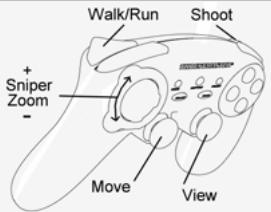
Action/Adventure ("On foot" mode)
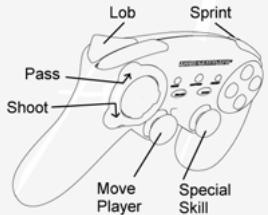
Sports ("Ball game" type)
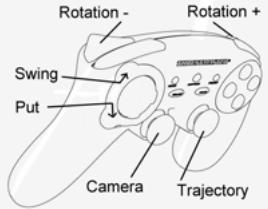
Sports ("Golf" type)
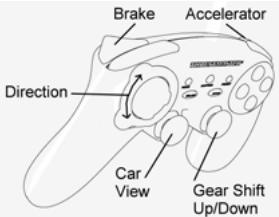
Car racing ("Simulation" type)
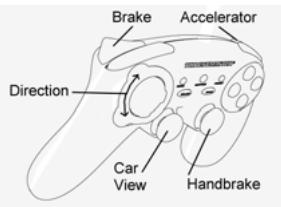
Car racing ("Arcade/Rally" type)
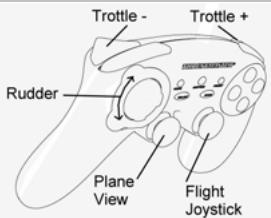
Flying ("Simulation" type)
Flying ("Arcade/Action" type)
TECHNICAL SUPPORT
If you encounter a problem with your product, please go to http://t'sthrustmaster.com and click Technical Support. From there you will be able to access various utilities (Frequently Asked Questions (FAQ), the latest versions of drivers and software) that may help to resolve your problem. If the problem persists, you can contact the Thrustmaster products technical support service ("Technical Support"):
By email:
In order to take advantage of technical support by email, you must first register online. The information you provide will help the agents to resolve your problem more quickly. Click Registration on the left-hand side of the Technical Support page and follow the on-screen instructions. If you have already registered, fill in theUsername and Password fields and then click Login.
By telephone:
| United Kingdom | 08450800942Charges at local rate | Monday to Friday from Noon to 4pm and 5pm to 10pmSaturday from 9am to Noon and 1pm to 7pmSunday from 9am to Noon and 1pm to 4pm |
| United States | 1-866-889-5036Free | Monday to Friday from 7am to 11am and from Noon to 5pm Saturday and Sunday from 7am to Noon (Eastern Standard Time) |
| Canada | 1-866-889-2181 Gratisuit / Free | Monday to Friday from 7am to 11am and from Noon to 5pm Saturday and Sunday from 7am to Noon (Eastern Standard Time) |
| Denmark | 80887690Free | Monday to Friday from 1pm to 5pm and 6pm to 11pm (English)Saturday from 9am to 1pm and 2pm to 8pm Sunday from 10am to 1pm and 2pm to 5pm |
| Sweden | 0200884567Free | Monday to Friday from 1pm to 5pm and 6pm to 11pm (English)Saturday from 9am to 1pm and 2pm to 8pm Sunday from 10am to 1pm and 2pm to 5pm |
| Finland | 0800 913060Free | Monday to Friday from 2pm to 6pm and 7pm to Midnight (English)Saturday from 10am to 2pm and 3pm to 9pm Sunday from 11am to 2pm and 3pm to 6pm |
WARRANTY INFORMATION
Worldwide, Guillemot Corporation S.A. ("Guillemot") warrants to the consumer that this Thrustmaster product will be free from material defects and manufacturing flaws for a period of two (2) years from the original date of purchase. Should the product appear to be defective during the warranty period, immediately contact Technical Support, who will indicate the procedure to follow. If the defect is confirmed, the product must be returned to its place of purchase (or any other location indicated by Technical Support).
Within the context of this warranty, the consumer's defective product will, at Technical Support's option, be either repaired or replaced. Where authorized by applicable law, the full liability of Guillemot and its subsidiaries (including for indirect damages) is limited to the repair or replacement of the Thrustmaster product. The consumer's legal rights with respect to legislation applicable to the sale of consumer goods are not affected by this warranty.
This warranty shall not apply: (1) if the product has been modified, opened, altered, or has suffered damage as a result of inappropriate or abusive use, negligence, an accident, normal wear, or any other cause not related to a material defect or manufacturing flaw; (2) in the event of failure to comply with the instructions provided by Technical Support; (3) to software not published by Guillemot, said software being subject to a specific warranty provided by its publisher.
Additional warranty provisions
In the United States of America and in Canada, this warranty is limited to the product's internal mechanism and external housing. Any applicable implied warranties, including warranties of merchantability and fitness for a particular purpose, are hereby limited to two (2) years from the date of purchase and are subject to the conditions set forth in this limited warranty. In no event shall Guillemot Corporation S.A. or its affiliates be liable for consequential or incidental damage resulting from the breach of any express or implied warranties. Some States/Provinces do not allow limitation on how long an implied warranty lasts or exclusion or limitation of incidental/consequential damages, so the above limitation may not apply to you. This warranty gives you specific legal rights, and you may also have other legal rights which vary from State to State or Province to Province.
COPYRIGHT
© 2007 Guilemot Corporation S.A. All rights reserved. Thrustmaster® is a registered trademark of Guilemot Corporation S.A. Playstation® is a registered trademark of Sony Computer Entertainment, Inc. Windows® and Windows® XP are registered trademarks of Microsoft Corporation in the United States and/or other countries. Pentium® is a registered trademark of Intel Corporation. All other trademarks and brand names are hereby acknowledged and are property of their respective owners. Illustrations not binding. Contents, designs and specifications are subject to change without notice and may vary from one country to another. Made in China.

ENVIRONMENTAL PROTECTION RECOMMENDATION
At the end of its working life, this product should not be disposed of with standard household waste, but rather dropped off at a collection point for the disposal of Waste Electrical and Electronic Equipment (WEEE) for recycling.
This is confirmed by the symbol found on the product, user manual or packaging.
Depending on their characteristics, the materials may be recycled. Through recycling and other forms of processing Waste Electrical and Electronic Equipment, you can make a significant contribution towards helping to protect the environment.
Please contact your local authorities for information on the collection point nearest you.
FAQs, tips and drivers available at www.thrustmaster.com
"PLAYSTATION® 2" MODUS
INFORMATIE MET BETREKKING TOT DE GARANTIE
PykoBODCTBWO noIb3ObaTeTn
TEXHUNECKNEXAPAKTEPNCTIKN
- 2 nponopuOHOaIbHbIx aHaIaONoBbIX MNHNJXoJICTKIA +2 UcMDpOBBe I KOMaHdHbIe KHOpKn
2.Прорюнаньнoi ONTNueckmДaTNK
3.Плоронционьнловпгггрс. - Поронорц�ильный павьт ртугэн.
- ManinnyIaTOp D-Pad
- Komahdhye KhoTIK
- KhoNka MAPPING (PEPEONPDEJELHNE) (Длгпрогамmarpoвань)
8.Khonka MODE (PEXIM) cHnDnkauene (IЯь bIbopa cnCTeMbI nII KOnIyueCTBa ocEi)
9. KhoPiKa PRESET (IPEyCTAHOBKM) c Hndmkaunei
Tenepb MoXHO NaHnHaTbIrpy!
BHIMAHHE 3APNEUAETCIPOKJIIOUYb PA3bEM USB (12) K PLAYSTATION® 2 (o u36e汗ue noepzdeHua zepo0o KoHmpnpepa Ulu KOHcnu)
Tenepb MoXHO NaHnHaTb Hpy!
PEXMM“PLAYSTATION®3”
KOHФИГУРALДА “ABTOMATUNCHECKIЕ ПЕДУCTAHOBКIN” - PLAYSTATION® 3
Baxhnbie 3ameuHnno pa6oTe c "PlayStation® 3"
-B npicstabke"PlayStation@ 3", KhoNka MODE donKHa b6bTB BByIKJIHOUEHA (He cBeTntcHn KpcahbIM, Hn 3eJeHbIM). Дял STOrO priNe Heo6xOДMooCTn HaxMHTe KhoNkY.
-BKoHTpOJIpee"Run'N'Drive"OTcYCTbYeT《dAaMkDnBxKeHnEA》N KHOIIKA"PS",ImeUIOIEeC B OΦmuaJIbHoB BepCMN KOHTpOJIpeA, BXoJaIeBO KOMPiNEKT KOHcONI.
- B pexime ondoro irpoka "1 Player": Ecni KOnTpornlep (odmuaIbnaHaeBepcna) BKIOHe, Heo6xOIMO nepeknioht erho ha controller port 2", tO6bl KOnTpornp" Run'N Drive" paobtan.
-Bnpictabke"PlayStation ⑧ 3",KoHTpolJIep"Run'N'Drive"coBMeTmTOIbKOcHrpAMnDnA "PlayStation ⑧ 3"
(и He byeDt paBoToTaB cnrgpamn "PlayStation® 2")
-ДяВьхаяиnp"PlayStation®3"noьзутесьКнок"PS"КоНрллпаофицальов Всим.
#
IIOKIIIOUCHENKII
CD-ДИСК, NOCTABLЯМь CиДЕЛЯМ, NO3ВОЛЯТ yctaHOBITb ДраИБеры Force Feedback (силобовoi obpaTHOн CB73N).
- BCTABteY cTahOBOHbY CD-IMCK B pRnOB CD IMCKOB. Iyra TcAHOBKn dApaiBePOB Force Feedback BbIOnHne IHNCTpyKUHN, KOtOpBE 6byyt NOrBNaTbc HA kPAne. Pocne 3abepeHne yctAHOBKn HAXMMTe Finish (3AKoHHTb) n nepearpY3te KOMbHToep.
- Поссе того, касКьтETe aarpy3ntcR, NOCDcoEINHnTE pa3bEm USB (12) K OndHMy n3 noptOB USB
На KMьнБуTepe.ОпетациHьile CnCTeMbI Windows 98/Me/2000/XP/Vista abTomaTneckn
obharyXkT HOBoe yctpoCTBO.
3.Драьевы yctahabimbaotca abTomatueckn.ДязabepseHЯ npocecca yctahOBKn BblnoHЯ Te HNCTpykUn, KOTOpbIe 6ydyT NOBJIaTcHa 3KpaHe. - NocleboBantbHO BbIbepHTe nyHKTb MeHIO Start (Nyck)/Settings (Hactpoika)/Control Panel (PanEnb ynpaonb), noCte Yero DaaKbI bIeKNHITe KONK MObln HA NyHKTe Game Controllers (UrpOblc yctpObnCTBa) (INN Gaming Options (NapametbIr np), B3abNCIMoCTOn OT yCTAHOBENHO OnepaLIOHNCH CInTeMb).
B duano2o8om okHe Game Controllers (Mapobie ycmpoucmea) 803ne umehu u2po8o2o KOhmponnepa bydem omobpaxeHo cocmohue OK.
- B OkHe Control Panel (Пань уралени), Быберпгунк Properties (Своства) в Вилине Кондуриpoоваме Исторо Контолпера.
KhoNika Test device (PpOBepnB yctpoCTBO): PO38OJIaET O3HAKOMNTcC KHOJIKAMM HrpoBOro KOtropJIepe, MaHInyIaTOpOM D-pad, ocAIM 2 MmH-IXKOHTKOB, ONTHeCKIM KOIEcKOMM u 2NyCKOBbIMK HOJIKAMM, a TAKKE PpOBepnB Hx pa60tocOcO6HocTb.
Khoika Test forces (IpoBepntb obaatnyo c83b): no3boJraT npOBepntb 8 9fpeKTob Bn6paunu Hactpontb ux dnn IcnoJIb3OBAHn.
Tenepb MoXho HauHnatb irpy!
BbIBOP YINCSIA OCEHNAIK
Khonka MODE BbIKJIOUeHA
3decb:
- OπTmUeCKn DaTnK COOTBETCTBYET KHOJIkAM BnEBo/BnpaBO'Ha Na IeBoM MInHn-DxOHTKe
- «Павын» Трирет соовтбут
Нарравенko«Верхь» праboro мнд
Джостда
«Левы» Трuntrep COOTBETCTBYET
нанразьгелно «Виз» на павов мнИ-
ДжоэntIKE
Pexim"5OCEI
Khoika MODE cBETITcK PACHbIM
3decb:
Ottuueckn daTtuk COOTBETCTBYE KHOIKAm BBeBO/BnpaboHa NEbOM MHNH-DKIOCTMKE
TenebpI《IpaBm》N《LebmyTPIRREpbI He3aBcMmbI DpyrO tDpyra, HO CKOM6MHIOBAHbI DpyrC dpyROM
Pexum"7OCEI
Khonka MODE cbetntc3JEHEbIM
3decb:
ДЛЯ BO3BPATA K 3ABODCKIM HACTPOИКAM
BbMOKeTe ydaJIntb cpa3y BCE nIb3ObaTeJIbckne HAcTPOKn OdHM DeiCTBnEM:
Action/Adventure (peXIM "TpaHcNopT")
Action/Adventure (peKIM "Peeuin")
Cnopt(mPbICMRAHOM)
Cnopt(ronb)
ABTOHKN (CIMyIaTOpbl)
ABTOROHKn (apkaIb/paIIIN)
Ponet(CmymyTopb)

Ponet (apkaab)
TEXHnueCKA NOIDEPKKKA
ПИ ВОЗн��овени npo6bem.Cаьвпьх x Cнлгьоьавиим KOHTPONJIpe,ЗаддуН АБЕ-сай http://ts.trustmaster.com И поердатно сьынke Technical Suppleting (Tsechuackn noDapeKx).Ha 3toi Stpahniue ectb doctyn k pazmnhim ytwnitam (ahtc 3aadaabaembe BONPOcsi (FAQ),cambte hobbe bceprm dpaivBepor n oprpammmHoro obcepeNnE) -3TO moKET nomOybe peueHHIO npo6bembl. EcnI 3To He nobOMI,MOKHO CB8ATsC co cnkyxho TneYeCKN noDapeKx Thrustmaster ("Technical Support"):
No 3JNEKTPOHHN NOUTe:
Tc0b6IOTOpBBA3ZPACO B OTdEN TExHmecck ONDpeDpKNN O NtEeKPOHOH NOyTE, Heo6xOIMO azeepMCTropOBaTcB. IpeOcTaBnEHNAH HmOpMaPAuN NOMOKET bSCTpee peunbT pno6neM. PepeJUte No cSbIke Registration (peHcTpaUN). KOTOPA hXoDMTC S CNEBa HA tCpAHNe TExHmecck ONDpeDpKNN Technical Support i cnedeYite HnctpyuKMM Na kXeAe. EcnI bI yKe 3apERiMtCPRIOBaNbI, BBeDITME HmN oNt3oBATEn nnapOn, 3aTeM UeJIKNHTe Logn (bxO).
INHΦOPMAUJRA O TAPAHTN
B0 Bexc 3pAxAK, Kopnoprana Guillemot Corporation S.A. (Guillermot) dae raptanHIO na HENDAI Thrustmaster B TOM,TOY 3TN iN ENDRA HE IMEOT DEPKEKTO MATEPANAO INN pNO38OCTBA HA (2) roda O dtalb NOKYNIK. Pm 6bnapyekheni DepekTA B TceHIM RApaHTIWHO CPOCA HeMeDNEHNO CBRYKITEb CO cSyKboT ETHMNCECKo NOdEPKKN, KOTOPAR 4a3yHNCT NoCNEATBHeONCTBDeCTBN. Ecn DepeKT noDTBepdntcA, HENDAI He6xODIMOBepHybNo MeCTY nnpObeTENNAIN DpyrOye, kAAaHHoe CnykBOg TNETHEKNEQ NO dKePPK).
ECNHmncnpaHoe 3eIeJeNo nnonaadTnO npocyraRapAHNTN, OHO 6ydt NIO 6aMeHNO, NIO 0eTpEMPOHTNBOA. PnI HauHnUc perynnpUoIeTO zakoHDoTeBCTBA, HAMbONbUAO NTBETCTBEHNHOCTB (BKNIOJAA KOCSEBHHe YbIKTN) KORnpaUM Guilemot n ee doepHnX npedPnTMyOr APOnHHeY pemOHToMn IIN MAneMOH Tne 3eIeHn Thrastmaster. OpDInecKeMH npBa nortpeBteHn BtOHOuHmNzAOHDATEbCTBA, pnpMeHIMO K pOdoJxam nortpe6bTeBCKHX ToBAPoH He BnIKOT Ha ykaah3hne rapAHNTNbIE o6baTeBCTBA.
37a rapatnHHe na pCapncOCTpAraHETc: (1) Hn 3eJINn MOndiMIOUPOBANHbIe, BCKbIbIte, DApOABOTAHNBE INI NOBpeKdHBeHBe Bpe3yJIte Tne HapPBNHOro nIn Ipy60r oBaOpEHH, HecMOPTerIbHTocHt, HecACTHRNO cTouyAR, HOPMaHOrHO hNcOHa, INI IMeOIOme IIOBOI pyTOI DeFKeHT, K He CBzAHHbI C KaYCTBOM MATEpNA IIN M3rOteNHmR; (2) B cyuYae Hec6oBIOHNeHN IITcPKUIN, BaIbAHNIX TeNtckOH NOpeDkXK; (3) Na pOrpAMMbHBe npOdyKtI, Ppa4oBToANTHHBe HE Guillemot, pCapncOPTaHETc RApatnHOrO/OTBeTcBEHcHObT, paPa4oTbNK aPpORMM.
ABTOPCKME IIPABA
© 2007 Guillemot Corporation S.A. BCE npaba aazaunheh. Thrustmaster® JIaIEETA zapeHCTPPOBAHbIM TOBAPHM 3HAOK Guillemot Corporation S.A. PlayStation® JIaIEETCA zapeHCTPPOBAHbIM TOBAPHM 3HAOK Computer Entertainment, Inc. Windows® et Windows® XP JIaIEOTCA zapeHCTPPOBAHbIM TOBAPHM 3HAKAM Microsoft Corporation B CIUA i dpyrnx cTpaHX. Pentium® JIaIEETCA zapeHCTPPOBAHbIM TOBAPHM 3HAOK Intel Corporation. BCE zapeHCTPPOBAHbIM TOBAPHbIM 3HAKNi TTOBIOBE MAPKIN JIaIEITCA CO6CTBENHOCTbIO COOTBTCTBYOUMX bnaJIeueS. VInIOCTPAUHN MOrYt HE NIOHOCTbIO COOTBTCTBOATb peALbHIbM IADJIeNMI. CoDEpXAHne, TEChHHeCKHe XapakTeRcNTMn HfynHKm MOrYt N3MeHtbc6e3 PpeyIpyKeDHeNn O tOIIHbATCbI rAanrOHTbIX CTpAH.NsroTobHEo B KItae.
PEKOMEHDAUINIPO3AUHTEOKPYKAIOUCECPEdi

PocneOkohanyika cpoka cnkybbl DaHoe 3dJeHne CnNeyETyTRNHNPOBAtB MBeCTe C bStOBtBM MycopoM, BO HNTKIE cOba OTXoDB NkTKePNrCEKO H NkTePOTHORO OOBpDyABm
DAnHue Oy3aHnOtBpKdAeTc COoBbETcByoUIM CMBOIOMN, HAnHeCHeHbM HA3EJIne, pykoBDCTBO NIO3OBATEINI INYKAOBY.
B 3aBcImOCTN OCBIOCTB, MATEPnAbI MOYr nepeBaTaBCA B NOBTOPhyHO nepepa6Otky.
TOBTHAPNEpBaTOn 0xTOD8N3EKNPTeCKFOI N3EKNPTOHORO O6OpYBOAHAN MOKET BHECTNHTIELbHbN KBLAD N COXPAHENDE OKPYKAIOUIE CpeDLs.
6bpaTInTeCb B MeCTbIe opraHbI BlaCTn 3a HNΦOpMauHei O 6nXaHMe mnyKTe npHema TAKNX OTXoOB.
- SAFETY NOTICE
- PLAYSTATION® 2
- INSTALLATION ON PLAYSTATION® 2
- "PLAYSTATION® 2" MODE
- PLAYSTATION® 3
- INSTALLATION ON PLAYSTATION® 3
- "PLAYSTATION® 3" MODE
- Important notes for "PlayStation® 3":
- PC
- INSTALLATION ON PC
- SELECTING THE NUMBER OF AXES ON PC
- "AXES" MODES AVAILABLE ON PC
- "AUTOMATIC PRESET" CONFIGURATION - PC
- MODE button is OFF
- MODE button is RED
- MODE button is GREEN
- ADVANCED FUNCTIONS
- ADJUSTING THE OPTICAL WHEEL'S SENSITIVITY
- PROGRAMMING MODES
- - "AUTOMATIC PRESET" (PRESET button OFF)
- - "MANUAL PRESET" (PRESET button GREEN)
- PROGRAMMING THE OPTICAL WHEEL AND TRIGGERS
- Examples of possible applications:
- - Programming procedure on optical wheel and triggers:
- SWITCHING BUTTONS/MINI-STICKS/D-PAD
- - Procedure for switching buttons, mini-sticks and D-Pad
- EEPROM MEMORY
- TO RETURN TO "FACTORY SETTINGS"
- POSSIBLE USES IN GAMES
- SOME EXAMPLES AND TIPS:
- DIFFERENT EXAMPLES ACCORDING TO TYPE OF GAME
- TECHNICAL SUPPORT
- By email:
- WARRANTY INFORMATION
- Additional warranty provisions
- COPYRIGHT
- ENVIRONMENTAL PROTECTION RECOMMENDATION
- "PLAYSTATION® 2" MODUS
- INFORMATIE MET BETREKKING TOT DE GARANTIE
- TEXHUNECKNEXAPAKTEPNCTIKN
- PEXMM“PLAYSTATION®3”
- KOHФИГУРALДА “ABTOMATUNCHECKIЕ ПЕДУCTAHOBКIN” - PLAYSTATION® 3
- Baxhnbie 3ameuHnno pa6oTe c "PlayStation® 3"
- #
- IIOKIIIOUCHENKII
- BbIBOP YINCSIA OCEHNAIK
- ДЛЯ BO3BPATA K 3ABODCKIM HACTPOИКAM
- TEXHnueCKA NOIDEPKKKA
- No 3JNEKTPOHHN NOUTe:
- INHΦOPMAUJRA O TAPAHTN
- ABTOPCKME IIPABA
- PEKOMEHDAUINIPO3AUHTEOKPYKAIOUCECPEdi
Brand : THRUSTMASTER
Model : RUN'N' DRIVE 3-IN-1 RUMBLE FORCE
Category : Video game accessory