
MFD COUGAR PACK - Flight simulation accessories THRUSTMASTER - Free user manual and instructions
Find the device manual for free MFD COUGAR PACK THRUSTMASTER in PDF.
| Product Type | Flight simulation accessory – replica of F-16 MFDs |
| Brand | Thrustmaster |
| Model | MFD Cougar Pack |
| Category | Flight simulation accessories |
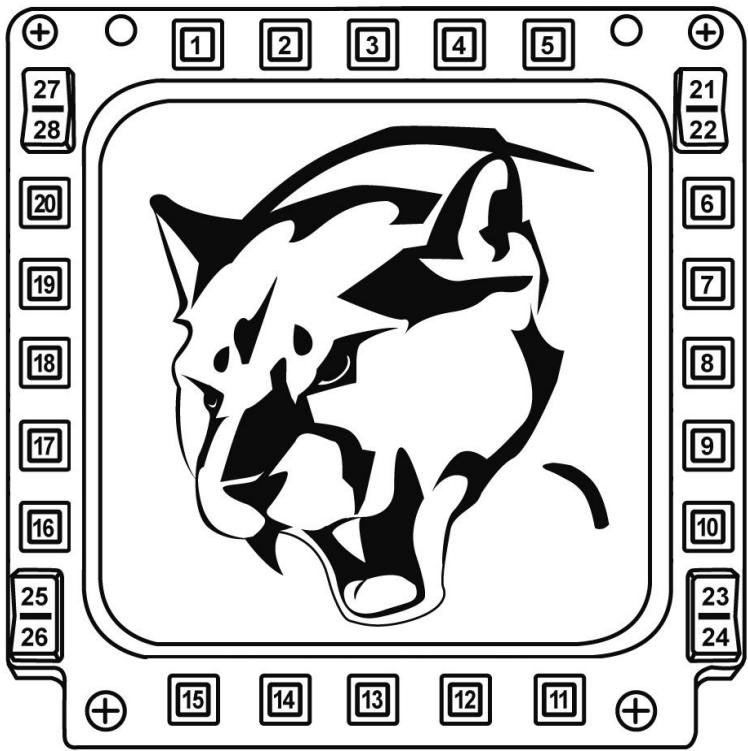
| Number of programmable buttons per MFD | 28 (20 buttons + 4 switches) |
| Backlighting | Adjustable via software (Thrustmaster Control Panel) or via hardware (key combination 14+15+25/26) |
| Identification LEDs | 2 programmable LEDs per MFD to distinguish up to 8 MFDs |
| Internal memory | Yes – saves settings (name, number, intensity, LED status) |
| PC compatibility | Windows XP, Vista, 7 (32/64-bit) |
| Maximum number of simultaneous MFDs | 8 |
| Connectivity | USB (each MFD has its own USB connector) |
| Included plug-in | For Flight Simulator 2004 and Flight Simulator X (3 profiles: generic, light aircraft, airliner) |
| Tilt adjustment | Yes, via adjustable mounting brackets (angles 39°, 54°, 72°) |
| Mounting | Detachable base + adjustable brackets + mounting system for screen or cockpit |
| Included accessories | 2 plexiglass windows, 2 removable brackets, 4 screw hole covers, FSX cardboard inserts |
| Installation | CD-ROM with drivers; plug in USB after restart |
| Technical support | Online (ts.thrustmaster.com) , email and phone (depending on country) |
| Warranty | 2 years against material and manufacturing defects |
| Maintenance and cleaning | Wipe with a soft dry cloth. Do not use chemical products. |
| Safety precautions | Connect only to compliant USB ports. Do not expose to moisture. |
Frequently Asked Questions - MFD COUGAR PACK THRUSTMASTER
User questions about MFD COUGAR PACK THRUSTMASTER
0 question about this device. Answer the ones you know or ask your own.
Ask a new question about this device
Download the instructions for your Flight simulation accessories in PDF format for free! Find your manual MFD COUGAR PACK - THRUSTMASTER and take your electronic device back in hand. On this page are published all the documents necessary for the use of your device. MFD COUGAR PACK by THRUSTMASTER.
USER MANUAL MFD COUGAR PACK THRUSTMASTER
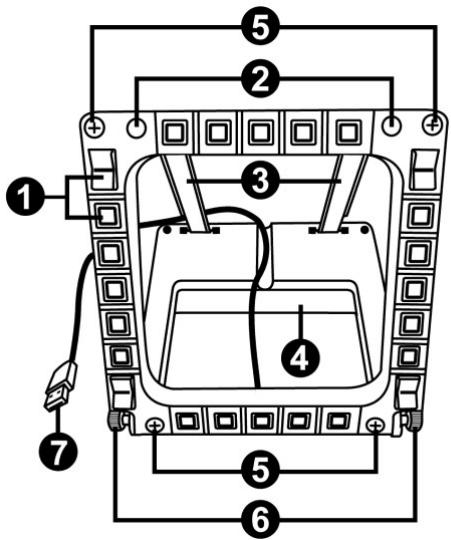
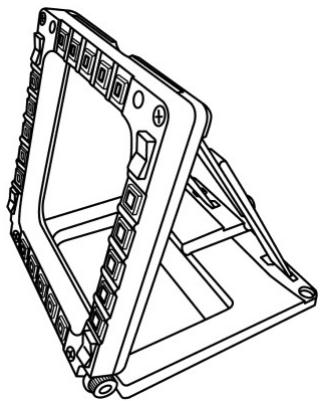
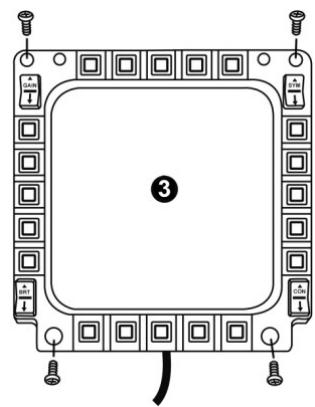
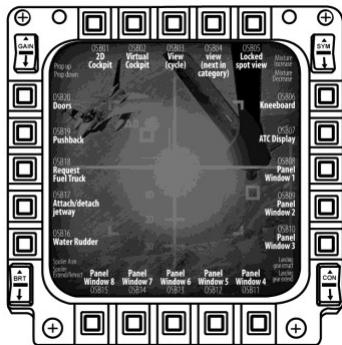
- 28 backlit programmable buttons
- 2 programmable identification LEDs
- 2 adjustable attachment rods
- Removable base
-
4 bore covers
-
2 attachment thumbscrews
- USB connector
- 2 removable rod attachment screws
- Rod attachment system
- Removable rod
11.2 Plexiglas windows
GETTING TO KNOW YOUR MFD COUGAR
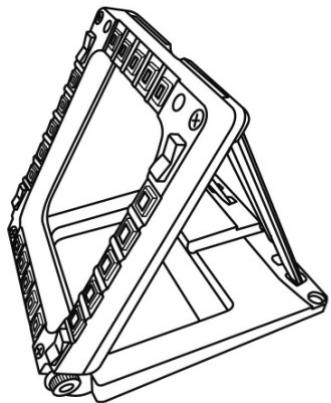
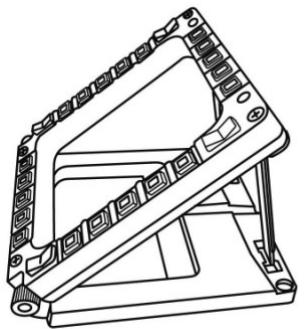
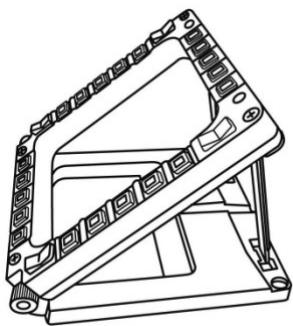
The THRUSTMASTER MFD COUGAR is the exact replica of the MFDs equipping U.S. Air Force F-16 fighters.
Each MFD COUGAR features 20 buttons and 4 switches, i.e. 28 buttons per MFD in total! The MFD's features enable you to allocate advanced keyboard or mouse controls to the device and to emulate various flight instruments, for enhanced gaming realism.
THRUSTMASTER is the creator of the HOTAS COUGAR and T.16000M simulation joysticks.
INTERNAL MEMORY
Each MFD COUGAR features an internal memory.
All personal settings (MFD identifier and number, backlighting intensity, identification LED status) will automatically be saved in the device's memory.
This way, all settings and preferences are retained if you choose to connect your MFD COUGAR to another computer.
BACKLIGHTING
The backlighting intensity can be software-adjusted, via the Thrustmaster Control Panel, or hardware-adjusted, directly from within the game.
2 IDENTIFICATION LEDs
Each MFD features 2 identification LEDs, enabling you to tell the devices apart.
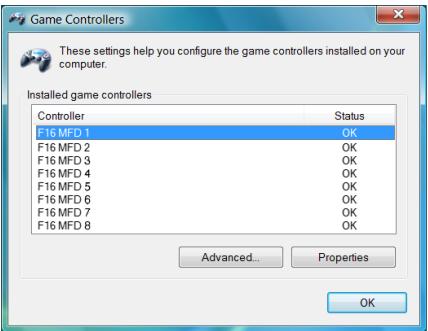
SIMULTANEOUSLY COMPATIBLE WITH UP TO 8 MFD COUGARS
The Thrustmaster Control Panel's advanced options enable you to adjust and control up to 8 MFDs simultaneously. Each MFD is therefore fully personalised and identifiable.
PHYSICAL ADJUSTMENT
The MFD COUGAR's base and window are mobile (for optimum comfort and visibility) and removable (enabling users to attach them to a cockpit or a computer display).
ACCESSORIES AND GAMES COMPATIBILITY
The MFD COUGAR is compatible with all currently available controllers, joysticks and yokes, as well as all PC simulation games (both military and civil) supporting multi-USB connectivity.
FLIGHT SIMULATOR X / FLIGHT SIMULATOR 2004 PLUG-INS
The included plug-ins enable you to instantly configure both MFD COUGARs for these games.
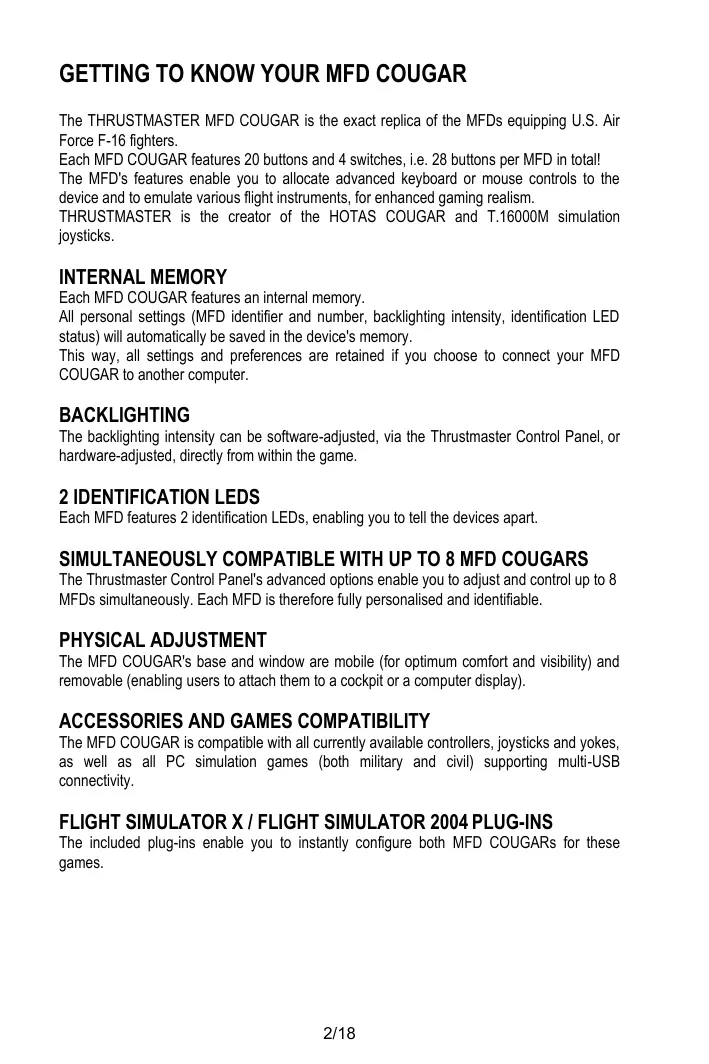
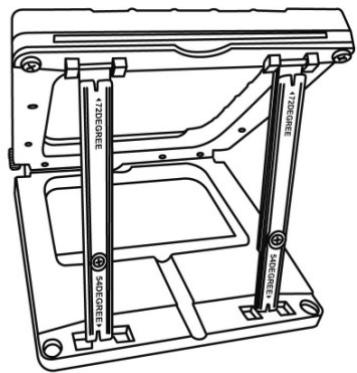
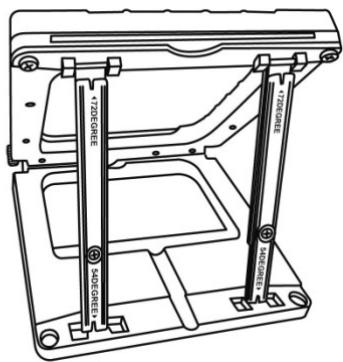
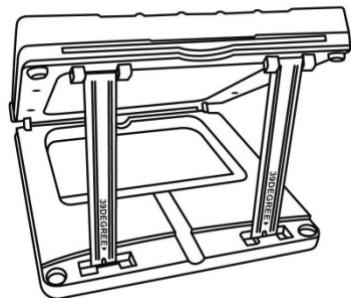
ADJUSTING THE MFD'S ANGLE ON THE BASE
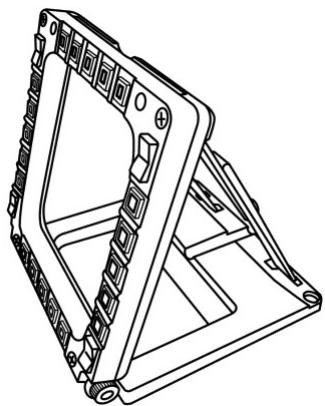
When the MFD is attached to the base (4), its angle can be adjusted to 72, 54 or 39 degrees.
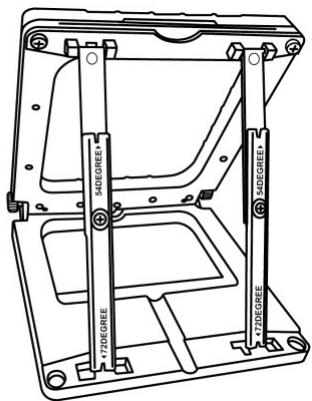
The attachment device (3) is comprised of 2 rods that can be set at an angle or removed:
- One long rod (featuring the indications 72DEGREE and 54DEGREE)
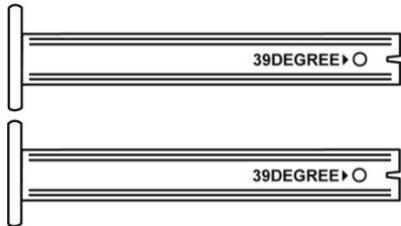
- One short rod (featuring the indication 39DEGREE)
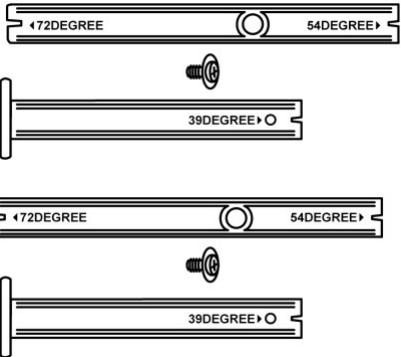
ADJUSTING THE ANGLE TO 72 DEGREES
- Place the attachment rods (3), with the 72DEGREE indication facing down (if required, slightly loosen the centre screw to facilitate angle adjustment).


- Insert the upper end of the rods in the attachment system (9) located at the back of the MFD, on the device's upper side.
- Attach the lower end of the rods to the back of the base, then tighten the 2 attachment thumbscrews (6).
ADJUSTING THE ANGLE TO 54 DEGREES
- Place the 2 attachment rods, with the 54DEGREE indication facing down (if required, slightly loosen the centre screw to facilitate angle adjustment).
- Insert the upper end of the rods in the attachment system (9) located at the back of the MFD, on the device's upper side.
- Attach the lower end of the rods to the back of the base, then tighten the 2 attachment thumbscrews (6).
ADJUSTING THE ANGLE TO 39 DEGREES
- Loosen the centre screw, then remove all the rods.

- Place the short attachment rods, with the 39DEGREE indication facing down.
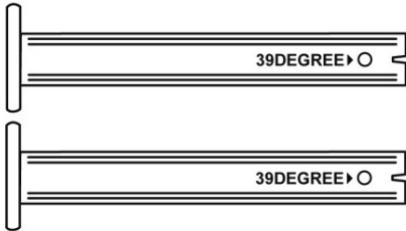
- Insert the upper end of the rods in the attachment system (9) located at the back of the MFD, on the device's upper side.
- Attach the lower end of the rods to the back of the base, then tighten the 2 attachment thumbscrews (6).
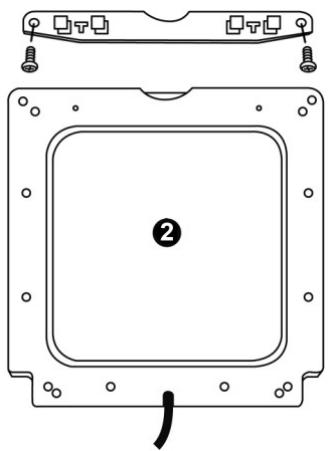
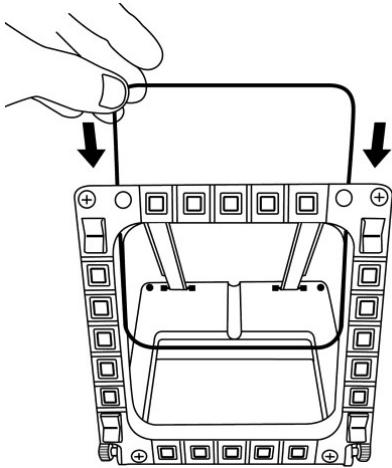
ATTACHING THE MFD TO A COCKPIT OR A SCREEN
1) Detach the attachment rods and remove the MFD from the base by fully unscrewing the 2 attachment thumbscrews (6).
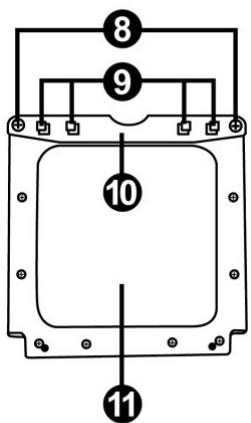
2) Detach the removable rod (10) located at the back of the MFD, on the device's upper side, by fully unscrewing the 2 attachment screws (8) located to either side.
3) Remove the 4 bore covers (5) by pushing them out from the back, using a thin screwdriver or a pin.

You can now attach the MFD using the 4 bores.
PERSONALISING THE MFD COUGARS
- Insert the 2 included Plexiglas windows (11) in the relevant slot located at the top of the MFD COUGAR.

- Between the 2 Plexiglas windows, insert the relevant graphic or one of the cards supplied with the pack.
NOTES:
- Flight Simulator X cards (available in English only) are included in this pack.
-
You can also download and print cards for the Flight Simulator 2004 plug-in and other cards from the following website:
-
http://ts.thrustmaster.com/
PC INSTALLATION
System requirements:
PC (Windows® XP, Windows® Vista, Windows® 7) featuring 2 USB ports
The CD-ROM included with this product is designed for driver installation.
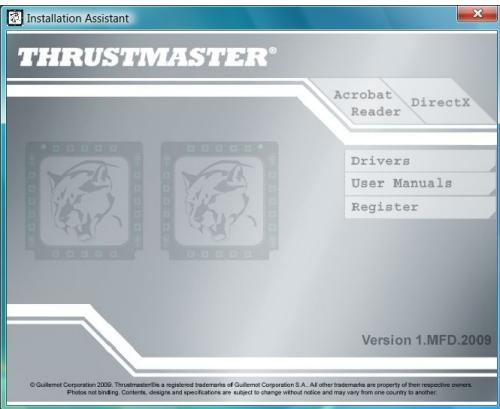
- Insert the installation CD-ROM in your CD-ROM drive. The installation wizard automatically appears onscreen (if the installation program doesn't launch automatically, access My Computer, then click twice on the CD-ROM drive icon; if necessary, double-click the file Setup.exe).
- Click on the DRIVERS button to launch the driver installation sequence.
- Once the installation is finished, click Finish and restart your computer.
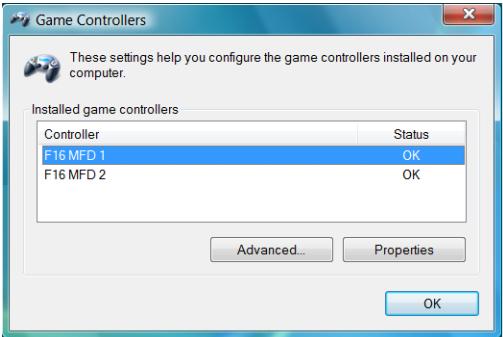
- Once your computer restarts, connect the MFD COUGAR's USB connectors (7) to your PC's USB ports. Windows® automatically detects the new devices.
- Driver installation occurs automatically. Follow the instructions displayed onscreen to finalise the installation.
- Select Start/Programs/Thrustmaster MFD COUGAR to access the Thrustmaster Control Panel and Flight Simulator 2004 / Flight Simulator X plug-ins.
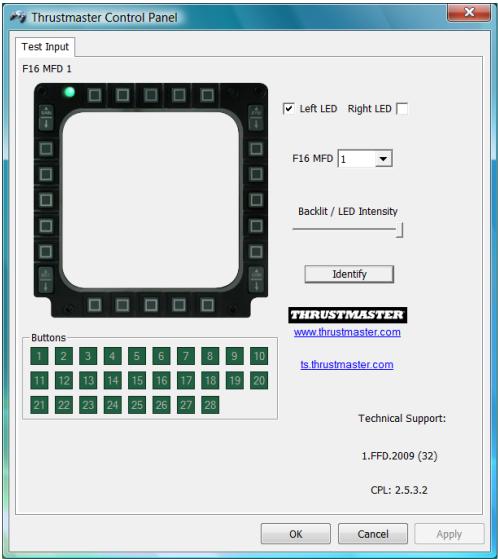
THRUSTMASTER CONTROL PANEL
- Select Start/Programs/Thrustmaster MFD COUGAR/Control Panel.

Thrustmaster MFD Cougar

Control Panel

Plug-In FLIGHT SIMULATOR 2004

Plug-In FLIGHT SIMULATOR X

Uninstall
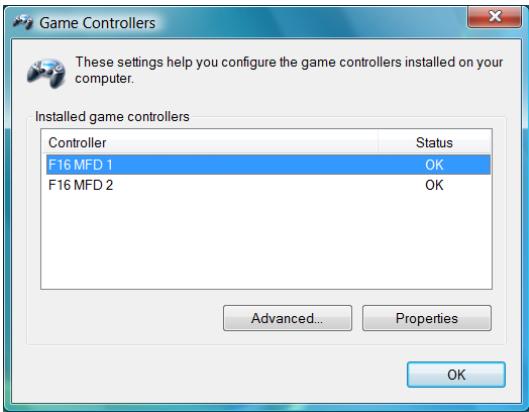
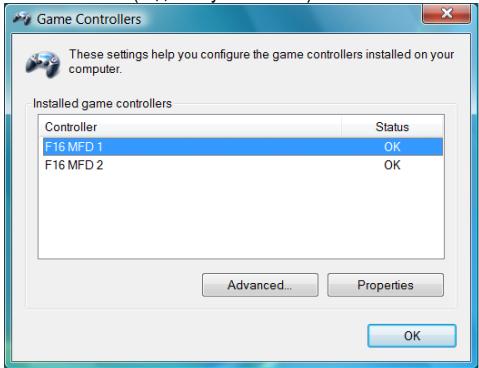
- The Game Controllers dialog displays the 2 MFD's default name (F16 MFD 1 and F16 MFD 2) with the status indication OK.

- Click on Properties to configure your MFD.
IDENTIFYING YOUR MFD COUGAR
When you open the Control Panel, the relevant MFD's name flashes for 2 seconds, enabling you to tell it apart from the other devices.
If you click on the Identify tab, the relevant MFD starts flashing, allowing you to locate it easily.
All buttons' and identification LEDs backlighting can be software-adjusted or hardware-adjusted.
ADJUSTING THE BACKLIGHTING FEATURE USING SOFTWARE
- In the Thrustmaster Control Panel, select the Backlit / LED Intensity tab.
ADJUSTING THE BACKLIGHTING FEATURE USING HARDWARE
(To adjust backlighting when playing)
- Simultaneously press buttons 14 + 15 + 25 to increase backlighting intensity
- Simultaneously press buttons 14 + 15 + 26 to increase reduce backlighting intensity
2 IDENTIFICATION LEDs
The MFD COUGAR features 2 LEDs (2), enabling users to easily identify and recognise the relevant MFD.
Unless configured otherwise, both LEDs turn on or off according to the selected MFD's name
| NAME and NUMBER of MFD | LEFT- HAND LED | LED RIGHT | LOCATION in a cockpit |
| F16 MFD 1 | ON | OFF | LEFT-HAND MFD no. 1 |
| F16 MFD 2 | OFF | ON | RIGHT-HAND MFD no. 1 |
| F16 MFD 3 | ON | ON | LEFT-HAND MFD no. 2 |
| F16 MFD 4 | OFF | OFF | RIGHT-HAND MFD no. 2 |
| F16 MFD 5 | ON | OFF | LEFT-HAND MFD no. 3 |
| F16 MFD 6 | OFF | ON | RIGHT-HAND MFD no. 3 |
| F16 MFD 7 | ON | ON | LEFT-HAND MFD no. 4 |
| F16 MFD 8 | OFF | OFF | RIGHT-HAND MFD no. 4 |
and number:
This default mode can be modified by activating or deactivating the Left LED and Right LED options in the Thrustmaster Control Panel.
USING MORE THAN 2 MFD COUGARS SIMULTANEOUSLY
The Thrustmaster Control Panel can simultaneously manage up to 8 MFD COUGARs connected to one same PC.
-
If you are using more than 2 MFDs simultaneously (and only in this event), access the F16 MFD tab and select the relevant MFD number.
-
Click OK.
- After performing this operation, the relevant MFD automatically disconnects from the computer before reconnecting with its new number.
NOTE:
We recommend that you only modify the MFD number if using more than 2 MFD COUGARs simultaneously.
BUTTON CONFIGURATION AND LOCATION
FLIGHT SIMULATOR PLUG-IN
The included plug-ins enable you to instantly configure both your MFDs for FLIGHT SIMULATOR 2004 and FLIGHT SIMULATOR X (you therefore no longer need to access the relevant game's options to manually configure each button on the MFDs).
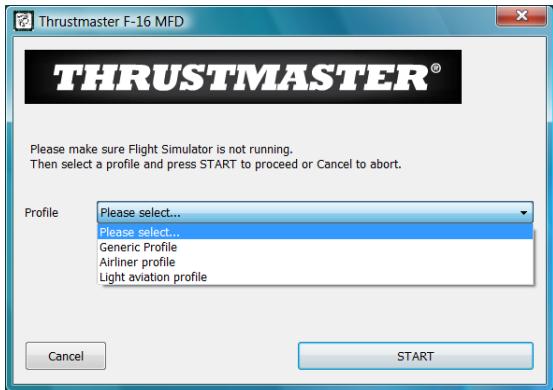
3 profiles are available to you:
* Generic Profile:
This profile covers the most frequent requirements for both civil and military aircraft.
* Light Aviation Profile:
This profile is specifically designed to meet the requirements of light and leisure aircraft. It comprises a basic autopilot feature as well as landing gear and flaps controls, electric systems management features, engine mixture, propeller pitch and engine cooling system controls, etc.
* Airliner Profile:
While offering a number of features available in the Light Aviation Profile, this profile also accounts for more specific aspects inherent to airliners and professional aviation, while also providing an advanced autopilot feature.
IMPORTANT NOTES
- The plug-ins are preconfigured for 2 MFD COUGARs ONLY!
- The game must not be running when installing the plug-ins.
- Prior to installing these plug-ins, configure both MFD COUGARs using the F16 MFD 1 and F16 MFD 2 identifiers (default identifiers).
INSTALLING THE PLUG-INS
- To access the Flight Simulator 2004 plug-in, select: Start/Programs/Thrustmaster MFD Cougar/FLIGHT SIMULATOR 2004 Plug-In

- To access the Flight Simulator X plug-in, select: Start/Programs/Thrustmaster MFD Cougar/FLIGHT SIMULATOR X Plug-In

- After performing this operation, 3 profiles are available to you: Generic Profile / Airliner Profile / Light Aviation Profile. Choose the relevant profile, then click START.
- The SUCCESS pane displays, confirming that the profile has been installed correctly. Click OK.
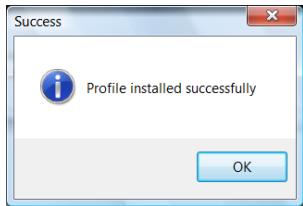
YOU ARE NOW READY TO PLAY WITH YOUR 2 MFD COUGARS FEATURING THE RELEVANT PROFILE!
NOTE: To play with another profile, proceed as described above while selecting the required profile.
IN OTHER GAMES
The MFD COUGAR is compatible with all PC simulation games (both military and civil aviation simulators) supporting multi-USB connectivity.
To configure the MFD COUGAR in your game, access the game's Controller Options, then manually allocate the required features to each of the MFD's buttons. You only need to perform this operation once; the relevant setting will automatically be saved in your game.
TROUBLESHOOTING AND WARNING
- My MFD COUGARs are not recognised or disconnect unexpectedly.
- Shut down your computer, disconnect the MFD COUGARs, then reconnect them and restart your computer.
- If this fails to solve the problem, connect the MFD COUGARs to other USB ports, or connect them directly to a mains-powered USB hub.
- Avoid connecting your MFD COUGARs to an unpowered USB hub.
- The Flight Simulator X and Flight Simulator 2004 plug-ins do not install or do not operate correctly.
- Check that the game is not running prior to installing the plug-ins.
- Ensure that both MFD COUGARs have been configured with the identifiers F16 MFD 1 and F16 MFD 2 (default identifiers) in the Control Panel.
- I can't configure my MFD COUGAR in other games.
- In your game's Options / Controllers / Pad or Joystick menu, manually allocate each of the MFD's buttons to the required function.
- Please refer to your game's user manual or online help for more information.
- Install the latest updates for your game.
TECHNICAL SUPPORT
If you encounter a problem with your product, please go to http://ts.thrustmaster.com and click Technical Support. From there you will be able to access various utilities (Frequently Asked Questions (FAQ), the latest versions of drivers and software) that may help to resolve your problem. If the problem persists, you can contact the Thrustmaster products technical support service ("Technical Support"):
By email:
In order to take advantage of technical support by email, you must first register online. The information you provide will help the agents to resolve your problem more quickly. Click Registration on the left-hand side of the Technical Support page and follow the on-screen instructions. If you have already registered, fill in theUsername and Password fields and then click Login.
By telephone:
| United Kingdom | 08450800942Charges at local rate | Monday to Friday from Noon to 4pm and 5pm to 10pm Saturday from 9am to Noon and 1pm to 7pm Sunday from 9am to Noon and 1pm to 4pm |
| United States | 1-866-889-5036Free | Monday to Friday from 7am to 11am and from Noon to 5pm Saturday and Sunday from 7am to Noon (Eastern Standard Time) |
| Canada | 1-866-889-2181 Gratisuit / Free | Monday to Friday from 7am to 11am and from Noon to 5pm Saturday and Sunday from 7am to Noon (Eastern Standard Time) |
| Denmark | 80887690Free | Monday to Friday from 1pm to 5pm and 6pm to 11pm (English) Saturday from 9am to 1pm and 2pm to 8pm Sunday from 10am to 1pm and 2pm to 5pm |
| Sweden | 0200884567Free | Monday to Friday from 1pm to 5pm and 6pm to 11pm (English) Saturday from 9am to 1pm and 2pm to 8pm Sunday from 10am to 1pm and 2pm to 5pm |
| Finland | 0800 913060Free | Monday to Friday from 2pm to 6pm and 7pm to Midnight (English) Saturday from 10am to 2pm and 3pm to 9pm Sunday from 11am to 2pm and 3pm to 6pm |
WARRANTY INFORMATION
Worldwide, Guillemot Corporation S.A. ("Guillemot") warrants to the consumer that this Thrustmaster product will be free from material defects and manufacturing flaws for a period of two (2) years from the original date of purchase. Should the product appear to be defective during the warranty period, immediately contact Technical Support, who will indicate the procedure to follow. If the defect is confirmed, the product must be returned to its place of purchase (or any other location indicated by Technical Support).
Within the context of this warranty, the consumer's defective product will, at Technical Support's option, be either repaired or replaced. Where authorized by applicable law, the full liability of Guillemot and its subsidiaries (including for indirect damages) is limited to the repair or replacement of the Thrustmaster product. The consumer's legal rights with respect to legislation applicable to the sale of consumer goods are not affected by this warranty.
This warranty shall not apply: (1) if the product has been modified, opened, altered, or has suffered damage as a result of inappropriate or abusive use, negligence, an accident, normal wear, or any other cause not related to a material defect or manufacturing flaw; (2) in the event of failure to comply with the instructions provided by Technical Support; (3) to software not published by Guillemot, said software being subject to a specific warranty provided by its publisher.
Additional warranty provisions
In the United States of America and in Canada, this warranty is limited to the product's internal mechanism and external housing. Any applicable implied warranties, including warranties of merchantability and fitness for a particular purpose, are hereby limited to two (2) years from the date of purchase and are subject to the conditions set forth in this limited warranty. In no event shall Guillemot Corporation S.A. or its affiliates be liable for consequential or incidental damage resulting from the breach of any express or implied warranties. Some States/Provinces do not allow limitation on how long an implied warranty lasts or exclusion or limitation of incidental/consequential damages, so the above limitation may not apply to you. This warranty gives you specific legal rights, and you may also have other legal rights which vary from State to State or Province to Province.
COPYRIGHT
© 2009 Guillemot Corporation S.A. All rights reserved. Thrustmaster® is a registered trademark of Guillemot Corporation S.A. Windows®, XP and Vista are registered trademarks of Microsoft Corporation in the United States and/or other countries. All other trademarks and brand names are hereby acknowledged and are property of their respective owners. Illustrations not binding. Contents, designs and specifications are subject to change without notice and may vary from one country to another. Made in China.
ENVIRONMENTAL PROTECTION RECOMMENDATION
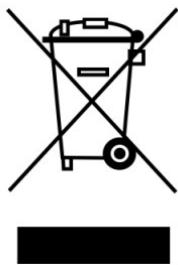
At the end of its working life, this product should not be disposed of with standard household waste, but rather dropped off at a collection point for the disposal of Waste Electrical and Electronic Equipment (WEEE) for recycling.
This is confirmed by the symbol found on the product, user manual or packaging.
Depending on their characteristics, the materials may be recycled. Through recycling and other forms of processing Waste Electrical and Electronic Equipment, you can make a significant contribution towards helping to protect the environment.
Please contact your local authorities for information on the collection point nearest you.
FAQs, tips and drivers available at www.thrustmaster.com
MFD COUGAR
Compatible : PC
FIXATION DU MFD SUR UN COCKPIT OU UN ECRAN
Thrustmaster MFD Cougar

Control Panel

Plug-In FLIGHT SIMULATOR 2004

Plug-In FLIGHT SIMULATOR X

Uninstall
INFORMATIONS RELATIVES À LA GARANTIE
LERNEN SIE IHR MFD COUGAR KENNEN
Thrustmaster MFD Cougar

Control Panel

* Light Aviation Profile:
- Selecteer Start/Programma's/Thrustmaster MFD COUGAR/Control Panel.

Thrustmaster MFD Cougar

Control Panel

* Light Aviation Profile:
Start/Programma's/Thrustmaster MFD Cougar/FLIGHT SIMULATOR X Plug-In

UBENT NU KLAAR OM TE GAAN VlieGEN
MET UW 2 MFD COUGARS EN HET GEKOZEN PROFIEL!
INFORMATIE MET BETREKKING TOT DE GARANTIE
ACCESSORIE COMPATIBILITA CON I GIOCHI
FISSARE L'MFD AD UN COCKPIT O A UNO SCHERMO
- Seleziona Start/Programmi/Thrustmaster MFD COUGAR/Control Panel.

Thrustmaster MFD Cougar

Control Panel

* Light Aviation Profile:
Start/Programmi/Thrustmaster MFD Cougar/FLIGHT SIMULATOR X Plug-In

Thrustmaster MFD Cougar

Control Panel

Plug-In FLIGHT SIMULATOR 2004

Plug-In FLIGHT SIMULATOR X

Uninstall
* Light Aviation Profile:
CON LOS 2 MFD COUGAR INCORPORANDO YA EL PERFIL CORRESPONDIENTE!
FIXAR O MFD A UM COCKPIT OU ECRA
* Light Aviation Profile:
PykoBoIDCTBO NOIb3OBATeJIa
TEXHNUCKNE XAPAKTEPNCNIKNI
- 28 nporpaMMpyEmbIX KHOIOK c NOCDBETKOI
6.26apawkoBbIXBVHTaDnKpennneHn - USB-pa3bem
- 2 wypyna dnia kpenne nna peek
- CnCTema KpeJIeHnI peek
-
Cbemna peika
11.2 nIpeKcIraocBbIX OKHa -
CbeMHoe OCHOBAHne
- 4 KpbIiKm OTBepCTn
3HAKOMCTBO C MFD COUGAR
MFD COUGAR OTHRUSTMASTER - 3TO TOUHЯ KONIN MHOFOyHKNUOHaNbHbIX DnCIIeB, KOTOpIbe yCTaHabJIbNAJIOcH Na 6oTpY peAKTINBbIX NCTpe6NteJeF-16, HaxoJaXxCra Ha BOOpJxHm BBC CUSA.
Kajdmb MFD COUGAR ochaen 20 KhoIkaMn n 4 nepeKJIouaTeIaMn, T. e. B cyMMe 28 KhoIkaMn!
Функци MFD nO3B0JHOT hAcTpoNTb paCusIpHeHoe ynpaBHeHne ycTpoCTbOM c NOMOuH KnaBnAtpybI INI MbIIN 3MyPnPoBaTb pa3NHyIe IINoTaXHbI e np6Opbl dIe eEe 6oJIepeAInCTNuHbIX OuyUeHn OTIrpl.
THRUSTMASTERЯьлгетсоцдателем джонстков HOTAS COUGARиT.16000M.
BCTPOEHHARIAMrTb
KaxdbMFD COUGAR OcnaeH BCTpoehHOI pAmrTbIO.
Bce INHINBUNyIaNbIbIe HAcTPOJKn (KoI NHomep MFD, RPKOCTb NOcCBETKn, COCTOHNCETOBOrIO INHINKaTOpA) ABTOMATUneCKn COxpaHHTCn B nAmrtn YCTPOJCTBa.
Takim obpazom, Bce NahtpoKn i npaMeTpbl coxpaHOTc npi nodknoyeHm MFD COUGAR Kdpyromy kOmblOtepy.
NODCBETKA
IpykoctbnoCBeTknMOKETpeyNIOBAbTcBpOrraMMoCnOMOuIpaHEnynPnpabHeHr ThrustmasternnannapatbIMcpeDCTBAMnHenocpeDCTBeHNOBOBpMaIrplbl.
3aKpeHnHbI Ha OCHOBaHn (4) MFD MoXHo yCTaHOBt b nOd yrIOM 72, 54 nIe 39 rpaIycob.
YcTpoIcTBo KpeIJIeHnIa (3) COCTOIT N3 DByx peEK, KOToPbIE MOXHO yCTaHOBInb NOd YrJIOM IIN CHrTb:
-
OndaПинная peиka (cOTMeTkamn 72DEGREE n 54DEGREE);
-
Onda KopoTka peika (cOTMeTKo39DEGREE).
YCTAHOBKA IOD YTJOM 72 TPAJYCA
- ПовернITE рени Креленя (3) OTMкои 72DEGREE BnH3 (при Heo6xOДIMOCTN CJIeKа OcIa6bTe ueHTpaIbHbI uypyI, YTO6bl OБЛERHTb yCTAHOBky pod yrglOM).


- YctahobITE BepxHne KOHbI peek B CnCTemy KpeJIeHna (9), HaxoJyUocc o6paTHo CTOpObHi MFD B BepxHeu cAtny yCtpoCTBa.
- 3aKpENITE HnKHe NcHbI peeK cObaTH OTOPOHbIO CTOHOBAHnA, 3aTeM 3aTaNITE Dba6apauKOBbIX BnHTa dny KpENNEHnA (6).

YCTAHOBKA IOD YTJOM 54 FPAUCA
- ПовернITE дve peиkn Дпг Крелпеня OTMeTkoI 54DEGREE BnI3 (при Heo6xOIMOCtN CJIeRka ocIa6bTe ueHTpaIbHbI yUpyI, YTO6bl OJIeTHy bYCTaHOBky noJyIOM).


- YctahOBITE BepxHne KOHbI peek B CnCTeMy KpeJIeHna (9), HaxoJyUocr c 6obpaTHoI CTOpObI MFD B BepxHe Jactu YcTpoIcTBa.
- 3aKpEnIte HnKHe KOHcIpeeK cOpaTHo CToPOHb OChOBaHna, 3aTeM 3aTaNITE DaBa6apauKOBbIX BnHTa dIy KpEnJIeHna (6).

YCTAHOBKA NOI YJLOM 39 TPAyCOB
- Ocna6bte ceHTpaIbHbI Wypyn, 3aTeM cHIMnTe BCE peKn.
-ПовернITEКОРOTКЕ peKKДЯ Креленя OTMeTko39DEGREE BHN3.
- Yctahobite BepxHne KOHbI peek B CnCTeMy KpeJIeHna (9), HaxOJaUyOcA C 6oBpaTHo CTOpOBb MFD B BepxHeu cactu yctpoiCTBa.
- 3aKpEnIte HnKHe KOHcIpeek C o6paTHoCtOPOhIO OCHOBaHnA, 3aTeM 3aTaNITE Dba 6apauKOBbIX BnHTa dJa KpeJIeHnA (6).
KPEJIENHE MFD HA PAHEJIY UYPABJIENH IIOJETOM NIM MOHITOPE
1) Chmnte peKnI dIa KpEJIeHnI nOTcoEINHTe MFD OT OCHOBHnI, OTNCTNB Da 6apaXkoBbIX BnHTa dIa KpEJIeHnI (6).
2) OToeDInHnTe CbEmHyO peMy (10), paTIOJIOKeHHyO c o6paTHoN CTOpOHbI MFD B BePXHe Yactn ycTpoiCTBa, OTNyCTMb Dba HaxOJaUHXcN o 06e CTOpOHbI KpEnExhBix BnHTa (8).
3) CHIMMITE YeTbIpe KpbIuKn OTBepCTn (5), HaNabNb Ha HNX C3aDi C NOMOuBTOHKOJ OTBepTKn JIN LIIINJIbKn.

Iocne 3toro MFD moKHO zakpeHnTb c nOmozbu yTeBipex OTBepCTM.
INHINBUNDAJbHAR HACTPOIKA MFD COUGAR
BCTaBbTe DBA BXOJAAH B KOMPJIeKT PIIeKcNfIacOBbIX OKHa (11) B COOTBeTCTByUoJHn na3 B BePxHeY qactn MFD COUGAR.
- MEXKJy DByMRAIINKcRnAocBIMN OKHAMIN BCTaBbTe COOTBeTCTBYUOuI INI ONDHY KAPT, NOCTABNIAEMbIX B KOMJIeKTE.

ПРИМЕЧАЦЯ.
- B Komplèkte noctablanhotc kaptbI d'Fly Flight Simulator X (ToIbko Ha aHrnniCKOM 3bIke).
- Kapты Ддп плагинfa Flight Simulator 2004 И дугne Kapты можно загузntь Иpacneчаты с веб-cайta
http://ts.thrustmaster.com
YCTAHOBKA HA ПК
Tpe6oBaHnK cnCTeMe:
ПК (Windows® XP, Windows® Vista, Windows® 7) с дум потум USB
KOMnakT-DnCK, NIOCTABNIAEMbY B KOMnJIeKeTbe, IpeDaHa3NaUeH dIy YcTaHOBKn dpaIbepa.
- Bctabbte yctahOBouHbI KOMnAKT-DINCK B npBOD IЯ KMnAKT-DINCKOB. Ha 3kpahe abTomatueckn NOBHTcR OKHO Mactepa YCTAHOBKn (ecu npoapamMa ycmaHO6Ke He 3anyckaemc AemomamUwecku, 3aDume e nanky "Mo' KOMnbOpem", deaJkbI ueKNHume 3NaOc NKpuOda dJa KOMnakm-duCKo, npu Heo6xodumocMu deaJkbI ueKNHume paun Setup.exe).
- Haxmte KhoNk yDRIVERS, tO6bI 3aynctnTb npoeeC yctaHOBKn dpaibepa.
- Поспе завершени установи нахмite Finish (Зakончы) и посяагузпту компьотер.
- Послne pepezaуки komblotepa nodklnohite pa3beMb USB (7) MFD COUGAR k nopram USB komblotepa. Windows® abTomatueckn obnapyknT HOBIE yctpoCTBA.
5.YctaHOBkaIpaIbepaI npOcXoDIT ABTOMaTHyecKn.ДЯ3aBepeHnIyE YCTaHOBKn CneIyTe INCtpyKlIaM Na 3kpaHe. - OTKpoIe Pync/IporpamMbI/Thrustmaster MFD COUGAR, TTo6bI pOnyUHTb DoCTyN K PAnenu npabneHn Thrustmaster n nnarnHam Flight Simulator 2004 n Flight Simulator X.
ПАHEЛь УПВАЛЕнЯ THRUSTMASTER
- OtkoTte Npck/IIporpaMMbl/Thrustmaster MFD COUGAR/Control Panel.

Thrustmaster MFD Cougar

Control Panel

-B DnaiNOrOBOM OKhe Game Controllers (VrpoBbIe KOHTpOJIpeBbI) OTo6paKaIoTcR MaHa no yMOJIuaHIO dBYx MFD (F16 MFD 1 u F16 MFD 2) u nx CoCToHne OK.
- UTo6b bIbInOJIHnTb KOHΦnHypauZmIO MFD, Μεικηνιte Properties (CboIcTBa).
IJDEHTNΦIKALMRA MFD COUGAR
PnO tKpbTINI NaHEnI ynpabNeHnI Mm COOTBcTbYIOero MFD mraet B TeueHne DByx cekynd, YTO no3BOJET paCNo3HaTB erO cpei dpyrnx ycTpoiCTB.
Pn Hauatm Bkndk Identy HaunHaet MraTb COOTBcTByoUm MFD, YTO no3BOJAE TJeKo erO oHapuyKtB.
HACTPOIKA JPKOCTNIODCBETKIN
IIOcBETKa BCEx KHOJOK INCBETOBbIX INHINKAtoPOB MOKET peRyINpOBAtbcr IIpOrpaMMhbIMN INI anIcapaTHbIMC cpeCTBaMn.
HACTPOIKA IIOCBETKIC IOMOUIIPOIPOPAMMBI
- B Thrustmaster Control Panel bbl6peTbeBknky Backlit/LED Intensity.
HACTPOIKA IIOCDBETKN ANIINAPATHbIMN CPEICTBAMN
(BbIIOJIHReTcBOBpMaIgpbI)
- YTo6bI yBéJIInHtB rpkOCTb NOCDBeTKn, OJHOBpeMeHHo HAXMnTe KHOIIKn 14 + 15 + 25.
- UTo6bI Chn3NtB pyKoCTb NIOCBETKN, OIOHOBpeMeHHO HaxMITE KHOHNK14 + 15 + 26.
2CBETOBbIX INHINKATOPA
MFD COUGAR ochaueh DBymra LED (2), no3boJHOUMn noIb3oBaTeJIO JeKo ndHnDfNpuoBaTb npacno3HaTb COOTBETCTByOUsM MFD.
Ecnn He BbInOpHeHa Hnaa KOnHpypaun, oba LED 3aropaotc n BbIKNouaOTcB COOTBeCTBn C BbIpaHbIM HomepOM NmEmem MFD.
Pexmno yMOnuHaHIO MOKeT 6bIb N3MeHeN BkIIOueHEm IIN BbIKIOueHEm OIIeN Left LED n Right LED b Thrustmaster Control Panel.
Ha bIbOp npedoctabnHOTc TpnpoHnla.
* Generic Profile
3ToT npoФиь BKIIOuae TcMbIe pacnpoCtpaHHeHbIe Tpe6OBAHЯ K TpaxJaHcKoi n BOEHHO aBnaUIM.
* Light Aviation Profile
3T0 npOoHJIb pa3pa6oTaH B COOTBeTCTBmN C Tpe6oBaHnM N KJIeKIM N pOryIoNCHbIM camolletam. OH BKIOHuaet B ceb8 6a3oByO yhKnUHO bAtoniNoTA, 3IeMeNTbl ynpabLeHnra 3akpbIknAMn I waccn, yfHKUINy npabLeHnra 3IeKtPrueCeKo CNCTeOM, 3IeMeNTbl ynpabNeHnra CMEceO6p3oBaHnEM B DvBraTeNE, 1aOR M Bo3dyuHoRO BVHTa N CNTeOM OXnaJxDeHn DvBraTeNl.
* Airliner Profile
Kpome pra da yhku,doctynbIX b npoqne IeIeKo ABauaun 3OT npoqnl TaKke BkIIOuayet 60oe cneuuchne napametpbI, CBOCTBHeHbIe naccKupckoi npocceCnHOHaBHO ABauaun, INpeDcTabIeYCOBepseHCTBOBaHHO yHKUHO ABTOINOTA.
BAXHbI IIPIMEYAHNIA
- KOnfyrpaiaqna plug-in zapahee BbInoJHea TOJIbKO nIa DIBYX MFD COUGAR!
-Пиустановке plug-in irpa He doJnxHa 6bIb 3anyuSha. - Ipei yctanobko plug-in BbIOnHnTe KOhpyrauio oboix MFD COUGAR c nOmoaHo KdoB F16 MFD 1 u F16 MFD 2 (KoJbI NO yMOUHaHHIO).
YCTAHOBKAJIAGINHOB
- Yto6bI nOuYnTb DocTy n K plug-in Flight Simulator 2004, Bbl6epnte
Ipyck/Iporpammbi/Thrustmaster MFD Cougar/FLIGHT SIMULATOR 2004 Plug-In

- YuTo6bI nOlyuHT bOcTyn k plug-in Flight Simulator X, BbIepeRte
Iync/IporpamMbI/Thrustmaster MFD Cougar/FLIGHT SIMULATOR X Plug-In

TObbHacptbKoHcHpyaHMO FMD COUGAR B COOTBcTCTBN C irpoi, BOJNTe B MeHIO "IapametpbKoHTpOJIpe"Irpl,
3aTeM BpyHyu 3aJaIe yHKnIu DJI KKaJIOI KHOJIK MFD.
3Ty onepaunH Heo6xOdIMo BbIOnJIHnTb TOnIbKO OINH pa3; COOTBeCTByIOUa HAcTPOKa ABTomATnueckn CoXpaHNTcB INrpe.
ПОИСК, YСТРАЕнUE HECHСРABHOCTeI IN ПРЕДУПЕЖДEHИ
-
Mon MFD COUGAR He paacno3haOTcI INI HeoxnlaHNO tKlnouaOTcI.
-
BbIKIOHnTE KOMMbOTep, OTKIOHnTE MFD COUGAR, 3aTeM cHOba NOdkIOHnTE nX IN BKJIIOHnTE KOMMbOTep.
- Ecnn npo6nemy yctpaHntb He ydaIocb, noKnIOuHTe MFD COUGAR K npyTm nopTAM USB nHn HnOncpeDCTBeHHo K USB-KoHcEHTpaTopy C nHTaHm OT 3NeKtpocTeN.
- He noiknouaTe MFD COUGAR K USB-KoHcEHTpaTopy, oTKNoUeHHomOy oT 3NeKtPoCeTeN.
- Plug-in Flight Simulator Xn Flight Simulator 2004 He yctaHaBnBaIOTc Hn HnnpaBnIbNo pa6oTaIOT.
-пелу уетановков plug-in yбдnteсь,чтга He zanyцeha. - Y6eIntecb, yto konfngypaunia oboux MFD COUGAR B Control Panel BbInOnHea c nOIOJIb3OBAHnEM KOIOB F16 MFD 1 u F16 MFD 2 (KOJbI no yMOJIuHaHIO).
- He ydaetc BbInonHnHt KoHpyrauio MFD COUGAR dnydpyrnx irp.
-B MeHIO nRpbl OUnn/KoHTpOJIeRbI/MaHnUyTApTOp mN MeHIO dKoJCTnKa BpyHyO 3aadai Te Heo6xOdMHyO fHyKcIIO dJa KaKdoi KhoNk MFD.
-Долнгельну Иформачи CMOTРВ Б руковдовп ВИНТЕСТПВОДСССССССССССССССССССССССССССССССССССССССССССССССССССССССССССССССССССССССССССССCS - YctahOBnTe nocneHnne oBHOBnEnHaIgI npbl.
TEXHnueCKA NOIDEPKKKA
Пи ВОЗнКНOBЕМИnpo6JIeM,CБЯЗАньхСИСЮЛБТОВАHIMeKOTPOrPJIeРa,3aДИТeHa Be6-caIHTp/Its.thrustmaster.comипердnte no cCbIyKe Technical Support (TexnueckajnopeJCKa).Ha 3ToI CTpaHne IMeETcA DcTyn K pa3NHyBIM yTNITAM (pa3dEny "Yacto 3aDabaeMble BOpocby" (FAQ),cambIM HObIM BepcIaM dpaIbEPov n nporpamMHoro obecneHENH),-3TO MOxET NOMOBy peSeHIO npo6JIeMbl. EcsIn 3to He NOMrno,MOxHO CBЯ3aTbCа co Cnyk6oi TeXnueckoi npoDePckn Thrustmaster ("Technical Support"):
Плэжтейнг поочу:
Ytobb Otnpabntb 3anpoc B cnyk6y texnueckno noDdeppKn no 3neKtpnoHn noUte, Heo6xodm0 3apeNCTPnpOBaTcRa Ha Be6-caine. PpeOCTaBHeHHa Bamn HfOpMaunna Nomoxet b6ctpee peuNTb np6bnemy. PepeNtne no c6blnke Registration (Pernctpaunna), KOTOPa haxoNTcra CbeBa Ha cTpaHnue texnueckno noDdeppKn, n CleNyIte NHCTpyKunm, BbIOIMbIM Ha 3kpah. EcnB bly Ke 3apeNCTPnpOBaHb, BBeDNTE NmM noNb3oBaTeNa n napbon B noPa lse Uname n Password COOTBETCTBEHNO, noCne Yero HaxMMte KHONKY Login (BxoJ).
INΦOPMALÇI N O ΓΑPAHTNIM
Bo Bexc ctpanax, Kopnpaunia Guillemot Corporation S.A. ("Guillemot") daet rapaHTnO ha n3dennr Thrustmaster B TOM, YTO 3TN n3dennr He IMeOT depeKTOB MATEpnaOB Nnnpo3B0DCTBA Ha (2) rOA dt NaTb NOKynk. PnI pb6HApYKeHN DEpeKTA B TceHe nepraapHTnHoro cpoA hemeJENHO CBXNTecb co Cnyxboi texHueckoi noDepeKKN, KOtopar pa3banchnoocdoBaTeNbHocb DeCTBNI Ecnn HauHne depeKTA noDTBepDITcR, n3dNne bEET Heo6XOnIMo BEpyhTo No MeCt y npno6peTHeN (nINn NO Dpyromy MeCtY, yka3AHOMy cnyxboi texHueckoi noDepeKKn).
Ecni HncnpaBHOe N3dJIne InonaAdet NDyCNOBra rapaHTNI, OHO 6ydet NIO 3aMeHHe, NIO 60 tpeMOHTNPOBAHO. Pn HANINI peryIpyMpyUOero 3akOHoataEnbCTBa, Han6OJIbSAa OTBeTCTBEHNcB (BKNIOUa KOCBENHbIe y6blTK) Kopnpaunu Guillemot n ee DoOpEHnx npEepnpiRtOnr pAONHcEA peMOHTOM NIN 3aDEHn 3dEJIra Thrustmaster. Yka3aHHble rapaTAtNHbIe 063aTeBcSTBa He BnIyAOT HA npDInHEckme npBaA NOTpe6BnteB a OTHOseHH 3aKoHOaTeBcTBA, pPmHeHMOrO K npOdaXam NOTpe6BnteBckx TObAPOB.
DaHnra rapaTnHe paCnpocTpaHnreTc: (1) Ha n3dEInna MoDnPhiNpOboAHbIe, BCKpbTbIe, Dopa6oTaHHbIe INOn NobpeXJdeHHbIe Bpe3yIbTaTe HnepaBnIbHOrO INn py6oBO o6paUeHHa, HecOMOTpntEJIbHOCTn, CnyAHIoro NOBpeXJdeHHa, HopMaIbHOrO IN3HOCA, INm IMeHOUne IIO6oI dpyroI deΦeKt, He CBz3aHHbIC KaueCTBOM MaTePnAna INn IN3rTOBJIeHHa; (2) B cNyAae Hec6oJIIODeHHa INCHtpKcIIN, BblDAHHbIX TexHueeckO NOdepjKko; (3) Ha npOrpaMMhIbe npOdyKtIb, papa6oTaHHbIe He KopnpouaIe Guillemot, paCnpocTpaHnreTc rapaHTn/OTBeTCTBeHHoCTb Pa3pa6oTuHa nporpaAM.
ABTOPCKOE IIPABO
© Guillemot Corporation S.A., 2009. Bce npaba 3aunuhebl. Thrustmaster® JBnIeTc3 zererntpobovhblm TOBaphlm 3hakom Guillemot Corporation S.A. Windows®, XP n Vista JBRAIOCTZ 3apeMCTPPOBAHbIMTOBAPHbIMN 3hakamn Koprnapm Microsoft B CoedinHehblx Wtatax AMepKn N/nn DpyRnx CTPanax. Bce npoChy ToBapHbIe 3hakn N fOpMeHHbIe Ha3BaHn, INpBeDeHbIe B DaHHOM Dokymeme, JBRAIOCTC O6ctBeHHocTbO COOTBECTBYUQXn BlaJeNbIeB. INlIOCTpaun Moryt He COOTBECTBOBaT bBHeNHemy BVdy/foHKnqm KOHKPeTHORO I3dEINr. CopeKxHne pykoBODCTBA, KOHcTpyKnIg TEHXHeCKne XapaKTepCRCTIKN I3dEINr I3MehraTOC 6e3 npdeBapHTeBHO YbeOMNeHNn 3aBNCAT OT CtpaHbI npno6pTeHNHa. CdenaHo B Kntae.
PEKOMEHDAUINIIO3AUHTEOKPYXAIOUCEINCPEdi


IIO OKOHuaHn cpoKa cnYk6bl daHHe N3dJIne CneJeYeT yTNIN3NPOBaTb OTdJIbHO OT bItOBoro MyCopa B NYHKTe c6opa OTXoJOB 3NeKTPnueckOrO n 3NeKTPoHHORO 6obopyoBaan.
IOTBvepKdHnEM 3TOMy ABJRETCN HAIHnue COOTBeTCTByUoTeO CmMBOna,HaHEcEHOrO Ha n3DeIne, pyKOBOCTBO NOIb3OBeTaTeI INI yNAKOBYK.
B 3aBcNMOCTN O CBOICTB, MaTePmaJIb MOYr nepeDaaTbcs Ha NOBTOHpy OnepeA6OTKy. CnOco6CTBya NOBTOHPOpeA6OTXoD0B 3eKTPmueckoro IN3eKtPOHOOBOpDAHINBA Bbl BHCNTE3aHHTenblbH BKJaB COxPAHeHMe OKpyKaIOSe CpeBl.
06paTTEcB MecTHbIe OpraHb IBaTn 3a INHOpMaJIeN O 6nKaiMeMpyHKTe PnE MaTaNX OTXoIOB.
Ombembl ha yacmo 3adabaemble bopocbl, coebbl u dpaubepbI, bbl hau deme Ha www.thrustmaster.com

Thrustmaster is a division of the Guillemot Corporation group
- GETTING TO KNOW YOUR MFD COUGAR
- INTERNAL MEMORY
- BACKLIGHTING
- IDENTIFICATION LEDs
- SIMULTANEOUSLY COMPATIBLE WITH UP TO 8 MFD COUGARS
- PHYSICAL ADJUSTMENT
- ACCESSORIES AND GAMES COMPATIBILITY
- FLIGHT SIMULATOR X / FLIGHT SIMULATOR 2004 PLUG-INS
- ADJUSTING THE MFD'S ANGLE ON THE BASE
- ADJUSTING THE ANGLE TO 72 DEGREES
- ADJUSTING THE ANGLE TO 54 DEGREES
- ADJUSTING THE ANGLE TO 39 DEGREES
- ATTACHING THE MFD TO A COCKPIT OR A SCREEN
- PERSONALISING THE MFD COUGARS
- NOTES:
- PC INSTALLATION
- System requirements:
- THRUSTMASTER CONTROL PANEL
- IDENTIFYING YOUR MFD COUGAR
- ADJUSTING THE BACKLIGHTING FEATURE USING SOFTWARE
- ADJUSTING THE BACKLIGHTING FEATURE USING HARDWARE
- USING MORE THAN 2 MFD COUGARS SIMULTANEOUSLY
- NOTE:
- BUTTON CONFIGURATION AND LOCATION
- FLIGHT SIMULATOR PLUG-IN
- * Generic Profile:
- * Light Aviation Profile:
- * Airliner Profile:
- IMPORTANT NOTES
- INSTALLING THE PLUG-INS
- IN OTHER GAMES
- TROUBLESHOOTING AND WARNING
- TECHNICAL SUPPORT
- By email:
- WARRANTY INFORMATION
- Additional warranty provisions
- COPYRIGHT
- ENVIRONMENTAL PROTECTION RECOMMENDATION
- MFD COUGAR
- FIXATION DU MFD SUR UN COCKPIT OU UN ECRAN
- INFORMATIONS RELATIVES À LA GARANTIE
- LERNEN SIE IHR MFD COUGAR KENNEN
- INFORMATIE MET BETREKKING TOT DE GARANTIE
- ACCESSORIE COMPATIBILITA CON I GIOCHI
- FISSARE L'MFD AD UN COCKPIT O A UNO SCHERMO
- FIXAR O MFD A UM COCKPIT OU ECRA
- TEXHNUCKNE XAPAKTEPNCNIKNI
- 3HAKOMCTBO C MFD COUGAR
- BCTPOEHHARIAMrTb
- NODCBETKA
- YCTAHOBKA IOD YTJOM 72 TPAJYCA
- YCTAHOBKA IOD YTJOM 54 FPAUCA
- YCTAHOBKA NOI YJLOM 39 TPAyCOB
- KPEJIENHE MFD HA PAHEJIY UYPABJIENH IIOJETOM NIM MOHITOPE
- INHINBUNDAJbHAR HACTPOIKA MFD COUGAR
- ПРИМЕЧАЦЯ.
- YCTAHOBKA HA ПК
- Tpe6oBaHnK cnCTeMe:
- ПАHEЛь УПВАЛЕнЯ THRUSTMASTER
- IJDEHTNΦIKALMRA MFD COUGAR
- HACTPOIKA JPKOCTNIODCBETKIN
- HACTPOIKA IIOCBETKIC IOMOUIIPOIPOPAMMBI
- HACTPOIKA IIOCDBETKN ANIINAPATHbIMN CPEICTBAMN
- 2CBETOBbIX INHINKATOPA
- * Generic Profile
- * Light Aviation Profile
- * Airliner Profile
- BAXHbI IIPIMEYAHNIA
- YCTAHOBKAJIAGINHOB
- ПОИСК, YСТРАЕнUE HECHСРABHOCTeI IN ПРЕДУПЕЖДEHИ
- TEXHnueCKA NOIDEPKKKA
- Плэжтейнг поочу:
- INΦOPMALÇI N O ΓΑPAHTNIM
- ABTOPCKOE IIPABO
- PEKOMEHDAUINIIO3AUHTEOKPYXAIOUCEINCPEdi
Brand : THRUSTMASTER
Model : MFD COUGAR PACK
Category : Flight simulation accessories