
5HA-780 X - Built-in oven FAGOR - Free user manual and instructions
Find the device manual for free 5HA-780 X FAGOR in PDF.

| Product Type | Built-in Oven |
| Brand | FAGOR |
| Model | 5HA-780 X |
| Dimensions (H x W x D) | 595 x 595 x 560 mm |
| Weight | Approximately 40 kg |
| Power Supply | 120/240 V, 60 Hz, 15.6 A (max 3660 W); compatible 120/208 V |
| Maximum Power | 3660 W (at 240 V) |
| Cooking Modes | Bake, Convection Bake, Broil, Convection Broil, Convection Roast, Dehydrate, Self-Clean, Sabbath Mode |
| Rapid Preheat | Yes |
| Timer and Delay Cook | Timer, timed cooking, delayed cooking |
| Interior Light | Halogen (2 bulbs) |
| Convection Fan | Yes |
| Removable Door | Yes (for cleaning or installation) |
| Extension Rack | Yes |
| Automatic Door Lock | Yes (for self-clean and safety) |
| Self-Clean | Pyrolysis (adjustable duration 2 to 4 hours) |
| Maintenance and Cleaning | Manual surface cleaning, remove racks before self-clean |
| Safety | Door lock, automatic shutoff, cooling ventilation |
| Spare Parts and Repairability | Halogen bulbs, racks, broiler pan, door gasket |
| General Information | Manual 82 pages (FR, EN, ES); installation by qualified technician |
Frequently Asked Questions - 5HA-780 X FAGOR
User questions about 5HA-780 X FAGOR
0 question about this device. Answer the ones you know or ask your own.
Ask a new question about this device
Download the instructions for your Built-in oven in PDF format for free! Find your manual 5HA-780 X - FAGOR and take your electronic device back in hand. On this page are published all the documents necessary for the use of your device. 5HA-780 X by FAGOR.
USER MANUAL 5HA-780 X FAGOR
CARE & INSTRUCTIONS MANUAL
GUIDE D'UTILISATION ET D'ENTRETIEN
MANUAL DE INSTRUCCIONES Y MANTENIMIENTO
30" CONVECTION OVEN
30" FOUR À CONVECTION
30" HORNO DE CONVECKION
- 5HA-780 X
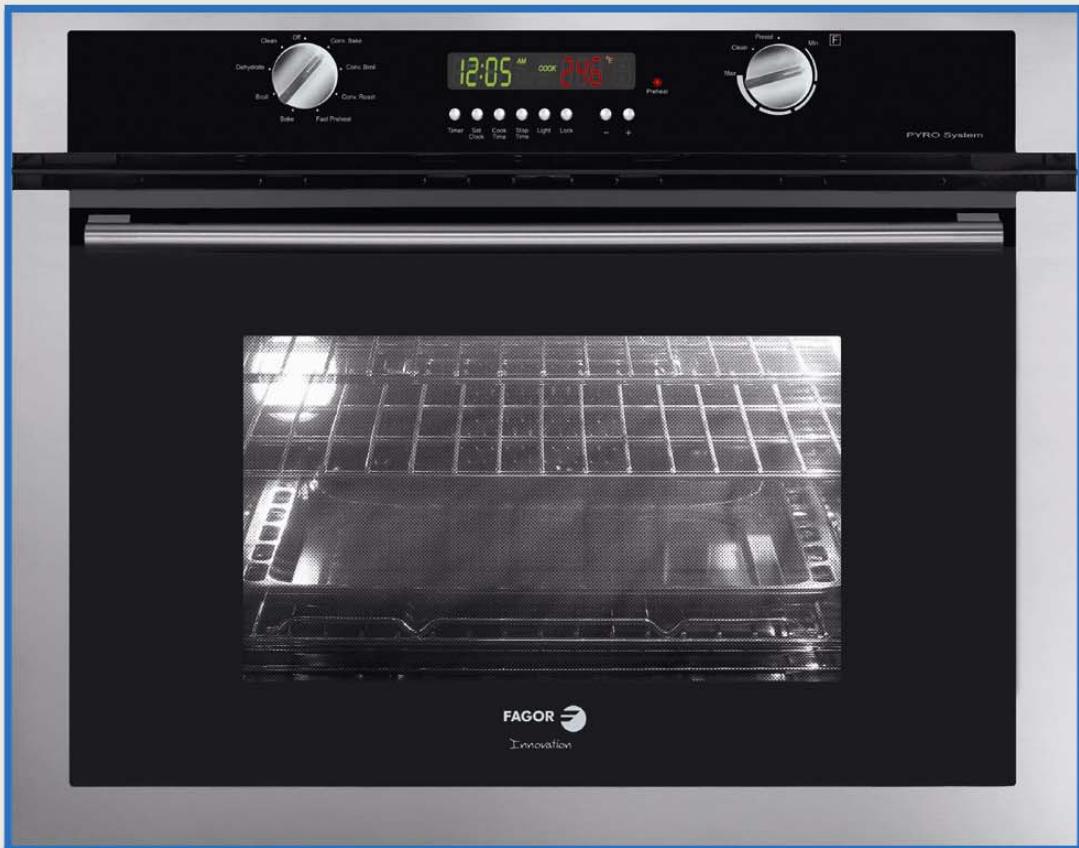
FAGOR

OVEN CARE AND INSTRUCTIONS MANUAL
MANUEL D'UTILISATION ET D'ENTRETIEN DU FOUR
MANUAL DE USO Y MANTENIMIENTO DEL HORNO
Table of Contents
Important Safety Instructions 1
Getting Started
Setting the Clock 2
Using the Oven Lights 2
Oven Parts and Accessories 3
Oven Control Panel 4
Display 4
Knobs 4
Other Features 4
General Oven Tips
Suggestions for Use 5
Advantages of Convection Cooking 5
About Convection Cooking 5
Oven Operation Overview 5
Preheating the Oven 5
Bakeware 5
Oven Racks 6
Oven Extendable Racks 6
Selecting the Rack Position 7
Using Multiple Racks 7
Condensation 7
Temperature Sensor 7
High Altitude Baking 7
Food Serving Temperature Guidelines 7
Setting the Oven
Setting the Cooking Mode 8
Setting the Timer: 8
Setting the Cooking Mode using Fast Preheat ... 8
Timed Cooking Modes 8
Setting the Timed Mode 8
Setting the Delayed Mode 8
Oven Modes
Bake 9
Convection Bake 9
Broil 10
Convection Broil 10
Convection Roast 11
Dehydrate 12
Self-Cleaning 13
Care and Maintenance
Replacing a Light Bulb 15
Cleaning Oven Surfaces 15
Removing the Oven Door 16
Do-It-Yourself Procedures
Activating Sabbath Mode 17
ChangingClockFormat 17
Changing Temperature Format 17
Changing Temperature Calibration 17
Changing Operating Voltage 17
Self Help
Baking 18
Operation 19
Getting Started
Important Safety Instructions Please read all instructions before using this appliance.
When properly cared for, your new Fagor oven has been designed to be a safe, reliable appliance. Read all instructions carefully before using this oven. These precautions will reduce the risk of burns, electric shock, fire and injury to persons. When using kitchen appliances, basic safety precautions must be followed, including the following:
- This appliance must be properly installed and grounded by a qualified technician. Connect only to properly grounded outlet. See electric preparation and connection instructions in the Installation Instructions.
- This appliance should be serviced only by a qualified service technician. Contact the nearest authorized service center for examination, repair or adjustment.
- Do not repair or replace any part of the oven unless specifically recommended. Refer service to an authorized service center.
- Do not operate this appliance if it is not working properly or if it has been damaged, until an authorized technician has examined it.
- Install or locate this appliance only in accordance with the Installation Instructions.
- Use this oven only as intended by the manufacturer. If you have any questions, contact the manufacturer.
- Do not cover or block any openings on this appliance.
- Use this appliance only for its intended use as described in this manual. Do not use corrosive chemicals, vapors, or nonfood products in this appliance. This type of oven is specifically designed to heat or cook. It is not designed for industrial or laboratory use. The use of corrosive chemicals for heating or cleaning will damage the appliance.
- In the event that personal clothing or hair catches fire, DROP AND ROLL IMMEDIATELY to extinguish flames.
- This oven is intended for residential use only. It is not approved for outdoor use.
REGARDING PET BIRDS
Birds have very sensitive respiratory systems. Keep pet birds out of the kitchen or other rooms where kitchen fumes could reach them. During Self-Clean mode, fumes that may be harmful to birds are released. Other kitchen fumes, such as from overheating margarines and cooking oils, may also be harmful.
- Do not allow children to use this appliance unless closely supervised by an adult. Children and pets should not be left alone or unattended in the area where the appliance is in use. Never allow children to sit or stand on any part of the oven.
- Do not store items of interest to children above the oven. If children should climb onto the appliance to reach these items, they could be seriously injured.
To reduce the risk of fire in the oven cavity:
- Do not store flammable materials in or near the oven.
- Do not use water on a grease fire. Smother fire or use a dry chemical or foam-type extinguisher.
- Have a fire extinguisher readily available and highly visible next to any cooking appliance. Be sure you know how to use it.
- Do not overcook food. Carefully attend oven if paper, plastic or other combustible materials are placed inside the oven.
- Do not use the cavity for storage purposes. Do not leave paper products, cooking utensils or food in the cavity when not being used.
- If materials inside the oven should ignite, keep oven door closed. Turn oven off and disconnect the circuit at the circuit breaker box.
- Do not block any vent openings.
- Be sure the blower fan runs when the oven is in operation. If the fan does not operate, do not use the oven. Call an authorized service center.
- Never use the oven to warm or heat a room. This can damage the oven parts.
- For personal safety, wear proper clothing. Loose fitting garments or garments with hanging sleeves should never be worn while using this appliance.

WARNING
The California Safe Drinking Water and Toxic Enforcement Act requires businesses to warn customers of potential exposure to substances which are known by the State of California to cause cancer or reproductive harm.
The elimination of soil during self-cleaning generates some by-products which are on this list of substances.
To minimize exposure to these substances, always operate this oven according to the instructions in this manual and provide good ventilation to the room during and immediately after self-cleaning the oven.
Getting Started

Important Safety Instructions
Please read all instructions before using this appliance.
SAFETY PRECAUTIONS
- Tie long hair so that it doesn't hang loose.
- The heating elements may be hot even though they are dark in color. Interior surfaces of an oven become hot enough to cause burns.
- During and after use, do not press or let clothing or other flammable materials contact the heating elements or the interior surfaces of the oven until they have had sufficient time to cool.
- The trim on the top and sides of the oven door may become hot enough to cause burns.
- Use care when opening the door. Open the door slightly to let hot air or steam escape before removing or replacing food.
- Do not heat unopened food containers. Buildup of pressure may cause the container to burst and result in injury.
- Always place oven racks in desired location while oven is cool. If a rack must be moved while oven is hot, do not let potholder contact the heating elements.
- Use only dry potholders. Moist or damp potholders on hot surfaces may result in burns from steam. Do not let potholders touch hot heating elements. Do not use a towel or other bulky cloth.
SAFETY PRECAUTIONS WITH SELF-CLEANING OVEN
- Confirm that the door locks and will not open once the door lock icon appears. If door does not lock, press OVEN OFF and do not run Self-Clean. Contact with an authorized Technical Center.
- Note: During a normal Self-Clean and a Delayed Self-Clean cycle, the door locks within 25 to 30 seconds after start is pressed.
- Do not clean the door gasket. It is essential for a good seal. Care should be taken not to rub, damage, move or remove the door gasket.
- Do not use commercial oven cleaners or oven liner protective coatings of any kind in or around any part of the oven.
- Clean only oven parts listed in this manual.
- Before self-cleaning the oven, remove the broiler pan, all oven racks, other utensils and excess soft spillage.
- Listen for fan. If no fan is heard, call for contact with an authorized Technical Center.
Getting Started
To Set the Clock:
- Press SET CLOCK. The hours flash and CLOCK appears in the display.
- Press + or - to set hour.
- Press SET CLOCK. The minutes flash.
- Press + or - to set minutes.
- Press SET CLOCK
The clock appears in the display at all times except when the timer or a timed cooking operation is running.
To Use the Oven Lights:
- Press LIGHT to turn the oven lights on or off.
Oven lights turn on automatically when:
the door is opened.
the oven is turned on.
Oven lights will turn off automatically when:
the oven is turned off.
the oven mode is cancelled.
The lights do not operate in the Self-Clean mode.
Getting Started
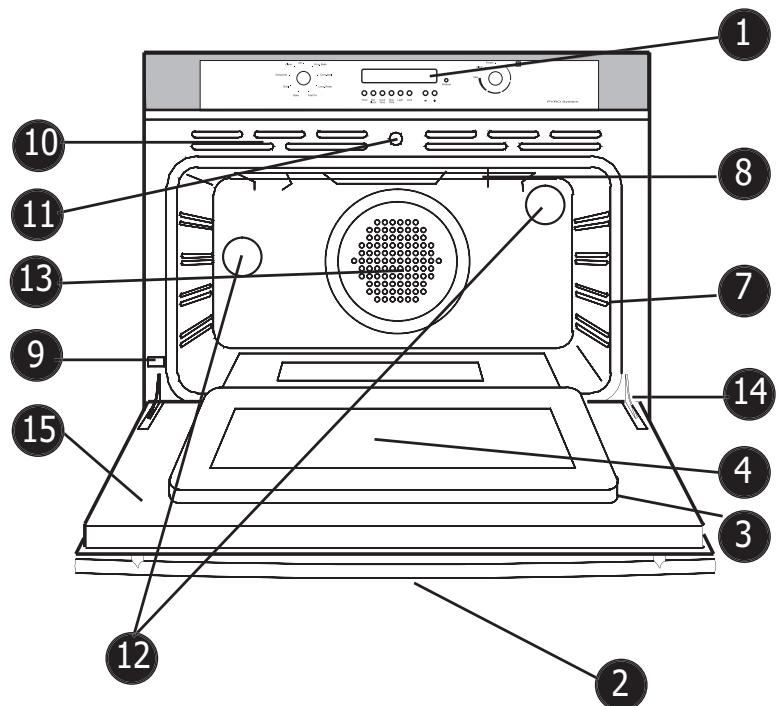
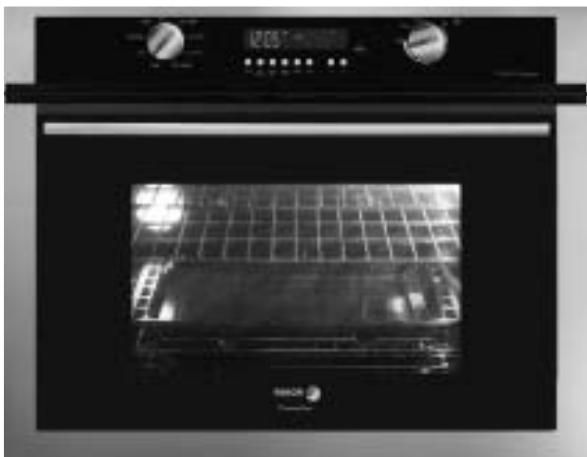
Figure 1: Oven Parts
Oven Parts and Accessories:
1 Control Panel
2 Door Handle
3 Oven Door Gasket
4 Window
5 Removable Oven Racks (not shown)
6 Broil Pan and Grid (not shown)
7 Rack Position Guides (4)
8 Broil Element
9 Data Plate
10 Oven Cooling Vents
11 Automatic Door Lock Latch
12 Halogen Oven Lights
13 Convection Fan and Cover
14 Door Hinge
15 Removable Oven Door
16. Literature Pack
Getting Started
Oven Control Panel
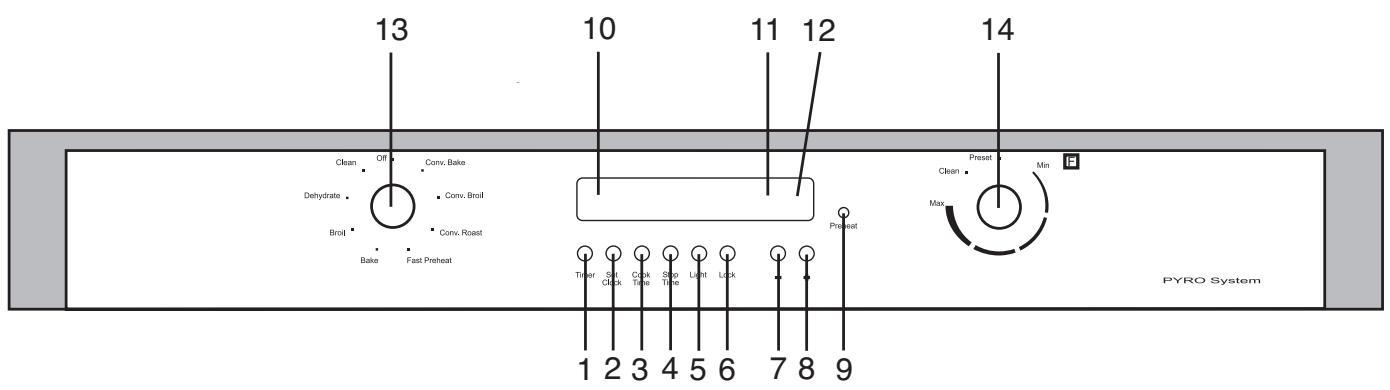
- TIMER: Press to set or clear the timer.
- SET CLOCK: Press to set or change the time of day.
- COOK TIME: Press to set a timed cook mode.
- STOP TIME: Press to set the stop time in a delayed cook mode.
- LIGHT: Press to turn oven lights on or off.
- LOCK: For single ovens, press and hold lock and + buttons at same time to turn safety lock on or off. For double ovens, press and hold + and - buttons to turn safety lock on or off (use Upper Lower button to select oven first). This function locks the oven door for safety purposes.
-
- : Press to decrease the time in one of the above functions by one minute at a time. Press and hold to increase by 10 minutes at a time.
- +: Press to increase the time in one of the above functions by one minute at a time. Press and hold to increase by 10 minutes at a time
Display
- PREHEAT LIGHT: Lights up when oven is preheating
- TIME: Green digits to left of display. Displays time of day and timer.
- TEMPERATURE: Red digits to right of display. Displays the chosen temperature for the oven.
- LOCK ICONS: Red icons display inside box icons. Indicates that door is locked.
Knobs
- MODE: turn to choose cooking mode.
- TEMPERATURE: turn to change oven temperature. When PRESET is selected, the default temperature is used.
Other Features
- BEEPS: One beep signals that the entry is accepted, two beep signals that the entry is invalid.
- F NUMBER CODES: Appear in display when the control detects a problem in the oven or its electronics. See Self Help section, page 19, for more information.
- DEFAULT TEMPERATURES: Each cooking mode has a default temperature that appears when the temperature knob is turned to PRESET. The default is the most common temperature for the mode.
- SABBATH MODE: When activated, oven bakes for 72 hours before shutting off automatically. The mode is Sabbath compliant for religious faiths with "no work" requirements on Sabbath.
General Oven Tips
Suggestions for Use
Use the cooking charts as a guide.
- Do not set pans on an open oven door.
- Use the interior oven light to view the food through the oven door window rather than opening the door frequently.
- Place pans in center of oven.
Advantages of Convection Cooking
Even baking.
Juices and flavors are sealed in.
Air-leavened foods such as cream puffs, souffles, meringues and yeast breads are higher and lighter.
- Multiple rack cooking with no flavor transfer.
No special bakeware required.
- Broiling thicker cuts of meat is possible with convection broil.
- Saves time and energy.
About Convection Cooking
Standard cooking modes (bake, broil, etc.) use heat radiated from one or more elements to cook food. Convection modes use both heat from the elements and a fan in the back of the oven to continuously circulate the heated air throughout the oven.
The result is faster, more even cooking. Convection modes seal in natural moisture and flavors and can also save time and energy since most foods can be cooked at lower temperatures and in less time (never reduce temperature when cooking meat).
Cook time is also reduced because multiple racks can be used at one time. Cook several sheets of cookies or several different dishes at the same time.
The oven also uses convection to dehydrate. The low heat from the elements is circulated through the oven by the convection fan to slowly remove moisture.
Refer to "Oven Modes" in this manual for further information on each convection mode.
Preheating the Oven
- Preheat the oven when using the bake and convection bake modes unless the recipe recommends otherwise.
Use fast preheat mode to shorten preheat time. - Selecting a higher temperature does not shorten the preheat time.
- Preheating is necessary for good results when baking cakes, cookies, pastries and breads.
- Place oven racks in their proper position before preheating.
- During preheat, the selected cooking temperature is displayed.
- A beep will confirm that the oven is preheated and the preheat light will turn off.
- When operating on 208 ~V , preheat time may be slightly longer.
Bakeware
- Glass baking dishes absorb heat. Reduce oven temperature 25^ F when baking in glass.
- Use pans that give the desired browning. The type of finish on the pan will help determine the amount of browning that will occur.
- Shiny, smooth metal or light nonstick/anodized pans reflect heat, resulting in lighter, more delicate browning. Cakes and cookies require this type of bakeware.
- Dark, rough or dull pans will absorb heat resulting in a browner, crisper crust. Use this type for pies.
- For brown, crisp crusts, use dark nonstick/anodized or dark, dull metal utensils or glass bakeware
- Insulated baking pans may increase the length of cooking time.
- Do not cook with the empty broiler pan in the oven as this could change cooking performance. Store the broil pan outside of the oven.
- Use baking sheets that are 19'' × 14'' or smaller for best results.
Oven Operation Overview:
Operation of the oven is through knobs and command buttons on the control panel.
Single oven models have one mode knob. Double oven models have two mode knobs (one for each oven).
Single oven models have one temperature knob.
The command buttons allow you to set the clock, the timer, the cook time (for timed and delayed cooking), the stop time (for delayed cooking) the oven lights and the child safety lock.
See the Control Panel/Display and Oven Operation sections for further details.
Operating the Oven
General Oven Tips
Oven Racks
- The oven has rack guides at four levels as shown in the illustration on page 7.
Rack positions are numbered from the bottom rack guide (#1) to the top (#4).
- Check cooking charts for best rack positions to use when cooking.
- Make sure that the racks are level once they are in position.
- The racks are designed to stop when pulled forward to their limit.
- CAUTION! Never use aluminum foil to cover the oven racks or to line the oven. Heat trapped under the foil can cause damage to the oven liner.
To remove oven rack from the oven:
- Pull rack forward
- Lift rack up at front and then remove it
To replace an oven rack:
- Place rear of rack between rack level guides
- While lifting front of rack, slide rack in all the way while lowering the front
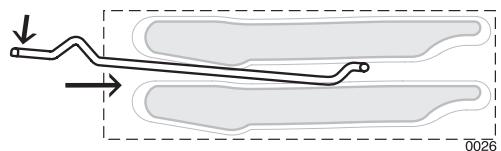
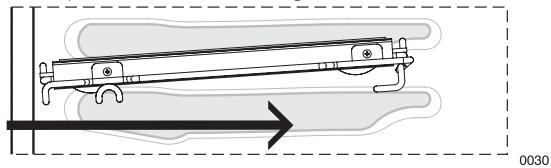
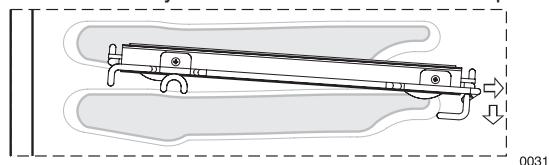
Oven Extendable Racks
- The extendable rack allows for easier access to food. It extends beyond the standard flat rack bringing the food closer to the user.

CAUTION: When the rack is outside of the oven, arms do not lock. They could unexpectedly extend rack is carried incorrectly. Extending slide arms and cause injury. Rack should only be held or tied by grasping the sides.
To remove extendable rack from the oven:
- Lift of rack slightly and push it until the stop release
- Raise back of rack until frame and stop clear rack guide
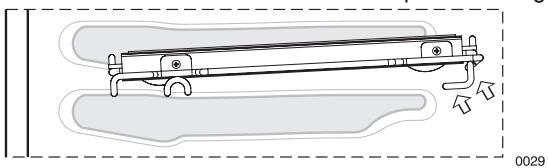
3.Pull rack down and out
NOTE: Always remove the extendable rack before self-cleaning the oven.
CAUTION! To avoid burns, pull rack all the way out and lift pan above handle when transferring food to and from oven.
Please refer to illustration on Page 7 if there is any question as to which side is the front of the rack.
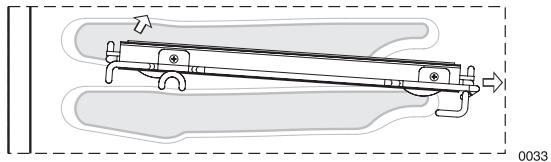
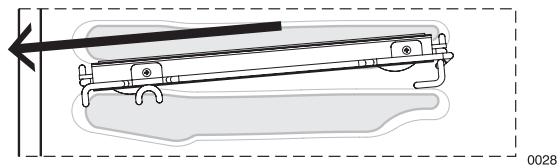
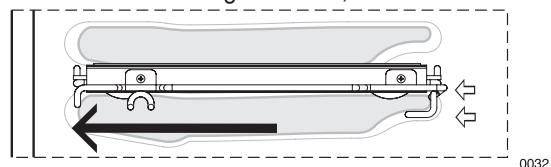
To replace an extendable rack:
- Grasp rack firmly on both sides. Place rack (including frame) above desired rack guide
2.Push all the way in until the back of the rack drops into place
3.Pull both sections forward until stops activates.
Rack should be straight and flat, not crooked

CAUTION: To avoid possible burns, place oven in desired positions before turning the oven on.
Always use oven mitts when the oven is warm.
Operating the Oven
General Oven Tips
Selecting the Rack Position
See graphic at right.
Rack 4 - Highest position. Use for melting cheese quickly.
Rack 3 - Use for broiling most meats and for toasting bread.
Rack 2 - Use for pies, casseroles, breads, bundt or pound cakes, small roasts or poultry. Also use for broiling thicker cuts of meat.
Rack 1 - Lowest Position. Use for angel food cake, large roasts and turkey.
Using Multiple Racks
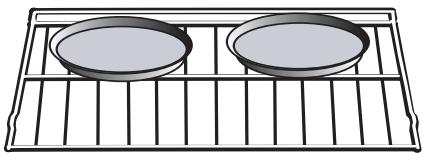
2 Rack baking: Use positions 1 and 3.
3 rack baking: Use positions 2, 3 and 4.
When baking four cake layers at the same time, stagger pans so that one pan is not directly above another. For best results, place cakes on front of upper rack and back of lower rack (See graphic at right). Allow 1'' - 1 1/2'' air space around pans.
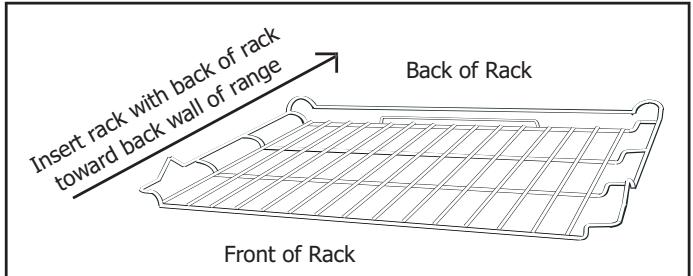
Figure 5: The Flat Rack
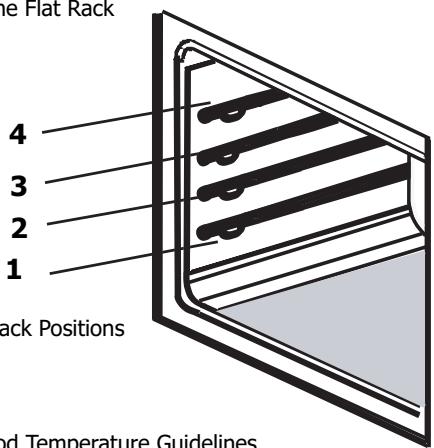

Rack 3
Rack 1
Figure 7: Multiple Rack Pan Placement
Condensation
The oven vent is located above the oven door. It is normal to see steam escaping from the vent and condensation may collect on areas above the vent such as the display.
Temperature Sensor
Your new oven has an electronic temperature sensor that accurately maintains the temperature selected. Your previous oven may have had a mechanical thermostat that drifted gradually to a higher temperature. As a result, you may need to adjust your favorite recipes when cooking in your new oven.
High Altitude Baking
When cooking at high altitude, recipes and cooking time will vary from the standard. For accurate information, write to Extension Service, Colorado State University, Fort Collins, Colorado 80521. There may be a charge for the bulletins.

CAUTION:
Many factors affect cooking performance.
Always check food for doneness before serving
Table 1: Food Temperature Guidelines
| Food Serving Temperature Guidelines from FSIS (USDA Food Safety & Inspection Service) | |
| 140°F (60°C) • Ham, precooked (to reheat) 145°F (63°C) • Fresh Beef, Veal, Lamb (medium rare) 160°F (71°C) • Ground Meat & Meat Mixtures (Beef, Pork, Veal, Lamb) • Fresh Beef, Veal, Lamb (medium) • Fresh Pork (medium) • Fresh Ham (raw) • Egg Dishes | 165°F (74°C) • Ground Meat & Meat Mixtures (Turkey, Chicken) • Stuffing (cooked alone or in bird) • Leftovers & Casseroles 170°F (77°C) • Fresh Beef, Veal, Lamb (well done) • Poultry breasts • Fresh Pork (well done) 180°F (82°C) • Chicken and Turkey, (whole) • Poultry (thighs and wings) • Duck and Goose |
Note: Eggs (alone, not used in a recipe) - cook until yolk & white are firm.
Operating the Oven
Setting the Oven
To Set the Cooking Mode:
- Turn mode knob to select cooking mode.
- Turn temperature knob to select temperature. Select PRESET to use the default temperature.
Red preheat light, oven light and oven fan turn on as oven preheats. When the preheat temperature is reached, the red preheat light shuts off and the oven beeps.
To Set the Timer:
- Press TIMER. TIMER appears in the display.
- Press TIMER again. The hours flash.
- Press + or - to set hours.
- Press TIMER. The minutes flash.
- Press + or - to set minutes.
- Press TIMER.
Beeps sound when the time ends.
TIP:
Hold the + or - key down to change time by 10 minute increments.
To Set the Cooking Mode using Fast Preheat:
- Turn mode knob to FAST PREHEAT.
- Turn temperature knob to select temperature. Red preheat light, oven light and oven fan turn on as oven preheats. When the preheat temperature is reached, the red preheat light shuts off and the oven beeps.
- Turn knob to select cooking mode.
- Place food in oven.
REMARKER!
When using fast preheat, you must select the cooking mode after preheat and before placing food in the oven.
Timed Cooking Modes
Use timed cook to turn the oven off automatically after cooking. Delayed cook also turns the oven on automatically.
The clock is set to the correct time of day.
- The timed mode turns off the oven at the end of the cook time.
To Set the Timed Mode:
- Turn knobs to select the mode and temperature.
- Press COOK TIME twice. The hours flash.
- Press + or - to set number of hours.
Note: Time required for the oven to reach temperature must be included in the set cooking time.
- Press COOK TIME again. Minutes flash.
- Press + or - to change the number of minutes.
- Press COOK TIME to confirm cooking time.
At the end of the programmed cooking time, the oven will automatically turn off.
To Set the Delayed Mode:
- Follow steps 1 through 6.
- Press STOP TIME twice. DELAY appears in the display. STOP TIME and the hours flash.
- Press + or - to change the hours.
- Press STOP TIME again. Minutes flash.
- Press + or - to change the minutes.
- Press STOP TIME to confirm stop time.
The oven automatically calculates the time of day to start.
At the end of the programmed cooking time, the oven turns off. Display shows END and the oven beeps. Reminder beeps sound and COOK TIME flashes.
TIP:
Press COOK TIME to view timed mode information.
Press STOP TIME to view delayed mode information.
Press TIMER to view timer.
Operating the Oven
Oven Modes
Bake
Baking is cooking with dry, heated air. Both the upper and lower elements cycle to maintain the oven temperature:
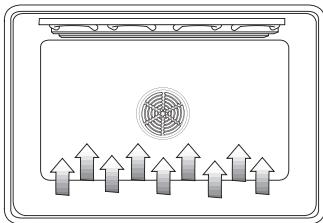
Figure 8: Bake
The bake mode can be used to prepare a variety of food items, from pastries to casseroles. It can also be used to roast meats.
For Best Results:
- When baking on two or more racks, use convection bake instead.
Convection Bake
Convection baking is similar to baking. In this case, heat comes from a third element behind the backwall. The main difference in convection baking is that the heat is circulated throughout the oven by the convection fan:
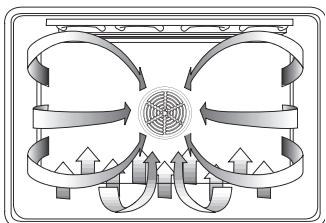
Figure 9: Convection Bake
The convection bake mode is well-suited for baking large quantities of food on multiple racks. It can be used to prepare cookies, pastries, breads, snack foods and appetizers among other items. DO NOT use convection bake for meats. Use convection roast instead.
- Reduce recipe temperature by 25^ F .
- Check food for doneness early:
Quick Cooking Tips: Converting from standard bake to convection bake
| If recipe calls for ... | Check food ... |
| 1 - 15 min. | 3 min. early |
| 16 - 30 min. | 5 min. early |
| 31 min. - 1 hr. | 10 min. early |
The benefits of convection baking include:
- Slight decrease in cooking time
Three rack cooking
Higher volume (yeast items rise higher) - More items cooked at once
For Best Results:
- Reduce recipe temperature by 25^ F . Refer to the convection baking chart for examples.
- Place food in low-sided, uncovered pans such as cookie sheets without sides.
Center baking pans side to side on the oven rack. - Do not use convection bake for custards, quiches, pumpkin pie, or cheeses. These items do not benefit from the convection-heating process. Use standard bake instead.
Table 2: Convection Bake Chart
| Food Item | Rack Position | Temp.* (preheated oven) (F°) | Convection Bake Time ** (min) |
| Cake | |||
| Cupcakes | 2 | 325 | 17-19 |
| Bundt Cake | 1 | 325 | 37-43 |
| Angel Food | 1 | 325 | 35-39 |
| Pie | |||
| 2 crust, fresh, 9" | 2 | 350 - 400 | 45-55 |
| 2 crust, frozen fruit, 9" | 2 | 350 | 68-78 |
| Cookies | |||
| Sugar | 2 | 325 - 350 | 6-11 |
| Chocolate Chip | 2 | 325 - 350 | 8-13 |
| Brownies | 2 | 325 | 29-36 |
| Breads | |||
| Yeast bread, loaf, 9x5 | 2 | 350 | |
| Yeast rolls | 2 | 350 - 375 | 18-22 |
| Quick Bread, loaf, 8x4 | 2 | 325 - 350 | 12-15 |
| Biscuits | 2 | 350 - 375 | 45-55 |
| Muffins | 2 | 400 | 11-15 |
| Pizza | |||
| Frozen | 2 | 375 - 425 | 23-26 |
| Fresh | 2 | 400 - 425 | 12-15 |
- The convection bake temperature is 25^ F less than recommended on packages or recipes. The temperature in this chart has been reduced 25^ F .
This chart is a guide. Actual times depend on the mixes or recipes baked. Follow recipe or package directions and reduce temperature appropriately.
* When convection baking on two racks, use positions one and three. When using three racks, use positions two, three and four.
Operating the Oven
Oven Modes
Broil
Broiling uses intense heat radiated from the upper element:
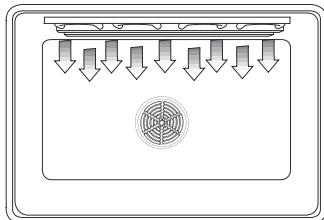
Figure 10: Broil
The broil mode is best suited to cook thin, tender cuts of meat (1" or less), poultry and fish. It can also be used to brown breads and casseroles.
The benefits of Broiling include:
- Fast and efficient cooking.
- Cooking without the addition of fats or liquids.
Browning as the food cooks.
For Best Results:
- Do not preheat oven.
- Steaks and chops should be at least 3 / 4'' thick.
- Brush fish and poultry with butter or oil to prevent sticking.
- Use the broil pan and grid included with your oven.
- Do not cover the broiler grid with foil. It is designed to drain fats and oils away from the cooking surface to prevent smoking and spattering.
- Turn meats once halfway through the recommended cooking time (see broil chart for examples).
- When top browning cassettes, use only metal or glass ceramic dishes such as Corningware®.
- Never use heat-proof glass (Pyrex®); it cannot tolerate the high temperature.
ALWAYS BROIL WITH THE DOOR CLOSED
Table 3: Broil Chart
| Food and Thickness | Rack Position | Broil Setting | Internal Temp. (°F) | Time Side 1 (min)* | Time Side 2 (min)* |
| Beef Steak (3/4" - 1") | |||||
| Medium Rare | 3 | 5 | 145 | 5-7 | 4-6 |
| Medium | 3 | 5 | 160 | 6-8 | 5-7 |
| Well | 3 | 5 | 170 | 8-10 | 7-9 |
| Hamburgers (3/4" - 1") | |||||
| Well | 3 | 5 | 160 | 7-9 | 5-7 |
| Poultry | |||||
| Breast (bone-in) | 3 | 3 | 170 | 14-16 | 14-16 |
| Thigh | 3 | 3 | 180 | 14-16 | 11-13 |
| Pork | |||||
| Pork Chops (1") | 3 | 5 | 160 | 7-9 | 5-7 |
| Sausage - fresh | 3 | 5 | 160 | 5-7 | 3-5 |
| Ham Slice (1/2") | 3 | 5 | 160 | 3-5 | 4-6 |
| Seafood | |||||
| Fish Files, 1"Buttered | 3 | 4 | Cook until opaque & flakes easily with fork | 10-14 | Do not turn |
| Lamb | |||||
| Chops (1") | |||||
| Medium Rare | 3 | 5 | 145 | 5-7 | 4-6 |
| Medium | 3 | 5 | 160 | 6-8 | 5-7 |
| Well | 3 | 5 | 170 | 8-10 | 7-9 |
| Bread | |||||
| Garlic Bread, 1"slices | 3 | 5 | 4-6 | ||
Convection Broil
Convection broil is similar to broil. It combines the intense heat from the upper element with heat circulated by the convection fan:

Figure 11: Convection Broil
The convection broil mode is well suited for cooking thicker, tender cuts of meat, poultry and fish. Convection Broil is typically not recommended for browning breads, casseroles and other foods.
The benefits of Convection Broiling, in addition to the benefits of standard broiling, include:
- Faster cooking than standard Broiling.
For Best Results:
- Do not preheat oven.
Meats should be at least 1 1 / 2'' thick. - Turn meats once halfway through the cooking time (See Convection Broil Chart for examples).
Use the broil pan and grid included with your oven. - Do not cover the broiler grid with foil. It is designed to drain fats and oils away from the cooking surface to prevent smoking and spattering.
Salt after cooking.
ALWAYS CONVECTION BROIL WITH THE DOOR CLOSED
Table 4: Convection Broil Chart
| Food and Thickness | Rack Position | Broil Setting | Intern- al Temp. (°F) | Time Side 1 (min)* | Time Side 2 (min)* |
| Beef Steak (1-1/2" or more) | |||||
| Medium Rare | 2 | 450 | 145 | 12-14 | 11-13 |
| Medium | 2 | 450 | 160 | 15-17 | 13-15 |
| Well | 2 | 450 | 170 | 18-20 | 16-17 |
| Hamburgers (more than 1") | |||||
| Well | 3 | 550 | 160 | 11-13 | 8-10 |
| Poultry Chicken Quarters | 3 | 450 | 180 (thigh) | 13-15 | 10-12 |
| Chicken Breasts | 3 | 450 | 170 | 14-16 | 12-14 |
| Pork Pork Chops (11/4" or more) | 2 | 450 | 160 | 12-14 | 13-15 |
| Sausage - fresh | 3 | 450 | 160 | 4-6 | 3-5 |
*Broiling and convection broiling times are approximate and may vary slightly.
Operating the Oven
Oven Modes
Convection Roast
Convection roast uses heat from the top and bottom elements as well as heat circulated by the convection fan:
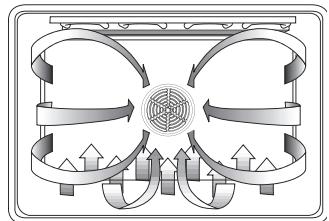
Figure 12: Convection Roast
The convection roast mode is well suited for preparing tender cuts of meat and poultry.
The benefits of convection roasting, include:
As much as 25% faster cooking than standard Roasting/ Baking
Rich, golden browning
For Best Results:
- Use the same temperature as indicated in the recipe.
- Check doneness early as roasting time may decrease by as much as 25% . Refer to convection roast chart for examples.
- Do not cover meat or use cooking bags.
- Use the broil pan and grid provided with the oven for roasting. A low-sided, uncovered pan can also be used.
- Use a meat thermometer to determine the internal temperature of the meat.
- If the meat is browned to your liking, but is not yet done, a small strip of foil can be placed over the meat to prevent overbrowning.
- Let meat stand covered with foil 10-15 minutes after removing from the oven.
Table 5: Convection Roast Chart
| Meats | Weight (lb) | Oven Temp. (°F) | Rack Position | Roasting Time* (min per lb) | Internal Temp. (°F) |
| Beef | |||||
| Rib Roast | 4 - 6 | 325 | 2 | 24-30 | 145 (med rare) |
| 27-33 | 160 (medium) | ||||
| Rib Eye Roast, (boneless) | 4 - 6 | 325 | 2 | 22-30 | 145 (med rare) |
| 27-33 | 160 (medium) | ||||
| Rump, Eye, Tip, Sirloin (boneless) | 3 - 6 | 325 | 2 | 22-28 | 145 (med rare) |
| 27-33 | 160 (medium) | ||||
| Tenderloin Roast | 2 - 3 | 425 | 2 | 15-25 | 145 (med rare) |
| Pork | |||||
| Loin Roast (boneless or bone-in) | 5 - 8 | 350 | 2 | 20-30 | 160 (medium) |
| Shoulder | 3 - 6 | 350 | 2 | 25-35 | 160 (medium) |
| Poultry | |||||
| Chicken - whole | 3 - 4 | 375 | 2 | 12-18 | 180 |
| Turkey, unstuffed** | 12-15 | 325 | 1 | 10-14 | 180 |
| Turkey, unstuffed** | 16-20 | 325 | 1 | 9-11 | 180 |
| Turkey, unstuffed** | 21-25 | 325 | 1 | 6-10 | 180 |
| Turkey Breast | 3 - 8 | 325 | 1 | 15-20 | 170 |
| Cornish Hen | 1 - 1 ½ | 350 | 2 | 45-75 total | 180 |
| Lamb | |||||
| Half Leg | 3 - 4 | 325 | 2 | 25-30 | 160 (medium) |
| 30-35 | 170 (well) | ||||
| Whole Leg | 6 - 8 | 325 | 1 | 25-30 | 160 (medium) |
| 30-35 | 170 (well) |
Roasting times are approximate and may vary depending on the shape of the meat. They are based on thawed meats.
*Stuffed turkey requires additional roasting time. The minimum safe temperature for stuffing in poultry is 165^ F
Quick and Easy Cooking Tips:
Converting from standard bake to convection roast
DO NOT change recipe temperature.
Use roasting times in chart at right.
Operating the Oven
Oven Modes
Dehydrate
Dehydrate dries foods with heat from a third element behind the back wall of the oven. The heat is circulated throughout the oven by the convection fan.

Figure 13: Dehydrate
Dehydrating is used to dry and/or preserve foods such as fruits, vegetables and herbs. This mode holds an optimum low temperature (120^ - 160^) while circulating the heated air to slowly remove moisture.
For Best Results:
- Dry herbs at 120^ F. Dry most fruits and vegetables at 140^ F. (Refer to the dehydrate chart for examples).
- Drying times vary depending on the moisture and sugar content of the food, the size of the pieces, the amount being dried and the humidity in the air. Check food at the minimum drying time.
- Multiple racks can be used simultaneously.
- Treat fruits with antioxidants to avoid discoloration.
- Consult a food preservation book, county Cooperative Extension Office or library for additional information.
Table 6: Dehydrate Chart
| Food | Preparation | Approximate Drying Time*(hrs) | Test for Doneness |
| Fruit Apples | Dipped in ¼ cup lemon juice and 2 cups water; ¼" slices | 11-15 | Slightly pliable |
| Bananas | Dipped in ¼ cup lemon juice and 2 cups water; ¼" slices | 11-15 | Slightly pliable |
| Cherries | Wash and towel dry. For fresh cherries, remove pits | 10-15 | Pliable, leathery, chewy |
| Orange Peels and slices | ¼" slices of orange; orange part of skin thinly peeled from oranges | Peels: 2-4 Slices: 12-16 | Orange peel: dry and brittle. Orange slices: skins are dry and brittle, fruit is slightly moist |
| Pineapple rings | Towel dried | Canned: 9-13 Fresh: 8-12 | Soft and pliable |
| Strawberries | Wash and towel dry. Sliced ½" thick, skin (outside) down on rack | 12-17 | Dry, brittle |
| Vegetables Peppers | Wash and towel dry. Remove membrane of peppers, coarsely chopped about 1" pieces | 16-20 | Leathery with no moisture inside |
| Mushrooms | Wash and towel dry. Cut off stem end. Cut into 1/8" slices | 7-12 | Tough and leathery, dry |
| Tomatoes | Wash and towel dry. Cut thin slices, 1/8" thick, drain well. | 16-23 | Dry, brick red color |
| Herbs Oregano, sage parsley and thyme, and fennel | Rinse and dry with paper towel | Dry at 120°F 3-5 hrs | Crisp and brittle |
| Basil | Use basil leaves 3 to 4 inches from top. Spray with water, shake off moisture and pat dry | Dry at 120°F 3-5 hrs | Crisp and brittle |
Oven will stay on for 48 hours before shutting off automatically.
Care and Maintenance
Self-Cleaning
During self-clean, the oven uses a very high temperature to burn away food soil and grease.
- As a safety feature, the oven door locks during self-clean to protect from very high temperatures. Do not try to open the oven during self-clean mode.
- It is common to see smoke and/or an occasional flame-up during the self-clean mode, depending on the content and amount of soil remaining in the oven. If a flame persists, turn off the oven and allow it to cool before opening the door to wipe up the excessive food soil.
- The oven light does not operate when the oven is in the self-clean mode.
- Do not use commercial oven cleaners as they may damage finish or parts.
- Heat and odors are normal during the self-clean cycle. Keep the kitchen well ventilated.
NOTE: Due to the high temperatures used for self-cleaning, fine lines or surface roughness may develop in oven cavity. This is a common condition and does not affect either the cooking or the cleaning performance of the oven.
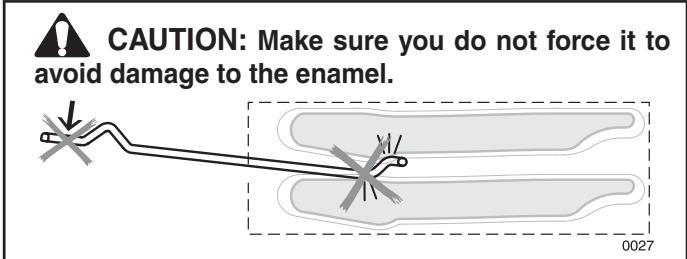
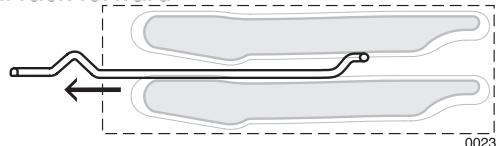
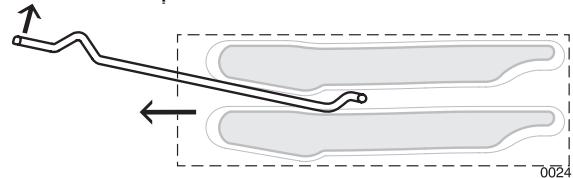
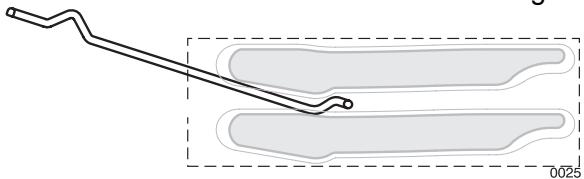
Before You Self-Clean
- Hand clean the oven door edge, window, oven front frame and oven cavity edges (see figures below). They do not get hot enough during the cleaning cycle for soil to burn away. Use a soapy sponge or a plastic scrubber. DO NOT RUB THE GASKET.
- Wipe up large overspills and grease with paper towels.
- Remove broiler pan, all utensils and bakeware.
- Remove oven racks. If the oven racks are left in the oven during a self-cleaning cycle, they will lose their shiny finish and will not glide smoothly in the rack guides. See "Cleaning Oven Surfaces, page 15 for proper care.
- Be sure the light is turned off on the control panel and the bulb and glass cover are in place.
After Self-Clean
- The self-clean mode may produce ash which will settle in the oven. If this happens, remove ash with a damp cloth before using the oven.
- Wipe rack edges with cooking oil to allow for proper glide. Wipe off excess.
IMPORTANT: Be sure to let the inside window glass in the oven door cool completely before wiping up any ash left from the clean cycle.
Hand clean front frame
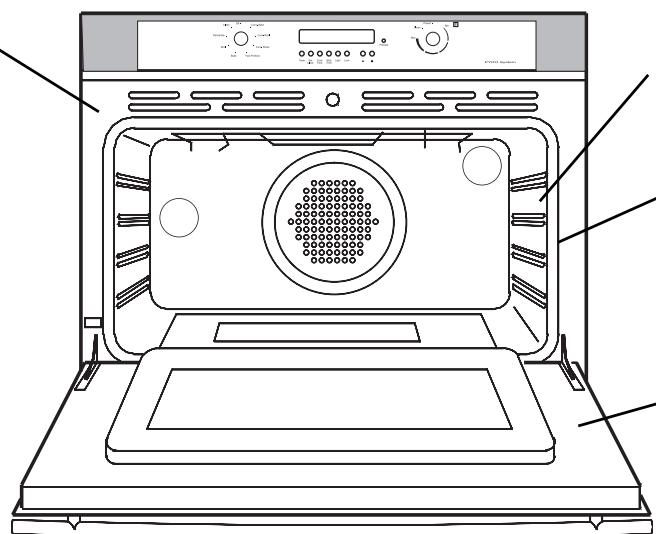
Figure 14: Before Self-Cleaning
Hand clean 1-1/2" from rack support to front of oven cavity
DO NOT hand clean gasket
Hand clean door and frame
Care and Maintenance
Self-Cleaning
To Set the Self-Clean Mode:
- Remove oven racks and close oven door.
- Turn both knobs to CLEAN.
NOTE:
If the door is open when the self-clean mode is selected, the lock symbol will continue to flash. Self-clean will not start until the door is closed.
CLEAN and TIME appear in the display.
The oven will clean for three hours. At the end of the programmed cleaning time the oven will automatically turn off.
END will appear on the display. CLEAN and TIME will flash until any button is pressed or the knob is turned to OFF.
To Change the Clean Time
The preset clean time is three hours. For light soil, use two hours, for heavy soil use four hours.
- Set self-clean mode as explained above.
- Press COOK TIME.
- Press + or - to change the number of hours.
- Press COOK TIME twice.
To Delay the Start of the Clean
Note: The time of day must be accurate for the delay function to work properly.
- Set self-clean mode as explained above.
- Change clean time as explained above (if desired).
- Set the time the oven will start self-cleaning:
Press STOP TIME twice.
Press + or - to set hours.
Press STOP TIME.
Press + or - to set minutes.
Press STOP TIME.
The oven door locks and DELAY appears in the display.
- When the delay time ends, self-clean starts.
At the end of the programmed cleaning time, the oven will automatically turn off.
END will appear on the display. CLEAN and TIME will flash until any button is pressed or the knob is turned to OFF.
TO CANCEL:
To cancel the self-clean, turn knob to OFF. The oven door will remain locked until the oven has reached a safe temperature.
About the Door Lock:
Do not attempt to open the door while the door is locking.
Lock symbol will flash until the door is locked. When the lock symbol is displayed, the door cannot be opened.
Check that the door has been locked and will not open before starting self-clean mode.
If door does not lock, turn the mode knob to OFF position and do not start self-clean; Contact an authorized Technical Center.
TIP:
To check the delayed clean time press COOK TIME.
To check the time remaining before the delayed mode starts, press STOP TIME.
Care and Maintenance
Cleaning Oven Surfaces
Table 7: Oven Surface Cleaning Methods
| Surface | Cleaning Method |
| Racks pow(Oven) mode, rack | Wash with hot sudsy water. Rinse thoroughly and dry, or gently rub with cleansing der or soap filled pads as directed. If racks are cleaned in the oven during the self-clean they will lose their shiny finish and may not glide smoothly. If this happens, wipe the edges with a small amount of vegetable oil, then wipe off excess. |
| Fiberglass Knit (Gasket) | DO NOT HAND CLEAN GASKET. |
| Glass (Window, Display) | Wash with soap and water or glass cleaner. Use a suitable cleaning product to remove grease spatters and stubborn stains. |
| Painted paper (Exterior) | Clean with hot sudsy water or apply a suitable cleaning product to a clean sponge or towel and wipe clean. Avoid using powdered cleansers, steel wool pads and oven cleaners. |
| Porcelain (Interior) | Immediately wipe up acid spills like fruit juice, milk and tomatoes with a dry towel. Do not use a moistened sponge/towel on hot porcelain. When cool, clean with hot sudsy water or apply a suitable cleaning product to a damp sponge. Rinse and dry. For stubborn stains, gently use soap filled pads. It is normal for porcelain to craze (fine lines) with age due to exposure from heat and food soil. |
| Stainless Steel (Exterior) | Always wipe or rub with grain. Clean with a soapy sponge then rinse and dry, or wipe with a suitable cleaning product sprayed onto a paper towel. Protect and polish with a suitable cleaning product and a soft cloth. Remove water spots with a cloth dampened with white vinegar. Use a suitable product to remove heat discoloration. |
| Plastic (Knobs, Controls) | When cool, clean with soapy water, rinse and dry. |
Replacing the Oven Light
Each oven is equipped with two halogen lights located in the back wall of the oven.
The lights are switched on when the door is opened or when the oven is in a cooking cycle.
- The oven lights do not operate during self-clean.
Each light assembly consists of a removable lens, a light bulb and a light socket housing that is fixed in place (see Figure 17, next page).
To replace a light bulb (see figure 17, next page):
- Read WARNING on this page.
- Turn off power at the main power supply (fuse or breaker box).
- Unscrew lens and remove.
- Pull straight out on light bulb to remove from socket.
- Replace the bulb with a new one. Avoid pressing the bulb with fingers; Oils from hands can damage the bulb when it becomes hot
- The bulb is halogen: use one with the same Volt and Watt.
- Screw the lens back on.
- Replace the fan cover (if applicable).
- Turn power back on at the main power supply (fuse or breaker box).

WARNING
- Make sure the oven and lights are cool and power to the oven has been turned off before replacing the light bulb(s). Failure to do so could result in electrical shock or burns.
- The lenses must be in place when using the oven.
- The lenses serve to protect the light bulb from breaking.
- The lenses are made of glass. Handle carefully to avoid breaking. Broken glass could cause an injury.
Care and Maintenance
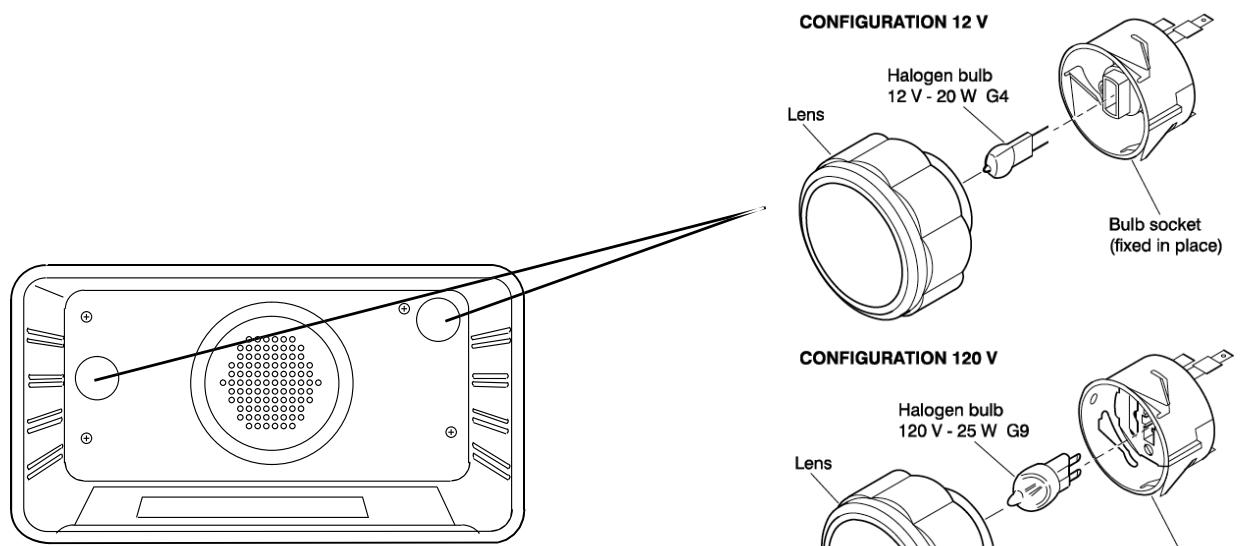
Figure 17: Oven Light
Removing the Oven Door
WARNING
- Make sure oven is cool and power to the oven has been turned off before removing the door. Failure to do so could result in electrical shock or burns.
- The oven door is heavy and fragile. Use both hands to remove the oven door. The door front is glass. Handle carefully to avoid breaking.
- Grasp only the sides of the oven door. Do not grasp the handle as it may swing in your hand and cause damage or injury.
- Failure to grasp the oven door firmly and properly could result in personal injury or product damage.
To Remove The Oven Door:
- Be sure to read the above WARNING before attempting to remove oven door.
- Open door completely.
- Lift hinge brackets (one on each side) into slots (see Figure 15).
- Close door slightly until hinge brackets lock into place.
- Close door about halfway (until it stops).
- Grasp firmly on both sides.
- Pull out and up. Place door in a stable location.
To Reinstall the Oven Door:
- Holding door firmly on both sides, drop hinges down and into hinge slots.
- Open door completely so that hinge brackets (one on each side) release.
- Open and close the door slowly and completely to test the installation.
The door should close easily and be straight, not crooked.

WARNING
To avoid injury from hinge brackets snapping closed, be sure that both levers are securely in place before removing door. Also, do not force door open or closed - the hinge could be damaged and injury could result.
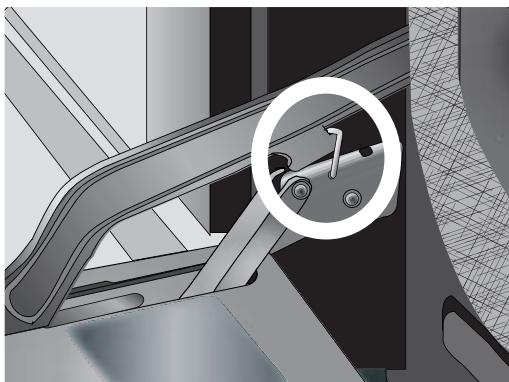
Figure 15: Hinge Bracket Locked Into Place

Figure 16: Hinge Bracket Released
Care and Maintenance
Do-It-Yourself Procedures
To Activate Sabbath Mode:
When activated, oven bakes for 72 hours before shutting off automatically. The mode is Sabbath compliant for religious faiths with "no work" requirements on Sabbath.
- Touch and hold SET CLOCK and TIMER until SELE deg is shown.
- Press + or - until SAb appears.
- Press SET CLOCK.
- Press + or - to select format (choose ON to activate Sabbath mode; choose OFF to turn it off).
- Hold SET CLOCK until clock appears in display. There is a five minute delay in which the following can be set:
- Turn knob to BAKE.
- Turn knob to set TEMPERATURE.
- Press LIGHT to turn oven lights on or off.
- After 5 minutes, the Sabbath mode is activated. The temperature no longer shows in the display. Only the time, "SAb" and the oven icon(s) are present. The preheat lights and all beeps are also disabled.
The oven lights cannot be changed after the Sabbath mode starts.
The Sabbath mode automatically cancels after 72 hours. To cancel the Sabbath mode early, turn the mode knob to OFF.
To Change Temperature Calibration:
The electronic thermostat has been carefully calibrated; However, if the browning results are too light or too dark for your preferences, you can raise or lower the setting.
- Touch and hold SET CLOCK and TIMER until SELE deg is shown.
- Press + or - until OFS appears.
- Press SET CLOCK.
- Press UPPER LOWER to select oven (double ovens only).
- Press + or - to set the number of degrees difference.
- Hold SET CLOCK until clock appears in display. NOTE: The available temperature offset range + or - 35^ . A change in the calibration affects all modes.
To Change Operating Voltage
The oven is preset for use with 240 VAC. If your residence has 208 VAC, the oven voltage can be changed.
208 V conversion must be done by a qualified technician. Contact your local appliance dealer or with an authorized Technical Center.
To Change Clock Format
The oven is preset with a 12-hour clock format; However, it can also display a 24-hour clock.
- Touch and hold SET CLOCK and TIMER until SELE deg is shown.
- Press + or - until Hr appears.
- Press SET CLOCK.
- Press + or - to select format (choose 12 for 12-hour format; choose 24 for 24-hour format).
- Hold SET CLOCK until clock appears in display.
To Change Temperature Format:
The oven has been preset to a Fahrenheit temperature format; However, it can also use a Celsius temperature format.
- Touch and hold SET CLOCK and TIMER until SELE deg appears.
- Press SET CLOCK.
- Press + or - to select format (choose ^ C for Celsius; choose ^ for Farenheit).
- Hold SET CLOCK until clock appears in display.
Self Help - Baking
Check the chart below for causes of the most common baking problems. Since the size, shape and material of baking utensils directly affect the baking results, the best solution may be to replace old baking utensils that have darkened and warped with age and use. Also check the convection baking chart on page 9, the rack position and the baking time.
Table 8: Self Help - Baking
| Baking Problem | Cause |
| Food browns unevenly | - Oven not preheated - Aluminum foil on oven rack or oven bottom - Baking utensil too large for recipe - Pans touching each other or oven walls |
| Food too brown on bottom | - Oven not preheated - Using glass, dull or darkened metal pans - Incorrect rack position - Pans touching each other or oven walls |
| Food is dry or has shrunk excessively | - Oven temperature too high - Baking time too long - Oven door opened frequently - Pan size too large |
| Food is baking or roasting too slowly | - Oven temperature too low - Oven not preheated - Oven door opened frequently - Tightly sealed with aluminum foil - Pan size too small |
| Pie crusts do not brown on bottom or have soggy crust | - Baking time not long enough - Using shiny steel pans - Incorrect rack position - Oven temperature is too low |
| Cakes pale, flat and may not be done inside | - Oven temperature too low - Incorrect baking time - Cake tested too soon - Oven door opened too often - Pan size too large |
| Cakes high in middle with crack on top | - Baking temperature too high - Baking time too long - Pans touching each other or oven walls - Incorrect rack position - Pan size too small |
| Pie crust edges too brown | - Oven temperature too high - Edges of crust too thin |
Self Help - Operation
Before calling for service, check the following:
Table 9: Self Help - Operation
| Oven Problem | Problem Solving Steps |
| F03 or F04 Error appear in the display window. | A problem with the lock occurred. Turn power off and turn it back on again after a few seconds. The oven should run a latch auto-test. If condition persists, note the code number and call an authorized technician. |
| Other F__Error appears in the display window. | Turn power off and turn it back on again after a few seconds. If condition persists, note the code number and call an authorized servicer. |
| The oven display stays OFF | Turn off power at the main power supply (fuse or breaker box). Turn breaker back on. The oven should reset itself and will be operable. If condition persists, call an authorized service center. |
| Cooling fan continues to run after oven is turned off | This is normal. The fan turns off automatically when the electronic components have cooled sufficiently. |
| Oven door is locked and will not release, even after cooling | Turn the oven off at the circuit breaker and wait a few seconds. Turn breaker back on. The oven should reset itself and will be operable. |
| Oven is not heating | Make sure the oven temperature has been selected. Check the circuit breaker or fuse box to your house. Make sure there is proper electrical power to the oven. |
| Oven is not cooking evenly | Check oven calibration. Adjust calibration if necessary (see Oven Offset, Page 17). Refer to cooking charts for recommended rack position. Always reduce recipe temperature by 25°F when baking with convention bake mode. |
| Oven temperature is too hot or too cold | The oven thermostat needs adjustment. See Calibrating Oven Temperature, Page 17. |
| Oven light is not working properly | Replace or reinsert the light bulb if loose or defective. See Page 15. Touching the bulb with fingers may cause the bulb to burn out. |
| Oven light stays on | Oven light comes on automatically when oven begins heating. Press LIGHT to turn oven light off. If oven is off, check for obstruction in oven door or check to see if hinge is bent. |
| Cannot remove lens cover on light | There may be soil build-up around the lens cover. Wipe lens cover area with a clean dry towel prior to attempting to remove the lens cover. |
| Oven will not self-clean properly | Allow the oven to cool before running self-clean. Always wipe out loose soil or heavy spills before running self-clean. If oven is badly soiled, set oven for a four-hour Self-Clean. See Self-Cleaning, Page 13. |
| Clock and timer are not working properly | Make sure there is proper electrical power to the oven. See the Clock and Timer sections on Pages 2 and 8. |
| Excessive moisture | When using bake mode, preheat the oven first. Convection bake will eliminate any moisture in oven (this is one of the advantages of convection). |
| Porcelain chips | When oven racks are removed and replaced, always tilt racks upward and do not force them to avoid chipping the porcelain. |
Table des matières
Cuisson a convection 9
Gril 10
Grill a convection 10
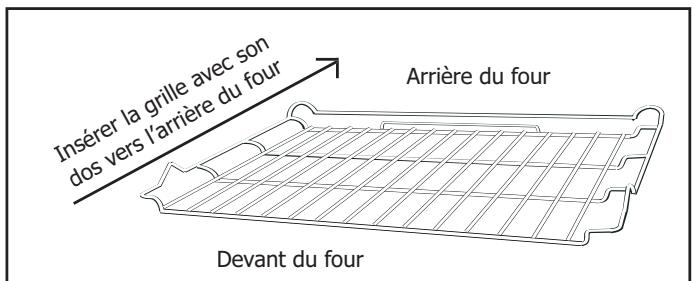
Figure 5: grille plate
MANUEL D'INSTALLATION DU FOUR
MANUAL DE INSTALLACION DEL HORNO
Important Safety Instructions
Table of Contents
Important Safety Instructions 1
Preparation 2
Installation 4
Final Steps. 5
Please read all instructions before installing this appliance.

WARNING
If the information in this manual is not followed exactly, a fire or explosion may result causing property damage, personal injury or death.
PARTS NEEDED:
- Tape Measure
Straight Edge or Ruler
Phillips Head Screwdriver
Level
Pencil - Wire Cutters or Wire Stripper
Wire Nuts - Volt Meter (0-250 VAC)
1" Hole Saw
Hand or Saber Saw - Drill and Drill Bit
- Safety Gloves and Goggles
- Cloth or cardboard (Optional - to Protect Floor)

WARNING
Before installing, turn power OFF at the service panel. Lock service panel to prevent power from being turned ON accidentally.

CAUTION
Do not use the oven for storage.
Unit is heavy and requires at least two people or proper equipment to move.
Important:
Save these instructions for the local inspector's use.
Installer:
Please leave the instructions with the unit for the owner
Owner:
Please save these instructions for future reference.
- Remove all tape and packaging before using the oven. Destroy the packaging after unpacking the oven. Never allow children to play with packaging material.
- Be sure your appliance is properly installed and grounded by a qualified technician in accordance with the National Electrical Code ANSI/ NFPA No. 7 latest edition (or the Canadian Electric Code) and local electrical code requirements.
Important: Local codes vary. Installation, electrical connections and grounding must comply with all applicable codes.
- Install only per installation instructions provided in the literature package for this oven.
- Ask your dealer to recommend a qualified technician and an authorized repair service.
- Learn how to disconnect the power to the oven at the circuit breaker or fuse box in case of an emergency.
- Do not repair or replace any part of the appliance unless specifically recommended in the manuals. All other servicing should be done by a qualified technician. This may reduce the risk of personal injury and damage to the oven.
- Never modify or alter the construction of an oven by removing panels, wire covers, screws, or any other part of the product.
DO NOT LIFT OVEN BY DOOR HANDLE.
Remove the door for easier handling and installation. See 'Removing the Oven Door' in the Maintenance section of the Care and Instructions Manual.
Preparation
Steps 1 through 3: Preparation
1. Preparation of Cabinets
General Instructions:
- The single oven can be installed under a counter or in a wall or cabinet.
- Choose a location away from strong drafts and where electrical power can be provided.
- The oven support surface must be a minimum 3/4'' thick plywood platform able to support 150 pounds. It must be solid, level and flush with the bottom of the cabinet cutout.
Cabinet Cutout Dimensions
See Table 1, below and Figures 1, 2 and 3 on following page for cutout dimensions.
2. Preparation of Electrical Outlet

Caution: Turn power off at service panel and vice panel before beginning.
General Information
Ovens are dual rated for use on either 120/240 VAC or 120/208 VAC. See Table 2 at right for power ratings and circuit breaker sizes based upon the supply voltage for each model.
The junction box must be located in the indicated space in Figures 1, 2 and 3, next page. It should be easily reached through the front of the cabinet where the oven will be located.
Verify that wiring to house is adequate.
Contact your local utility company to verify that the present electric service to your home is adequate. In some instances, the size of the wiring to the house and service switch must be increased to handle the electrical load demanded by the oven.
Verify that wiring inside house is adequate.
Most wiring codes require a separate circuit with separate disconnect switch and fuses either in the main entrance panel or in a separate switch and fuse box. Most local building regulations and codes require that electrical wiring be done by licensed electricians. Be sure to install your oven according to the electric codes in place in your region.
3. Preparation of Oven
Remove any remaining packaging and discard. Remove racks, accessories and oven door(s) and set aside. See instructions in Use and Care Manual for proper removal of oven doors. DO NOT lift oven by door handles!
Place oven in front of cabinets where it is to be installed. Rest it on a jack or other sturdy support so that it is in line with the cabinet cutout.
Table 2: Electrical Specifications
| Electrical Specifications | |||
| Model | Volts | Watts | Amps |
| 5HA-780X | 120/208 | 3,530 | 17,4 |
| 120/240 | 3,660 | 15,6 | |
| Ltr | Dimension | Single |
| 30" | ||
| A | Cutout Width | 28 1/2"-28 3/4" |
| B | Cutout Depth | 24 |
| C | Cutout Height | 23 5/8" |
| D | Floor to Bottom of Cutout | 34" |
| E | Top of Cutout to Opening Above | 1" min. |
| F | Bottom of Cutout to Opening Below | 1/4" min. |
| Single Oven Under Cabinet Installation Only: | ||
| G | Top of Cutout to Top of Counter | 4 1/2" min. |
| H | Side of Cutout to Adjacent Door orDrawer Front | 1/4" min. |
| I | Oven Door Frame Width | 29 1/2" |
Installation
Steps 1 through 3: Preparation (continued)
Cabinet Cutout Dimensions
Refer to the figures below and the table on the previous page for cabinet cutout dimensions.
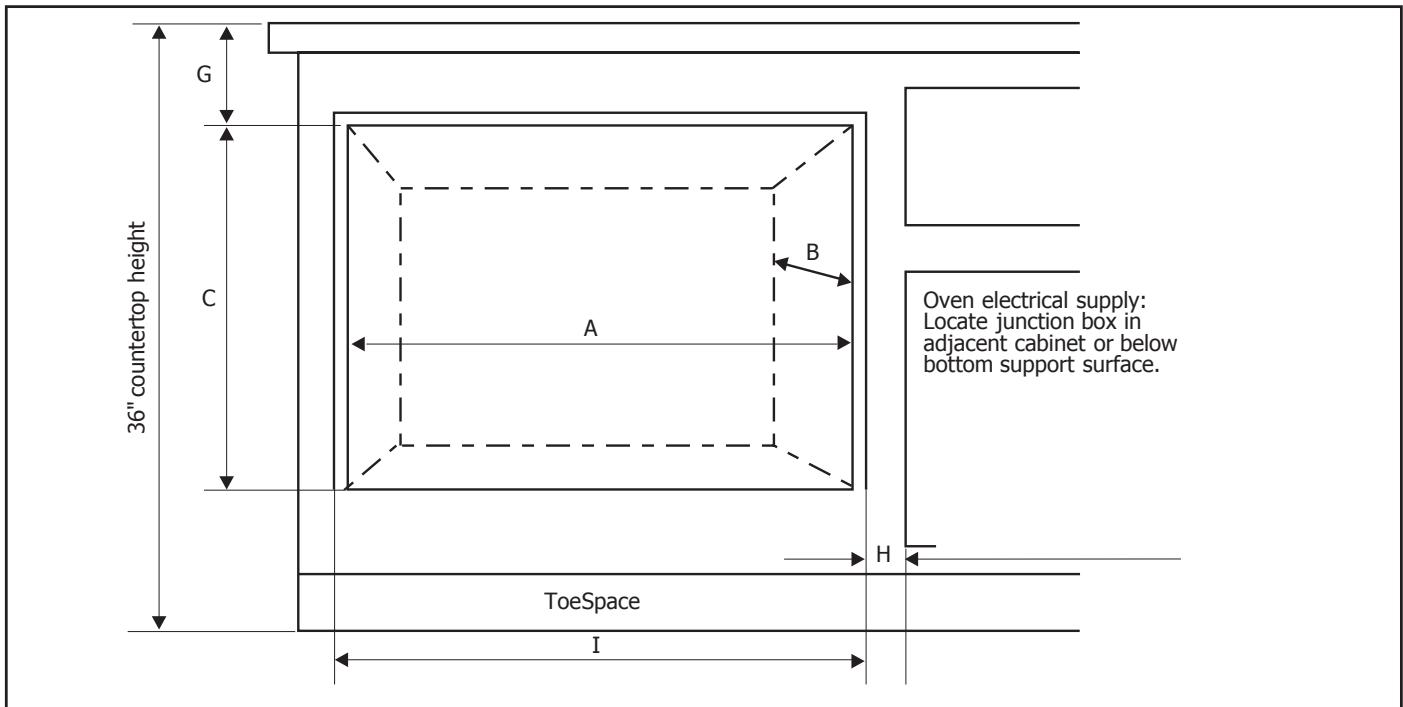
Figure 1: Single Oven Under Counter Cutout Dimensions
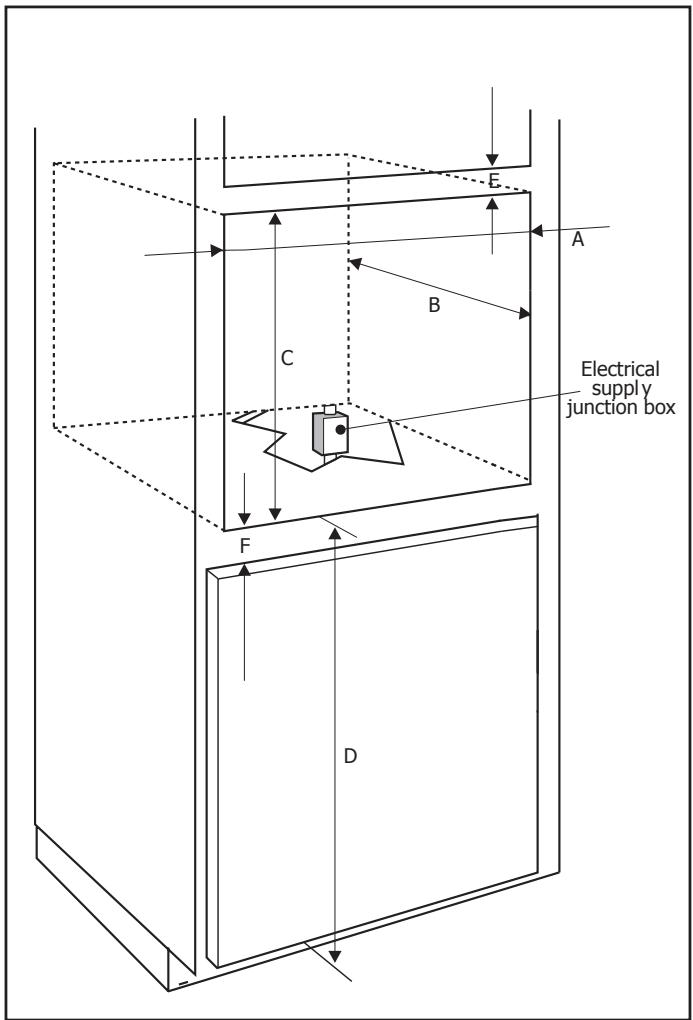
Figure 2: Single Oven Wall or Cabinet Cut-Out Dimensions
Installation
Step 4: Connect Electric
4. Connect Electric
Verify that electric to the junction box has been turned off before beginning this step.
General Instructions:
- Use copper wire ONLY. Wire size and connections must be suitable for the rating of the appliance per the National Electrical Code requirements or the Canadian Electric Code requirements.
- The flexible conduit extending from the oven should be connected directly to the junction box.
- Do not shorten flexible conduit.
- The junction box should be located to allow as much slack as possible between the junction box and the oven.
- A UL listed conduit connector must be provided at each end of the power supply cable.
- The four wire branch circuit connection is preferred, but where local codes permit, a three wire branch circuit connection is also acceptable.
Four Wire Connection (Preferred Method):
- Connect green ground wire from oven to green (or bare) ground wire in junction box.
- Connect red wire from oven to red wire in junction box.
- Connect black wire from oven to black wire in junction box.
- Connect white wire from oven to white (or gray) neutral wire in junction box.
Three Wire Connection :
Note: The four wire connection is preferred, but where local codes permit, the three wire connection is also acceptable.
- Connect red wire from oven to red wire in junction box.
- Connect black wire from oven to black wire in junction box.
- Connect both green ground wire and white wire from oven to white (or gray) neutral wire in junction box.

Figure 6: Location of rating plate
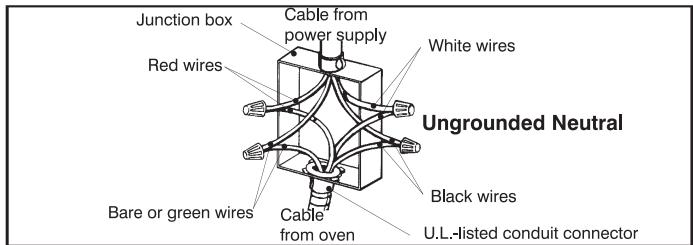
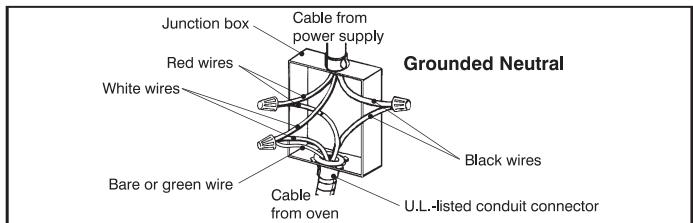
Figure 4: Four Wire Connection
Figure 5: Three Wire Connection
Connecting to a 208 V circuit:
The oven is pre-wired for connection to 240V, 60Hz supply, but can be converted for use with 208V, 60Hz supply.
- Turn power on a breaker.
- Press and hold SET CLOCK and TIMER for at least three seconds.
SeledeG appears in display.
- Press and hold STOP TIME and TIMER for at least three seconds.
Display is blank.
- Press and hold COOK TIME and STOP TIME for at least three seconds.
VOLT 240 is displayed.
- Press SET CLOCK.
- Press + or - to select appropriate voltage (choose 208 for 208 V connection; choose 240 to 240 V connection).
- Press SET CLOCK.
- Press and hold STOP TIME and TIMER for at least three seconds.
SeledeG appears in display
- Press and hold SET CLOCK for at least three seconds.
Time of day clock appears in display.
Final Steps
Step 5 and 6: Install Oven and Test Operation
5. Install Oven
- Slide oven into cabinet cutout.
- Push straight in until oven trim is flush with cabinet wall, being careful not to crimp flexible conduit between oven and cabinet back wall. The oven should be straight, not crooked.
- Install 2 screws through tap holes in trim.
6. Test Operation
- Verify that all control knobs are in the OFF position.
- Turn on power at the breaker.
The oven will beep and the clock will appear in the display. The lock icons in the display will blink on and off and you will hear a series of clicks as the oven performs a system check.
When successfully completed, only the clock time will appear in the display. The clock is preset to 12:00 AM.
- Check power at junction box using a volt meter.
For 240V installation, the reading between the red and black wires (line to line) should be 220 to 240 volts.
For 208 V installation, the reading between the red and black wires (line to line) should be 190 to 208 volts.
- Test the oven mode.
Turn cooking mode selector knob to BAKE. The following should occur:
-
350^ F (the default baking temperature) and COOK appear in the display.
Red preheat indicator lights up.
Oven light and fan turn on. -
If any of the tests do not result as explained above, contact with our authorised Thecnical Service. Otherwise, the installation is complete at this time.
| Ltr | Dimension | Single |
| 30" | ||
| A | Cutout Width | 28 1/2"-28 3/4" |
| B | Cutout Depth | 24 |
| C | Cutout Height | 23 5/8" |
| D | Floor to Bottom of Cutout | 34" |
| E | Top of Cutout to Opening Above | 1" min. |
| F | Bottom of Cutout to Opening Below | 1/4" min. |
| Single Oven Under Cabinet Installation Only: | ||
| G | Top of Cutout to Top of Counter | 4 1/2" min. |
| H | Side of Cutout to Adjacent Door orDrawer Front | 1/4" min. |
| I | Oven Door Frame Width | 29 1/2" |