USER MANUAL HC5810 REMINGTON
10/INT/HC5150 Version 05/10 Part No. T22-29490
REIMINGTON® is a Registered Trade Mark of
Spectrum Brands, Inc., or one of its subsidiaries
VARTA Consumer Batteries GmbH & Co. KGaA
Alfred-Krupp-Str.9
73479 Ellwangen
Germany
www.remington-europe.com
© 2010 SBI


C

HC5150

REMINGTON
PRO POWER HAIR CLIPPER

REMINGTON

3.

5.
GERMANY
BENELUX
FRANCE
DENMARK
ITALY
SCANDINAVIA
AUSTRIA
SWITZERLAND
PORTUGAL
GREECE
SPAIN
MALTA
Central Europe
00800/821700821
Mo.-Fr. 9 a.m.-5 p.m. Central European Time (free call)
E-Mail: service@remington-europe.com
www.remington-europe.com

Tel. 00800 821 700 82 (free call)
UNITED KINGDOM
CESKA REPUBLICIKA

Tel. +44 0800 212 438 (free call)
Rayovac Europe Ltd, Watermans House, Kingsbury Crescent, The Causeway, Staines, Middlesex, TW18 3BA, UNITED KINGDOM, www.remington.co.uk

Tel. +420 487 754 605
VARTA Baterie spo. l s.r., Jindificha z Lipé 108, 470 01 Ceska Lipa, CESKA REPUBLICA, www.cz.remington-europe.com
IRELAND

Tel. +353 (0) 1460 4711
MAGYARORSZAG
Remington Consumer Products, Unit 7C, Riverview Business Park, New Nangor Road, Dublin 22, IRELAND, www.remington.co.uk

Tel / fax 06 13300 404
TKFexpert SRL, 4th, Drumul Taberei St., sector 6, Bucharest, Romania, www.remington-europe.com
SLOVENIA
VRR d.o.o., Trzaska cesta 132, 1000 LJUBLJANA, www.remington-europe.com
ENGLISH
REMINGTON
Thank you for choosing Remington. Our products are designed to meet the highest standard of quality, functionality and design. We hope you enjoy using your new Remington® appliance. Please read the instructions for use carefully and keep in a safe place for future reference.

CAUTION
Use this appliance only for its intended use as described in this manual. Do not use attachments not recommended by Remington.
Do not use this product if it is not working correctly, if it has been dropped or damaged, or dropped into water.

DESCRIPTION
I. On/Off Switch
2.Blade set
3.2 attachment guide combs
4. Charging indicator light
5. Charging adaptor

GETTING STARTED
CHARGING YOUR HAIRCLIPPER
Before using your hair clipper for the first time, charge for 14-16 hours.
Ensure the product is switched off.
Connect the charging adaptor to the product and then to the mains.
- When the cord is connected to the mains, the charging indicator light will light up.
Your hair clipper cannot be overcharged. However, if the product is not going to be used for an extended period time (2-3 months), unplug it from the mains and store. Fully recharge your hair clipper when you would like to use it again.
To preserve the life of your batteries, let them run out every six months then recharge for 14-16 hours
ENGLISH
CORDEDUSE
Connect the charging adaptor to the product and then to the mains.
- When the cord is connected to the mains, the charging indicator light will light up.
CAUTION: Extended mains only use will result in the reduction of the battery life.
CORDLESS USE
- When the unit is switched on and fully charged, the product will provide you with a usage time of 30 minutes which will decrease during usage.

HOW TO USE
BEFORE STARTING THE CUT
- Inspect the clipper making sure that it is free from hair and dirt.
- Seat the person so that their head is approximately at your eye level.
- Before cutting, always comb the hair so it is tangle free and dry.
TO ATTACH A COMB
Hold the comb with its teeth upward.
Slide it onto and along the track of left and right side of the housing unit, the front of the combs firmly sits against the clipper blade.
| Comb position | Short comb | Long comb |
| 1 | 3 mm | 24 mm |
| 2 | 6 mm | 27 mm |
| 3 | 9 mm | 30 mm |
| 4 | 12 mm | 33 mm |
| 5 | 15 mm | 36 mm |
| 6 | 18 mm | 39 mm |
| 7 | 21 mm | 42 mm |
Imm length is achieved without any combs.
TO REMOVE THE COMB
Holding the clipper with the blades facing away from you, firmly push the comb upward and away from the blades.
The comb attachment is marked accordingly on its outside middle surface. (3-21mm & 24-42mm)
INSTRUCTIONS FOR HAIR CUTTING
NOTE: For even cutting, allow the comb attachment/blade to cut its way through the hair. Do not force it through quickly. If you are cutting for the first time, start with the maximum comp attachment.
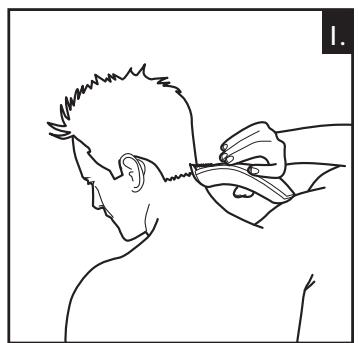
STEP I - Nape of the neck - PICTURE I
Set the comb attachment to 3mm or 6mm.
Hold the clipper with the blade teeth pointing upwards. Begin starting at the centre of the head at the base of the neck.
Slowly lift the clipper, working upwards and outwards through the hair, trimming just a little at a time.
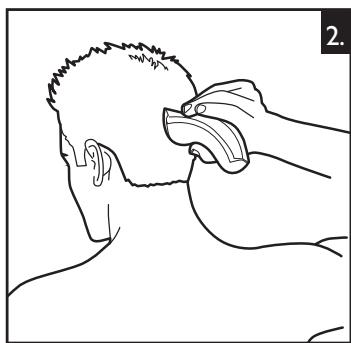
STEP 2 - Back of the head - PICTURE 2
With the comb attachment set on 12mm or 18mm, cut the hair at the back of the head.
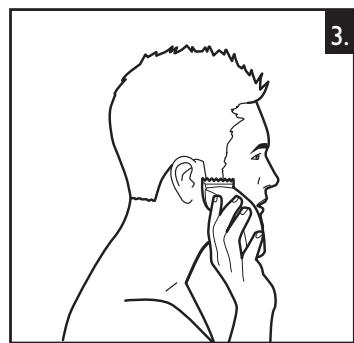
STEP 3 - Side of the head - PICTURE 3
- Set the comb attachment to 3mm or 6mm guide to trim sideburns. Then change the setting to 9mm and continue to cut to the top of the head.
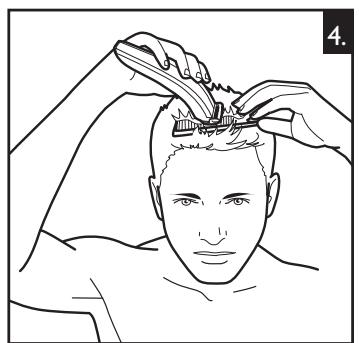
STEP 4 - Top of the head - PICTURE 4
Use the longer length comb attachment and set it to 24mm or 27mm then cut hair on top of the head against the direction in which the hair normally grows.
For longer hair on top, use the longer length comb attachment (24-42mm) to achieve desired style.
Always work from the back of the head.
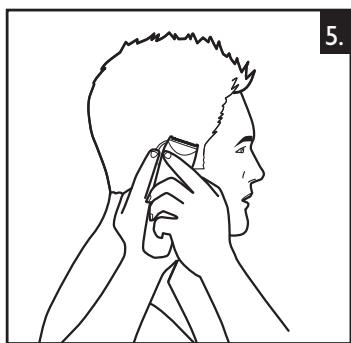
STEP 5 - The finishing touches - PICTURE 5
- Use the clipper without an attachment comb for close trimming around the base and sides of the neck. Use the ear comb guides to get a clean line around each ear. For the required ear comb guide, angle the clipper and lightly stroke around each ear to the back of the neck.
To produce a clean straight line at the sideburns, reverse the hair clipper. Place the reversed clipper at right angles to the head, tips of the blades lightly touching the skin and then work downwards.
SHORT TAPERED STYLES - "FLAT TOPS" & SHORT CUTS
Starting with the longest comb attached (24mm-42mm), cut from the back of the neck to the crown. Hold the guide comb flat against the head and slowly move the clipper through the hair, as shown. (PICTURE 1)
- Use the same procedure from the lower side to the upper side of the head, as illustrated. Then cut the hair against the direction in which it grows and level with the sides. (PICTURE 3)
To give a "flat top" look, the hair on top of the head must be cut over the top of a flat comb.
Use a closer guide comb to taper the hair down to the neckline as desired.
ENGLISH

CARE FOR YOUR HAIRCLIPPER
Your clipper is fitted with high quality blades. To ensure long lasting performance of your clipper, clean the blades and unit regularly. Always keep the attachment guide comb on the trimmer blade.
AFTER EACH USE
Ensure the clipper is switched off and disconnected from the mains.
Brush the accumulated hair from the blades. Do not submerge the clipper in water.
To clean the unit, wipe with a damp cloth and dry immediately.
Gently brush the remaining hairs away from the trimmer comb and trimmer blade.
Do not rinse the cutter assembly under water.
NOTE: Ensure that the clipper is turned off when cleaning.

CLEANING CAUTIONS
Only the adjustable trimmer comb and cutter assembly may be removed from the trimmer for cleaning.
Cleaning should only be done with a soft brush, such as the brush supplied with the product.
Only use the light-grade oil supplied or sewing machine oil on the blades.
Do not use harsh or corrosive cleaners on the units or their cutters.
Do not apply pressure or hard objects to cutters.
Do not disassemble cutter assembly.
Do not submerge in water as damage will occur.
NOTE: Ensure that the hair clipper is turned off when cleaning.
EVERY SIX MONTHS
At regular intervals the Blade Set should be removed and cleaned.
Remove the 2 screws retaining the fixed blade with a screwdriver. Do not remove bladeset.
Brush out hairs from between the blades with soft cleaning brush. Do not remove the lubricating grease from the blades. It is not necessary to remove the small moving blade from the unit.
If the moving blade has been removed this can be re-fitted by slotting the coated blade holder over the pin in the centre of the interior product head. The groove on the coated blade, just below the teeth, rests on a metal plate at the opposite side to the screw holes. The fixed blade is fitted with the raised profile pointing outwards and fixed with the 2 screws.
Note that if the blades are not correctly aligned then cutting efficiency will be impaired.
Place a few drops of cutter or sewing machine oil onto the blades. Wipe off excess oil.
CAUTION:
Do not use liquid cleaners on the blades or harsh or corrosive chemicals on the bladecasing. Always use a soft brush to remove the accumulated hairs.
Unplug the charge adaptor from the power outlet when fitting or removing attachments, or while cleaning the product.
Always store this appliance and cord in a moisture-free area.
Do not wrap the cord of the charging adaptor around the appliance.
STOP
IMPORTANT SAFETY INSTRUCTIONS
WARNING - TO REDUCE THE RISK OF BURNS, ELECTROCUTION, FIRE, OR INJURY TO PERSONS:
An appliance should never be left unattended when plugged into a power outlet.
- Keep the power plug and cord away from heated surfaces.
Make sure the power plug and cord do not get wet.
Do not unplug the product with wet hands.
Do not use the product with a damaged cord. A replacement can be obtained via the nearest Remington Service Centre.
Charge, use and store the product at a temperature between 15^ and 35^ .
Always unplug from the mains when cleaning.
Only use the parts supplied with the appliance.
The trimmer is not washable. If it falls into water, ensure the power outlet is switched off before removing.
Keep this product out of reach of children. The use of this appliance by persons with reduced physical, sensory or mental capabilities or lack of experience and knowledge can give cause to hazards. Persons responsible for their safety should give explicit instructions or supervise the use of the appliance.
ENGLISH

PROTECT THE ENVIRONMENT
The product contains a Nickel Metal Hydride cell unit. Do not dispose of the trimmer in household waste at the end of its useful life. Disposal can take place at our service centres or appropriate collection sites.
CAUTION:
Do not put in fire or mutilate your battery packs as they may burst or release toxic materials.

For further information on recycling see www.remington-europe.com

BATTERY REMOVAL
The battery must be removed from the appliance before it is scrapped.
The appliance must be disconnected from the supply mains when removing the battery.
Ensure the clipper is discharged of all power and disconnected from the mains.
Lift or pry the screw cover and unscrew I screw located on the back housing of the clipper.
Life or pry the clipper halves apart, exposing the battery on the printed circuit board.
Cut the tabs on both ends of the battery and remove it from the printed circuit board.
The battery is to be disposed of safety.

SERVICE AND WARRANTY
This product has been checked and is free of defects. We warrant this product against any defects that are due to faulty material or workmanship for a 3 year period from the original date of consumer purchase. If the product should become defective within the warranty period, we will repair any such defect or elect to replace the product or any part of it without charge provided there is proof of purchase. This does not mean an extension of the warranty period.
In the case of a warranty simply call the REMINGTON® Service Center in your region.
This warranty is offered over and above your normal statutory rights.
The warranty shall apply in all countries in which our product was sold via an authorised dealer.
This warranty does not include cutters which are consumable parts. Also not covered is damage to the product by accident or misuse, abuse, alteration to the product or use inconsistent with the technical and/or safety instructions required. This warranty shall not apply if the product has been dismantled or repaired by a person not authorised by us.
DEUTSCH
PASO I - NUCA - IMAGEN I
KORT AVSMALNANDE STIL - "PLATT TOPP" OCH KORTKLIPPNING
PASSO I - BASE DA NUCA - FIGURA I
KAZDYCH SEST MESIACOV
Čepele treba v pravidelnych intervaloch vybrat' a yčistit.
Skrutkovačom odmontujte 2 skrutky, ktoréupevnuju Čepele. Nemyberajte celú dostavu.
Mäkcoli Čiastioc kefkou odstráte vlaspemodzi Čepei. Neodstrañujte mazivo z Čepei. Malu pohyblívú Čepei ybervar'z jétrnodnynemùsîte.
Ak ste vybrali pohyblivu Čepe!, možete ji zo\novu nasadit' zaloZenim drziika chromovanej Čepele s otvorom na kolik v strede vnitra hlavy strojčeka. Dražka na chromovanej Čepei, rovo pod zubami, sa nacháda za kovovej platničke oproti otvorom pre skrutky. Pevná Čepe! je nasadená s vystupujucim profilom smerom von a zaistěn dvoma skrutkami.
Upozornenie: ak su Čepele nesprávné vyrovné, zhorsi sa učinnost strihania.
Kvpnite na cepele niekofko kvapiek dodanheo oleja alebo oleja do sijacich strojov. Utrite nadbytoznoy olej.
UPOZORNENIE:
Na cistenie pudzra nepeli nepouzijAVE tekele aldo drse nciesta prostriedy k a korozine chemikale. Na odstranenie nazbieranjh vlasov vdy pouzijave mukk kefu.
Pri zakladani alebo yberaniem vymennych hrebeñovych nástavcov alebo pri ciisteni strojěcka odpoje tnejabici adaptér z elektrické jaszuvky.
Tento pristroj a sietovy kabel drzte vzdy naSuchom mieste.
Napajaci snuru neomotavajte okolo nabijacieho adapéra.
STOP
DOLEZITE BEZPECNOSTNÉ POKNY
UPOZORNENZE-ZNIÖVANIE RIZIKA POPÄALENI, SMRTI SPOSBENEJE ELEKTRICKYM PRUDOM, POZIARU ALEBO ZRANENIA OSÖB:
Nikdy nenechavajte pristroj bez dozoru, ke' je zapojen'y do elektrickej siete.
Sietovy kabel a zastrchu nepokladajte na horuce povrchy.
Zabzepečte, aby sietový kabel a zastrčka neboli mokré.
Nezapajte alebo neodpajte vyrobok z elektrickej siete mokrymi rukami.
Nablaci adaptor nepouzivte s poskodenu napajacu snurov. Nahradyn diel si mozezte objednat' cz nea servisi stersted riskmoto Srsgre
SLOVENCINA
REMINGTON
Odporucana teplata pre nabijanie, pouzivanie a skladovanie toto vyrobku je 15 - 35^.
Pred cistenim pristoja ho vzdy odpoje z elektrickej siete.
Používajte iba súcasti dodané s pristrojom.
Tento zastrihavač vlasov sa nesmie umyvat'vo vode. Ked spadne do vody, pred jeho vytachnutim odpojatejaciuhur zu elektricke jaskuvky.
Tento vyrobok uchovájte mimo dosahu deti. Použivanie tohto pristroja osobami so zniženymi fyzickymi, zmyslovymi alebo mentalnymi schopnostami alebo s nedostatkom skusenosti a vedomsti要考虑byt' pričinou ohrzenia. Osoby zodpovedné za ich bezpečnost' by im mali poskýtnív'slyvóné poukny alebo dohladnut na použivanie pristroja.

OCHRANA ZIVOTNÉHO PROSTREDA
Sustac'tou yvobkue be nablajtelnba tatiu type NiMH. Na konci zivotnosti strojek neyshadzujte o komunlneho odapdu. Litkvidaciy vykonavajnu nae servisi'restsdiska alebo prisulne zberne mista.
POZOR: Bacteriu nehadzujte do ohna ani neprepichujte jej alob, pretoze moze ybuchn't alebo ypustat toxicke materialy.

Dalsie informacie o recyklacii najdeta na www.remington-europe.com

VYBRATIE BATERIE
Pred likvidaciou yberte zo strojceka batériu.
Pred vybratim baturie musite napajciu snuru strojceka odpojit z elektrickej zasuvky.
Uistite sa, ci je zaatrihavač vlasov uplné vybity a odpojte ho z elektricnej zasuvky.
Nadvihite alabo vypácte kryt skrutiek a odskrutkujte skrutku ě. I umiestnú na zadnej āsti teša strojěčka.
Nadvihite alebo oddte de seba polovice strojceka, cim sa okryje bateria na doske s plośnymi spojm.
Na obidvoch stranach baterie odpojte kontaktne pliesky a batériu vyberte z dosky s plosnymi spojmi.
Bateriu zlikvidujte bezpechnym sposobom.

SERVISA ZÁRUKA
IPEDA HauAOM CTPNXKIN
- y6eHNTecb B TOM, YTO MaSHINKHe He 3aqrpa3HeHa H He 3acopeHa.
- IocAHTDE TOPOKOMBYB BoI cO6PaeTcEbCTCPnHb BOACbTaK,TOb6Iero rOAOBA HAXOIAaCbI pRnSAHbTeBHO h YAOBHE BauINh Ia3.
- Pereda HauaOM TpuKkN TuaTeAbH OpaChEINTE BOAOcB. OHn DOAOKhbl 6bTb CYHMn H e CNYTAHBMHm.
ПРИКРЕНЕ HACADК-ГРБН
AepKeTe rpe6eHb 3y6aAMn BBePx
3a4KcpyHe HAcAky-pacChecy,peMeCTNB eB DAbHnaprabAAoux,paCNOAoJKeHNbHXaLeoHn pOToHApOyKcnpAeTbKHOKxyMaHNIH
CHRTHE HACADKNI-PTPBHRA
AepkMaHmHKyAe3BHeMOTc68,3HEPRINHOHaaBaHTeCH3yHa rpe6eHb HnapBaEHHNtO Ae3Bh.
B CENTHe NaHUYKOH CTOPOHE KAKDOH HACADKN-PaCecKYN YK3A3Ha COOTBETCTBYIOUAANHA BOAO NCPOE CTPNKHK (3-21 MMN 24-42 MM)
HHCTPYKUINIPOCTPNXKEBOAOC
PImHmuaHHe: DAOBHO TcRbHKN He6xDAHMO, YTObI HacaDAKa-paCheKcA/HoKn Camn PPOXDAH KcbO3b BOaOLCb. He npHaarateY cUHMa CueBAy UckOpHT NpOABJHKeHc. ECAbl BoNtAcTPhaTe BOaOLCb B nepBb paa, IcnOa3Byte rpe6EH DaA KMCMAaBHON DAmblBOAe
PyCCKN
I -ANHNAEN-PNCYHOKI
YcTaHOBnTe HacaKy-paChecky B IIOAOXeHne 3 MM HAN 6 MM.
AepKHTe MaunHky 3y6zamn Ae3Bna HabePx. HaHNTe B ueHTpe rOAnobbl y OCHOBaHNs
MeAeHNOPONEtATE MAUNHIOK NOAOCLAM HABEPX NOT CEPEAHNb13aTbIAKA,KAKDbIpa3 COPTPRAA HbIe HeoBaOIE KOAHECTBO AOAC.
UAR2-3ATbIAOK-PNCYHOK2
VctaHOBHTHacaKy-pacChecy BnOAneHne 12 MM Hn 18 MM nIOCTpHnTe BOACbHa 3aTbIaKE.
IIAF3-IO BOKAMTOAOBbl-PNCYHOK3
VctaHOBHte HAcAky-paceeKy B NOAOJEHHe 3 MM NIA 6 MM DAA NOpABnBnAHn8 BaKeHbAp.
PiocAE TOTO YCTaHOBHte HAcAky-paceeKy B NOAOJEHHe 9 MM N IpoOJaKaIte cTPhKKy nO
hapraeHN K MakuJHKe.
UAR4-BEPXTOAOBbl-PNCYHOK4
Bocnoa3bYIEeAaHnHMAACaHPO-PAeCKeHc, yCTAHOBHe BEE aBOJXeAE 24 MM HN 27 MM, AAR CTKHNBOAOC HA BEPXHEI YACTH ROAOJI. CcoTPhRaite BOAcBI pNOTH HANpABEAHIN XH poCTA.
Aa DTRPKH60AeAAHHN6B OAOc, pactyHXu HBXKHeYtACTnOHOBBi, hCNOA3bYte AAMHYIO HAcAky-pacChecky (24-42 MM), KOTOPAR NO3BOAHT NPOUYHTbJEaAEMyo MObAeb TCHPKH60
CTpnKky BceIa HauHnHaTe C 3aHHeu ChaTn rOAObl.
UAR5-3ABEPWAAIOUNE WTPNXN-PNCYHOK5
MaaHHKO63eRb6H KOPOTK NOACTPRHTE BOLOcbY OCHOBAHN N NO 6OKAM WEN. Icnoa3yTe HACdAky AAR CTPNKHXI BOKPY YUW EAL NOAYEHNA POBHORO KOHTpy.AepkNTe MaunHKY NOA yLOM N, pNlAAraJ MNNHMYM YCNNI, NOACTPRHTE BOLOcb BOKpy YUW, ABINRAcB HAnpaBaeHN 34HeJ qactn WEn.
TtO6bIaKyyPHTAOIOAPOBHb7kAIO,NOBEPHNTAEMAHNHKYAAETCPHHKBOAOHC 180 rpaAcob. PnCTABtE NOBEPHYKO MAIMHKNYIOAIPMByIgAMKTOAOBE.PIN3OTOM KOHNJIe3BNDAJKHBI AANCbCAEKA pNPKACATCBKa KOKE.PIOACTPNITRE BOAOCb CBEXy BHN3.
KOPOTKME CTYIENHATbIE PIPNUECKIN - «ПАOCKИВЕРX» И KOPOTKAR CTPNKIME
VCTAHOBHBAAMHYKO HACaKy-pacChecy (24-42 MM) COCTPHTAeTOBOcbl, DBNARcB 03aHEn qaTHEN WEN KMAkyIke. CAEbHtze 3e TAm, YTObHs HAcKa-pacChecka pabHOmePHO npHaerAA K rOAbOE, nMeDAEHNO pOABHArte MauHHNky epe3 BOACOH NpOKOB, kKaON3aA H PNCY/HKE I.
CaeyBn bIeHNpBNBEAENHIM PekOHEAuaHm, COCTPNHTE BOACbH a BEpxHxN cHtAn FOLOobi, ABINrABc OTO Aka MakyuSyce (cm.PHCNYOK).3aTeM cOCTPNHTe BOACb,pactyue n6 BoKAM ROAOBo. POCTPRAITE BOACCb pnoTb HAPBAENH xH poCTA.(PCVHYOK 3)
AaO3aAnnPnmeckn《IaocKnBepx》NOAcTprntFE BOaOcbHa MaKyuKe Haa YApEkn-BAeMoN PAaUMn paCeCKoN.
PnI NOMOUIO 0oEe KOPOTKORO rpe6Hr CTyENHATO NOCTPRHTE BOAOcI NO HApRbAE-HNIO BH3K AHHNIU
yXoA 3A MAUHHKOI AIA CTPNKKN BOLOC
Maunnka Cha6kena BbICOKAKeCTBeHbIMN HOKAM. Yo6bl npOaMTb cPOK CAYK6bl MaunHHK, He6xoMMo PeyAraHPO OCHuATte ee HOxN HOPcYnc. He CHImaTHe HacaKy-pacYeCKy C HoJA TpHMMepa.
IPOCAKAKDOFOHCIOAb3OBAHNA
6e_ nTecbbTom,TO npH6Op BbIKAOueH N OTcoeAHHeH OT cETn nepemehoro Toka.
C NIOOMsIbIO UeToUKN ydaHnTe C HoxKe OCTaTKN BOAoC. He norgyKaIte MaunHky B BoADy.
IpOToPnTe KOpNc MaunHKn BλaKHO TpIOnQKO HemeAeHNO BbITpntE erO hAcyxo.
C NOMOJIbIO UeToUKN aKKyPaTHo YdaANTE OCTaTKI BOLOC C HacaKn-paCeckN I HOXA TpIMMepa.
3aPpeHNO pombBaTb HOKeBOB 6AOK IOA CTpye BOAbI.
Прмочи:О6Я3aTeMbHO BbIaUChte MaunHky nepea nCTKoI.

MEPBI I PEPDOCTOPOXHOCTH PPN YNCTKE
PbO uCHTE OTHMMEPO MOXHO OTOEADHnTB Tohko peyAnpyemyo HacaKy-pacCheky N HOKEB 6aok.
UCTAOKA HBAIOAHRTBCNCKAOHHTAEBO MNGKOH IETOCHKOI,NOAO6HO TOI,KOTOPAR BXOAMT B KOMPTAKE.
HaHOCHTe HAOKTHO TaBko CBETAOE MCAO,IOCTABAREMOE B KOMIAEKTE,AH60MACAO AARUBEBHbIX MAUHH.
HeNcIbAHTy CBAHbOAEiHTBkyIOue HnEaKHe UcTCTRue cpeCTBa AAR OCHCTKN YCTPOIcTBAAH HOJEBOGO 6oKa.
He NyockaIte KOHTAKTA HOXeBOO 6oKA O C TBEApBIMN PpeAMETAMn H He npHaarAte K Hemy Upe3MeHOPHO DAABAHy.
He pa36npaTHeXeBOH 6oK.
Bo n36ekannne noBpeKdEHHe NoIgpyKaIte npI6Op B vOy.
PnmeaHHe: nepea OunchKo MaunHKy AaCTPNKKBOAoc Heo6xOAnMO BbIKHOHTb.
PA3B IIOAFOAA
PeyarpoCHIMaHTe IN PPOUHuaTe 6AOK Ae3Bn.
OTBnHTTE npn NOMOOn OTBePTKn 2 BnHTa, KcNpyUoXx Ae3BHe. He ChmMaTe 6AOK ae3BnI.
CMA3HOHE M4KIOI 50HIOHO BOACBO, OCTABIMEC MEKOY AEXBHMN. He ydaAaJIe C aE3-Ni Bm3AOHOE BESECTBO. The HEO6XoAMOHTCHINMBAI MAELHKO NOAOXBHXO AE3BE NcPbOBA.
HbHTyBn HOOK MOHO YCTAHOBH Na HcTe, NOeMCTHE DEXKATEAE HOKO C NOKPbTHEM Ha 1uTbPEK, HXAOADJHNCI NO LHTpy BHYPrn TOBOIKN. T3a HONKe C NOKpBTNHm, HXAOADJHNCI HENOCpeACTBeHHO No pEkyueo NOBEPHXocTBIO, 3aHKnCpYETcH a MToaAHHeCKO IaCTHNE cTOCHOBi, PNOBTHOANOOHIOBTEOPCHM AAR BHOT. HoK B CAERKa PnHOAnDRTom OAOJxEHIN NPOCooHNETc K MaUSHNKHe N KHCIPYETc C nMOUH2 B HHTB.
ECANHOKIN6ydyT yCTaHOBAEHbI CnepeKOcOM,3ofoeKTMBHOCTb pe3KNyxydunTcA.
HaHECHTE HeCKaBO KaNEb MacaA AAR HOKe HAnu HUeBHO MauHNKn HAe3Bn. COTpIte N3AuHHeE MAO.
BHIMAHNE:
He Noa3bYtceB XHdKHMn YHCTaLMMn CpeAeTBAMn AAA OHCTKN HOXKeH HAN CbHbOeHcTeBHyoHMM, EaKMn XHMKAtAmn AAA YHCTKN KOpTyCa. OctaTKN BOLOC BcERa YAaALrTe MFKOn IeToHOHKO.
PyCCKN
INTyCtAHOBKe HN CHTNIH CAAOK NIO OCHTE YCTPOCTBAOTKIAOHTAE aADTIPET AAR 3APAKN OT CET
XpaHnTe npH6Op n 3eKToPouHpy B cyxOM IomeuEHH.
He 6MaTbIaTe uHpy aAnTepa AaA 3apAKN BOKpy YcTPOCTBA.

INHCTPyKUINIIOBE3OPIACHOCTNI
BHIMAHNE! -ДАг CHINKEHMH PMCKA OXKOTOB, YDAAPA 3AEGKTPNUECKM TOKOM, BO3TOPAHANI UNTAPMBI?
Hikorda He octabAte NOcoaHEHbK 3eKtpocTe np6op 6e3 npncmOtpa.
He KlaaNTe WTeNceAByIO BnAky N uHyp Ha rOpAne NOBepxHOCTN.
He no3BOAry Te wTeNCEaBHOH BnAke HhHyp HAMOKHyTb.
He noKauyTe np6op K 3eKtpocetn H He oTcoeAnHraTe erO OT Hee MOKpbIM pyKaMn.
He IIOAOJIyBte YCTe PQOBCTBO, ECAN HYP NOPBEXAEH.3AMEHNTo NOPBEXAHMHNI UHP NITAHJMA MOKH, O a 6aHKJHwEM CepBHCNOM CEHTRE Remington
3apKaITe,ncnOa3yIte n xpaHITe np6Op npu Tempepatye 15^ - 35^
Pn uCTKe BcERda OTcoeHNHnTe np6Op ot 3AekTPOCeTn.
Vcnoab3yIte NCKAIOHTeABHO BXO4JHNE B KOMTAEtAH.
HMMNepHe3MaBtB.EcAnOH CAYaHNO OKAKETC B BOAE,NEpeA HBAeHemEM YCTPOCTBAY6bEHTnCbTO OHOTOKAIOENTO CETNIPTAHNA.
XpaHnB B HeOAcTyNHOM AIA AeTe MeMe. NcIOaMb3OBaHHe 3TOO pNb6OpA IaAMC n YMeHNbHEHbIMM FINHecKIMM, YCbCTBtAEbHBIMM HAI MYNCTBEHbIMM CIOCo5HOCTMm HAI HEXbATKO ONbTA HNAHMOH MoeTb 6ToI NaChbIM. Iua, OETBCTBeHbHBe 3A Hx Be3OAnoCHObTb, DOAXHb DAy TcHKe NHCHTpykUIM KAN HOHTPOMPOBaT bNcIOaBOHaHIn apnAPata.

3AUHTA OKPYXKAIOUCEI CPEAbI
UcypoBTOO cHsEHO NHEKb- metAAA-RHApAHOH AKyMAYOPHOB 6aTepeR. IIOCTeHmI cPoka ClyKb bTnMPMeHa He BbpaCbBAIte rTo EBMcte C b6tobMbOM NToDAAMN V3dAe MOnKHO yTHMaHbOPaBt B aHauix cepBNCbX cTePHTxA mCteuAAH3bPOBaHbMbN pHmEHbX pNYHKtA
PPEaYPiEKAeHHe:
3aepaaeCTo6bOATB B OBOH MAn DeOpMPoABoTb GbAteRbHeBb 6AoKH, NOKoAbky 30 MOKET pNBEcTH K BbByB MAn BbOFOY TOCKMHNX BEUcCTB.

3a OAnOAnHTeBAHn HINΦOPMAUENo NOBTOPOM HNcOaB3OBAHNi MaTePNaOb 6ObpaauaTecb, NaOKyAChuHa, NaCaiWefwww.remington-europe.com

N3BAEYEHNE BATAPEH
IpepeA yTHnH3aUneH Heo6xoAMMo N3BaeCb aKKyMyAToPHyO 6aTapeHO n3 yCTpoiCTBa.
Pn n3BaeueHnn 6aTapeu yCTpOJCTBO DOAxAHO 6bITb OTCOeAHHeHO OT cETn 3AEKTPOINTaHH.
6e_山 nTecb, yTo MaunHka dA CTpKKn NIOHOCTbO pa3pXKeHa OTKIOUoHea OT cETn NTaHna.
ПОДИМНТЕ ИПОДАБЛТЕ КБИЧКУ ВИТHA I OTKPYTHTE BIVHT, PACNOAOXEGHBNI HA TbIbHONCTOPOK KOPNYCA MASTINKHN DAETPKNK...
PINOHOAMNHMTAE HNOAADBeHTe OAHy CTbE MaHNNKnO,OTAEaER ee OT APYrO,TOB6I NOAYHTb DOCTYN KAKMYAETOPHO BATapee, PACAOXHEOKH N HAeTHOH NIAATE.
PerepekBeTe KOHTAKTbHa 06OHX KOHxA kKyMAYaTOPHOB 6aTepei n CHMNTe ee c neatHOI PAAHt.
YTHH3aUIO 6aTapeIN CAEyET IPOBOAHTb C CO6IOAeHNEM IpaBn 6e3ONaCHOCTN.

CEPBNUCHOE OBCAYKINBAHNE I TAPAHTNA
PnB6op npOBepen H nDeeKToB He NMeET. Mbl rapaHTnpyem OTCYCTBNE B npBope AeEeKTOB, BO3NHkAIOUHxN 33-34 NEHAeCETBEHnO MAtePnAAu HAm HEKAeCTBEHNO CbOpKn, B TeYehene rapaHTnHOro cpoKa co DnH NOyKTHn PnpOBA. Ean B TceHHe RapaHTnHOro cpoKa BaW npB6p BlBtE N3 CTOB, Mbl - pNl HAaMHUY eHa - BeCNATHO OTpeMOHTNpye ERO mAn 3aEMHM HA HOBBi.
Cpok rapaHTn TEM cMbIM He npOdaeBaetc.
B CAYAe IOAMOKN pRb6Opa CBKHTeCb NO TEaEOHy C cEBINbIM cENTPOM Remington B BaWEM perHOE.
Aaepca n Teaeohbi CepBCHbIX cIeHTPOB MoXHO 3aHbTb No 6cEaTHAOy TaeOFOH roPAHn AHMN 8-800-100-8011* (EBOHNc 6cEaTHAHN o TEPPHTONP DPH)
AaHnra rapaTna npeOCTaBAeTcB D OonoAHeHne K BaIIM 3aKOHbIM npabAM nOTpe6nteA.
IAPHTNArEAECTBtAeBbBA BO CECTBx CTpAHax, B KOTOpbIx Bbl pno6peHn pnp6Op y hauero ABotPBOAHHO DAhepa.
IapantnHe paCnpocptpaHreTcHa AeEeKtbl, Bo3NHKUme H3-3a HenpabInbHOk cKnlyatauIm npH6opa, IcNObTaobAnr Ero He No Ha3HuEnO, HmEHeHn KOHCTpyKUnn HmE Heo6bAoDHeH NHCHTpyKUnn NO TExNHueckOn KcNlAytaunn HmMepam pNeOCTOpoxHoCTn. TaHnTHn NCTKaet, eCm np6op 6bl Pa306pahn OtnPemOHTOpOBaH Be ATOBt3OBAHbHM HAmn AHOM.
Cpok cayx6bni 3deAna 3 roda c daTbi npoDAaKn.
TAPAHNTHbI TALOH
MoAeAb REMINGTON HC5150
Aata npoDaxn
PpOaBeu
(noaNcB,neuatb)
H3eAnepoBepeno. PpeTeH3n He HmeO.
C yCAOBHn rapaHTn O3HaKOMaeh n corlaaceH.
nokynataeM.I.
TÜRKÇE
ADIM I - ENSE TRASI - RESIM I
PASUL I - CEIFA - IMAGINEA I
Fixati pieptenele ataabil la 3mm Sau 6mm.
Tinei aparatul de tuns cun dintii lamei orientaitsin sus. Incepi sa tundetei din centrul capului de la baza gatalu.
Ridicatu incet aparatul de tuns,deplasandu-va in sus si catre exterior prin parr,tunzand putin cate putin.
PASUL 2 - PARTEA DIN SPATE A CAPULUI - IMAGINEA 2
IPIN APX'IZETE TO KO'YPEMA
TIA NA NPOZAPT'HSETE MIA XT'ENA
KpatnoTe Tn XtEv aE Ta bovia Tnc npoc ta naw.
ToOeHTnOte nTtEVA tOu aauAIO tN ovApatepKn Tn deEia nEupa Tou nepiBAAuTOc Ka eTakivnTe nKata uKoc tw auAikw, n npooTiv nEupa TNC tXeVAC epaOpceI OaTebpA oTn AIEOA nUxvHc.
Beaaiweite otE xete anevepyoiooei Tnv koupeutikn uxavkai Tnv exetexybaea anot npia.
Kαρισίμε τη μοβύστα τι πίχες Μουν ὄκευτι Πτις λεπιδές, Μη βιθιζε τήν Μουρεική μχανή εόνρο.
Tov kai aoiopno tnc oadac, xpoiaonoiote eva vwno navi kai katontv okouniote nyn aoeow.
Bouptioate ana tic unoloinec troxc ano Tt xteva kai Tn Iaia Ta Koupetuihnc mxvachc.
Mny EeAevE Tn diataeKornc eVepo.
VAŽNE SIGURNOSNE UPUTE
UPOZORENJE - KAKO BISTE SMANJILI RIZIK OD OPEKLINA, UDARA STRUJE, POZARA IILI OZLJEDA OSoba:
Uredaj nikada ne smijete ostaviti bez nadzora kada je ukljucen u strujnu uticnicu.
Strujni utikač i kabel držite dalje od zagrijanih povrsina.
Uvjerite se da strujni utikač i kabel nisu vlažni.
Ne isklučujte proizvod mokrim rukama.
Uredaj se ne smje rabiti ako je kabel ostecen. Zamjenski mozte dobiti u servinom centru poduzeca Remington.
Rabite i cuvaje proizvod na temperature izmedu 15^ i 35 ^ C
Uvijek odspojite iz struje kada ciscenje
Koristite samo dijelove koje ste dobili s uredajem.
Sisac se ne pere. Ako upadne u vodu, prije vadenja izvucite njegov utiack iz uticnice.
Drzite ovaj proizvod izvan domasaja djece. Ako ovaj uredaj koriste osope smanjenih fizichik, perceptivni信息系统 mentalinahs posbosnosti ili osi kobe joqne nemaju iskustva, moze doci do opasosti. Osobe koje nadziru nijhovu signormst trebaju im dati jasne upute ili nagdgelati uporabu uredaja.


ZASTITA OKOLISA
Proizvod sadrži poniklanu metalnu hidridnu celiju. Šišć ne bacajte u kuci ni opad po isteku njegov radnog vijeka. Odložite ga u našem servisnom centru ili na previdenim sabirnim mestima.
OPREZ:
Ne stavljaje u vatu i ne unistavaje pakiranja baterija jer ona mogu izavati plamen ili ispustiti steţne vturni.

Daljnje informacije o reciklaranju vidjeti na: www.remington-europe.com
Izjava o sukladnosti nalazi se na nasoj web stranici www.remington-europe.com
HRVATSKI JEZIK / SRPSKI JEZIK

VADENJE BATERIJE
Bateriju morate izvaditi iz uredaja prije odlaganja na sabirno mjesto.
Urej mora biti iskljuen iz struje kada uklanjate bateriju.
Provjerite je li baterija sišačispražnjena te je li šišac iskopćan iz struje.
- PodignitePoklopacvija pa odvjte I vijak sa straznje strane kuciesta sišača.
Odovite polovice sisača kako biste dosl od baterije na tiskanoj pločici.
Odrezite jezičke s oba kraja baterije te je uklonite s tiskane pločice.
Bateriju treba sigurno odloziti na optrad.

SERVIS I JAMSTVO
abaw all g j 15u Joo Lioic jg11ofoosui
a b c a b c d e g f g g g g g g
Lg1

sla21g laailljj .1
1jia aicgao 2
12.1gj111a1gjbl0012.3
1 4
j = L1,L2,1 J0j1^-15.
1

jui jai iSlo jai
17-12 jy cgljai aJ uJUJIa. 8o JgJgJauu Jauu Jpuiuui
.
.1ai 1jg3i j 10g5i
Lg≤JJIJIJIJIJIJIJIJIJIJIJIJIJIJIJIJIJIJIJIJIJIJIJIJIJIJIJIJIJIJIJIJIJIJIJIJIJIJIJIJIJIJIJIJIJIJIJIJIJIJIJIJIJIJIJIJIJIJIJIJIJIJIJIJIJIJIJIJIJIJIJIJIJIJIJIJIJIJIJIJIJIJIJIJIJIJIJIJIJIJIJIJIJIJIJIJIJIJIJIJI
J 1
p 1000000000000000000000000000000000000000000
.4jg auiy jll llog11 uc alai jao .(gai r-5) algoa oioj oyiaol ciill
.01


aaiw aio g yaiu J5 aicj jsc J Lill Jg 0c Jiaai .aclw 17 g 12 jy jy
jll jolj lalei
jLJI j0gJgLlI JgLgJ
J 1111
Lac JJIaJJIyaiI aieil 1
LwU1 puiuW
r. gui piusiu wiy iig yaii jy. Lols Js uu ng aag
pLsiWg Joai a
plesii 21 a.s.

a
g jai gjg jai oog Loo aol aal aia slo
1.
cysgssy
2.
Lilio ycg LgL gS: yall Jao Jao Jao
b00s
1c8 ailiwi aii iui
oLo 1 g oLo r g aI I aI I pss
J 1 J 1 J 1 J 1 J 1 J 1 J 1 J 1 J 1 J 1 J 1 J 1 J 1 J 1
.
m = 311
1
Lc Lai 1g JSLIJI g aalll aal lgl
aJ111 aJIaI aJIaI aJIaI aJIaI aJIaI
gglgllglaal 5j j Jllo yo yy
.
aagbll no jIg JSLg aillu o jxla loia
jLgJgJgJgJgJgJgJgJg


Joo
STOP
j 1
y 1
aLwll 1Jg
J 1
ailln gul slygsl 12
Jg 15
. Remington
g 10 g jgai jia jia jia jia jia jia jia jia jia jia
.
jgl 20 aogjdl jg 1aas pssu
Jc Jc Jc Jc Jc Jc Jc Jc Jc Jc Jc Jc Jc Jc Jc Jc Jc Jc Jc Jc Jc Jc Jc Jc Jc Jc Jc Jc Jc Jc Jc Jc Jc Jc
- f( x) = x - ax^2 + bx + c .
jgl11 1011 jgl21 Jglio 11
a a a i g iiaiaiaiaiaiaiaiaiaiaiaiaiaiaiaiaiaiaiaiaiaiaiaiaiaiaiaiaiaiaiaiaiaiaiaiaiaiaiaiaiaiaiaiaiaiaiaiaia
52gdoLwIcJnaiLJIyIcU. JbLio gdoJgdo
jLg11111111111111111111111
iJl 1c Jb0

g 1
gjy jgio yaii li c. lgIeoiwia xuolglij 1iyaii
aLil1 gao jgogj aooJzJy JLoLoo
:
JySgJyKo no zlll I yIyIyIyIyIyIyIyIyIy