
COOKING HOB - Hob FAGOR - Free user manual and instructions
Find the device manual for free COOKING HOB FAGOR in PDF.

User questions about COOKING HOB FAGOR
0 question about this device. Answer the ones you know or ask your own.
Ask a new question about this device
Download the instructions for your Hob in PDF format for free! Find your manual COOKING HOB - FAGOR and take your electronic device back in hand. On this page are published all the documents necessary for the use of your device. COOKING HOB by FAGOR.
USER MANUAL COOKING HOB FAGOR
EN GUIDE TO INSTALLATION AND USE
- Safety Guidelines 49
Description of Your Appliance 50
Environmental Protection 49
1 / INSTALLING YOUR APPLIANCE
- Proper positioning 51
- Building in 51
- Hook-up 52
2 / USING YOUR APPLIANCE
- Description of the top 53
Cookware for induction 54 - Which cooking zone should you use based on your cookware? 54
Vitroceramic cookware 55
Description of control panel 56 - Powering on 56
- Adjusting the power 56
- Setting the timers 56
- Using the "child safety device" 56
·General shutdown 56
Additional zone 56 - Safeties during operation 57
3 / DAILY CARE OF YOUR APPLIANCE
- Protecting your appliance 58
- Maintaining your appliance 58
4 / SPECIAL MESSAGES, DIFFICULTIES
During initial use 59
- When powering on 59
During operation 59
6 / COOKING CHART
- Cooking chart for food types 60
As part of our commitment to constantly improving our products, we reserve the right to make changes to them based on technological advances to their technical, functional and/or aesthetic properties.

Attention
Before installing and using your appliance, please carefully read this Guide to Installation and Use, which will allow you to quickly familiarise yourself with its operation.
SAFETY GUIDELINES
We have designed this cooking hob for use by private persons in their homes.
These cooking hobs are meant to be used exclusively for cooking beverages and foodstuffs and do not contain any asbestos-based materials.
- Residual heat
A cooking zone can remain hot for several minutes after use.
An "H" is displayed during this period.
Avoid touching the hot areas during this time.

Warning
Do not touch glowing cooking zones, burn risk.
Following extended power outage, another light display may appear, it can be switched off by pressing any touch control. Glowing cooking zone temperatures may however remain high.
- Child safety device
Your hob is equipped with a child safety device that locks its operation after use or during cooking (See "Using the Child Safety Device" section).
Do not forget to unlock it before using the hob again.
- For users of pacemakers and active implants
The functioning of the hob conforms to current electromagnetic interference standards and thus is in total compliance with legal requirements (89/336/CEE directives).
In order to avoid interference between your cooking hob and a pacemaker, your pacemaker must be designed and programmed in compliance with the regulations that apply to it.
Consequently, we can only guarantee that our own product is compliant.
With regard to the compliance of the pacemaker or any potential incompatibility, you can obtain information from the manufacturer or your attending physician.
Electrical Danger
Ensure that the power cables of any electrical appliances plugged in close to the hob are not in contact with the cooking zones.
If a crack appears in the glass worktop, immediately disconnect your appliance to avoid the risk of electric shock.
To do this, remove the fuses or use the circuit breaker.
Do not use your hob until you have replaced the glass worktop.

Warning
Do not look directly into cook zone halogen lamps
ENVIRONMENTAL PROTECTION
This appliance's packaging material is recyclable. Help recycle it and protect the environment by dropping it off in the municipal receptacles provided for this purpose.
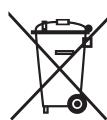
- Your appliance also contains a great amount of recyclable material. It is marked with this label to indicate the used appliances that should not be mixed with other waste. This way, the appliance recycling organised by your manufactu
rer will be done under the best possible conditions, in compliance with European Directive 2002/96/EC on Waste Electrical and Electronic Equipment. Contact your town hall or your retailer for the used appliance collection points closest to your home.
We thank you doing your part to protect the environment.
DESCRIPTION OF YOUR APPLIANCE
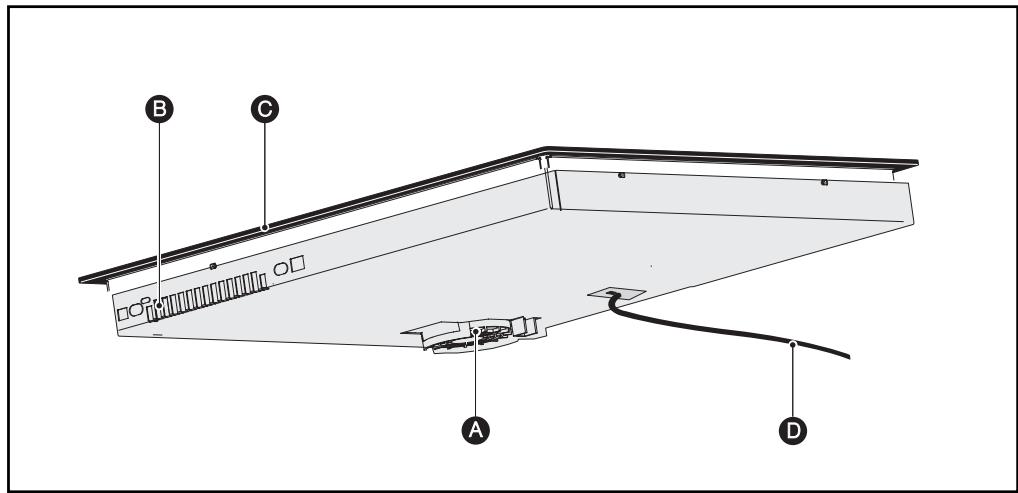
Air intake
B Air outlet
Vitroceramic glass
D Power cord
1 / INSTALLING YOUR APPLIANCE
EN
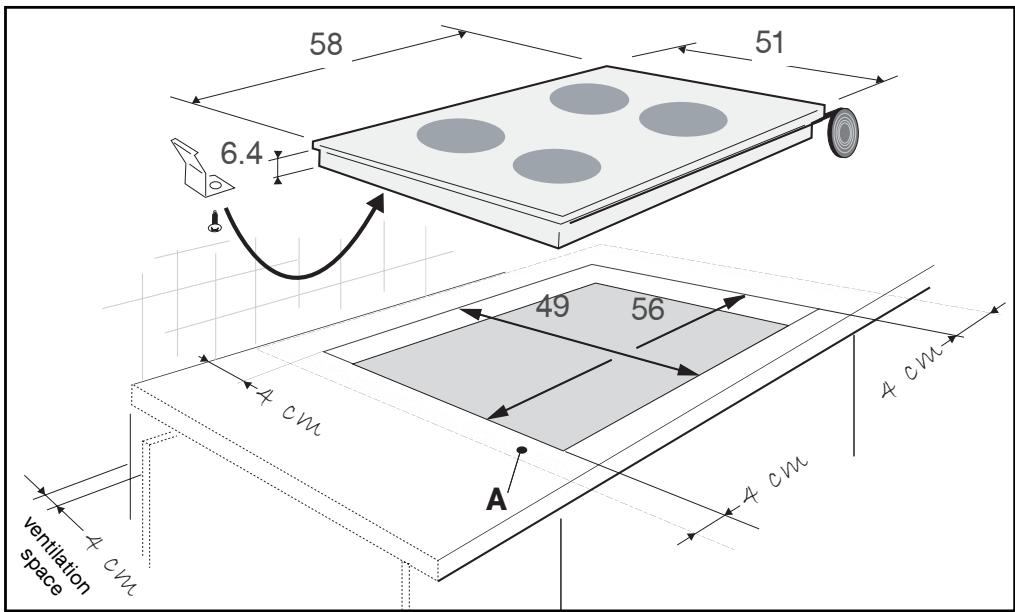
PROPER POSITIONING
Your appliance should be positioned so that the plug-in unit is accessible.
The distance between the edge of your appliance and the side and rear walls (or partitions) must be at least four centimetres (area A).
Your appliance can be easily integrated above a cabinet, an oven or a build-in-ready household appliance. You must simply ensure that the air intakes and air outlets are clear (See "Description of Your Appliance" section).
BUILD-IN
Follow the diagram above.
Glue the foam seal underneath your appliance by following the outline of the worktop upon which your appliance will rest. This will allow you to achieve an airtight seal with the worktop.
Attach the clips to the hob.

Warning
You must ensure that the air intakes located under your cooking appliance remain clear at all times.
For all types of installation, your induction hob needs proper ventilation.
1 / INSTALLING YOUR APPLIANCE
- HOOK-UP
- 220-240 V monophase hook-up 32-amp fuse.
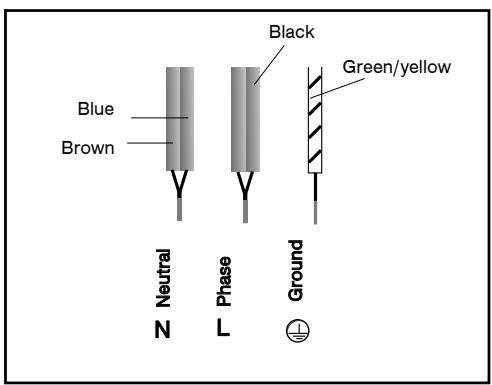
These hobs must be connected to the power grid via an electrical outlet that complies with EIC publication 60083 or an all-pole cut-off device that complies with installation regulations in effect.
When power is first supplied to your hob, or after an extended power outage, an indicator light will appear on the control panel. It automatically disappears after approximately 30 seconds, or as soon as any touch control on the control panel is pressed. This display is normal and, if needed, serves as an indication to the after-sales service staff. In all cases, the user of the hob should disregard it.
Warning If the pow
If the power cable is damaged, it should be replaced by the manufacturer, its after-sales service department or by a person with similar qualifications to avoid danger.
- 400 V 2N triphase hook-up
16-amp fuse.
Separate the two phase wires (L1 and L2) before hooking up.
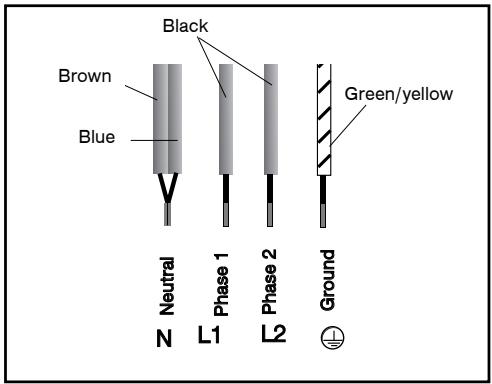
For a 400 V 2N triphase hook-up, if your hob malfunctions, check that the neutral conductor is properly connected.
2 / USING YOUR APPLIANCE
EN
DESCRIPTION OF THE TOP
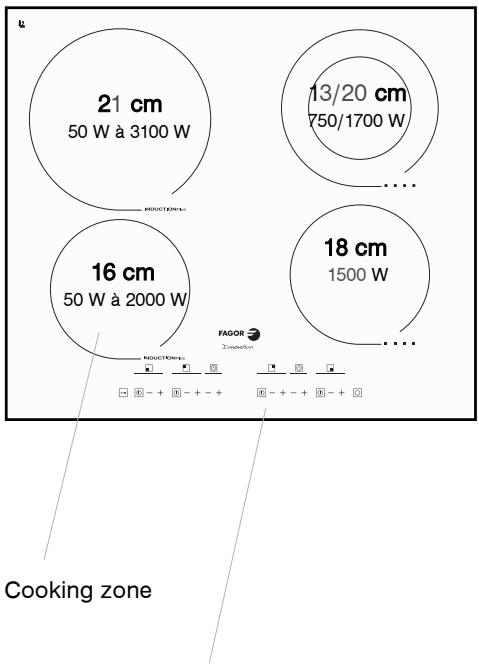
Control zone
1-200
53
2 / USING YOUR APPLIANCE
COOKWARE FOR INDUCTION
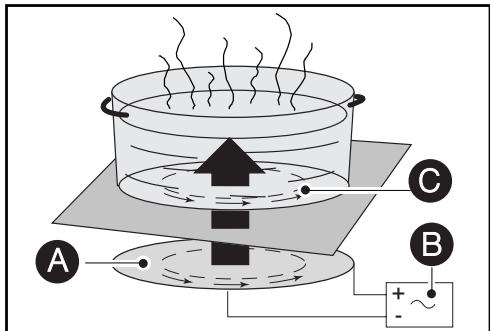
The induction principle
A Inductor
Electronic board
Induced electric current
The principle of induction is based on a magnetic phenomenon.
When you place your cookware on a cooking zone and you turn it on, the electronic boards in your cooking hob produce "induced" currents in the bottom of the cookware and instantly raise its temperature. This heat is then transferred to the food, which is simmered or seared depending on your settings.
Cookware
Most cookware is compatible with induction.
Only glass, terra cotta, aluminium without a special finish on the bottom, copper and some non-magnetic stainless steels do not work with induction cooking.
We recommend that you select cookware with a thick, flat bottom. The heat will be distributed better and cooking will be more uniform.
WHICH COOKING ZONE SHOULD YOU USE BASED ON YOUR COOKWARE?
| Cooking zone | Cookware to use |
| 16 cm | 10 .... 18 cm |
| 18 cm | 12 .... 22 cm |
| 21 cm | 18 .... 24 cm |

Tip
To check the suitability of your cook
ware:
Place the vessel on a cooking zone at
power level 4.
If the display remains on, your cookware is compatible.
If the display flashes, your cookware cannot
be used with induction cooking.
VITROCERAMIC COOKWARE
Cookware
They must be designed for electric cooking. They must have flat bases.
Preferably use the following types of cookware:
- Stainless steel with thick trimetal or "sandwich" base.
- Aluminium with smooth, thick base.
- Enamelled steel
Use
A higher setting is necessary in the event of:
- abundant quantities
- cooking with uncovered cookware
- use of a glass or ceramic pot.
A lower setting is necessary in the event of: - cooking food that tends to burn easily
(begin with a low setting, as it can be increased if necessary).
- overflow (remove the cover or the pot then lower the setting).
- Energy economy:
To end cooking, place on position 0, leaving the cookware in place to use the heat accumulated (this way you will save energy).
Use a cover as often as possible to reduce heat loss through evaporation.
Automatic cooking zone setting
The cooking zones set automatically, they switch on and off to maintain the selected power. This way, the temperature remains consistent and suited to the food you are cooking.
The setting frequency varies according to selected power.

Tip
Use cookware of appropriate
size.The diameter of the cookware base must be equal or superior to the printed zone
2 / USING YOUR APPLIANCE
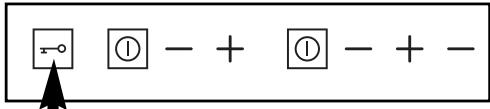
DESCRIPTION OF THE CONTROL PANEL
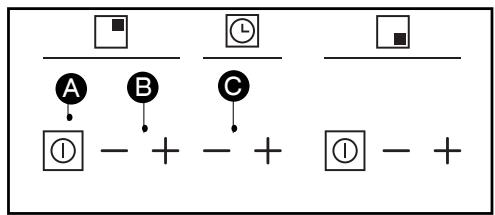
A Start/stop touch control.
B Power - + touch controls.
Timer touch controls.
- POWERING ON
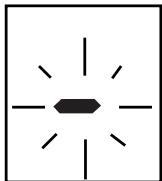
Press the start/stop touch control for the zone you want to use. A flashing "0" indicates that the zone is on. You can then choose the desired power level.
If you do not select a power level, the cooking zone will automatically shut off.
ADJUSTING THE POWER
Press the + or - power touch controls.

Tip
For zones of induction cooking, use of a cooking zone at maximum power self-limits the other and is made visible by power displays.
GENERAL SHUTDOWN
Switches off all cooking zones.
Press on this touch control for a few seconds: the beeps will confirm your manoeuvre.
ADDITIONAL ZONE
Set the principal zone at maximum power. Additional pressure on ^+ starts up the additional zone, a beep and a display point confirm your manoeuvre, you can then set power according to your needs.
To switch off the additional zone, press start then on and set your power.
- SETTING THE TIMER
The timer functions when the cooking zone in question is in use.
To turn on the timer, press the - or + timer touch controls.
To adjust the timer setting, press the - or + touch controls.
To manually stop the timer, press until "0" is displayed.
When cooking is complete, "0" is displayed and a beep notifies you; to cancel these indications, press any touch control for the cooking zone in question.
Otherwise, these indications will automatically stop after approximately one minute.
- USING THE "CHILD SAFETY DEVICE"
Your cooking hob is equipped with a child safety device that locks its operation after use (e.g. so the hob can be cleaned) or during cooking (e.g. to guard your settings).
For safety reasons, the "off" touch control is always active and allows you to shut off a heating zone, even if it is locked.
How do you lock the control panel?
Find the specific touch control for locking Press this touch control, the light display will turn on.
The display disappears after a few seconds. Any attempt to adjust the touch control reactivates this display.
How do you unlock the control panel?
Press the lock touch control until the locking icon disappears from the display.

Warning
Remember to unlock your hob before
using it again (See the "Using the Child Safety Device" section).
SAFETY OF INDUCTION ZONES DURING OPERATION
- Residual heat
After intensive use, the cooking zone that you have just used can remain hot for several minutes.
An "H" is displayed during this period.
Avoid touching the hot areas during this time.

Warning
Do not touch glowing cooking zones, burn risk.
- Temperature limiter
Each cooking zone is equipped with a safety sensor that constantly monitors the temperature of the bottom of the cookware. In the event that an empty vessel is left on a cooking zone that is on, this sensor automatically adjusts the power output of the hob, thereby avoiding any risk of damage to the cookware or the hob.
"Small Items" safety
A small object (such as a fork, a spoon, a ring, etc.) left alone on the hob is not detected as a piece of cookware.
The display flashes and no heat is produced.

Warning
Several small objects together on a cooking zone may be detected as cookware.
If the display remains on: power may be supplied and the objects may be heated.
- Protection against overflows
The hob may shut down (with the adjacent symbol in the display) automatically in any of these three situations:
- Overflow that spills onto the touch controls.
- Damp towel placed over the touch controls.
- Metallic object placed on the touch controls.
Clean the hob or remove the object, then begin cooking again.
HOB SAFETY DURING OPERATION
- Auto-Stop system
If you forget to turn off a cooking zone, your hob is equipped with an "Auto-Stop system" safety measure that will automatically shut off the forgotten cooking zone after an amount of time pre-set at the factory (see the table below).
| Power level used | The cooking zone automatically shuts off after |
| between 1 and 4 | 8 hours |
| between 5 and 7 | 2 hours |
| for 8 and 9 | 1 hour |
In the event that this safety measure is triggered, the powering off of the cooking zone is indicated by an "A" displayed in the control panel. Simply pressing on any of the touch controls will cancel this display.
3 / DAILY CARE OF YOUR APPLIANCE
PROTECTING YOUR APPLIANCE
Avoid hard shocks from cookware: The vitroceramic glass worktop is very sturdy; however, it is not unbreakable.
Do not place any hot lids flat on your cooking hob. A suction effect may damage the vitroceramic surface.
Avoid dragging cookware across the surface, which may in the long-term result in the degradation of the decorative finish of the vitroceramic top.
Avoid placing cookware on the frame or cover (depending on the model).
Avoid using cookware with rough or bumpy bottoms: they can capture and transfer particles that may produce stains or scratches on your hob.
These defects that do not result in appliance malfunction or do not make it unsuitable for use are not covered by the warranty.
Do not store cleaning products or flammable products in the cabinet underneath your cooking hob.
Do not heat unopened canned goods; they may burst.
Of course, this precaution applies to all types of cooking.
Never use a sheet of aluminium for cooking. Never place items wrapped in aluminium foil or packaged in aluminium dishes on your cooking hob.
The aluminium will melt and permanently damage your cooking appliance.
Objects not intended for cooking should never be placed on the hob (risk of powering on, scratches, etc.).
Steam cleaning should never be used. The steam jet could damage your hob.
MAINTAINING YOUR APPLIANCE
| TYPE OF STAINS/SPOTS | USE | WHAT TO DO |
| Light. | Disinfectant spon-ges. | Thoroughly moisten the zone to be clea-ned with hot water, then wipe off. |
| Accumulation of baked-on soil. Overflow of sugary pre- parations, melted plastic. | Disinfectant spon-ges. Scraper for glass. | Thoroughly moisten the zone to be clea- ned with hot water. Use a scraper for glass to remove the large bits, follow with the rough side of a disinfectant sponge, and then wipe off. |
| Rings and hard water residue. Shiny metallic streaks. Weekly maintenance. | White spirit vinegar. | Apply warm white vinegar to the stain, let stand, then wipe with a soft cloth. |
| Cleaning agent for vitroceramic glass. | Apply a cleaning agent for vitroceramic glass (preferable one with silicone for its protective properties) to the surface. | |
| Cream | Special disinfectant sponge for delicate dishes | Powder Scouring sponge |
4 / SPECIAL MESSAGES, DIFFICULTIES
EN
- During initial use
| YOU OBSERVE THAT: | POSSIBLE CAUSES: | WHAT SHOULD YOU DO: |
| An indicator light appears. | Working normally. | Nothing. |
| Your installation blows a fuse. | The electrical hook-up of your hob is incorrect. | Verify the connections. See the "Hook-Up" section. |
| Only one side works. | ||
| The hob produces an odour during the first cooking sessions. | New appliance. | Operate each cooking zone for 30 minutes with a saucepan full of water. |
- When powering on
| YOU OBSERVE THAT: | POSSIBLE CAUSES: | WHAT SHOULD YOU DO: |
| The hob is not working and the indicator lights on the control panel are not on. | The appliance is not receiving electricity. The electrical sup-ply is defective or the hook-up is incorrect. | Inspect the electrical circuit breaker and fuses. |
| The table is not working and another message is displayed. | The electronic board is functioning poorly. | Call the After-Sales Service Department. |
| the hob does not workn ☐ ☐ is displayed | The hob is locked | see chapter on child safety use. |
- During operation
| YOU OBSERVE THAT: | POSSIBLE CAUSES: | WHAT SHOULD YOU DO: |
| The hob stops working and it emits a beep approximately every 10 seconds and a - or "F7" is displayed. | There was an overflow or an object is in contact with the control panel. | Clean the hob or remove the object, then begin cooking again. |
| A series of small - or "F7" is displayed. | The electronic boards heated up. | See "Built-In" section. |
| After turning on a heating zone, the indicator lights on the control panel continue to flash. | The cookware used is not suitable for induction or is less than 12 cm in diameter (10 cm for the 16-cm cooking zone). | See section on cookware for induction. |
| The saucepans make noise during cooking. Your hob makes a clicking sound during cooking. | This is normal with some types of cookware. This is caused by the transfer of energy from the hob to the cookware. | Nothing. There is no risk, neither to your hob nor to your cookware. |
| The fan continues to function a few minutes after your hob is turned off. | Cooling of the electronic components. Working normally. | Nothing. |

Warning
In the event that there is a break, crack or opening—even minor—in the vitroceramic glass, immediately disconnect your appliance to avoid the risk of electric shock.
Contact the After-Sales Service Department.
6 / COOKING CHART
- INDUCTION
| FRY BRING TO A BOIL | COOK/BROWN RETURN TO BOILING BOILING LIGHT BROTHS | COOK/SIMMER | KEEP WARM | ||
| 9 8 | 7 6 | 5 4 3 | 2 1 | ||
| SOUPS | BROTHS | ||||
| THICK SOUPS | |||||
| FISH | COURT BOULLON | ||||
| FROZEN FOODS | |||||
| SAUCE | THICK, FLOUR-BASED | ||||
| BUTTER-BASED WITH EGGS (BEARNAISE, HOLLANDAISE) PREPARED SAUCES | 9 8 | 7 6 | 5 4 3 | 2 1 | |
| VEGETABLES | ENDIVES, SPINACH | ||||
| DRIED BEANS | |||||
| BOILED POTATOES | |||||
| GOLDEN BROWN POTATOES | |||||
| SAUTEED POTATOES | |||||
| DEFROSTING VEGETABLES | |||||
| MEAT | MEAT, NOT TOO THICK | ||||
| STEAKS, IN SKILLET | |||||
| GRILLED MEATS (CAST IRON GRILL) | |||||
| FRYING | FROZEN FRENCH FRIES | ||||
| FRESH FRENCH FRIES | |||||
| 9 8 | 7 6 | 5 4 3 | 2 1 | ||
| MISCELLA- NEOUS | PRESSURE COOKER (ONCE IT STARTS WHISTLING) | ||||
| COMPOTES | |||||
| CRÈPES | |||||
| CRÈME ANGLAISE | |||||
| MELTED CHOCOLATE | |||||
| JAMS | |||||
| MILK | |||||
| EGGS, FRIED | |||||
| PASTA | |||||
| JARS OF BABY FOOD (Double BOILER) | |||||
| MEAT STEW | |||||
| SPANISH RICE | |||||
| RICE PUDDING | |||||
- VITROCERAMIC
| FRY BRING TO A BOIL | COOK/BROWN RETURN TO BOILING BOILING LIGHT BROTHS | COOK/SIMMER | KEEP WARM | ||
| 9 8 | 7 6 | 5 4 3 | 2 1 | ||
| SOUPS | BROTHS | ||||
| THICK SOUPS | |||||
| FISH | COURT BOULLON | ||||
| FROZEN FOODS | |||||
| SAUCE | THICK, FLOUR-BASED | ||||
| BUTTER-BASED WITH EGGS (BEARNAISE, HOLLANDAISE) PREPARED SAUCES | 9 8 | 7 6 | 5 4 3 | 2 1 | |
| VEGETABLES | ENDIVES, SPINACH | ||||
| DRIED BEANS | |||||
| BOILED POTATOES | |||||
| GOLDEN BROWN POTATOES | |||||
| SAUTEED POTATOES | |||||
| DEFROSTING VEGETABLES | |||||
| MEAT | MEAT, NOT TOO THICK | ||||
| STEAKS, IN SKILLET | |||||
| GRILLED MEATS (CAST IRON GRILL) | |||||
| FRYING | FROZEN FRENCH FRIES | ||||
| FRESH FRENCH FRIES | |||||
| 9 8 | 7 6 | 5 4 3 | 2 1 | ||
| MISCELLA- NEOUS | PRESSURE COOKER (ONCE IT STARTS WHISTLING) | ||||
| COMPOTES | |||||
| CRÈPES | |||||
| CRÈME ANGLAISE | |||||
| MELTED CHOCOLATE | |||||
| JAMS | |||||
| MILK | |||||
| EGGS, FRIED | |||||
| PASTA | |||||
| JARS OF BABY FOOD (Double BOILER) | |||||
| MEAT STEW | |||||
| SPANISH RICE | |||||
| RICE PUDDING | |||||