
CC-70D - Air conditioner FAGOR - Free user manual and instructions
Find the device manual for free CC-70D FAGOR in PDF.

| Product type | Mobile air conditioner (heating and ventilation) |
| Brand | FAGOR |
| Model | CC-70D |
| Power supply | 230 V ~ 50 Hz |
| Power | 2000 W |
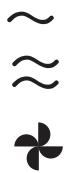
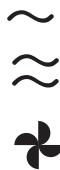
| Operating modes | Low power, High power, Ventilation only |
| Adjustable temperature range | 18 °C to 35 °C |
| Anti-frost function | Yes (automatic activation below 4 °C) |
| Timer | 1 to 10 hours |
| Oscillation | Yes |
| Remote control | Yes (batteries LR44 or AG13 included) |
| Display | LCD screen |
| Safety | Tip-over safety switch, overheating protection |
| Maintenance | Clean the exterior with a soft dry cloth. Do not use water or abrasive products. |
| Repairability | Contact an approved Technical Support Service |
| Use | Household use only |
| Do not cover | Important: never cover the appliance while in operation |
Frequently Asked Questions - CC-70D FAGOR
User questions about CC-70D FAGOR
0 question about this device. Answer the ones you know or ask your own.
Ask a new question about this device
Download the instructions for your Air conditioner in PDF format for free! Find your manual CC-70D - FAGOR and take your electronic device back in hand. On this page are published all the documents necessary for the use of your device. CC-70D by FAGOR.
USER MANUAL CC-70D FAGOR
The manufacturer reserves the right to modify the models described in this User's Manual.
natural_image
Illustration of a FAGOR Confort Line electric heater with control panel and power outlet (no text or symbols on the device itself)RADIADOR DE CERÁMICA / RADIADOR DE CERÂMICA / CERAMIC RADIATOR /
RADIATEUR CÉRAMIQUE / KERAMIKRADIATOR / RADIATORE CERAMICO /
KEPAMIKH ΘΕΡΜΑΣΤΡΑ / KERÁMIA RADIÁTOR / KERAMICKÝ RADIÁTOR /
Fig. 2
Alta potência
Função anti-gelo (frost watch):
- Control panel
- Base
- Safety switch
- Remote control receiver
- Front grille
- Pilot light
- On/Off button
- Function button
- Temperature selection button
- Timer
- Swing button
-
- Button
-
- Button
- LCD screen
- Remote control
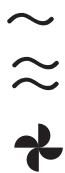
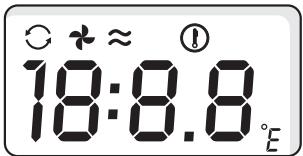
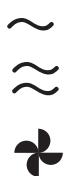
Screen symbols
a. Continuous operation
b. Fan
c. Mode
d. Swing symbol
e. Temperature
f. Timer
g. Temperature in degrees
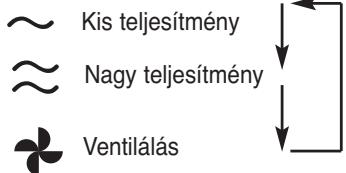
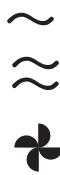
High
Low
Fan only
Remote control: requires two button
batteries AG 13 or LR 44 (included)
3. SAFETY WARNINGS
- Before using the heater, read these instructions and keep them for reference later.
- Make sure that the voltage on the specifications plate is the same as supplied to your home.
- Always use the handles to move the heater.
- Keep flammable material such as furniture, pillows, bed clothes, papers, clothing and curtains, at least 1 metre away from the heater.
- Extreme precaution must be taken when using any type of heater close to children or disabled people and when in operation, the appliance should not be left unattended. Avoid using the heater whilst you are sleeping.
- Do not let the cable make contact with sharp surfaces or be squashed by heavy objects.
- Always unplug the heater when it is not being used.
- Do not pull the cable to unplug the appliance. First, turn the appliance off, grab the plug and remove it from the socket.
- The appliance is only to be used domestically. Do not use it to defrost pipes or prevent them from freezing; do not hang clothing on it to dry.
- Do not cover it with clothing or put flammable objects on top of it such as cushions, newspapers or curtains.
- Do not plug the heater into loose or worn sockets.
- Do not wash it with water or touch it with wet hands.
- Do not touch the heater whilst it is working, as the protection grille heats up and you can burn yourself.
- Do not coil the cable tightly around the appliance, as this can cause the cable to peel and break.
- Do not operate the appliance if the cable or the plug is damaged, if it does not work correctly or it has fallen or has been damaged in some way. Take the appliance to an authorised technical service when faced with any type of technical problem to avoid risks.
- Do not use it outside.
- Do not use this heater close to a bath, shower, swimming pool or close to any other water container. If the heater gets wet, unplug it from the power supply before touching it, given that a wet heater can give electric shocks, even when they are switched off.
- The heater must not be placed right under a plug socket.
- Do not run the cable under the carpet or cover it with rugs, rails or similar. Fit the cable far from walkway areas so it is not tripped over or trodden on.
- Do not insert foreign bodies or allow anything to enter the opening as it could damage the heater or even cause an electric shock or a fire.
- Do not use the heater in areas where petrol, paint or flammable liquids are used or stored, as it has parts which project sparks.
- Do not use this heater with a programmer, timer or other devices which connect the heater automatically, given that there is a fire risk if the heater is covered or fitted incorrectly.
- In order to avoid an electric shock or blowing the fuses, make sure that no other appliance is using the same socket.
- Only use this heater as described in the manual. Any other use not recommended by the manufacturer could cause a fire, electric shock or other physical damage to people.
- Avoid the use of extension cables because they can overheat the heater and cause a fire.
- Always fit the appliance vertically on a flat, stable floor. The appliance will not operate if it is not resting appropriately on the ground.

IMPORTANT: Never cover the appliance whilst it is working as it could cause dangerous overheating.
4. OPERATION
The appliance has a safety switch located on the base which prevents the appliance from working if it falls accidentally. For the safety switch to operate, the appliance must be resting on a firm and stable surface.
IMPORTANT: Do not try to block the safety system in any way.
- Make sure that the heater is on a horizontal and stable surface before plugging it into the power supply. Once plugged in, the LCD screen will show the ambient temperature.
FUNCTIONS
Mode function
- Press the button to adjust the operating mode: low, high or fan only.
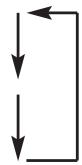
- In order to change mode, press this button again. The screen mode indicator (c) will show which mode has been selected. Every time this button is pressed, the selected speed will vary following the sequence in figure 3.
Temperature function
- Use this function to adjust the temperature.
- When this button is pressed the selected temperature will appear, which is 23 °C by default.
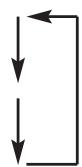
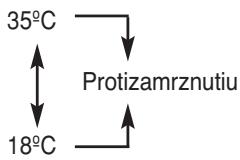
- In order to select a temperature, use buttons ⚙ and ⚠. You can select from 18 °C to 35 °C and the frost function following the sequence in figure 4.
- A few seconds after selecting the temperature, the screen will show the ambient temperature again.
- The heater will be connected until the desired temperature is reached and then
it will switch off. If the temperature drops under the selected temperature, it will switch on again.
- The temperature control can be disabled by pressing the Ⓗ button until the
temperature symbol (e) disappears. The heater will operate continuously. - The temperature control can be verified by pressing the . .button once
Frost watch function:
After adjusting the frost watch function as explained in the "Temperature function" section, the heater will remain disconnected unless the temperature drops below 4^ C. If this occurs, the frost function will connect the heater cycle automatically to stop ice forming on the appliance.
Timer function
- Press the timer button to adjust the operating time.
- Press the timer button; the time adjustment will then appear on the screen in hours and minutes along with the timer symbol (f). The continuous symbol will disappear.
Warning: By default, the time is 0 and if there is no adjustment at that time, the timer symbol (f) will be substituted by the continuous symbol (a) in a few seconds. - Use the ⬇ and ⬆ arrows to adjust the operating time between 1 and 10 hours.
- In a few seconds the ambient temperature will reappear after the timer has been adjusted.
- The timer symbol (f) will remain lit during this time and when the time runs out, the heater will disconnect. All the previous adjustments will be cancelled, so the next time it is switched on, the default adjustment will reappear.
- The timer can be disabled if you hold the 📊 button down until the timer
symbol (f) disappears. Then the continuous symbol (a) will reappear.
- The time remaining can be verified by pressing the timer once..
Swing
The swing can be used in any of the appliance's functions.
In order to activate this function, press the button and deactivate it by pressing the same button again.
OPERATION
- To switch the heater on, press the button. In order to activate the appliance, you can use either the remote control or the appliance buttons.
When the appliance is switched on, the pilot light comes on, the symbols in figure 2 are lit and the heater will start to give out heat at 23^ continuously.. - Use the function which best meets your needs as indicated in the "FUNCTIONS" section.
- In order to switch off the appliance, press the 📄 .button again.
5. CLEANING AND MAINTENANCE
- Always switched the unit off, unplug the cable from the socket and let the heater cool down completely before cleaning it.
- To clean the outside, use a soft, dry cloth. Do not use abrasive or rough cleaners.
- Use a vacuum cleaner to clean out the dust inside if necessary.
WARNING: DO NOT submerge the heater in water or let the inside of the heater get wet, as this could cause an electric shock.
6. STORAGE
- Keep the heater in a dry place. Tidy the cable into loops and fix them with tape.
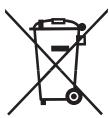
7. INFORMATION FOR THE CORRECT DISPOSAL OF ELECTRICAL AND ELECTRONIC APPLIANCES
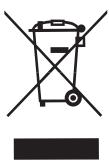
At the end of its working life, the product must not be disposed of as urban waste. It must be taken to a special local authority differentiated waste collection centre or to a dealer providing this service. Disposing of a household appliance separately avoids possible negative consequences for the environment and health deriving from inappropriate disposal and enables the constituent materials to be recovered to obtain significant savings in energy and resources.
To remind you that you must collaborate with a selective collection scheme, the symbol shown appears on the product warning you not to dispose of it in traditional refuse containers.
For further information, contact your local authority or the shop where you bought the product.
FR
1. DÉFINITION DU PRODUIT (Fig. 1)
Fig. 2
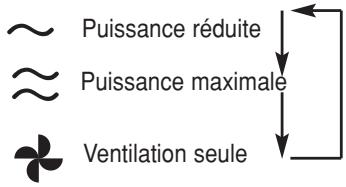
Fig. 2
Alta potenza
- Ábra
The Ground Truth image displays a single, solid horizontal line. According to Rule 2 (UNDERSCORE & LINE RULES), this is a stylistic or background line, not a placeholder underscore. Therefore, the OCR result must ignore it and output nothing or only meaningful text. The provided OCR content is "____", which consists of four underscores. This is an incorrect interpretation of the line as a placeholder, violating the rule that stylistic lines must be ignored. The OCR has hallucinated underscores where none should exist based on the GT's visual context. Hence, the OCR result is inconsistent with the Ground Truth.
Nízky výkon
Vysoký výkon
Len ventilátor
Obr 3
Obr 4
2. TECHNICKÉ ÚDAJE
Príkon: 2000 W
Napätie: 230 V
Рис. 2

Рис. 3
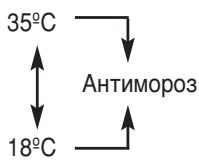
Рис. 4
- Função anti-gelo (frost watch):
- Screen symbols
- SAFETY WARNINGS
- OPERATION
- IMPORTANT: Do not try to block the safety system in any way.
- FUNCTIONS
- Mode function
- Temperature function
- Frost watch function:
- Timer function
- Swing
- OPERATION
- CLEANING AND MAINTENANCE
- STORAGE
- INFORMATION FOR THE CORRECT DISPOSAL OF ELECTRICAL AND ELECTRONIC APPLIANCES
- FR
- DÉFINITION DU PRODUIT (Fig. 1)
- TECHNICKÉ ÚDAJE
Brand : FAGOR
Model : CC-70D
Category : Air conditioner