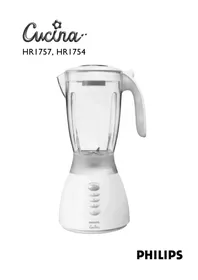
Cucina HR1754 - Food processor PHILIPS - Free user manual and instructions
Find the device manual for free Cucina HR1754 PHILIPS in PDF.


| Product Type | Food Processor |
| Brand | Philips |
| Model | Cucina HR1754 |
| Dimensions (HxWxD) | Approx. 40 x 25 x 25 cm |
| Weight | Approx. 4.5 kg |
| Power Consumption | 650 W |
| Power Supply | 220-240 V, 50-60 Hz |
| Bowl Capacity | 2.1 L |
| Material | Plastic body, stainless steel blades |
| Main Functions | Chopping, slicing, shredding, blending, kneading, emulsifying |
| Number of Speeds | 2 + pulse |
| Safety Lock | Bowl and lid locking system prevents operation if not properly closed |
| Non-Slip Feet | Yes, for stability during operation |
| Dishwasher Safe Parts | Bowl, lid, pusher, discs (except motor unit) |
| Cleaning | Wipe motor unit with damp cloth; other parts top-rack dishwasher safe |
| Storage | Cord wrap feature; compact storage for accessories |
| Included Accessories | Stainless steel chopping blade, slicing disc, shredding disc, kneading tool, spatula |
| Repairability | Spare parts available via Philips service centers |
| Warranty | 2 years |
| Certifications | CE, RoHS |
Frequently Asked Questions - Cucina HR1754 PHILIPS
User questions about Cucina HR1754 PHILIPS
0 question about this device. Answer the ones you know or ask your own.
Ask a new question about this device
Download the instructions for your Food processor in PDF format for free! Find your manual Cucina HR1754 - PHILIPS and take your electronic device back in hand. On this page are published all the documents necessary for the use of your device. Cucina HR1754 by PHILIPS.
USER MANUAL Cucina HR1754 PHILIPS
The appliance is equipped with built-in safety system:
- The appliance does not function if the accessories have been assembled incorrectly or have not been assembled at all.
- NEVER SWITCH THE APPLIANCE ON OR OFF BY TURNING THE JAR!
Important
Read these instructions for use carefully and look at the illustrations before using the appliance.
▶ Keep these instructions for future reference.
Check if the voltage indicated on the appliance corresponds to the local mains voltage (110-127V or 220-240V) before you connect the appliance.
Never use any accessories or parts from other manufacturers or that have not been specifically advised by Philips. Your guarantee will become invalid if such accessories or parts have been used.
Do not exceed the maximum level indicated on the accessories.
Do not exceed the quantities and preparation times indicated in the table.
Never remove accessories or parts from the motor unit while the appliance is running. Always unplug the appliance first.
▶ Never use the accessories to turn the appliance on and off!
- Keep the appliance out of the reach of children.
▶ Never let the appliance run unattended.
Do not use the appliance if the mains cord, the plug or other parts are damaged.
If the mains cord is damaged, it must be replaced by Philips, a service centre authorised by Philips or similarly qualified persons in order to avoid a hazard.
Let hot ingredients cool down before chopping them or pouring them into the jar (max. temperature 80° C/175°F).
To avoid spillage, never fill the jar beyond the maximum level indication (1.5 litres), particularly not if you are blending hot liquids (maximum 1.1 litres).
To avoid spillage, always insert the stopper into the lid before you start processing.
Never reach into the jar with your fingers or an object while the appliance is running.
If the ingredients stick to the wall of the blender, switch the appliance off, unplug the appliance and loosen the ingredients from the wall by adding liquid or using a spatula.
Preparing the appliance for use

Wash all accessories and detachable parts (see 'Cleaning').
- Wind excess mains cord round the base of the appliance.
Using the appliance
Blender
The blender is intended for:
- Blending fluids, e.g. dairy products, sauces, fruit juices, soups, mixed drinks, shakes.
- Mixing soft ingredients, e.g. pancake batter or mayonnaise.
- Pureeing cooked ingredients, e.g. for making baby food.

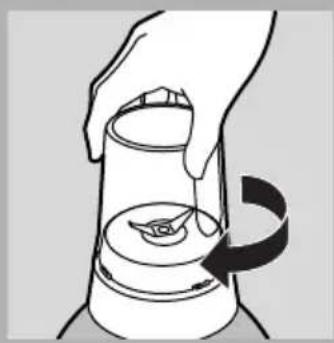
Mount the jar onto the motor unit. Fasten it by turning it in the direction of the arrow.
Do not exert too much pressure on the handle of the jar.
2 Put the ingredients in the jar.
Never fill the jar with ingredients that have a temperature of over 80° C.
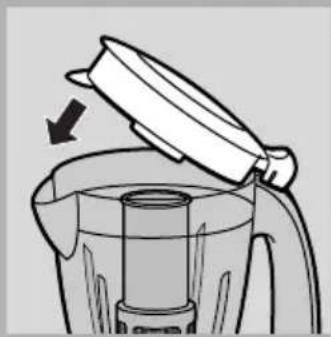
3 Close the lid.
4 Insert the stopper into the lid.
To avoid spillage, always insert the stopper into the lid before you start processing.

5 Put the mains plug in the wall socket.
6 Select the required setting by pressing the appropriate button and the appliance will switch on automatically.
The speed buttons allow you to choose the right speed to obtain optimal results. See the table for the recommended speeds.


| Ingredients to process | Speed |
| liquid ingredients (e.g. chocolate milk, milk with fruit, mayonnaise) | speed 1 |
| heavier ingredients e.g. a combination of liquid and solid ingredients (e.g. tomato sauce or pate) | speed 2 |
| heavy, mainly solid ingredients (e.g. ice cubes, soups, beans, etc.) | speed 3 |
Press the pulse button (M-button) a few times to let the appliance run for only a few seconds at a time. The appliance will stop when you release the button. Press the pulse button as often as is necessary.
Always switch the appliance off before you open the lid.
7 Press the 0-switch to switch the appliance off.
Never switch the appliance on or off by turning the jar.
Recipes can be found in the 'Recipes' chapter below.
Tips
To avoid spillage, never fill the jar above the maximum level indication (1.5 litres), particularly not if you are blending hot liquids (maximum 1.1 litres).
If you are blending foaming liquids, never fill the jar beyond the 1.2 l indication.
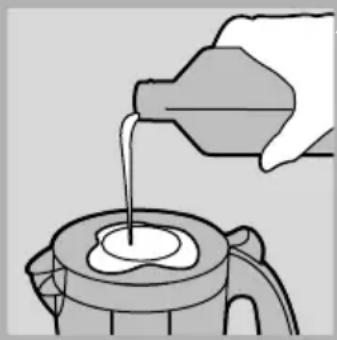
Liquid ingredients (e.g. oil) can be poured into the blender jar through the opening in the lid while the appliance is running.
Do not let the blender run for more than 3 minutes at a time. If you have not finished blending after 3 minutes, switch the appliance off for one minute before you continue blending.
- Dry ingredients must not be processed for more than 1 minute.
- Cut solid ingredients into smaller pieces before putting them in the blender jar. Do not process a large quantity of solid ingredients at the same time. Process these ingredients in a series of small batches instead.
If you are not satisfied with the result when blending solid ingredients, switch the blender off and press the pulse button (M-button) a few times to let the blender run briefly. You can also stir the ingredients with a spatula (not while the blender is running!) or pour out some of the contents of the jar and process smaller amounts.
To crush ice cubes, drop them through the opening in the lid onto the rotating blades.
To make tomato juice, cut the tomatoes in four and drop the pieces through the opening in the lid onto the rotating blades.
Never reach into the jar with your fingers or an object (e.g. a spatula while the blender is running.
If you are processing solid and liquid ingredients at the same time, pour the liquid ingredients in the jar before switching the appliance on. Add the solid ingredients while the appliance is running.
Filter
- You can use the filter accessory to obtain extra finely blended sauces, fresh fruit juices or cocktails. All pips and skins will be caught in the filter.
I Put the filter in the blender jar.
Make sure the filter is properly fitted onto the bottom of the jar. The grooves of the filter and the ribs inside the blender jar will help you put the filter in the right position.


2 Put the lid on the jar to fix the filter in its proper position.
3 Put the ingredients in the filter through the opening in the lid. Never fill the filter beyond its metal part. Do not use the filter to process hot ingredients.
4 Add water or another liquid.
ENGLISH8

5 Insert the stopper into the opening in the lid and switch the appliance on. Select the highest speed and let the appliance run for max. 40 seconds.
6 Switch the appliance off. Pour out the drink through the spout of the blender jar.
7 For optimal results, put the jar with the remaining ingredients back onto the appliance and let it run for a few more seconds.
8 Pour out the rest of the drink.
Tips
Particularly when you are processing large quantities, we advise you not to put all the ingredients in the filter at the same time. Start processing a small quantity, let the appliance run for a moment, switch it off and then add another small quantity. Repeat this procedure until you have processed all the ingredients.
For making soy milk:
Soak soy beans for 4 hours before processing them.
You can process max. 50 g. of dry soy beans with max. 500 ml. water at a time.
▶ For making fruit juices and cocktails:
For the best results, add approx. 300 ml water (or another liquid if you are making e.g. cocktails, etc.) to 150 g fruit.
Mill (only type HR1757)
The mill attachment can be used for grinding and chopping ingredients such as peppercorns, sesame seeds, rice, wheat, coconut flesh, nuts (shelled), coffee beans, soy beans, dried peas, cheese, breadcrumbs, etc.
Always process cloves, star anise and aniseed together with other ingredients. If processed separately, these ingredients may attack the plastic materials of the appliance.
The mill is not suitable for chopping very hard ingredients like nutmeg and ice cubes.
I Put the ingredients in the beaker.
Process only dry ingredients. Do not fill the beaker beyond the 'MAX' indication.
See the table for the advised quantities.


| Ingredients | Quantities |
| pepper coms | 5-25 g |
| sesame seed | 10-50 g |
| rice, wheat | 25-75 g |
| soy beans | 25-75 g |
| dried peas | 25-75 g |
| coconut flesh | 25-75 g |
| coffee beans | 25-50 g |
| cheese | 25-75 g |
| bread crumbs | 20-40 g |
| sugar cubes | 25-50 g |
| nuts (shelled) | 25-75 g |

2 Ensure the rubber ring on the blade unit is properly placed.

3 Screw the blade unit onto the beaker.
If this requires some effort, moisten the rubber ring with a drop of water.

4 Turn the assembled mill upside down and screw it onto the motor unit in the direction of the arrow.
5 We advise you to operate the mill by means of the pulse button (M-button).
Never use the mill for more than 30 seconds without interruption.

After processing, you can use the shaker lid to sprinkle the ingredients evenly onto a dish.
Cleaning
Cleaning of the appliance, its parts and the accessories is easiest immediately after use.
Never clean the accessories or parts of the appliance in the dishwasher.
Clean the motor unit with a moist cloth.
Do not use abrasives, scourers, alcohol, etc.
Unplug the appliance, detach the accessories and parts you have used and clean them in warm, soapy water.
2 Then rinse them under the tap to wash away soap residues.
Quick cleaning of the blender jar

Pour lukewarm water and some washing-up liquid into the blender jar, up to the Quick Clean level indication (500 ml) on the jar. Do not exceed this level when using the Quick Clean function.
2 Close the lid and insert the stopper into the lid.
3 Press the Quick Clean button and let the appliance run for a few moments. Stop as soon as the jar is clean.
4 Detach the blender jar and rinse it with clean water.
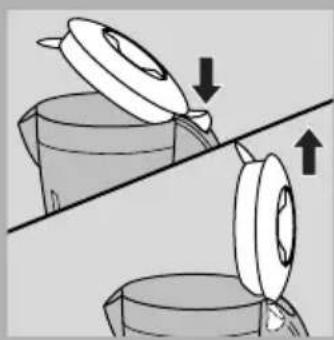
5 Only remove the lid (by pulling it off the blender jar) for cleaning purposes!
Cleaning the filter
I Take the filter out of the blender jar.
2 Hold the filter over a waste bin and gently shake out its contents.
3 Rinse the filter under the tap.
Environment

Do not throw the appliance away with the normal household waste at the end of its life, but hand it in at an official collection point for recycling. By doing this you will help to preserve the environment.
Information & service
If you need information or if you have a problem, please visit the Philips Web site at www.philips.com or contact the Philips Customer Care Centre in your country (you will find its phone number in the worldwide guarantee leaflet). If there is no Customer Care Centre in your country, turn to your local Philips dealer or contact the Service Department of Philips Domestic Appliances and Personal Care BV.
Recipes
The hole in the lid can be used to add drops of liquid to the ingredients in the jar in order to obtain the required level of consistency.
Mayonnaise (about 300 ml)
- 2 eggyolks or 1 whole egg
- | tsp. mustard powder
- | tsp. salt
- 1/2 tsp. pepper
- | tsp. sugar
- 30ml vinegar or lemon juice
- 300ml oil
▶ All the ingredients have to be at room temperature.
- Put the egg or egg yolks in the blender jar, add salt, pepper and mustard powder and half of the vinegar or lemon juice and blend at average speed. Pour oil through the hole in the lid until the mayonnaise becomes thick. Then add the remaining vinegar or lemon juice and season according to taste.
▶ Store in the refrigerator.
Carrot cake
- 4 Eggs
- 200 g sliced carrot
- 200 ml milk
- 100 g condensed milk
- 300 g sugar
- 300 g wheat flour
- 150 g oil
-
I tsp. dried yeast
-
Put the eggs, the sliced carrots, the milk, the condensed milk and the sugar in the blender jar and process it for approx. 15 seconds at max. speed.
- Add the wheat flour spoon by spoon. When the mixture has become homogeneous, gradually add the oil through the small hole in the safety lock. Finally add the dried yeast and let the appliance run for another 5 seconds.
- Put the mixture in a baking tin and bake it at 180° for approx. 40 minutes.
Salad dressing
- I part vinegar or lemon
- 3 parts oil
- salt, pepper
Pour vinegar or lemon juice into the blender jar, add salt and pepper and switch the appliance on. Process until the salt and pepper have dissolved. Then add the oil through the hole in the lid until a homogeneous dressing has formed.
- You can also prepare a larger quantity of this basic dressing and store it in the refrigerator. Always shake before use to mix the ingredients.
Cheese cake
- 4 eggs
- 525 ml milk
- 75g margarine
- 90g Parmesan cheese cut into 1 -cm cubes
- 440g sugar
- 290g corn flour
- 250g wheat flour
- I tsp baking powder
- Put the eggs, milk, margarine, Parmesan cheese and sugar in the jar. Let the appliance run at maximum speed for 10 seconds.
- Add the corn flour spoon by spoon and let the appliance run for 20 seconds at maximum speed. Then add the wheat flour spoon by spoon and let the appliance run for another 30 seconds at maximum speed. Add the baking powder and let the appliance run for 10 more seconds. Then turn the appliance off. Put the mixture in a baking tin that has been greased with oil or margarine and then floured. Bake the cheese cake in the oven at 200 - 210°C for approximately 35-40 minutes.
Troubleshooting guide
| Problem | Solution |
| The appliance does not work | The appliance is provided with a safety system. If accessories are not properly connected with the motor unit, the appliance does not work. Check whether the accessories have been connected in the right way (see the various sections). Turn off the appliance first! |
| The knife unit / motor unit is blocked. | Turn off the appliance and process a smaller quantity. |
| The motor unit gives an unpleasant smell during the first few times of use. | This is normal for the first few applications. If the smelling continues, check the quantity you are processing, the application time or used speed. |
| The appliance makes a lot of noise, smells, feels hot to touch, smokes, etc. | Turn off the appliance and unplug it. Contact the Philips Customer Care Centre or the nearest Philips service centre. |
| The mill shows a high vibration, produces a lot of noise or the knife unit is out of alignment. | Check whether the knife is properly attached to the beaker. |
| The mill leaks powder | Check whether the rubber ring is assembled in a correct way. |
| Make sure the rubber ring is assembled properly. The ring should rest around all interface, in a flat position. Note: a small leakage is normal. | |
| Despite the filter accessory juices show pulp of fruits or soybean. | Make sure that the filter accessory has been attached properly into the blender jar. |
* If problems persist or if other problems occur, please contact the Philips Customer Care Centre or the nearest Philips service centre.
Einleitung


Was alle accessoires en afneembare onderdelen af (zie 'Schoonmaken').


6 Velg innstilling ved å trykke på den aktuelle knappen, og apparatet startes automatisk.

| Ingredienser som skal behandles | Hastighet |
| flytende ingredienser (f.eks. sjokolademelk, melk med frukt, majones) | hastighet 1 |
| tyngre ingredienser, f.eks. en blanding av flytende og faste ingredienser (f.eks. tomatsaus eller tomatpuré) | hastighet 2 |
| tunge, overveiende faste ingredienser (f.eks. isbiter, supper, bønner osv.) | hastighet 3 |
▶ Slik lages soyamelk:
La soyabønnene ligge i bløt i 4 timer før de behandles.
Maks. 50 g tørre soyabønner med 5 dl vann kan behandles av gangen.
2 Kontroller at gummiringen på knivenheten sitter ordentlig på.

4 Sett den monterte kvernen opp ned og skru den fast på motorenheten i pilens retning.


| Ingredienser | Kvantitet |
| pepparkom | 5-25 gram |
| sesamfrön | 10-50 gram |
| ris, hela vetekom | 25-75 gram |
| sojabönor | 25-75 gram |
| torkade ärtor | 25-75 gram |
| kokosflingor | 25-75 gram |
| kaffebönor | 25-50 gram |
| ost | 25-75 gram |
| brödsmulor | 20-40 gram |
| sockerbitar | 25-50 gram |
| nötter (utan skal) | 25-75 gram |
Göra ren filtret


| Ingredienser | Kvantiteter |
| peberkom | 5-25 g |
| sesamfrø | 10-50 g |
| ris, hvede | 25-75 g |
| soyabønner | 25-75 g |
| tørrede ærter | 25-75 g |
| kokosnød | 25-75 g |




| Ingredienser | Kvantiteter |
| kaffebønner | 25-50 g |
| ost | 25-75 g |
| rasp | 20-40 g |
| hugget sukker | 25-50 g |
| nødder (uden skal) | 25-75 g |





Brand : PHILIPS
Model : Cucina HR1754
Category : Food processor