
HR1734 - Food processor PHILIPS - Free user manual and instructions
Find the device manual for free HR1734 PHILIPS in PDF.


| Product type | Food processor |
| Brand | Philips |
| Model | HR1734 |
| Power | 700 W |
| Bowl capacity | 1.5 L |
| Dimensions (L x W x H) | 25 x 20 x 35 cm |
| Weight | 3.5 kg |
| Power supply | 220-240 V, 50-60 Hz |
| Number of speeds | 2 speeds + pulse |
| Main functions | Mix, chop, slice, grate, knead, beat |
| Accessories included | Stainless steel blade, slicing/shredding disc, whisk, dough hook |
| Bowl material | BPA-free plastic |
| Cleaning and maintenance | Bowl and accessories are dishwasher safe |
| Safety | Safety bowl lock, automatic shut-off in case of overload |
| Spare parts and repairability | Parts available via Philips, repairability score 8.3/10 |
| Color | White and silver |
| Warranty | 2 years |
| General information | User manual included, available in 8 languages |
Frequently Asked Questions - HR1734 PHILIPS
User questions about HR1734 PHILIPS
0 question about this device. Answer the ones you know or ask your own.
Ask a new question about this device
Download the instructions for your Food processor in PDF format for free! Find your manual HR1734 - PHILIPS and take your electronic device back in hand. On this page are published all the documents necessary for the use of your device. HR1734 by PHILIPS.
USER MANUAL HR1734 PHILIPS
natural_image
Black-and-white photo of a blender with scattered fruits and berries, no visible text or symbolsEnglish Page 4
- Keep pages 3 and 38 open when reading these operating instructions.
Français Page 8

English
Important
- Read the instructions carefully and look at the illustrations before you start using the appliance.
- To avoid damage, check if the voltage indicated on the appliance corresponds to the mains voltage in your home (110-127 V or 220-240 V) before you connect the appliance.
- Never use any accessories or parts from other manufacturers or which have not been specifically advised by Philips. Your guarantee will become invalid if such accessories or parts have been used.
- For optimal results and to prevent damage to the appliance, follow the instructions with regard to the maximum and minimum processing quantities.
- Never remove accessories or parts from the motor unit while the appliance is running. Always unplug the appliance first.
- Keep the appliance out of the reach of children.
- Never let the appliance run unattended.
- Do not use the appliance when the mains cord, the plug or other components are damaged.
- If the mains cord of this appliance is damaged, it may only be replaced by a cord of the original type. Turn to your Philips dealer or the Philips organisation in your country for replacement.
Blender
- Do not fill the blender jar with ingredients that are hotter than 80 °C.
- To avoid spillage, do not fill the jar above the maximum level indication (i.e. 1.5 litres), particularly not when you are blending liquids. Always insert the stopper into the lid before you start processing.
- Never put your hand or any other object in the blender jar while the appliance is switched on. If necessary, use a spatula to remove food from the wall of the jar after you have switched the blender off.
- Before you start using the blender, make sure that the blade unit is securely fitted to the blender jar (see ‘Preparing the blender for use’).
- Always make sure that the lid is in “closed position” when processing ingredients.
Mill (only type HR 1737)
- The cutting edges of the blade unit are very sharp: avoid touching them!
- Never let the mill accessory run for more than 30 seconds without interruption.
• Always make sure that the rubber sealing ring has been correctly placed before you start using the appliance. - Do not use the mill accessory to process liquid ingredients.
- The mill accessory is not suitable for grinding very hard ingredients, such as nutmeg and ice cubes.
• Always process cloves, star anise and aniseed together with other ingredients. If they are processed separately, they may attack the plastic parts of the mill.
Filter
- Do not use the filter to process hot ingredients.
- Make sure the filter has been properly inserted before you switch the appliance on.
General description (fig. 1)
Blender
A Stopper
B Lid
© Opening in the lid
DSpout
E Blender jar
F Level indications
G Rubber sealing ring
H Blade unit
1 Motor unit
M = pulse position ('Moment') / Quick Clean button
K Speed buttons
3 = high speed
2 = normal speed
1 = low speed
0 = off
L Cord storage facility
Mill (only type HR 1737)
M Beaker
N Rubber sealing ring
Mill blade unit
P Lid with reclosable sprinkling hole
Filter
Filter
Cord storage
You can store excess mains cord by winding it around the base of the appliance (fig. 2).
Built-in safety lock
The appliance has been equipped with a built-in safety lock that prevents it from functioning if the accessories have been assembled incorrectly or have not been assembled at all.
Note: never use the accessories to turn the appliance on and off!
Blender
Preparing the blender for use
- Wash all detachable parts (see section 'Cleaning').
- Put the rubber sealing ring on the inner edge of the blade unit (fig. 3).
- Mount the blender jar onto the blade unit and turn it in the direction of the arrow until it is fixed (fig. 4).
- Mount the jar with blade unit onto the motor unit and turn in the direction of the arrow until it is fixed (fig. 5).
- After putting the ingredients in the jar, fix the lid onto the jar by pressing it down (fig. 6).
- Insert the stopper into the opening in the lid (fig. 7).
To disassemble the blender, proceed in reverse order and opposite direction.
Speed selection
- Make sure that the appliance is plugged in and the blender jar has been properly attached before you switch the appliance on.
- Select the speed that is most suitable for the ingredients you want to process (fig. 8):
1 light processing of mainly liquid ingredients, e.g. chocolate milk.
2 heavier processing of e.g. a combination of liquid and solid ingredients.
3 heavy processing of mainly solid ingredients.
- If you are not sure which speed to select, you can always use the highest speed (speed 3).
- To let the appliance run for only a few moments at a time, press the M button and release it straightaway (fig. 9).
- To switch the motor off, press the O button (fig. 10).
Tips
- Put the stopper upside down in the lid to use it as a dosing device (fig. 11).
- The opening in the lid can be used for adding ingredients while the motor is running (fig. 12).
- Do not let the appliance run for longer than 3 minutes at a time. If you have not finished processing after 3 minutes, switch the appliance off for one minute before you let it run again.
- Precut meat and other solid ingredients into smaller pieces before putting them into the blender jar.
- For optimal blending of solid ingredients, feed a series of small amounts into the jar rather than processing a large quantity at once.
- If you are not satisfied with the performance of the appliance, switch it off and
- let it run briefly a number of times by means of pulse position M, or
- stir the ingredients with a spatula (not while the blender is running!), or
- reduce the contents of the jar and process smaller amounts at a time.
- To crush ice cubes, drop them onto the blades through the opening in the lid while the motor is running.
- If you are processing solid and liquid ingredients at the same time, first put the liquid ingredients in the jar. Add the solid ingredients while the appliance is running.
Mill (only type HR 1737)
Preparing the mill for use
- Put the ingredients in the beaker (fig. 13). Process only dry ingredients. Do not fill the beaker beyond the "MAX" indication.
- Place the rubber ring on the blade unit (fig. 14).
- Screw the blade unit onto the beaker (fig. 15). If this requires some effort, moisten the rubber ring with a drop of water.
- Turn the assembled mill upside down and screw it onto the motor unit (fig. 16).
- Preferably use the mill at pulse position M.
What to use the mill for?
The mill is suitable for grinding and chopping e.g.:
Ingredients Quantities
- peppercorns 25-75 g
- sesame seeds 25-75 g
- rice, wheat 25-75 g
- soy beans 25-75 g
- dried peas 25-75 g
- coconut flesh 25-75 g
- coffee beans 25-75 g
- cheese 25-75 g
- breadcrumbs one dried slice of bread
- sugar cubes 50 g
- nuts (shelled) 25-75 g
(Optimal results are achieved if you process the quantities mentioned)
Storage and sprinkling facilities
After you have processed the ingredients, you can unscrew the mill from the appliance. If you remove the blade unit and replace it with the lid (fig. 17), you can store the ingredients, for instance in the refrigerator. You can also sprinkle the ingredients onto a dish via the reclosable sprinkling hole in the lid. Handy for on the table!
Filter
With this filter you will make delicious fresh fruit juices and cocktails in next to no time. All pips and skins will remain behind in the filter.
Preparing the filter for use
- Assemble the blender jar.
- Put the filter in the assembled blender jar (fig. 18). Make sure that the grooves of the filter fit exactly onto the ribs inside the blender jar.
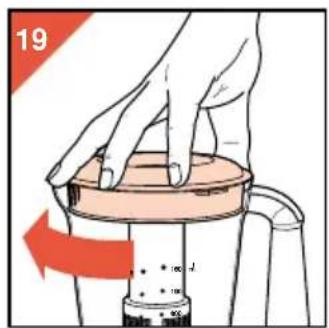
- Put the lid in place and turn it to fix the filter (fig. 19).
- Put the ingredients in the filter (fig. 20).
Note: the filter should never be filled beyond its metal part! - Add water or another liquid (e.g. for cocktails).
- Put the stopper in place and switch the appliance on. Select the highest speed. Let the appliance run for 40 seconds.
- Switch the appliance off. Pour out the drink through the spout of the blender jar (fig. 21).
- For optimal results, put the jar with the remaining ingredients back onto the appliance and let it run for a few more seconds.
- Pour out the rest of the drink.
Tips
Particularly when you are processing large quantities, we advise you not to put all the ingredients in the filter at the same time. Start processing a small quantity, let the appliance run for a moment, switch it off and then add another small quantity. Repeat this procedure until you have processed all the ingredients.
For soy milk
- Soak soy beans for 4 hours before processing them.
- Max. 50 g of dry soy beans can be processed with max. 500 ml water.
For fruit juices and cocktails
- For the best results, add approximately 300 ml water (or other liquid for cocktails, etc.) to 150 g fruit.
Cleaning
- Cleaning of the appliance, its parts and the accessories is easiest immediately after use.
- Never clean the accessories or the parts in the dishwasher.
- The motor unit can be cleaned with a moist cloth. Do not use abrasives, scourers, alcohol etc.
Blender
- Quick cleaning: assemble the blender jar and pour lukewarm water and some washing-up liquid into the blender jar.
-
Assemble the lid and the stopper.
-
Let the appliance run for a few moments by pressing the Quick Clean button (fig. 9), then release this button.
- Unplug the appliance.
- Remove the blender jar and rinse it with clean water.
- Thorough cleaning: remove the blade unit and clean all parts separately. Be careful with the sharp edges of the blade unit!
Mill
- Unplug the appliance
- Detach the mill from the motor unit
- Clean the beaker, the lid and the blade unit in luke warm water with some washing-up liquid.
- After washing up the parts, rinse them with clean water and dry them thoroughly
Filter
- Take the filter out of the blender jar.
- Hold the filter over a waste bin and gently shake out the contents of the filter.
- Rinse the filter under the tap.
Français
Important
J M = Pulse-stand ("Moment") / Quick clean
K "Snelheid" knoppen
3 = Hoge snelheid
2 = Normale snelheid
1 = Lage snelheid
0 = Uit
natural_image
Illustration of a hand washing machine with a red curved arrow indicating motion (no text or symbols)
natural_image
Illustration of a hand using a tool to lift a small component into a conical container (no text or symbols)


natural_image
Illustration of a hand pouring liquid into a steamer (no text or symbols)

natural_image
Illustration of a hand holding a tool over a lid with arrows indicating motion (no text or symbols)
natural_image
Illustration of hands holding a cup with a red arrow indicating compression or compression (no text or symbols)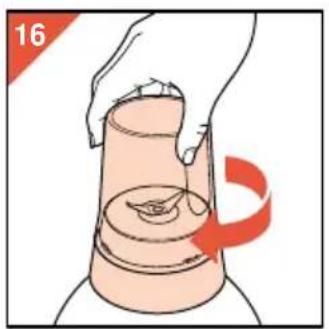

natural_image
Illustration of hands holding a lid with a red arrow indicating rotation (no text or symbols)

natural_image
Illustration of a spoon lifting a small amount of food into a blender (no text or symbols)
natural_image
Illustration of a hand pouring liquid from a container into a bowl (no text or symbols)

- English Page 4
- Français Page 8
- English
- Important
- Blender
- Mill (only type HR 1737)
- Filter
- General description (fig. 1)
- Cord storage
- Built-in safety lock
- Preparing the blender for use
- Speed selection
- Tips
- Preparing the mill for use
- What to use the mill for?
- Storage and sprinkling facilities
- Preparing the filter for use
- For soy milk
- For fruit juices and cocktails
- Cleaning
- Mill
- Français
Brand : PHILIPS
Model : HR1734
Category : Food processor