
CombiMax 700 - Food Processor BRAUN - Free user manual and instructions
Find the device manual for free CombiMax 700 BRAUN in PDF.


| Product Type | Food Processor |
| Brand | Braun |
| Model | CombiMax 700 |
| Motor Power | 700 W |
| Voltage | 220-240 V, 50/60 Hz |
| Capacity (Main Bowl) | 3.5 L (working capacity approx. 1.5 L) |
| Dimensions (L x W x H) | 31 x 25 x 27 cm |
| Weight | 4.8 kg |
| Main Functions | Chopping, slicing, shredding, grating, mixing, kneading, blending, emulsifying, citrus juicing |
| Speed Settings | 2 speeds + pulse |
| Included Accessories | Stainless steel chopping knife, dough blade, emulsifying disc, fine and coarse shredding discs, slicing disc, citrus press, blender attachment |
| Materials | Plastic body, stainless steel blades and discs |
| Safety Features | Overload protection, safety locking system, non-slip feet |
| Cleaning | Removable parts dishwasher safe (except motor base) |
| Maintenance | Wipe motor base with damp cloth; dry immediately |
| Spare Parts Availability | Replacement bowls, blades, discs, and seals available from Braun service centers |
| Repairability | Modular design; motor and electronic parts replaceable by authorized technicians |
| Cord Length | 1.2 m |
| Color | White and gray |
Frequently Asked Questions - CombiMax 700 BRAUN
User questions about CombiMax 700 BRAUN
0 question about this device. Answer the ones you know or ask your own.
Ask a new question about this device
Download the instructions for your Food Processor in PDF format for free! Find your manual CombiMax 700 - BRAUN and take your electronic device back in hand. On this page are published all the documents necessary for the use of your device. CombiMax 700 by BRAUN.
USER MANUAL CombiMax 700 BRAUN
Deutsch 6, 111
English 12, 111
Français 18, 111
Español 24, 111
Português 30, 111
Italiano 36, 111
Nederlands 42, 112
Dansk 48, 112
Norsk 54, 112
Svenska 60, 112
Suomi 66, 112
Polski 72, 112
Türkçe 78
Ελληνικά 84, 113
Русский 90, 113
Українська 96, 114

110, 105

Braun Infolines

00 800 27 28 64 63
00 800 BRAUNINFOLINE

08 44 - 88 40 10

0 800 783 70 10

1 800 509 448

0 800 944 802

0 800 14 592

901 11 61 84

808 20 00 33

(02) 667 86 23

0 800-445 53 88

70 15 00 13

22 63 00 93

020 - 21 33 21

020 377 877

0 801 127 286
0 801 1 BRAUN

0212-473 75 85

8 800 200 20 20

+ 38 044 428 65 05

852-25249377
(Audio Supplies Company Ltd.)
Internet:
www.braun.com
Braun GmbH
 |  | K 700 | K 700 vital | ||
 | (a) | ● | ● | ||
 | (b) | ● | ● | ||
 | (c) | ● | ● | ||
 | (d) | ● | ● | ||
 | (e) | ● | ● | ||
 | ● | ● | |||
 | ● | ● | |||
 | ● | ● | |||
 | ● | ||||
 | ● | ||||
Deutsch







Gerätebeschreibung
Our products are engineered to meet the highest standards of Quality, functionality and design. We hope you thoroughly enjoy your new Braun appliance.
Please read the use instructions carefully before first use.
Important

The blades ⑫/⑭ are very sharp!
Take hold of the blades by the knob only. After use, always first remove the blades from the bowls ⑦/⑩ before removing the processed food.
- Make sure that your voltage corresponds to the voltage printed on the bottom of the appliance. Connect to alternating current only.
- Keep the appliance out of the reach of children.
- This appliance is not intended for use by children or persons with reduced physical or mental capabilities, unless they are given supervision by a person responsible for their safety. In general, we recommend that you keep the appliance out of reach of children.
- This appliance was constructed for household use only to process the listed quantities.
- Do not use any parts in the microwave oven.
- Make sure to avoid touching the running drives with your fingers. Put on the protective cover Ⓔ whenever a drive place is not in use, since both drives rotate simultaneously when switching on the appliance.
- Do not allow the appliance to operate unsupervised.
- Braun electric appliances meet applicable safety standards. Repairs or the replacement of the mains cord must only be done by authorised service personnel. Faulty, unqualified repair work may cause considerable hazards to the user.
- Switch the appliance off and disconnect it from the outlet before storing it.
Specifications
- Voltage/wattage: See typeplate on the bottom of the appliance.
- Operating time and max. capacity: See processing instructions.
Description
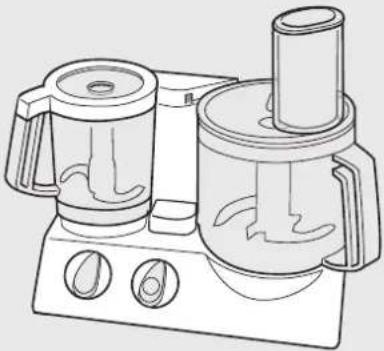
The Braun CombiMax with the 2-bowl system meets highest demands for kneading, mixing, blending, chopping, slicing, shredding and grating, both simply and quickly.
To obtain best results, two different working bowls are available: a large food processor bowl ⑦ and a small chopper bowl ⑩.
Thus, for chopping, puréeing or mixing you can choose between the large and the small working bowl. Moreover, you can use the small bowl to prepare the food which then can be further processed in the large bowl (e.g. to chop nuts for a nut cake dough). Only one bowl can be operated at a time.
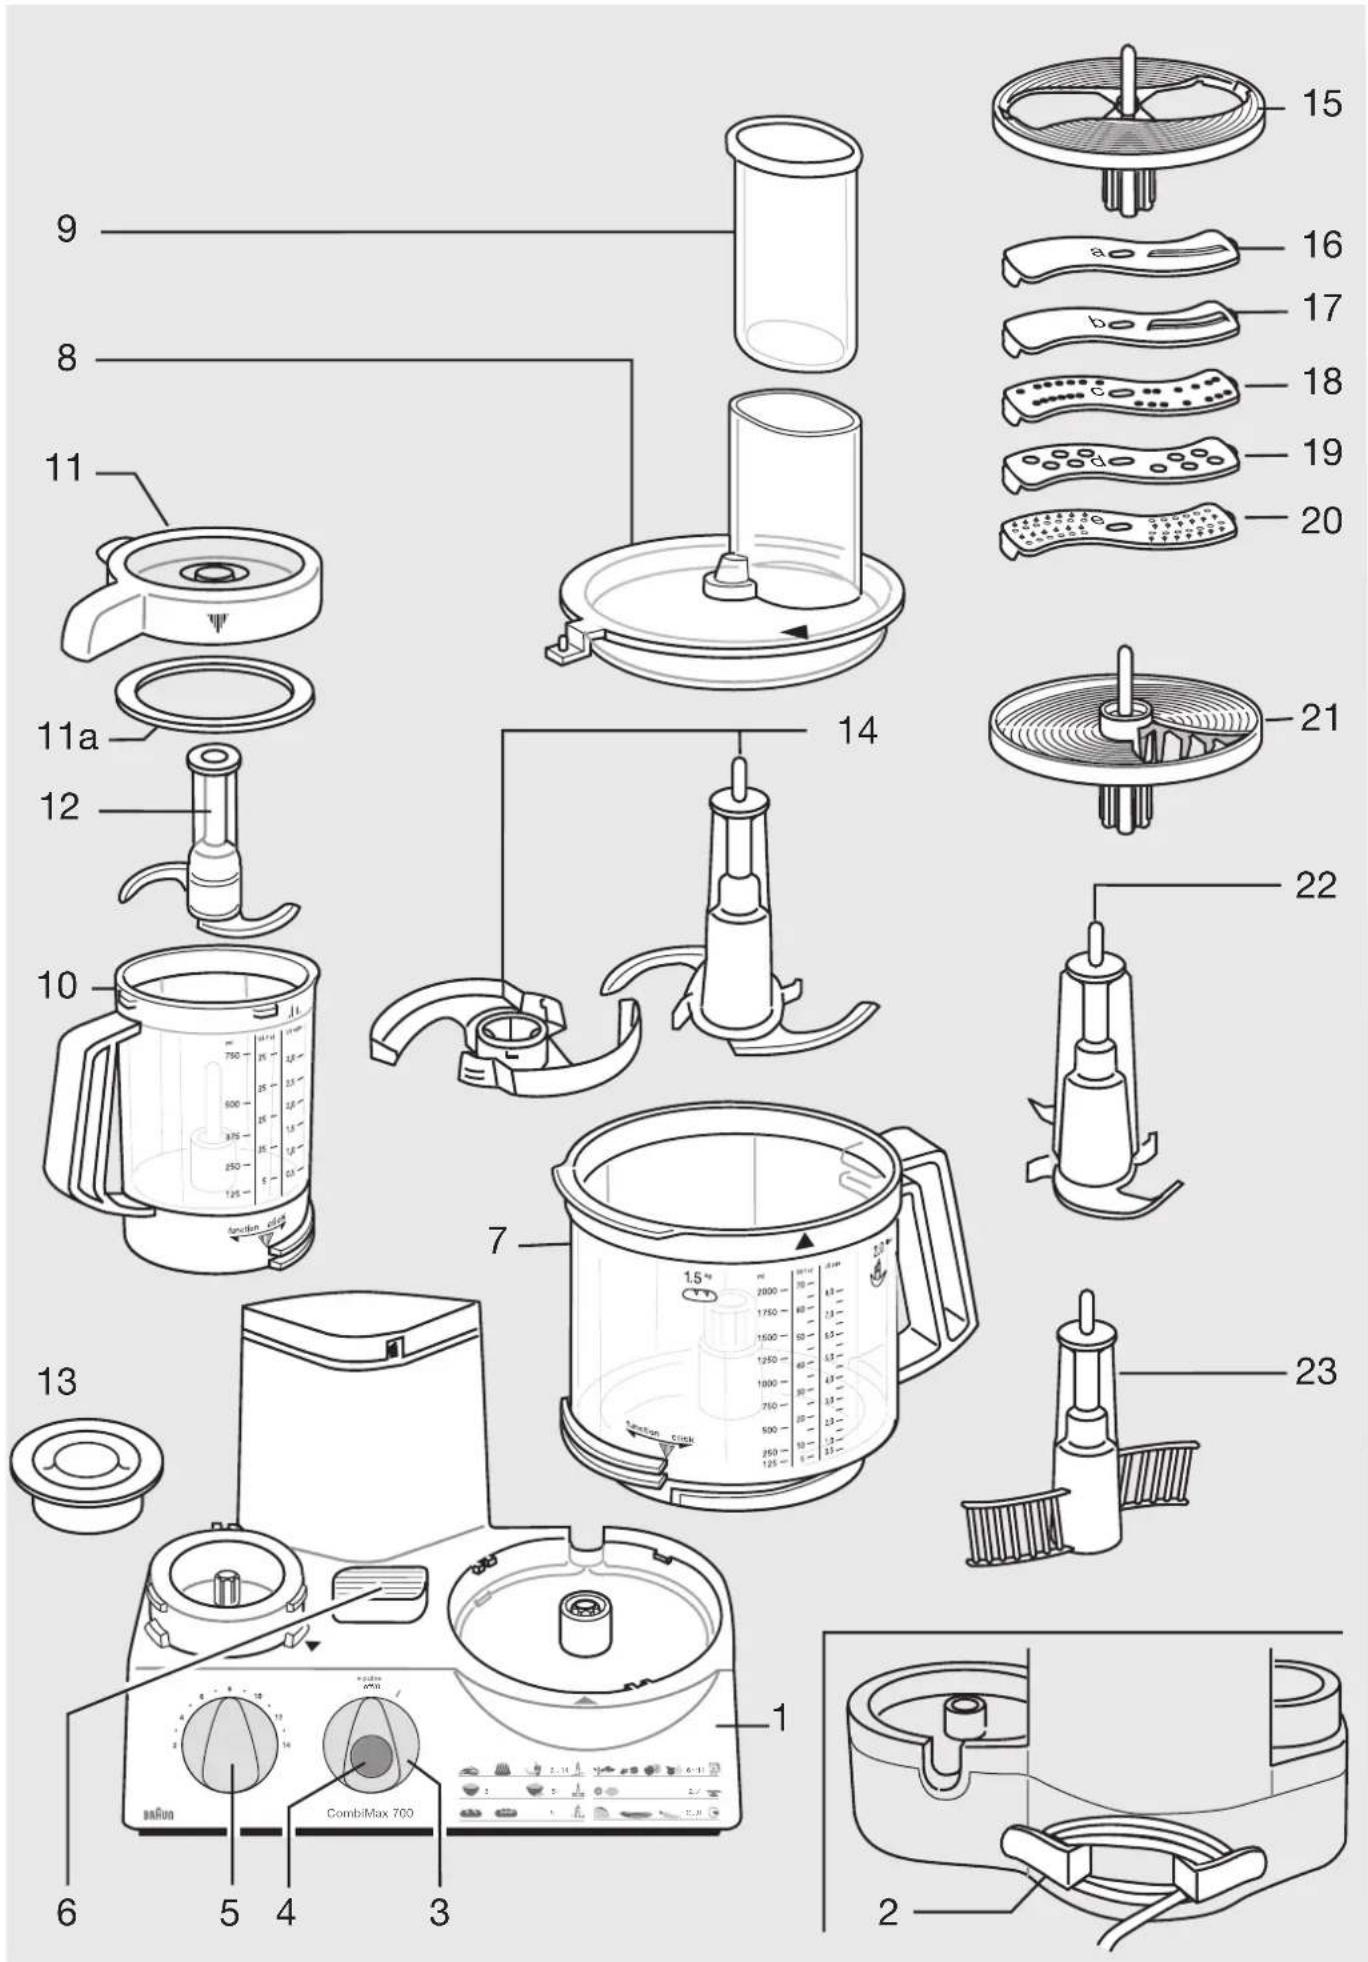
① Motor block
② Cord storage
③ Motor switch (on = «|», off = «off/0»)
④ Pulse mode «• pulse»
⑤ Variable speed regulator (2-14)
⑥ Safety lock (avoids simultaneous operation of both working bowls)
⑦ Food processor bowl (2 l capacity)
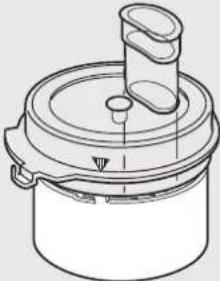
⑧ Lid for food processor bowl ⑦
⑨ Pusher for lid ⑧
⑩ Chopper/mixer bowl for small quantities (0.75 l capacity)
⑪ Lid for chopper bowl ⑩
⑱ Seal ring for lid ⑪
⑫ Blade for chopper bowl ⑩
⑬ Protective cover for motor drive when bowl has been taken off
Attachments for food processor bowl ⑦
(Important: Not all attachments will be included in the standard equipment of all models).
⑭ Blade for food processor bowl ⑦ with protective cover
⑮ Insert carrier
⑯ Fine slicing insert – a
⑰ Coarse slicing insert – b
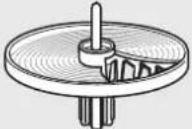
⑱ Fine shredding insert - c
⑲ Coarse shredding insert – d
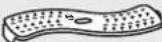
⑳ Grating insert - e
② French-fries system
② Plastic or metal kneading hook (depending on model)
② Whipping attachment
Note: Before using the food processor for the first time, clean all parts as described under «Cleaning».
Overload protection
In order to avoid damages caused by overload, this appliance is equipped with an automatic security switch which shuts off the current supply if necessary. In such case, turn the motor switch ③ back to «off/0» and wait approx. 15 minutes to allow the motor to cool off before switching on the appliance again.
Pulse mode «• pulse» ④
The pulse mode is for example useful for the following applications:
- Chopping delicate and soft food, e.g., eggs, onions or parsley.
- Carefully folding flour into dough or batter to maintain the creaminess.
- Adding whipped eggs or cream to more solid food.
The pulse mode «• pulse» is activated by pressing the blue knob on the motor switch ④ with switch setting «off/0».
Before activating the pulse mode, set the desired speed with the speed regulator ⑤. When releasing the pulse knob ④, the appliance is switched off.
Recommended speed ranges for individual attachments
Set the speed range by means of the variable speed regulator ⑤. It is recommended to first select the speed and then switch on the appliance in order to work with the desired speed right from the beginning.
Attachments Speed range
Kneading hook 6
Blade ⑫ and ⑭ 6 - 14
Whipping attachment:
- egg-whites 5
- cream 3
Slicing, grating and
shredding inserts 2 - 8
French-fries system 2 - 3
(please also refer to product printing)
Working with the 2-bowl system
Only one working bowl can be operated at a time.
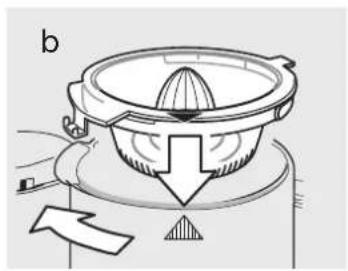
The working bowl which is not used must be in the upper position or additionally, can be turned in the «click» direction where it is locked in place. When the arrow markings are aligned, the bowl can be taken off. For safety reasons, always put the protective cover onto the free drive shaft after a bowl has been taken off.
Double safety feature:
The appliance can only be switched on when the desired working bowl with lid is properly engaged. If the lid is opened during operation, the motor switches off automatically. As in this case the motor switch ③ is still on «I», turn it back to «off/0» to avoid switching on the motor accidentally.
Attaching the working bowls
The food processor bowl ⑦ is operated on the large drive place of the motor block ①. The chopper bowl ⑩ is operated on the small drive place.
- With the motor switched off, place the respective bowl onto its drive place matching the arrow on the bowl with the arrow on the motor block (A).

Then turn the bowl in the «function» direction until the lower fixed stop is reached. The bowl on the other drive place must be in the lifted position. If the other drive place is free, put on the protective cover ③.
- Put the attachment needed (see instructions for each of the attachments) onto the drive shaft of the bowl and push it down as far as it will go (B).

When inserting the blade ⑫ onto the chopper bowl ⑩, push it down until it audibly snaps in place.
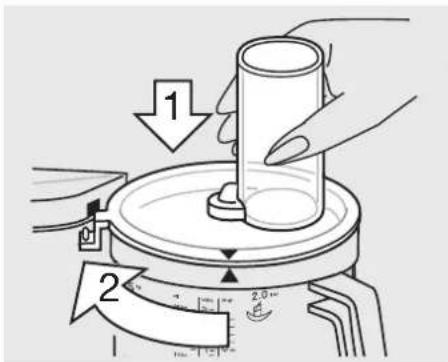
- Put the lid onto the bowl matching the arrow on the lid with the arrow on the bowl (C).

Then turn the lid clockwise guiding its nose into the safety lock opening of the motor block ① until it audibly snaps in place.
N.B.
When attaching the lid ⑪ of the chopper bowl ⑩, it must be provided with the seal ring ⑬
Removing the working bowls
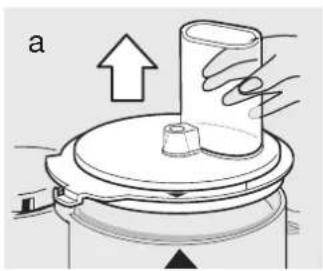
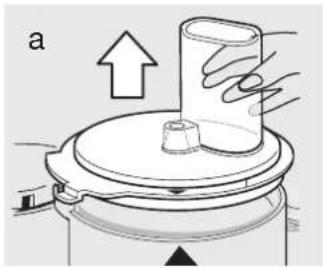
Switch off the appliance. Turn the lid anti-clockwise and lift it off. Then turn the bowl in the «click» direction until the arrow on the bowl matches the arrow on the motor block and lift off the bowl.
When removing the blade from a bowl, take hold of it by the knob and pull it off.
Caution: The blades are very sharp.
The blade 14 comes with a protective cover. If not in use, store the blade on the protective cover.
Cleaning
First, always switch off the motor and unplug the appliance. Clean the motor block ① with a damp cloth only.
All parts can be cleaned in the dishwasher. If necessary, clean all parts thoroughly with a spatula or a brush before rinsing them.
Color-intensive food (e.g. carrots) may leave stains on the plastic parts; wipe them off with cooking oil before cleaning with water.
For cleaning the lid ⑩, first remove the seal ring ⑪ Put the seal ring back in place after cleaning. You can use the seal ring from both sides. Do not use sharp objects for cleaning purposes.
Clean the blades and the inserts very carefully – they are very sharp.
Using the food processor bowl ⑦
When using the food processor bowl, always insert the required attachments before adding ingredients.
1. Kneading
For kneading you can use the kneading hook ② or the blade ⑭. For best results, we recommend using the kneading hook which is specially designed for making yeast dough, pasta and pastries.
Yeast dough (bread/cake)
Max. 500 g flour plus other ingredients Speed 6, 1 1/2 minutes
Pour the flour into the food processor bowl, then add the other ingredients – except liquids.
Put on the lid ⑧ and lock in place. Then choose speed 6 and switch the appliance on.
Add liquids by pouring them through the filling tube of the lid while the motor is running.
When kneading with the blade ⚙, do not add ingredients like raisins, candied peel, almonds, etc. which are not supposed to be cut. These have to be added manually after having taken the kneaded dough out of the food processor bowl.
Pasta dough
Max. 500 g flour plus other ingredients Speed 6, 1 1/2 minutes
Pour the flour into the food processor bowl, then add the other ingredients – except liquids.
Pour the required amount of liquid through the filling tube in the lid when the motor is running.
Do not add any liquid after the dough has formed into a ball as then the liquid will no longer be absorbed evenly.
Pastries
Max. 500 g flour plus other ingredients Speed 6, approx. 1 minute
Pour flour into the food processor bowl, then add the other ingredients. For best results, be butter used must not be too hard, nor too soft.
Put on the lid ⑧ and lock in place. Choose speed 6 and switch on the appliance.
Stop kneading the dough shortly after a ball has formed. Otherwise the pastry dough will become too soft.
2. Mixing
For mixing cake dough or sponges use the blade ⑭.
The kneading hook ② is not suitable for mixing cake doughs or sponges.
Max. 500 g flour plus other ingredients
Cake mixture
(2 methods) Speed / time
a) Cream butter with sugar end eggs 6 / ca. 1 min pour in milk and 6 / ca. 15 secs carefully fold in 14 / ca. 10-15 x flour with pulse «• pulse» mode.
b) Pour all ingredients except liquids into the food processor bowl. 14 / ca. 1 min
Add required liquids through the filling tube of the lid while the motor is running. Finally add ingredients like raisins manually.
Sponge Speed/time
Cream eggs and
water (if required) 14 / ca. 2 mins
and sugar 14 / ca. 4 mins
fold in flour with
pulse mode 8 / 5 x «• pulse»
add cocoa powder 8 / 3 x «• pulse»
3. Blending
Use the blade ⑭ for blending soups, shakes, etc.
Maximum capacity 2 l
Speed 10
(otherwise the bowl may overflow)
For milk-shakes, pour coarsely chopped fruit into the food processor bowl.
Put on the lid ⑧ and lock in place. With speed 14, blend fruit first, then add liquid at speed 10 and finish blending.
When blending milk, please not that it will froth. Use smaller Quantities.
4. Chopping
Chopping in the food processor bowl with the blade ⑭
Note: For processing larger quantities, use the food processor bowl ⑦ with blade ⑭. For processing smaller quantities, we recommend to use the chopper bowl ⑩ with blade ⑫.
Processing examples
The processing times are approximate and depend on the quality, the amount of food to be processed and the required degree of fineness.
| Product | Max. amount | Preparation | Speed | Mode | Time/pulses |
| Hard bread rolls | 4 | quartered | 14 | I | 45 secs |
| Ice cubes | 28 | whole | 14 | I | 1 minute (snow) |
| Apples | 700 g | quartered | 8 | «• pulse/I» | 15 secs |
| Chocolate cool | 400 g | broken | 14 | I | coarse 15 secs fine 30 secs |
| Eggs | 8 | whole | 6 | «• pulse» | 8 x |
| Cheese (soft) | 400 g | 3-cm cubes | 14 | I | 20 secs |
| Cheese (hard) | 700 g | 3-cm cubes | 14 | I | 60-70 secs |
| Meat | 700 g | in cubes | 14 | «• pulse/I» | 40 secs |
| Carrots | 700 g | in pieces | 14 | I | 10 secs |
| Onions | 700 g | quartered | 14 | «• pulse» | 10 - 13 x |
5. Slicing, shredding, grating
- Place the insert you want to use into the insert carrier 16 as shown in (D) and snap into position. In order to remove the insert, push up the insert end that protrudes at the bottom of the insert carrier.
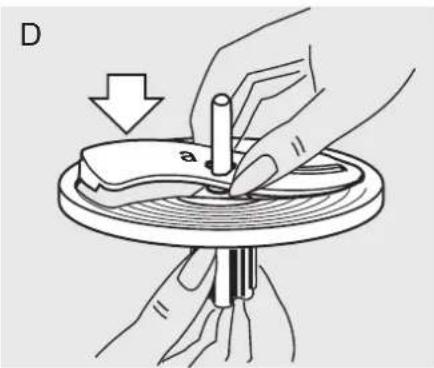
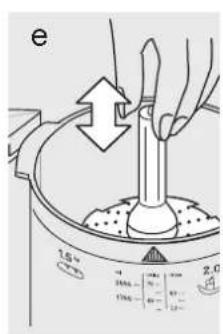
- Put the assembled slicer/shredder onto the drive shaft of the food processor bowl (E).
- Put on the lid ⑧ and lock in place. Set the speed and fill the food to be processed into the filling tube while the motor is switched off. Refilling should be done with the motor switched off.

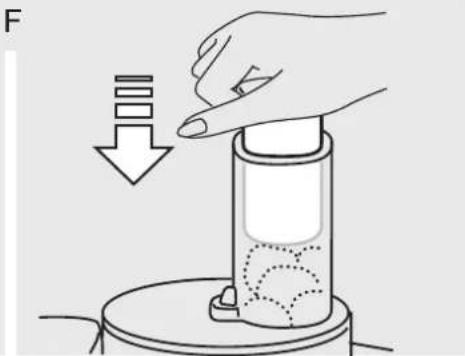
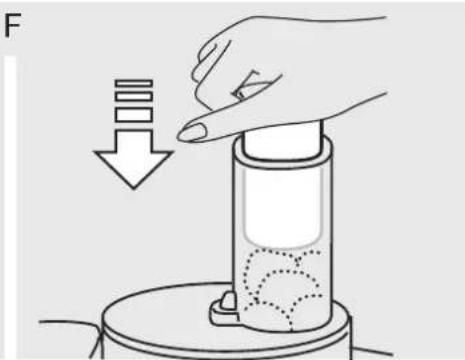
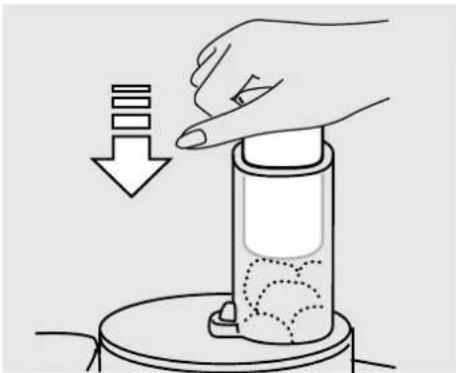
- Never reach into the filling tube when the motor is running. Always use the pusher ⑨ (F).
N.B.: When processing juicy or soft food, you will obtain better results at a lower speed. Hard food should be processed at a higher speed. Do not overload the food processor bowl.
Fine slicing insert - a ⑯
Speed 2 - 3
Processing examples: cucumbers, cabbage, raw potatoes, carrots, onions, radishes.
Coarse slicing insert - b ⑰
Speed 2 - 3
Processing examples: cucumbers, kohlrabi, raw potatoes, onions, bananas, tomatoes, mushrooms, celery.
Fine shredding insert - c ⑱
Speed 4 - 6
Processing examples: cheese (soft to medium), cucumbers, carrots, raw potatoes, apples.
Coarse shredding insert - d ⑲
Speed 4 - 6
Processing examples: cheese (soft to medium), cucumbers, kohlrabi, beet-root, carrots, raw potatoes, apples, cabbage.
Grating insert - e ⑳
Speed 8 - 14
Processing examples: raw potatoes (e.g. for potato pancakes), horseradish, parmigiano cheese (hard).
French-fries system ②1
Place the French-fries system onto the drive shaft, put on the lid ⑧ and lock in place. For best results, place 3 - 4 potatoes (depending on size) in the filling tube of the lid ⑧ while the motor is switched off.
Set speed to 2 - 3 and switch on the appliance. Before filling in a new load, switch the motor off. Use the pusher ⑨ to apply slight pressure when pushing the potatoes into the filling tube.
6. Whipping with the whipping attachment ②3
Speed time
Whipping sponges
| Max. 280-300 g flour plus ingredients Cream eggs and water (if required) add sugar fold in flour |
Whipping egg-whites
| Min.: 2 egg-whites | 4-5 / ca. 4 mins |
| Max.: 6 egg-whites | 4-5 / ca. 6 mins |
| Whipping cream | |
| Min.: 0.15-0.2 l | 3/ca. 1-2 mins |
| Max.: 0.4 l | 3/ca. 3.5-4 mins |
Before whipping sterilized cream, keep the cream cool for several hours (at 4 °C approx.).
Using the chopper bowl ⑩
The blade ⓖ can be used for chopping, blending, puréeing and mixing smaller quantities. The chopper bowl is perfectly suited for preparing mousse, pastes or dips.
Maximum capacity: 750 ml liquid.
Caution:
The blade ⑫ is extremely sharp.
Important: The maximum processing time in the chopper bowl is 1 minute. Liquids can be processed longer. Chocolate, hard spices and coffee beans may not be chopped.
Whith the motor switched off, insert the blade ⑫ in the chopper bowl ⑩ , then place all ingredients into the chopper bowl. Liquids can be poured through the opening in the lid ⑪ when the motor is running.
Put the lid Ⓤ with the seal ring ⓑ onto the chopper bowl and close it as described earlier. After use, always remove the blade from the chopper bowl first and then empty the processed food. When blending milk, please note that it will froth. Use smaller quantities.
Processing examples
The processing times are approximate and depend on the quality and amount of food to be processed and the degree of fineness required.
Chopping
| Product | Max. amount | Preparation | Speed | Switch position | Time/pulses |
| Carrots | 150 g | in pieces | 6 | «• pulse» | 7 x |
| Onions | 100 g / 11/2 onion | quartered | 6 | «• pulse» | 6-8 x |
| Parsley | 30 g / 1/2 bunch | without stems | 14 | I | 5-10 seconds |
| Garlic | 1 clove | whole | 14 | I | 5 seconds |
| Meat (lean) | 250 g | quartered | 14 | I | 15 seconds |
Blending
| Product Preparation Speed Switch Time/pulses | position | |
| Mixed drinks Chop fruit before approx. processing. Add milk. 14 l 30 seconds | ||
| Baby food Chopped 14 «• pulse» 10 x (e.g. fruit, l 10 seconds vegetable) | ||
| Mayonnaise Blend 1 egg, seasoning, 14 l 30-45 seconds mustard and vinegar.Slowly pour in oil through lid opening. | ||
| Tartar | Blend 1 egg, seasoning, 14 l 30-45 seconds mustard and vinegar.Slowly pour in oil through lid opening.Add quartered egg and vinegar. | 6 «• pulse» 3-5 x |
| Avocado | Chop 1 clove garlic, add 2 ripe avocados (quartered, w/o stone), 1 tbsp. lemon juice, 1 tbsp. olive oil, 150 ml yogurt, 1/2 tsp. sugar, salt, pepper. | 14 l 5 seconds |
Vanilla-Honey-Prunes (as a pancake stuffing or spread) (use the chopper bowl (10), speed 14)
Fill 100 g creamy honey and 100 g prunes into the chopper bowl and chop 10 seconds, then add 50 ml water (vanilla-flavoured) and resume chopping for 3 seconds.
Mixing smaller dough quantities
The chopper bowl is only suitable for processing the following dough type; the recipe reflects maximum quantities:
Speed Switch Time position
Pancake mixture
240 g flour Mix the flour, eggs, 6 l 45-60 sec. 375 ml milk salt and half of the milk, 2 eggs add rest of the milk salt while te motor is running.
Whipping cream
200 ml cream 6 | 30 sec.
Special accessories
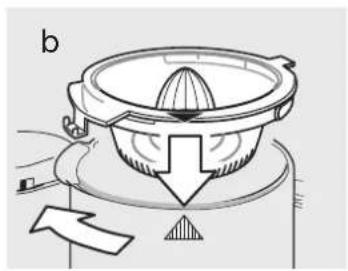
Braun Citrus press PJ 600 Type 3200, Speed: 2 - 4
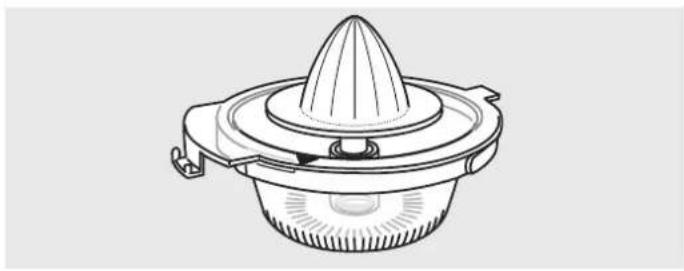


Braun Juice Extractor/Fine Grating Attachment SJ 600 Type 3200


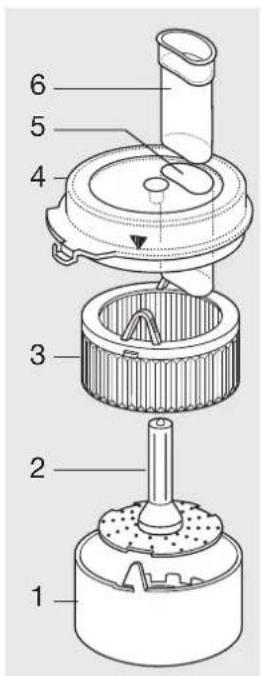
Description
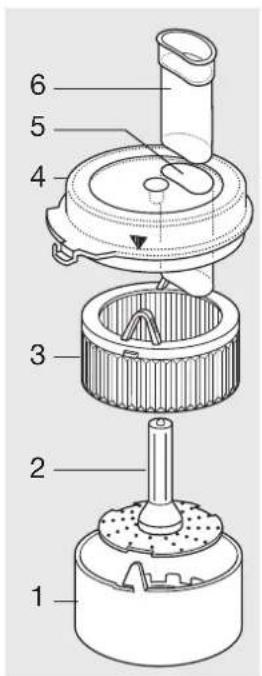
① Juicer drum
② Fine grating disc
③ Strainer basket
④ Cover
⑤ Filling tube
⑥ Pusher
Before the first use
After unpacking the appliance, please disassemble it and clean all parts. To disassemble the appliance proceed as follows:
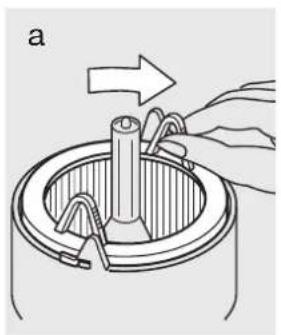
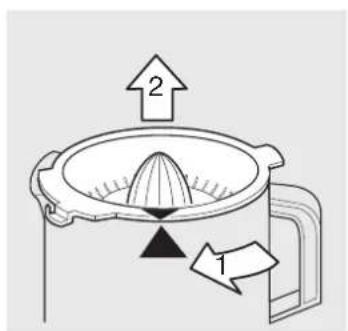
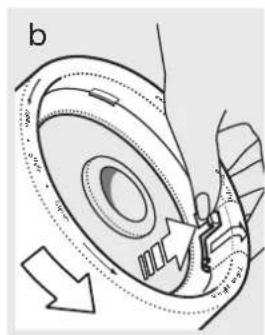
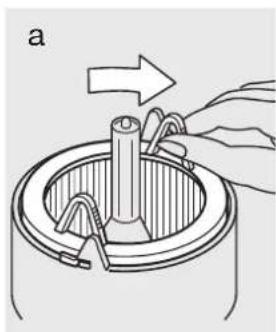
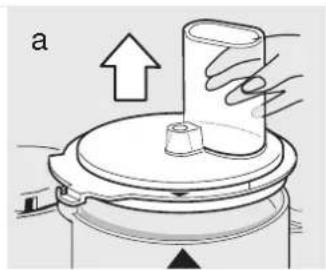
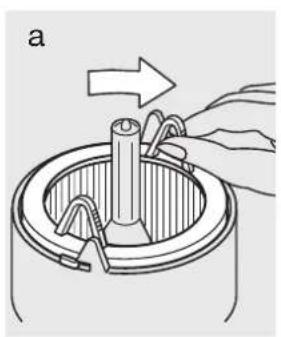
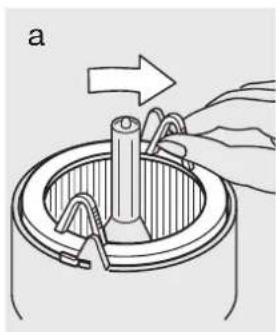
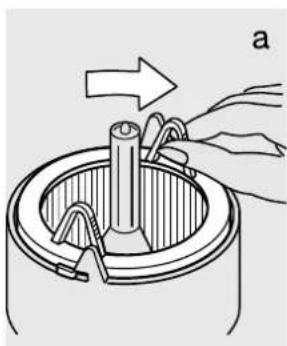
- Unlock the strainer basket ③ by turning it clockwise (a) and wash all parts by hand.
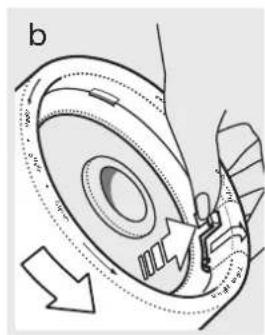
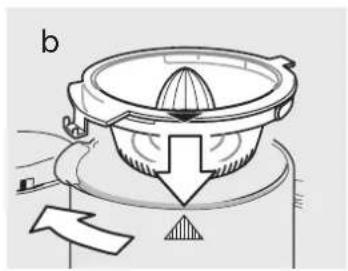
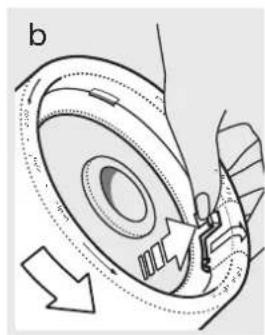
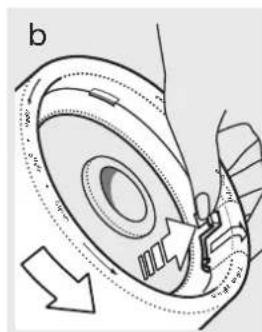
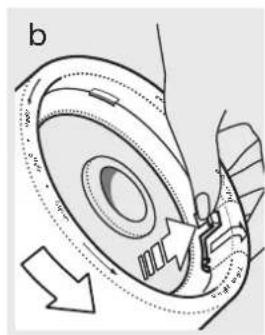
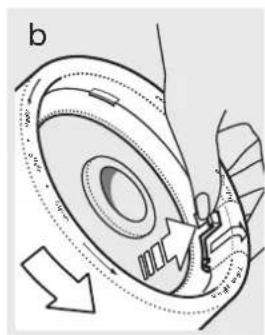
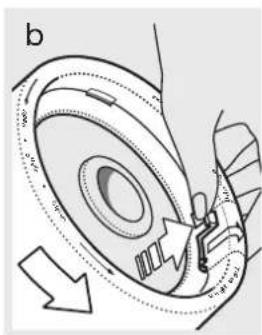
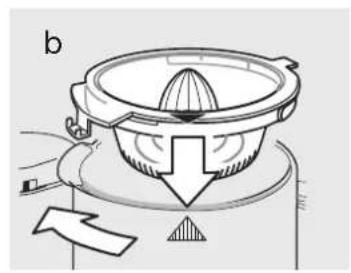
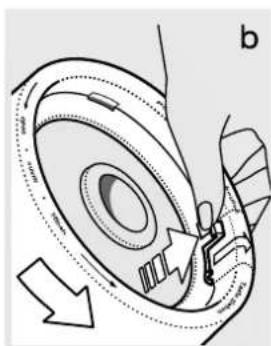
- Pull the key in the bottom of the juicer drum ① as far as it will go (b).
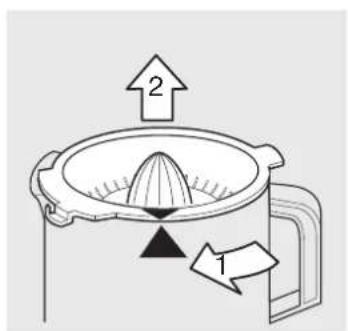
- Turn the juicer drum ① anti-clockwise with the key in the bottom of the juicer drum pulled (b) – until the fine grating disc ② is unlocked.
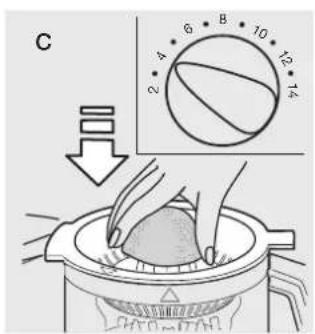
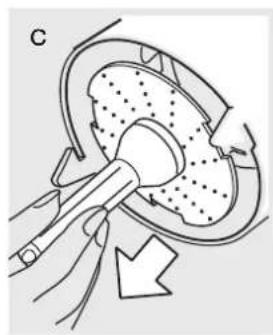
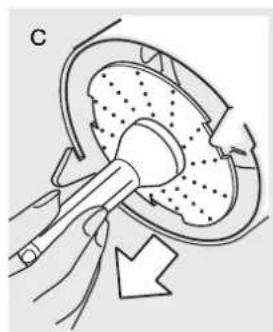
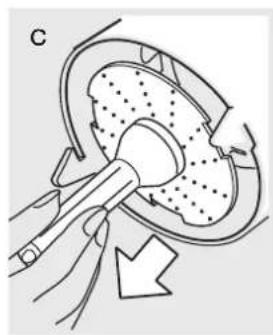
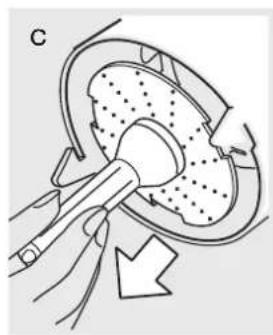
- Then pull the fine grating disc ② by its shaft out of the juicer drum ① (c).
Assembling
- Attach the food processor bowl of your Braun CombiMax (without the blade) to the motor block and lock it in place.
For grating:
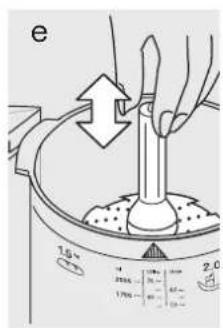
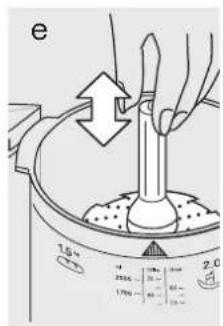
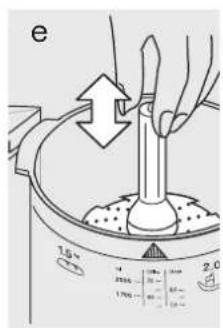
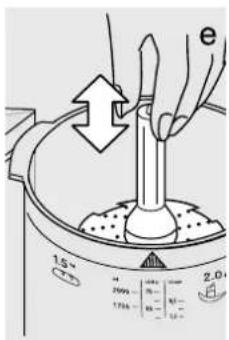
- Use the fine grating disc ② only (e).
For juice extracting:
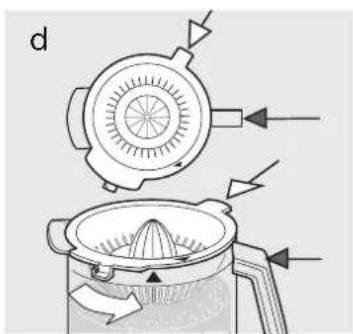
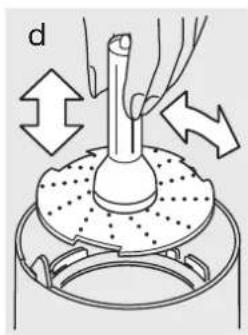
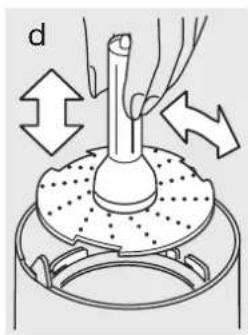
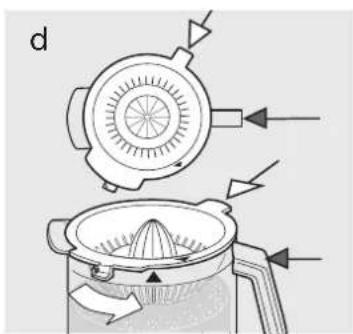
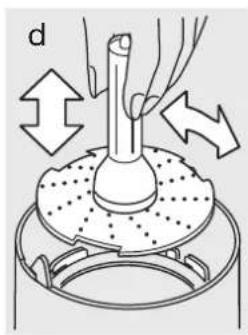
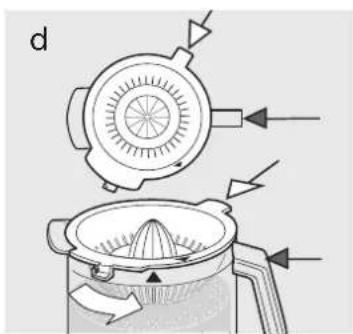
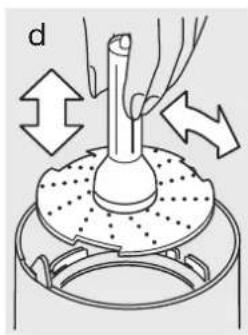
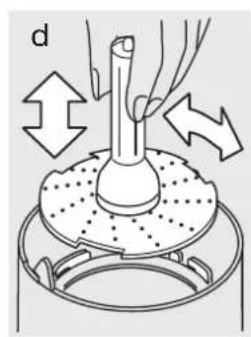
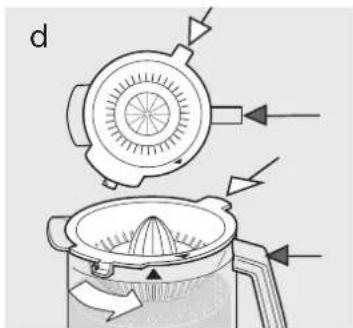
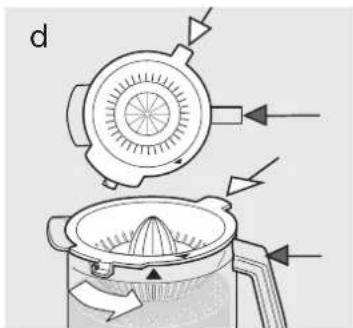
- Insert the fine grating disc ② into the juicer drum ① so that the cut-out sections in the rim of the fine grating disc slide over the holding studs in the juicer drum (d).
- Push the fine grating disc ② by its shaft slightly down and turn it clockwise until it clicks in (d).
- Check by trying to turn the shaft of the fine grating disc ② whether the grating disc is properly locked. If it is, the shaft cannot be turned.
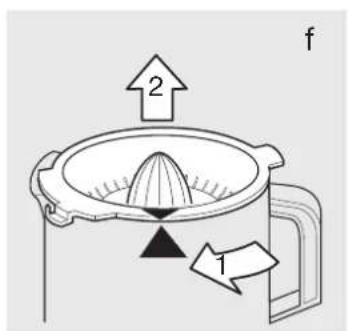
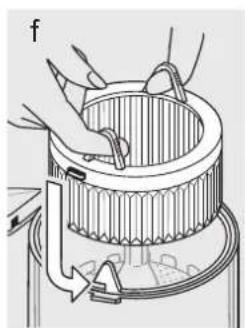
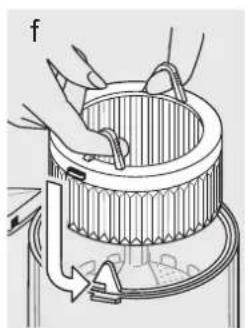
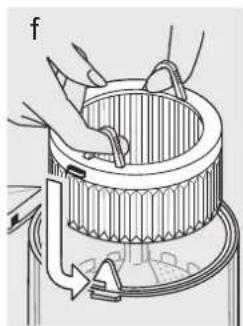
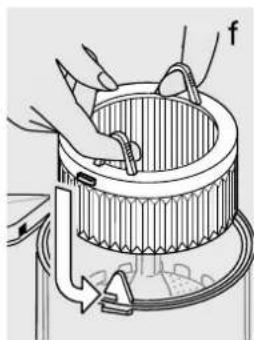
- Insert the strainer basket ③ into the juicer drum ①, and ensure that both tabs fit into the notches of the drum (f).
- For juice extracting set the assembled juice extractor on the food processor bowl drive shaft of your Braun CombiMax. If you want to grate, set the fine grating disc ② only on the drive shaft of the food processor bowl.
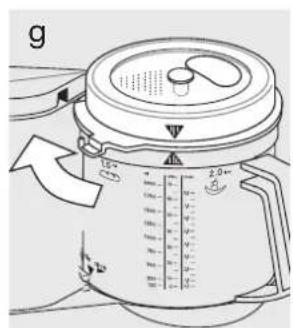
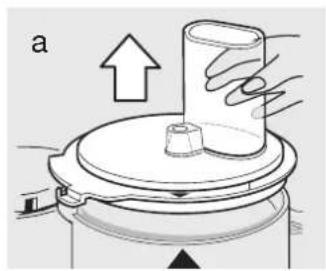
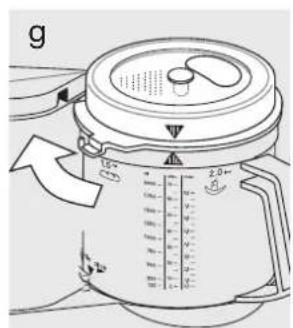
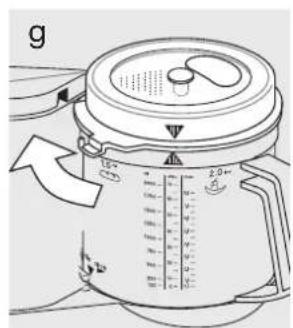
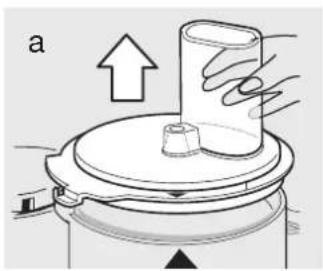
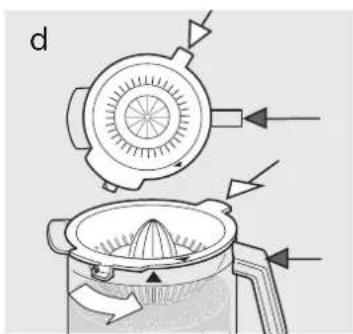
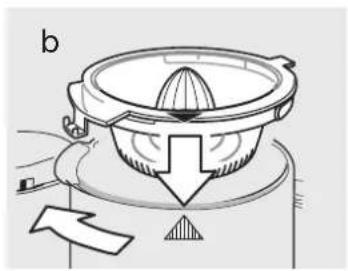
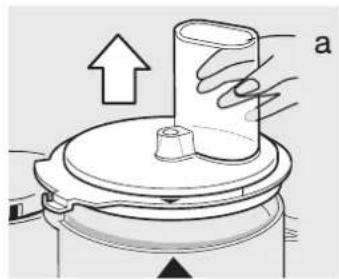
- Place the cover ④ on the Braun CombiMax food processor bowl so that the arrow on the cover matches the arrow on the food processor bowl. Then turn the cover clockwise until the nozzle on the cover is in the safety lock on the motor block of your Braun CombiMax system and audibly snaps into place (g). To remove, turn the cover anti-clockwise.
Extracting juice
Maximum capacity: 500 g or when the pulp space is full. You can extract juice from fruits, as well as from vegetables.
- Preparing fruits or vegetables: First wash or peel the food. Fruits with pits should always have the pits removed first. Citrus fruits, as well as fruits with skin and vegetables (e.g. red beets and Kiwi-fruits) should be thoroughly peeled. Seed fruits (e.g. apples) can be processed with peels and cores.
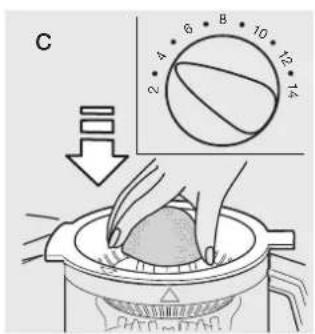
- Speed selection: Please select the setting 7–8 on your Braun CombiMax.
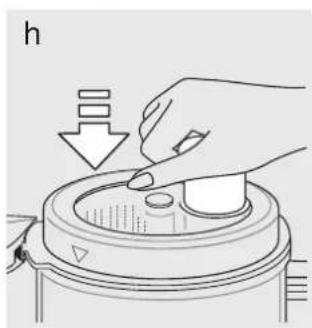
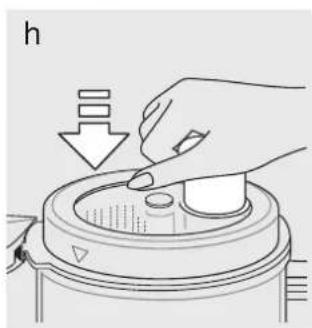
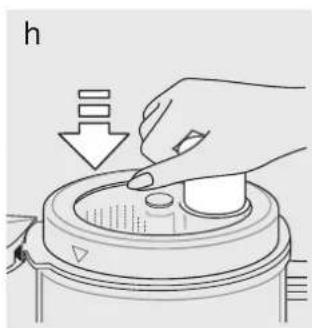
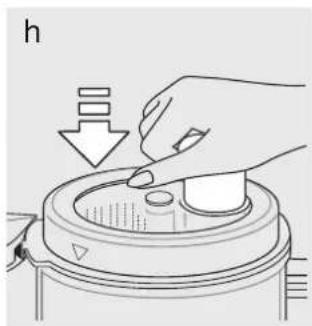
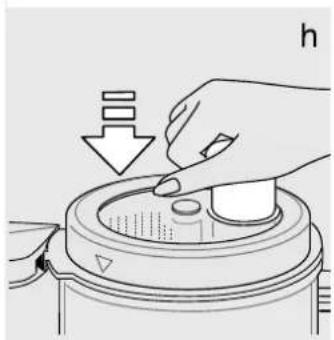
- Extracting: Turn on the motor of your Braun CombiMax. Fill the prepared fruits or vegetables into the filling tube ⑤ and push it down with the pusher ⑥ (h). Caution: Always use the pusher. Never reach into the filling tube while the motor is running! Do not overload the appliance.
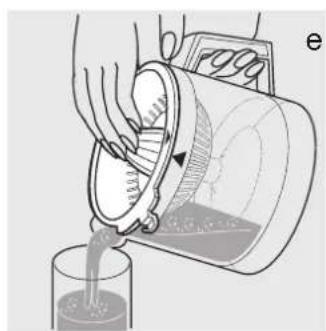
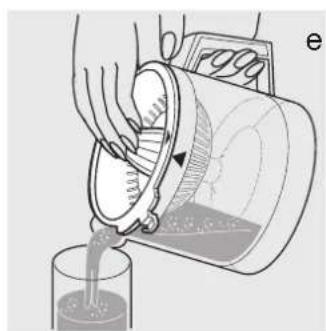
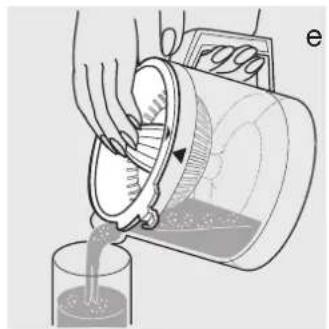
- Disassembling: Turn off the motor of your Braun CombiMax. Turn the cover ④ anti-clockwise and remove it from the food processor bowl. Then proceed as described in the section «Before the first use». Remove all parts from the food processor bowl of your Braun CombiMax. If the fruit pulp is very dense, pull the disengaged strainer basket ③ out of the juicer drum ① by using the pull rings (f).
Grating
The fine grating device is designed for very fine grating of food such as hard cheese (e.g. Italian parmigiano cheese or Swiss sprintz cheese), horse-radish (e.g. for horse-radish cream), apples and carrots (e.g. for baby food).
Important: The fine grating disc is not suited for grating chocolate.
- Preparing the food for grating: Fruits and vegetables should be washed first or peeled. Seeds and cores should be removed. Cut off the crust from cheese. The food should be cut small enough to fit into the filling tube ⑤.
- Speed selection: Please select the setting 7–14 on your Braun CombiMax. Note: Hard food should be grated at higher speeds.
- Grating: Turn on the motor of your Braun CombiMax. Fill the prepared food into the filling tube ⑤ and push it down with the pusher ⑥ (h). Caution: Always use the pusher. Never reach into the filling tube while the motor is running!
- Disassembling: Turn off the motor of your Braun CombiMax. Turn the cover ④ anti-clockwise and remove it from the food processor bowl. Then remove the fine grating disc ② from the food processor bowl.
Cleaning
All parts can be cleaned in the dishwasher at temperatures up to 65 °C. Pulp and other residues should not become dry before the appliance is cleaned. The appliance may discolour when processing food with high degree of pigments (e.g. carrots); use vegetable oil to clean it, before cleaning with detergents or in the dishwasher.

This product conforms to the European Directives EMC 2004/108/EC and Low Voltage 2006/95/EC.

Please do not dispose of the product in the household waste at the end of its useful life. Disposal can take place at a Braun Service Centre or at appropriate collection points provided in your country.
Subject to change without notice.
Français
Accessoires Vitesses
5. Émincer, râper, gratter



Description







Descripción






Descrição
① Motor
② Disco ralador (fino)
③ Cesto coador
④ Cobertura
⑤ Tubo de entrada de alimentos
⑥ Pressor
zucchero, sale, pepe. 14 l circa 45 sec.



Braun Centrifuga/Accessorio grattugia fine SJ 600 Type 3200



Descrizione
Gistdeeg (brood/cake)
Meng bloem erdoor. 2 / ca. 30 sec.
Kloppen van eiwit






Beschrijving



Braun Saftcentrifuge tilbehør SJ 600 Type 3200




Beskrivelse
5. Snitting, riving, rasping
Grov snitteinnsats - b ⑰
Hastighet 2 - 3
Fin riveinnsats - c ⑱
Hastighet 4 - 6



Braun Tilbehør: Saftpresse SJ 600 Type 3200




Beskrivelse
① Juicetrommel
② Raspeinnsats
③ Filterkurv
④ Lokk
⑤ Påfyllingsrør
⑥ Stapper
Fin skärskiva - a ⑯
Hastighet 2 - 3






Beskrivning
① Juice-trumma
② Fin rivskiva
③ Silkorg
④ Lock
⑤ Inmatningsrör
⑥ Pådrivare




Braun Mehulinko-lisäosa SJ 600 Type 3200




Laitteen osat
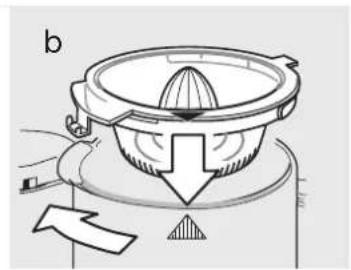

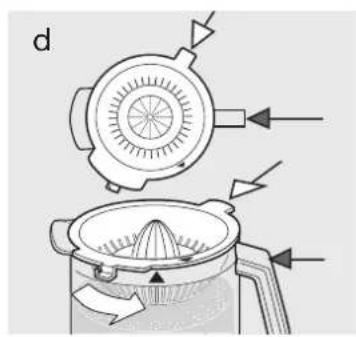


Braun Juice Extractor/Fine Grating Attachment SJ 600 Typ 3200





Opis urządzenia
① Bęben sokowirówki





Tanımlamalar
trconsumers@custhelp.com
Ελληνικά







Περιγραφη







Описание




Опис


3200 :Braun CombiMax CH 600




الnez
Country of origin: Hungary
Year of manufacture
To determine the year of manufacture, refer to the 3-digit production code located near the type plate. The first digit of the production code refers to the last digit of the year of manufacture. The next two digits refer to the calendar week in the year of the manufacture.
Example: "631" – The product was manufactured in week 31 of 2006.
صنعت في هنغارية
عام الصنع

We grant a 2 year guarantee on the product commencing on the date of purchase. Within the guarantee period we will eliminate any defects in the appliance resulting from faults in materials or workmanship, free of charge either by repairing or replacing the complete appliance at our discretion. This guarantee extends to every country where this appliance is supplied by Braun or its appointed distributor.
This guarantee does not cover: damage due to improper use, normal wear or use as well as defects that have a negligible effect on the value or operation of the appliance. The guarantee becomes void if repairs are undertaken by unauthorised persons and if original Braun parts are not used.
To obtain service within the guarantee period, hand in or send the complete appliance with your sales receipt to an authorised Braun Customer Service Centre.
For UK only:
This guarantee in no way affects your rights under statutory law.
Français
Garantie

- DEUTSCH
- GERÄTEBESCHREIBUNG
- IMPORTANT
- THE BLADES ⑫/⑭ ARE VERY SHARP
- SPECIFICATIONS
- DESCRIPTION
- ATTACHMENTS FOR FOOD PROCESSOR BOWL ⑦
- OVERLOAD PROTECTION
- PULSE MODE «• PULSE» ④
- RECOMMENDED SPEED RANGES FOR INDIVIDUAL ATTACHMENTS
- WORKING WITH THE 2-BOWL SYSTEM
- ONLY ONE WORKING BOWL CAN BE OPERATED AT A TIME
- DOUBLE SAFETY FEATURE
- ATTACHING THE WORKING BOWLS
- REMOVING THE WORKING BOWLS
- CAUTION: THE BLADES ARE VERY SHARP
- CLEANING
- USING THE FOOD PROCESSOR BOWL ⑦
- KNEADING
- YEAST DOUGH (BREAD/CAKE)
- PASTA DOUGH
- PASTRIES
- MIXING
- FOR MIXING CAKE DOUGH OR SPONGES USE THE BLADE ⑭
- CAKE MIXTURE
- SPONGE SPEED/TIME
- BLENDING
- USE THE BLADE ⑭ FOR BLENDING SOUPS, SHAKES, ETC
- CHOPPING
- CHOPPING IN THE FOOD PROCESSOR BOWL WITH THE BLADE ⑭
- PROCESSING EXAMPLES
- SLICING, SHREDDING, GRATING
- FINE SLICING INSERT - A ⑯
- COARSE SLICING INSERT - B ⑰
- FINE SHREDDING INSERT - C ⑱
- COARSE SHREDDING INSERT - D ⑲
- GRATING INSERT - E ⑳
- FRENCH-FRIES SYSTEM ②1
- WHIPPING WITH THE WHIPPING ATTACHMENT ②3
- USING THE CHOPPER BOWL ⑩
- CAUTION
- THE BLADE ⑫ IS EXTREMELY SHARP
- MIXING SMALLER DOUGH QUANTITIES
- PANCAKE MIXTURE
- WHIPPING CREAM
- SPECIAL ACCESSORIES
- BEFORE THE FIRST USE
- ASSEMBLING
- FOR GRATING
- FOR JUICE EXTRACTING
- EXTRACTING JUICE
- GRATING
- FRANÇAIS
- ÉMINCER, RÂPER, GRATTER
- DESCRIPCIÓN
- DESCRIÇÃO
- DESCRIZIONE
- GISTDEEG (BROOD/CAKE)
- KLOPPEN VAN EIWIT
- BESCHRIJVING
- BESKRIVELSE
- SNITTING, RIVING, RASPING
- GROV SNITTEINNSATS - B ⑰
- FIN RIVEINNSATS - C ⑱
- FIN SKÄRSKIVA - A ⑯
- BESKRIVNING
- LAITTEEN OSAT
- OPIS URZĄDZENIA
- TANIMLAMALAR
- ΕΛΛΗΝΙΚΆ
- ΠΕΡΙΓΡΑΦΗ
- ОПИСАНИЕ
- ОПИС
- COUNTRY OF ORIGIN: HUNGARY
- YEAR OF MANUFACTURE
- FOR UK ONLY
- GARANTIE
Brand : BRAUN
Model : CombiMax 700
Category : Food Processor