
SJM3152 - Remote control PHILIPS - Free user manual and instructions
Find the device manual for free SJM3152 PHILIPS in PDF.


| Product Type | Remote Control |
| Brand | Philips |
| Model | SJM3152 |
| Dimensions (approx.) | 20 x 5 x 2 cm |
| Weight (approx.) | 100 g |
| Power Source | 2 AAA batteries (1.5 V) |
| Battery Life | Approximately 6 months depending on usage |
| Infrared Range | Up to 10 meters |
| Transmission Angle | ±30 degrees |
| Main Functions | Volume control, channel change, menu navigation, numeric keypad, mute button, standby |
| Special Buttons | Source, settings, back, electronic guide buttons |
| Compatibility | Philips TVs and other compatible brands |
| Programming | Automatic or manual code via numeric keys |
| Material | ABS Plastic |
| Color | Black or dark gray |
| Care and Cleaning | Wipe with a soft, dry cloth, avoid abrasive products |
| Safety | Keep out of reach of children, do not expose to moisture |
| Operating Temperature | 0°C to 40°C |
| Repairability | Accessible battery compartment, spare parts available on request |
| Warranty | 2 years (depending on country) |
Frequently Asked Questions - SJM3152 PHILIPS
User questions about SJM3152 PHILIPS
0 question about this device. Answer the ones you know or ask your own.
Ask a new question about this device
Download the instructions for your Remote control in PDF format for free! Find your manual SJM3152 - PHILIPS and take your electronic device back in hand. On this page are published all the documents necessary for the use of your device. SJM3152 by PHILIPS.
USER MANUAL SJM3152 PHILIPS
natural_image
Black remote control device with a Philips screen displaying the logo, shown against a plain background (no text or symbols on the device itself)SJM3152
www.philips.com/welcome
EN Universal remote and docking cradle for iPod™ 3
PT Universal remote and docking cradle for iPod™ 147
2. Your universal remote and docking cradle for iPod™ 6
2.1 What's in the box 7
2.2 What you'll also need 7
2.3 Universal remote and docking cradle for iPod™ overview 8
2.4 Main menu overview 8
3. Getting Started 9
3.1 Prepare 9
3.2 Connect 9
3.3 Install 10
4. Using your universal remote and docking cradle for iPod™ 12
4.1 Using your universal remote for iPod™ as a controller for your iPod™ 12
4.2 Browsing and playing music from your iPod™ 12
4.3 Using your universal remote for iPod™ as a universal remote control 14
4.4 Starting up an activity 15
4.5 Replacing the batteries 15
5. Use more of your universal remote and docking cradle
for iPod™ 16
5.1 Adding a device 16
5.2 Deleting a device 17
5.3 Fixing a key 17
5.4 Adding a function 18
5.5 Adding an activity 18
5.6 Deleting an activity 19
5.7 About RF Settings 19
5.8 Changing language 20
5.9 Copying volume 20
5.10 Changing display time out 21
5.11 Performing a full reset 21
-
Warranty and service 22
-
Technical data 23
-
Frequently asked questions 24
1 Important
Take time to read this manual before you use your universal remote and docking cradle for iPod ^™ . It contains important information and notes regarding operating your universal remote and docking cradle for iPod ^™ .
© 2008 Philips Consumer Lifestyle.
All rights reserved. Reproduction in whole or in part is prohibited without the written consent of the copyright owner. Trademarks are the property of Koninklijke Philips Electronics N.V. or their respective owners.
FCC Compliance
This device complies with Part 15 of the FCC Rules. Operation is subject to the following two conditions :
1 This device may not cause harmful interference; and
2) This device must accept any interference received, including interference that may cause undesired operation.

Note
This equipment has been tested and found to comply with the limits for a Class B digital device, pursuant to Part 15 of the FCC Rules. These limits are designed to provide reasonable protection against harmful interference in a residential installation. This equipment generates, uses and can radiate radio frequency energy and, if not installed and used in accordance with the instructions, may cause harmful interference to radio communications. However, there is no guarantee that interference will not occur in a particular installation. If this equipment does cause harmful interference to radio or television reception, which can be determined by turning the equipment off and on, the user is encouraged to try to correct the interference by one or more of the following measures:
• Reorient or relocate the receiving antenna.
• Increase the separation between the
equipment and the receiver.
- Connect the equipment to an outlet on a circuit different from that to which the receiver is connected.
- Consult the dealer or an experienced radio/TV technician for help.
Any unauthorized modification to this equipment could result in the revocation of the authorization to operate the equipment.
Industry Canada Statement This Class B digital apparatus complies with Canadian ICES-003.
PHILIPS
AQ95-56F-1115KR
(report No.)
EC DECLARATION OF CONFORMITY
We, Philips Consumer Lifestyle: BU P&A: Building SFF5 (manufacturer's name)
P.O. Box 80002, 5600 JB Eindhoven, The Netherlands (manufacturer's address)
declare under our responsibility that the product:
Philips
(name)
SJM3152-/05-/12
(type or model)
RF remote control and docking station (product description)
to which this declaration relates is in conformity with the following standards:
EN300 400 -2 V1.1.2:2004
EN301 489-17 V1.2.1:2002
EN300 328 V1.6.1:2004
EN50371:2000
EN60950-1:2001 + A11:2004
(title and/or number and date or issue of the standards)
following the provisions of 1999/5/EC (R&TTE Directive) and is produced by a manufacturing organisation on ISO 9000 level.
Eindhoven, 21/10/2008
(place, date)
K. Rysman
Approbation manager
(signature, name and function)
Disposal of your old product:
Your product is designed and manufactured with high quality materials and components, which can be recycled and reused.

W hen this crossed-out wheeled bin bol is attached to a product it ns the product is covered by the opean Directive 2002/96/EC
Please inform yourself about the local separate collection system for electrical and electronic products.
Your product contains batteries covered by the European Directive 2006/66/EC, which cannot be disposed with normal household waste. Please inform yourself about the local rules on separate collection of batteries because the correct disposal will help prevent negative consequences for the environmental and human health.
Your product contains batteries that shall not be exposed to water or excessive heat. Please inform yourself about the local rules on separate collection of batteries because the correct disposal will help prevent negative consequences for the environmental and human health. The mains plug of this products adapter is used as the disconnect device and shall remain readily operable

Warnings
- Do not expose the product to rain or water.
- Keep away from sunlight to prevent heat build-up.
• Do not disassemble or repair. - Keep away from high voltage devices
- When you replace the batteries, do not mix different brands of batteries or place zinc carbon batteries in the remote. This can trigger unpredictable behavior.
Take the package to your local recycling center.
2 Your universal remote and docking cradle for iPod™
Congratulations on your purchase and welcome to Philips!
To fully benefit from the support that Philips offers, register your product at www.philips.com/welcome.
Your universal remote and docking cradle for iPod ^TM allows you to control your iPod ^TM remotely while simultaneously charging your iPod ^TM . It also allows you to control up to 6 other AV devices. Philips offers an entire line of products to enhance your iPod ^TM experience.
Your universal remote and docking cradle for iPod ^TM works with all iPod ^TM models that have a dock connector. For the best connection, use the dock adapter that came packaged with your iPod ^TM or choose the appropriate adapter from the 5 included with your universal remote and docking cradle for iPod ^TM .

Note
Philips SJM3152 is compatible with the following iPod models:


Note
Stereo and A/V equipment can only be controlled via Infra Red, or “line of sight” operation. Distance for controlling these devices is limited to 30 feet and the remote must be in the line of sight of the IR port on your AV equipment. Only devices with an IR sensor can be controlled by the remote.
This section gives you an overview of the controls and functions of this universal remote with docking cradle for iPod ^™ .
Product highlights
• Controls iPod™, TV, VCR, DVD player, cable and satellite system
• Control your iPod™ and home entertainment system.
• Backlit LCD screen
- Provides an easy view of iPod™ menu, playlists and libraries, even under darker lighting conditions.
- Play your iPod™ through your home entertainment system
- Leave your iPod™ in the dock, then connect to home stereo via the AV cable provided.
- Control iPod™ through walls, floors, doors, ceilings and windows with 2-way RF technology.
- Provides control over iPod™ menu, features, playlists and libraries from virtually anywhere at home.
- Docking cradle
- Allows you to play and charge iPod™ simultaneously.
• Share your video library on a larger screen
• S-Video out cable or yellow RCA of AV cable allows you to easily connect to a TV.
2.1 What's in the box.
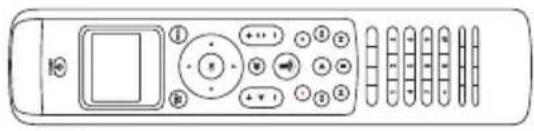
natural_image
Line drawing of a remote control with buttons and dials (no text or symbols)Universal remote control
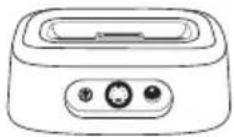
Docking cradle for iPod™
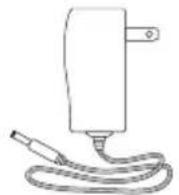
Power adapter

natural_image
Five identical rectangular shapes with horizontal black lines inside, arranged vertically (no text or symbols)5 iPod™ dock adapters: *
- type 3 for mini
- type 4 for 4G 20GB
- type 5 for 4G 40GB
- type 6 for iPod™ with color display 20GB/30GB
• type 7 for iPod™ with color display 60G

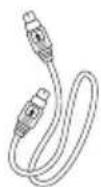
S - Video cable
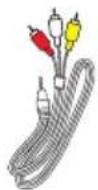
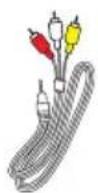
3.5mm-to-RCA AV cable
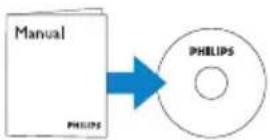
CD ROM with instruction manual

Quick Start guide

(3) AA batteries
*For newer iPod™ versions, please use the adapter that shipped with your iPod™.
2.2 What you'll also need.

iPod™ with dock connector

Stereo receiver
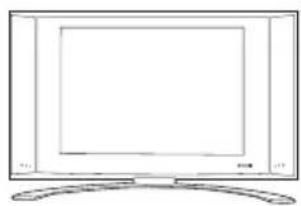
natural_image
Line drawing of a flat-screen TV with a curved base (no text or symbols)TV

Electric outlet
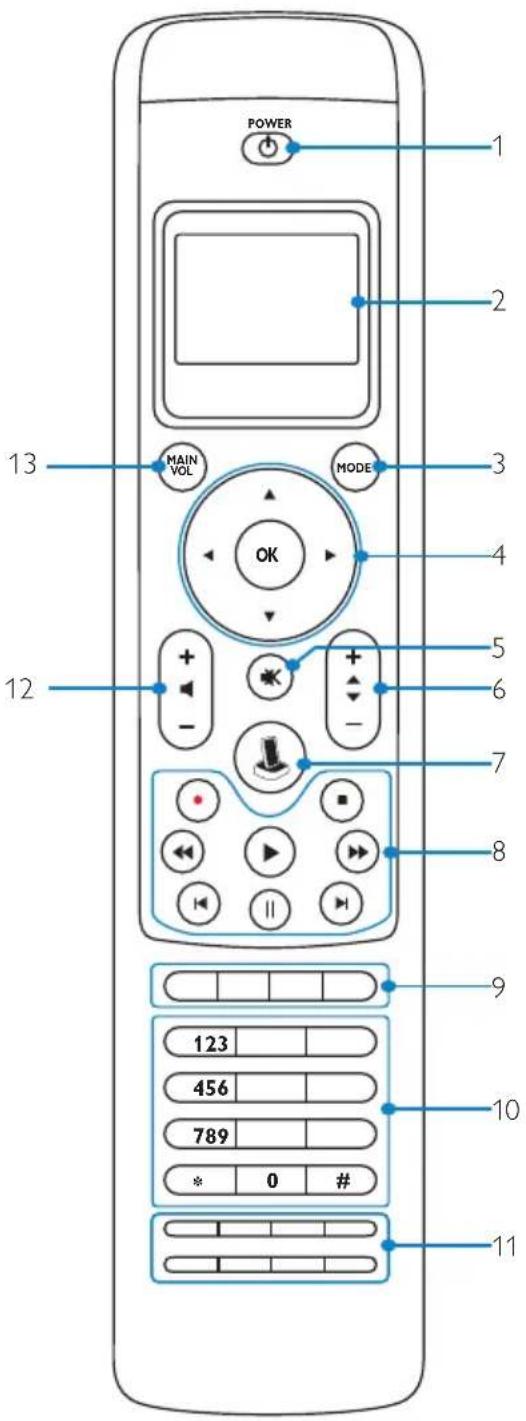
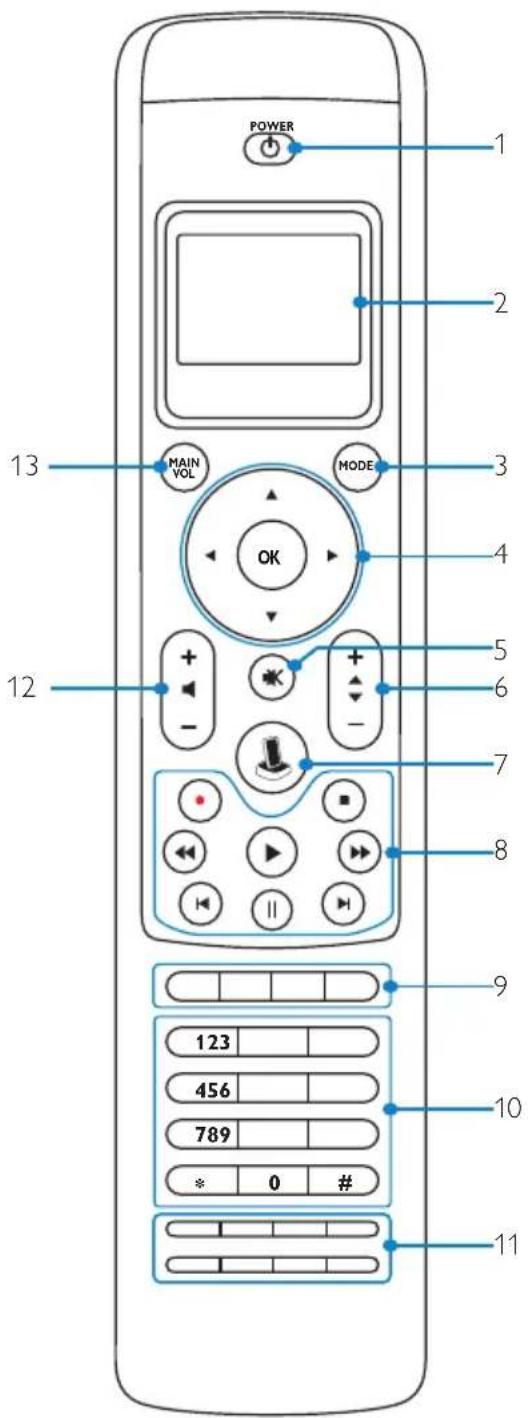
2.3 Universal remote and docking cradle for iPod™ overview
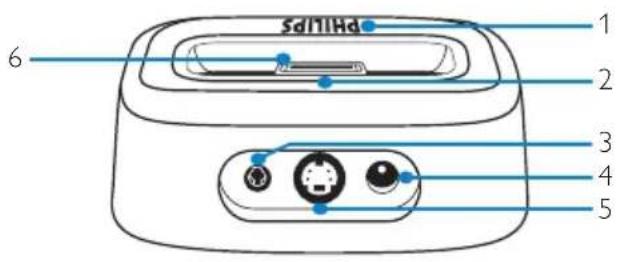

Cradle:
- LED Indicator
- Slots for removing dock adapter
- 3.5mm A/V Out Jack
- DC Power Jack
- S-Video Out Jack
- iPod ^TM connector
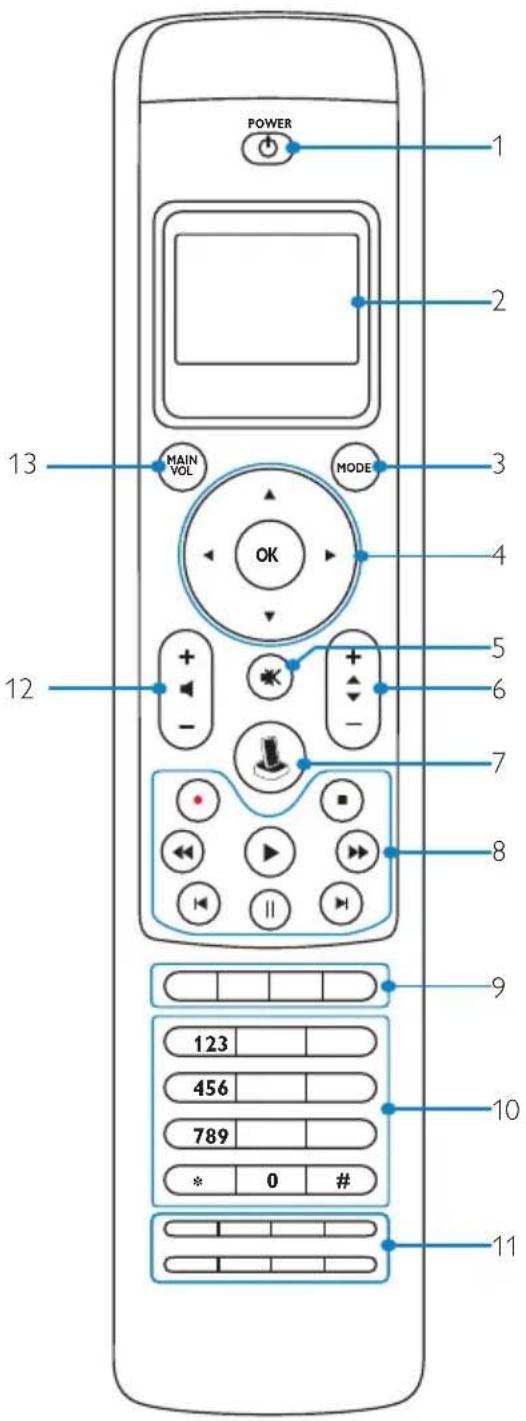
Remote:
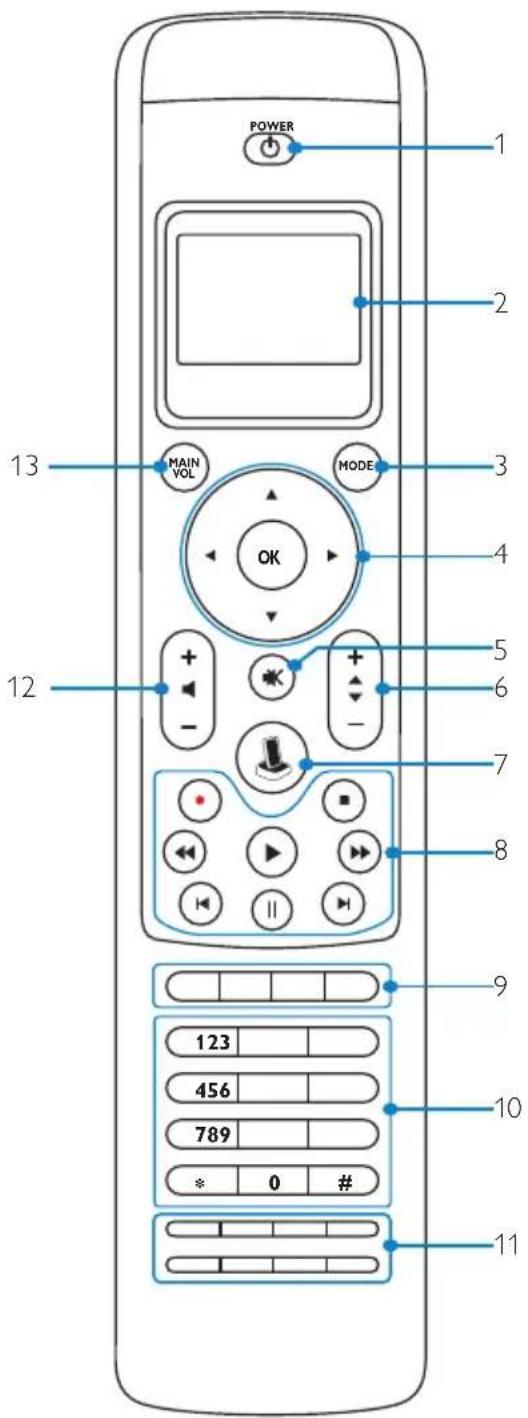
- Power key
- LCD Screen
- Mode key
- Cursor keys (Navigation) and OK key
- Mute key
- Volume Up/Down key
- iPod ^TM Launch key
- Playback keys (Play, Rec, Stop, Rew, FF, Pause, Skip, Next)
- Device specific keys (Guide, Live TV, HDD, Menu)
- Digit keys
- Device specific keys (CC/Text, Clear, Enter, Zoom/16:9, Title, Chapter, SUBT, CC & Zoom for /27 Text & 16:9 for /10, Audio)
- Channel Up/Down key
- Main Volume Key
- Battery low icon (See below)
- No connection icon (See below)
- IR Transmission icon (See below)
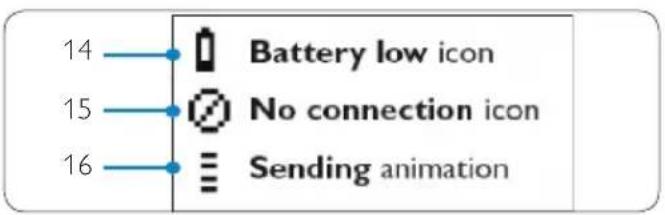
2.4 Main menu overview
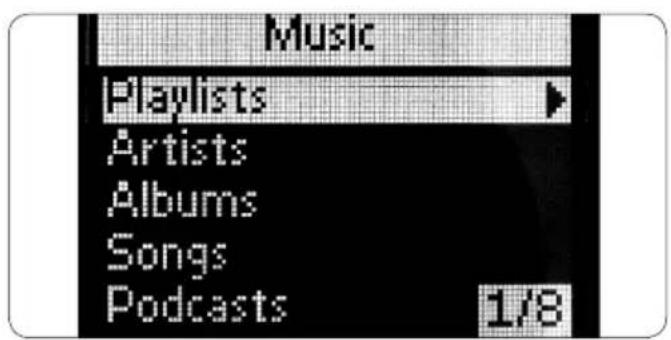
3 Getting Started

Warning
Carefully read the safety precautions in section
1.1 Important, before connecting your universal remote and docking cradle for iPod™.
This section helps you with the first time installation of your universal remote and docking cradle for iPod™.
3.1 Prepare
- Remove all package contents
- Position your dock near your home entertainment system, stereo or TV.
- Turn off power on all your home entertainment components.
- Locate the nearest electrical wall outlet.
- Remove the protective screen cover from your universal remote for iPod™.
- Remove iPod™ connector protective cover on the docking cradle.
- Select the correct dock adapter for your specific iPod™ model.
- Insert the correct dock adapter into the universal well on your docking cradle.
3.2 Connect
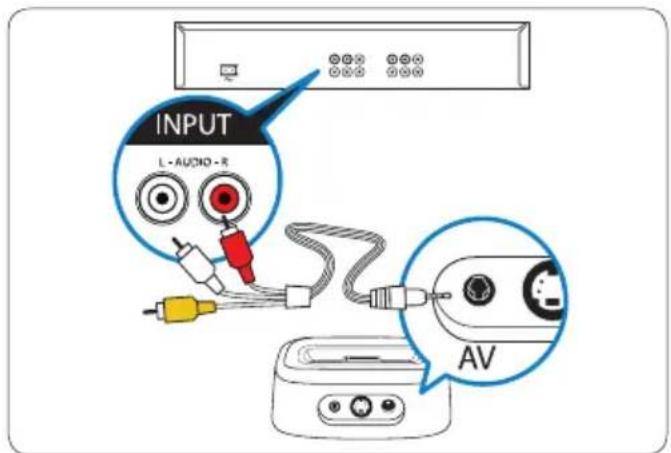
For stereo playback:
- Connect the red and white RCA connectors on one end of the supplied AV cable to the Audio In RCA jacks on your home entertainment system or stereo.

Note
If you are not using the device with video, or you plan on connecting to video via the S-Video connection, leave the yellow RCA connector end unplugged.
-
Connect the other end of the supplied AV cable with 3.5mm plug to the jack labeled "AV" on your docking cradle.
-
Connect one end of the power cord to an electrical outlet and the other end to the DC 12V jack on the back of your docking cradle.
- Install the 3 supplied AA batteries into the battery compartment on the remote. Follow the proper polarity markings in the compartment.
For video playback:
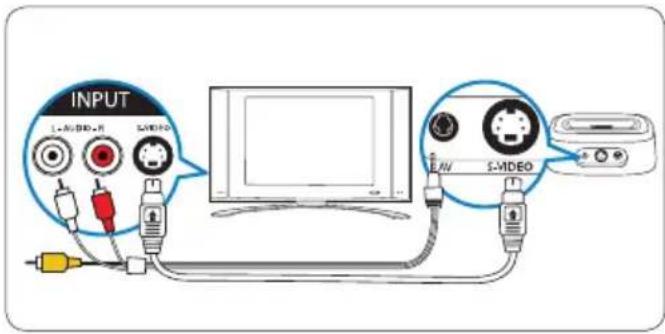
- Connect one end of the supplied S -Video cable to the Video In jack on your home entertainment system or TV.
- Connect the other end of the supplied S-Video cable to the jack labeled "S-Video" on your docking cradle. If you are using the composite video jacks, plug the yellow RCA plug into the RCA video jack on your TV.
- Connect one end of the power cord to an electrical outlet. Connect the other end to the DC 12V jack on the back of your docking cradle.
- Install the 3 supplied AA batteries into the battery compartment on the remote. Follow the proper polarity markings in the compartment.
RCA Connection

S-Video Connection
3.3 Install
Once you have installed the batteries in the remote and connected all of the appropriate cables, you will need to do a quick "pairing" of the dock with the remote.

Note
It is recommended to complete the initial set-up, including the "pairing" sequence before docking your iPod™ in the docking cradle.
Pairing the dock with the remote for the first time:
- Press the POWER Button on the remote.
- Position the remote within 1m of the dock for this duration of this procedure.
- Follow the easy on-screen set-up wizard screen prompts.
The easy on-screen set up wizard will guide you through the different steps on the initial set-up of your universal remote for iPod ^TM .
Initial set-up of your universal remote for iPod™:
- Select the language for your instructions on the remote using the cursor keys. Press OK.

While pairing the remote to the docking cradle, position the remote within 1m of the dock for the duration of the procedure.

Note
While your iPod ^™ is docked in the cradle, your iPod ^™ screen will show the message below. This is normal operation.
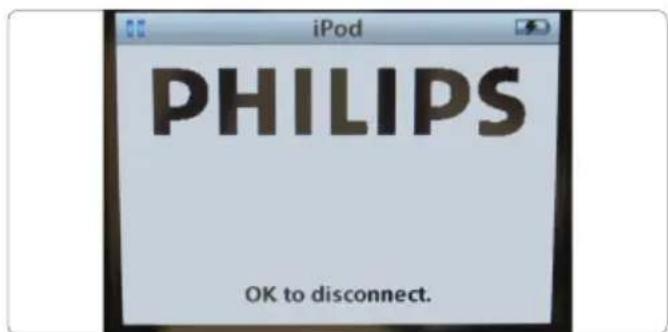
- Select "Next" and press OK.
- Confirm if you want to add other devices, like your TV or DVD player, by selecting "Yes". Press OK. This replaces the devices' original remote controls with the universal remote for iPod™.
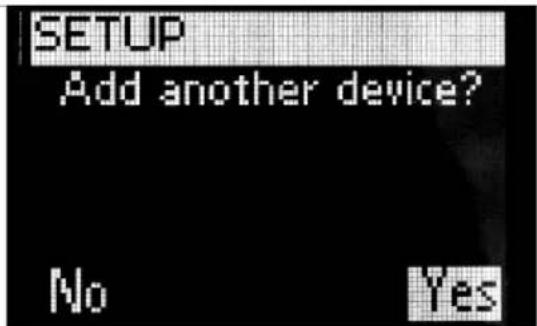
- Select the device and brand of the device you want to add by using the cursor keys. Press OK. The remote will search the database for available code sets.
- Follow the on-screen instructions to test the codes. When a working code set is found, your device is correctly installed. When the device is correctly installed, the following screen appears:


Note
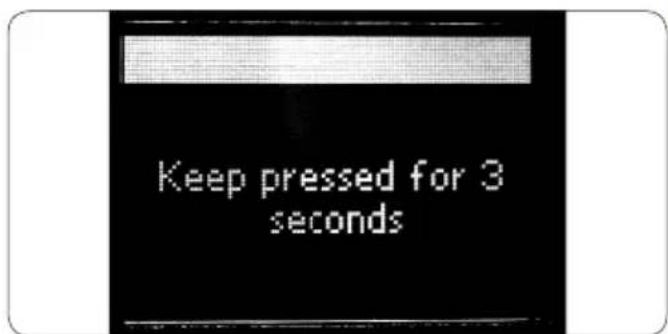
You can adjust the settings of your universal remote for iPod™ anytime after initial install via the set-up menu. Press the MODE and IPOD™ LAUNCH keys simultaneously for 3 seconds.
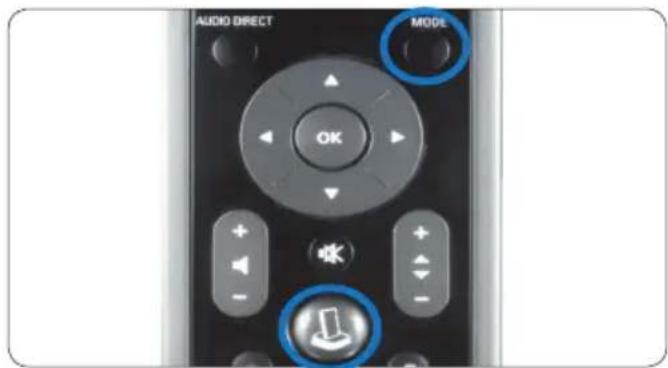
The screen will ask you to press and hold the 2 keys for 3 seconds to enter set-up mode.
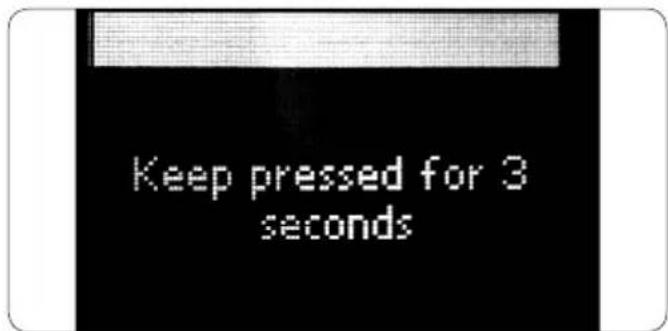
If no working code set is found:
- You can perform a full data base search to find a correct code set. This can take up to 25 minutes.
- You can learn codes from the original remote device.
To add an additional device:
- Select "Yes", Press OK.
- Repeat this process for each additional device.
-
When you are finished adding devices, select "No". Press OK. Exit the wizard.
-
Using your universal remote and docking cradle for iPod™
Learn how to operate your universal remote and docking cradle for iPod™.
4.1 Using the universal remote for iPod™ as a controller for iPod™
Control your iPod™ menus, playlists, music and video libraries.
- Position the correct dock adapter for your specific iPod™ model in the docking cradle.
- Position your iPod™ in the docking cradle Charging begins automatically.
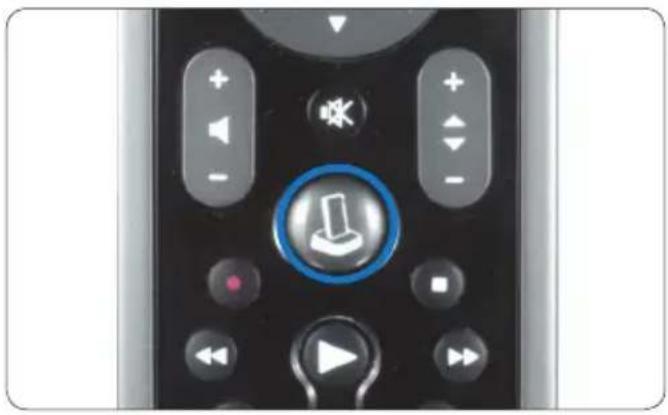
- Press the IPOD™ LAUNCH key.
natural_image
Close-up of a black remote control with playback buttons and a blue circular play button (no text or symbols visible)The remote connects to your docked iPod ^TM and displays your iPod ^TM menu playlists.

Note
If the No Connection icon begins blinking in the upper right-hand corner of the screen, the universal remote for iPod™ is not able to connect to the docking cradle for iPod™. See Section 8 Frequently Asked Questions to solve the problem.
4.2 Browsing and playing music from your iPod™
The menu on the universal remote for iPod ^TM is similar to the menu on your iPod ^TM .

Navigating in iPod™ mode:
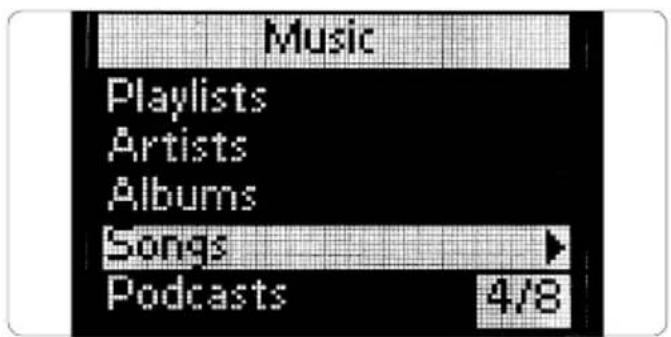
- Scroll to Music, Settings, Now Playing. Press OK to select.
Note
If the iPod ^™ is not Video capable, the Video option will not appear on your screen.
Note
"Now Playing" is only viewable when a song is playing.
- Press > or OK on the navigation dial to go to the next screen.
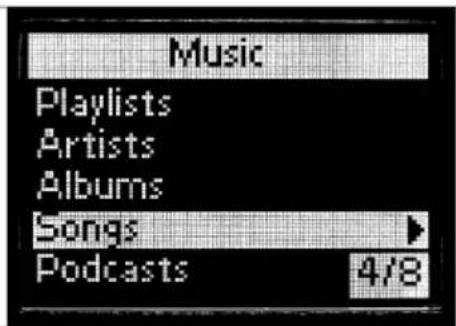
- Selecting "Music" presents the following screens:
Playlists
Artists
Albums
Songs
Podcasts
Genres
Composers
Audio Books
a. To select one of the menu items and go to the next screen, press > or OK on the navigation dial.
b. Press < to return to the previous screen or press OK to move to the next screen.
c. Repeat until you have made your listening selection.

Note
While in iPod™ Mode, press < cursor key to return to the previous screen / Menu item. Press OK to make a selection and move to the next screen.
- Selecting settings will present the following screens:
Shuffle
Shuffle Options are:
Off, Songs, and Albums.
Default for this option is OFF>
Repeat
Repeat Options are:
Off, One, and All.
Default for this option is OFF>
a. To select one of the menu items and go to the next screen, press > or OK on the navigation dial
b. Press < to return to the previous screen. Press OK to move to the next screen.
c. Repeat until you have made the selection you want to use.
- Selecting "Now Playing" will display the most recently played song:
a. Press < to return to the previous screen.


Note
Your universal remote and dock for iPod ^™ does not allow browsing or control of Photo Library on your iPod ^™ .
Controlling the volume of your docked iPod ^™ and connected AV devices, such as a home theater system, stereo system or TV:
-
To adjust the audio output level of the iPod™ docking cradle, press the Volume Up or Volume Down keys. A volume bar will be shown on the remote's display screen.
-
If the sound level of playback is still too loud or too soft, press the MAIN VOL key to switch to the AV device and change the master volume.

Note
Controlling AV devices requires that the components have an IR receiver and that your universal remote for iPod ^™ is within 30 feet of the component in line of sight.
- To return to iPod ^™ control, press the IPOD ^™ LAUNCH key.

Note
The Main Volume works like a short cut key to switch to either TV or AMP or RECEIVER mode. If more than one of these devices is installed, the priority will be: AMP, RECEIVER, TV.
4.3 Using your universal remote for iPod™ as a universal remote control
You can add up to 6 AV devices and your iPod ^TM docking cradle, if available, to your universal remote for iPod ^TM .
- Press MODE key. The device icon of your last selected device will appear on the screen. Repeat MODE press until the device you want to control appears on the display screen.
- Control the device using the hard keys on your universal remote for iPod™. They will access the same function as the corresponding keys of the original remote of the selected device.

Note
Music that was started while using the remote as an iPod ^TM controller, will continue to play even when you change Modes.

Note
Some specific keys that are available on the original remote will not be available on your universal remote for iPod™. Check your original remote for the available functions.

Note
When you awaken the remote after a time out, the last device selected before the time out will be active.
Device specific keys
The device specific keys on your universal remote for iPod™ can have different functions, depending on the device you select via the MODE key.
Below you can find a complete overview of the functions for all device specific keys listed for the IPod™ docking cradle, TV, cable/satellite and your audio set.


| TV | Sat/Cable | Audio set |
| 1. Guide | Guide | Band |
| 2. Exit | Return to Live TV | Scan |
| 3. - | Exit | - |
| 4. Menu | Menu | Menu |
| 5. Digit Keys | Digit keys | Input Sources |
| 6. -/-- | -/-- | Surround |
| 7. AV Input | TV/SAT input | Surround Mode |
| 8. cc/text | Favorite | RDS |
| 9. - | Help | Clear |
| 10. PIP | Enter | Enter |
| 11. Zoom/16:9 | Home | GEQ |
| 12. Color key | Color key | Front |
| 13. Color key | Color key | Center |
| 14. Color key | Color key | Rear |
| 15. Color key | Color key | Test |

Note
Other installed devices use the functions that are labeled on the remote. Check your original remote when you are not sure.
To switch back to your iPod ^TM playlist after controlling another device with your universal remote for iPod ^TM , press the IPOD ^TM LAUNCH key.
4.4 Starting up an activity
An activity is a sequence of key presses that you can program. For example, for watching a DVD you normally would have to:
- Turn on the TV;
- Turn on the DVD;
- Turn on the surround sound system;
- Select the right input on your TV and surround sound system;
- Press the PLAY key to start the DVD.
By selecting the activity “Watch DVD” on the universal remote for iPod ^™ , all the actions are automatically executed in the predefined sequence.
Starting up an activity:
- Press MODE key repeatedly until the activity name appears in the header of the display screen.
- Confirm your selection by pressing OK. The activity will begin immediately.
You can add up to 8 activities to your universal remote for iPod™. For more information about adding and deleting activities, see section
5.5, Adding an activity and section
5.6, Deleting an activity.
Selecting extra functions
Devices may have extra functions that are not covered by the hard keys on your universal remote for iPod™. You can select these extra functions in the display.
- While in any device mode, Press MAIN VOL key. Extra functions for the selected
device appear in the display screen.
- To scroll through all the extra functions, press the cursor up or cursor down key.
- When you find the selection you want, press OK. The remote sends out an IR signal.
For adding extra functions to your universal remote for iPod ^™ , see section 5.4, Adding a function.

Tip
If you cannot find the extra function you are looking for, you can exit the Extra menu by pressing the MAIN VOL key again.

Note
Some devices do not have any extra functions available in the remote's data base. However, you can easily copy additional functions from your original remote by learning keys. See section 5.4, Adding a function.
4.5 Replacing the batteries

Warning
When you replace the batteries, do not mix different brands of batteries or place zinc carbon batteries in the remote. This can trigger unpredictable behavior.
When the batteries are almost empty, the "Battery Low" icon appears. Replace the batteries with new LR6 or AA type alkaline batteries. Follow the local regulations for disposal of the empty batteries.
5 Use more of your universal remote and docking cradle for iPod™
To access the advanced features of your universal remote and dock for iPod ^TM , you must use the Set-up menu.
To open the Set-up menu, press and hold the MODE and IPOD ^™ LAUNCH keys simultaneously for 3 seconds.
To exit the Set-up menu and go directly to your iPod ^TM menu, press the IPOD ^TM LAUNCH key again.
To switch to your last selected device, press the MODE key.
5.1 Adding a device
To be able to operate your devices with your universal remote for iPod™, you first have to add these devices to the remote control. You can add up to 6 devices from the list of devices below. Examples of available devices include (but are not limited to):
• DVD
- Cable
- DSS (Satellite)
- Tuner
• CD
• TV
Please check the Remote menu for the complete listing of device labels that can be added.
You cannot add a device twice. Once you have added a device to your Universal remote for iPod™, it disappears from the list. However, the list of devices includes 'TV-2' or 'VCR-2' for use when you want to program a second TV or second VCR.
To add a device:
- Select the option "Add a Device" in the Set-up menu by using the cursor keys Press OK.
Note
If you have already added 6 devices on the remote, besides your iPod ^™ docking cradle, you will be asked to delete a device.
- Select the device and brand you want to add. Press OK. The remote will search for available codes for the brand.
- Follow the on-screen instructions to test the codes. When a working code set is found, your device is correctly installed. When the device is correctly installed, the following screen appears:

If no working code set is found:
- You can perform a full data base search to find a correct code set. This means that the remote will send out all codes available in the database until a working code is found. This can take up to 25 minutes.
- You can learn codes from the original remote device.
When you want to add another device, select "Yes". Press OK and repeat steps 2 and 3.
When you have added all your devices, select "No". Press OK to return to the Set-up menu.
5.2 Deleting a device
You can delete a programmed device from your universal remote for iPod ^TM .
To delete a device:
- Select the option "Delete a Device" in the set-up MENU by using the cursor keys Press OK.
- Select the device you want to delete from the list. Press OK.
- Confirm you want to delete that device by selecting "Yes". Press OK. The device is now deleted and becomes available again in the list of devices you can add.
- To return to the Set-up menu, select "Exit". Press OK.

Note
Keys of the deleted device that are used elsewhere, e.g. in an activity or the volume keys you copied, will be deleted as well. Check the activities you programmed and volume keys for your devices and reprogram them, if necessary.
5.3 Fixing a key
If a hard key is not working properly with your device, you can fix the key by learning it from your original remote control. Your universal remote for iPod™ can store up to 200 learned keys. You can fix all keys on your universal remote for iPod™ except the MODE key, the MAIN VOL key and IPOD™ LAUNCH key.
To fix a key:
- Select the option "Fix a Key" in the Set-up menu by using the cursor keys. Press OK.
- Select the device for which you want to fix a key. Press OK.
- Confirm you have a working original remote control available to learn from by selecting "Yes". Press OK.

Note
If your universal remote for iPod ^™ has already learned 200 keys, a screen will alert you that the memory is full and automatically return you to the Set-up menu. You will have to delete a device with fixed keys to clear memory.
- Follow the on-screen instructions to fix the key: Point the 2 remotes towards each other at a distance of 0.5 - 2 inches (2-5 cm).
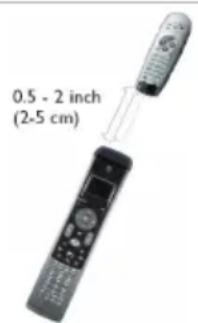
- Select the hard key or extra function you want to fix on your universal remote for iPod™. To select an extra function press MAIN VOL. Select the function with the Cursor Up or Cursor Down key. Press OK.
- Press the corresponding key on the original remote until you see confirmation on-screen.
After the key is learned and fixed. The following screen appears:

- When you would like to fix other keys for this device, select "Yes". Press OK. Repeat step 3.
When all keys are fixed and you want to return to the Set-up menu, select "No". Press OK.

Note
Fixing a key overwrites the key's data that was stored in your universal remote for iPod™. This means that if this key is used in an activity this will also change.
5.4 Adding a function
You can add extra functions to your universal remote for iPod ^TM .
To add a function:
- Select the option "Add a Function" in the Set-up menu. Press OK.
- Select the device you want to add a function to.
- Select the label you want to use for the extra function.
- Learn the function from your original remote.
The extra function is added to your universal remote for iPod ^TM .
To access the extra function:
- Press the MAIN VOL key to access the Functions menu.
- Select the function you want by using the cursor keys. Press OK.

Note
Extra functions are device-specific. They can only be selected when in the desired AV device's specific mode. For example, if you want to access a TV function, the remote must be in the TV mode.
5.5 Adding an activity
An activity consists of several key presses that will be sent out by your universal remote for
iPod ^TM when you select the activity. You can add up to 8 activities. One activity can contain a maximum of 25 steps.
By default, your universal remote for iPod ^TM inserts a delay of 0.6 sec between every key press to make sure your devices are responding correctly to the signals.
You can overwrite this default delay:
- If one of your devices needs a longer delay before receiving the next IR signal, you can insert a delay of 1 or 3 seconds. Replacing the default delay counts as a step in the activity.
- If an activity needs no delay between the different key presses to simulate a long key press, you can add the option “no delay”. For example: When you would like to turn the volume up during an activity by pressing VOL Up key four times, you do not need to insert delays between these 4 key presses. Between each step you add the option “no delay”.
To add an activity:
- Select the option "Add an Activity" in the Set-up menu by using the cursor keys. Press OK.

Note
If you already have added 8 activities, you will be asked to delete an activity. See section 5.6, Deleting an activity.
-
Select the label from the list of activities Press OK.
-
Follow the on-screen instructions to create an activity.
-
Use the cursor keys to select the device. Press OK. Press the required key to insert a key press.
- Decide if you want to add an additional key or key delay, select YES by pressing OK.
If you do not wish to add an additional activity, select NO. Press OK.
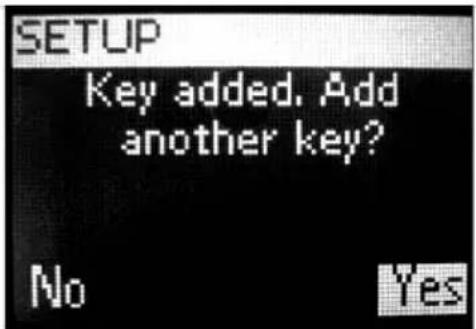
- Select the delay you want to add.
Press OK. See instructions at the end of this procedure, "To select the delay you want".
Keep in mind that an activity contains a maximum of 25 steps.
When you have added all key presses and delays, select "No". Press OK. The activity is installed on your universal remote for iPod™.
- To return to the Set-up menu, select "Exit". Press OK.
To select the delay you want:
-
Use the cursor keys to scroll through the list of possible delays.
-
Press OK on desired delay. You'll see confirmation screen.
-
Press YES to add another key or delay. Press NO to exit activity set-up.

Tip
Start up the activity by pressing the Mode key repeatedly until the activity name appears in the header of the universal remote for iPod™ display screen. Press OK.
5.6 Deleting an activity
To delete an activity from your remote control:
- Select the option "Delete an Activity" in the Set-up menu by using the cursor keys Press OK.
- Select the activity you want to delete. Press OK.
- Confirm you want to delete the activity by selecting "Yes". Press OK. The activity is deleted and becomes available again in the list of activities you can add.
- To return to the Set-up menu, select "Exit" and press OK.
5.7 About RF settings
Show details:
You can check the status of the connection between the docking cradle and remote:
- Select the option "RF Settings" in the Setup menu by using the cursor keys. Press OK.
- Select "Show details." Press OK The name of the connected docking cradle and the strength of the signal appear.
- To return to the Set-up menu, select "Next". Press OK.

Note
When the details of the RF Settings show "No Connection", the remote is unable to connect to the docking cradle. If this occurs, you must reconnect to the dock.
Reconnect to dock
When you want to use your universal remote for iPod™ with another docking cradle, or in case of technical problems, you will have to pair the remote to the docking cradle again.
-
Press and release reconnect button at the bottom of the iPod™ docking cradle
-
Select the option "RF Settings" in the Setup menu by using the cursor keys. Press OK.
- Select "Reconnect to Dock". Press OK. You are now pairing the remote to the docking cradle. Be sure to position the remote within 1m of the dock for the duration of this procedure.
- To return to the Set-up menu, select "Next" and press.
When the details of the RF Settings show "Cannot connect to dock. Try again", you must reconnect to the dock using the following procedure:
- Press the RECONNECT button on the bottom of the dock. After 5 seconds, the Philips logo on the dock will begin flashing.
- Select "Yes" on remote. Press OK.
Remote and dock will reconnect. When the process is completed, the screen below will appear:
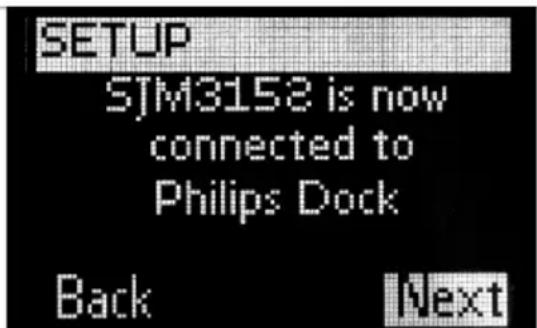
- Select "Next". Press OK.
5.8 Changing language
You can change the language of the instructions on your universal remote for iPod ^TM .
Models purchased in North America offer the following languages:
- English
- Francáis
- Espanol
Models purchased in Europe offer the following languages:
- English
- Espanol
- Francáis
- Deutsch
- Nederlands
- Italiano
To change the language:
- Select the option "Change language" in the Set-up menu by using the cursor keys. Press OK.
- Select your preferred language. Press OK. The Set-up menu appears on the screen in your preferred language.
5.9 Copying volume
After adding devices, your universal remote for iPod ^™ automatically copies the Volume keys and Mute key, as follows:
• Video devices, like DVD, DVDR, VCR and Satellite box, use the Volume keys of the TV (provided that you have programmed a TV).
- Audio devices, like CD, DMR and Tuner, use the Volume keys of the Amplifier or Receiver (provided that you have programmed an Amplifier or Receiver).
When no TV or amplifier is installed, the Volume keys will not send codes. When the source device is added later on, the Volume keys will be automatically updated. You can change which Volume keys are used. For example, when you
want to use the Volume keys of the Amplifier for the DVD.
To change the volume keys:
- Select the option Copy volume in the Setup menu by using the cursor Keys. Press OK.
- Select the device you want to copy the Volume keys from (e.g. TV or AMP or RECEIVER). Press OK.
- Select the device you want to copy the Volume keys to (e.g. DVD or SAT). Press OK.
- Confirm you want to copy the Volume keys from one device to the other by selecting "Yes". Press OK. The Volume keys and Mute key are copied.
- To return to the Set-up menu, select "Exit". Press OK.
5.11 Performing a full reset
You can reset your universal remote for iPod ^TM completely, deleting all programmed devices, activities, learned keys and other settings. After the reset, you will have to configure your remote again.
To perform a full reset:
- Select the option "Full Reset" in the Set-up menu by using the cursor Keys. Press OK.
- Confirm you want to perform a full reset by selecting "Yes". Press OK.
- Press OK to reconfirm. The remote control deletes all settings. When the full reset is ended, the remote automatically re-initializes. You now have to configure your remote again. See section 3.3, Install, and follow the directions for pairing the dock with the remote to repeat this procedure.
5.10 Changing display time out
To save power, your universal remote for iPod ^TM will switch off when it is not used for a while.
This is the display time out. You can change this time out to one of the following:
- Short
- Medium (default)
- Long
To change the display time out:
- Select the option "Display Time Out" in the Set-up menu by using the cursor keys. Press OK.
- Select your preferred display time out Press OK. The time out is changed for your universal remote for iPod™. The Set-up menu appears on the screen.

Note
The display time out has an impact on the life of the batteries. The longer the backlight stays on, the faster the batteries will be drained.
6 Warranty & Service
United States of America
One Year Limited Warranty
Philips warrants that this product shall be free from defects in material, workmanship and assembly, under normal use, in accordance with the specifications and warnings, for a period of one year from the date of purchase. This warranty extends only to the original purchaser of the product, and is not transferable. To exercise your rights under this warranty, you must provide proof of purchase in the form of an original sales receipt that shows the product name and the date of purchase. For customer support or to obtain warranty service, please visit our website http://www.philips.com/welcome. THERE ARE NO OTHER EXPRESS OR IMPLIED WARRANTIES. Philips' liability is limited to repair or, at its sole option, replacement of the product. Incidental, special and consequential damages are disclaimed where permitted by law. This warranty gives you specific legal rights. You may also have other rights that vary from state to state.
Europe
For warranty information and product support please visit http://www.philips.com/welcome
7 Technical data
Mechanical Specifications
Size
Docking Station:
• Overall Length: 92.3mm
• Overall Width: 94.2mm
• Overall Thickness: 28.5mm
Remote Control :
• Overall Length: 243.5mm
• Overall Width: 52mm
• Overall Thickness: 30mm
Power
- Dock: 12v DC
• Remote: 3AA Alkaline Batteries
• Approximate Battery Life 4 months
Screen
• Type: Dot Matrix
• Size: 96 pixels by 64 pixels
• Lighting: Backlighting
• Colour: black/white
Connectors
- IPod™ Connector
• S Video Jack - Audio in jack
• DC Power Jack.
Communication and Interface
Transmission Medium
IR AND RF Carrier Frequency
• IR:36kHz +/- 2%,
RF:2.4GHz
General Operating Voltage
• (min.) typical 3.3V to 4.8 V
Ambient Operating Temperature Range
• +5 C to 45 C
Certifications
- FCC
• IC - UL/CUL
• CE - Swiss Mark
C-Tick
8 Frequently asked questions
Here you will find the most frequently asked questions and answers about your universal remote and dock for iPod™. For further help, please visit www.philips.com/welcome
To keep the warranty valid, never try to repair the system yourself. If you encounter problems when you use your universal remote and dock for iPod™, check the following points before you contact Philips. If the problem remains unsolved, go to the Philips website www.philips.com/welcome. When you contact Philips, make sure that your universal remote and dock for iPod™ is nearby and the model number and serial number are available.
What should I do if “Cannot connect to IPod™ DOCKING CRADLE” appears on the screen?
This means the docking cradle is not configured to connect to the remote. Reconnect the remote to the docking cradle.
What should I do if "No IPod™ DOCKING
CRADLE found" appears on the screen?
This means the docking cradle is not within range of the remote. Move closer, up to 3 feet (1m) of the docking cradle. Press OK to try again.
What if I cannot find my brand in the list of the selected devices?
The brands are divided by device and you could be looking in the wrong device.
• STB contains the different set-top boxes for Satellite and DVB-T
• AUDIO SET contains the tuner-amplifier combination and CD or DVD in some cases
• HTS contains the home theater systems
• PVR contain personal video recorders and hard disc recorders
• DMR contains Digital Media receivers
• TV-VCR, TV-DVD, DVD-VCR DVD-HDD contain combination devices
• GAME contains the DVD playback functions of the game consoles e.g. Xbox and Play Station.
Not all brands are available in the database. If your brand is not in the list, select “Not in list” and perform a full database search. The remote will test all codes that are available. This can take up to 25 minutes.
How do I quit the installation wizard?
To quit the installation wizard, press the IPOD™ LAUNCH key.
What do I do if the “No Connection” icon blinks in the upper right-hand corner of the screen?
This could mean:
- The dock is disconnected. Make sure the power adapter is connected to a live electrical outlet and that the cables are connected properly.
- The remote is too far from the docking cradle to set up a connection.
The remote should be no farther than a maximum distance of 130 ft (40m) from the docking cradle.
Obstructions in the path from the remote to the docking cradle can reduce this distance. Move the remote closer to the docking cradle.
Another radiant device, e.g. a microwave oven, is positioned too close to the docking cradle and is interfering with the signals of the remote.
Turn off the devices placed near the docking cradle that could be causing the interference and try connecting again.
What should I do if the universal remote for iPod™ is not powered?
Make sure the power adapter is connected to a live electrical outlet and that the cables are connected properly. Your universal remote for iPod™ could be in standby mode. It may take some time for start-up after standby mode.
Ensure that 3 fresh AA batteries are installed in the remote.
What should I do if one or more keys are not working correctly?
This usually means the specific function is not available on the original remote control. Keep in mind that your universal remote for iPod ^™ only has hard keys, so only the hard keys on the remote that have a function in the device will work. It may also mean that the code behind the key is defective. You can fix keys from your original remote control. Some keys have device specific functions.
What should I do if the Volume keys are not working properly?
This means the default source device for your device is not installed. After adding devices, the SJM3152 automatically copies the Volume keys and Mute key, as follows:
• Video devices, like DVD, DVDR, VCR and Satellite box, use the Volume keys of the TV.
• Audio devices, like CD, DMR and Tuner, use the Volume keys of the Amplifier or Receiver. If you did not install the source device, the Volume keys and the Mute key will not work. You can choose to install the source device on your remote.
What do I do if I cannot see all the music available on my iTunes on my universal remote for iPod™ screen?
Only music that is available in the library of your iPod ^TM is shown on the remote. Save the music available on your iTunes library in the library of your selected iPod ^TM .
What do I do if I cannot wake-up the universal remote for iPod™?
This means the battery level is too low. Take out the batteries and insert new batteries.
Inhaltsverzeichnis
1. Wichtig 28
This Class B digital apparatus complies with Canadian ICES-003.
EC DECLARATION OF CONFORMITY
We, Philips Consumer Lifestyle: BU P&A: Building SFF5 (manufacturer's name)
P.O. Box 80002, 5600 JB Eindhoven, The Netherlands (manufacturer's address)
declare under our responsibility that the product:
Philips
(name)
SJM3152 -/05 -/12
(type or model)
RF remote control and docking station (product description)
to which this declaration relates is in conformity
with the following standards:
EN300 400 -2 V1.1.2:2004
EN301 489-17 V1.2.1:2002
EN300 328 V1.6.1:2004
EN50371:2000
EN60950-1:2001 + A11:2004
(title and/or number and date or issue of the standards)
following the provisions of 1999/5/EC (R&TTE Directive) and is produced by a manufacturing organisation on ISO 9000 level.

Eindhoven, 21/10/2008
(place, date)
K. Rysman
Approbation manager
(signature, name and function)


iPod nano 4th generation (video) 8GB 16GB

iPod classic 120GB

iPod touch 8GB 16GB 32GB

iPod nano 3rd generation (video) 4GB 8GB

iPod classic 80GB 160GB

iPod nano 1st generation 1GB 2GB 4GB

iPod 4th generation (color display) 40GB 60GB

iPod 4th generation (color display) 20GB 30GB

iPod nano 2nd generation (aluminum) 2GB 4GB 8GB

iPod 5th generation (video) 60GB 80GB

iPod 5th generation (video) 30GB

iPod 4th generation 40GB

iPod 4th generation 20GB

iPod mini 4GB 6GB

Hinweis
natural_image
Line drawing of a remote control with buttons and dials (no text or symbols)natural_image
Five identical rectangular shapes with horizontal black lines inside, arranged vertically (no text or symbols)5 iPod™-Dock-Adapter: *
natural_image
Line drawing of a flat-screen TV with a curved base (no text or symbols)Fernsehgerät
Netzsteckdose
Dockingstation:
3 Erste Schritte

Warnung
natural_image
Close-up of a remote control interface with playback controls and a blue circular button (no text or symbols visible)Hinweis
© 2008 Philips Consumer Lifestyle.
Industry Canada Statement
This Class B digital apparatus complies with Canadian ICES-003.
EC DECLARATION OF CONFORMITY
We, Philips Consumer Lifestyle: BU P&A: Building SFF5 (manufacturer's name)
P.O. Box 80002, 5600 JB Eindhoven, The Netherlands (manufacturer's address)
declare under our responsibility that the product:
Philips
(name)
SJM3152 -/05 -/12
(type or model)
RF remote control and docking station (product description)
to which this declaration relates is in conformity
with the following standards:
EN300 400 -2 V1.1.2:2004
EN301 489-17 V1.2.1:2002
EN300 328 V1.6.1:2004
EN50371:2000
EN60950-1:2001 + A11:2004
(title and/or number and date or issue of the standards)
following the provisions of 1999/5/EC (R&TTE Directive) and is produced by a manufacturing organisation on ISO 9000 level.
Eindhoven, 21/10/2008
(place, date)
K. Rysman
Approbation manager
(signature, name and function)
iPod nano 4th generation (video) 8GB 16GB

iPod classic 120GB

iPod touch 8GB 16GB 32GB

iPod nano 3rd generation (video) 4GB 8GB

iPod classic 80GB 160GB

iPod nano 1st generation 1GB 2GB 4GB

iPod 4th generation (color display) 40GB 60GB

iPod 4th generation (color display) 20GB 30GB

iPod nano 2nd generation (aluminum) 2GB 4GB 8GB

iPod 5th generation (video) 60GB 80GB

iPod Sth generation (video) 30GB

iPod 4th generation 40GB

iPod 4th generation 20GB

iPod mini 4GB 6GB
natural_image
Line drawing of a remote control with buttons and dials (no text or symbols)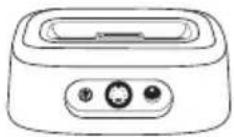

natural_image
Five identical rectangular shapes with horizontal black lines inside, arranged vertically (no text or symbols)natural_image
Line drawing of a flat-screen TV with a curved base (no text or symbols)
Station d'accueil :
3 Mise en route

Avertissement
natural_image
Close-up of a remote control interface with playback buttons and a circular play button (no readable text or symbols)
Remarque
© 2008 Philips Consumer Lifestyle.
EC DECLARATION OF CONFORMITY
We, Philips Consumer Lifestyle: BU P&A: Building SFF5 (manufacturer's name)
P.O. Box 80002, 5600 JB Eindhoven, The Netherlands (manufacturer's address)
declare under our responsibility that the product:
Philips
(name)
SJM3152 -/05 -/12
(type or model)
RF remote control and docking station (product description)
to which this declaration relates is in conformity
with the following standards:
EN300 400 -2 V1.1.2:2004
EN301 489-17 V1.2.1:2002
EN300 328 V1.6.1:2004
EN50371:2000
EN60950-1:2001 + A11:2004
(title and/or number and date or issue of the standards)
following the provisions of 1999/5/EC (R&TTE Directive) and is produced by a manufacturing organisation on ISO 9000 level.

Eindhoven, 21/10/2008
(place, date)
K. Rysman
Approbation manager
(signature, name and function)




Opmerking
natural_image
Line drawing of a remote control with buttons and dials (no text or symbols)Universele afstandsbediening
natural_image
Five identical rectangular shapes with horizontal black lines inside, arranged vertically (no text or symbols)5 iPod™ stationsadapters: *
natural_image
Line drawing of a flat-screen monitor with a curved base (no text or symbols)TV

Stopcontact
3 Aan de slag
Waarschuwing
natural_image
Close-up of a black remote control interface with playback buttons and a play button (no readable text or symbols)Opmerking
Navigeren in de iPod™-modus:
© 2008 Philips Consumer Lifestyle.
EC DECLARATION OF CONFORMITY
We, Philips Consumer Lifestyle: BU P&A: Building SFF5 (manufacturer's name)
P.O. Box 80002, 5600 JB Eindhoven, The Netherlands (manufacturer's address)
declare under our responsibility that the product:
Philips
(name)
SJM3152 -/05 -/12
(type or model)
RF remote control and docking station (product description)
to which this declaration relates is in conformity
with the following standards:
EN300 400 -2 V1.1.2:2004
EN301 489-17 V1.2.1:2002
EN300 328 V1.6.1:2004
EN50371:2000
EN60950-1:2001 + A11:2004
(title and/or number and date or issue of the standards)
following the provisions of 1999/5/EC (R&TTE Directive) and is produced by a manufacturing organisation on ISO 9000 level.

Eindhoven, 21/10/2008
(place, date)
K. Rysman
Approbation manager
(signature, name and function)




Nota:
natural_image
Line drawing of a remote control with buttons and dials (no text or symbols)natural_image
Five identical rounded rectangular objects with horizontal black bars, arranged vertically (no text or symbols)natural_image
Line drawing of a flat-screen TV with a curved base (no text or symbols)3 Introducción
Advertencia
natural_image
Close-up of a remote control interface with playback buttons and a blue circular play button (no text or symbols visible)Note:
- Seleccione "Next". Pulse OK.
© 2008 Philips Consumer Lifestyle.
EC DECLARATION OF CONFORMITY
We, Philips Consumer Lifestyle: BU P&A: Building SFF5 (manufacturer's name)
P.O. Box 80002, 5600 JB Eindhoven, The Netherlands (manufacturer's address)
declare under our responsibility that the product:
Philips
(name)
SJM3152 -/05 -/12
(type or model)
RF remote control and docking station (product description)
to which this declaration relates is in conformity
with the following standards:
EN300 400 -2 V1.1.2:2004
EN301 489-17 V1.2.1:2002
EN300 328 V1.6.1:2004
EN50371:2000
EN60950-1:2001 + A11:2004
(title and/or number and date or issue of the standards)
following the provisions of 1999/5/EC (R&TTE Directive) and is produced by a manufacturing organisation on ISO 9000 level.
Eindhoven, 21/10/2008
(place, date)
K. Rysman
Approbation manager
(signature, name and function)

Nota
natural_image
Front view of a remote control device with buttons and dials (no text or symbols visible)natural_image
Five identical rounded rectangular objects with horizontal black bars, arranged vertically (no text or symbols)natural_image
Line drawing of a flat-screen TV with a curved base (no text or symbols)Televisore
Presa elettrica
natural_image
Close-up of a remote control interface with playback buttons and a play button (no readable text or symbols)Nota
Podcasts (Podcast) Genres (Generi
Composers (Autori)
Audio Books (Audiolibri)
© 2008 Philips Consumer Lifestyle.
EC DECLARATION OF CONFORMITY
We, Philips Consumer Lifestyle: BU P&A: Building SFF5 (manufacturer's name)
P.O. Box 80002, 5600 JB Eindhoven, The Netherlands (manufacturer's address)
declare under our responsibility that the product:
Philips
(name)
SJM3152 -/05 -/12
(type or model)
RF remote control and docking station (product description)
to which this declaration relates is in conformity
with the following standards:
EN300 400 -2 V1.1.2:2004
EN301 489-17 V1.2.1:2002
EN300 328 V1.6.1:2004
EN50371:2000
EN60950-1:2001 + A11:2004
(title and/or number and date or issue of the standards)
following the provisions of 1999/5/EC (R&TTE Directive) and is produced by a manufacturing organisation on ISO 9000 level.
Eindhoven, 21/10/2008
(place, date)
K. Rysman
Approbation manager
(signature, name and function)


Nota
natural_image
Front view of a remote control device with buttons and dials (no text or symbols visible)Telecomando universal
natural_image
Five identical rectangular shapes with horizontal black lines inside, arranged vertically (no text or symbols)5 adaptadores de base iPod™: *
- tipo 3 para mini
- tipo 4 para 4G de 20 GB
- tipo 5 para 4G de 20 GB
- tipo 6 para iPod™ com visor a cores de 20 GB/30 GB
- tipo 7 para iPod™ com visor a cores de 20 GB/30 GB
Cabo S-Video
Cabo AV 3,5 mm-para-RCA
natural_image
Line drawing of a flat-screen TV with a curved base (no text or symbols)TV

Tomada eléctrica
2.4 Menu principal

3 Como iniciar

Aviso
- Utilizar o telecomando universal e base de suporte para iPod™
Eis como funcionam o seu telecomando universal e base de suporte para iPod™.
natural_image
Close-up of a remote control interface with playback buttons and a blue circular play button (no text or symbols visible)
Nota
Navegar no modo iPod™:

- Navegue até Music (MÚSICA), Settings (DEFINIÇÕES), Now Playing (A tocar). Prima OK para seleccionar.

Nota
© 2008 Philips Consumer Lifestyle.
EC DECLARATION OF CONFORMITY
We, Philips Consumer Lifestyle: BU P&A: Building SFF5 (manufacturer's name)
P.O. Box 80002, 5600 JB Eindhoven, The Netherlands (manufacturer's address)
declare under our responsibility that the product:
Philips
(name)
SJM3152 -/05 -/12
(type or model)
RF remote control and docking station (product description)
to which this declaration relates is in conformity
with the following standards:
EN300 400 -2 V1.1.2:2004
EN301 489-17 V1.2.1:2002
EN300 328 V1.6.1:2004
EN50371:2000
EN60950-1:2001 + A11:2004
(title and/or number and date or issue of the standards)
following the provisions of 1999/5/EC (R&TTE Directive) and is produced by a manufacturing organisation on ISO 9000 level.

Eindhoven, 21/10/2008
(place, date)
K. Rysman
Approbation manager
(signature, name and function)


Obs!
natural_image
Front view of a remote control device with buttons and dials (no text or symbols visible)Universalfjärrkontroll
natural_image
Five identical rectangular shapes with horizontal black lines inside, arranged vertically (no text or symbols)natural_image
Line drawing of a flat-screen TV with a curved base (no text or symbols)TV
Eluttag

Dockningsstation:
3 Komma igång

Varning
natural_image
Close-up of a remote control interface with playback buttons and a play button (no readable text or symbols)
Obs!
© 2008 Philips Consumer Lifestyle.
EC DECLARATION OF CONFORMITY
We, Philips Consumer Lifestyle: BU P&A: Building SFF5 (manufacturer's name)
P.O. Box 80002, 5600 JB Eindhoven, The Netherlands (manufacturer's address)
declare under our responsibility that the product:
Philips
(name)
SJM3152 -/05 -/12
(type or model)
RF remote control and docking station (product description)
to which this declaration relates is in conformity
with the following standards:
EN300 400 -2 V1.1.2:2004
EN301 489-17 V1.2.1:2002
EN300 328 V1.6.1:2004
EN50371:2000
EN60950-1:2001 + A11:2004
(title and/or number and date or issue of the standards)
following the provisions of 1999/5/EC (R&TTE Directive) and is produced by a manufacturing organisation on ISO 9000 level.

Eindhoven, 21/10/2008
(place, date)
K. Rysman
Approbation manager
(signature, name and function)


iPod nano 4th generation (video) 8GB 16GB

iPod classic 120GB

iPod touch 8GB 16GB 32GB

iPod nano 3rd generation (video) 4GB 8GB

iPod classic 80GB 160GB

iPod nano 1st generation 1GB 2GB 4GB

iPod 4th generation (color display) 40GB 60GB

iPod 4th generation (color display) 20GB 30GB

iPod nano 2nd generation (aluminum) 2GB 4GB 8GB

iPod 5th generation (video) 60GB 80GB

iPod 5th generation (video) 30GB

iPod 4th generation 40GB

iPod 4th generation 20GB

iPod mini 4GB 6GB

Σημείωση
natural_image
Front view of a remote control device with buttons and dials (no text or symbols visible)natural_image
Five identical rectangular shapes with horizontal black lines, arranged vertically (no text or symbols)natural_image
Line drawing of a flat-screen television with a blank screen and stand (no text or symbols)Τηλεόραση
Πρίζα
Βάση σύνδεσης:
3 Ξεκινώντας

Προειδοποίηση
natural_image
Close-up of a remote control interface with playback buttons and a play button (no readable text or symbols)
Σημείωση
Shuffle (Tuxaia avanapaywyn)

Σημείωση
© 2008 Philips Consumer Lifestyle.
EC DECLARATION OF CONFORMITY
We, Philips Consumer Lifestyle: BU P&A: Building SFF5 (manufacturer's name)
P.O. Box 80002, 5600 JB Eindhoven, The Netherlands (manufacturer's address)
declare under our responsibility that the product:
Philips
(name)
SJM3152 -/05 -/12
(type or model)
RF remote control and docking station (product description)
to which this declaration relates is in conformity
with the following standards:
EN300 400 -2 V1.1.2:2004
EN301 489-17 V1.2.1:2002
EN300 328 V1.6.1:2004
EN50371:2000
EN60950-1:2001 + A11:2004
(title and/or number and date or issue of the standards)
following the provisions of 1999/5/EC (R&TTE Directive) and is produced by a manufacturing organisation on ISO 9000 level.
Eindhoven, 21/10/2008
(place, date)
K. Rysman
Approbation manager
(signature, name and function)



iPod nano 4th generation (video) 8GB 16GB

iPod classic 120GB

iPod touch 8GB 16GB 32GB

iPod nano 3rd generation (video) 4GB 8GB

iPod classic 80GB 160GB

iPod nano 1st generation 1GB 2GB 4GB

iPod 4th generation (color display) 40GB 60GB

iPod 4th generation (color display) 20GB 30GB

iPod nano 2nd generation (aluminum) 2GB 4GB 8GB

iPod 5th generation (video) 60GB 80GB

iPod 5th generation (video) 30GB

iPod 4th generation 40GB

iPod 4th generation 20GB

iPod mini 4GB 6GB

Uwaga
natural_image
Front view of a remote control device with buttons and dials (no text or symbols visible)natural_image
Five identical rectangular shapes with horizontal black lines inside, arranged vertically (no text or symbols)natural_image
Line drawing of a flat-screen TV with a curved base (no text or symbols)3 Czynności wstępne

Uwaga
natural_image
Close-up of a black remote control interface with playback buttons and a circular play button (no readable text or symbols)Uwaga!
© 2008 Philips Consumer Lifestyle.
EC DECLARATION OF CONFORMITY
We, Philips Consumer Lifestyle: BU P&A: Building SFF5 (manufacturer's name)
P.O. Box 80002, 5600 JB Eindhoven, The Netherlands (manufacturer's address)
declare under our responsibility that the product:
Philips
(name)
SJM3152 -/05 -/12
(type or model)
RF remote control and docking station (product description)
to which this declaration relates is in conformity
with the following standards:
EN300 400 -2 V1.1.2:2004
EN301 489-17 V1.2.1:2002
EN300 328 V1.6.1:2004
EN50371:2000
EN60950-1:2001 + A11:2004
(title and/or number and date or issue of the standards)
following the provisions of 1999/5/EC (R&TTE Directive) and is produced by a manufacturing organisation on ISO 9000 level.

Eindhoven, 21/10/2008
(place, date)
K. Rysman
Approbation manager
(signature, name and function)



iPod nano 4th generation (video) 8GB 16GB

iPod classic 120GB

iPod touch 8GB 16GB 32GB

iPod nano 3rd generation (video) 4GB 8GB

iPod classic 80GB 160GB

iPod nano 1st generation 1GB 2GB 4GB

iPod 4th generation (color display) 40GB 60GB

IPod 4th generation (color display) 20GB 30GB

iPod nano 2nd generation (aluminum) 2GB 4GB 8GB

iPod 5th generation (video) 60GB 80GB

iPod 5th generation (video) 30GB

iPod 4th generation 40GB

iPod 4th generation 20GB

iPod mini 4GB 6GB

Примечание
natural_image
Line drawing of a remote control with buttons and dials (no text or symbols)natural_image
Five identical rectangular shapes with horizontal black lines inside, arranged vertically (no text or symbols)natural_image
Line drawing of a flat-screen TV with a curved base (no text or symbols)Телевизор
Сетевая розетка
3 Начало работы

Предупреждение
natural_image
Close-up of a remote control interface with playback buttons and a central play button (no text or symbols visible)
Примечание
© 2008 Philips Consumer Lifestyle.
EC DECLARATION OF CONFORMITY
We, Philips Consumer Lifestyle: BU P&A: Building SFF5 (manufacturer's name)
P.O. Box 80002, 5600 JB Eindhoven, The Netherlands (manufacturer's address)
declare under our responsibility that the product:
Philips
(name)
SJM3152 -/05 -/12
(type or model)
RF remote control and docking station (product description)
to which this declaration relates is in conformity
with the following standards:
EN300 400 -2 V1.1.2:2004
EN301 489-17 V1.2.1:2002
EN300 328 V1.6.1:2004
EN50371:2000
EN60950-1:2001 + A11:2004
(title and/or number and date or issue of the standards)
following the provisions of 1999/5/EC (R&TTE Directive) and is produced by a manufacturing organisation on ISO 9000 level.

Eindhoven, 21/10/2008
(place, date)
K. Rysman
Approbation manager
(signature, name and function)
iPod nano 4th generation (video) 8GB 16GB

iPod classic 120GB

iPod touch 8GB 16GB 32GB

iPod nano 3rd generation (video) 4GB 8GB

iPod classic 80GB 160GB

iPod nano 1st generation 1GB 2GB 4GB

iPod 4th generation

iPod 4th generation (color display) 20GB 30GB

iPod nano 2nd generation (aluminum) 2GB 4GB 8GB

iPod 5th generation (video) 60GB 80GB

iPod 5th generation (video) 30GB

iPod 4th generation 40GB

iPod 4th generation 20GB

iPod mini 4GB 6GB

Poznámka
natural_image
Line drawing of a remote control with buttons and dials (no text or symbols)natural_image
Five identical rectangular shapes with horizontal black lines inside, arranged vertically (no text or symbols)natural_image
Line drawing of a flat-screen TV with a curved base (no text or symbols)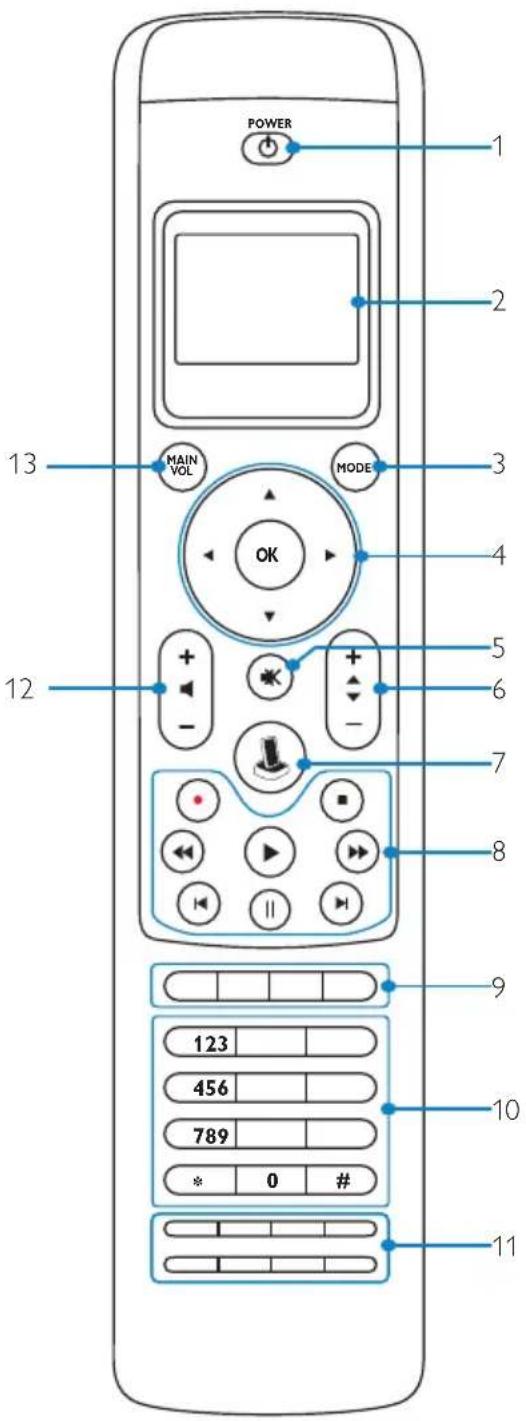
Kolébka:
3 Začínáme

Varování
natural_image
Close-up of a remote control interface with playback buttons and a blue circular play button (no text or symbols visible)
Poznámka

Poznámka
EC DECLARATION OF CONFORMITY
We, Philips Consumer Lifestyle: BU P&A: Building SFF5 (manufacturer's name)
P.O. Box 80002, 5600 JB Eindhoven, The Netherlands (manufacturer's address)
declare under our responsibility that the product:
Philips
(name)
SJM3152-/05-/12
(type or model)
RF remote control and docking station (product description)
to which this declaration relates is in conformity
with the following standards:
EN300 400 -2 V1.1.2:2004
EN301 489-17 V1.2.1:2002
EN300 328 V1.6.1:2004
EN50371:2000
EN60950-1:2001 + A11:2004
(title and/or number and date or issue of the standards)
following the provisions of 1999/5/EC (R&TTE Directive) and is produced by a manufacturing organisation on ISO 9000 level.
Eindhoven, 21/10/2008
(place, date)
K. Rysman
Approbation manager
(signature, name and function)

Megjegyzés
natural_image
Front view of a remote control device with buttons and dials (no text or symbols visible)natural_image
Five identical rectangular shapes with horizontal black lines inside, arranged vertically (no text or symbols)5 iPod™ dokkoló adapter: *
natural_image
Line drawing of a flat-screen TV with a curved base (no text or symbols)TV
3 Bevezetés
Figyelmeztetés
natural_image
Close-up of a remote control interface with playback buttons and a blue circular play button (no readable text or symbols)Megjegyzés
© 2008 Philips Consumer Lifestyle.
EC DECLARATION OF CONFORMITY
We, Philips Consumer Lifestyle: BU P&A: Building SFF5 (manufacturer's name)
P.O. Box 80002, 5600 JB Eindhoven, The Netherlands (manufacturer's address)
declare under our responsibility that the product:
Philips
(name)
SJM3152 -/05 -/12
(type or model)
RF remote control and docking station (product description)
to which this declaration relates is in conformity
with the following standards:
EN300 400 -2 V1.1.2:2004
EN301 489-17 V1.2.1:2002
EN300 328 V1.6.1:2004
EN50371:2000
EN60950-1:2001 + A11:2004
(title and/or number and date or issue of the standards)
following the provisions of 1999/5/EC (R&TTE Directive) and is produced by a manufacturing organisation on ISO 9000 level.

Eindhoven, 21/10/2008
(place, date)
K. Rysman
Approbation manager
(signature, name and function)

Not
natural_image
Front view of a remote control device with buttons and dials (no text or symbols visible)natural_image
Five identical rectangular shapes with horizontal black lines inside, arranged vertically (no text or symbols)natural_image
Line drawing of a flat-screen TV with a curved base (no text or symbols)TV
Bağlantı Cihazı:
3 Başlarken

Uyarı
natural_image
Close-up of a remote control interface with playback buttons and a blue circular button (no readable text or symbols)
Not
iPod™ modunda gezinme:

Specifications are subject to change without notice
© 2008 Philips Consumer Lifestyle.
All rights reserved. Trademarks are the property of Koninklijke Philips Electronics N.V. or their respective owners. iPod is a trademark of Apple Inc., registered in the U.S. and other countries.
M-SJM3152-081003-B

- www.philips.com/welcome
- Your universal remote and docking cradle for iPod™ 6
- Getting Started 9
- Using your universal remote and docking cradle for iPod™ 12
- Use more of your universal remote and docking cradle
- Important
- Note
- PHILIPS
- EC DECLARATION OF CONFORMITY
- Warnings
- Your universal remote and docking cradle for iPod™
- Product highlights
- What's in the box.
- AA batteries
- What you'll also need.
- Cradle:
- Remote:
- Getting Started
- Warning
- Prepare
- Connect
- RCA Connection
- S-Video Connection
- Install
- Using your universal remote for iPod™ as a universal remote control
- Device specific keys
- Starting up an activity
- Starting up an activity:
- Selecting extra functions
- Tip
- Replacing the batteries
- Use more of your universal remote and docking cradle for iPod™
- Adding a device
- To add a device:
- Deleting a device
- To delete a device:
- Fixing a key
- To fix a key:
- Adding a function
- To add a function:
- To access the extra function:
- Adding an activity
- You can overwrite this default delay:
- To add an activity:
- Deleting an activity
- About RF settings
- Changing language
- Copying volume
- To change the volume keys:
- Performing a full reset
- To perform a full reset:
- Changing display time out
- To change the display time out:
- Warranty & Service
- United States of America
- Europe
- Technical data
- Mechanical Specifications
- Size
- Docking Station:
- Remote Control :
- Power
- Screen
- Connectors
- Communication and Interface
- Transmission Medium
- IR AND RF Carrier Frequency
- General Operating Voltage
- Ambient Operating Temperature Range
- Certifications
- Frequently asked questions
- What should I do if “Cannot connect to IPod™ DOCKING CRADLE” appears on the screen?
- What should I do if "No IPod™ DOCKING
- CRADLE found" appears on the screen?
- What if I cannot find my brand in the list of the selected devices?
- How do I quit the installation wizard?
- What do I do if the “No Connection” icon blinks in the upper right-hand corner of the screen?
- What should I do if the universal remote for iPod™ is not powered?
- What should I do if one or more keys are not working correctly?
- What should I do if the Volume keys are not working properly?
- What do I do if I cannot see all the music available on my iTunes on my universal remote for iPod™ screen?
- What do I do if I cannot wake-up the universal remote for iPod™?
- Inhaltsverzeichnis
- Wichtig 28
- Hinweis
- Dockingstation:
- Erste Schritte
- Warnung
- © 2008 Philips Consumer Lifestyle.
- Station d'accueil :
- Mise en route
- Avertissement
- Remarque
- Opmerking
- Aan de slag
- Waarschuwing
- Nota:
- Introducción
- Advertencia
- Note:
- Nota
- Menu principal
- Como iniciar
- Aviso
- Obs!
- Dockningsstation:
- Komma igång
- Varning
- Σημείωση
- Βάση σύνδεσης:
- Ξεκινώντας
- Προειδοποίηση
- Uwaga
- Czynności wstępne
- Uwaga!
- Примечание
- Начало работы
- Предупреждение
- Poznámka
- Kolébka:
- Začínáme
- Varování
- Megjegyzés
- Bevezetés
- Figyelmeztetés
- Not
- Bağlantı Cihazı:
- Başlarken
- Uyarı
Brand : PHILIPS
Model : SJM3152
Category : Remote control