
TVHD50500 - Surveillance Camera ABUS - Free user manual and instructions
Find the device manual for free TVHD50500 ABUS in PDF.


| Product Type | Surveillance Camera |
| Brand | ABUS |
| Model | TVHD50500 |
| Video Resolution | 1920 x 1080 (Full HD) |
| Viewing Angle | 90° |
| Night Vision | Yes, up to 20 m (IR LED) |
| Protection Rating | IP66 (weather resistant) |
| Power Supply | 12 V DC, power adapter included |
| Dimensions (W x H x D) | 120 x 80 x 70 mm |
| Weight | 500 g |
| Connectivity | Ethernet RJ45, PoE (Power over Ethernet) |
| Storage | microSD card (up to 128 GB) or NVR |
| Motion Detection | Yes, with built-in alarm |
| Audio Function | Built-in microphone, two-way audio |
| Operating Temperature | -20°C to +50°C |
| Cleaning | Clean with a soft, dry cloth |
| Security | Password protection, SSL encryption |
| Warranty | 2 years |
| Repairability | Spare parts available on request |
Frequently Asked Questions - TVHD50500 ABUS
User questions about TVHD50500 ABUS
0 question about this device. Answer the ones you know or ask your own.
Ask a new question about this device
Download the instructions for your Surveillance Camera in PDF format for free! Find your manual TVHD50500 - ABUS and take your electronic device back in hand. On this page are published all the documents necessary for the use of your device. TVHD50500 by ABUS.
USER MANUAL TVHD50500 ABUS
natural_image
Exterior view of a black and silver ABUS camera with visible lens and control knobs (no text or symbols on body)These operating instructions belong with this product. They contain important information for putting it into service and operating it. This should be noted also when this product is passed on to a third party. Therefore look after these operating instructions for future reference!
A list of contents with the corresponding page numbers can be found in the index on page 22.

natural_image
Exterior view of a black and silver ASUS camera with visible lens and control knobs (no text or symbols on body)Version 05/2012
TVHD50000
TVHD50500
CE
natural_image
Close-up of a camera lens component with a white arrow pointing to the lens (no text or symbols visible)natural_image
Exterior view of a black and silver Airbus A80 camera with visible lens and control knob (no text or symbols on body)Version 05/2012
TVHD50000
TVHD50500
CE
Original operating instructions in German. Retain for future reference!
Dear customer,
Thank you for purchasing this product.
This product complies with current domestic and European regulations. Conformity has been proven, and all related certifications are available from the manufacturer on request (www.abus-sc.com).
To maintain this status and to guarantee safe operation, it is your obligation to observe these operating instructions!
Read the entire operating instructions carefully before putting the product into operation and pay attention to all operating and safety information!
All company names and product descriptions are trademarks of the corresponding owner. All rights reserved.
In the event of questions, please contact your local maintenance specialist or dealer.

Disclaimer
These operating instructions have been produced with the greatest of care. Should you discover any missing information or inaccuracies, please let us know about them.
ABUS Security-Center GmbH & Co. KG does not accept any liability for technical and typographical errors, and reserves the right to make changes to the product and operating instructions at any time and without prior warning.
ABUS Security-Center is not liable or responsible for direct or indirect damages resulting from the equipment, performance and use of this product. No forms of guarantee are accepted for the contents of this document.
Important Safety Information

All guarantee claims are invalid in the event of damage caused by non-compliance with these operating instructions. We cannot be held liable for resulting damages.

In the event of material or personal damage caused by improper operation or non-compliance with the safety notes, we cannot be held liable. All guarantee claims are invalid in such cases.
Dear customer,
The following safety information and hazard notes are not only intended to protect your health, but also to protect the device from damage. Please read the following points carefully:
- There are no components inside the product that require servicing by the operator. Opening or dismantling the product invalidates the CE certification and guarantee claims / warranty.
- The product can be damaged if it is dropped, even from a low height.
Avoid the following adverse conditions during operation:
- Moisture or excess humidity
- Extreme heat or cold
- Direct sunlight
- Dust or flammable gases, vapors, or solvents
• Strong vibrations
• Strong magnetic fields (e.g. next to machines or loudspeakers) - The camera must not be directed toward the sun when the aperture is open.
This can destroy the sensor.
- The camera must not be installed on unstable surfaces
General safety information:
- Do not leave packaging material lying around. Plastic bags, sheeting, polystyrene packaging, etc., can pose a danger to children if played with.
- The surveillance camera contains small parts which could be swallowed, and should be kept out of reach of children for safety reasons.
- Do not insert any objects into the device through the openings.
- Only use replacement devices and accessories that are approved by the manufacturer. Do not connect any non-compatible products.
- Please pay attention to the safety information and operating instructions for the other connected devices.
- Check the device for damage before commissioning. Do not put the device into operation if you detect any damage.
- Adhere to the operating voltage limits specified in the technical data. Higher voltages could destroy the device and pose a health risk (electric shock).

When installing the device in an existing video surveillance system, ensure that all devices are disconnected from the mains power supply and low-voltage circuit.

If in doubt, have a specialist technician carry out assembly, installation and connection of the device. Improper or unprofessional work on the power supply system or domestic installation puts both you and other persons at risk.
Connect the installations so that the power supply circuit and low-voltage circuit always run separately from each other. They should not be connected at any point or be able to become connected as a result of a malfunction.
Contents
- INTENDED USE....23
- EXPLANATION OF SYMBOLS 23
- SCOPE OF DELIVERY 23
- FEATURES AND FUNCTIONS....23
- DEVICE DESCRIPTION....24
5.1 OVERVIEW - MODEL NUMBERS 24
5.2 UNPACKING THE DEVICE 24
- INSTALLATION 24
6.1 POWER SUPPLY 24
6.2 MOUNTING A LENS 25
6.3 INSTALLING THE VIDEO CABLE 25
6.4 INSTALLING THE CAMERA 25
- REAR VIEW OF THE CAMERA 26
- OSD MENU 27
- MAINTENANCE AND CLEANING....33
9.1 FUNCTION TEST 33
9.2 CLEANING 33
- DISPOSAL 33
- TECHNICAL DATA....34
1. Intended Use
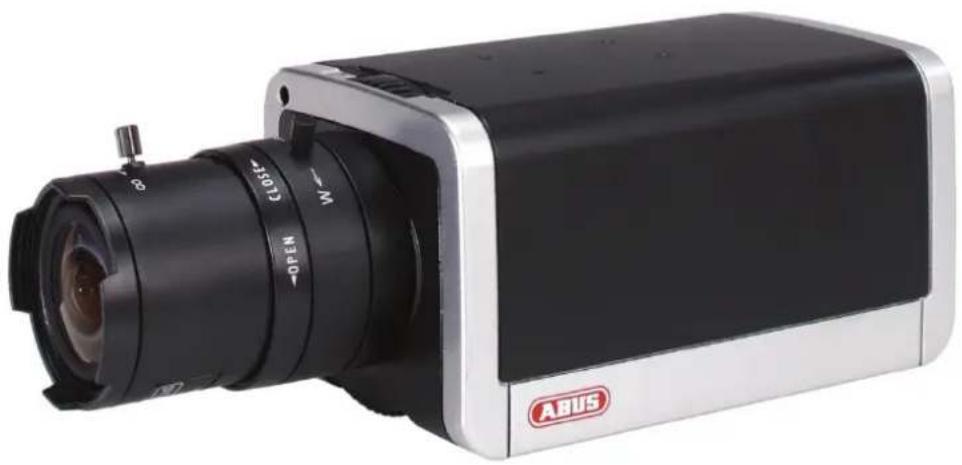
The day & night HD-SDI 1080p standard camera is equipped with a high-quality image sensor. It is used for indoor video surveillance in conjunction with a recording device or surveillance monitor.
For a detailed description of functions, refer to Section 4, "Features and functions".
The product must not be exposed to moisture. The video surveillance camera is only designed for indoor use in dry rooms. For outdoor use, an appropriate outdoor housing must be used (e.g. TV8493).

Use of this product for other than the described purpose may lead to damage to the product and other hazards. All other uses are not as intended and will result in the invalidation of the product guarantee and warranty. No liability can be accepted as a result. This also applies to any alterations or modifications made to the product. Read the entire operating manual carefully before putting the product into operation. The operating manual contains important information on installation and operation.
2. Explanation of symbols

The triangular high voltage symbol is used to warn of the risk of injury or health hazards (e.g. caused by electric shock).

The triangular warning symbol indicates important notes in these operating instructions which must be observed.

This symbol indicates special tips and notes on the operation of the unit.
3. Scope of delivery
• Day & night HD-SDI 1080p standard camera
• C-mount lens adapter ring
- Base for camera mount incl. screws
- Connection cable for the 12 VDC power supply (TVHD50000)
- Operating instructions
4. Features and functions
• HD-SDI – High-Definition Serial Digital Interface
• Full HD resolution (1080p, 2.0 MPx)
• Transmission via conventional CCTV infrastructure (coaxial cable)
- Day & night function with electromechanical IR swivel filter
• Second video output for camera setup (FBAS)
- WDR function to compensate for high image contrasts
- Convenient OSD (on-screen display) for camera configuration
- Compatible with electronically-controlled auto-iris megapixel lenses
5. Device description
5.1 Overview - Model numbers
| Model number TVHD50000 TVHD50500 | ||
| Resolution 1080p / 2.0 MPx 1080p / 2.0 MPx | ||
| WDR √ √ | ||
| DNR √ √ | ||
| Day & night (IR swivel filter) | √ √ | |
| Operating voltage 12 V DC / 24 V AC 110–240 V AC | ||
5.2 Unpacking the device
Handle the device with extreme care when unpacking it.

If the original packaging has been damaged, inspect the device. If the device shows signs of damage, then return it in the original packaging and contact the delivery service.
6. Installation
6.1 Power supply
Before starting installation, ensure that the power supply system voltage and the rated voltage of the camera are identical.
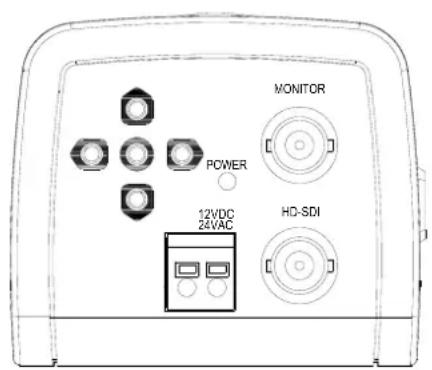
TVHD50000

TVHD50500
(1) TVHD50000 is equipped with a 12 V DC/24 V AC power supply. If you use a DC power supply, the polarity is not important.
In order to connect a plug-in power supply unit (DC connection 5.5 mm x 2.1 mm) to the camera, the adapter included with the camera must first be installed. The pins are inserted and the cable ends are inserted into the clamps.
(2) TVHD50500 is equipped with a 110 - 240 V AC power supply (pre-installed cable).
6.2 Mounting a lens
The camera is intended for use with CS-mount lenses. A C-mount lens can be mounted using the lens adapter ring included.

Before mounting a C-mount lens, ensure that the adapter ring is in place on the camera.
Otherwise, the CMOS image sensor can be damaged.
For lenses with a DC aperture, the connection for the lens cable is located on the right side of the camera. The camera automatically detects the lens type. For optimal image quality, a lens with a DC light adjustment aperture is recommended.
The back focus setting on the camera can also be used to precisely set the focus. A fixing screw for the back focus ring is located on the side of the camera.

natural_image
Close-up of a camera lens component with a white arrow pointing to the lens (no text or symbols visible)6.3 Installing the video cable
In order to transmit the video signal from the HD-SDI camera to an HD-SDI converter, monitor or recorder, an RG6 coaxial cable of type RG59 with BNC plug (male) must be connected to the "Video OUT" connection. The cable length to the next device may not exceed 80 meters (RG59) or 150 meters (RG6). To increase the range, you can install suitable signal HD-SDI repeaters.
6.4 Installing the camera
For installation, the included base can be attached to the upper or lower side of the camera. The plate is then aligned to the pre-defined screw openings and fastened with the screws provided.

IMPORTANT!
The camera must be disconnected from the power supply during installation.
CAUTION!
The camera must not be directed toward the sun when the aperture is open as this can destroy the CCD element.
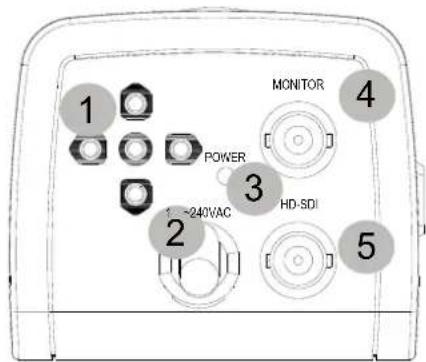
7. Rear view of the camera
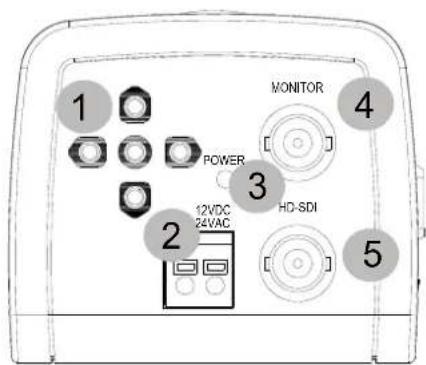
12 V DC/24 V AC version

110\~240 V AC version
(1) OSD buttons
(2) Power supply connection (12 V DC/24 V AC or 110 - 240 V AC)
(3) Status LED (active when voltage present)
(4) BNC test monitor output (MONITOR)
(5) BNC HD-SDI video output (HD-SDI)
Buttons
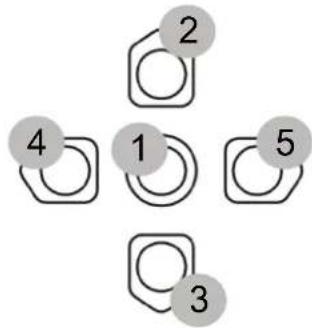
flowchart
graph TD
    A["1"] --> B["2"]
    B --> C["3"]
    C --> D["4"]
    D --> E["5"]
Function
(1) Enter : Enter menu / Perform action
(2) Up : Navigation in the menu
(3) Down : Navigation in the menu
(4) Left : Decrease value / Select option
(5) Right : Increase value / Select option
8. OSD Menu
| Function Description | |
| QUICK INSTALL Quick setup of the most important camera parameters | |
| ADVANCED MENU Detailed explanation of all camera parameters | |
| EXIT | Exit menu |
QUICK INSTALL
The "QUICK INSTALL" function has been implemented for simple configuration of the camera. This function takes you through the most important menu items in order to quickly adjust the camera to the given lighting conditions.
If the desired settings do not result in optimal image performance, you can perform "QUICK INSTALL" again at any time and adjust the settings.
Press "Enter" on the back of the camera to open the camera's "MAIN MENU". Use the buttons described in the last section to open the "QUICK INSTALL" menu and select the desired settings.
MAIN MENU
QUICK INSTALL
ADVANCED MENU
EXIT
The "QUICK INSTALL" menu contains the following steps:

flowchart
graph LR
    A["Quick Install"] --> B["EXPOSURESHUTTERWDR"]
    B --> C["WHITE BALANCE"]
    C --> D["END"]
A description of the different steps can be found in the following table.
To get to the next step in the "QUICK INSTALL" menu, select "NEXT" in the display. "BACK" brings you to the previous step.
| Function Description Standard | value | |
| EXPOSURE | DC / AESSettings for the lens in useDC: Setting for the electronically-controlled AI lensAES: Setting for lens with manual lens aperture | DC |
| SHUTTER Exposure control settingsSHUTTER Automatic or manual setting for the exposure time | AUTO | |
| WDR Exposure control settingsWDR Wide Dynamic Range function inactive = "OFF"Wide Dynamic Range function active = "ON" | OFF | |
| WHITE BALANCE | AWB / ATW / PTLWhite balance function settings | AWB |
For a more detailed description of the functions, see the following pages of these instructions.
ADVANCED MENU
EXPOSURE DC ..
WHITE BALANCE AWB
ENHANCE ..
D/N AUTO ..
MISCELLANEOUS
RESTORE DEFAULT
EXIT
| Function Description | |
| EXPOSURE Exposure control settings | |
| WHITE BALANCE White balance settings | |
| ENHANCE Image optimization settings | |
| D/N | Day/night settings |
| MISCELLANEOUS Settings for image mirroring, masking, camera name and live picture verification | |
| RESTORE DEFAULT Restore settings | |
| EXIT Exiting the OSD menu | |
EXPOSURE
| Function | Description |
| EXPOSURE Exposure | control settingsDC: The exposure control of the camera is set for various lighting conditions.Shutter: Auto: Automatic setting of exposure time1/30s-1/10000s: Fixed setting of exposure timeWDR Function for improving image quality when subject to extreme image contrasts (WDR – Wide Dynamic Range). Image noise is increased when activated.OFF: Function deactivatedON: Function activatedAE REFERENCE: Calculation of luminance as reference for gain and shutter time as a result of the average value ...AVERAGE: ... of the entire video image.CENTER: ... of the middle area of the video image.SPOT: ... of the spot area of the video image.AES: The exposure control of the camera is set for various lighting conditions. Only lenses with manual shutter control may be used. |
| Function Description | |
| White balance settings | AWB: Auto White BalanceWhite balance calculations are dynamically and continuously performed in the 2700~9500K range. |
| ATW: Auto White BalanceWhite balance calculations are dynamically and continuously performed in the 1800~10500K range. | |
| PTL: Push-To-LockWhite balance is performed after pressing the "Enter" button on the back of the camera and the value is stored permanently. |
ENHANCE
| Function Description | |
| AGC | Automatic Gain Control (0~20)The higher the value, the higher the maximum gain value. The image performance in low-light conditions is improved but image noise may be increased. |
| GAMMA | Gamma value (0~3)Adjustment of the gray scale to the display device. |
| APERTURE | Aperture value (0~15)A higher value increases sharpness but also increases image noise. |
| WDR | Wide Dynamic Range functionFunction for improving image quality when subject to extreme image contrasts (WDR – Wide Dynamic Range). Image noise is increased when activated.OFF: Function deactivatedON: Function activated |
| DNR | Digital Noise Reduction (DNR) (0~15)Digital noise reduction is automatically activated when picture brightness is low. A higher value can reduce image noise. Image sharpness is reduced when the DNR value is increased. |
| BRIGHTNESS | Picture brightness setting (0~15) |
| CONTRAST | Picture contrast setting (0~15) |
| COLOR SATURATION | Picture color saturation setting (0~15) |
| D/N | Day/night settingsAUTO: Switching between day and night mode occurs automatically and is regulated by the light sensor on the front of the camera.DELAY TIME (5~60): Delay time before switching takes place.NIGHT CHROMA: Settings for color display in night mode.NO CHROMA: S/W modeCOLOR: Color modeNIGHT MODE: Settings for contrast treatment in night mode.NORMAL: No WDR function in night modeWDR: Wide Dynamic function in night modeDAY: The camera setting is set to day mode.NIGHT: The camera setting is set to night mode. |
MISCELLANEOUS
| Function Description | |
| MIRROR | Image mirroringOff: Image mirroring deactivatedH: Horizontal image mirroringV: Vertical image mirroringH/V: Horizontal and vertical image mirroring |
| MASK | Setting the privacy maskingMask (1 ~ 16): Configuration and activation of up to 16 private zones. Select a mask with the "Left/Right" buttons on the back of the camera.Mask status (Off / On): Mask Off / OnPosition: Select this submenu with the "Enter" button. Change the mask position with the Left/Right/Up/Down buttons. Exit the menu with the Enter button.Size: Select this submenu with the "Enter" button. Change the mask size with the Left/Right/Up/Down buttons.Exit the menu with the Enter button. |
| CAMERA ID | Camera title display settings in OSDID Display: Camera title display On/OffON: OnOFF: OffCamera ID: Define the camera name (max. 18 characters)Left/Right: NavigationEnter : Select characterLeft : Navigate one place to the leftRight : Navigate one place to the rightDelete : Delete character |
| WINKER | Live picture verificationThe "winker" function enables live picture verification. A flashing symbol is shown in the camera image.Off : Live picture verification deactivatedOn : Live picture verification activated |
RESTORE DEFAULT
| Function Description | |
| RESTOREDEFAULT | Restore settingsSelect this function to reset the camera parameters to factory settings.Important: All previous settings will be lost! YES: Restoring the settings Confirm reset with "ENTER" on the back of the camera.NO: Cancel restore settings. YES: Restoring the settings Confirm reset with "ENTER" on the back of the camera.NO: Cancel restore settings. |
9. Maintenance and cleaning
9.1 Function test
Regularly check the technical safety of the product, e.g. check the housing for damage.
If safe operation is no longer possible, cease operating the product and safeguard it against accidental operation.
Safe operation is no longer possible in the following circumstances:
- The device shows visible damage.
- The device no longer works correctly.
- The device has been stored in adverse conditions for a long period of time.
- The device has been subjected to stress during transportation.

Please note:
This product is maintenance-free for you. There are no components to service or anything inside the product to check. Never open it.
9.2 Cleaning
Clean the device with a clean, dry cloth. The cloth can be dampened with lukewarm water if it gets dirty.

Ensure that liquid does not penetrate the device, as this will cause damage. Do not use any chemical cleaning products, as they could damage the surface of the housing.
10. Disposal

Devices displaying this symbol may not be disposed of as domestic waste. At the end of its service life, dispose of the product according to the applicable legal requirements.
Please contact your dealer or dispose of the products at the local collection point for electronic waste.
- Technical data
| TVHD50000 | TVHD50500 | |
| Image sensor | 1/2.8" progressive scan Sony Exmore CMOS | |
| DSP | Sony IT-N | |
| Camera type | HD-SDI standard camera | |
| Resolution | 1080p | |
| Pixels (total) | 2000 x 1241 | |
| Pixels (effective) | 1920 x 1080 | |
| Lens mount | CS, C | |
| Lens control | AI | |
| Day/night switching | IR swivel filter (ICR), color / B/W | |
| Minimum illumination (color) | 1 lux @ F1.2 | |
| Minimum illumination (IR) | 0 lux @ F1.2 | |
| Noise reduction | 2D DNR | |
| Electronic shutter | Rolling shutter | |
| White balance | AWB, 1800~10000K | |
| Gain control | Auto | |
| Backlight compensation | Soft WDR | |
| Dynamic range (WDR) | 50 dB | |
| Video system | SMPTE292M (HD-SDI) | |
| Synchronization | Internal | |
| Privacy masking zones | 16 freely-configurable masks | |
| Back focus adjustment | Yes | |
| Connections | 1 x BNC (HD-SDI),1 x BNC (FBAS, 1Vss, 75 Ohm),1 x DC (5.5x2.1mm) | |
| Power supply | 12 V DC, 24 V AC 110–240 V AC | |
| Power consumption | 500 mA (max.) | |
| Operating temperature | -10°C ~ +50 °C | |
| Humidity | 0-85% non-condensing | |
| Protection class | IP34 | |
| Dimensions (W x H x D) | 69 x 59 x 122 mm | |
| Weight | 420 g | |
| Certifications | CE, RoHS, REACH | |
Caméra standard jour/nuit HD-SDI 1080p
natural_image
Exterior view of a black and silver Airbus A85 camera with visible lens and control knob (no text or symbols on body)Version 05/2012
TVHD50000
TVHD50500
CE
natural_image
Close-up of a camera lens component with a white arrow pointing to the lens (no text or symbols visible)natural_image
Exterior view of a black and silver ASUS camera with visible lens and control knobs (no text or symbols on body)Versie 05/2012
TVHD50000
TVHD50500
CE
natural_image
Close-up of a camera lens component with a white arrow pointing to the lens (no text or symbols visible)natural_image
Exterior view of a black and silver ASUS camera with visible lens and control knobs (no text or symbols on body)Version 05/2012
TVHD50000
TVHD50500
CE
natural_image
Close-up of a camera lens component with a white arrow pointing to the lens (no text or symbols visible)7. Kameraets bagside

12 V DC/24 V AC-variant
110\~240 V AC-variant
(1) OSD-betjeningsknapper
natural_image
Exterior view of a black and silver ASUS camera with visible lens and control knobs (no text or symbols on body)Wersja 05/2012
TVHD50000
TVHD50500
CE
natural_image
Close-up of a camera lens component with a white arrow pointing to the lens (no text or symbols visible)Wariant 12 V DC/24 V AC

Wariant 110\~240 V AC
These operating instructions are published by ABUS Security-Center GmbH & Co.KG, Linker Kreuthweg 5, 86444 Affing, Germany. No reproduction (including translation) is permitted in whole or part e.g. photocopy, microfilming or storage in electronic data processing equipment, without the express written consent of the publisher.
The operating instructions reflect the current technical specifications at the time of print.
We reserve the right to change the technical or physical specifications.

Note de l'éditeur
© Copyright 05/2012 by ABUS Security-Center
- Disclaimer
- Important Safety Information
- Dear customer,
- Contents
- Intended Use
- Explanation of symbols
- Scope of delivery
- Features and functions
- Device description
- Overview - Model numbers
- Unpacking the device
- Installation
- Power supply
- Mounting a lens
- Installing the video cable
- Installing the camera
- IMPORTANT!
- CAUTION!
- Rear view of the camera
- OSD buttons
- Buttons
- Function
- OSD Menu
- QUICK INSTALL
- MAIN MENU
- ADVANCED MENU
- EXPOSURE
- RESTORE DEFAULT
- Maintenance and cleaning
- Function test
- Please note:
- Cleaning
- Disposal
- Caméra standard jour/nuit HD-SDI 1080p
- Kameraets bagside
- Note de l'éditeur
Brand : ABUS
Model : TVHD50500
Category : Surveillance Camera