
VR21.BI - Air Conditioning Bimar - Free user manual and instructions
Find the device manual for free VR21.BI Bimar in PDF.


| Product Type | Portable air conditioner |
| Brand | Bimar |
| Model | VR21.BI |
| Dimensions (L x W x H) | 30 x 30 x 70 cm |
| Weight | 20 kg |
| Power supply | 220-240 V ~ 50 Hz |
| Cooling power | 1200 W (approx. 4100 BTU/h) |
| Main functions | Cooling, dehumidification, ventilation, timer, remote control |
| Water tank capacity | 1.5 L |
| Noise level | 55 dB (max) |
| Energy class | A |
| Air flow rate | 300 m³/h |
| Maintenance and cleaning | Clean the air filter every 2 weeks with a vacuum cleaner or with warm soapy water. Clean the casing with a damp cloth. |
| Safety | Automatic shut-off in case of overheating, anti-freeze protection, child lock on remote control |
| Spare parts and repairability | Parts available on the manufacturer's website or from authorized dealers. Repair possible by a professional. |
| Included accessories | Exhaust hose, window adapter, remote control, user manual |
| Warranty | 2 years |
| Country of origin | China |
Frequently Asked Questions - VR21.BI Bimar
User questions about VR21.BI Bimar
0 question about this device. Answer the ones you know or ask your own.
Ask a new question about this device
Download the instructions for your Air Conditioning in PDF format for free! Find your manual VR21.BI - Bimar and take your electronic device back in hand. On this page are published all the documents necessary for the use of your device. VR21.BI by Bimar.
USER MANUAL VR21.BI Bimar
natural_image
Hand holding a pointing finger next to a black surface, with an upward arrow above (no text or symbols visible)Please read these instructions carefully before appliance, and instruct other persons using it, too, when
necessary. Keep booklet Hndy for fur
If when reading this instructions manual certain parts should remain difficult to understand, or if there is any confusion, contact the company indicated on the last page before using the product.

This symbol sh: the appliance is class II equfor which the power cord plug is without of the pole to the ground.

Attention: instructions and general notices for safety use.
GENERAL NOTICES
- This appliance is designed for domestic use, for ventilating and cooling interiors in the manner described in these instructions: do not use it for any other purpose.
- The appliance must not be used in dusty environments or with extremely volatile materials (that could clog the grills), or in environments with high humidity, inflammable products or outdoors. Any other use is improper and dangerous. The manufacturer will not be liable for damage resulting from improper, incorrect or irresponsible use and/or for repairs made by unqualified persons.
This appliance is intended to be used in household and similar applications such as:
- staff kitchen in shops, offices and other working environments;
- farm houses
- by clients in hotels, motels and other residential type environments
-
bed and breakfast type environments
-
Do not insert any tool, or your fingers, into the grille protecting the blades.
- Do not use the device at room temperatures above 40^ .
- This appliance can be used by children aged from 8 years and above and persons with reduced physical, sensory or mental capabilities or lack of experience and knowledge if they have been
given supervision or instruction concerning use of the appliance in a safe way and if they understand the hazards involved. Children shall not play with the appliance. Cleaning and user maintenance shall not be made by children without supervision.
- This appliance can be used by children aged 8 and older and by persons with reduced physical, sensory or mental capabilities or lack of experience and knowledge if they are properly supervised or if they have received instructions regarding the safe use of the appliance and have understood the related dangers. Children should not play with the appliance. Cleaning and maintenance should not be performed by children unless they are older than 8 years of age and are supervised.
- The appliance must be kept out of children's reach.
- Attention: when using electrical appliances, always follow basic safety precautions to avoid the risks of fire, electric shock and personal injury. You must take even more precautions when using electrical appliances that incorporate a water reservoir: in the case of water overflows, immediately remove the plug from the power outlet, make sure that the electrical components are not wet and, if they are, carefully dry them completely. Make sure that the main switch is turned to "0" (off), put the plug back into the outlet and then use the appliance. In the case of doubt, ask for professionally qualified help.
- Do not use the appliance if it is not operating correctly or seems damaged; if in doubt, contact professionally qualified personnel.
- Make sure that the appliance is working correctly: if not, turn the appliance off and have it checked by professionally qualified personnel.
- Unplug the appliance when not in use.
- Always unplug the appliance before you assemble, disassemble or make adjustments to the appliance.
- Do not leave the device exposed to the weather (sun, rain, etc.).
- Attention: when using electric appliances, the basic safety precautions must always be observed to avoid risks of fire, electric shocks and physical injury.
- Do not pull on the cord to disconnect the plug from the socket.
- Do not move the appliance when it is in function.
- If the electric cord is damaged, it has to be replaced by the supplier or an authorized service center or a professionally qualified, to avoid any risks.
- Do not use the appliance with a timer or a programmer or with a system that can switch on the appliance automatically, to avoid risk of fire, since a fire risk exists if the heater is covered or positioned incorrectly.
- In the event of a breakdown or poor operation, turn the fan heater off and ask for professionally qualified help: repairs made by unqualified persons can be dangerous and render void the warranty.
INSTALLATION
- After removing the packing materials, check the integrity of the appliance; if you are unsure, do not use it and ask for qualified professional help. The packing materials (plastic bags, polystyrene foam, nails, etc.) must be kept out the reach of children because they are potential sources of danger. Attention: any stickers or advertising material applied to the grid removed before using the appliance. The manufacturer declines all responsibility in case this is not safe working practices will be respected.
- Before connecting the appliance, check that the voltage values shown on the data plate correspond to those of the electricity supply network, and that the electric plug is grounded. In the event of incompatibility between the electric outlet and the plug of the heater, have the outlet replaced with another more suitable type by professionally qualified personnel, who will make sure that the section of the wires of the outlet is appropriate for the absorbed power of the heater. In general, the use of adapters or extension cords is not recommended; if their use is indispensable, they must conform to existing safety standards and their current capacity (amperes) must not be less than the maximum of the appliance.
- The power socket must be easy to reach so the plug can be removed quickly in case of emergency.
- To not place the appliance near sinks or other container of liquids (minimum distance of 2 meters) to avoid the risk of it falling in.
- Do not place the appliance near an open flame, cooking or other heating appliance.
- Keep the fan far away from fabrics (curtains, etc.) or unstable materials that could obstruct the air intake grille; make sure that the front is free of unstable materials (dust, etc.).
- The appliance requires no installation, i.e., the preparation of electrical and water connections, fastening or anything else, for its use.
- Make sure that the electric cord is not touching rough, hot or moving surfaces and not twisted or wrapped around the appliance.
ASSEMBLY
Attention: always unplug the appliance before you assemble, and insert the water inside the tank.
The package contains:
- main unit (19) 1 piece, tank (4) 1 piece, castors with brake (6) 2 pieces and pivoting wheels (7) 2 pieces, remote control (3) 1 piece, gel ice "blocks" (18) 2 pieces.
For assembly, refer to the pictures on pages 2 and 3 and proceed as follows:
- The main unit is inserted upside down in the tank: slide it in using the side handles (14): in case of difficulty, check that the pins (13) are not hitting the inner edge of the tank.
- Place the main unit on a stable surface without rough spots to avoid scratching the control panel and remove the water hose from its seat.
- Turn the tank upside down and insert the wheels into the holes on the bottom: the 2 wheels with brake (6) must be inserted in the back and those without a brake (7) in the front. Insert the wheels by applying pressure and check that all 4 are touching the floor.
- Make sure that the water drain plug (10) is securely fastened/screwed into its seat; fill the tank with cool, clean water up to the maximum level indicated (word MAX (16)) printed on the tank. Use only water, i.e., without any additives (aromas, essences or detergents). Do not fill above the maximum level (16) or below the minimum level (17). Move the tank very carefully when filled with water and grip the lower edges (21). The tank holds 20 litres and provides cooling for 55-60 hours.
- To cook the air more, insert the two ice bricks provided after leaving them in the freezer for about 12 hours.
- Insert the main unit above the tank and inside its edges (see the pictures), taking care to:
- handle the main unit with the 2 side handles.
- make sure that the main unit is in the correct position (control panel on top) and that its front is aligned with the front of the tank (straight side).
- make sure that the water hose stays (15) inside the tank and without kinks.
- check that the 2 pins (13) are fully out and "engaging" the edge of the tank.
- check that the electric cord is outside of the tank and is not kinked.
- make sure the unit and tank are correctly connected.
- after placing the appliance in its more or less permanent position, check that it is stable on the supporting surface (which, of course, must be horizontal), and lock the rear wheels by depressing the latch in order to prevent it from moving inadvertently.
- The air is sucked in through the two filters in the rear of the main unit: the outer one made of synthetic material is washable and catches the larger particles (dust, fluff, lint, etc.); it attaches using the 2 tabs on the top. The internal honeycomb filter of natural fibres is sprayed with water by the pump and cools the air passing through it: the water drain must be pointing downwards and must be inserted in the rectangular slot.
- Insert the 2 AAA batteries in the remote control, respecting their polarity. Open the rear door, insert them and then close it.
Attention: the appliance can be used only when completely and correctly assembled.
USE
Attention: always unplug the appliance before you assemble, and insert the water inside the tank.
This appliance is intended for home ventilation and cooling. With the "cooler" function, the appliance adds micro-droplets of water to the air, which evaporate and cool it: the drier the air, the more effective it is and its effectiveness decreases as the relative humidity of the air (RH) increases. Above an RH of 75%, the cooling effect is negligible. The honeycomb filter (20) is constantly sprayed with water and
the air picks up micro-droplets as it passes through it. The "cooler" function only works with water in the tank between the min and max values.
These are the functions of the appliance:
- 0/1 main switch (2), turns the appliance on and off
- stand-by function (ON/OFF button) activates or stops the functions.
- normal ventilation/sleep/nature (Mode button): Normal = constant ventilation; Sleep = ventilation increases and decreases and stops alternately; Nature = ventilation alternately changes intensity like a breeze.
- intensity Min/Med/Max. (Speed button): adjusts the speed of the above ventilation modes. Min = minimum speed, Med = medium speed, Max = maximum speed.
- cooling (Cooler button): turns the cooling function on and off and, in effect, the pump that sprays the honeycomb filter.
- timer (Timer button): turns the timer on and off (up to 8 hours with intervals of 1 hour) and stops the machine when the time elapses. If the timer is not on, the appliance runs continuously until it is manually turned off but it turns of anyway after running for 24 hours: after this time, just press the ON button to continue ventilation/cooling.
- oscillation (Swing button): turns the automatic right-left oscillation on and off.
- Ionizer (Ion button): turns the ionizer function on and off, which produces a stream of negative ions.
All the above functions are indicated by a lighted symbol on the control panel in addition to an LED that indicates "appliance connected".
Before each use, check that the appliance is in good condition and that the power cord is not damaged: if it is, replace it.
The functions of the fan can be turned on and off using either the button pad on the control panel (1) or the remote control (3). The remote control must be pointed at the control panel. Insert the plug into the outlet.
-
Turn the main switch (2) at the side to "I".
-
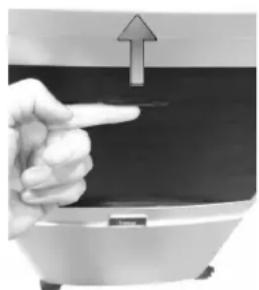
Attention: for the appliance to run, the front grill must be open (at least 45°); manually raise the grill toward the other one, as shown in the picture to the side: you will hear a "click" indicating that the appliance is in stand-by mode.
natural_image
Hand pointing at a dark surface with an upward arrow, no visible text or symbols-
To operate the appliance, press the ON/OFF button (D) on the remote control or the control panel, the NORMAL light will turn on at the minimum FAN LOW speed; to change the desired speed, repeatedly press the SPEED button (E) and the FAN MIDDLE light (medium speed) and then the FAN HIGH light (maximum speed) will turn on.
-
When you press the MODE button (C) on the control panel or remote control, it changes to NATURE mode: the NATURE indicator light will turn on.
-
SLEEP mode is activated by pressing the MODE button on the control panel or remote control again: the SLEEP indicator light turns on.
-
Pressing the COOLER button (G) on the control panel or remote control activates the function: the COOLER indicator light turns on.
-
When you press the SWING button (B) on the control panel or remote control, the oscillation function turns on: the SWING indicator light will turn on. To turn off oscillation, press the SWING button again.
-
When you press the IONIC button (F) on the control panel or remote control, the function is activated: the IONIC indicator light will turn on indicating that the ionizer is working. To turn this function off, press the key again.
-
When you press the Timer button (A) on the control panel or remote control, the function is activated: each press of the button changes the time set; press once to start a time of 1 hour, the corresponding 1hr light will turn on; press again to set the time to 2 hours and the corresponding 2hr light will turn on; press it a third time to set a time of 4 hours, the corresponding 4hr light will turn on; finally, press it a fourth time and a time of 8 hours will be set, the corresponding 8hr light will turn on. To turn this function off, press the button again (fifth time) and no light will be on.
-
In all modes, the fan and cooler can run for a maximum of 24 hours, after which the appliance stops automatically and goes to stand-by mode; to start it again, press the ON/OFF button.
-
To turn off the appliance and put it in stand-by mode, press the ON/OFF button on the control panel or remote control.
-
After each use, we recommend that you empty the tank of water using the plug.
When not in use for long periods, the plug must always be removed from the socket.
CLEANING AND MAINTENANCE
Attention: before normal cleaning, remove the plug from the socket.
The appliance works best if the filters and tank are clean.
- Periodically check that the rear intake filter (11) is not clogged with dust, lint, or fibres. If it is dirty, remove it by pressing the two tabs (12), and clean the netting with a brush or with water, being careful not to damage it; then dry it completely and put it back in place.
- Periodically check that the honeycomb filter (20) is not dirty. If it is, remove it from its seat and clean it with water with a little household detergent and use a soft brush to clean the external honeycombs. Be careful not to damage the honeycombs or other parts. Rinse thoroughly under the tap water and let it drip dry before replacing it in its seat and check that no electrical parts are wet. If they are, dry carefully and completely.
- To clean the tank and ice bricks, use water with a little detergent and a soft cloth and wash carefully. Rinse the tank and bricks under running water and let drip dry before replacing them in their seat.
- To prevent lime deposits (or more frequently if the water is very hard) or impurities, periodically clean out the holes in the water using a brush or a brush, be careful not to damage the holes.

- Clean the body with soft, slightly damp, cloth; do not use abrasive or corrosive products.
- Do not immerse any part of the fan in water or other liquid: if this should happen, do not put your hand in the liquid, but first remove the plug from the socket. Carefully dry the appliance and make sure that all the electrical parts are dry: in the case of doubt, ask for professionally qualified help.
- It is essential that the motor's air holes be kept from dust and lint.
- If the fan will not be used for long periods, it must be protected from dust and humidity; we recommend storing it in its original packaging.
- Should you decide not to use the appliance any more, we recommend making it inoperative by cutting the power cord (after making sure you have disconnected the plug from the socket) and make dangerous parts harmless if children are allowed to play with them (such as the ice bricks).
- The batteries of the remote control must be disposed of in the appropriate containers; dispose of them in compliance with current law.
IMPORTANT INFORMATION FOR CORRECT DISPOSAL OF THE PRODUCT IN ACCORDANCE WITH EC DIRECTIVE 2011/65/EC.
At the end of its working life, the product must not be disposed of as urban waste. It must be taken to a special local authority differentiated waste collection centre or to a dealer providing this service. Disposing of a household appliance separately avoids possible negative consequences for the environment and health deriving from inappropriate disposal and enables the constituent materials to be recovered to obtain significant savings in energy and resources. As a reminder of the need to dispose of household appliances separately, the product is marked with a crossed-out wheeled dustbin.


natural_image
Hand pointing at a dark object with an upward arrow, no visible text or symbolsnatural_image
Hand pointing at a small object with an upward arrow above it (no text or symbols visible)natural_image
Hand pointing at a black surface with an upward arrow, next to a metallic appliance (no text or symbols visible)-
Control panel
-
Main switch
-
Remote control
-
Tank
-
Trasparent level
-
Wheels with brake
-
Wheels without brake
-
Grids up/down
-
Wind direction adjustable
-
Water drain plug
-
Intake filter
-
Two tabs
-
Pins
-
Wandle
-
Water hose
-
Maximum level
-
Minimum level
-
Gel ice "blocks"
-
Main unit
-
Honeycomb filter
-
Lower edges
A. Timer button
B. Swing button
C. Mode button
D. ON/OFF button
E. Speed button
F. Ionic button
G. Cooler button
Brand : Bimar
Model : VR21.BI
Category : Air Conditioning