
BS 18 LTX BL Impuls - Drill METABO - Free user manual and instructions
Find the device manual for free BS 18 LTX BL Impuls METABO in PDF.


| Product Type | Cordless Drill/Driver |
| Brand | Metabo |
| Model | BS 18 LTX BL Impuls |
| Battery Voltage | 18 V |
| Battery Type | LiHD (Lithium High Density) |
| Motor | Brushless |
| Special Feature | Impulse (Impuls) for loosening stuck screws |
| Chuck | Metabo automatic chuck (13 mm) |
| No-load speed (1st/2nd gear) | 0-500 / 0-1800 rpm |
| Max torque (hard/soft) | 70 / 30 Nm |
| Max drilling capacity (wood/steel) | 50 mm / 13 mm |
| Weight (without battery) | 1.1 kg |
| Dimensions (L x W x H) | 186 x 66 x 220 mm |
| Sound level (LpA) | 88 dB(A) |
| Vibrations (metal drilling) | 2.5 m/s² |
| Power source | Cordless (18 V battery) |
| Main functions | Drilling, screwdriving, hammer (optional), Impuls function |
| Maintenance and cleaning | Clean with a dry cloth; regularly check carbon brushes (if present); store in a dry place |
| Safety | Motor brake, spindle lock, electronic speed control, overload protection |
| Spare parts and repairability | Batteries, chargers, chuck, switch, brushes (depending on version) – available via Metabo service |
| General information | Manufacturer warranty 3 years; compatibility with Metabo 18 V batteries |
Frequently Asked Questions - BS 18 LTX BL Impuls METABO
User questions about BS 18 LTX BL Impuls METABO
0 question about this device. Answer the ones you know or ask your own.
Ask a new question about this device
Download the instructions for your Drill in PDF format for free! Find your manual BS 18 LTX BL Impuls - METABO and take your electronic device back in hand. On this page are published all the documents necessary for the use of your device. BS 18 LTX BL Impuls by METABO.
USER MANUAL BS 18 LTX BL Impuls METABO
natural_image
Two metal Elabo electric drillers with black casings and branding (no visible text or symbols on the devices themselves)
natural_image
Exterior view of a handheld electric drill press with attached base (no visible text or symbols)
natural_image
Pure electrical circuit lines without any symbols
other
| Category | Value (%) | |---|---| | Top Battery | 100 | | Bottom Battery | 75 | | Bottom Charge | 50 | | Bottom Charge (Battery) | 25 |
natural_image
Close-up of a mechanical component with a curved edge and rectangular opening (no visible text or symbols)


7.1
C
natural_image
Two views of a power tool with black plastic base and mechanical components, showing internal movement arrows (no text or symbols)

7.2
D
natural_image
Three Meabo robotic devices with directional arrows indicating motion or operation (no text or symbols on the devices themselves)

7.3
E


7.4
F
...18 LTX BL Quick
flowchart
graph TD
    A["Input: Impuls"] --> B{1...11}
    B --> C["Output: Nm ... Nm"]
    C --> D["Output: max. Nm"]
    D --> E["Final Output"]
    style A fill:#f9f,stroke:#333
    style E fill:#bbf,stroke:#333

= Impuls


1...11
Nm ... Nm

flowchart
graph TD
    A["Start"] --> B["Process Step 1"]
    B --> C["Process Step 2"]
    C --> D["End"]
    style A fill:#f9f,stroke:#333
    style B fill:#ccf,stroke:#333
    style C fill:#cfc,stroke:#333
    style D fill:#fcc,stroke:#333
    note right of A "max. Nm"


7.6
G
...18 LTX Impuls / Quick,
...18 LTX BL Impuls

natural_image
Close-up of a mechanical component with a tool interacting with it (no visible text or symbols)
= Impuls
1...10
Nm ... Nm

= max. Nm


7.6

7.8
7.9
7.10
7.11
 | BS18LTXBLImpuls*1)SerialNumber:02241.. | BS18LTXBLQuick*1)SerialNumber:02197.. | BS18LTXImpuls*1)SerialNumber:02191.. | BS18LTXQuick*1)SerialNumber:02193.. | SB18LTXBLImpuls*1)SerialNumber:02240.. | SB18LTXBLQuick*1)SerialNumber:02199.. | SB18LTXImpuls*1)SerialNumber:02192.. | SB18LTXQuick*1)SerialNumber:02200.. | ||
| U | V | 18 | ||||||||
| n0 | /min, rpm | 1 | 0-6000-5000-6000-500 | |||||||
| 2 | 0-20500-17000-20500-1700 | |||||||||
| M1 | Nm(in-lbs) | 44(390)55(487)44(390)55(487) | ||||||||
| M2 | Nm(in-lbs) | 49(434)60(531)49(434)60(531) | ||||||||
| M3 | Nm(in-lbs) | 90(797)110(974)90(797)110(974) | ||||||||
| M4 | Nm(in-lbs) | 1 | 0,8-20(7-177) | 6,5-24(58-212) | 0,8-20(7-177) | 6,5-24(58-212) | ||||
| 2 | 0,8-8(7-71) | 1,7-11(15-97) | 0,8-8(7-71) | 1,7-11(15-97) | ||||||
| D1max | mm(in) | 13 (1/2) | ||||||||
| D2max | mm(in)50(2) | 65(2 9/16) | 50(2) | 65(2 9/16) | ||||||
| D3max | mm(in) | 2 | - | - | 16 (5/8) | 16 (5/8) | ||||
| s/min,bpm-- | 38950 | 32300 | ||||||||
| mkg(lbs) | 1,9(4.2)2,0(4.4)2,0(4.4)2,1(4.6) | |||||||||
| G | UNF(in) | 1/2" - 20 UNF | - | 1/2" - 20 UNF | - | 1/2" - 20 UNF | - | 1/2" - 20 UNF | - | |
| Dmax | mm(in) | 13 (1/2) | ||||||||
| ah,ID/Kh, ID | m/s2 | -- | 18/1,5 | 13/1,5 | ||||||
| ah,D/Kh, D | m/s2 | <2,5/1,5 | <2,5/1,5 | <2,5/1,5 | <2,5/1,5 | |||||
| ah,S/Kh, S | m/s2 | <2,5/1,5 | <2,5/1,5 | <2,5/1,5 | <2,5/1,5 | |||||
| LpA/KpA | dB(A) | 76/3 | 80/3 | 91/3 | 91/3 | |||||
| LWA/KWA | dB(A) | 87/3 | 91/3 | 102/3 | 102/3 | |||||


12.
M

*2) 2014/30/EU, 2006/42/EC, 2011/65/EU
*3) EN 60745-1:2009+A11:2010, EN 60745-2-1:2010, EN IEC 63000:2018
ppa. B.F.
2021-06-22, Bernd Fleischmann
D1\ max = in Stahl
D2 = in Weichholz
D3 = in Beton
s = max. Schlagzahl
Original instructions
1. Declaration of Conformity
On our own responsibility, we hereby declare that these battery-powered drilling screwdrivers and impact drills, identified by type and serial number 1 , meet all relevant requirements of directives 2 and standards 3 . Technical documents at 4 ) - Fig. M.
For UK only:
UK CA We as manufacturer and authorized person to compile the technical file, see *4) → Fig. M., hereby declare under sole responsibility that these battery-powered drilling screwdrivers and impact drills, identified by type and serial number *1) on page 3, fulfill all relevant provisions of following UK Regulations *2) S.I. 2016/1091, S.I. 2008/1597, S.I. 2012/3032 and Designated Standards EN 60745-1:2009+A11:2010, EN 60745-2-1:2010, EN IEC 63000:2018.
2. Specified Use
The drills and impact drills are suitable for drilling in metal, wood, plastic and similar materials, and also for screwdriving and thread tapping.
The impact drills are also suited for drilling in masonry, brickwork and stone.
The user bears sole responsibility for any damage caused by improper use.
Generally accepted accident prevention regulations and the enclosed safety information must be observed.
3. General safety instructions

For your own protection and for the protection of your electrical tool, pay attention to all parts of the text that are marked with this symbol!

WARNING – Reading the operating instructions will reduce the risk of injury.

WARNING – Read all safety warnings, instructions, illustrations and specifications provided with this power tool.
Failure to follow all instructions listed below may result in electric shock, fire and/or serious injury.
Save all warnings and instructions for future reference. Pass on your electrical tool only together with these documents.
4. Special Safety Instructions
Wear ear protectors with impact drills (machines with the designation SB). Exposure to noise can cause hearing loss.
Use auxiliary handles supplied with the tool (depending on the model). Loss of control can cause personal injury.
Hold power tool by insulated gripping surfaces, when performing an operation where the cutting accessory/fastener may contact hidden wiring. Cutting accessory/fasteners contacting a "live" wire, may make exposed metal parts of the power tool "live" and could give the operator an electric shock.
Ensure that the spot where you wish to work is free of power cables, gas lines or water pipes (e.g. by using a metal detector).
Safety instructions when using long drill bits:
a) Never operate at higher speed than the maximum speed rating of the drill bit. At higher speeds, the bit is likely to bend if allowed to rotate freely without contacting the workpiece, resulting in personal injury.
b) Always start drilling at low speed and with the bit tip in contact with the workpiece. At higher speeds, the bit is likely to bend if allowed to rotate freely without contacting the workpiece, resulting in personal injury.
c) Apply pressure only in direct line with the bit and do not apply excessive pressure. Bits can bend causing breakage and loss of control, resulting in personal injury.

Protect battery packs from water and moisture!
Do not expose battery packs to naked flame!
Do not use faulty or deformed battery packs! Do not open battery packs!
Do not touch or short-circuit battery packs!

Slightly acidic, flammable fluid may leak from defective li-ion battery packs!

If battery fluid leaks out and comes into contact with your skin, rinse immediately with plenty of water. If battery fluid leaks out
and comes into contact with your eyes, wash them with clean water and seek medical attention immediately.
If the machine is defective, remove the battery pack from the machine.
Remove the battery pack from the machine before any adjustments, conversions or servicing are performed.
Before fitting the battery pack, make sure that the machine is switched off.
LED lights (15): Do not observe the LED radiation directly with optical instruments.

CAUTION Do not stare at operating lamp.
Reducing dust exposure:

WARNING - Some dust created by power sanding, sawing, grinding, drilling, and other
construction activities contains chemicals known to
ENGLISH en
cause cancer, birth defects or other reproductive harm. Some examples of these chemicals are:
- Lead from lead-based paints,
- Crystalline silica from bricks and cement and other masonry products, and
- Arsenic and chromium from chemically treated lumber.
Your risk from these exposures varies, depending on how often you do this type of work. To reduce your exposure to these chemicals: work in a well ventilated area, and work with approved safety equipment, such as those dust masks that are specially designed to filter out microscopic particles.
This also applies to dust from other materials such as some timber types (like oak or beech dust), metals, asbestos. Other known diseases are e.g. allergic reactions, respiratory diseases. Do not let dust enter the body.
Observe the relevant guidelines and national regulations for your material, staff, application and place of application (e.g. occupational health and safety regulations, disposal).
Collect the particles generated at the source, avoid deposits in the surrounding area.
Use suitable accessories for special work. In this way, fewer particles enter the environment in an uncontrolled manner.
Use a suitable extraction unit.
Reduce dust exposure with the following measures:
- do not direct the escaping particles and the exhaust air stream at yourself or nearby persons or on dust deposits,
- use an extraction unit and/or air purifiers,
- ensure good ventilation of the workplace and keep clean using a vacuum cleaner. Sweeping or blowing stirs up dust.
- Vacuum or wash the protective clothing. Do not blow, beat or brush.
Transport of li-ion battery packs:
The shipping of li-ion battery pack is subject to laws related to the carriage of hazardous goods (UN 3480 and UN 3481). Inform yourself of the currently valid specifications when shipping li-ion battery packs. If necessary, consult your freight forwarder. Certified packaging is available from Metabo.
Only send the battery pack if the housing is intact and no fluid is leaking. Remove the battery pack from the machine for sending. Prevent the contacts from short-circuiting (e.g. by protecting them with adhesive tape).
5. Figures
Illustrations are provided at the beginning of the operating instructions.
Symbol explanation:

Movement direction

Slow

Fast

First gear

Second gear

Screws

Drill bit

Without torque limitation

Impact drilling
Nm
Torque
6. Overview

Fig. A
1 Keyless chuck
2 Additional handle
3 Slide switch (normal drilling, impact drilling) *
4 Slide switch (1st/2nd gear)
5 Button (switch between 'max. torque' and function set at setting wheel (14)) *
6 Rotation selector switch (rotation setting, transport lock) - both sides of the machine
7 Bit depot *
8 Belt hook *
9 Handle
10 Battery pack release button
11 Capacity indicator button
12 Capacity and signal indicator
13 Battery pack
14 Setting wheel (pulse function, torque control, where applicable 'max. torque') *
15 LED lights
16 Trigger switch
*equipment-specific
7. Use
7.1 Battery pack, capacity and signal display → Fig. B
Charge the battery pack before use.
If performance diminishes, recharge the battery pack.
Instructions on charging the battery pack can be found in the operating instructions of the Metabo charger.
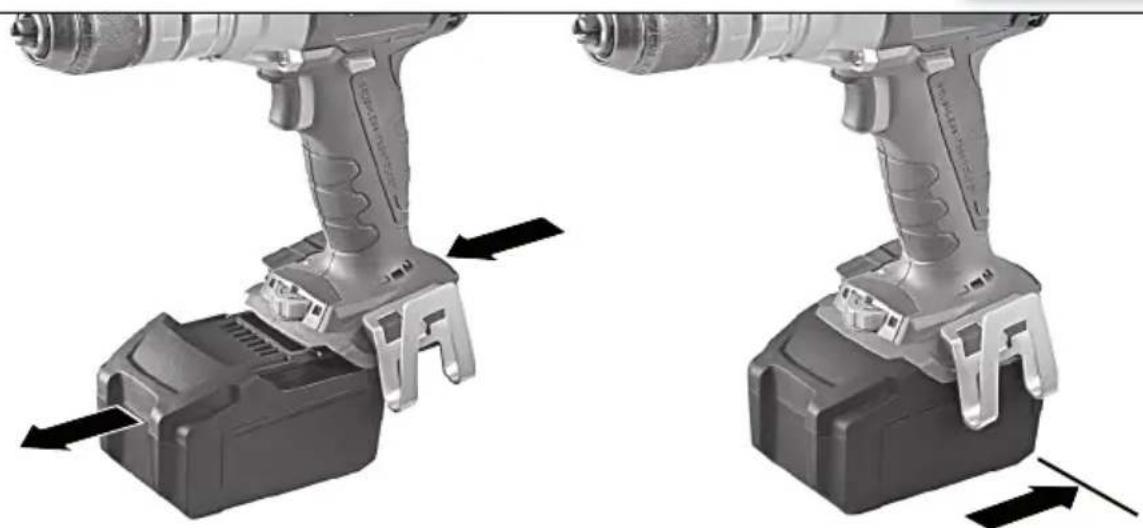
7.2 Removing, replacing battery pack → Fig. C
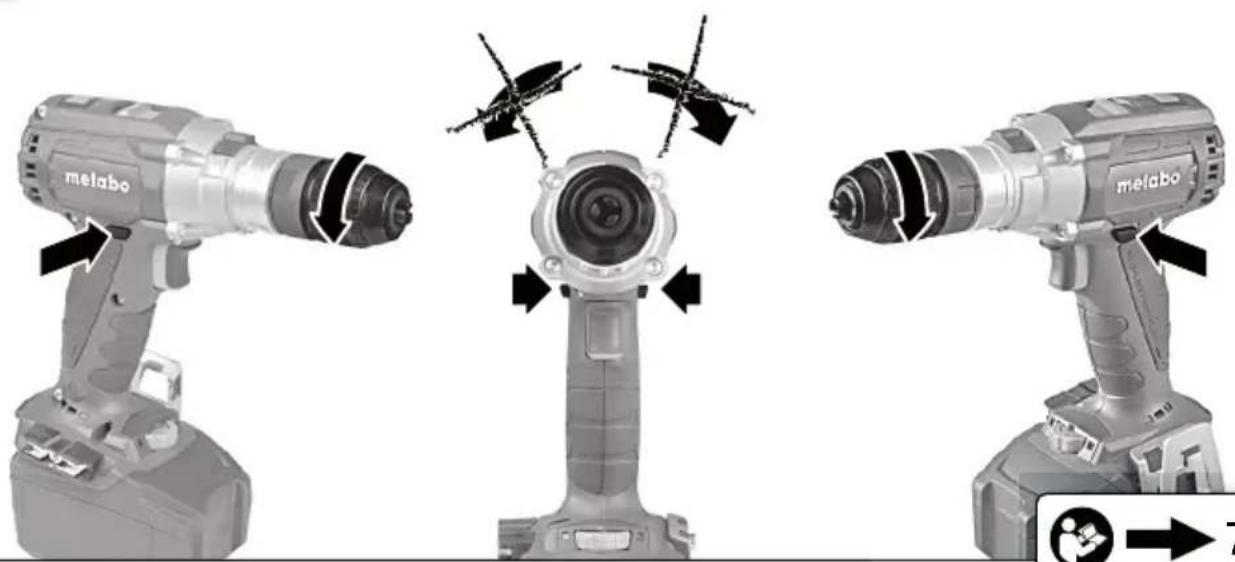
7.3 Setting direction of rotation, transporting safety device (switch-on lock) → Fig. D
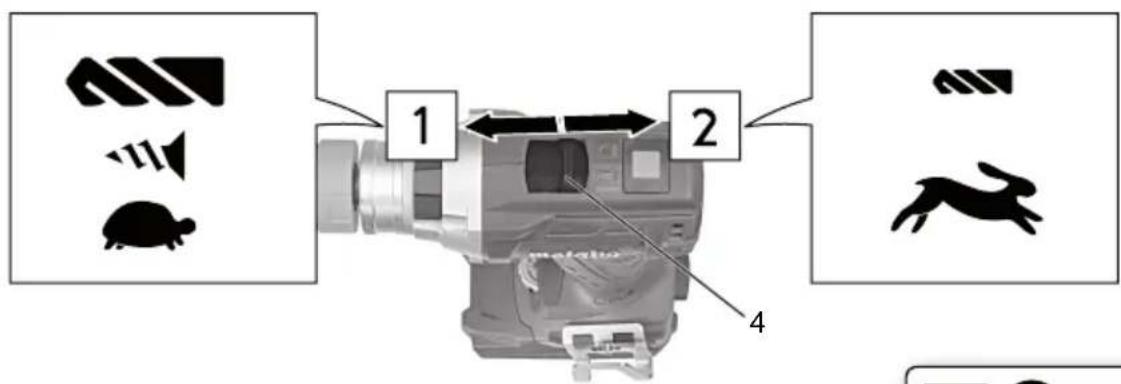
7.4 Selecting gear stage → Fig. E

Only actuate slide switch (4) with the motor at a standstill!
7.5 Setting for normal drilling, impact drilling → Fig. A
Press the slide switch (3).
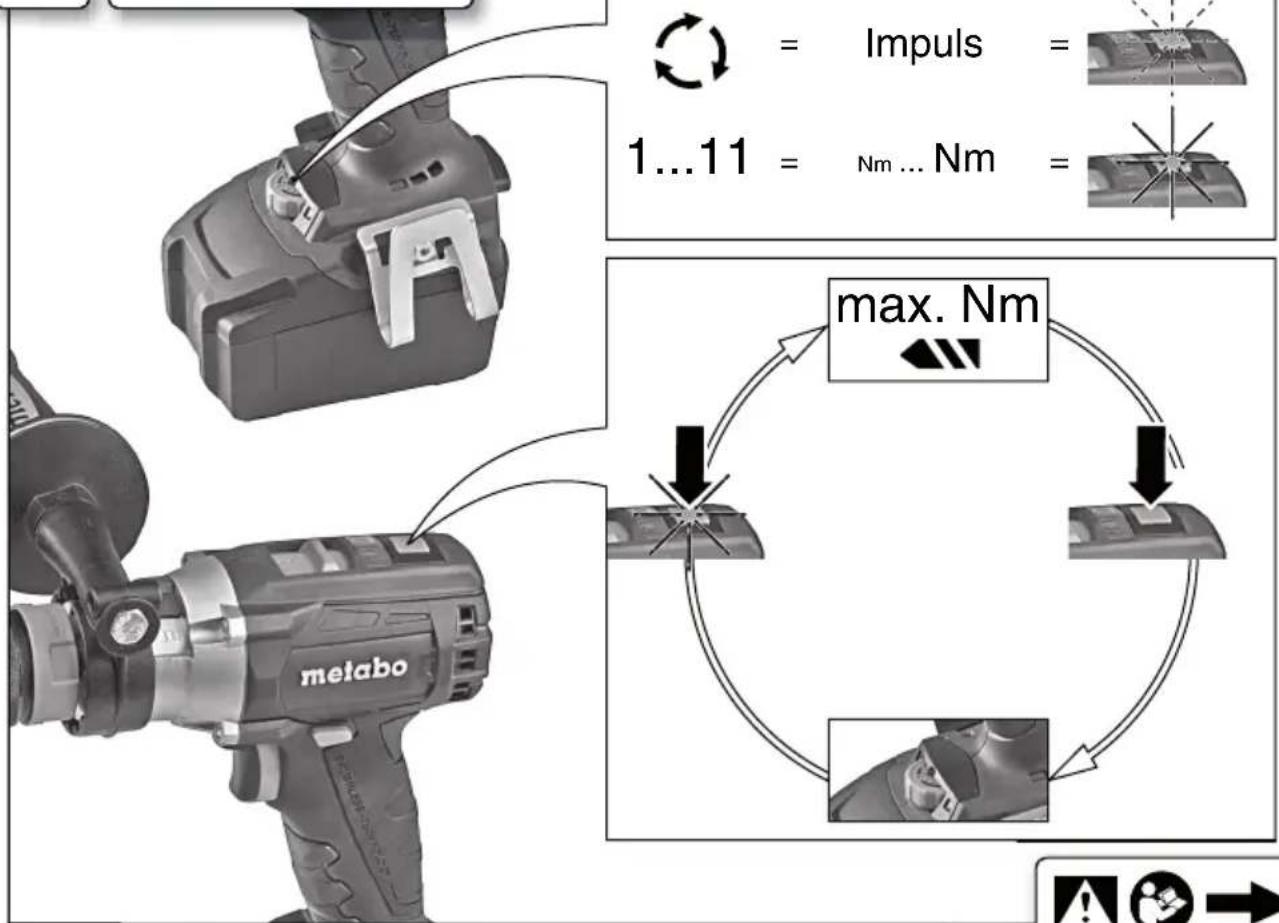
7.6 Setting torque control, maximum torque, pulse function

Do not work for long periods with pulse function switched on! (The motor can overheat.)
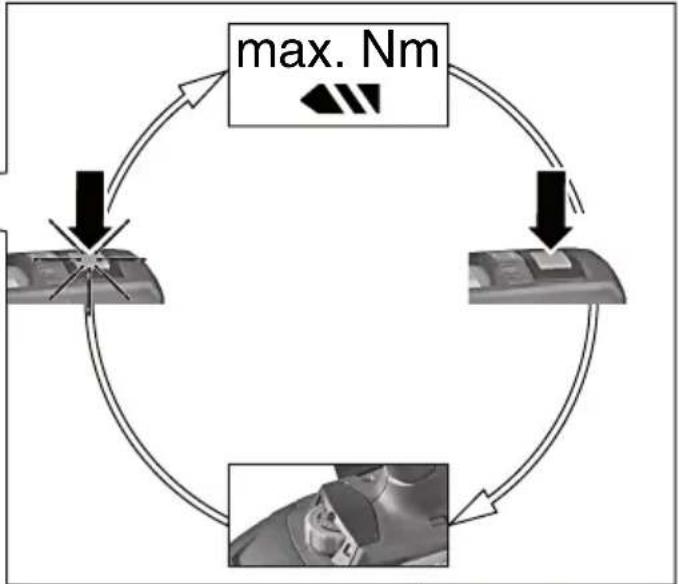
Machines with designation ...18 LTX BL Quick...: → Fig. F
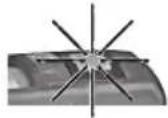
Turn the setting wheel (14) to switch on the pulse function (button (5) flashes) or to switch on the torque control (button (5) lights up continuously)
For maximum torque (drilling position), press the button (5) (the button (5) is not illuminated). To activate the settings of setting wheel again: press the button (5) again or turn the setting wheel.
Machines with designation ...18 LTX Impuls/
Quick, ...18 LTX BL Impuls: → Fig. G
Set the desired operating mode at the setting wheel (14):
1...10 = torque control
Drill bit = maximum torque
Impuls = pulse function
7.7 Switching on/off, setting speed
→ Fig. A
Switching on, speed: Press the trigger (16). The speed can be changed by pressing in the trigger.
Switching off: release the trigger switch (16). Note: The noise that the machine makes when it switches off is due to the design (quick stop) and has no influence on the function or the service life of the machine.
7.8 Keyless chuck
→ Fig. H
With a soft tool shank, retightening may be required after a short period of operation.
Notes on machines with the designation SB...:
-
The ratchet sound which can possibly be heard after opening the drill chuck is functional and is switched off by a reverse rotation of the sleeve.
-
Clamping tool: Turn sleeve (1) in direction "GRIP, ZU" until the noticeable mechanical resistance has been overcome.
Caution! The chuck is not yet fully tightened! Keep turning the sleeve (it must "click" when turning)) until it cannot be turned any further - only now is the tool safely clamped.
Cleaning: From time to time, hold the machine vertically with the keyless chuck facing downwards and turn the sleeve fully in direction "GRIP, ZU" and then turn fully in direction "AUF, RELEASE". The dust collected falls from the keyless chuck.
7.9 Unscrewing chuck
→ Fig. I
Employ the same procedure when attaching the chuck, except in reverse order.
7.10 Chuck with quick bit change system (for BS 14.4 LTX Quick, BS 18 LTX Quick)
→ Fig. J
To remove: Push the interlock ring forward (a), advance and pull off the chuck (b).
To mount: Push the interlock ring forward and move the chuck as far as the limit stop on the drill spindle.
7.11 Attaching the belt hook (depending on machine features) / bit depot (depending on machine features → Fig. K
Attach the belt hook to the left (8), as shown.
Attach the bit depot to the right (7), as shown.
8. Troubleshooting
8.1 The machine's multifunctional monitoring system
If the machine switches off automatically, the machine electronics have activated automatic protection mode. A warning signal sounds (continuous beeping). The beeping stops after a maximum of 30 seconds or when the trigger (16) is released.
In spite of this protective function, overloading is still possible with certain applications and can result in damage to the machine.
Causes and remedies:
-
Battery pack almost empty → Fig. A, B (The electronics protect the battery pack against damage through total discharge). If one LED is flashing (12), the battery pack is almost flat. If necessary, press the (11) button and check the LEDs (12) to see the charge level. If the battery pack is almost flat, it must be recharged.
-
Long continuous overloading of the machine will activate the temperature cut-out.
Leave the machine or battery pack to cool.
Note: If the battery pack feels very warm, the pack will cool more quickly in an "AIR COOLED" charger.
Note: The machine will cool more quickly if you operate it at idling speed.
- Metabo safety shutdown: The machine was SWITCHED OFF automatically. If the slew rate of the current is too high (for example, if the machine suddenly seizes or kickback occurs), the machine switches off. Switch off the machine at the trigger (16). Switch it on again and continue to work as normal. Try to prevent the machine from seizing.
Switch off the machine at the trigger (16). Then continue working as normal. Try to prevent the machine from seizing.
8.2 Note:
The LED lamp (15) switches off automatically after a specific time.
To activate the electronic functions: press the trigger (16).
ENGLISH en
9. Accessories
Use only original Metabo or CAS (Cordless Alliance System) battery packs and accessories.
Use only accessories that fulfil the requirements and specifications listed in these operating instructions.
Fit accessories securely. Secure the machine if it is operated in a bracket. Loss of control can cause personal injury.
For a complete range of accessories, see www.metabo.com or the main catalogue.
10. Repairs

Repairs to electrical tools must be carried out by qualified electricians ONLY!
If you have Metabo electrical tools that require repairs, please contact your Metabo service centre. For addresses see www.metabo.com.
You can download spare parts lists from www.metabo.com.
11. Environmental Protection
Do not allow battery packs to come into contact with water!

To protect the environment, do not dispose of power tools or battery packs in household waste. Observe national regulations on rated collection and recycling of disused nes, packaging and accessories.
Before disposal, discharge the battery pack in the power tool. Prevent the contacts from short-circuiting (e.g. by protecting them with adhesive tape).
12. Technical specifications

Fig. L. We reserve the right to make technical movements.
U = Voltage of battery pack
n0 = No-load speed
Tightening torque for screwing:
M1 = Soft screwing application (wood)
M2 = Pulse torque
M3^- = Hard screwing application (metal)
M4 = Adjustable torque
Max. drill diameter:
D1\ max = in\ steel
D2 = in softwood
D3\ max = in concrete
s = Max. impact rate
m = Weight (with smallest battery pack)
G = Spindle thread
Dmax = Chuck clamping range
Measured values determined in conformity with EN 62841.
Permitted ambient temperature during operation:
-20 °C (-4°F) to 50 °C (120°F) (limited performance
with temperatures below 0 °C (32°F). Permitted
ambient temperature for storage: 0 °C (32°F) to 30 °C (86°F).
--- Direct current
The technical specifications quoted are subject to tolerances (in compliance with the relevant valid standards).

Emission values
Using these values, you can estimate the emissions from this power tool and compare these with the values emitted by other power tools. The actual values may be higher or lower, depending on the particular application and the condition of the tool or power tool. In estimating the values, you should also include work breaks and periods of low use. Based on the estimated emission values, specify protective measures for the user - for example, any organisational steps that must be put in place.
Vibration total value (vector sum of three directions) determined in accordance with EN 62841:
ah, ID = Vibration emission value (impact drilling into concrete)
ah,D = Vibration emission value (drilling into metal)
ah,S = Vibration emission level (screwing without impact)
Kn,... = Uncertainty (vibration)
Typical A-effective perceived sound levels::
LpA = Sound pressure level
LWA = Acoustic power level
KpA , KWA= Uncertainty (noise level)
During operation the noise level can exceed 80 dB(A).

Wear ear protectors!
Kh,... = incertitude (vibration)
Transport van Li-ion-occupacks:
3 Schakelschuif (boren, slagboren) *
G = schroefdraad as
D _ = boorhouder - spanbreedte
a _ h, D amp; = trillingsemissiewaarde (boren in amp; metaal)
a _ h, S amp; = trillingsemissiewaarde (schroeven amp; zonder slag)
K _ n, ... = onzekerheid (trilling)
Quick (per BS 14.4 LTX Quick, BS 18 LTX Quick) → Fig. J
7.5 Stille inn boring, slagboring fig. A
Aktiver sleiden (3).
7.6 Stille inn dreiemomentbegrensning, maksimalt dreiemoment, impulsfunksjon
a _ h, ID = Vibrationsemission (slagboring i beton)
a _ h, D = daVibrationsemission (boring i metal)
a _ h, S amp; = Vibrationsemission (skruning uden amp; slag)
K _ n, ... = Usikkerhed (vibration)
- Original instructions
- Declaration of Conformity
- For UK only:
- Specified Use
- General safety instructions
- Special Safety Instructions
- Safety instructions when using long drill bits:
- Reducing dust exposure:
- ENGLISH en
- Transport of li-ion battery packs:
- Figures
- Symbol explanation:
- Overview
- Fig. A
- Use
- Battery pack, capacity and signal display → Fig. B
- Removing, replacing battery pack → Fig. C
- Setting direction of rotation, transporting safety device (switch-on lock) → Fig. D
- Selecting gear stage → Fig. E
- Setting for normal drilling, impact drilling → Fig. A
- Setting torque control, maximum torque, pulse function
- Switching on/off, setting speed
- Keyless chuck
- Notes on machines with the designation SB...:
- Unscrewing chuck
- Chuck with quick bit change system (for BS 14.4 LTX Quick, BS 18 LTX Quick)
- Attaching the belt hook (depending on machine features) / bit depot (depending on machine features → Fig. K
- Troubleshooting
- The machine's multifunctional monitoring system
- Causes and remedies:
- Note:
- Accessories
- Repairs
- Environmental Protection
- Technical specifications
- Emission values
- Wear ear protectors!
- Transport van Li-ion-occupacks:
- Stille inn boring, slagboring fig. A
- Stille inn dreiemomentbegrensning, maksimalt dreiemoment, impulsfunksjon
Brand : METABO
Model : BS 18 LTX BL Impuls
Category : Drill