
AMXXL 129 - Washer dryer HOTPOINT - Free user manual and instructions
Find the device manual for free AMXXL 129 HOTPOINT in PDF.
| Product type | Washer-dryer |
| Brand | HOTPOINT |
| Model | AMXXL 129 |
| Dimensions (W x H x D) | 59.5 x 85 x 52.5 cm |
| Washing capacity | 7 kg |
| Drying capacity | 5 kg (cotton), 3 kg (synthetics) |
| Power supply | 220-240 V, 50 Hz |
| Power consumption | 1700-2100 W |
| Water pressure | 0.05-1 MPa (0.5-10 bar) |
| Maximum spin speed | 1200 rpm |
| Drum volume | 53 liters |
| Wash programs | 11 programs (cotton, synthetics, delicates, wool, etc.) |
| Drying programs | Cotton, synthetics and timed drying (up to 180 min) |
| Options | Intensive drying, easy iron, rinse hold, quick wash, extra rinse |
| Special functions | Anti-crease, Woolmark Platinum Care for wool |
| Noise level (approximate) | Approximately 65 dB (wash), 75 dB (spin) |
| Energy class (approximate) | A (according to standards, not specified) |
| Maintenance and cleaning | Regular cleaning of the detergent drawer, the door, and annual check of the water inlet hose |
| Safety | Door lock, child safety, automatic stop in case of problem |
| Spare parts and repairability | Contact an approved technician for any repair; parts available only original |
| General information | Complies with directives 73/23/EEC and 89/336/EEC; domestic use |
Frequently Asked Questions - AMXXL 129 HOTPOINT
User questions about AMXXL 129 HOTPOINT
0 question about this device. Answer the ones you know or ask your own.
Ask a new question about this device
Download the instructions for your Washer dryer in PDF format for free! Find your manual AMXXL 129 - HOTPOINT and take your electronic device back in hand. On this page are published all the documents necessary for the use of your device. AMXXL 129 by HOTPOINT.
USER MANUAL AMXXL 129 HOTPOINT
Remove the transit fixings
Levelling
Water connections
Drainage and electrical connections
Technical Details
Washer dryer description, 4-5
Control panel
LEDs
Starting and programmes, 6-9
Briefly: starting a programme
Programme table
Setting the temperature
Setting the spin speeds
Options
Drying section
AMXXL 129
Detergents and laundry, 10
Detergent dispenser
Preparing your laundry
Special items
Precautions and advice, 11
General safety
Disposal
Saving energy and respecting the environment
Care and Maintenance, 12
Switching off the water or electricity supply
Cleaning
Caring for your appliance door and drum
Checking the water inlet hoses
Troubleshooting, 13-14
Service, 15
Before calling for assistance
Spare parts
! Keep this instruction manual in a safe place for future reference. Should the appliance be sold, transferred or moved, make sure the instruction manual accompanies the machine to inform the new owner as to its operation and features.
! Read these instructions carefully: they contain vital information on installation, use and safety.
Unpacking
- Unpack the machine.
- Check whether the machine has been damaged during transport. If this is the case, do not install it and contact your retailer.
Remove the transit fixings
IMPORTANT: Follow these instructions to remove the TWO transit fixings (see Description for location).
Situated on either side of the rear panel, BOTH transit bolts MUST be removed before use.
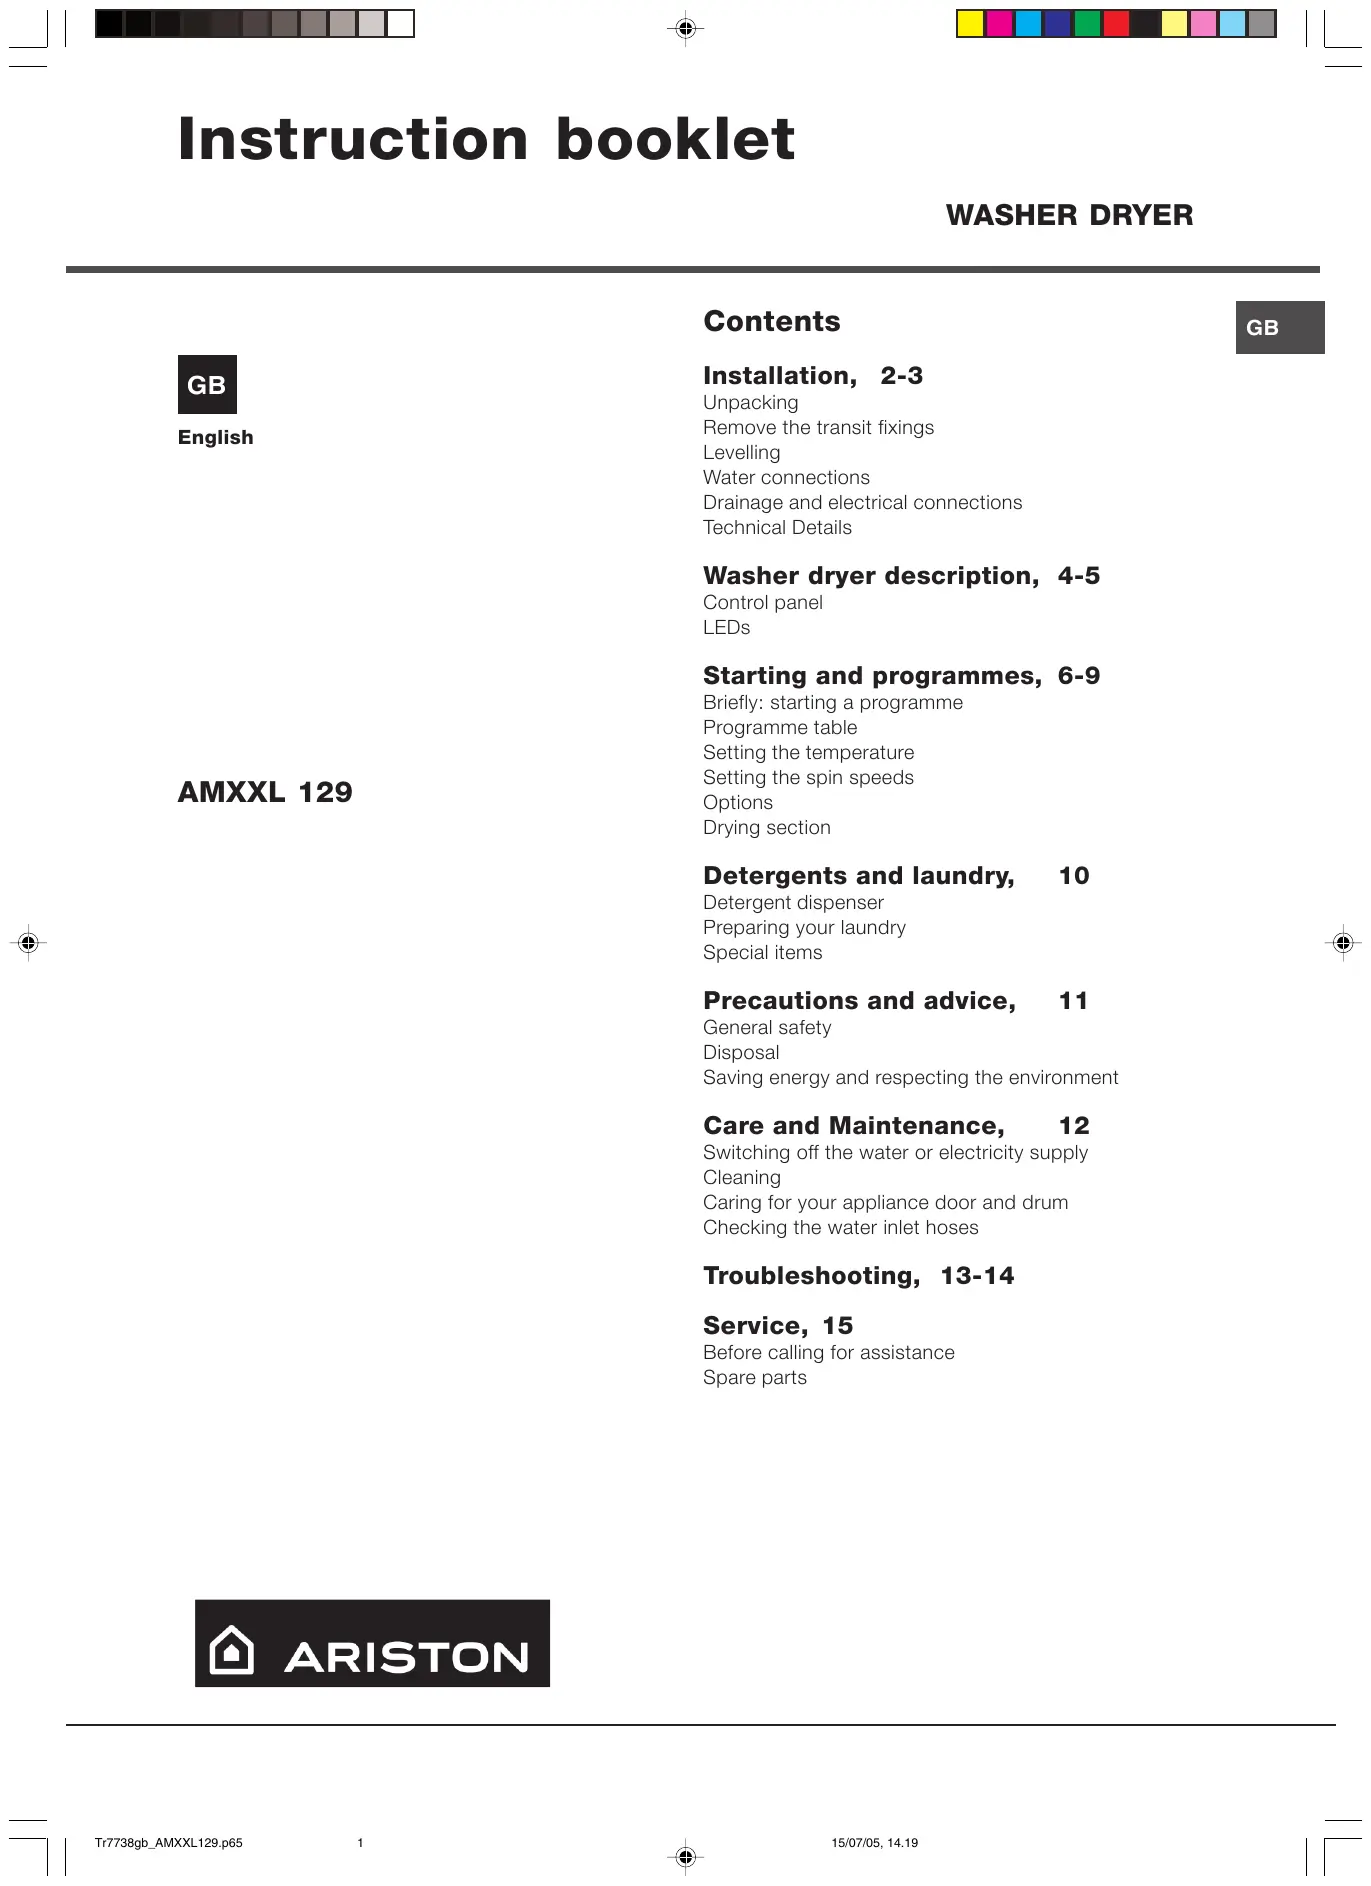
! Failure to do so may cause damage to your machine. It is important the transit bolt and spacer (see pic) come out intact.
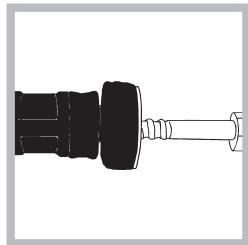
- Unscrew the bolt using a 13mm spanner.
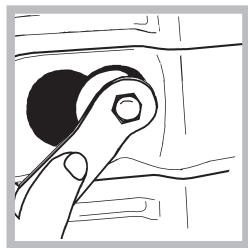
- STOP when 3 threads can be seen.
- Hold, slide sideways and pull to remove.
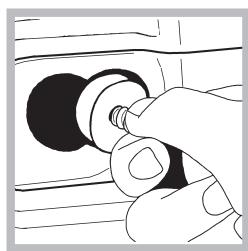
- For safety, insert one of the the plastic covers (supplied with your machine) over the hole.
! Repeat steps 1 to 4 to remove the second transit bolt.
! Packaging materials are not children's toys.
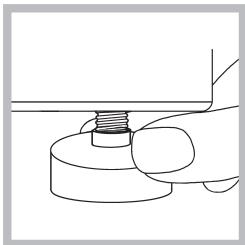
Levelling
Your machine will be noisy if the two front feet are not adjusted so that the machine stands firm and level.
! The machine should be levelled from side to side and from front to back.
- Move your machine into its final location.
- Take care not to trap or kink the hoses.
-
Turn one or both front feet anti-clockwise by hand until the feet cannot be turned any more. When adjusting the feet, use a spirit level to check the machine stands level, from side to side and from front to back.
-
The spring on each foot will
stop them coming loose.
! If it is placed on a fitted or loose carpet, adjust the feet in such a way as to allow enough room for ventilation beneath the machine.
Water connection
Connecting the water inlet hose.
Remember that this is a cold-fill machine.
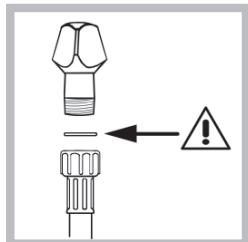
! Check that seal is in place inside the hose end cap.
Before making the water connections to gas 4 % thread, allow the water to run freely from the supply tap until it is perfectly clear.

Screw the inlet end with the blue cap onto the cold water supply tap.
Turn the tap on and check for leaks: tighten if necessary.
! Make sure there are no kinks or bends in the hose.
! The water pressure at the tap must be within the values indicated in the Technical details table (next page).
! If the water inlet hose is not long enough, contact a specialist store or an authorised serviceman.
! Always use new hoses.
! Check the water hose at least once a year, replace any that are cracked as worn hoses could split under water pressure.
Drainage connections
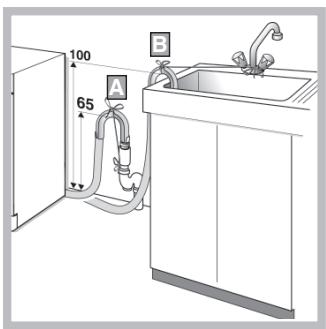
A. Connect the drain hose, without kinking it, to a draining duct or a wall drain fixed at a height between 65 and 100cm from the floor. Use the curved bracket, if required.
B. Alternatively, place it
over the edge of a basin, sink or tub, fastening the hose supplied to the tap.
! The free end of the hose should not be under water.
! We advise against the use of hose extensions. In case of absolute need, the extension must have the same diameter as the original hose and must not exceed 150cm in length.
Electrical connections
Before plugging the appliance into the mains socket, make sure that:
- the socket is earthed and in compliance with the applicable law.
- the socket is able to sustain the appliance's maximum power load indicated in the Technical Details table (on the right).
- the supply voltage is included within the values indicated in the Technical Details table (on the right).
- the socket is compatible with the machines plug. If this is not the case, replace the socket or the plug.
! The machine should not be installed in an outdoor environment, not even when the area is sheltered, because it may be very dangerous to leave it exposed to rain and thunderstorms.
! When the machine is installed, the mains socket must be within easy reach and should be connected to a suitable electrical supply.
! Do not use extensions or multiple sockets.
! The power supply cable must never be bent or dangerously compressed.
! The power supply cable must only be replaced by an authorised serviceman.
The company denies all liability if and when these norms are not respected.
The first wash cycle
Once the appliance has been installed and before you use it for the first time, run a wash cycle without detergent and no laundry, setting the 90^ C programme without a pre-wash cycle.
| TECHNICAL DETAILS | |
| Model | AMXXL 129 |
| Dimensions | 59.5 cm wide 85 cm high 52.5 cm deep |
| Capacity | from 1 to 7 kg |
| Electric connections | voltage 220/240 volts 50 Hz absorbed power 1700 - 2100 W |
| Water connection | maximum pressure 1 MPa (10 bar) minimum pressure 0,05 MPa (0,5 bar) drum capacity 53 litres |
| Spin speed | up to 1200 rpm |
| Control programmes according to the IEC456 directive | Programme 4 Wash run with a 7 kg load. Dry run with 5 kg and 2 kg loads |
| CE | This appliance is compliant with the following European Community directives: - 73/23/CEE of 19/02/73 (Low Voltage) and subsequent amendments - 89/336/CEE of 03/05/89 (Electromagnetic Compatibility) and subsequent amendments |
Control panel
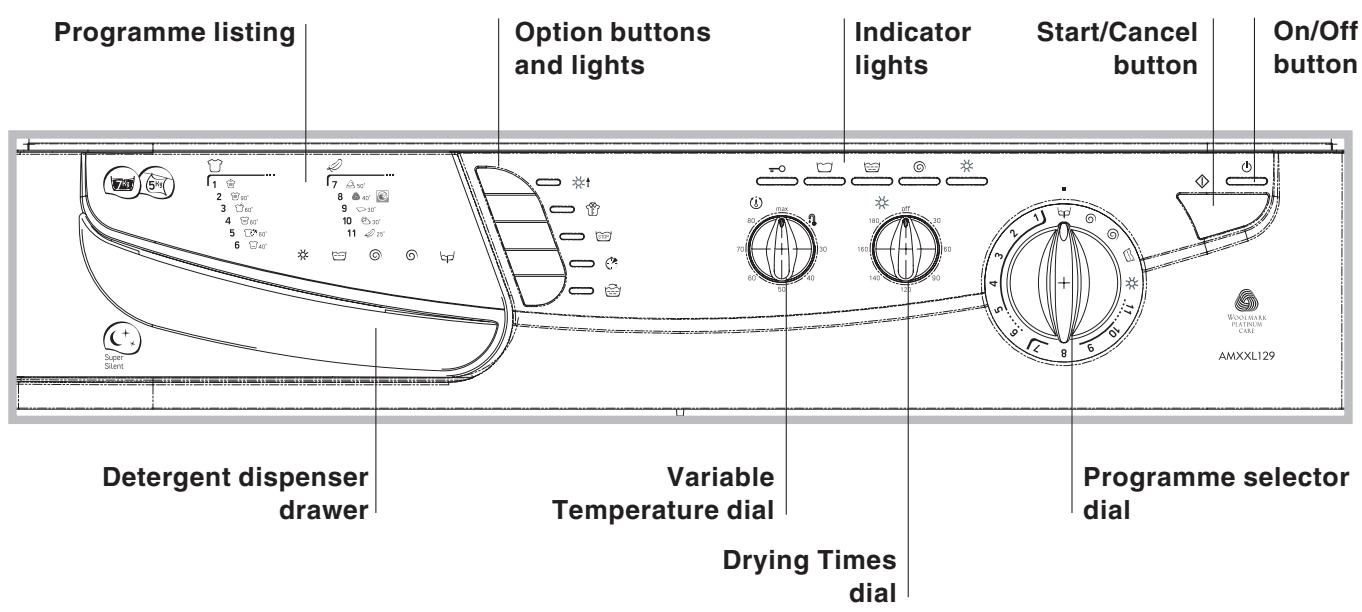
Detergent dispenser drawer. To add detergent and fabric softener (see Detergents and Laundry).
Programme listing: To consult a straight forward chart of the different programmes available.
Option buttons: To select the options available (see Programme Table and Options).
Option lights: When an option is selected, the corresponding light is illuminated.
Variable Temperature dial: To reduce the selected programmes wash temperature (see Programme Table and Options).
Drying Times dial: To set the drying time.
On/Off button: (1) To turn the washer dryer on and off.
Start/Cancel button: To start the programme or to cancel it, if incorrect settings were selected.
Programme selector dial: To select the programme you require. The knob stays still during the cycle.
Indicator lights: Shows if the door is locked (when lit, the door cannot be opened) and the stage of the programme that the machine has reached (wash, rinse or spin).
LEDS
PROGRESS INDICATOR LEDs:

Wash

Rinse

Spin

Dry
These light up to indicate the progress of the selected programme.
When the programme is started the light corresponding to the first cycle is lit and as the programme progresses, successive lights will come on until the programme finishes.
OPTION buttons / LEDs:
When an option is selected, the corresponding LED is illuminated.
- If the option selected is incompatible with the programme set, the button will flash and the option will not be enabled.
- If you set an option that is incompatible with another option you selected previously, only the last one selected will be enabled.
ON-OFF/DOOR LOCK LED: =O
If this LED is on, the appliance door is locked to prevent it from being opened accidentally; to avoid any damage. Wait for the LED to go out before you open the appliance door.
Briefly: starting wash a programme
Operating the machine
-
On-Off / Selecting a programme:
-
Switch the machine on by pressing the On/Off button.
- Load your laundry into the machine and shut the door.
- Add the detergent and any fabric softener.
-
Turn the programme selector dial to the required programme.
-
Select any options you require (see Options).
-
Press the Start/Cancel button to start the programme.
-
To stop or change a programme:
-
Press the Start/Cancel button for 3 seconds.
- Select 'Drain' on the programme selector dial.
- When the machine has finished emptying, turn the programme selector dial to the new programme required. You may need to add detergent.
- Press the Start/Cancel button to start the programme.
Programme table
| Type of fabric and degree of soil | Programmes | Tempe- rature | Deter gent | Fabric softener | Cycle length (minutes) | Description of wash cycle |
| Cottons | ||||||
| Prewash | 1 | 30°C | ● | ● | 20 | Prewash only |
| Extremely soiled whites (sheets, tablecloths, etc) | 2 | 90°C | ● | ● | 150 | Wash cycle, rinse cycles, intermediate and final spin cycles |
| Heavily soiled whites and colourfast items | 3 | 60°C | ● | ● | 140 | Wash cycle, rinse cycles, intermediate and final spin cycles |
| Normally soiled whites and colourfast items | 4 | 60°C | ● | ● | 130 | Wash cycle, rinse cycles, intermediate and final spin cycles |
| Lightly soiled whites and colourfast items | 5 | 60°C | ● | ● | 60 | Wash cycle, rinse cycles, intermediate and final spin cycles |
| Normal to heavily soiled non-colourfast items | 6 | 40°C | ● | ● | 110 | Wash cycle, rinse cycles, intermediate and final spin cycles |
| Synthetics | ||||||
| Fast colours (all types of lightly soiled garments) | 7 | 50° | ● | ● | 65 | Wash cycle, rinse cycles, and delicate spin cycles |
| Delicate | ||||||
| Hand wash wool (Woolmark Platinum Care) | 8 | 40°C | ● | ● | 50 | Wash cycle, rinse cycles, and delicate spin cycles |
| Very delicate fabrics (silk, viscose, etc) | 9 | 30°C | ● | ● | 55 | Wash cycle, rinse cycles, and delicate spin cycles |
| Lightly soiled whites and colourfast items | 10 | 30°C | ● | ● | 30 | Wash cycle, rinse cycles, intermediate and final spin cycles |
| Handwash (handwash label) | 11 | 25°C | ● | ● | 50 | Wash cycle, rinse cycles, intermediate and final spin cycles |
| Drying Cottons | ||||||
| Select option 'High Heat' | HIGH | Max 180 | Drying cycle including thermal spin | |||
| Drvina Synthetics | ||||||
| Ensure option 'High Heat' is not selected | LOW | Max 120 | Gentle drying cycle | |||
| PARTIAL PROGRAMMES | ||||||
| Rinse | ● | 30 | Rinse cycles and spin cycle. | |||
| Fast Spin | 15 | Draining and heavy duty spin cycle | ||||
| Delicate Spin | 13 | Draining and delicate spin cycle | ||||
| Drain | 2 | Draining | ||||
Notes
For the anti-crease function: see Easy Iron (next page). The information contained in the table is purely indicative. All cycle length times are approximate.
Setting the temperature
Use this option to reduce the wash temperature below the maximum for the programme you have chosen. Turn the rotary dial to the required wash temperature. Please note this option can only be used to reduce the selected programmes temperature. Setting a temperature higher than the selected wash programme has no effect.
Options
To enable an option:
- press the button corresponding to the desired option, according to the table below.
-
the option is enabled when the corresponding LED is illuminated.
-
The rapid flashing of the button indicates that the corresponding option cannot be selected for the programme set.
| Option | Effect | Comments | Enabled with programmes |
| High Heat | Sets the drying heat to maximum for drying cottons | Enable this option to select high drying heat for cotton loads, leave disabled to dry synthetics at a lower temperature | 2, 3, 4, 5, 6, |
| Easy Iron | This reduces the wash action & spin speed | Reduces the amount of creases in the washing load at the end of the cycle, making clothes easier to iron | 3, 5, 7 Rinse & Spin |
| STOP Rinse Hold | Clothes held in the final rinse water until you are ready to complete | Complete the final spin by pressing the Rinse Hold button or the Start button when the Rinse Hold light is flashing | 2, 3, 4, 5, 7, 9 Rinse & Spin |
| Rapid | Saves up to a third on the programme time | In addition to reducing the programme time, this option also reduce energy consumption | 2, 4, 7 |
| Extra Rinse | Adds an additional rinse | Enable this option to carry out a full extra rinse for more effective rinsing performance. | 2, 3, 4, 5, 6, 7 |
Independent drying only programme:
- Remove the wet laundry and in drum dosing ball (if used) until the correct 'Drying Weight Load' (see Drying table) is left in the drum. Close the door until it clicks shut.
- Turn the programme selector dial to drying programme (see Programmes).
- Select HIGH HEAT (see Options) if drying cottons by pressing the Drying High Heat option button: the corresponding light will show selection.
- Set the required drying time (see Drying Option below).
- When all selections have been made press the Start/Cancel button. The door will lock.
- A short time after the programme has finished the 'Door locked' indicator light will go out and the door can be opened.
Drying option
Timed Drying programmes:
Where you can select the length of the drying time suitable for your load.
- Turn the Drying Times rotary to the required drying programme duration.
- A maximum drying time of 180 minutes can be selected.
- The rotary does not rotate during drying.
- Remember to turn the rotary back to the OFF position once the programme has finished.
! Remember, with the 'Timed Drying' programme, the Drying High Heat option needs to be selected if drying non-delicate loads (eg. Cottons).
Drying table
| Fabric | Programme | Dry Weight load | Heat setting | Time Setting* (approx) |
| Cottons | * | 5 kg | HIGH | max. 3 hours |
| Synthetics | * | 3 kg | LOW | max. 2 hours |
- for smaller loads reduce the drying time accordingly.
- It is recommended that you separate your drying loads into similar fabric types, as this will increase the drying efficiency.
A typical wash and dry programme:
- Sort your laundry into groups with the same wash and dry care labels.
- Load the machine, making sure that items are not trapped in the door. Close the door by pushing it until it clicks.
- Add detergent and fabric conditioner (if required), to the dispenser drawer. Refer to the detergent manufacturer's dosage instructions.
- Switch the machine on by pressing the ON/OFF button. The ON-OFF/DOOR LOCKED LED will illuminate.
- Select desired wash programme (see Programmes).
-
Select any optional wash feature(s) that you may require by pressing the appropriate button(s). (see Option chart). The corresponding LED will illuminate to show what you have chosen.
-
Select a drying time using the Drying time dial.
-
Press the START/CANCEL button to begin the programme.
-
During the programme status lights will illuminate to indicate what stage in the cyle the programme has reached.
-
When the programme has finished the ON-OFF / DOOR LOCK LED will flash to indicate that the appliance door can now be opened. Take out your laundry and leave the appliance door ajar to allow the drum to dry thoroughly. Turn the machine off by pressing the ON/OFF button, the ON/OFF / DOOR LOCKED LED will go out.
Drycare tips
Items not suitable for tumble drying:
- Garments with the ITCL code.

- Woollens.
- Large, bulky items eg. quilts, bedspreads, pillows etc... expand when dry, preventing air flow through the appliance.
- Items containing plastic film, foam rubber or rubber like materials eg. pillows, cushions, PVC rainwear or inflammable articles which contain inflammable substances eg. towels contaminated with hair lacquer.
- Fibreglass (eg. some types of curtains).
- Items which have been dry cleaned.
Important information:
! A 20 minute 'cool tumble' is included at the end of drying, allowing fabrics to cool down, minimising creasing.
! A spin cycle may be carried out during drying if you have set a cotton programme.
! The sensor dry function can be used on either the cotton (HIGH heat) or synthetic (LOW heat) programmes.
Detergents and Laundry
Detergent dispenser
! Do not put any items into the drawer, other than detergents designed to be released from the drawer, as they may cause damage or blockage.
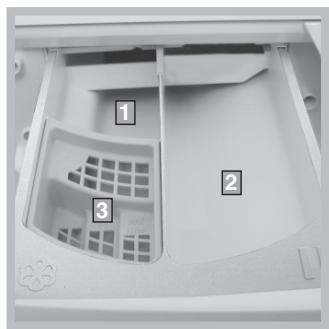
- Pre-wash detergent compartment.
Maximum 200 ml powder or 100 ml liquid - Main wash detergent compartment.
Maximum 400 ml powder or 200 ml liquid - Fabric conditioner compartment.
Maximum 120 ml.
Dispensing powder detergent
To achieve the best wash results the manufacturer's recommended amount of detergent should be measured and added to the main detergent compartment.
Dispensing liquid detergent
We recommend the use of a detergent dosing ball, as provided by your detergent manufacturer.
Adding fabric conditioner
Pour the recommended amount of fabric conditioner into the compartment. Do not exceed the maximum fill line.
Pre-wash (Programme 1)
When selecting programme 1 add detergent to both the pre-wash and the main wash compartment.
! Do not use in drum dosing devices with pre-wash programme 1.
Maximum load size
-
Divide your laundry according to:
-
the type of fabric/the symbol on the label.
-
the colours: separate coloured garments from whites.
-
Empty all pockets and check for loose buttons.
-
Do not exceed the weight limits stated below, which refer to the weight when dry:
Sturdy fabrics : max. 7kg
Synthetic fabrics : max. 3kg
Delicate fabrics : max. 2kg
Wool : max. 1kg
! DO NOT overload the machine as this could result in reduced performance.
How much does your laundry weigh?
1 sheet 400-500g
1 pillow case 150-200g
1 tablecloth 400-500g
1 bathrobe 900-1200g
1 towel 150-250g
Woolmark Platinum Care
As gentle as a hand wash.

Ariston sets a new standard of superior performance that has been endorsed by The Woolmark Company with the prestigious Woolmark Platinum Care brand.
Look for the Woolmark Platinum Care logo on the Washing Machine to ensure you can safely and effectively wash wool garments labelled as 'hand wash' (M.00221).
Set programme 8 for all 'Hand Wash' garments, using the appropriate detergent.
Wool: for best results, use a specific detergent, taking care not to exceed a load of 1kg .
! The machine was designed and built in compliance with the applicable international safety regulations. The following information is provided for your safety and should consequently be read carefully.
General safety
- This appliance has been designed for non-professional, household use and its functions must not be changed.
- This machine should only be used by adults and in accordance with the instructions provided in this manual.
- Never touch the machine when barefoot or with wet or damp hands or feet.
- Do not pull on the power supply cable to unplug the appliance from the electricity socket. Pull the plug out yourself.
- Do not open the detergent dispenser while the appliance is in operation.
- Do not touch the drain water as it could reach very high temperatures.
- Never force the machine door: this could damage the safety lock mechanism designed to prevent accidental openings.
- In the event of a malfunction, do not under any circumstances touch internal parts in order to attempt repairs.
- Always keep children well away from the appliance while in operation.
- The appliance door tends to get quite hot during the wash cycle.
- Should it have to be moved, proceed with the help of two or three people and handle it with the utmost care. Never try to do this alone, because the appliance is very heavy.
- Before loading your laundry into the machine, make sure the drum is empty.
Saving energy and respecting the environment
Environmentally-friendly technology
If you only see a little water through your appliance door, this is because thanks to the latest Ariston technology, your machine only needs less than half the amount of water to get the best results: an objective reached to respect the environment.
Saving on detergent, water, energy and time
-
To avoid wasting resources, the machine should be used with a full load. A full load instead of two half loads allows you to save up to 50% on energy.
-
The pre-wash cycle is only necessary on extremely soiled garments. Avoiding it will save on detergent, time, water and between 5 and 15% energy.
- Treating stains with a stain remover or leaving them to soak before washing will cut down the need to wash them at high temperatures.
A programme at 60^ C instead of 90^ C or one at 40^ C instead of 60^ C will save up to 50 % on energy.
- Use the correct quantity of detergent, depending on the water hardness, how soiled the garments are and the amount of laundry you have, to avoid wastage and to protect the environment: despite being biodegradable, detergents do contain ingredients that alter the natural balance of the environment. In addition, avoid using fabric softener as much as possible.
- If you use your machine between late in the afternoon and the early hours of the morning, you will help reduce the electricity board's peak load.
- If your laundry has to be dried in a tumble dryer, select a high spin speed. Having the least water possible in your laundry will save you time and energy in the drying process.
Disposal
- Disposing of the packaging material: observe local regulations, so the packaging can be re-used.
- Disposing of an old machine: before scrapping your appliance, cut the power supply cable and remove the appliance door.
Disposal of old electrical appliances
The European Directive 2002/96/EC on Waste Electrical and Electronic Equipment (WEEE), requires that old household electrical appliances must not be disposed of in the normal unsorted municipal waste stream. Old appliances must be collected separately in order to optimise the recovery and recycling of the materials they contain and reduce the impact on human health and the environment.
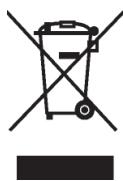
The crossed out "wheeled bin" symbol on the product reminds you of your obligation, that when you dispose of the appliance it must be separately collected.
Consumers should contact their local authority or retailer for information concerning the correct disposal of their old appliance.
Switching off the electricity
- Turn off the water tap after every wash. This will limit the wear of your appliance's water system and also prevent leaks.
- Unplug your appliance when cleaning it and during all maintenance operations.
Cleaning
Cleaning the exterior
Use a damp cloth or silicon polish to clean the exterior surfaces of the appliance.
Cleaning the door bowl
Clean the internal surface of the door bowl regularly with a soft cloth. A build up of soap powder and water hardness residue may result in water leaking from the door.
Cleaning the dispenser drawer and compartments
It is advisable to clean the dispenser drawer regularly.
! Do not try to clean any part of the dispenser drawer while the machine is running.
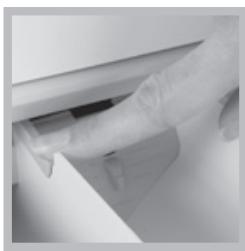
- Pull out the drawer until it reaches its stop.
- Press the drawer release button to remove the dispenser drawer (see figure).
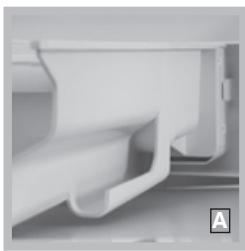
- Clean and dry the dispenser drawer, syphons, grate and fabric conditioner exit channel (A). Also regularly clean the outlet pipe area (B).

- Relocate the dispenser drawer and push it firmly back into place.
! Do not clean any part of the machine with abrasive cleaners, scouring agents, acids, any bleach or metal polish as they may cause damage.
Caring for your appliance door and drum
- Always leave the appliance door ajar to prevent unpleasant odours from forming.
Checking the water inlet hose
Check the water inlet hose at least once a year. If you see any cracks, replace it immediately. During the wash cycles, high water pressure could cause a cracked hose to split open.
! Never use hoses that have already been used.
Your machine could fail to work. Before calling for Assistance (see Service), make sure the problem can't easily be solved by consulting the following list:
| Problem: | Possible causes / Solution: |
| The machine won't start? | · The appliance is not plugged into the socket, or not enough to make contact. · There has been a power failure. |
| The wash cycle won't start? | · The appliance door is not shut properly. · The ON/OFF button has not been pressed for at least 2 seconds. · The START/CANCEL button has not been pressed for at least 2 seconds. · The water tap is not turned on. |
| The machine fails to fill with water? | · The water inlet hose is not connected to the tap. · The hose is kinked. · The water tap is not turned on. · There is a water shortage. · The water pressure is insufficient. · The START/CANCEL button has not been pressed for at least 2 seconds. |
| The machine continuously fills with water and drains? | · The drain hose is not fitted between 65 and 100cm from the floor (see Installation). · The free end of the hose is underwater (see installation). · The wall drainage system doesn't have a breather pipe. If the problem persists even after these checks, turn off the water tap, switch the appliance off and call for Assistance. If the dwelling is on one of the upper floors of a building, there may be drain trap problems causing the machine to load and unload water continuously. In order to avoid such an inconvenience, special anti-drain trap valves are available in shops. |
| The machine does not drain or spin? | · If the machine was unable to balance the load it will use a slow spin rather than risk machine damage; the clothes might appear wetter than expected. · The drain hose is bent (see Installation). · The drain duct is clogged. |
Problem:
Possible causes / Solution:
The machine vibrates too much during the spin cycle?
- The transit fixings were not removed correctly (see Installation).
- The machine is not level (see Installation).
- The machine is closed in, between furniture cabinets and the wall (see Installation).
The machine leaks?
- The water inlet hose is not connected correctly (see Installation).
- The detergent dispenser is obstructed, clean it (see Care and Maintenance).
- The drain hose is not secured properly (see Installation).
There is too much foam?
- The detergent is not suitable for machine washing (it should bear the definition "for washing machines" or "hand and machine wash", etc.)
- You used too much detergent.
The machine does not dry?
- Is the cold water turned on at the tap?
- Did you select the correct heat/time setting?
- Was the laundry spun dry at the end of the wash programme, if not select the spin and dry option to suit the type of fabric?
- Is your water pressure within limits?
The ON-OFF/DOOR LOCK LED O flashes rapidly at the same time as at least one other LED?
- Call for assistance because this means there is an error.
Steam is coming from the dispenser drawer
- This is not a fault. We have designed the machine to release steam from the dispenser drawer during hot washes. It may also vent (Washer Dryer only) during drying.
The dispenser drawer will not close, or is collecting water.
- Check the drawer is properly aligned.
- Clean the dispenser drawer (see Care and Maintenance).
Not all the detergent has flushed away.
- Check the cold water supply tap is turned on fully (see Installation).
- Check the cold water inlet hose is not kinked.
- Is your water pressure too low? (see Technical Details Chart).
The clothes are warm at the end of the programme.
- Check the water inlet hose is connected to the cold water supply tap and not the hot (see Installation, 'Water connection').
Before calling for Assistance:
- Use the troubleshooting guide to see if you can solve the problem yourself (see Troubleshooting).
- If not, turn off the appliance and call the Service Centre closest to you.
What to tell the Service Centre:
- name, address and post code.
- telephone number.
- the type of problem.
the date of purchase. - the appliance model (Mod.).
the serial number (S/N).
This information can be found on the data label inside the door of the machine.
Spare Parts
This appliance is a complex machine. Repairing it yourself or having a non-authorised person try to repair it could cause harm to one or more persons, could damage the machine and could invalidate the spare parts warranty.
Call an authorised technician if you experience problems while using the machine.
The spare parts have been designed exclusively for this appliance and not for other uses.
GB

Italiano
Indice
LED PROGRAMME EN COURS:

Lavage

Rinage

Essorage

Séchage
A这其中 produces a few of the most important aspects of the program.
A boa, não seca?