
CombBind C110E - Binder GBC - Free user manual and instructions
Find the device manual for free CombBind C110E GBC in PDF.


| Product type | Manual comb binding machine |
| Brand | GBC |
| Model | CombBind C110E |
| Dimensions (L x W x H) | 46 x 30 x 15 cm |
| Weight | 4.5 kg |
| Power supply | Manual (non-electric) |
| Punching capacity | Up to 10 sheets (80 gsm) |
| Binding capacity | Up to 300 sheets with 19-ring comb |
| Number of rings | 19 rings (A4 size) |
| Compatible comb diameter | 6 to 51 mm |
| Paper size | A4, A5, Letter (up to 297 mm long) |
| Chassis material | Painted steel |
| Main functions | Manual punching with adjustable depth guide, comb opening and closing |
| Maintenance and cleaning | Clean with a soft dry cloth; avoid moisture |
| Safety | Do not insert fingers into the punching area; use on a stable surface |
| Spare parts and repairability | Replacement combs, adjustable stop, punches available; repair by authorized center |
| General information | For professional document binding; office use |
Frequently Asked Questions - CombBind C110E GBC
User questions about CombBind C110E GBC
0 question about this device. Answer the ones you know or ask your own.
Ask a new question about this device
Download the instructions for your Binder in PDF format for free! Find your manual CombBind C110E - GBC and take your electronic device back in hand. On this page are published all the documents necessary for the use of your device. CombBind C110E by GBC.
USER MANUAL CombBind C110E GBC
natural_image
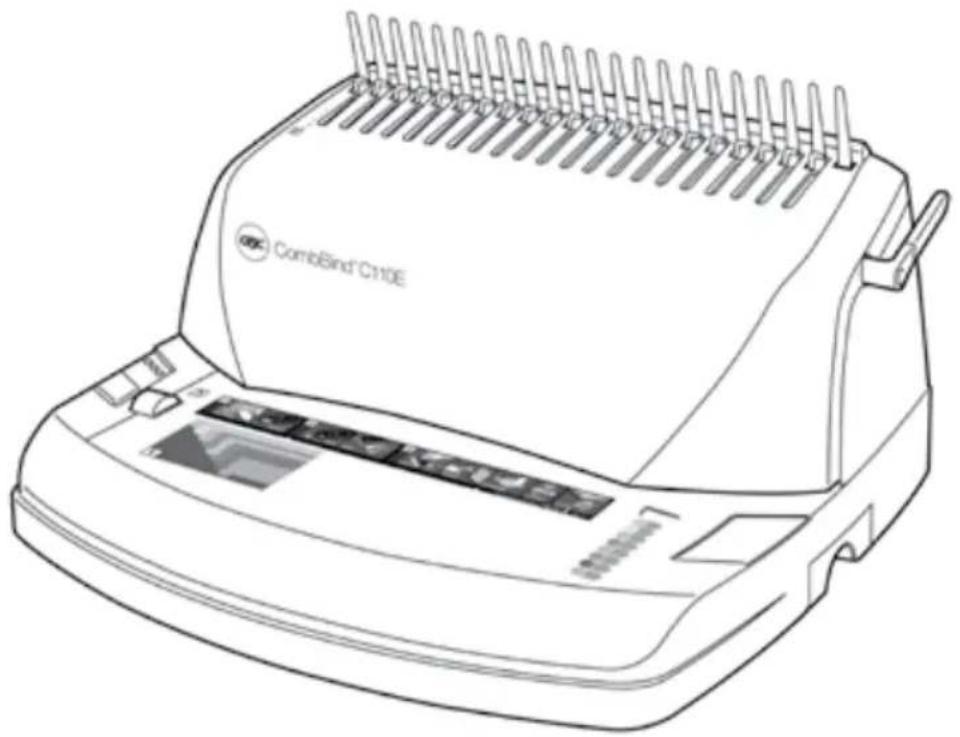
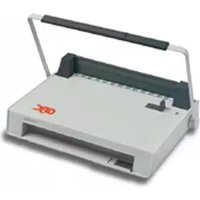
Black and white photo of a ComBrid C110E printer with spooling blades (no visible text or symbols on body)CombBind C110 E
GB Instruction Manual
F Manuel d'utilisation
D Bedienungsanleitung
① Manuale d'istruzioni
NL Gebruiksaanwijzing
E Manual de instrucciones
P Manual de Instruções
TR Kullanım Kılavuzu
GR Οδηγίες
DK Brugsvejledning
FI Käyttöopas
NO Bruksanvisning
⑤ Bruksanvisning
PL Instrukcja obsługi
© CZ Návod k obsluze
H Használati útmutató
RUS Руководство по эксплуатации

To register and activate the warranty go to
www.accoeurope.com
natural_image
Line drawing of a CombiBind C110E printer with no visible text or symbols on the device bodyEnglish 4
Français 8
Deutsch 12
Italiano 16
Nederlands 20
Español 24
Português 28
Türkçe 32
Ελληνικά 36
Dansk 40
Suomi 44
Norsk 48
Svenska 52
Polski 56
Česky 60
Magyar 64
Русский 68


natural_image
Illustration of a printer being inserted into a laptop keyboard (no text or symbols visible)
natural_image
Illustration of hands holding a tablet device with a black tab, no visible text or symbols
natural_image
Close-up of a hand pressing down on a microchip component (no text or symbols visible)
natural_image
Line drawing of a computer with a magnified inset showing a circular component (no text or symbols)


natural_image
Technical line drawing of a mechanical component with internal threading (no text or symbols)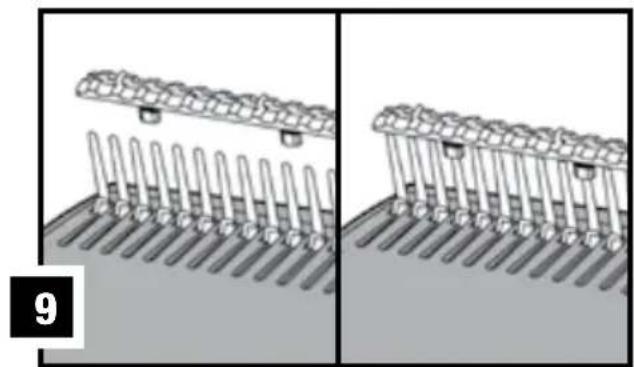
natural_image
Diagram showing two views of a multi-tiered microfluidic device with pipettes and connectors (no text or symbols)10 Quickstart Guide 1-2-3

Technical specifications
| GBC CombBind C110 E | |
| Dimensions (HxWxD) | 411 x 355 x 225 mm |
| Weight | 9.1 kg |
| Punch Capacity, Paper | Max. 15 sheets (80 gsm) |
| Punch Capacity, PVC covers | Max. 1 sheet, 0.2 mm |
| Punch Capacity, PP covers | Max. 1 sheet, 450 micron |
| Bind Capacity | 330 sheets (38 mm) |
| Maximum Sheet Width | 297mm A4 |
| Electrical | 230V / 50Hz / 1 Amp / 150W |
Safety instructions

YOUR SAFETY AS WELL AS THE SAFETY OF OTHERS IS IMPORTANT TO ACCO® BRANDS. IN THIS INSTRUCTION MANUAL AND ON THE PRODUCT ARE IMPORTANT SAFETY MESSAGES. READ THESE MESSAGES CAREFULLY.

THE SAFETY ALERT SYMBOL PRECEDES EACH SAFETY MESSAGE IN THIS INSTRUCTION MANUAL. THIS SYMBOL INDICATES A POTENTIAL PERSONAL SAFETY HAZARD THAT COULD HURT YOU OR OTHERS, AS WELL AS CAUSE PRODUCT DAMAGE OR PROPERTY DAMAGE.
THIS WARNING IS FOUND ON THE PRODUCT.

This safety message means that you could be seriously hurt or killed if you open the product and expose yourself to hazardous voltage.
The following ISO and IEC symbols appear on this product, and their meaning is as follows:

Important safeguards


WARNING: FOR YOUR PROTECTION DO NOT CONNECT THE COMB BINDER TO ELECTRICAL POWER UNTIL YOU READ THESE INSTRUCTIONS COMPLETELY. KEEP THESE INSTRUCTIONS IN A CONVENIENT LOCATION FOR FUTURE REFERENCE. TO GUARD AGAINST INJURY, THE FOLLOWING BASIC SAFETY PRECAUTIONS MUST BE OBSERVED IN THE SET-UP AND USE OF THIS PRODUCT.
Electrical safeguards
- The CombBind C110 E must be connected to a supply voltage corresponding to the electrical rating of the machine as indicated on the serial/rating plate or in this manual.

CAUTION: THE POWER RECEPTACLE MUST BE LOCATED NEAR THE EQUIPMENT AND BE EASILY ACCESSIBLE.
- Unplug the CombBind C110 E before moving it, or when it is not in use for an extended period of time.
- Do not operate with a damaged supply cord or plug, after it malfunctions, or after it has been damaged in any manner.
- Do not alter attachment plug. Plug is configured for the appropriate electrical supply.
- Do not overload electrical outlets beyond their capacity as this can result in fire or electrical shock.
- The unit is intended for indoor use only.
- Never push objects into this product through cabinet slots. Do not spill liquid of any kind on this product.
- Do not operate if the product has been exposed to rain or water.
Cleaning

Caution: Unplug this product before cleaning.
- Wipe exterior only with a damp cloth. Do not use detergents or solvents.
General safeguards
- Use the CombBind C110 E only for its intended purpose of punching and binding paper and covers according to the indicated specifications.
- Do not place anything in the punch opening of the machine other than paper and cover stock.
- Place unit on a secure, stable work area to prevent the unit from falling and possibly causing personal injury and damage to the unit.
- Follow all warnings and instructions marked on the unit.
- Lift the machine from the bottom, not the cover.
- Do not lift the machine by the cover or paper holder wire.
Service
- Do not attempt to service or repair the CombBind C110 E yourself.
- Unplug the comb binder and contact an authorised GBC service representative for any required repairs.
Guarantee
Operation of this machine is guaranteed for two years from date of purchase, subject to normal use. Within the guarantee period, ACCO Brands Europe will at its own discretion either repair or replace the defective machine free of charge. Defects due to misuse or use for inappropriate purposes are not covered under the guarantee. Proof of date of purchase will be
required. Repairs or alterations made by persons not authorised by ACCO Brands Europe will invalidate the guarantee. It is our aim to ensure that our products perform to the specifications stated. This guarantee does not affect the legal rights which consumers have under applicable national legislation governing the sale of goods.
Instructions for use
Please read these instructions carefully and keep them in a safe place for later reference.
Getting started
Plug the power cord into an appropriate power receptacle.
Determine sheet width
- Rotate the edge guide to the paper / cover size you wish to bind (fig.1):
- Letter (8-1/2" x 11")
- A4 (297mm x 210mm)
-
Oversized (222mm x 286mm)
-
When using oversized covers, rotate the edge guide to the oversize position, punch all of the covers for your documents and set aside.
- Rotate the edge guide to either Letter or A4 position and punch the paper for your document.
Binding
To turn the machine "ON" press the ON / OFF (I/O) switch located in the rear of the machine. A green light will illuminate to indicate that the power is on.
2 Place the document including the covers straight up against the comb support to the right side aligning with the binding size scale. Rotate the binding lever away from you to close the hooks until they make contact with the document.
3 Select comb which fits your document (fig.3)
Use the comb size guide to select the size of comb that fits your document i.e. 25 sheet document = 6mm comb.
4 Load comb onto machine (fig.4)
Insert the binding comb next to the white positional arrow on the machine, behind the metal comb support fingers, with the open side of the comb pointing upwards.
Note: If using GBC ProCombs™ the coloured line on your comb should align to the coloured arrows on the machine for faster binding.
5 Open comb by turning lever towards you
The coloured arrows adjacent to the opening comb act as a guide as to how far to open in order to allow punched sheets to be easily inserted.
Rotate the binding handle towards you to open the hooks away from the comb support (fig.6)
6 Jog or align the sheets or covers and insert the edge to be punched into the punch throat opening.
7 Fully insert the sheets into the throat opening and against the edge guide (fig.5).
8 To punch, press the punch button≡(fig.5). The CombBind C110 E will punch up to 15 sheets of 80 gsm paper. Do not punch more than 1 clear cover at a time to prevent jams.
9 If the punch jams the red jam light will illuminate to indicate that the machine has jammed. The machine will automatically reverse the punches to clear the jam and the red jam light will remain illuminated. Remove the paper and push the punch button to re-set the machine. The red jam light will turn off indicating that the machine is ready to punch. Reduce some of the sheets and repeat steps 2 to 4 to avoid jams on additional lifts.
10 Place the front cover (finished side down) onto the opened binding element fingers. Place the document pages (face down) onto the element. Repeat for larger documents as required. Place the back cover (finished side up) on the open binding element fingers last.
11 Rotate the binding lever away from you, back to its original position to close the binding element.
12 Remove the book by lifting upward. Your document is now complete.
13 Once you become familiar with your CombBind C110 E you will find that you can bind as you punch, increasing your productivity.
14 When finished punching turn the machine OFF by pressing the ON / OFF (I/O) switch located at the rear of the machine.
Quickstep Guide 1-2-3 (fig.10)
The QuickStep Guide label on the machine is a quick reference guide to how to bind in three quick and simple steps.
1 Understand the comb size required by measuring on the document size area 1, select the appropriate ProComb.
2 Load the ProComb with the dot to the left and open until you see the coloured arrow.
3 Punch and load your document on to the spine until your document is complete. Close the spine.
ZipComb spine (fig.9)
The ZipComb spine allows you to create an easily editable document with comb punch orientation.
1 Place the adaptor on to the metal teeth.
2 Place the spine into the zip holder as shown in fig.4.
3 Load and punch paper as per 'Binding' section 6-8.
4 Load punched paper on to spine.
5 Remove document and spine, close the ZipComb using the zipper included in the ZipComb boxes.
6 Complete by flipping the back cover around the spine, for a professional finish where the spine is hidden.
Empty chip drawer (fig.8)

- Your CombBind C110 E has a chip drawer located on the right side of the machine.
- When it is full of punched paper chips, a red light (fig.5) will illuminate.
- Gently pull the drawer to open it and remove from machine, empty and re-insert the drawer back in machine until it snaps in place.
DENNE ADVARSEL ER ANF∅RT PÅ PRODUKTET.

ADVARSEL
FÖLJANDE WARNING FINNS PÅ PRODUKTEN.
!VARNING

GB ACCO Service Division
Hereward Rise, Halesowen, West Midlands, B62 8AN
Tel: 0845 658 6600, Fax: 0870 421 5576
www.acco.co.uk/service
F Acco Brands France SAS
Service après-vente, ZAC Excellence 2000,
6 rue Robert Schuman, 21800 Chevigny Saint Sauveur
Tel: +33 3 80 68 60 30, Fax: +33 3 80 68 60 49
contact@vmbs.fr
Arnoldstrasse 5, 73614 Schorndorf, Germany
Tel: +49 7181 887 120, Fax:+49 7181 887 198
info.de@acco.com
E ACCO Brands Iberia SL
P Isaac Peral 19, 28820 Coslada (Madrid)
Tel: 902 500 182 ext. 2, Fax: 91 309 6412
① ACCO Brands Italia Srl
⑤ ACCO Brands Nordic AB
DK Makadamgatan 5, 254 64 Helsingborg, Sweden
N Tel: +46 42 38 36 00, Fax: +46 42 38 36 10
⑤ service.nordic@acco.com
LV
EST
LT
CZ XERTEC a.s.
SK Kloknerova 2278/24 (vchod z ulice Koštiřova, budova CeWe Color - Fotolab)
148 00 Praha 4 - Chodov
Tel: 225 004 411, Fax: 225 004 162
servis@xertec.cz, http://www.xertec.cz
PL ACCO Polska Sp. z o.o
Al. Jerozolimskie 184, 02-486 Warszawa
Tel.+48 22 570-18-29, fax +48 22 570-18-33
www.acco.pl
H Interelektronik Kft.
2 Coronation Avenue, Kings Park, NSW, Australia 2148
Tel: +61 2 9674 9000, Fax: +61 2 9674 0910
custsupport@pelikanartline.com.au
Clonshaugh Business & Technology Park, Clonshaugh, Dublin 17, Ireland
Tel: 01 816 4300, Fax: 01 816 4302
information-ie@acco.com, www.accorexel.ie
ZA Rexel Office Products (PTY) Ltd
Crusher Road, Crown Ext.3, PO Box 102,
Crown Mines, Johannesburg 2025, South Africa
Tel: +27 (0) 11 837 7723
service@rexelsa.co.za
IND ACCO Brands Asia Pte Ltd
PAK 47 Ayer Rajah Crescent, #05-08/17, Singapore 139947
BD Tel: +65 6776 0195, Fax: +65 6779 1041
webmaster@accobrandsasia.com
JPN GBC-Japan K.K.
14F Harmony Tower, 1-32-2 Honcho, Nakano-ku, Tokyo 164-8721
Tel: (81)-03-5351-1801, Fax: (81)-03-5351-1831
serv@gbc-japan.co.jp, www.gbc-japan.co.jp


- CombBind C110 E
- Safety instructions
- THIS WARNING IS FOUND ON THE PRODUCT.
- Important safeguards
- Electrical safeguards
- CAUTION: THE POWER RECEPTACLE MUST BE LOCATED NEAR THE EQUIPMENT AND BE EASILY ACCESSIBLE.
- Cleaning
- General safeguards
- Service
- Guarantee
- Instructions for use
- Getting started
- Determine sheet width
- Binding
- Quickstep Guide 1-2-3 (fig.10)
- ZipComb spine (fig.9)
- Empty chip drawer (fig.8)
- DENNE ADVARSEL ER ANF∅RT PÅ PRODUKTET.
- ADVARSEL
- FÖLJANDE WARNING FINNS PÅ PRODUKTEN.
- !VARNING
Brand : GBC
Model : CombBind C110E
Category : Binder