
DigiFrame 1360 - Digital photo frame BRAUN - Free user manual and instructions
Find the device manual for free DigiFrame 1360 BRAUN in PDF.


| Product type | Digital photo frame |
| Brand | Braun |
| Model | DigiFrame 1360 |
| Screen size | 10.1 inches (approx. 25.7 cm) |
| Resolution | 1024 x 600 pixels |
| Supported image formats | JPEG, BMP, PNG |
| Built-in storage | Internal memory (capacity not specified) |
| External storage media | SD/SDHC card, USB flash drive |
| Multimedia functions | Slideshow, clock, calendar, audio player (MP3) |
| Built-in speakers | Yes, 2 x 1 W |
| Power supply | AC adapter 5V / 1A (included) |
| Power consumption | Approximately 5 W in operation |
| Dimensions (W x H x D) | Approx. 27 x 18 x 2 cm |
| Weight | Approximately 500 g |
| Frame material | Black plastic |
| Mounting | On removable stand or wall mount (not included) |
| Spare parts and repairability | Not available individually. Contact customer service for any defects. |
| Maintenance and cleaning | Wipe with a soft, dry cloth. Do not use liquid or abrasive products. |
| Safety | Do not expose to moisture, shocks, or extreme temperatures. Do not open the case. |
| Warranty | 2 years (according to applicable legislation) |
Frequently Asked Questions - DigiFrame 1360 BRAUN
User questions about DigiFrame 1360 BRAUN
0 question about this device. Answer the ones you know or ask your own.
Ask a new question about this device
Download the instructions for your Digital photo frame in PDF format for free! Find your manual DigiFrame 1360 - BRAUN and take your electronic device back in hand. On this page are published all the documents necessary for the use of your device. DigiFrame 1360 by BRAUN.
USER MANUAL DigiFrame 1360 BRAUN

BRAUN®
This symbol on the product or in the instructions means that your electrical and electronic equipment should be disposed at the end of its life separately from your household waste. There are separate collection systems for recycling in the EU. For more information, please contact the local authority or your retailer where you purchased the product.
3. Erste Schritte

= Common = Gemeinsam

= Time, Clock = Zeiteinstellung

= P lay, Setup = Wiedergabeeinstellung

= System = System
Hinweis:
Hinweis:
Thank you for purchasing this Digital Photo Frame. It is designed to allow quick and easy viewing of photos taken with your digital camera, mobile phone, or from a memory card. Please read this user manual carefully to learn the correct way to use the digital photo frame.
Contents:
- Stand Installation....12
2a. Rear and Left Side View .....12
2b. Remote Control ....13
2c. Installing & Replacing the Battery .....13 - Getting Started ....14
- Operating Instructions ....14 USB and Memory Card....14
- Picture Mode ....14
- Music Mode.....15
- Video Mode 15
- Scrolling Subtitle Function .....16
- HDMI-IN Function.....16
- Insert commercial....16
- Setup....16
- Specifications....18
- Troubleshooting .....18
Packaging Check List:
- 13.3 inch digital photo frame
- AC/DC adapter
- Remote control
- User manual
- Bracket
Cautions:
Precautions and maintenance
- For indoor use only
• To avoid risk of fire or electric shock, do not expose the unit to moisture or condensation. - To avoid overheating, do not block the ventilation holes on the back of the Digital Photo Frame.
- Keep the Digital Photo Frame out of direct sunlight.
- Do not dismantle the Digital Photo Frame. There is a risk of electric shock and there are no user-serviceable parts inside.
- Dismantling the Digital Photo Frame will void your warranty.
Cleaning the LCD Screen
- Treat the screen carefully. Because the screen of the Digital Photo Frame is made of glass and it would easily be broken or scratched.
- If fingerprints or dust accumulate on the LCD screen, we recommend using a soft, non-abrasive cloth such as a camera lens cloth to clean the LCD screen.
- Moisten the cleaning cloth with the cleaning solution and apply the cloth to the screen.
WARNING:
Please power off the unit before inserting or removing a card or USB device.
Failure to do so may cause damage to the card/USB and the unit.
To reduce the risk of fire or electric shock, do not expose this appliance to rain or moisture
Note:
This Device is for private use only and not designed for commercial utilization.
Features:
- Supported picture formats: JPEG, BMP, PNG
- Supported audio formats: MP3
- Supported video formats: MPEG1, MPEG2, MPEG4, H.264, RM, RMVB, MOV, MJPEG, DivX
- Supported memory cards: SD/MMC/MS
- USB port: USB 2.0
- HDMI interface: supports HDMI-IN function
-
Slideshow with background music
-
Supports scrolling subtitles when playing photo, music, movie files
- Supports time bar when playing photo, music, movie files
- Built-in clock and alarm clock, scheduled auto on/off
- Adjustable brightness, contrast, saturation
- OSD languages: English and other languages selectable
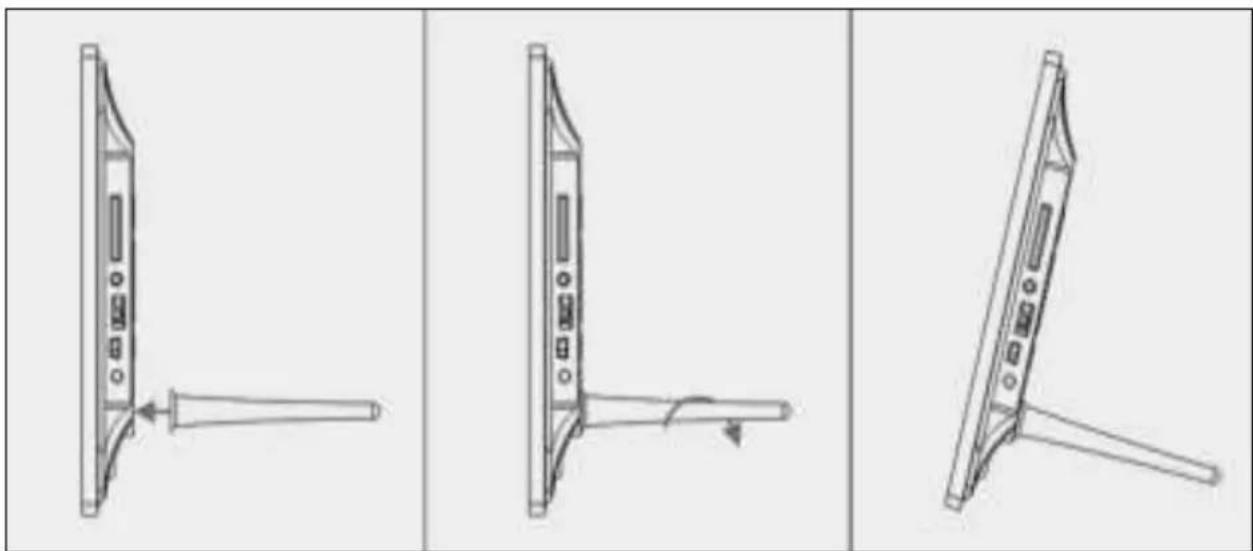
1. Stand Instruction
Insert the bracket into the slot of the digital photo frame and rotate the bracket clockwise to set it tight. Please make sure the bracket is locked before
then put it on the table steadily .Please refer to the illustration showing below.
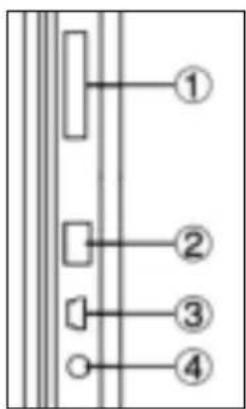
2. Back side Buttons and left side of the frame

- SD/MMC/MS CARD
- USB
- HDMI
- DC IN
2b. Remote Control
- Mute: Mute speaker output
- Source: Press it to select input source (HDMI-IN/DMP)
- Power: Switch On/Off
- Photo: Press to show photos
- Music: Press to play music
- Movie: Press to play movies
- ▶ II Play/Pause: Press to start playback in stop or pause modes, and press again to pause
- Exit - Return to previous page
- ← Navigation left
- ▶ Navigation right
- ▲ Navigation up
- ▼ Navigation down
- Enter: Press to confirm
- Setup: Enter setup mode
- Toolbar: Enter info bar or delete photo, music, video file
- VOL +: Turn up the volume
- VOL -: Turn down the volume
- ◀ Rewind music or video file
- ▶▶ Fast forward in music or video file
- ◀ Previous music or video file
- ▶▶ Next music or video file

2c. Installing & Replacing the Battery
Turn the remote control upside down; press down the ridged area of the battery cover and pull towards you to remove the tray. Place one CR2025 lithium button-cell battery on the tray with the positive "+" side facing you. Reinsert the tray.

3. Getting Started
3.1 Plug one end of the included AC adapter into a standard 110-240V AC electrical outlet and the other end into DC in of the photo frame.
3.2 Remove the protective film covering the LCD.
3.3 Remove the plastic battery insulator from the battery compartment and make sure that the remote control has a battery inserted. Please refer to "Installing & Replacing the Battery" if you need a new battery.
3.4 Power on the unit by pressing the Power button on the remote control.
4. Operating Instructions
After turning the unit on it will show the start-up picture.

4.1 Main Menu
After showing the start-up picture, it will automatically enter the main menu.


= Common

= Time, Clock

= P lay, Setup

= System
USB and Memory Card
The unit supports SD/MMC/MS and USB 2.0. Press Enter to select the source device.

Note:
1) Make sure there are supported picture, music and video files on the card or USB device.
2) You can also select Auto-play Photo, Music, Movie or Photo + Movie in the Common menu.
5. Picture Mode
Highlight Photo from the main menu or press the PHOTO button on the remote control to display the photos stored on the USB drive or SD card. Press the EXIT button on the remote control to display the photo file list of the memory device.
Press ▲▼◀▶ to highlight and select the photo to be displayed and press ENTER to display the photo.
Press the EXIT button on the remote control to display the memory device menu. Press ◀ ▶ to highlight and select the memory device (card/USB) and press ENTER to display the photos stored on this device.

Picture Playback
When playing the single picture, press Toolbar to enter information bar and set up the item.

Note:
1) In the setup menu, press ◀ ▶ to enter the time setup menu, here you can set up Time format, Time position, Time colour of the time bar.
2) In the sub-menu Time format you can select "Off" to close the time bar.
3) Press Toolbar to enter info bar, then use ◀ ▶ to operate.
6. Music Mode
Highlight Music from the main menu or press the MUSIC button on the remote control to play the music stored on the USB drive or SD card.
Press the EXIT button on the remote control to display the music file list of the memory device.
Press ▲ ▼ ◀ ▶ to highlight and select the music be played and press ENTER to play the music.
Press the EXIT button on the remote control to display the memory device menu. Press ◀ ▶ to highlight and select the memory device and press ENTER to display the music stored on this device.

Music Playback
During music playback, press Toolbar to enter the music information bar, select with ◀ ▶ and press Enter to operate.

Note:
1) In the setup menu, press ◀ ▶ to enter the time setup menu, here you can set up Time format, Time position, Time colour of the time bar.
2) In the sub-menu of Time format, you can select "Off" to close the time bar.
3) Press Toolbar to enter info bar, then use ◀▶ to operate.
7. Video Mode
Highlight Video from the main menu or press the VIDEO button on the remote control to display the videos stored on the USB drive or SD card. Press the EXIT button on the remote control to display the video file list of the memory device.
Press ▲ ▼ ◀ ▶ to highlight and select the video to be played and press ENTER to play the video. Press the EXIT button on the remote control to display the memory device menu. Press ◀ ▶ to highlight and select the memory device and press ENTER to display the videos stored on this device.

Video Playback
When playing a single video, press Toolbar to enter info bar to set up.

Note:
1) In the setup menu, press ◀ ▶ to enter the time setup menu, here you can set up Time format, Time position, Time colour of the time bar.
2) In the sub-menu of Time format, you can select "Off" to close the time bar.
3) Press Toolbar to enter info bar, then use ◀▶ to operate.
8. Scrolling Subtitle Function
The unit supports scrolling subtitles when playing photo, music, video files.

Follow these steps to set up scrolling subtitle:
a) Create a TXT file.
b) Save as TXT file in "Unicode" format and name it "SCROLL.TXT" in CAPITALS.

c) Copy this TXT file to USB stick or memory card.
d) Insert the USB stick or memory card, it will show the subtitle when playing the photo, music or movie file.
9. HDMI-IN Function
Connect the HDMI-out device to HDMI-IN interface of the photo frame. Press Source and select input source "HDMI".

10. Insert commercial
Insert commercials, please refer to Play setup 11.4.
11. Setup
11.1 Setup Menu

Highlight Common in the main menu, press Enter to access, press ▲▼ to select the item (Note: press Exit to return to the main menu and press SETUP to return to the previous menu).

11.1.1 Language: DE, EN, FR, IT, ES, PT, NL, SV, GR
11.1.2 Media Type: Press Enter, then select "Photo, Music, Movie, Photo + Movie" to setup Auto-play. Photo + Movie means playing Photos and Movies combined
11.1.3 Background music On/OFF
11.1.4 Slide Mode: Off/On.
11.1.5 Slide Time: 3S/5S/10S/30S/60S.
11.1.6 Repeat Mode: All/One/Off.
11.1.7 Scroll Subtitle: Black, White, Red, Blue, Green, Off.
11.1.8 Copy: Supports copy function between memory card and USB disk.
11.1.9 Restore Factory Default: Press Enter and use ◀ ▶ to select or deselect reset.
11.2 Time Setup

Highlight Time in the main menu, press Enter and use ◀ ▶ to select and access the Time setup menu. Press ▲▼ to select the item and press ◀▶ to confirm (Note: press Exit to return to the main menu and press SETUP to return to the previous menu).

11.2.1 Clock: Press ▲▼, then use ▲▼◀▶ to set up Date, Month, Year, Hour, Minute, Sec and press Enter to confirm.
11.2.2 Auto Power on/off
Press ▲▼, then use ▲▼◀▶ to select "Once, Every Day, Off" to set up the frequency of Auto Power on/off.
Use ▲▼◀▶ to enter and select the desired alarm.
Use ▲▼◀▶ to select Off/On. If selecting "On", then you can set up Hour and Min, to Auto power on/off.
11.2.3 Time Style: Press ▲▼, then use ◀▶ to select Time format. Press Enter to confirm.
11.2.4 Time Position: Press ▲▼, then use ◀▶ to select "Right-Top, Left-Top". Press Enter to confirm.
11.2.5 Time Colour: Press ▲ ▼ and select with ◀ ▶ "White, Black, Red, Blue, Yellow" to set up the desired time colour, then press Enter to confirm.
11.3 Picture Setup

Highlight System in the main menu, press Enter and use ◀ ▶ to select and access the picture setup menu. Press ▲ ▼ to select the item and press Enter to confirm (Note: press Exit to return to the main menu and press SETUP to return to the previous menu).

11.3.1 Picture Mode:
a) Press ◀ ▶ to select "Standard, Mild, User, Dynamic".
b) If selecting "User", you can set up the following: Contrast: Use ◀ ▶ to select from 00 (lowest) to 100 (highest).
Colour: Use ◀▶ to select from 00 (lowest) to 100 (highest).
Sharpness: Use ◀▶ to select from 00 (lowest) to 100 (highest)
11.3.2 Aspect Ratio: Fit, Just Scan, Panorama
11.3.3 Picture Adjust
a) Press ◀ ▶ to select "Cool, Medium, Warm, User".
b) If selecting "User", you can set up the following: Red: Use ◀ ▶ to select from 00 (lowest) to 100 (highest).
Green: Use ◀ ▶ to select from 00 (lowest) to 100 (highest).
Blue: Use ◀ ▶ to select from 00 (lowest) to 100 (highest)
11.4 Play Setup

To insert a commercial during playback, press the arrow buttons to set up the interval time (e.g. 5 minutes) for playing the commercial.
Create a folder named "Advert" on the SD card or USB drive and save the commercial in this folder.
When switching the unit on, the “normal” videos, which are stored on SD card or USB drive, will be played. After the set interval time has elapsed (in this example 5 minutes), the commercial is played. After the commercial has ended, playback of the “normal” video will resume. This is repeated every time after the set interval has elapsed.
12. Technical Specifications
• A dapter: Input AC 100-240V 50/60HZ
Output DC: 12V/2A
• Picture Format: JPEG
• Audio Format: MP3
• Video formats: MPEG1, MPEG2, MPEG4, Divx4.0, Divx5.0, M-JPEG, AVI, MOV, RMVB
• Memory Cards: SD/SDHC/MS/MMC
- USB: USB Host
- Screen Parameter:
Screen Size: 33.8 cm, 13.3 inch TFT
Resolution: 1366x768 Pixel
Aspect Ratio: 16:9
Operating temperature: 0°\~40°
Moisture: 10 - 85%
13. Troubleshooting Guide
If you are having problems with your player, please consult this guide. If you need further assistance, please contact Technical Support.
No power:
- Please check whether the plug is inserted correctly.
Remote control no function:
- Please check whether the battery has power (the battery can be used for half a year in normal conditions). Replace with new battery if necessary.
Can not read the CARD or USB:
- Please confirm whether there is storage in the card or USB device.
• Empty devices cannot be read.
Can not play the file:
- Please confirm if the file format is compatible with the player.
Display too bright or too dark:
- Please adjust the brightness or contrast in the setup menu.
The color is light or no color:
- Please adjust the color and contrast setup.
No sound:
- Please check whether the volume is correct and the player is not in Mute mode.
Introduction:

= Common = Commun

= Time, Clock = Horaire

= P lay, Setup = Parametres de lecture

= System = Système
Remarque :
Remarque :
Remarque :
11.3.1 Mode image :
- On/Off
- Su (UP)
- Volume +/Destra
- Play/Pausa/OK
- Volume -/Sinistra
- Giù (DOWN)
- MENU

= Common = Commune

= Time, Clock = Orario

Nota:
Nota:
Nota:
3. Primeros pasos

= Common = Comun

= Time, Clock = Tiempo

= P lay, Setup = Ajuste de reproduccion

= System = Sistema
Nota:
Nota:
3. Aan de Slag

= Common = Algemen

= Time, Clock = Tijd

= P lay, Setup = Afspel instellingen

= System = System
USB en Geheugenkaart
Opmerking:
Opmerking:
Opmerking:
11.1.1 Taal: DE, EN, FR, IT, ES, PT, NL, SV, GR.
11.1.2 Mediatype: Druk op Enter en selecteer vervolgens "Photo, Music, Movie, Photo+Movie" om de Automatische Weergave in te stellen. Photo+Movie betekerit gecombineert weergave.
11.3.1 Beeldmodus:
= Common = Comun
= Time, Clock = Horario
= P lay, Setup = Ajuste de reproducao
= System = Sistema
Nota:
Nota:
Nota:
VARNINGSINFORMATION:
- SD/MMC/MS-minne-skort
- USB
- HDMI
- ELANSLUTNING
2b. Fjärrkontroll
3.Erste Schritte

= Common = Allmän

= Time, Clock = Tid

Obs:
Obs:
Obs:


- BRAUN®
- ERSTE SCHRITTE
- HINWEIS
- CONTENTS
- PACKAGING CHECK LIST
- CAUTIONS
- PRECAUTIONS AND MAINTENANCE
- CLEANING THE LCD SCREEN
- WARNING
- NOTE
- FEATURES
- STAND INSTRUCTION
- BACK SIDE BUTTONS AND LEFT SIDE OF THE FRAME
- 2B. REMOTE CONTROL
- 2C. INSTALLING & REPLACING THE BATTERY
- GETTING STARTED
- OPERATING INSTRUCTIONS
- 4.1 MAIN MENU
- USB AND MEMORY CARD
- PICTURE MODE
- PICTURE PLAYBACK
- MUSIC MODE
- MUSIC PLAYBACK
- VIDEO MODE
- VIDEO PLAYBACK
- SCROLLING SUBTITLE FUNCTION
- HDMI-IN FUNCTION
- INSERT COMMERCIAL
- SETUP
- 11.1 SETUP MENU
- 11.2 TIME SETUP
- 11.3 PICTURE SETUP
- 11.4 PLAY SETUP
- TECHNICAL SPECIFICATIONS
- TROUBLESHOOTING GUIDE
- NO POWER
- REMOTE CONTROL NO FUNCTION
- CAN NOT READ THE CARD OR USB
- CAN NOT PLAY THE FILE
- DISPLAY TOO BRIGHT OR TOO DARK
- THE COLOR IS LIGHT OR NO COLOR
- NO SOUND
- INTRODUCTION
- REMARQUE
- NOTA
- PRIMEROS PASOS
- AAN DE SLAG
- USB EN GEHEUGENKAART
- OPMERKING
- VARNINGSINFORMATION
- 2B. FJÄRRKONTROLL
- 3.ERSTE SCHRITTE
- OBS
Brand : BRAUN
Model : DigiFrame 1360
Category : Digital photo frame