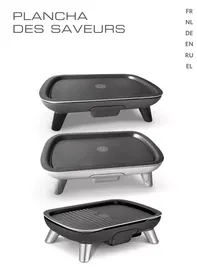
GRILL N PACK - Electric grill TEFAL - Free user manual and instructions
Find the device manual for free GRILL N PACK TEFAL in PDF.

| Brand | TEFAL |
| Model | GRILL N PACK |
| Product type | Electric grill |
| Usage | Domestic, can be used outdoors |
| Power supply | Grounded power outlet, 220-240 V, 50-60 Hz |
| Power | Approximately 2000 W (estimate) |
| Thermostat | Adjustable, from Mini to Maxi position |
| Preheating | 10 to 15 minutes on Maxi position |
| Cooking function | Grill with water addition during cooking |
| Cooking plate | Removable grill plate |
| Heating element | Removable, safety system prevents start-up if poorly positioned |
| Reflector | Removable, do not store in water |
| Protective cover | Removable, locks with two clips |
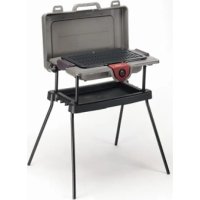
| Support legs (depending on model) | Removable, store under the shelf |
| Shelf (depending on model) | Removable, serves as storage |
| Safety | Do not use unattended, hot surfaces, grounded outlet, 30 mA differential circuit breaker |
| Maintenance and cleaning | Grill plate: non-metallic sponge, no scouring powder; do not immerse the appliance |
| Storage | Can be stored vertically, cord stored in the reflector |
| Spare parts and repairability | Cable replacement by manufacturer or after-sales service; parts: grill plate, heating element, reflector, cover |
| Compliance | Low Voltage Directive, EMC, materials in contact with food, Environment |
Frequently Asked Questions - GRILL N PACK TEFAL
User questions about GRILL N PACK TEFAL
0 question about this device. Answer the ones you know or ask your own.
Ask a new question about this device
Download the instructions for your Electric grill in PDF format for free! Find your manual GRILL N PACK - TEFAL and take your electronic device back in hand. On this page are published all the documents necessary for the use of your device. GRILL N PACK by TEFAL.
USER MANUAL GRILL N PACK TEFAL
Thank you for buying this TEFAL appliance, which is intended for domestic use only. Read the instructions in this leaflet carefully and keep them within reach. They apply to every version depending on the accessories that come with your appliance (NB: the parts with a * in front of their reference number are only delivered with certain models).
For your safety, this product conforms to all applicable standards and regulations (Low Voltage Directive, Electromagnetic Compatibility, Food Compliant Materials, Environment, ...).
The appliance is suitable for outdoor use.
TEFAL has an ongoing policy of research and development and may modify these products without prior notice.
The drawings shown on page 2 illustrate the instructions.
Any solid or liquid foodstuff that comes into contact with the parts marked with the logo should not be consumed.
Prevention of accidents at home
For a child, even a slight burn may sometimes be serious.
As they grow up, teach your children to be careful around hot appliances in the kitchen.
If you do use your appliance in the company of children:
Always use it under adult supervision.
- Never touch the hot surfaces of the appliance.
- Never leave the appliance unattended when plugged in or in use.
If an accident occurs, rinse the burn immediately with cold water and call a doctor if necessary.
Assembly
-
Open the appliance by raising the two clips (1). A
-
Open the protection lid (2) until it locks in the open position. B
If the lid is closed, a device (6a) prevents the appliance switching on. D
Depending on the model, remove the storage shelf (*12).
Before first use:
- Remove any packaging, stickers or accessories inside and outside the appliance.
- Clean the grill plate (4) : follow the instructions in the section "After use".
Place the reflector (7) in the base of the appliance (8): the curved part of the reflector (7a) must be positioned towards the front. D
Place the heating element (5) on the reflector (7) then press firmly on the control panel (6) to position it in the housing
provided for this purpose, so that the safety system is activated. D
If the heating element is incorrectly positioned, the safety system will prevent the appliance from working.
Position the grill plate (4) on the appliance (the pattern 4a must be placed on the back) and lock it in place using the two handles (3). D
- Depending on model :
Take out the support legs (11) stored underneath the storage shelf (12). - Insert the support legs (11) into the storage shelf (12). E12
- Turn over the storage shelf (12) and then open the two supports (13).
- Place the barbecue on the two supports (*13).
Make sure that the lugs (14) are correctly fitted into the slots (15) underneath the appliance.
Connection and pre-heating
It is essential to pour 4 litres of water into the base of the appliance (8) to ensure that the barbecue works properly. D

Pour the water into the opening (8a) provided for this purpose at the rear of the base of the appliance (8). D

If your appliance is not equipped with support legs ( - 11 / 12 / *13) , place it on a stable heat resistant surface.
Do not use it on a flexible type of support, such as a rubberised protective cloth.
GB
Never place the appliance directly onto a fragile surface (glass table, cloth, varnished furniture...).
To avoid overheating of the appliance, we recommend you do not place it in a corner or against a wall.
Unwind the cord completely.
Check that your electrical installation is compatible with the power and the voltage indicated under the appliance.
You should regularly examine the power supply cord so as to detect any signs of wear. Do not use the appliance if the cord is damaged.
If the power supply cord is damaged, it must be replaced by the manufacturer or its service agent or a similarly qualified person in order to avoid any danger.
Connect the appliance to a socket with an earth connection.
Supply the appliance through a residual current device (RCD) having a tripping current not exceeding 30mA .
If an extension cord is used:
- it must be with an incorporated earth connection;
- take every precaution to ensure that people cannot become caught up in it.
Plug the cord into the mains.
Never plug the appliance in when not in use.
Never use the appliance when it is empty.
Never use the appliance with the protection lid (2) closed. D
Set the thermostat to the Maxi position.
Leave to pre-heat the appliance for 10-15 minutes.
On first use, the appliance may smell slightly and possibly give off smoke for the first few minutes - this is normal.
Never leave the appliance unattended when in use.
WARNING: do not use charcoal or any other combustible material in the appliance.
Cooking
After pre-heating, the appliance is ready to be used.
Set the thermostat to the position of your choice.
Leave to cook depending on your taste.
Ensure that there is always water in the base during the use of the appliance.
If water needs to be added during cooking, pour it into the opening (8a) provided for this purpose at the rear of the base of the appliance (8). D

Do not touch metallic parts while the appliance is on as they are very hot.
Do not cook food in tinfoil.
Never place aluminium foil or anything else between the grill plate and the food to be cooked.
Never put aluminium foil in the reflector.
Do not place cooking utensils to heat on the appliance.
After use
Never leave the reflector in the water between each use.
Set the thermostat to the min. position.
Unplug the appliance and let it cool down before removing the grill plate (4), the heating element (5) and the reflector (7). D
Never close over the protection lid (2) if the appliance is still hot. D
The grill plate (4), the reflector (7), the base of the appliance (8) and the protection lid (2) can be cleaned with a sponge, hot water and washing up liquid. D
To remove the grill plate (4), unlock it from the appliance using the handles (3). D
To remove the protection lid (2):
Take hold of the handle, lift the protection lid (2) and then incline it towards you. F
- When the identical shapes in the hinge axis and the hole in the lid (9) are opposite one another, the lid may be removed by slightly extending the lid towards the outside. G
Do not use a metal scourer or scouring powder.
To clean the grill plate (4), the sponge can be replaced by a brush.
The heating element (5) does not need cleaning. D
If it is really dirty, rub with a dry cloth when cold.
Never immerse the appliance in water with its heating element and its cord.
Storage
Place the heating element (5) on the reflector (7) then insert the control panel (6) properly in its place. D
Put the power supply cord (10) in the compartment provided for this purpose behind the control panel (6), and then store it in the reflector (7). H
Place the grill plate (4) on the appliance and lock it in place using the two handles (3). D
Put the protection lid (2) back in place by extending it slightly, taking care to match up the identical shapes in the hinge axis and the hole in the lid (9).
- Depending on the model:
- Remove the appliance from the two supports (13) and fold up the storage shelf (12) as shown in the drawings E4 -> E3 -> E2 -> E1
- Place the storage shelf (*12) upside down on top of the appliance (opposite of C).
Close the protection lid (2): take hold of the handle, lift the protection lid (2) and then pull towards you. F
Lock the protection lid in place (2) by closing the two clips (1) (opposite of A71).
The appliance may be stored vertically.
For U.K. users only :
If you have any problems or queries, please contact our Customer Relations team on : HELPLINE 0845 602 1454 - UK (01) 4751947 - Ireland www.tefal.co.uk
This product has been designed for domestic use only. Any commercial use, inappropriate use or failure to comply with the instructions, the manufacturer accepts no responsibility and the guarantee will not apply.
Desenrolle completenessel cable.
Environment protection first!
- Your appliance contains valuable materials which can be recovered or recycled.
- Leave it at a local civic waste collection point.