
e-Vivacity - Scooter PEUGEOT - Free user manual and instructions
Find the device manual for free e-Vivacity PEUGEOT in PDF.


| Product type | Electric scooter |
| Brand | Peugeot |
| Model | e-Vivacity |
| Dimensions (L × W × H) | 1950 × 670 × 1150 mm |
| Kerb weight | 120 kg |
| Range | Approximately 80 km (depending on usage conditions) |
| Battery | Lithium-ion 48 V / 24 Ah (removable) |
| Motor | Central electric motor, rated power 3 kW |
| Brakes | Front disc brake, rear drum brake |
| Top speed | 45 km/h (governed, moped category) |
| Tires | Front: 120/70-12, Rear: 130/60-13 |
| Lighting | LED headlight, LED tail lights and indicators |
| Main features | Keyless start, digital dashboard, USB port for smartphone charging |
| Maintenance and cleaning | Clean with a soft cloth, avoid high-pressure water jets. Check tire pressure and brake condition regularly. |
| Safety | Steering lock, battery cut-off switch, regenerative braking |
| Spare parts and repairability | Parts available at Peugeot dealerships. Removable battery, motor and controller repairable by a professional. |
| General information | Approved for two people, 2-year factory warranty, battery warranty 1 year or 10,000 km |
Frequently Asked Questions - e-Vivacity PEUGEOT
User questions about e-Vivacity PEUGEOT
0 question about this device. Answer the ones you know or ask your own.
Ask a new question about this device
Download the instructions for your Scooter in PDF format for free! Find your manual e-Vivacity - PEUGEOT and take your electronic device back in hand. On this page are published all the documents necessary for the use of your device. e-Vivacity by PEUGEOT.
USER MANUAL e-Vivacity PEUGEOT

natural_image
Side view of a white electric scooter with black seat and visible branding (no text or symbols)| FR | Notice d'utilisation |
| GB | Owner's manual |
| DE | Bedienungsanleitung |
| IT | Libretto d'istruzioni |
| ES | Manual de utilización |
| NL | Gebruikershandleiding |
| GR | ΕΓΧΕΙΡΙΔΙΟΧΡΗΣΤΗ |
| SE | Instruktionsbok |
| PT | Manual de proprietàrio |
| FI | Käyttöohjekirja |
| DK | Instruktionsbog |
SOMMAIRE
| Type mines | |
| V3AFAA Version 45 km/h | |
| V3AGAA Version 25 km/h | |

INSTRUMENTS
natural_image
Technical line drawing of a mechanical device with labeled parts (no text or symbols present)CONSEILS DE MISE EN ROUTE ET DE CONDUITE
AVERTISSEMENT
natural_image
Diagram of a car interior showing a coiled cable and valve mechanism (no text or labels)CHARGE DE LA BATTERIE DE TRACTION
natural_image
Top-down diagram of a car's front wheel and dashboard (no text or symbols)
REMPLACEMENT DES AMPOULES
Ampoule de phare
natural_image
Line drawing of a motorcycle's seat and side arm, no text or symbols presentCONTENTS
Information.... 1
Introduction....1
Safety advice....2
Characteristics 3
Products to use.... 3
Information about the instructions.... 4
Description of the vehicle.... 5
Instruments....6
Display functions....7
The various operating modes....7
Controls 8
Equipments....9
Accessory socket....9
Key-operated ignition switch functions 9
Checks to perform before use....9
Inspection before setting off....9
Advice for starting up and driving ....10
Warning 10
Driving....10
Starting off 10
Accelerating and decelerating 10
Braking....10
Stopping the vehicle and parking.... 10
Special important points.... 11
Transponder-equipped immobiliser 11
Traction battery....11
Charging cord 11
Charging the traction battery 11
Autonomy / Energy saving.... 12
Level checks.... 12
Tyres....12
Fuses....13
Bulb replacement 13
Headlight adjustment.... 14
INFORMATION
You have just bought a Peugeot vehicle.
We would like to thank you for purchasing one of our products.
Please take some time to read this manual carefully before using the vehicle.
This user manual should always be kept in the boot of the vehicle. It contains instructions for use, checks and maintenance of the vehicle, and important safety instructions intended to protect the user and third parties against accidents.
These instructions provide you with plenty of advice to allow you to maintain a vehicle in perfect working order.
Your authorised dealer is familiar with all the vehicle's characteristics and has genuine spare parts and specific tools. He can advise you and service your vehicle in the best conditions according to the established service schedule to ensure that you can enjoy driving it in complete safety.
INTRODUCTION
Your electric scooter is fitted with a 33 volt permanent magnet synchronous motor powered by a traction battery composed of two 24 volt Lithium ion type modules which can be recycled and reused at the end of their life.
This zero emission motor is fitted both with system to recovery energy in the deceleration phase allowing current to be reinjected into the traction battery and a reversing system to facilitate low speed manoeuvring.
ECUs record, manage and check the driver's orders, the use of electrical power and the operating safety devices.
The vehicle has 1 or 2 chargers for recharging the traction battery (depending on the model).
SAFETY ADVICE
A inexperienced motorcyclist should make himself completely familiar with his vehicle before going out in traffic. You are strongly advised not to lend your vehicle to an inexperienced rider.
To ride a motorbike, you are required by law to hold a licence or to have completed specific training with a professional, depending on the applicable legislation and based on engine capacity.
Both the user and passenger are required to wear an approved helmet. It is also recommended that you wear protective gloves and glasses as well as garments with a reflective insert that provide suitable protection for motorists on two-wheels.
In some countries, the applicable legislation may not authorise transportation of a passenger, and elsewhere it may oblige motorcycle users to contract a civil liability insurance policy to protect third parties and the passenger against potential damage resulting from an accident.
Driving whilst under the influence of alcohol, drugs or certain medicines is inexcusable and dangerous for yourself and others.
Excessive speed is an important factor in many accidents. You must observe the road signs and signals and adapt your speed to the weather conditions.
Luggage carriers and paniers approved by PEUGEOT SCOOTERS are available as options (depending on the model). The assembly instructions must be complied with and the maximum permissible load (3 to 5 kg depending on the equipment) must not be exceeded.
Mounting adaptable parts that have not been approved by PEUGEOT SCOOTERS, which alter the technical characteristics or performances of the vehicle is forbidden. Any modification will invalidate the warranty and the vehicle will no longer be in compliance with the version approved by the appropriate services.
The vehicle identification data required under Directive 97/24/EC features on the control label placed on the vehicle. It represents a measure against tampering with mopeds and light motorcycles.

Any electrical appliance represents a potential danger. Only a suitably qualified repairer can intervene on your electric scooter.
Your scooter is powered by a soundless
electric motor. Near certain traffic zones such as pedestrian areas or cycle paths, you are advised to warn other road users of your presence using the various horns fitted to this vehicle.

A release of gas can take place if one of the conditions below is not met (Abnormal use conditions).
• Overcharging the traction battery by using a charger that has not been approved by PEUGEOT SCOOTERS.
• Overheating of the traction battery following a charging incident or the vehicle being stored at a temperature over 40^ C.
- Short circuit between the terminals of the traction battery, a short circuit due to work on the electric harness or one of the vehicle's components.
In this case: You are advised to have the vehicle checked by an authorised dealer.
CHARACTERISTICS
| Official type-approval code | ||
| V3AFAA 45 | km/h version | |
| V3AGAA 25 | km/h version | |
| Dimensions in mm | ||
| Length 1910 | ||
| Width 680 | ||
| Height 1168 | ||
| Wheelbase 1338 | ||
| Weight in kg | ||
| In working order 115 | ||
| Authorised maximum. Total weight of the vehicle, the user, the passenger, the accessories and luggage | 290 | |
| Capacities in litres | ||
| Relay box oil 0.1 | ||
| Engine | ||
| Type | Three-phase synchronous motor with permanent magnets | |
| Power 3 KW | ||
| Tension 33 V | ||
| Tyres dimensions | |
| Front 120/70-12 | |
| Charge and minimum speed ratings | 37B |
| Rear 120/70-12 | |
| Charge and minimum speed ratings | 51B |
| Pressure in bars | |
| Front 1.8 | |
| Rear 2.2 | |
| Lighting | |
| Headlight bulb | 12V-35/35W |
| Indicator bulbs | 12V-2.3W |
| Stop/tail bulb | 12V-21/5W |
| Traction battery | |
| Type | 2 modules Lithium-ion |
| Tension | 24 V x2 |
| Capacity | 45 Ah to 20°C |
PRODUCTS TO USE
| Relay box oil |
| SAE 80W90 API GL4 |
| Brake fluid |
| DOT 4 |
| Fork oil |
| SAE 10W |
INFORMATION ABOUT THE INSTRUCTIONS
Specific information is indicated by the following symbols:

Recyclable

Means that the product or the package can be recycled.

Irritant
The product can irritate the skin, eyes and respiratory organs.
Avoid contact with skin and clothes. Wear gloves, safety glasses and appropriate clothing such as a cotton overall. Do not breath fumes. If in contact, wash thoroughly with water.

Flammable
Keep it away from any flame or heat source (barbecue, radiator, heating, etc.). Do not leave the product in the sun.

Corrosive
The product can damage living tissues or other surfaces.
Avoid contact with skin and clothes. Wear gloves, safety glasses and appropriate clothing such as a cotton overall. Do not breath fumes. If in contact, wash thoroughly with water.

Explosive
Avoid impacts, friction, sparks and heat.

Hazardous to the environment
The product affects fauna and flora. Do not dump it in dustbins, sinks or in the environment. The ideal solution is to bring this
product to your nearest household waste recycling centre.

Toxic
The product can seriously affect health if it is inhaled, ingested or in contact with skin. Avoid direct contact with the body, even by
inhalation. If you feel unwell, seek medical advice immediately.

Do not throw away into a garbage can
One of the product's component is toxic and can be hazardous to environment. Do not throw the used product in the dustbin. Take it
back to the trader or to a specific waste disposal site.

People's safety
Operation that can be dangerous for people.
People's safety can be seriously affected if the recommendations are not fully respected.

Important
Operation that can be hazardous to the vehicle.
Indicate the specific procedures that shall be n order not to damage the vehicle.

Note
Operation that can be difficult.
Indicate a note which gives key information to procedure easier.
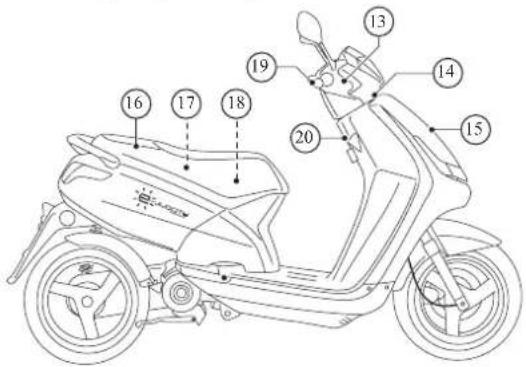
DESCRIPTION OF THE VEHICLE
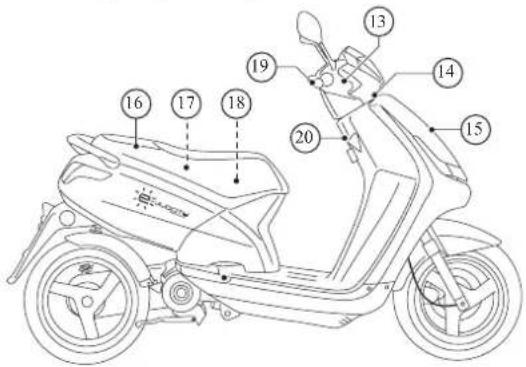
- Brake levers
- Instrument panel
- Charging cord
- Anti-tamper label
- Fuses
- Grab handle
- Engine number
- Central stand
- Passenger footrests
- Lateral stand
- Manufacturer's plate / Chassis markings
-
Utility hanger
-
Brake fluid level
- Opening the storage compartment
- Front storage compartment
- Saddle
- Saddle storage compartment
- Accessory socket
- Throttle
- Ignition switch / Opening the saddle

INSTRUMENTS
Each time the contact is made, after pressing the starter button, the headlight turns on and the instrument panel initialises: A function test of the display unit segments and lighting of all indicator lights are performed automatically.
- Main beam control
When the contact is made, after pressing the starter button, the indicator light turns on for 3 seconds.
- Direction indicator warning light
When the contact is made, after pressing the starter button, the indicator light turns on for 3 seconds.
When a flasher bulb has failed the repeater light and the other flasher light flash more quickly to alert the rider of a failure.
A buzzer reminds the driver of the direction indicators.
- Transponder diagnostic warning light
When the contact is made, after pressing the starter button, the indicator light turns on for 3 seconds followed by a short time lit, then turns off if there is no incident.
If the indicator light blinks for a short time and then stays lit, and the instrument panel does not turn on, the diagnostic function has detected an anomaly with the anti-start system and the traction system is overridden.
In this case: You are advised to have the vehicle checked by an authorised dealer.
When the contact is cut, the indicator light blinks for a short time, which indicates that the anti-start system has locked the traction system.
The transponder diagnostic indicator light blinks while the traction battery is being charged.
- Multi-function display
- Display control knob
- Operating mode selection button

DISPLAY FUNCTIONS

A. Speedometer
B. Operating mode indicator
The change of operating mode is only possible if the speed of the vehicle is less than 5km/hour and the throttle is released.
When switching on the ignition, select the desired operating mode after pressing the starter button.
You can change the operating mode by successive pushes on the mode button.
Each change of operating mode is validated by the emission of one or more audible signals and the selected operating mode is displayed on the dashboard.
The various operating modes

-Manoeuvring: This operating mode intended to facilitate vehicle manoeuvres restricts the speed to approximately 5km/hour when the throttle is turned.

-Normal: This operating mode restricts the speed to 45km/hour.
This mode is directly accessible using a specific procedure.

-Economy: This operating mode restricts the speed to approximately 25km/hour.

-Reverse: This operating mode restricts the speed to approximately 3km/hour when the throttle is turned.
modes
Diagram of the different operating

flowchart
graph TD
    A["MODE"] --> B["Person"]
    A --> C["Motor"]
    B --> D["x1"]
    B --> E["x3"]
    C --> F["x1"]
    C --> G["x3"]
    D --> H["x1"]
    E --> I["x3"]
    F --> J["x1"]
    G --> K["x3"]
    H --> L["x1"]
    I --> M["x3"]
    J --> N["x1"]
    K --> O["x3"]
    style A fill:#f9f,stroke:#333
    style B fill:#ccf,stroke:#333
    style C fill:#ccf,stroke:#333
    style D fill:#cfc,stroke:#333
    style E fill:#cfc,stroke:#333
    style F fill:#cfc,stroke:#333
    style G fill:#cfc,stroke:#333
    style H fill:#fcc,stroke:#333
    style I fill:#fcc,stroke:#333
    style J fill:#fcc,stroke:#333
    style K fill:#fcc,stroke:#333
    style L fill:#cff,stroke:#333
    style M fill:#cff,stroke:#333
C. Traction battery charge indicator
While the battery is charging, the E-VIVACITY E logo is lighted with green segments rotating around it and the charge level indicator segments flash in succession according to the quantity of energy stored by the traction battery. The highest level on the charge level indicator flashes until 100% charge is reached.
D. Traction battery charge level indicator.
When the 10 segments are lighted, this indicates that the traction battery is fully charged. It is represented by 7 green segments, 2 orange segments and 1 red segment.
The orange segments and the red segment represent the energy reserve.
When the reserve is reached, the segments flash continuously and then go off one after the other and cause the vehicle to stop.
E. Autonomy counter
The autonomy counter displays an estimation of the remaining range in kilometers. The remaining autonomy is estimated at each stop and can reduce based on decreases in the ambient temperature, the weight of the load being transported and the type of use.
F. Traction battery temperature indicator
When the traction battery temperature is too high, all the segments light up.
Safe mode will be activated. You are advised to switch off the vehicle and wait for it to cool down. You are advised to have the vehicle checked by an authorised dealer.
G. Engine temperature gauge
When the motor temperature is too high, all the segments come on.
Safe mode will be activated. You are advised to switch off the vehicle and wait for it to cool down. You are advised to have the vehicle checked by an authorised dealer.
H. Outside temperature gauge
The temperature shown is that read on the front of the vehicle.
The "risk of black ice" symbol comes on as soon as the temperature falls below3°C.
J. Traction system diagnostic indicator light
The indicator light comes on when the ignition is turned on to check it is operational and comes off after 3 seconds if there are no faults.
If an incident occurs, the driver is informed by the light.

•The light comes on and stays on. Serious safety fault or fault which could lead to destruction of the engine, the vehicle must be stopped.
•The light flashes.
Serious fault affecting the functioning or riding comfort.

K.Maintenance indicator
The maintenance indicator goes on 5000 kms after the last reset.
You are advised to go to an authorised dealer to have the vehicle serviced and the message on the maintenance indicator erased.
L. Milometer. Tripmeter (TRIP)
The tripmeter displays and stores the number of kilometres travelled by the vehicle. The machine total kilometres remains in the memory when the battery is disconnected.
Each time the contact is made, the instrument panel automatically displays the odometer mode.
The tripmeter displays and stores the number of kilometers travelled during a given period.
Changing from the total distance display to the daily
8/14 Reproduction or translation, even partial, is forbidden without the written consent of Peugeot Scooters
distance display
- With the ignition on, changeover from the total distance to the daily distance display and inversely is by briefly pressing the control button (1).
Resetting the tripmeter
- Multifunction display on.
- Display the daily counter (Trip) with a short press on the control button (1).
- The daily counter is reset by pressing more than 3 seconds on the control button (1).
M. Setting the clock
- Multifunction display on.
It is only possible to set the time in the total kilometres position with the machine stationary.
Pressing the control button (1) for more than 3 seconds will make the two hour digits flash.
- Set the time by successive pushes on the control button.
Pressing the control button for more than 3 seconds will make the first digit of the minutes flash.
- Change the minutes by successive pushes on the control button.
Pressing the control button for more than 3 seconds will make the second digit of the minutes flash.
- Change the minutes by successive pushes on the control button.
- Press the control button for more than 2 seconds to confirm the clock setting.
CONTROLS
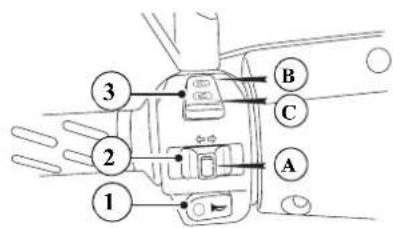
-
Horn switch
-
Indicators switch
To indicate a change of direction, press the switch:
- Either to the right.
- Or to the left.
To stop the indicators flashing, press the switch (A).
- Dipped lights/Headlights switch
The dipped lights/headlights switch has 2 functions:
B.High beam
C.Dip beam.

- Pedestrian warning button/Starter button
This button has 2 functions:
- When the ignition is switched on, pressing this button will power up the traction system.
- When driving, this is a low power audible signal to warn pedestrians and cyclists of your approach.
EQUIPMENTS
Accessory socket
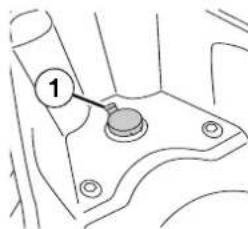
An accessory socket (max. 12 V - 50 W), which is powered when the ignition is turned on, is located in the storage compartment under the saddle (1).
It can be used to connect low-voltage devices (mobile phone, GPS, etc.).
KEY-OPERATED IGNITION SWITCH FUNCTIONS
A. Power to the electrical circuit is off. The key can be removed.
B. Power to the electrical circuit is on. The key cannot be removed.

With the ignition on, after an extended period at halt or if the key is forgotten in the ignition, the electrical circuit is systematically switched off after 5 minutes after an audible signal.
Simply pressing on the starter button will reconnect the electrical circuit and allow you to select an operating mode using the "MODE" button on the instrument panel.
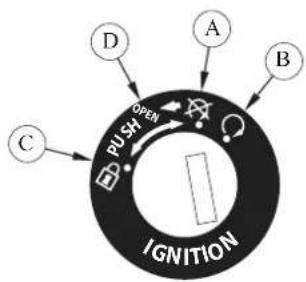
C. Power to the electrical circuit is off. The handlebars are turned to the left. Steering can be locked. The key can be removed.
D. Action of the key in this position allows you to open the saddle with a cable device.
CHECKS TO PERFORM BEFORE USE
The user must personally ensure that his vehicle is in good condition. Certain safety elements may show signs of damage even when the vehicle is not used. e.g. prolonged exposure to bad weather can lead to oxidation in the braking system or a pressure drop in the tyres which can have serious consequences. In addition to a simple visual inspection, it is extremely important to check the following points before use.

These checks only take a few minutes and help to keep your vehicle in good condition, for optimum use combining reliability and safety.
If one if the elements in the checklist does not
work properly, ask your registered dealer to check it and have it repaired if necessary before using the vehicle.
INSPECTION BEFORE SETTING OFF
- Disconnect the charging cord from the mains socket if necessary and store it in its housing.
- Check the traction battery charge level.
- Check operation of the lights, flashers, horn, and brake light.
- Check the tyre wear and condition.
- Check the tyre pressure.
- Check that the throttle is working properly.
- Check that the central and side stands can be unfolded smoothly.
- Check that the rear-view mirrors are in the correct position.
- Check that the dashboard is working correctly and that no warning lights are lit. If they don't work, have the system checked by a registered dealer.
- Check that the brake levers are working and moving properly.
If a brake lever feels soft when pulled:

Front brake:
- If it is a hydraulic control, it must be checked immediately by a registered dealer.
Rear brake:
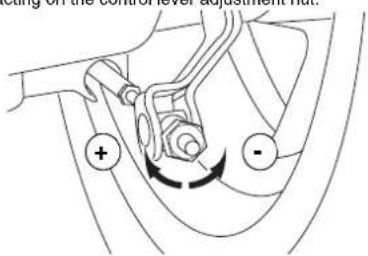
- If it is a mechanical control, you must adjust the tension by acting on the control lever adjustment nut.
ADVICE FOR STARTING UP AND DRIVING
WARNING
GB
Before using the vehicle for the first time, make sure you are familiar with all the controls and their respective uses. If you are not sure about the functions of any of the controls, your registered dealer can answer your questions and give you any help you may require.
DRIVING
Starting off
- Stand is folded back.
- Sit on the vehicle.
- Ensure that the throttle is in the OFF position.
Starting in normal mode:
- Turn on the ignition.
- Activate the left brake lever.
- Press the starter button.
- Release the starter button when the headlight and the instrument panel are on.

- Release the left brake lever.
"Normal" operating mode should appear on the display. Otherwise, either repeat the operation from the creation of the contact, or finalise the selection using the "Mode" button.
Starting by selecting a driving mode:
- Turn on the ignition.
- Press the starter button.
- Release the starter button as soon as the headlight and the instrument panel turn on.
- Select the desired operating mode using button "MODE" on the instrument panel.

If the instrument panel does not turn on, repeat the starting procedure.

If the traction system diagnostic indicator light (J) remains on after the starting procedure, it is recommended that you repeat the operation and if the problem persists, it is recommended contact an authorised distributor.
Accelerating and decelerating
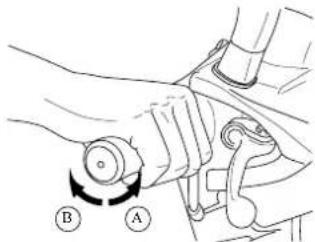
To accelerate, turn the throttle towards (A). To slow down, turn the throttle towards (B).
Braking
The right lever controls the front brake and the left lever controls the rear brake.
For good braking, it is very important to coordinate the following actions:
- Close the throttle.
- Operate the left and right brake levers simultaneously and slowly increase the pressure.

Using only one brake reduces braking efficiency and can lock the wheel, causing a fall.
Braking suddenly on a wet road or in a bend should be avoided.
Reduce speed on steep slopes to avoid prolonged braking, as overheating will reduce braking efficiency.
STOPPING THE VEHICLE AND PARKING
The vehicle is stopped and all the circuits are switched off by turning the ignition key to "OFF".

When the contact is cut, the transponder indicator light stops blinking after a few seconds.
If the transponder indicator light continues to blink rapidly after the contact has been cut, it is recommended to see an authorised distributor as soon as possible to avoid deterioration of the traction battery.
The vehicle should be parked on flat ground.
- Either on the middle stand.
- Or on the lateral stand.
Each time the vehicle is parked, the steering should be locked and the ignition key removed.

You are advised not to leave any objects in the storage compartments, whatever the value (helmet, document-holder, etc.). The manufacturer may not be held liable in the
event of theft.

It is important to protect the base of the saddle storage compartment against any entry of water.
Transporting or storing any containers of liquid products in the saddle storage compartment is strongly discouraged.
SPECIAL IMPORTANT POINTS
TRANSPONDER-EQUIPPED IMMOBILISER
This anti-theft system lets the vehicle start when it electronically acknowledges the transponder built into the ignition key. Only programmed keys can start the vehicle. A transponder diagnostic indicator light on the instrument panel makes it possible to start the anti-theft system during the vehicle starting procedure.
Ignition keys

The vehicle is supplied with two types of keys.
A.A unique "master" key. The special "master" key featuring a red marking is not intended for daily use. This key is used to reprogram the system should the black key be misplaced.
The whole anti-theft system must be replaced if the "master" key should be lost.

Each time the vehicle is serviced, you are advised to supply your authorised dealer with the "master" key to carry out possible system updates.
B.A unique black key used to operate the vehicle.
The black key is special since it also features a transponder containing an identification code which is stored by the anti-theft system during programming. It is possible to program up to 6 black keys on the system. Should a black key be misplaced, it is advisable to contact an authorised dealer to reprogram the system with at least once new black key or with all the black keys, using the "master" key to cancel the engine start-up with the lost key.
TRACTION BATTERY
The traction battery's technology enables partial recharges without affecting its useful life, so you can charge it as often as possible without waiting for it to become discharged.

Use of an additional charger is not authorised. Failure to follow this recommendation will lead to the breakdown of the traction battery.

In case of insufficient charge, an ECU first of all triggers a downgraded safe operating mode, then immobilises the vehicle to avoid damaging the traction battery by completely discharging it. The traction battery must be
immediately charged to avoid its self-discharge causing it to fall below the voltage threshold that will render it unusable.

The traction battery does not require any maintenance but in the event of prolonged disuse, it must be recharged regularly.

If the traction battery gives off an unusual smell, you are advised to have it checked by an authorised dealer.
Batteries contain harmful products. In the event of leaks or accident, you are advised to consult an approved dealer who is equipped to remove it and dispose of batteries in a way that is not harmful to nature or the environment.
CHARGING CORD
A charging cord is coiled in the compartment under saddle. It is designed to be connected to a 230V -10/16A electrical socket protected by a 30 mA differential circuit breaker.
The charging cord must be positioned carefully in one of the passages intended for this purpose before reclosing the storage compartment.

natural_image
Diagram of a car interior showing a coiled cable and directional arrows indicating movement or force (no text or symbols present)CHARGING THE TRACTION BATTERY
The charging zone must be fitted with a 230V -10/16A electrical socket protected by a 30 mA differential circuit breaker. It must be far from any heat source.
As soon as the charging cord is connected to an electric socket, the charging process is automatically commanded and the traction system is neutralised.
During charging of the traction battery.
• The transponder diagnostic indicator light blinks.
• The charging indicator is active.
• The charge level indicator is active.
While the traction battery is charging, the dashboard display goes into standby after 30 seconds of inactivity. Press one of the keys to reactivate it to check the charging status.
In case of deep discharge, a delay will be needed before the first segment of the charge level indicator blinks.
The time to charge the traction battery, managed by an ECU, depends on the estimated autonomy remaining.
The battery temperature and ambient temperature can be affected during charging.
- The vehicle must not be parked or stored in an area where the temperature exceeds 40°C.
- If the temperature is close to 8^ , the charging will slow down.
- If the temperature is close to -10^ charging will be greatly slowed down.
An empty battery requires on average 5 hours of charging to achieve 100% charge and 3 hours for 80% charge. (model with 2 chargers)
An empty battery requires on average 8 hours of charging to achieve 100% charge and 5 hours for 80% charge. (model with 1 charger)
The charging can be interrupted at any time without affecting the operation of the traction system.

No operations, maintenance or washing are allowed on the vehicle while the traction battery is charging.
AUTONOMY / ENERGY SAVING
The autonomy of an electric scooter depends first and foremost on the way the energy is consumed. You are advised to comply with the following instructions:
- Maintain a constant speed, avoiding frequent stopping and starting.
- Manage your speed according to the estimation shown on the autonomy counter and the steepness of your route.
- Slow without sudden braking to benefit from the energy recovery system.
- Ensure that the tyres are the correct pressure and the brake clearance is correct.
- Ensure that the weight of the user, the passenger, luggage and accessories does not exceed the maximum authorised load.
Average autonomy:
- 60 km Normal mode.
- 120km Eco mode.

Transporting a passenger or other additional load, the fitting of an accessory such as a windshield, as well as climate conditions such as a temperature below zero, all affect the
autonomy of the vehicle.
Managing your energy consumption is also a way of participating in environmental respect on a personal level.
LEVEL CHECKS
Brake fluid

The brake fluid levels must be checked regularly through the braking unit inspection window (A). If the level is close to the minimum mark, we advise you to go to a registered dealer to have the
braking system checked and topped up if necessary.

TYRES
Tyre pressure should be cold-checked regularly.
Incorrect pressure causes abnormal wear and affects road behaviour, thus making driving dangerous.
Tyre pressure that is too low significantly reduces traction battery autonomy due to an over-consumption of energy caused by friction.
If the wear limit on the tread is reached (B), you are advised to go to a registered dealer to change the tyres.
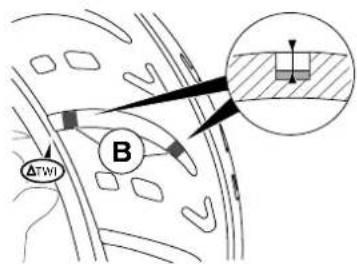

When replacing tyres, you are advised to mount tyres of the same brand and equivalent quality. In case of puncture, it is forbidden to mount an inner tube in a tubeless tyre.

Tyres contain substances that are harmful to the environment. Your dealer is equipped to dispose of used tyres without endangering the environment in compliance with current
standards.
FUSES
The electrical system is protected by the fuses located under the storage compartment.
If a fuse often blows this is usually a sign of a short circuit in the electrical circuit. You are advised to have the system checked by a registered dealer.

You are advised to switch off the ignition before changing a fuse and always to replace it with a fuse of the same rating. If you do not do so, this may lead to damage in the electrical
circuit or even a fire.

Any electrical appliance represents a potential danger. Only a suitably qualified repairer can intervene on your electric scooter.
Replacing a fuse
- Open the saddle.
- Remove the access door (3 screw).
- Checking the condition of the fuses.

natural_image
Top-down schematic of a vehicle's front view showing dashboard, steering wheel, and seat (no text or labels)
Any work involving removal and refitting, for cleaning or other purpose involving the storage compartment components, must be done with the utmost care.
It is important to protect the base of the storage compartment from any entry of water.
FUSE ALLOCATION
| F1 | Not used |
| F25A | Starting circuit |
| F35A | 12-volt plug |
| F415A | Transponder antennaInstrument panelAcceleration potentiometerConverter relayTraction battery regulating calculatorElectrical traction calculatorDiagnostic plugLightingHorn |
| F510A | Converter |
| F620A | Battery charge circuit |
BULB REPLACEMENT
Headlight bulb
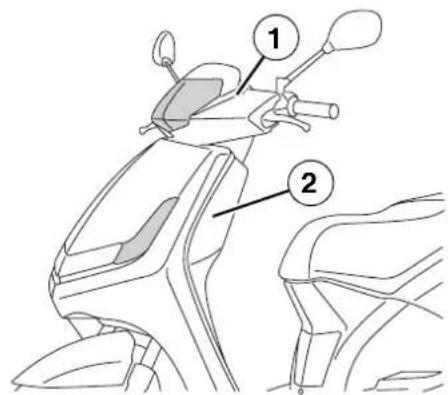
- Remove the headlight fairing (1).

You are advised to contact a registered dealer to have this operation carried out.
GB
Indicator bulbs
- Remove the rear shield panel (2).
- Remove the 3 screws that secure the front turnsignal light.

You are advised to contact a registered dealer to have this operation carried out.
Rear light and indicator bulbs
- Remove the saddle storage compartment (1).
- Remove the grab handle (2).
- Remove all the rear shieldings (3).
GB


You are advised to contact a registered dealer to have this operation carried out.
HEADLIGHT ADJUSTMENT
The headlight is adjusted using a screw located under the headlight.

natural_image
Line drawing of a motorcycle's seat and side arm, no text or symbols presentINHALT
INSTRUMENTE
K.Wartungsanzeige
natural_image
Diagram of a car interior showing a coiled cable and directional arrows indicating movement or force (no text or symbols present)LADEN DER ANTRIEBSBATTERIE
natural_image
Top-down schematic of a vehicle's front view showing dashboard, steering wheel, and dashboard (no text or labels)
Blinkerleuchten
natural_image
Line drawing of a motorcycle's seat and side arm, showing no text or symbolsINDICE

STRUMENTAZIONE
natural_image
Diagram of a mechanical device with labeled parts (no text or symbols present)natural_image
Diagram of a car interior showing a coiled cable and valve mechanism (no text or symbols)natural_image
Top-down schematic of a vehicle's front view showing dashboard, steering wheel, and seat (no text or labels)


natural_image
Line drawing of a motorcycle's seat and side arm, no text or symbols presentSUMARIO

INSTRUMENTOS
natural_image
Technical line drawing of a mechanical device with labeled component (no text or symbols)natural_image
Diagram of a car interior showing a coiled cable and directional arrows indicating movement or force (no text or symbols present)CARGA DE LA BATERÍA DE TRACCION
natural_image
Top-down schematic of a vehicle's rearview dashboard and steering wheel (no text or labels)
ES
AJUSTE DE LOS FAROS
natural_image
Line drawing of a motorcycle's seat and side arm, showing no text or symbols
INFORMATIE MET BETREKKING TOT DE HANDLEIDING

INSTRUMENTEN
natural_image
Technical line drawing of a mechanical device with labeled parts (no text or symbols present)natural_image
Diagram of a car interior showing a coiled cable and directional arrows indicating movement or force (no text or symbols present)LADING VAN DE TRACTIEBATTERIJ
natural_image
Top-down schematic of a vehicle's front view showing dashboard, steering wheel, and seat (no text or labels)
NL
NL

natural_image
Line drawing of a motorcycle's seat and side arm, no text or symbols present
ПЕРИЕХОМЕНА
ΠΛΗΡΟΦΟΡΙΕΣ 1
ΠΑΡΟΥΣΓΙΑΣΗ 1

ОРГАНА
Α.Ταχύμετρο
natural_image
Technical line drawing of a mechanical device with labeled parts (no text or symbols present)natural_image
Diagram of a car interior showing a coiled cable and directional arrows indicating movement or force (no text or symbols present)natural_image
Top-down schematic of a vehicle's rearview dashboard and steering wheel (no text or symbols)Λυχνία φλας

natural_image
Line drawing of a motorcycle's seat and wheel assembly (no text or symbols)
INNEHÅLLSFÖRTECKNING

INSTRUMENT
K. Serviceindikator
natural_image
Technical line drawing of a mechanical device with labeled parts (no text or symbols present)GRANSKNING INNAN AVFÄRDEN
RÅD INFÖR IGÅNGSÄTTNINGEN OCH KÖRNINGEN
WARNING
natural_image
Diagram of a car interior showing a coiled cable and directional arrows indicating movement or force (no text or symbols present)LADDNING AV DRIVBATTERIET
natural_image
Top-down schematic of a car dashboard and steering wheel (no text or labels)
natural_image
Line drawing of a motorcycle's seat and side arm, showing no text or symbolsSUMÁRIO
INFORMAÇÕES ACERCA DAS INSTRUÇÕES
INSTRUMENTOS
natural_image
Technical line drawing of a mechanical device with labeled parts (no text or symbols present)natural_image
Diagram of a mechanical or electrical component with no visible text, numbers, or symbolsnatural_image
Diagram of a car interior showing a coiled cable and directional arrows indicating movement or force (no text or symbols present)natural_image
Top-down schematic of a vehicle's front view showing dashboard, steering wheel, and steering wheel (no text or labels)
natural_image
Line drawing of a motorcycle's seat and side arm, showing no text or symbolsSISÄLLYSLUETTELO

FI
MITTARISTO
A. Nopeusmittari
natural_image
Technical line drawing of a mechanical device with labeled component (no text or symbols)VIRTALUKON TOIMINNOT
KÄYTTÖÖNOTTO- JA AJO-OHJEET
VAROITUS
natural_image
Diagram of a car interior showing a coiled cable and directional arrows indicating movement or force (no text or symbols present)AJOAKUN LATAUS
natural_image
Top-down schematic of a vehicle's rearview dashboard and steering wheel (no text or symbols)
natural_image
Line drawing of a motorcycle's seat and side arm, showing no text or symbolsINDHOLDSFORTEGNELSE
PRODUKTER, DER SKAL BRUGES
| Gearkasseolie |
| SAE 80W90 API GL4 |
| Bremsevæske |
| DOT 4 |
| Gaffelolie |
| SAE 10W |
INFORMATIONER VEDR∅RENDE VEJLEDNINGEN

INSTRUMENTER
K. Serviceindikator
natural_image
Technical line drawing of a mechanical device with labeled component (no text or symbols)RÅD OM START OG K∅RSEL
ADVARSEL
natural_image
Diagram of a car interior showing a coiled cable and two arrows indicating connection points (no text or symbols present)OPLADNING AF TRÆKBATTERIET
natural_image
Top-down schematic of a vehicle's front view showing dashboard, steering wheel, and gear (no text or labels)
Blinklygtepærer
natural_image
Line drawing of a motorcycle's seat and side arm, showing no text or symbolsDK
CERTIFIÉ ISO 9001
Peugeot Scooters recommande
MOTUL

natural_image
Side view of a white electric scooter with black seat and blue wheels (no visible text or symbols)- SOMMAIRE
- INSTRUMENTS
- CONSEILS DE MISE EN ROUTE ET DE CONDUITE
- AVERTISSEMENT
- CHARGE DE LA BATTERIE DE TRACTION
- REMPLACEMENT DES AMPOULES
- Ampoule de phare
- CONTENTS
- INFORMATION
- INTRODUCTION
- SAFETY ADVICE
- INFORMATION ABOUT THE INSTRUCTIONS
- Recyclable
- Irritant
- Flammable
- Corrosive
- Explosive
- Hazardous to the environment
- Toxic
- Do not throw away into a garbage can
- People's safety
- Important
- Note
- DESCRIPTION OF THE VEHICLE
- Autonomy counter
- Traction battery temperature indicator
- Engine temperature gauge
- Outside temperature gauge
- distance display
- Resetting the tripmeter
- EQUIPMENTS
- KEY-OPERATED IGNITION SWITCH FUNCTIONS
- CHECKS TO PERFORM BEFORE USE
- INSPECTION BEFORE SETTING OFF
- ADVICE FOR STARTING UP AND DRIVING
- WARNING
- GB
- DRIVING
- Starting off
- Braking
- STOPPING THE VEHICLE AND PARKING
- SPECIAL IMPORTANT POINTS
- TRANSPONDER-EQUIPPED IMMOBILISER
- Ignition keys
- The vehicle is supplied with two types of keys.
- TRACTION BATTERY
- CHARGING CORD
- CHARGING THE TRACTION BATTERY
- AUTONOMY / ENERGY SAVING
- Average autonomy:
- LEVEL CHECKS
- Brake fluid
- TYRES
- FUSES
- Replacing a fuse
- FUSE ALLOCATION
- BULB REPLACEMENT
- Headlight bulb
- Indicator bulbs
- Rear light and indicator bulbs
- HEADLIGHT ADJUSTMENT
- INHALT
- INSTRUMENTE
- Blinkerleuchten
- INDICE
- STRUMENTAZIONE
- SUMARIO
- INSTRUMENTOS
- CARGA DE LA BATERÍA DE TRACCION
- AJUSTE DE LOS FAROS
- INFORMATIE MET BETREKKING TOT DE HANDLEIDING
- INSTRUMENTEN
- LADING VAN DE TRACTIEBATTERIJ
- ПЕРИЕХОМЕНА
- ОРГАНА
- Λυχνία φλας
- INNEHÅLLSFÖRTECKNING
- INSTRUMENT
- GRANSKNING INNAN AVFÄRDEN
- RÅD INFÖR IGÅNGSÄTTNINGEN OCH KÖRNINGEN
- SUMÁRIO
- INFORMAÇÕES ACERCA DAS INSTRUÇÕES
- SISÄLLYSLUETTELO
- MITTARISTO
- VIRTALUKON TOIMINNOT
- KÄYTTÖÖNOTTO- JA AJO-OHJEET
- VAROITUS
- AJOAKUN LATAUS
- INDHOLDSFORTEGNELSE
- INFORMATIONER VEDR∅RENDE VEJLEDNINGEN
- INSTRUMENTER
- RÅD OM START OG K∅RSEL
- ADVARSEL
- OPLADNING AF TRÆKBATTERIET
- Blinklygtepærer
- Peugeot Scooters recommande
- MOTUL
Brand : PEUGEOT
Model : e-Vivacity
Category : Scooter