
Elystar ADV 4Temps - Scooter PEUGEOT - Free user manual and instructions
Find the device manual for free Elystar ADV 4Temps PEUGEOT in PDF.


| Product Type | Scooter |
| Brand | PEUGEOT |
| Model | Elystar ADV 4Temps |
| Overall Length | 1900 mm |
| Overall Width (excluding mirrors) | 720 mm |
| Overall Height (including mirrors) | 1230 mm |
| Wheelbase | 1368 mm |
| Weight (full tanks) | 155 kg |
| Fuel Tank Capacity | 9.0 L |
| Engine Oil Capacity | 1.25 L |
| Coolant Capacity | 1.6 L |
| Engine Type | 4-stroke, single cylinder |
| Displacement | 124.8 cm³ |
| Bore x Stroke | 57 x 48.9 mm |
| Compression Ratio | 11.7:1 |
| Transmission | Trapezoidal belt and reduction gear |
| Battery | 12V - 12Ah |
| Fuses | 10A (accessories), 25A (main) |
| Front Tyre | 120/70 x 12, 1.6 bar |
| Rear Tyre | 130/70 x 12, 1.8 bar |
| Brakes | Hydraulic disc front and rear |
| Ignition / Anti-theft | Electronic transponder system |
| Service Interval | First 500 km, then every 5000 km |
| Headlight Bulb | H4 60/55W |
Frequently Asked Questions - Elystar ADV 4Temps PEUGEOT
User questions about Elystar ADV 4Temps PEUGEOT
0 question about this device. Answer the ones you know or ask your own.
Ask a new question about this device
Download the instructions for your Scooter in PDF format for free! Find your manual Elystar ADV 4Temps - PEUGEOT and take your electronic device back in hand. On this page are published all the documents necessary for the use of your device. Elystar ADV 4Temps by PEUGEOT.
USER MANUAL Elystar ADV 4Temps PEUGEOT
natural_image
Side profile of a silver and gray electric scooter (no visible text or symbols)Owner's manual
Elystar ADV 4 Temps
Information
Information /Prolonged immobilisation 2-3
Equipment....4
Instrument panel ....5
Electronic display....6
Switch....7
Petrol / Oil 8
Check and change engine oil....9
Check and change coolant ....10
Battery / Fuse....11
Lighting / Signalling 12
Starting the engine 13
Running / driving....14
Spark plug / Air filter .....14
Braking 15
Tyres 16
Removing / Refitting front / rear wheel ......17
Transponder....18
Specifications....19
Please take the time to read it carefully.
Information
You have just purchased a PEUGEOT scooter. Thank you for the confidence that you have shown in our company.
This guide describes how to control, use and perform basic maintenance on your new PEUGEOT scooter. As with all high technology machinery, you will find it easier to control and you will obtain the best results from your SCOOTER if you use it and maintain it with care and attention. Your dealer will advise and inform you and use his experience to strictly respect the maintenance plan this is essential to keep your scooter in perfect working condition. Your PEUGEOT dealer knows all your scooter's special features. He has PEUGEOT original parts and special tools to perform standard maintenance on your scooter under optimum conditions.
Safety recommendations
The safety of a scooter depends on the care taken by its driver.
Excessive speed is a decisive factor in many accidents. Respect speed limits and never go faster than is safe under the road conditions. Take care not to skid on road marking lines. Always do a general check before using your scooter to make sure that it can be used safely. Traffic rules require that the driver and his passenger wear a helmet. It is also recommended that you wear gloves, an eye protection and bright and visible clothes to increase safety. A new Scooter driver should become familiar with his scooter before starting to drive in traffic. A scooter driver must signal his presence to other users by:
- Switching on his lights when in motion
- Avoiding driving in places in which he is not visible to other vehicles
- Driving carefully
- Taking special care at intersections, car park entrances and exits, and slip roads.
Your scooter is designed for town use on the road only. Optional luggage and briefcase carriers are designed to transport lightweight objects. Make sure that the weight is distributed evenly and that loads are securely fastened:
Maximum Loads : 3 kg
Your scooter is designed to satisfy legal requirements, please do not make any modifications to it particularly to the exhaust.
Use only petrol, oil and lubricants tested and recommended by PEUGEOT.
Maintenance recommendation
In order to keep your scooter in a safe and reliable riding condition, do not modify it and only use genuine PEUGEOT parts for maintenance and repair. Use of other spare parts may detrimentel to your vehicle
If your scooter is involved in a crash, have the main parts checked carefully, for example all parts making up the frame, suspension and steering system. This inspection will help to restore essential safety conditions.
It is recommended that you make a general check after storing your scooter for an extended period of time.
To avoid injury, always make sure that the engine is switched off and the scooter is stable on its stand on a flat surface before performing any maintenance operations.
Take your scooter to a Peugeot dealer to do any repair work, checks, tune-ups, maintenance or to obtain recommendations for use.
The bodywork is made of plastic parts coated with special paints making it easy to keep it looking as good as new.
Cleaning consists of washing dirty parts with soapy water or with a mild detergent, rinsing frequently with clean water and drying with a chamois leather.
In general do not use high pressure cleaners or solvents such as petrol or highly alkaline detergents.
You can always call a Peugeot dealer if in doubt. He will advise you about how to use maintenance products or to repair scratched or grazed parts.
In the event of prolonged immobilisation of the vehicle, (longer than 1 month), it necessary by precaution to :
- Remove the battery and to store it in a horizontal position in a dry and cool place, recharge it (see page 23) before and after storage if necessary
Start the engine after storage :
If the vehicle has been stored for more than 1 month, drain the fuel tank, the carburator float chamber and fill with new fuel.
- Activate the starter without accelerating.
Starter activation time can last up to 7 seconds.
- If the engine does not start within 7 seconds,
wait 3 to 5 seconds and repeat the previous action.
- Repeat these two operations until the engine
starts (the number of actions on the starter depends on the time the vehicle has been stored.
Once the engine has started, gradually accelerate while braking until the engine warms up (the time to reach the temperature depends on the time the vehicle has been stored). The engine will provide optimum performance only after running a certain time, depending on the external temperature.
Inspection before the vehicle leaves
What the buyer has to do.
To check
- The fuel level
- The oil level
- The possible leaks
- The state of the tyres and their inflating
- The level of the brake fluid
- The level of cooling fluid
- The state of wear of the brake pads
To check the smooth working of
- The front and the back brakes
- The accelerator
- The front and back lightings
- The stop light and the indicators
- The horn
For best operation of your engine, use only non-leaded petrol 95 or 98
For reasons of continuous improvement, Peugeot Motocycles reserves the right to modify, delete or add any part number quoted (photos non-contractual)
Copyright forbidden without any written authorisation from Peugeot Motocycles.
Protection of the environment
General points
- A worn spark plug, an incorrectly fixed interference suppresser, a clogged up air filter, a poorly adjusted carburettor are all potential sources of problems which may lead to a significant reduction in the life span of the catalytic converter and the exhaust system.
- In the event of dismantling, check the tightness on the cylinder end after reassembly (it is essential to replace the seal).
- Any changes made to engine specifications (ignition, carburation, timing, ...) is likely to lead to the rapid destruction of the exhaust system.
Fuel / Lubricant
- Use only unleaded fuel
- Avoid to run out of fuel while driving
- Use only the recommended lubricants
- Don't use any additives for fuel or lubricants
Ignition
- In case of misfiring or loss of power, slow down and cut off the engine as described.
Contact your local dealer when the problems persists
Cutting off the engine
- Switch off ignition only when the engine runs at idle speed
Starting the engine
- In case of problems when starting the engine, contact your dealer to have it checked
Using your vehicle
- Avoid driving or stationing your vehicle on flammable underground (e.g. dry leaves)
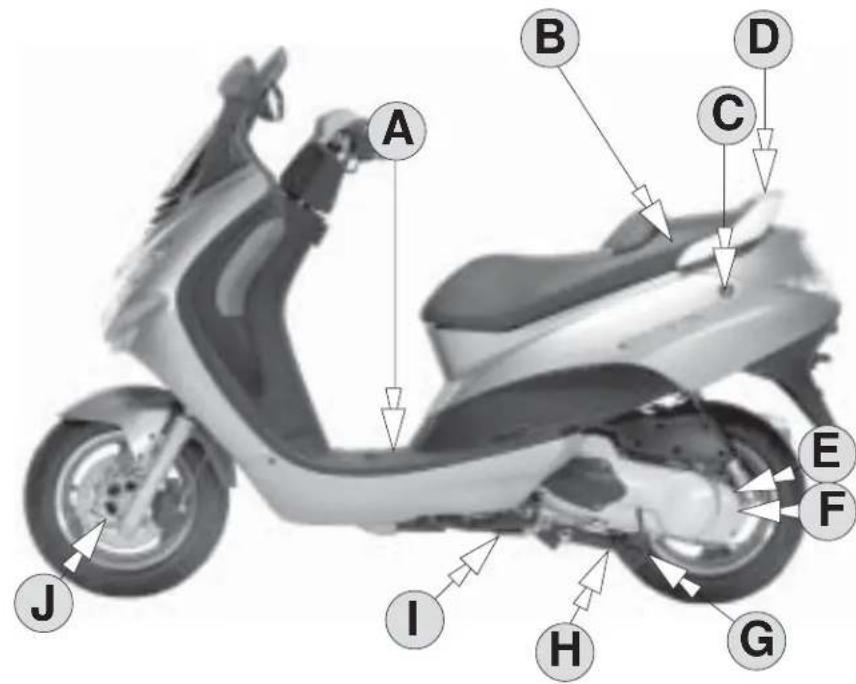
Equipement
Ⓐ - Battery housing
B - Manufacturer's plate
© - Saddle lock
(D) - Passenger support handle
E - Rear brake
(F) - Engine number
G - Stand lever
H - Central stand with lever
① - Side stand *
(with automatic lift)
J - Front disk brake
(K) - Expansion vessel cover
L - Bag hook *
M - Ignition key
N - Throttle
© - Flap
P - Hand glove box
@ - Rear brake fluid level
® - Rear brake lever
S - Front brake fluid level
T - Front brake lever

flowchart
graph TD
    K --> L
    L --> M
    M --> N
    N --> O
    O --> P
    P --> K

* According to the model


natural_image
Close-up of a car dashboard with multiple gauges and a speedometer, no visible text or symbols on the main display.
Instrument panel
① - Speedometer
The needle shows the vehicle speed in km/h or mph.
② - Oil pressure telltale
Warning
If the oil pressure telltale comes on when driving, it is essential to stop the vehicle and to check the level of engine oil (see level of engine oil page 19).
③ - Coolant temperature indicator
If the needle goes into the red area, it is essential to stop the engine and to wait for it to cool down (check the level as shown on page 21 and go to a dealer's)
④ - Indicator light
⑤ - Headlight indicator light
⑥ - Antit theft warning light
⑦ - Electronic display
see page 13


Electronic display
⑧ - Mileage counter
- (TOTAL) Indicates the total distance travelled either in Km or in miles.
- By pressing button A the display will change to the trip counter and vice versa.
⑨ - Trip counter
- (TRIP) Indicates the trip distance travelled in Km or in miles.
- The trip counter can be reset by keeping button A pressed down for more than 5 seconds when the trip counter value is displayed.
10 - Digital clock
The clock displays the hours and the minutes, the “::” flash on and off. In order to set the time (which must be done with the vehicle at a standstill and with the counter on ‘TOTAL’), keep button Ⓐ pressed down for more than 2 seconds, the hour figure will flash on and off; to change it, press button Ⓐ . In order to move to the next figure, keep button Ⓐ pressed down for more than 2 seconds. When the last figure has been set, keep button Ⓐ pressed down for more than 2 seconds.
11 - Fuel level indicator
The 8 segments indicate the fuel level; the vehicle is running on its reserve capacity when the first two segments are flashing. The reserve capacity covers about 20 km.
12 - Service indicator \*
After the first 500 km and every 5000 km thereafter, the indication “- - - -” appears on the clock display for 10 seconds each time the engine is started; this means that the vehicle should go in for a service. In order to reset the counter after the service, turn on the ignition whilst simultaneously pressing button A
* According to the model

Ignition keys and locks
Two keys are supplied with the scooter and are identified by a number. Please keep them apart and note the reference number. The ignition key :
- Makes the contact when starting
- Locks the steering
- Unlocks the saddle and the hand glove box
① - Starter switch
A - Engine stopped
B - Electrical contact position. Starter and signal functions may be used.
© - Steering locked
② - Light switch
D - Lighting off
E - Lighting front sidelight, speedometer and rear light, number plate.
F - Lighting beadlights or dipped beadlights according to the position of the reverser high beam/low beam, speedometer and rear light number plate
③ - Starter button
Start as described on page 27.
④ - Dimmer high beam/low beam
⑤ - Turn signal light switch
To signal a change of direction : - To the right, push the switch to G - To the left, push the switch to H The indicator is turned off by pressing the central button I
6 - Horn button
⑦ - Button for brief headlight activation

natural_image
Close-up of a white scooter seat with a small circular button on the side (no visible text or symbols)

GB For best operation of your engine, use only non-leaded petrol 95 or 98
- Insert the ignition key in the lock at the back of the left side, rotate it a quarter of a turn towards the right and lift the saddle.
To close
- Press the back of the saddle: you do not need the key. The seat storage compartment gives access to :
A - Helmet housing
B - Petrol tank
- At the engine oil filter neck
Do not store flammable products or materials in the seat storage compartment
B - Petrol
For best operation of your engine, use only non-leaded petrol 95 or 98
Do not add any additives to the fuel
Do not allow water or any grit or particles to enter the tank when filling.
4-STROKE ENGINE, do not use a mixture of petrol and oil.
Warning
Petrol is an extremely inflammable substance that can explode under some conditions. Fill up with petrol in a well ventilated location with the engine switched off. Do not smoke, do not allow flames or sparks close to the scooter or close to the place in which the petrol is stored. Do not overfill your tank. Petrol must not reach the neck of the filling orifice. Make sure that the plug is well closed after filling.
Petrol is a dangerous substance and can be fatal if swallowed.
Avoid repeated and prolonged contact with the skin and do not inhale the vapors. Keep out of reach of children. Do not cause vomiting if petrol is swallowed. Call a doctor immediately.
© - Oil
Filler neck of engine oil housing.
4-stroke engine :
- Do not use 2-stroke engine oil
- Never exceed the maximum level on the peephole on the engine
- Important note: Read page 19 of this manual
- Do not add any additives to the lubricant

recommande
recommends
empfiehlt

4T SPECIAL 10W40
UNIFLO 10W40

natural_image
Exploded view diagram of a mechanical assembly showing internal components and fasteners (no text or labels)Checking and changing engine oil
(Frequency : see maintenance booklet)
- Checking engine oil level.
Engine cold or at a standstill for at least 10 minutes,
- Put the vehicle onto its central stand on level ground
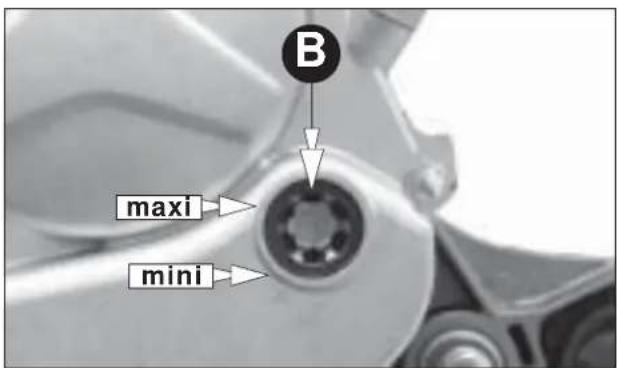
- Check the oil level contained in the engine housing using the
peephole B located on the lower right hand side of the engine; the level should always be above the minimum level but never above the maximum level. The oil level is topped up through the filler neck A
Important
The difference between the max. and min. oil level is approximately 0.25 litre.
Use of the vehicle if the oil level is less than the min. level or more than the max. level, may cause irremediable damage to the engine.
- Changing the engine oil
Changing the engine oil must be carried out when the engine is at least warm in order to facilitate oil flow.
Warning
The engine oil, housings, cylinder head and exhaust pipe can reach very high temperatures, be careful of the risk of burning. Used engine oil must be disposed of at a purpose-built recycling point.
- Put the vehicle onto its central stand on level ground,
- Place a container with a capacity of at least 1.5 litres under he oil ge hole
- Wear protective gloves
- Loosen and remove the oil change plug and filter
- Let the oil run into the container
- Wipe the oil change plug C and filter D with a clean cloth and change the tightness seal E
- Retighten the plug with the filter and a seal in place in the housing
- Filling / Topping up
- Slowly fill the engine housing via the oil fill hole with new 4-stroke oil A
- Do not exceed the max. level of the sight glass B
- Make sure that there is no leak around the oil change plug
- Check the oil level in the engine housing as described in the level checking procedure
- After having run the engine for a few minutes, top up if necessary
Warning
- Never exceed the maximum level of the sight glass on the engine.
- The filler hole is under no circumstances and must never be considered as an oil tank.
Changing the oil filter
- Wear protective gloves
- Remove the used filter from its housing
- Put the new filter in place
- Check the presence and state of the "O" ring
- Replace the protection cover
- Loosen the 2 protection cover screws and remove the cover
Warning
The oil filter must be changed when changing the engine oil and before refilling with new oil.

Checking the coolant level (Frequency : see maintenance booklet)
- Minimum level. : the coolant is visible at the bottom of the container (expansion vessel), - Maximum level. : fill the container up to the rim (to the bottom of the screw thread)
Danger
Never remove the plug from the expansion vessel when the engine is hot. The pressurised coolant might be projected and could cause serious burns.
It is essential that the used coolant be deposited at a recycling point.
Warning
Do not use the vehicle :
- If the coolant level is lower than the minimum level - If there is a leak - In the event of high consumption of coolant In all cases, you will cause irreversible damage to your vehicle. Contact a Peugeot dealer for maintenance and repair.
Checking the level of coolant is carried out with the engine cold and at a standstill.
- To top up :
- Put the vehicle onto its central stand on level ground - Using a flat screw driver, remove the protection cover A
- Loosen the plug on the expansion vessel B
- The coolant level must always be above the minimum level
- If necessary, top up with a similar coolant, making sure that there is always a summer and winter protection
- Retighten the plug of the expansion vessel - Replace the protection cover
Battery and fuse
① - Battery
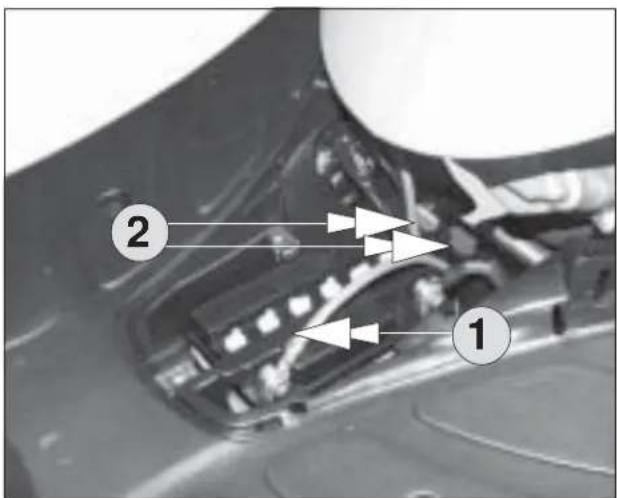
Maintenance free battery
A maintenance free battery must never be opened. Never add coolant or electrolyte
Traditional battery
Battery electrolyte
Check and keep the level between the «upper» (maximum) and «lower» (minimum) marks.
Use demineralized water or special lead battery water only for your battery; tap water will reduce its life.
When you replace the battery, make sure that the air vent hose is properly in place and is not blocked or pinched. Please call a PEUGEOT dealer if you have excessive electrolyte loss.
Connections to battery wires :
- Connect the red wire to the battery's (+) terminal,
- Connect the green wire to the battery's (-) terminal.
- Charging the battery
The level of battery liquid must always be checked before charging. The charge must be carried out with a suitable battery charger with a maximum output of 0.4 to 1 ampere; we recommend that this operation is done by a dealer.
Note : you can damage the battery if the battery charger that you use is too powerful.

The battery contains sulphuric acid. Avoid contact with the skin, the eyes or clothing.
1streaction :
- External : rinse with water and see a doctor immediately.
- Internal : do not drink or induce vomiting. Call a doctor
immediately or the nearest antipoison centre.
- Eyes : rinse with water and see a doctor immediately.
The battery releases explosive gases. Do not bring sparks, flames or cigarettes close. When charging or using in a closed location, make sure that the ventilation is good. Protect eyes when working close to a battery.
Always keep batteries out of children's reach.
A used battery must always be taken to a certified recycling point.
② - Fuse
A fuse protects the electrical equipment against short circuits or circuit overloads.
It is located in a fuse holder at the side of the battery.
It melts and breaks the circuit if there is a fault in the installation.
- 10A accessory fuse
- 25 A main fuse
Precaution
The fuse only burns out if there is a fault in the electrical circuit.
Please call a PEUGEOT dealer.
Only use standard fuses.
Replace a burnt out fuse by a fuse of the same capacity.
Replacing a fuse with an inappropriate fuse can cause irreversible damage to the equipment and can even cause safety faults, placing the user at risk.

natural_image
Medical scan image showing anatomical structures with white arrows pointing to specific regions (no text or labels visible)
natural_image
Close-up of a motorcycle's wheel and suspension system, labeled with 'A' (no text or symbols beyond label)

natural_image
Close-up of a car's front bumper with a white arrow pointing to a component, labeled 'E' in the corner (no other text or symbols)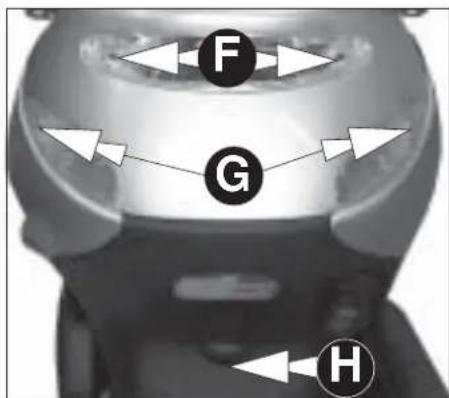
Lighting and signalling
Lighting and signalling equipment in good working condition is essential for safety.
Check the various lamps from time to time before starting and when using your scooter to make sure that they are working as they should.
- Lamp characteristics
Headlight/Diplight H4 60/55W P43T38
Rear light and brake light P 21/5W BAY15d
Turn signal lights R10W BA15S
Number plate light ....W5W(T10)
Side lights W5W(T10)
All lamps are 12 volts
See your dealer or distributor immediately if one of the lamps is not working properly.
- Changing the bulbs
FRONT BULBS
- Remove the 5 screws A from the front panel
- Tip the fairing forward
- Change headlight bulb
- Change sidelight bulbs
- Change indicator light bulbs
- Refit fairing correctly (fitting of parts)
- Tighten the 5 screws
To adjust the headlight : unclip the container in the bottom of the LH side glove compartment and turn the adjustment screw E in order to set the vertical orientation.
REAR
Rear light :
Remove the 2 screws Ⓕ and the lens
- Change the bulb
Indicators :
- Remove the screw
- Change the bulb
G and the lens
NUMBER PLATE

- Remove the screw
- Remove the 2 support screws from the bulb holder cover
- Change the bulb
Starting the engine
For safety reasons :
- Put the scooter on its central stand
The electric starter will not work unless you squeeze the left brake lever.
To start the engine :
- Turn the ignition key to the position
- Grip the left or front right lever
- Press the starter button
- Release the button when the engine starts
Keep the throttle closed
Precautions
Never run the engine in a closed room. Exhaust gases contain carbon monoxide and toxic gases.
- De-flooding the engine
- After several attempts to start the engine, it may be necessary to ventilate the cylinder in order to eliminate any fuel excess.
- Turn the ignition key
- Turn the gas grip fully (throttle opening)
- Press the starter button for a few seconds
- Close the throttle and carry out starting procedure again
Stopping the engine and parking
With the engine running at iding speed
- Put the ignition key to ✗
- Put the vehicle on its stand
- Turn the key to the position
steering) in order to avoid risk of theft
- Remove the key to prevent risks of theft

(locking the
- Parking on the stand
- Avoid driving or parking on easily inflammable materials (eg : dry leaves, ...)
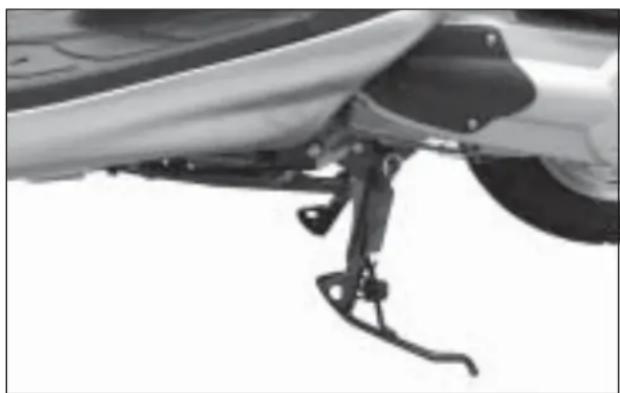
The stand is fitted with a lever to park the scooter easily.
Move to the left side of the scooter
- Hold the scooter by its handlebar and the grab handle at the back of the saddle
- Push the stand lever with your right foot while pulling the scooter backwards with the handlebars and the saddle's grab handle
- Placing on side stand \*
Bearing in mind that the isde stand is equipped with an automatic lift mechanism, be careful when carrying out different operations on the vehicle.
Caution
Make sure that the vehicle is stable on its stand so that it cannot fall over and possibly cause any body wound or any damage to the scooter.
* According to the model
natural_image
Close-up of a mechanical component with attached brackets and a curved base (no visible text or symbols)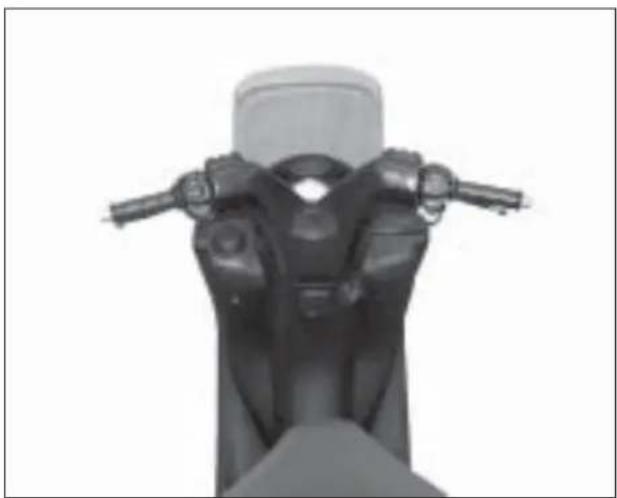
natural_image
Close-up of a mechanical component with lever arms and handle (no visible text or symbols)
natural_image
Close-up of a car's dashboard and engine compartment with white arrows pointing to specific parts (no text or symbols visible)Running in and driving
- Running
Running in has an essential influence on correct operation, power and long life of your engine. During the first 500 kilometers, never run your scooter at maximum speed, particularly when cold or going down hill. The vehicle will obtain its maximum performances only after the running in time.
- Driving your scooter
With the engine running on its stand :
- Grip the left brake lever
- Do not open the throttle
- Lift the stand
- Get onto your scooter
- Free the rear wheel (release the brake lever)
- Accelerate to start (turn the throttle gradually)
- Turn the throttle in the opposite direction to decelerate
Caution
You must lock the rear wheel before you lift the stand. If the rear wheel is turning you could lose control of the scooter when it touches the ground.
- Do not accelerate roughly (quickly opening and closing the throttle)
- Do not leave your scooter unattended with the engine running
Maintenance
(Frequency : see maintenance manual)
- Spark plug (NGK CR8E)
Compliance with PEUGEOT assembly recommendations is mandatory.
The use of a non recommended or insufficiently tightened spark plug may result in the destruction of the engine and the electronics.
- Got to a Peugeot Motocycles dealer for all operations on the vehicle.
- Air filter
- Loosen the 10 screws and remove the cover
- Remove the filter
-Change air filter foam - Check the cover seal
- Refit the cover
Front and rear brake hydraulically controlled
PEUGEOT recommends that you :
- Check the level of brake fluid
- Checking the wear of the brake pads.
- Monitor operation of your FRONT and REAR brakes.
- Have adjustment and maintenance operations performed by a PEUGEOT dealer whenever action proves to be necessary
- Use PEUGEOT original parts only.
The hydraulic circuit is filled with fluid in compliance with the standard PEUGEOT.
Braking efficiency depends on :
- The fluid level in the hydraulic control,
- The circuit seal,
- The condition of the brake pads.
If the brake lever appears "loose" when activated, take the vehicle in for a service of the system by a PEUGEOT dealer as quickly as possible.
- Braking and parking
Good coordination between the throttle and the FRONT and REAR brakes is very important.
- Reduce your speed by allowing the throttle to return.
- Pull on the rear and front brakes levers
Warning
Use of a single brake reduces braking efficiency. Excessive force applied to a single brake may cause the corresponding wheel to lock, causing you to lose control of the vehicle and come off. When driving down a steep slope, drop back the throttle and use both brakes in order to reduce your speed, enabling you to maintain control of the vehicle. Avoid constantly applying the brakes as excessive heating will reduce braking efficiency and may cause an accident.
natural_image
Top-down illustration of a car wheel with visible spokes and hub, no text or symbols presentTyres : Tyre inflation pressure
Check the tyre pressure frequently and adjust it if necessary. Observe the following specifications :
| Tyre | Pressure cold | |
| Front | 120/70 x 12 | 1,6 bar |
| Rear | 130/70 x 12 | 1,8 bar |
Nota :1,6 bars = 0,16 Mégapascal 1,8 bars = 0,18 Mégapascal
Incorrect tyre pressure will cause abnormal wear of the tyre tread and will reduce riding safety.
It is dangerous to drive with worn tyres (it is illegal to use worn tyres, and they affect the steering-ability, braking efficiency, traction and road holding).
- Wheels
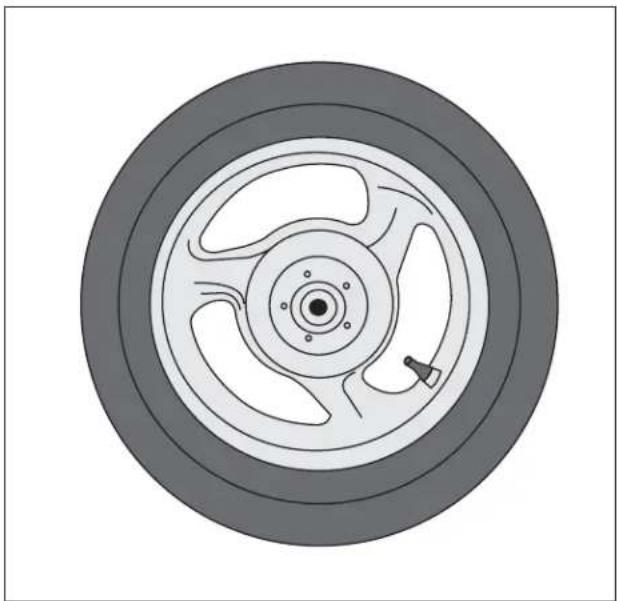
This scooter is fitted with tubeless tyres. Tubeless is marked on the tyres' sivewall and on the rims to show that they are specially designed for use without an inner tube.
Appropriate valves are fitted in rims.
When replacing them, use tyres and rims marked tubeless only. Ask your PEUGEOT dealer to repair or replace your Tubeless tyres.

Do not fit an inner tube inside a Tubeless tyre or put a Tubeless tyre on an ordinary rim (risk of bursting).
- For your security we suggest to have the wheel(s) balanced after replacing the tyre(s).
- For an optimum result, Peugeot Motocycles recommends you to respect the original assembly tire.


Removing and refitting the wheels
Important
For these operations we advise you to contact a garage equipped with special tooling or a Peugeot dealer (agent).
- When dismantling, be careful not to damage the pipework, brake disc, brake pads and brake shoes
- Check the location of the parts, washers and exhaust seal in order to put them back in the right place
- Do not action the front brake lever once the wheel has been removed as the calliper pistons may cause a leakage of brake fluid. In the event of this happening, see a dealer who will carry out the operation.
- Removing front wheel
- Position the vehicle on its central stand, place a support under the vehicle in such a way that the wheel is free and the vehicle is stable.
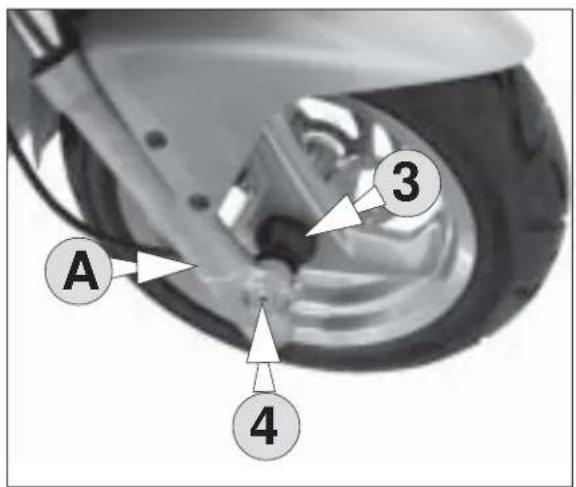
- Block the wheel axle ④
- Loosen and remove the nut ② and remove the washer
- Loosen the screw
- Push the wheel axle ④ using a rubber hammer if necessary
- Remove the wheel
- Refitting front wheel
- Position the reduction gear ③ on the wheel
- Line up the wheel between the fork tubes and position the reduction gear on the tube A
- Introduce the wheel axle ④
- Put the washer in place and tighten a new nut to a tightness torque of 5 m.daN whilst blocking the axle
- Tighten screw ① to 1.2 m.daN
- Removing rear wheel
- Release the rear brake
- Loosen the two screws
- Free the screws ⑦ and ⑥ and remove them whilst holding the exhaust pipe (be careful of the weight and risk of burning)
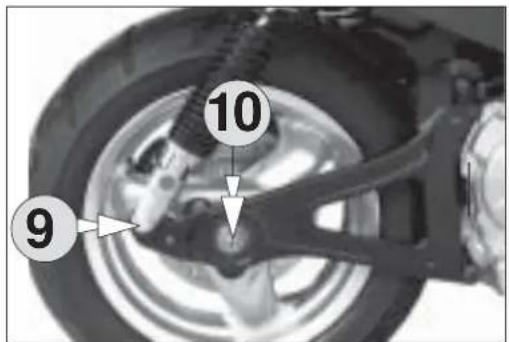
- Loosen the RH shock absorber support screw ⑨ and pivot it upwards
- Loosen the suspension arm support screw and remove it ⑧
- Loosen the central wheel bolt ⑩
- Refitting rear wheel
- Retighten the central wheel bolt 10 to a torque of 10 m.daN
- Put the suspension arm back in place and retighten it
- Retighten the rear shock absorber screw ⑨ to a torque of 2.5 m.daN
- Put the exhaust pipe and seal in place, start the screw ⑥ start the screw ⑦ and then refit the exhaust seal carefully then tighten screws ⑦ and ⑤
- Check the good adjustment of the brake
Transponder
The ignition keys are equipped with a TRANSPONDER which is an electronic component built into the key's plastic part.
This anti-theft system allows the rider to start his scooter thanks to an «ANTENNA» which surrounds the key and recognises the transponder ELECTRONICALLY.
All the elements required for starting the engine are conditioned by the recognition of an ELECTRONIC CODE generated by the key, called the MASTER KEY, which means the scooter can not be used simply by changing the ignition key.
A LED warning light blinks on the instrument panel to show that the system is actuated (dissuasive effect).
To save the battery, this LED stops blinking after 48 hours, although the system is still operational.
Reminder
We advise you not to use the Master Key (red key) for everyday use but to keep it in a safe place with the number of the keys.
Only the transponder can be used to reprogram your theft protection system: if it is lost, the whole system will have to be replaced and is not covered under the guarantee.
The master key will be useful for the dealer wishing to operate on the system.
Specifications
Dimensions (mm)
Overall length 1900
Overall width (excluding rear view mirrors) 720
Overall height (including rear view mirrors) 1230
Wheel base 1368
Weight (kg)
Tanks full 155
Capacities (L)
Oil tank 1,25
Petrol tank 9,0
Coolant level 1,6
Engine block
Bore x stroke 57x48,9
Compression ratio 11,7
Displacement (cm 3 ) 124,8
Transmission
Primary gear .... Trapezoidal belt
Final gear .... Reduction gear with two gear trains
Electricity
Battery 12V-12Ah
Generator ......Flywheel magneto
Fuses 10/25A
Avoid :
- Noise, electrical interference, smoke, ....
Consequently, do not modify your vehicle (for example the original exhaust system).
Any modification of the technical specifications of the vehicle will result in the invalidation of the guarantee and non compliance with the approval certificate (official approval of the vehicle by the authorities); consequently you will no longer be covered by your insurance in the event of an accident.
And do not forget that a PEUGEOT scooter should be maintained at a PEUGEOT dealer.
Only your dealer knows it thoroughly, and has genuine PEUGEOT spare parts and the required special tools PEUGEOT to perform complete service and maintenance operations.
Like us, he is at your service.



recommande

www.peugeot-motocycles.fr
N° 11.762948.00
- Information
- Please take the time to read it carefully.
- Safety recommendations
- Maximum Loads : 3 kg
- Maintenance recommendation
- Start the engine after storage :
- Inspection before the vehicle leaves
- To check
- To check the smooth working of
- Protection of the environment
- General points
- Fuel / Lubricant
- Ignition
- Cutting off the engine
- Starting the engine
- Using your vehicle
- Equipement
- Instrument panel
- ① - Speedometer
- ② - Oil pressure telltale
- Warning
- ③ - Coolant temperature indicator
- ④ - Indicator light
- ⑤ - Headlight indicator light
- ⑥ - Antit theft warning light
- ⑦ - Electronic display
- Electronic display
- ⑧ - Mileage counter
- ⑨ - Trip counter
- - Digital clock
- - Fuel level indicator
- - Service indicator \*
- Ignition keys and locks
- To close
- B - Petrol
- © - Oil
- Checking and changing engine oil
- - Checking engine oil level.
- Important
- - Changing the engine oil
- - Filling / Topping up
- Changing the oil filter
- Checking the coolant level (Frequency : see maintenance booklet)
- Danger
- Battery and fuse
- ① - Battery
- Maintenance free battery
- Traditional battery
- Battery electrolyte
- - Charging the battery
- ② - Fuse
- Precaution
- Lighting and signalling
- - Lamp characteristics
- All lamps are 12 volts
- - Changing the bulbs
- FRONT BULBS
- REAR
- NUMBER PLATE
- For safety reasons :
- To start the engine :
- Keep the throttle closed
- Precautions
- - De-flooding the engine
- Stopping the engine and parking
- With the engine running at iding speed
- - Parking on the stand
- - Placing on side stand \*
- Caution
- Running in and driving
- - Running
- - Driving your scooter
- Maintenance
- - Spark plug (NGK CR8E)
- - Air filter
- Front and rear brake hydraulically controlled
- PEUGEOT recommends that you :
- Braking efficiency depends on :
- - Braking and parking
- Tyres : Tyre inflation pressure
- - Wheels
- Removing and refitting the wheels
- - Removing front wheel
- - Refitting front wheel
- - Removing rear wheel
- - Refitting rear wheel
- Transponder
- Reminder
- Specifications
- Dimensions (mm)
- Weight (kg)
- Capacities (L)
- Engine block
- Transmission
- Electricity
- Avoid :
- Like us, he is at your service.
Brand : PEUGEOT
Model : Elystar ADV 4Temps
Category : Scooter