
KM 130 300 R D - Industrial sweeper KARCHER - Free user manual and instructions
Find the device manual for free KM 130 300 R D KARCHER in PDF.

| Product type | Industrial sweeper |
| Brand | KARCHER |
| Model | KM 130 300 R D |
| Dimensions (L x W x H) | 2040 x 1330 x 1430 mm |
| Empty weight | 951 kg |
| Maximum permissible weight | 1512 kg |
| Dust hopper capacity | 300 L |
| Engine | Yanmar 3TNV76A, diesel 3-cylinder, 15.8 kW |
| Engine displacement | 1116 cm³ |
| Fuel | Diesel, tank 16 L |
| Maximum speed | 10 km/h (forward and reverse) |
| Sweeping width without side brooms | 1000 mm |
| Sweeping width with side brooms | 1300 mm |
| Sweeping capacity without side brooms | 10000 m²/h |
| Sweeping capacity with side brooms | 13000 m²/h |
| Maximum gradient (direction of travel) | 18% |
| Filter surface area | 5.2 m² |
| Sound level (L_WA) | 102 dB(A) |
| Battery | 12 V, 62 Ah |
| Hydraulic oil | HV 46, tank 21.2 L |
| Tire pressure | 8 bar (front and rear) |
| Main functions | Sweeping with rotating brush and side broom, dust suction, filtration |
| Maintenance and cleaning | Regular filter cleaning, hopper emptying, checking oil and coolant levels |
| Safety | Seat contact, parking brake, emergency hammer, ear protectors |
| Spare parts and repairability | Use original Kärcher parts, maintenance by authorized service center |
| General information | CE approval, use on stable surfaces, do not use indoors |
Frequently Asked Questions - KM 130 300 R D KARCHER
User questions about KM 130 300 R D KARCHER
0 question about this device. Answer the ones you know or ask your own.
Ask a new question about this device
Download the instructions for your Industrial sweeper in PDF format for free! Find your manual KM 130 300 R D - KARCHER and take your electronic device back in hand. On this page are published all the documents necessary for the use of your device. KM 130 300 R D by KARCHER.
USER MANUAL KM 130 300 R D KARCHER
natural_image
Technical line drawing of a vehicle's internal components and suspension system (no text or symbols)| Deutsch | 2 |
| English | 15 |
| Français | 28 |
| Italiano | 41 |
| Nederlands | 54 |
| Español | 67 |
| Português | 80 |
| Dansk | 93 |
| Norsk | 106 |
| Svenska | 119 |
| Suomi | 131 |
| Ελληνικά | 144 |
| Türkçe | 158 |
| Русский | 171 |
| Magyar | 186 |
| Čeština | 199 |
| Slovenščina | 212 |
| Polski | 225 |
| Româneşte | 238 |
| Slovenčina | 251 |
| Hrvatski | 264 |
| Srpski | 277 |
| Български | 290 |
| Eesti | 304 |
| Latviešu | 317 |
| Lietuviškai | 330 |
| Українська | 343 |
| 中文 | 357 |
| العربية | 382 |
natural_image
Close-up of a mechanical component with red L-shaped bracket and metallic bolts (no visible text or symbols)natural_image
Close-up of mechanical components with hoses and a circled detail (no visible text or symbols)Vorsicht
natural_image
Technical line drawing of a mechanical component with an arrow indicating direction (no text or symbols present)natural_image
Line drawing of a mechanical agricultural machine with wheels and a blade (no text or symbols)natural_image
Exterior view of a battery connected to a small electronic device (no visible text or symbols)natural_image
Technical line drawing of a car engine bay with no visible text or symbolsnatural_image
Technical line drawing of a mechanical assembly with no visible text or symbolsnatural_image
Technical diagram of a mechanical assembly with no visible text or symbolsnatural_image
Abstract geometric pattern with layered chevron shapes and a blue upward arrow (no text or symbols)natural_image
Mechanical assembly diagram showing engine components and a close-up of a bolted joint with directional arrows (no text or symbols)natural_image
Technical line drawing of a mechanical device interior with internal components (no text or symbols)natural_image
Technical line drawing of a mechanical housing or enclosure with internal components and mounting holes (no text or symbols)natural_image
Hand interacting with mechanical components, no visible text or symbols71364 Winnenden (Germany)
Tel.: +49 7195 14-0
Fax: +49 7195 14-2212
Winnenden, 2011/03/01
Hilfe bei Störungen
General notes ..... EN .. 1
Symbols on the machine EN .. 2
Symbols in the operating instructions.... EN .. 2
Function ..... EN .. 2
Proper use ..... EN .. 2
Suitable surfaces..... EN .. 2
Environmental protection .. EN .. 2
Warranty.... EN .. 2
Operating and Functional Elements ..... EN .. 3
Before Startup..... EN .. 4
Fold up the cab ..... EN .. 4
Lock/ release parking brake EN .. 4
Moving sweeper without en- gaging self-propulsion.. EN .. 4
Moving sweeper by engaging self-propulsion..... EN .. 4
Start up.... EN .. 4
General notes ..... EN .. 4
Refuelling ..... EN .. 4
Inspection and maintenance work. EN . . 4
Operation ..... EN .. 4
Adjusting driver's seat.. EN .. 4
Adjust engine speed ... EN .. 4
Programme selection .. EN .. 4
Starting the machine... EN .. 4
Drive the machine ..... EN .. 4
Sweeping mode ..... EN .. 5
Emptying waste container EN .. 5
Turn off the appliance .. EN .. 5
Transport ..... EN .. 5
Storage.... EN .. 5
Shutdown ..... EN .. 5
Maintenance and care .... EN .. 5
General notes ..... EN .. 5
Cleaning ..... EN .. 5
Maintenance intervals.. EN .. 5
Maintenance Works ... EN .. 6
EC Declaration of Conformity EN . 10
Troubleshooting ..... EN . 11
Technical specifications ... EN . 12
Safety instructions

Risk of hearing impairment. Always use proper ear-protection aids while working with the appliance.
General notes
Your sales outlet should be informed about any transit damage noted when unpacking the product.
- Warning and information plates on the machine provide important directions for safe operation.
- In addition to the information contained in the operating instructions, all statutory safety and accident prevention regulations must be observed.
Drive mode
⚠️ Danger
Risk of injury, risk of damage!
Use a suitable ramp or a cranel to load the appliance (Caution: Appliance weighs 951 kg net!). If upgrade kits are installed, the weight is even higher). Do not use a forklift.
⚠️ Danger
Risk of injury!
Danger of tipping if gradient is too high.
- The gradient in the direction of travel should not exceed 18%.
Danger of tipping when driving round bends at high speed.
- Drive slowly when cornering.
Danger of tipping on unstable ground.
- Only use the machine on sound surfaces.
Danger of tipping with excessive sideways tilt.
- The gradient perpendicular to the direction of travel should not exceed 10%.
- It is important to follow all safety instructions, rules and regulations applicable for driving motor vehicles.
- The operator must use the appliance properly. He must consider the local conditions and must pay attention to third parties, in particular children, when working with the appliance.
- The appliance may only be used by persons who have been instructed in handling the appliance or have proven qualification and expertise in operating the appliance or have been explicitly assigned the task of handling the appliance.
- The appliance must not be operated by children, young persons or persons who have not been instructed accordingly.
- It is strictly prohibited to take co-passengers.
- Ride-on appliances may only be started after the operator has occupied the driver's seat.
→ Please remove the ignition key, when not in use, to avoid unauthorised use of the appliance.
→ Never leave the machine unattended so long as the engine is running. The operator may leave the appliance only when the engine has come to a standstill, the appliance has been protected against accidental movement, if necessary, by applying the immobilization brake and the ignition key has been removed.
Appliances with combustion engine
⚠️ Danger
Risk of injury!
- Do not close the exhaust.
- Do not bend over the exhaust or touch it (risk of burns).
- Do not touch the drive motor (risk of burns).
- Exhaust gases are poisonous and hazardous to health, do not inhale them.
- The engine requires approx. 3-4 seconds to come to a standstill once it has been switched off. During this time, stay well clear of the working area.
Machines with driver cabin
- In emergencies, destroy the windows with a hammer.
Note
The emergency hammer is located in the foot area, underneath the driver seat.
Accessories and Spare Parts
- Only use accessories and spare parts which have been approved by the manufacturer. The exclusive use of original accessories and original spare parts ensures that the appliance can be operated safely and troublefree.
- At the end of the operating instructions you will find a selected list of spare parts that are often required.
- For additional information about spare parts, please go to the Service section at www.kaercher.com.
Symbols on the machine
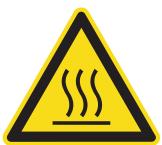 | Risk of burns on account of hot surfaces! Allow the exhaust to cool down sufficiently before starting work on the machine. |
 | Always use appropriate gloves while working on the device. |
 | Risk of getting squeezed on account of getting jammed between vehicle parts. |
 | Risk of injury on account of moving parts. Do not reach in. |
 | Risk of fire. Do not vacuum up any burning or glowing objects. |
 | Chain pick-up / crane point Lashing point |
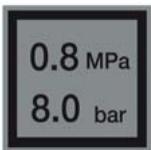 | Tyre pressure (max.) |
 | Intake points for the jack |
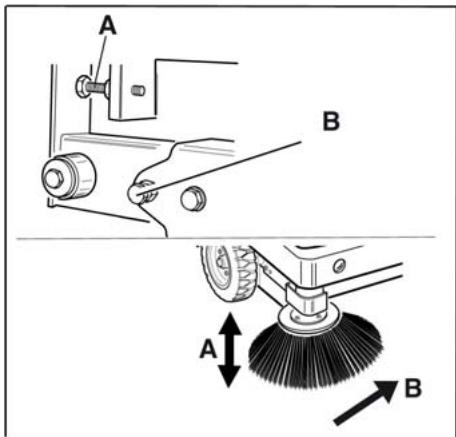
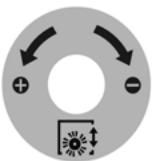 | Brush roller adjustment |
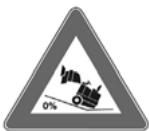 | Maximum decline of ground when driving with the waste container raised. |
Symbols in the operating instructions
⚠️ Danger
Immediate danger that can cause severe injury or even death.
⚠ Warning
Possible hazardous situation that could lead to severe injury or even death.
Caution
Possible hazardous situation that could lead to mild injury to persons or damage to property.
Function
The sweeper operates using the sweep-shovel principle.
- The rotating roller brush moves the dirt directly into the waste container.
- The side brush cleans the corners and edges of the surface and moves dirt and debris into the path of the roller brush.
- The fine dust is sucked in via the dust filter through the suction blower.
Proper use
Use this sweeper only as directed in these operating instructions.
→ The machine with working equipment must be checked to ensure that it is in proper working order and is operating safely prior to use. Otherwise, the appliance must not be used.
- This sweeper has been designed to sweep dirt and debris from outdoor surfaces.
- The appliance should not be used in closed rooms.
- Ride-on machines that are not equipped with the proper equipment (option ex factory) are not approved for public transport.
- The appliance can be used on public roads only after an individual acceptance by an official regulatory body.
- The machine is not suitable for vacuuming dust which endangers health.
– The machine may not be modified.
- Never vacuum up explosive liquids, combustible gases or undiluted acids and solvents. This includes petrol, paint thinner or heating oil which can generate explosive fumes or mixtures upon contact with the suction air. Acetone, undiluted acids and solvents must also be avoided as they can harm the materials on the machine.
- Do not sweep/vacuum up any burning or glowing objects.
- The machine is only suitable for use on the types of surfaces specified in the operating instructions.
- The machine may only be operated on the surfaces approved by the company or its authorised representatives.
- The machine may not be used or stored in hazardous areas. It is not allowed to use the appliance in hazardous locations.
- The following applies in general: Keep highly-flammable substances away from the appliance (danger of explosion/fire).
Suitable surfaces
⚠️ Danger
Risk of injury. Verify the stability of the ground prior to driving on it.
- Asphalt
- Industrial floor
- Screed
- Concrete
- Paving stones
Caution
Risk of damage! Do not sweep up straps, strings or wires as these may wrap around the brush roller.
Environmental protection

The packaging material can be recycled. Please do not throw the packaging material into household waste; please send it for recycling.
Old appliances contain valuable materials that can be recycled; these should be sent for recycling. Batteries, oil, and similar substances must not enter the environment. Please dispose of your old appliances using appropriate collection systems.
Notes about the ingredients (REACH)
You will find current information about the ingredients at:
www.kaercher.com/REACH
Warranty
The warranty terms published by the relevant sales company are applicable in each country. We will repair potential failures of your appliance within the warranty period free of charge, provided that such failure is caused by faulty material or defects in manufacturing. In the event of a warranty claim please contact your dealer or the nearest authorized Customer Service centre. Please submit the proof of purchase.
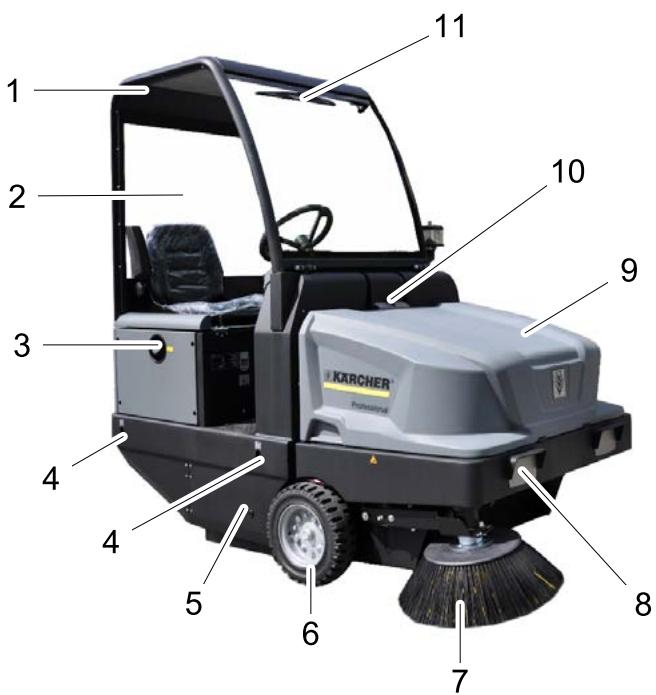

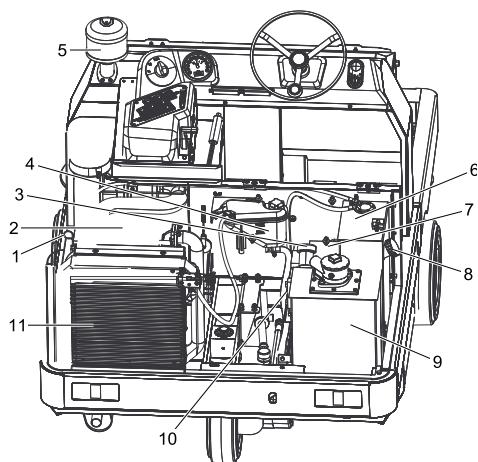
KM 130/300 R D
1 Driver cabin (optional)
2 Cabin door (option)
3 Tank lid
4 Lashing point (4x)
5 Roller brush
6 Front wheel
7 Side brushes
8 Lighting system (optional)
9 Waste container
10 Lock of appliance hood
11 Windshield wiper (option)
12 Engine cover
13 Rear wheel
14 Cab lock
15 Beacon lamp
16 Centrifugal separator
17 Lock lever of cab
18 Brush roller adjustment (not pictured)
Operating field
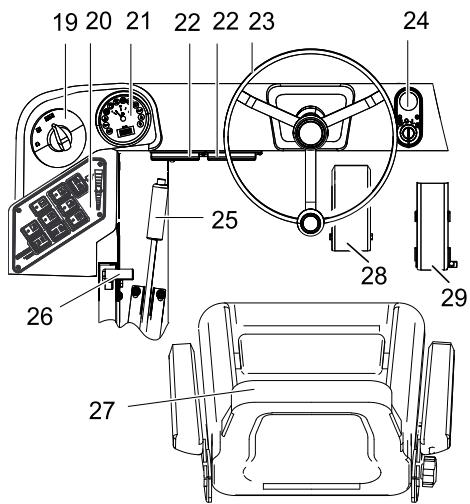
19 Programme switch
20 Function keys
21 Multi-function display
22 Fuse box - work station
23 Steering wheel
24 Ignition lock
25 Parking brake
26 Motor speed adjustment
27 Seat (with seat contact switch)
28 Brake pedal
29 Drive pedal
Ignition lock (24)
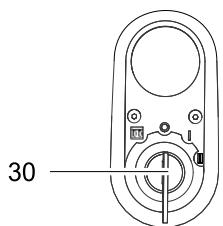
30 Ignition key
Filament symbol : Pre-heat
Position 0: Switch off engine
Position 1: Ignition on
Position 2: Start the engine
Function keys (20)
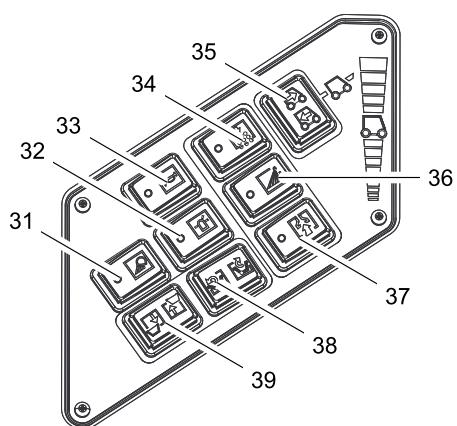
31 Work lights on/off (option)
32 Beacon lamp on/off
33 Horn
34 Filter dedusting
35 Blinker switch
36 Irrigation of side brush (optional)
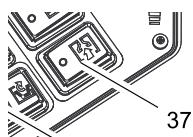
37 Blower
38 Open/close container lid
39 Raise/lower waste container
Multi-functional display (21)
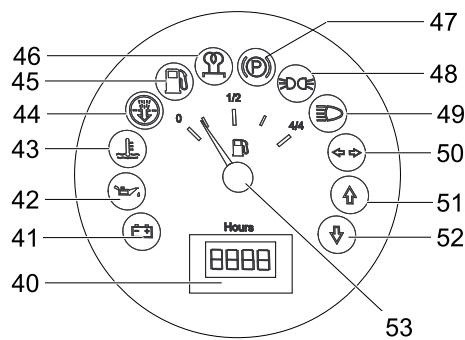
40 Operating hour counter
41 Charge warning lamp
42 Oil pressure warning lamp
43 Cooling water temperature warning lamp
44 Motor suction air
45 Warning lamp fuel reserve
46 Preglow indicator light
47 Indicator lamp (not connected)
48 Indicator parking light (option)
49 Indicator light low beam (option)
50 Indicator light blinker (option)
51 Indicator lamp - forward driving direction
52 Indicator lamp - reverse driving direction
53 Tank indicator
Before Startup
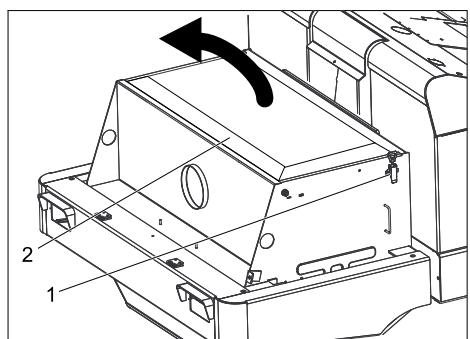
Fold up the cab
In order to perform different tasks, you may have to fold up the cab first.
Note: The cab must only be tilted while the vehicle is on even ground ( ± 5^ ).
→ Open the cab lock.
→ Tilt the cab up until the lock lever clicks into place.
natural_image
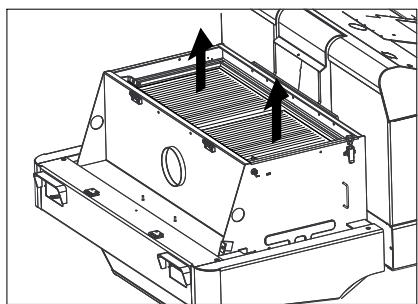
Close-up of a mechanical component with red and black parts, no visible text or symbols→ Unlock the lock lever prior to lowering the cab.
Lock/ release parking brake
→ Loosen parking brake; press brake pedal at the same time.
→ Activate the parking brake; press brake pedal at the same time.
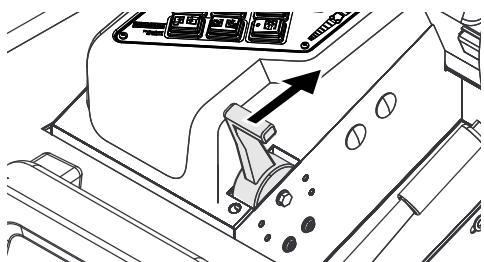
Moving sweeper without engaging self-propulsion
→ Open engine cover.
→ Turn the freewheel lever of the hydraulic pump by 90° down on the side.
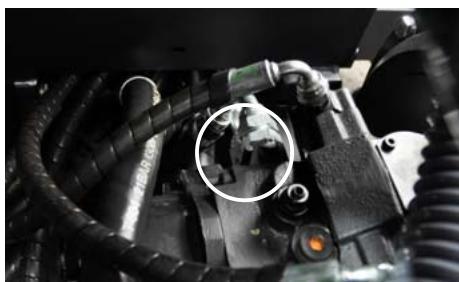
natural_image
Close-up of mechanical components with hoses and a circled detail (no visible text or symbols)Caution
Do not move the machine for long distances without engaging self-propulsion; a speed of 10 km/h should not be exceeded.
→ After moving, fold the freewheel lever up again.
Moving sweeper by engaging self-propulsion
→ After moving, fold the freewheel lever up again.
Start up
General notes
→ Read the operating instructions of the engine manufacturer before start-up and follow the safety instructions carefully.
→ Park the sweeper on an even surface.
→ Remove ignition key.
→ Lock parking brake.
Refuelling
⚠️ Danger
Risk of explosion!
- Only use the fuels specified in the Operations Manual.
- Do not refuel the machine in enclosed spaces.
- Smoking and naked flames are strictly prohibited.
- Ensure that no fuel reaches the hot open surfaces.
→ Check fuel level via the tank indicator.
→ Switch off engine.
→ Open the tank lock.
→ Fill in diesel.
→ Wipe off any spilt fuel and close fuel filler cap.
Inspection and maintenance work
→ Check engine oil level.
→ Check the water cooler.
→ Check roller brush.
→ Check tyre pressure.
→ Adjust driver's seat.
→ Shake off dust filter.
Note: For description, see section on Care and maintenance.
Operation
Adjusting driver's seat
→ Pull seat adjustment lever outwards.
→ Slide seat, release lever and lock in place.
→ Check that the seat is properly locked in position by attempting to move it backwards and forwards.
Adjust engine speed
natural_image
Technical line drawing of a mechanical component with an arrow indicating direction (no text or symbols present)→ Move the gas lever all the way to the front (high speed).
Note: The speed of the side brush and the brush roller depends on the motor speed.
Programme selection

1 Transport drive
2 Sweeping with sweep roller
3 Sweeping using roller brush and side brushes
Starting the machine
Note: The machine is equipped with a seat contact switch. If the driver's seat is vacated, the machine is switched off.
→ Sit on the driver's seat.
→ Bring the direction selector switch into the middle position.
→ Lock parking brake.
→ Engine speed adjustment - push forward by 1/3.
Pre-heat
→ Insert the ignition key into the ignition lock.
→ Turn the ignition key to position "Filament".
Pre-heat lamp glows.
Start the engine
→ When the pre-heating lamp goes off, turn the ignition key to position "II".
→ If the machine starts, release the ignition key.
Note: Never operate the starter motor for longer than 10 seconds. Wait at least 10 seconds before operating the starter motor again.
Drive the machine
→ Set programme selection switch to "Transport drive".
→ Move the gas lever all the way to the front (high speed).
→ Press brake pedal and keep it depressed.
→ Release parking brake.
Drive forward
→ Set the travel direction switch to "forward".
→ Press accelerator pedal down slowly.
Reverse drive
⚠️ Danger
Risk of injury! While reversing, ensure that there is nobody in the way, ask them to move if somebody is around.
Caution
Risk of damage. Only use the direction switch when the machine is standing still.
→ Set the travel direction switch to "backwards".
→ Press accelerator pedal down slowly.
Driving method
- The accelerator pedal can be used to vary the driving speed infinitely.
- Avoid pressing the pedal suddenly as this may damage the hydraulic system.
- In the event of power loss on inclined surfaces, slightly reduce the pressure on the accelerator pedal.
Brakes
→ Release the accelerator pedal, the machine brakes automatically and stops.
Note: The braking effect can be supported by pressing the brake pedal.
Driving over obstacles
Driving over fixed obstacles which are 70 mm high or less:
→ Drive forwards slowly and carefully. Driving over fixed obstacles which are more than 70 mm high:
→ Only drive over these obstacles using a suitable ramp.
Sweeping mode
Caution
Do not sweep up packing strips, wire or similar objects as this may damage the sweeping mechanism.
Note: To achieve an optimum cleaning result, the driving speed should be adjusted to take specific situations into account.
Note: During operation, the waste container should be emptied at regular intervals.
Note: During operation, the dust filter should be shaken off and cleaned at regular intervals.
Sweeping dry floors
→ Switch on the blower.
→ Set the programme switch to sweep with sweeping brush when cleaning surfaces.
→ Set the programme switch to sweep with sweeping brush and side brush when cleaning edges.
Sweeping damp or wet floors
→ Switch off the blower.
→ Set the programme switch to sweep with sweeping brush when cleaning surfaces.
→ Set the programme switch to sweep with sweeping brush and side brush when cleaning edges.
Emptying waste container
⚠️ Danger
Risk of injury! When emptying the waste container, care should be taken to ensure that no persons or animals are within its swivelling range.
⚠️ Danger
Danger of crushing. Never reach into the rod assembly for the drainage mechanism. Stay away from the area under the raised container.
⚠️ Danger
Danger of tipping. Place the machine on an even surface during emptying.
natural_image
Line drawing of a mechanical device with wheels and a blade, no text or symbols present→ Set programme selection switch to "Transport drive".
→ Raise waste container.
→ Slowly drive towards the collection container.
→ Lock parking brake.
→ Tip waste container out.
→ Release parking brake.
→ Drive away the collection container slowly.
→ Tilt the waste container up to the end-position.
→ Lower the waste container up to the end-position.
Turn off the appliance
→ Push the motor speed adjustment all the way to the rear.
→ Press brake pedal and keep it depressed.
→ Lock parking brake.
→ Turn ignition key to "0" and remove it.
Transport
⚠️ Danger
Risk of injury and damage! Observe the weight of the appliance when you transport it.
→ Turn ignition key to "0" and remove it.
→ Lock parking brake.
→ Secure the appliance at the lashing points (4x) using tension belts, ropes or chains.
→ Secure the wheels of the machine with wheel chocks.
→ When transporting in vehicles, secure the appliance according to the guidelines from slipping and tipping over.
Storage
⚠️ Danger
Risk of injury and damage! Note the weight of the appliance in case of storage.
Shutdown
If the sweeper is going to be out of service for a longer time period, observe the following points:
→ Park the sweeper on an even surface.
→ Raise the roller brush and the side-brushes to prevent the bristles from being damaged.
→ Turn ignition key to "0" and remove it.
→ Lock parking brake.
→ Lock the sweeper to ensure that it does not roll off.
→ Change engine oil.
→ Drain off the cooling water if frost is expected and check whether there is adequate anti-frosting agent.
→ Clean the inside and outside of the sweeper.
→ Charge the battery and clamp it off.
Maintenance and care
General notes
- Maintenance work may only be carried out by approved customer service outlets or experts in this field who are familiar with the respective safety regulations.
- Mobile appliances used for commercial purposes are subject to safety inspections according to VDE 0701.
→ Park the sweeper on an even surface.
→ Turn ignition key to "0" and remove it.
→ Lock parking brake.
Cleaning
Caution
Risk of damage! Do not clean the appliance with a water hose or high-pressure water jet (danger of short circuits or other damage).
Cleaning the inside of the machine
⚠️ Danger
Risk of injury! Wear dust mask and protective goggles.
→ Clean machine with a cloth.
→ Blow through machine with compressed air.
External cleaning of the appliance
→ Clean the machine with a damp cloth which has been soaked in mild detergent.
Note: Do not use aggressive cleaning agents.
Maintenance intervals
See inspection checklist 5.950-646.0!
Note: The elapsed-time counter shows the timing of the maintenance intervals.
Maintenance by the customer
Note: Where maintenance is carried out by the customer, all service and maintenance work must be undertaken by a qualified specialist. If required, a specialised Kärcher dealer may be contacted at any time.
Daily maintenance:
→ Check engine oil level.
→ Check cooler water level.
→ Check tyre pressure.
→ Check the sweeping roller and the side brush for wear and wrapped belts.
→ Refill the fuel tank.
→ Check fuel filter.
→ Check the centrifugal separator and the air filter, clean if required.
→ Check function of all operator control elements.
→ Check appliance for damages.
Weekly maintenance:
→ Clean the water cooler.
→ Clean the hydraulic oil cooler.
→ Check hydraulic unit.
→ Check the hydraulic oil level.
→ Check brake fluid status.
→ Check the pad for wear, replace if required.
→ Check the container lid and lubricate it.
Maintenance to be carried out every 50 operating hours:
→ Drain the water from the diesel/water separator.
Maintenance following wear:
→ Replace sealing strips.
→ Readjust the side seals or replace them.
→ Replace roller brush.
→ Replace side brush.
Note: For description, see section on Maintenance work.
Maintenance by Customer Service
Maintenance to be carried out after 50 operating hours:
→ Have the first inspection done according to the service manual.
Maintenance to be carried out after 250 operating hours:
→ Have the inspection done according to the service manual.
Note: In order to safeguard warranty claims, all service and maintenance work during the warranty period must be carried out by the authorised Kärcher Customer Service in accordance with the maintenance booklet.
Maintenance Works
Preparation:
→ Park the sweeper on an even surface.
→ Turn ignition key to "0" and remove it.
→ Lock parking brake.
Overview
1 Oil dipstick
2 3-Cylinder diesel engine
3 Hydraulic oil fill neck
4 Cooling water container
5 Centrifugal separator
6 Fuel container
7 Battery
8 Fuel container lid
9 Hydraulic oil tank
10 Looking glass
11 Water cooler
General notes on safety
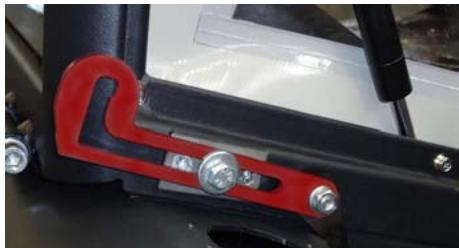
⚠️ Danger
Risk of injury! Always apply the safety bar when the waste container is raised.
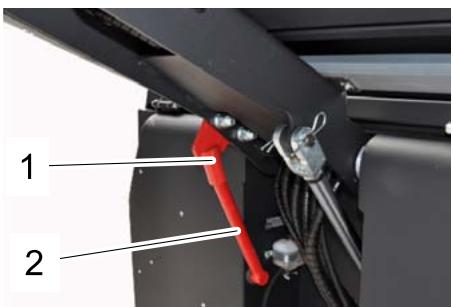
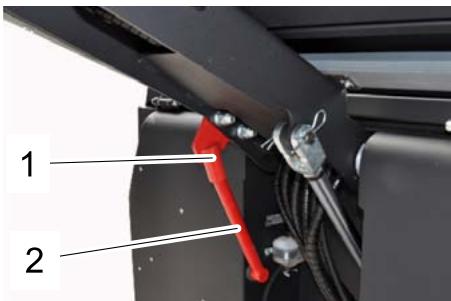
1 Holder of safety rod
2 Safety rod
→ Fold the safety rod for the high emptying up and insert it into the holder (secured).
| Please do not release engine oil, fuel oil, diesel and petrol into the environment. Protect the ground and dispose of used oil in an environmentally-clean manner. |
Safety notes regarding the batteries
Please observe the following warning notes when handling batteries:
| Observe the directions on the battery, in the instructions for use and in the vehicle operating instructions! | |
| Wear an eye shield! | |
| Keep away children from acid and batteries! | |
| Risk of explosion! | |
| Fire, sparks, open light, and smoking not allowed! | |
| Danger of causticization! | |
| First aid! | |
| Warning note! | |
| Disposal! | |
| Do not throw the battery in the dustbin! |
⚠️ Danger
Risk of explosion! Do not put tools or similar on the battery, i.e. on the terminal poles and cell connectors.
⚠️ Danger
Risk of injury! Ensure that wounds never come into contact with lead. Always clean your hands after having worked with batteries.
⚠️ Danger
Risk of fire and explosion!
- Smoking and naked flames are strictly prohibited.
- Rooms where batteries are charged must have good ventilation because highly explosive gas is emitted during charging.
⚠️ Danger
Danger of causticization!
- Rinse thoroughly with lots of clear water if acid gets into the eye or comes in contact with the skin.
- Then consult a doctor immediately.
- Wash off the acid If it comes in contact with the clothes.
Installing and connecting the battery
→ Insert battery in battery mount.
→ Screw on mounts on battery base.
→ Connect pole terminal (red cable) to positive pole (+).
→ Connect pole terminal to negative pole (-).
Note: Check that the battery pole and pole terminals are adequately protected with pole grease.
Check fluid level in the battery and adjust if required
Caution
Regularly check the fluid level in acid-filled batteries.
- The acid in a fully charged battery has a specific weight of 1.28 kg/l at a temperature of 20 °C.
- The acid in a partially discharged battery has a specific weight between 1.00 and 1.28 kg/l.
- The specific weight of the acid must be uniform in all cells.
→ Unscrew all cell caps.
→ Take a sample from each cell using the acid tester.
→ Put the acid sample back into the same cell.
→ Where fluid level is too low, top up cells to the mark provided with distilled water.
→ Charge battery.
→ Screw in cell caps.
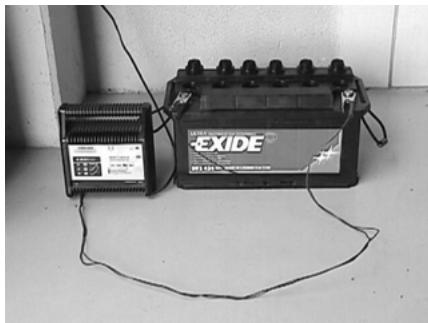
Charging battery
Danger
Risk of injury! Comply with safety regulations on the handling of batteries. Observe the directions provided by the manufacturer of the charger.
Danger
Charge the battery only with an appropriate charger.
natural_image
Exterior view of a battery connected to a small electronic device (no visible text or symbols)→ Unscrew all cell caps.
→ Connect positive terminal cable from the charger to the positive pole connection on the battery.
→ Connect negative terminal cable from the charger to the negative pole connection on the battery.
→ Plug in mains connector and switch on charger.
→ Charge battery using lowest possible level of charging current.
Note: When the battery is charged, first remove the charger from the mains and then disconnect it from the battery.
Remove the battery
→ Disconnect pole terminal to negative pole (-).
→ Disconnect pole terminal to positive pole (-).
→ Loosen the mounts on battery base.
→ Remove the battery from the battery holder.
→ Dispose of the used battery according to the local provisions.
Check engine oil level and top up, if required
⚠️ Danger
Risk of burns!
→ Allow engine to cool down.
→ Wait for at least 5 minutes after switching off the engine before checking the engine oil fill level.
→ Pull out oil dipstick.
→ Wipe off oil dipstick and insert.
→ Pull out oil dipstick.
→ Read the value of the oil level.
→ Insert the oil dip again.
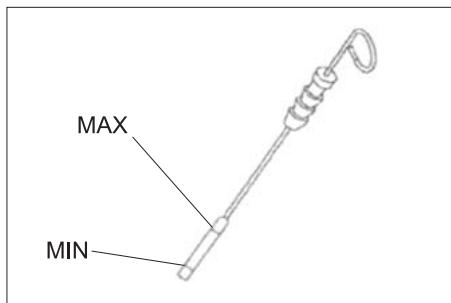
- The oil level must lie between "MIN" and "MAX" marking.
- Add motor oil if the oil level is below the "MIN" marking.
- Do not fill oil above the "MAX" marking.
→ Loosen the screw cap of the oil filling opening.
→ Fill in motor oil.
→ Close oil filler opening.
→ Wait at least 5 minutes.
→ Check engine oil level.
Oil grade: see Technical Data
Change the motor oil and the oil filter. Caution
Risk of burns due to hot oil!
→ Ready a catch bin for approx. 6 litre oil.
→ Allow engine to cool down.
natural_image
Technical line drawing of a vehicle engine bay with no visible text or symbols→ Unscrew oil drain plug.
→ Loosen the screw cap of the oil filling opening.
→ Drain off oil.

natural_image
Technical line drawing of a mechanical assembly with no visible text or symbols→ Unscrew the oil filter.
→ Clean the intake and sealing areas.
→ Coat the washer of the new oil filter with oil before fitting it.
→ Fit in the new oil filter and tighten it by hand.
→ Screw in the oil drain screw along with the new washer.
Note: Tighten the oil drain screw using a torque wrench to 25 Nm.
→ Fill in motor oil.
Oil grade: see Technical Data
→ Close oil filler opening.
→ Let the motor run for approx. 10 seconds.
→ Check engine oil level.
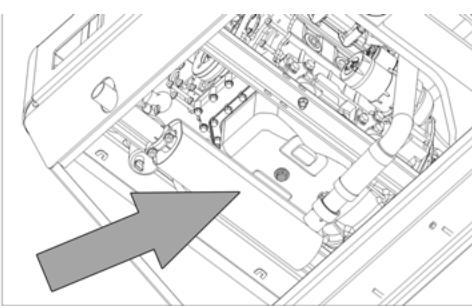
Check hydraulic oil level and refill hy-draulic oil
Note
The waste container must not be raised.
→ Open engine cover.
1 Looking glass
2 Manometer
3 Screw cap, oil fill opening
→ Check hydraulic oil level in the looking glass.
- The oil level must lie between "MIN" and "MAX" marking.
- Add hydraulic oil if the oil level is below the "MIN" marking.
→ Loosen the closing cap of the oil filling opening.
→ Clean the filling area.
→ Refill hydraulic oil.
→ Replace and tighten the closing cap of the oil filling opening.
Oil grade: see Technical Data
Note
If the pressure gauge shows an increased hydraulic oil pressure, the hydraulic oil filter must be replaced by Kärcher customer service.
Check hydraulic unit
→ Lock parking brake.
→ Start the motor.
Only Kärcher Customer Service is authorised to carry out maintenance tasks on the hydraulic unit.
→ Check all hydraulic hoses and connections and ensure that they are leak-proof.
Check water cooler and maintain it
⚠️ Danger
Danger of scalding by boiling water! Let the cooler cool down for at least 20 minutes.
→ Check the cooling water level on the balance reservoir (water level between MIN and MAX).
→ Clean cooler lamella.
→ Check cooler hoses and connections and ensure that they are leak-proof.
→ Clean the fan.
Checking roller brush
→ Start the motor.
→ Raise the waste container up to the end-position.
→ Switch off engine.
→ Lock parking brake.
→ Use the safety bar for emptying from a height.
→ Remove belts or cords from roller brush.
→ Remove the safety bar.
→ Start the motor.
→ Lower the waste container up to the end-position.
→ Switch off engine.
Replacing roller brush
1 Fastening screws of the roller brush intake
2 Roller brush
3 Roller brush intake
4 Holding plate for side seal
5 Side seal
natural_image
Technical diagram showing a mechanical assembly with no visible text or symbols→ Open the side covers using a key.
→ Unscrew the wingnuts from the holding plate side seals and remove the holding plate.
→ Flip the side seal out.
→ Uncscrew the retaining screw of the roller brush intake, and swing the intake to the outside.
→ Pull out roller brush.
natural_image
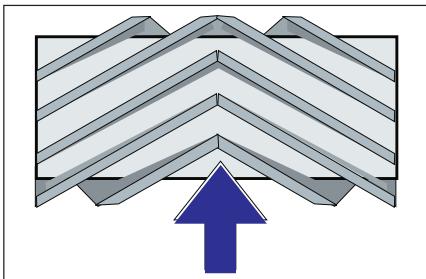
Abstract geometric pattern with layered chevron shapes and a blue upward arrow (no text or symbols)Installation position of roller brush in direction of travel (top view)
Note: When installing the new roller brush, ensure correct positioning of the bristle assembly.
→ Install new roller brush. The nuts of the roller brush must be inserted on the notches of the opposite crank.
Note: Once the new roller brush has been installed, the sweeping track must readjusted.
Check and adjust roller brush sweeping track
Note: The sweeping track is factory-set to 80 mm; it is steplessly adjustable if the brush roller wears down.
→ Check tyre pressure.
→ Switch off suction blower.
→ Drive sweeper on to a smooth, even surface covered with a visible layer of dust or chalk.
→ Set the programme switch to sweep with roller brush.
→ Set programme selection switch to "Transport drive".
→ Drive machine backwards.
→ Check sweeping mirror.
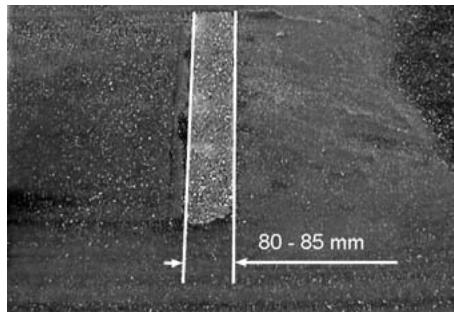
The sweeping track should have an even rectangular shape which is 80-85 mm wide.
natural_image
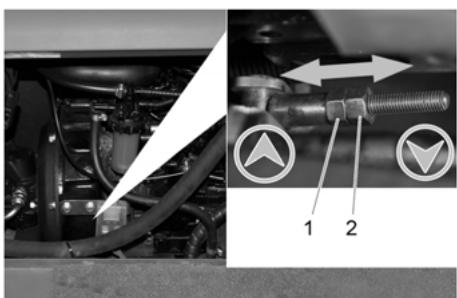
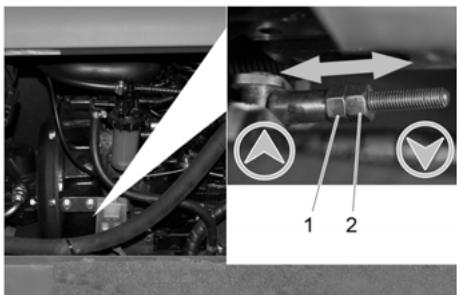
Mechanical assembly diagram showing engine components and a close-up of a bolted joint with directional arrows (no text or symbols)1 Rating nut
2 Counter-nut
→ Open the side engine panel.
→ Loosen counter-nut.
→ Adjust sweeping track
→ Tighten counter nut.
→ Check the sweeping track of the sweeping roller.
Check and adjust sweeping track of the side-brush
→ Check tyre pressure.
→ The side-brushes lift up.
→ Drive sweeper on to a smooth, even surface covered with a visible layer of dust or chalk.
→ Set the programme switch to sweep with roller brush and side brush.
→ The side-brushes lift up.
→ Set programme selection to "Drive".
→ Drive machine backwards.
→ Check sweeping mirror.
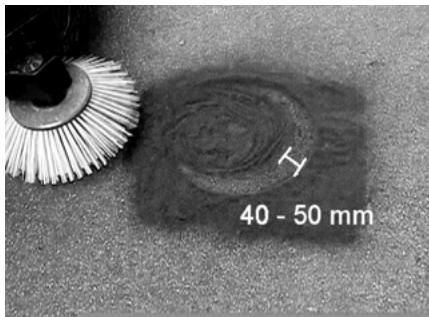
The width of the sweeping track should lie between 40-50 mm.
→ Set the sweeping track using the two adjusting screws.
→ Check sweeping mirror.
Adjust the side seals
→ Check tyre pressure.
→ Drive the waste container up and secure it with the safety rod.
⚠️ Danger
Risk of injury! Always apply the safety bar when the waste container is raised.
→ Fold the safety rod for the high emptying up and insert it into the holder (secured).
1 Holder of safety rod
2 Safety rod
→ Open the side cover as described in Chapter "Replace brush roller".
→ Release the 6 wing nuts on the side holding plate.
→ Loosen 3 nuts (SW 13) on the front holding plate.
→ Press the side seal down (elongated hole) until it is about 1 to 3 mm to the floor.
→ Screw in the holding plates.
→ Repeat the procedure on the other side of the appliance.
Check the tyre pressure
→ Park the sweeper on an even surface.
→ Connect air pressure testing device to tyre valve.
→ Check air pressure and adjust if required.
→ For permissible tyre air pressures see "Technical data".
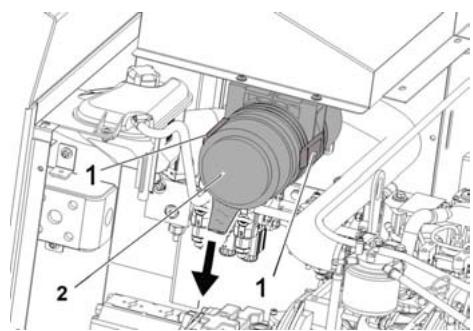
Manually clean the dust filter
→ Clean the dust filter with the filter cleaning button.
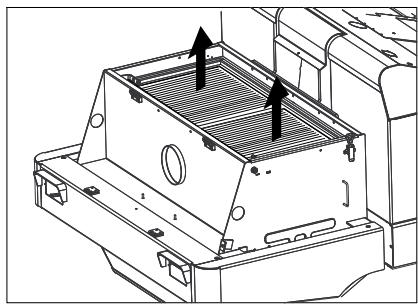
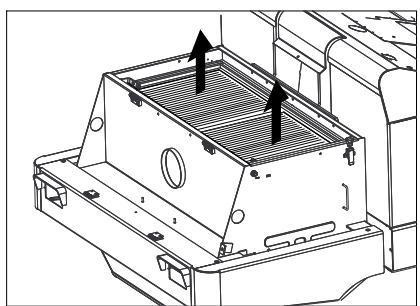
Replacing dust filter
⚠ Warning
Empty waste container before replacing dust filter. Wear a dust mask when working around the dust filter. Observe safety regulations on the handling of fine particulate material.

1 Lock of appliance hood
2 Cover
→ Open the lock, remove the star grip screw to do this.
→ Fold cover forwards.
→ Open filter cap.

natural_image
Technical line drawing of a mechanical device interior with internal components (no text or symbols)→ Fold the filter vibrator forward.
natural_image
Technical line drawing of a mechanical housing or enclosure with internal components and mounting holes (no text or symbols)→ Replace the dust filter.
→ Close the filter cover.
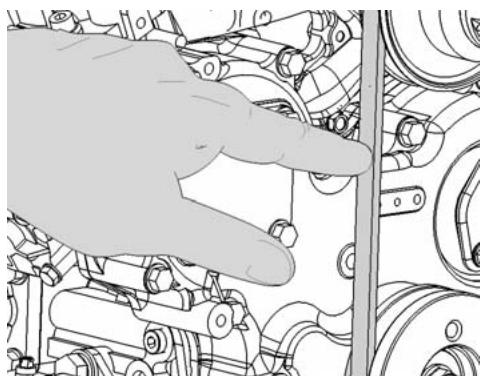
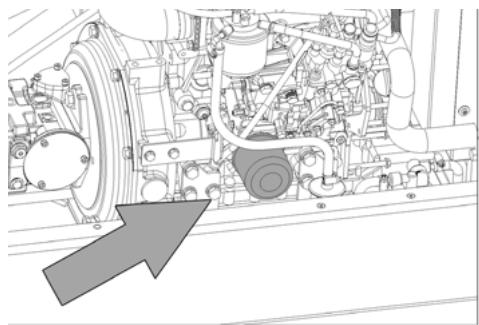
Check and adjust the V-Belt
natural_image
Hand interacting with mechanical components, no visible text or symbolsThe V-Belt must deflect approx. 7-9 mm at a pressure of 10 kg.
→ Get the V-belt tension adjusted by an authorized customer service.
Check air filter and replace, if necessary
→ Remove the air filter housing.
→ Replace the air filter insert.
Note: Installation position with blowout opening pointing down (see illustration).
→ Unscrew the wing nut from the centrifugal separator.
→ Clean the centrifugal separator.
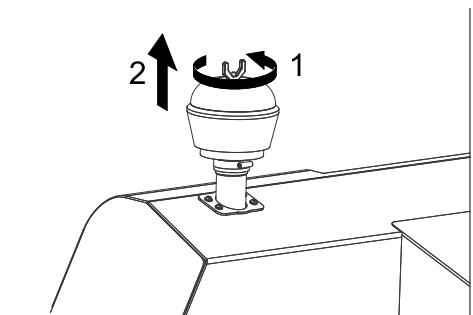
Changing the headlight bulb (option)
→ Unscrew the head lamps.
→ Take out the head lamps and pull out the plug.
Note: Note the positions of the plugs.
→ Dismantle the head lamps.
→ Dismantle the head lamp casing and hold it horizontally because the lamp unit is not fastened.
→ Unlock the bracked and take out the bulb.
→ Insert new bulb.
→ Reinstall in reverse sequence.
Replacing fuses
→ Open the fuse holder.
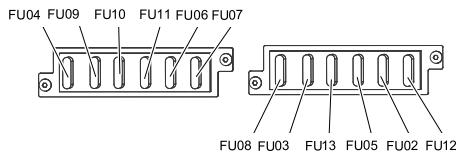
→ Check the fuses.
Note: The fuse FU 01 is located in the engine compartment.
| FU 01 | Main fuse | 60 A |
| FU 04 | Fuel pump | 10 A |
| FU 09 | Left lighting | 7,5 A |
| FU 10 | Right lighting | 7,5 A |
| FU 11 | Front work lights (low beam) | 10 A |
| FU 06 | Solenoid valve drive | 7,5 A |
| FU 07 | Program selection switchWaste container functions | 10 A |
| FU 08 | Safety relay | 7,5 A |
| FU 03 | Multi-function display | 3 A |
| FU 13 | Water pump | 10 A |
| FU 05 | Time relaySeat contact switch | 25 A |
| FU 02 | HornWiper | 7,5 A |
| FU 12 | Vibrator systemBeacon lamp | 20 A |
→ Replace defective fuses.
Note: Only use fuses with identical safety ratings.
EC Declaration of Conformity
We hereby declare that the machine described below complies with the relevant basic safety and health requirements of the EU Directives, both in its basic design and construction as well as in the version put into circulation by us. This declaration shall cease to be valid if the machine is modified without our prior approval.
Product: Ride-on vacuum sweeper
Type: 1.186-xxx
Relevant EU Directives
2006/42/EC (+2009/127/EC)
2004/108/EC
2000/14/EC
Applied harmonized standards
EN 60335-1
EN 60335-2-72
EN 55012: 2007 + A1: 2009
EN 55014-2: 1997 + A2: 2008
Applied national standards
Applied conformity evaluation method
2000/14/EC: Appendix V
Sound power level dB(A)
Measured: 99
Guaranteed: 102
The undersigned act on behalf and under the power of attorney of the company management.

Authorised Documentation Representative S. Reiser
71364 Winnenden (Germany)
Phone: +49 7195 14-0
Fax: +49 7195 14-2212
Winnenden, 2011/03/01
Troubleshooting
| Fault | Remedy |
| Appliance cannot be started | Sit on the driver seat, the seat contact switch gets activated. |
| Charging or replacing battery | |
| Fill in fuel, deaerate the fuel system | |
| Change fuel filter | |
| Check fuel pipes, connections and joints and maintain them if required | |
| Inform Kärcher Customer Service. | |
| Engine is running erratically | Clean air filter or change filter cartridge. |
| Check fuel pipes, connections and joints and maintain them if required | |
| Inform Kärcher Customer Service. | |
| Engine is overheated | Refill coolant |
| Rinse cooler | |
| Tighten V-Belt | |
| Inform Kärcher Customer Service. | |
| Engine is running but machine is only moving slowly or is not moving at all | Release parking brake |
| Check for trapped ribbons and strings. | |
| Inform Kärcher Customer Service. | |
| Whistling sound in the hydraulic system | Refill hydraulic fluid |
| Inform Kärcher Customer Service. | |
| Brushes are rotating slowly or not at all | Move the gas lever all the way to the front (high speed). |
| Check for trapped ribbons and strings. | |
| Inform Kärcher Customer Service. | |
| Too little or no suction power in the brush area | Clean filter |
| Inform Kärcher Customer Service. | |
| Dust gathers in the machine | Adjust the side seals |
| Switch on blower | |
| Clean dust filter | |
| Replace filter washers | |
| Inform Kärcher Customer Service. | |
| Sweeping unit does not pick up waste | Empty waste container |
| Clean dust filter | |
| Replacing roller brush | |
| Adjust sweeping track | |
| Replace sealing strips of the waste container | |
| Remove the blocking of the brush roller | |
| Inform Kärcher Customer Service. | |
| Waste container does not raise or lower | Check the fuses. |
| Inform Kärcher Customer Service. | |
| Waste container is rotating slowly or not at all | Inform Kärcher Customer Service. |
| Operation problems with hydraul-lic movement parts | Inform Kärcher Customer Service. |
Technical specifications
| KM 130/300 R D | ||
| Machine data | ||
| Drive speed, forward | km/h | 10 |
| Drive speed, reverse | km/h | 10 |
| Climbing capability (max.) | -- | 18% |
| Surface cleaning performance without side brushes | m2/h | 10000 |
| Surface output with side-brush | m2/h | 13000 |
| Working width without side brushes | mm | 1000 |
| Working width with side-brush | mm | 1300 |
| Protection type, drip-proof | -- | IPX 3 |
| Usage duration when tank is full | h | 4 |
| Engine | ||
| Type | -- | YANMAR 3TNV76A |
| Type | -- | 3-Cylinder 4-stroke diesel engine |
| Cooling type | -- | Water cooling |
| Rotation direction | -- | Anticlockwise direction |
| Holes | mm | 70 |
| Hub | mm | 82 |
| Cylinder capacity | cm3 | 1116 |
| Amount of oil | l | 3,4 |
| Operating speed | 1/min | 2500 |
| Max. speed | 1/min | 2500 |
| Dry run speed | 1/min | 1300 |
| Max. power | kW/PS | 15,8 / 21,5 |
| Maximum torque at 2100 rpm | Nm | 67,9 |
| Oil filter | -- | Filter cartridge |
| Suction air filter | -- | Internal filter cartridge, external filter cartridge |
| Fuel filter | -- | Filter cartridge |
| Electrical system | ||
| Battery | V, Ah | 12, 62 |
| Generator, rotary current | V, A | 12, 80 |
| Starter | -- | Electrical starter |
| Hydraulic system | ||
| Oil quantity in the entire hydraulic system | l | 26,5 |
| Oil quantity in hydraulic tank | l | 21,2 |
| Oil grades | ||
| Engine (above 25 °C) | -- | SAE 30, SAE 10W-30, SAE 15W-40 |
| Engine (0 to 25 °C) | -- | SAE 20, SAE 10W-30, SAE 10W-40 |
| Engine (below 0 °C) | -- | SAE 10W, SAE 10W-30, SAE 10W-40 |
| Hydraulics | -- | HV 46 |
| Waste container | ||
| Max. unloading height | mm | 1400 |
| Volume of waste container | l | 300 |
| Roller brush | ||
| Roller brush diameter | mm | 300 |
| Roller brush width | mm | 1000 |
| Speed | 1/min | 350 |
| Sweeping track | mm | 80 |
| Side brushes | ||
| Side brush diameter | mm | 600 |
| Speed (continuous) | 1/min | 0 - 60 |
| Tyres | ||
| Size, front | -- | 15-4.5x8 |
| Air pressure, front | bar | 8 |
| Size, rear | -- | 15-4.5x8 |
| Brake | ||
| Front wheels | -- | mechanical |
| Rear wheel | -- | hydrostatic |
| Filter and vacuum system | ||
| Type | -- | Flat fold filter |
| Speed | 1/min | 2800 |
| Filter surface area, fine dust filter | m2 | 5,2 |
| Nominal vacuum, suction system | mbar | 15,5 |
| Nominal volume flow, suction system | m3/h | 800 |
| Vibrator system | -- | Electro motor |
| Working conditions | ||
| Temperature | °C | -5 and +40 |
| Air humidity, non-condensing | % | 0 - 90 |
| Values determined as per EN 60335-2-72 | ||
| Noise emission | ||
| Sound pressure level LpA | dB(A) | 84 |
| Uncertainty KpA | dB(A) | 3 |
| Sound power level LWA + Uncertainty KWA | dB(A) | 102 |
| Machine vibrations | ||
| Hand-arm vibration value | m/s2 | 1,4 |
| Seat | m/s2 | 0,7 |
| Uncertainty K | m/s2 | 0,1 |
| Dimensions and weights | ||
| Length x width x height | mm | 2040x1330x1430 |
| Right turning radius | mm | 1400 |
| Left turning radius | mm | 1400 |
| Unladen weight (without attachment sets) | kg | 951 |
| Permissible overall weight | kg | 1512 |
| Permissible front axle load | kg | 877 |
| Permissible rear axle load | kg | 635 |
| Capacity of fuel tank, diesel | l | 16 |
| Subject to technical modifications! | ||

www.kaercher.com/REACH
Garantie
natural_image
Close-up of a mechanical assembly with red L-shaped component and bolted joints (no visible text or symbols)natural_image
Close-up of mechanical components with hoses and a circled detail (no visible text or symbols)Attention
natural_image
Technical line drawing of a mechanical device with a handle and control panel (no text or symbols)natural_image
Line drawing of a mechanical device with wheels and a disc (no text or symbols)natural_image
Exterior view of a battery connected to a small electronic device (no visible text or symbols)natural_image
Technical line drawing of a vehicle interior with no visible text or symbolsnatural_image
Technical line drawing of a mechanical assembly with no visible text or symbolsnatural_image
Technical diagram of a mechanical assembly with no visible text or symbolsnatural_image
Abstract geometric pattern with layered chevron shapes and a blue upward arrow (no text or symbols)natural_image
Mechanical assembly diagram showing internal components and a close-up of a bolted joint with directional arrows (no text or symbols)natural_image
Technical line drawing of a mechanical device interior with internal components (no text or symbols)natural_image
Technical line drawing of a mechanical housing or enclosure with internal components and mounting holes (no text or symbols)natural_image
Hand interacting with mechanical components, no visible text or symbols2006/42/CE (+2009/127/CE)
2004/108/CE
2000/14/CE
71364 Winnenden (Germany)
Winnenden, 2011/03/01
www.kaercher.com/REACH
Garanzia
natural_image
Close-up of a mechanical component with red L-shaped bracket and metallic bolts (no visible text or symbols)natural_image
Close-up of industrial machinery components with hoses and a circled detail (no visible text or symbols)Attenzione
natural_image
Technical line drawing of a mechanical component with no visible text or symbolsnatural_image
Line drawing of a mechanical device with wheels and a wheel rim (no text or symbols)natural_image
Exterior view of a battery connected to a small electronic device (no visible text or symbols)natural_image
Technical line drawing of an internal vehicle or engine bay with no visible text or symbolsnatural_image
Technical line drawing of a mechanical assembly with no visible text or symbolsnatural_image
Technical diagram of a mechanical assembly with no visible text or symbolsnatural_image
Abstract geometric pattern with layered chevron shapes and a blue upward arrow (no text or symbols)natural_image
Mechanical assembly diagram showing internal components and a close-up of a bolted joint with two circular features labeled 1 and 2 (no text or symbols present)natural_image
Technical line drawing of a mechanical device interior with no visible text or symbolsnatural_image
Technical line drawing of a mechanical device with internal components and directional arrows indicating movement (no text or symbols)natural_image
Close-up of a hand adjusting mechanical components with no visible text or symbols2006/42/CE (+2009/127/CE)
2004/108/CE
2000/14/CE

S. Reiser
Head of Approbation
71364 Winnenden (Germany)
Tel.: +49 7195 14-0
Fax: +49 7195 14-2212
Winnenden, 2011/03/01
Stillegging.... NL .. 5
www.kaercher.com/REACH
Garantie
natural_image
Close-up of a mechanical component with red L-shaped bracket and metallic bolts (no visible text or symbols)natural_image
Close-up of mechanical components with hoses and a circled detail (no visible text or symbols)Voorzichtig
natural_image
Technical line drawing of a mechanical component with no visible text or symbolsnatural_image
Line drawing of a mechanical agricultural machine with wheels and a blade (no text or symbols)1 Oliepeilstok
2 3-cilinder dieselmotor
3 Vulopening hydraulische olie
4 Koelwaterreservoir
5 Centrifugaalseparator
6 Brandstofreservoir
7 Accu
8 Deksel brandstofreservoir
9 Hydraulische-olietank
10 Kijkglas
11 Radiateur
natural_image
Exterior view of a battery connected to a small electronic device (no visible text or symbols)natural_image
Top-down line drawing of a car interior showing dashboard and engine components (no text or symbols)natural_image
Technical line drawing of a mechanical assembly with no visible text or symbols1 Kijkglas
2 Manometer
natural_image
Technical diagram of a mechanical assembly with no visible text or symbolsnatural_image
Abstract geometric pattern with layered chevron shapes and a blue upward arrow (no text or symbols)natural_image
Mechanical assembly diagram showing internal components and a close-up of a bolted joint with directional arrows (no text or symbols)1 Instelmoer
2 Contramoer
→ Filterafdekking openen.

natural_image
Technical line drawing of a mechanical device interior with internal components (no text or symbols)natural_image
Technical line drawing of a mechanical housing or enclosure with internal components and mounting holes (no text or symbols)natural_image
Hand interacting with mechanical components, no visible text or symbols71364 Winnenden (Germany)
Tel.: +49 7195 14-0
Fax: +49 7195 14-2212
Winnenden, 2011/03/01
Hulp bij storingen
www.kaercher.com/REACH
Garantía
natural_image
Close-up of a mechanical component with red L-shaped bracket and metallic bolts (no visible text or symbols)natural_image
Close-up of mechanical components with hoses and a circled detail (no visible text or symbols)Precaución
natural_image
Technical line drawing of a mechanical component with no visible text or symbolsnatural_image
Line drawing of a mechanical device with wheels and a disc (no text or symbols)natural_image
Exterior view of a battery connected to a small electronic device (no visible text or symbols)natural_image
Technical line drawing of a car interior showing engine and dashboard components (no text or symbols)natural_image
Technical line drawing of a mechanical assembly with no visible text or symbolsnatural_image
Technical diagram of a mechanical assembly with no visible text or symbolsnatural_image
Abstract geometric pattern with layered chevron shapes and a blue upward arrow (no text or symbols)natural_image
Mechanical assembly diagram showing internal components and a close-up of a bolted joint with two labeled parts (1 and 2), no readable text or symbols present.1 Tuerca de ajuste
2 Contratuerca
natural_image
Technical line drawing of a mechanical device interior with no visible text or symbolsnatural_image
Technical line drawing of a mechanical housing or enclosure with internal components and mounting holes (no text or symbols)natural_image
Hand interacting with mechanical components, no visible text or symbols2006/42/CE (+2009/127/CE)
2004/108/CE
2000/14/CE
71364 Winnenden (Germany)
Tfno.: +49 7195 14-0
Fax: +49 7195 14-2212
Winnenden, 2011/03/01
natural_image
Close-up of a mechanical component with red and black parts, no visible text or symbolsnatural_image
Close-up of mechanical components with hoses and a circled detail (no visible text or symbols)Atenção
natural_image
Technical line drawing of a mechanical component with no visible text or symbolsnatural_image
Line drawing of a mechanical device with wheels and a disc (no text or symbols)natural_image
Exterior view of a battery connected to a small electronic device (no visible text or symbols)natural_image
Technical line drawing of a car interior showing engine and dashboard components (no text or symbols)→ Desapertar o parafuso de descarga de óleo.
→ Soltar o parafuso de fechamento na abertura de enchimento de óleo.
→ Descarregar o óleo.

natural_image
Technical line drawing of a mechanical assembly with no visible text or symbolsnatural_image
Technical diagram of a mechanical assembly with no visible text or symbolsnatural_image
Abstract geometric pattern with layered chevron shapes and a blue upward arrow (no text or symbols)natural_image
Mechanical assembly diagram showing engine components and a close-up of a valve with directional arrows (no text or symbols)natural_image
Technical line drawing of a mechanical device with internal components and mounting brackets (no text or symbols)natural_image
Technical line drawing of a mechanical housing or enclosure with internal components and mounting holes (no text or symbols)→ Trocar o filtro de pó.
→ Voltar a fechar a cobertura do filtro.
natural_image
Hand interacting with mechanical components, no visible text or symbols2006/42/CE (+2009/127/CE)
2004/108/CE
2000/14/CE
71364 Winnenden (Germany)
Tel.: +49 7195 14-0
Fax: +49 7195 14-2212
Winnenden, 2011/03/01
www.kaercher.com/REACH
Garanti
natural_image
Close-up of a mechanical component with red L-shaped bracket and metallic bolts (no visible text or symbols)natural_image
Close-up of mechanical components with hoses and a circled detail (no visible text or symbols)Forsigtig
natural_image
Technical line drawing of a mechanical component with an arrow indicating direction (no text or symbols present)natural_image
Line drawing of a mechanical device with wheels and a blade, no text or symbols presentnatural_image
Exterior view of a battery connected to a small electronic device (no visible text or symbols)natural_image
Top-down technical line drawing of a car engine bay with no visible text or symbols→ Skru olieaftapningsskruen ud.
→ Løsn låseskruen til olien påfyldningsåbning.
→ Aftap olien.
natural_image
Technical line drawing of a mechanical assembly with no visible text or symbolsnatural_image
Technical diagram of a mechanical assembly with no visible text or symbolsnatural_image
Abstract geometric pattern with layered chevron shapes and a blue upward arrow (no text or symbols)natural_image
Mechanical assembly diagram showing internal components and a close-up of a bolted joint with two circular indicators (1 and 2) pointing to features.1 Indstillingsmøtrik
2 Kontramøtrik
→ Åbn motorskærmen i siden.
→ Løsne kontramøtrikken.
→ Justere fejebanen
→ Stram kontramøtrikken.
→ Kontrollér fejevalsens fejeprofil.
natural_image
Technical line drawing of a mechanical device interior with no visible text or symbols→ Klap filterafrysteren frem.
natural_image
Technical line drawing of a mechanical device interior with internal components and mounting holes (no text or symbols)natural_image
Hand interacting with mechanical components, no visible text or symbols2006/42/EF (+2009/127/EF)
2004/108/EF
2000/14/EF
71364 Winnenden (Germany)
Tlf.: +49 7195 14-0
Fax: +49 7195 14-2212
Winnenden, 2011/03/01
Hjælp ved fejl
www.kaercher.com/REACH
Garanti
natural_image
Close-up of a mechanical component with red and black parts, no visible text or symbolsnatural_image
Close-up of mechanical components with hoses and a circled detail (no visible text or symbols)Forsiktig!
natural_image
Technical diagram of a mechanical component with an arrow indicating a specific part (no text or symbols present)natural_image
Line drawing of a mechanical device with wheels and a blade, no text or symbols present1 Oljepeilepinne
2 3-sylinder dieselmotor
3 Hydraulikkolje påfyllingsstuss
4 Kjølevannsbeholder
5 Sentrifugalseparator
6 Drivstoffbeholder
7 Batteri
8 Drivstofftanklokk
9 Hydraulikkoljetank
10 Seglass
11 Vannkjøler
Generelle sikkerhetsanvisninger
⚠️ Fare
natural_image
Exterior view of a battery connected to a small electronic device (no visible text or symbols)Fare for forbrenning!
natural_image
Technical line drawing of an internal vehicle or engine bay with no visible text or symbolsnatural_image
Mechanical assembly diagram showing internal components and a directional arrow (no text or labels)natural_image
Technical diagram of a mechanical assembly with no visible text or symbols→ Åpne sidekledning med nøkkel.
→ Skru opp vingemuttere på festeplaten fra pakningene på siden, og ta av festeplaten.
→ Vipp ut sidepakning.
→ Skru ut festeskruen på feieavfallsbeholderen og sving holderen ut.
→ Ta av feievalsen.
natural_image
Abstract geometric pattern with layered chevron shapes and a blue upward arrow (no text or symbols)natural_image
Mechanical assembly diagram showing internal components and a close-up of a bolted joint with two circular indicators (no text or symbols present)→ Åpne filterdeksel.

natural_image
Technical line drawing of a mechanical device with internal components and mounting holes (no text or symbols)→ Vipp filterristeren forover.
natural_image
Technical line drawing of a mechanical device with internal components and mounting holes (no text or symbols)natural_image
Hand interacting with mechanical components, no visible text or symbols2006/42/EF (+2009/127/EF)
2004/108/EF
2000/14/EF
2000/14/EF: Vedlegg V
Lydeffektnivå dB(A)
Målt: 99
Garanteret: 102

S. Reiser
Head of Approbation
71364 Winnenden (Germany)
Tlf: +49 7195 14-0
Winnenden, 2011/03/01
Feilretting
natural_image
Close-up of a mechanical component with red and black parts, no visible text or symbolsnatural_image
Close-up of mechanical components with hoses and a circled detail (no visible text or symbols)Varning
natural_image
Technical line drawing of a mechanical component with an arrow indicating direction (no text or symbols present)natural_image
Line drawing of a mechanical device with wheels and a circular component (no text or symbols)natural_image
Exterior view of a battery connected to a small electronic device (no visible text or symbols)natural_image
Technical line drawing of an internal vehicle or engine bay with no visible text or symbolsnatural_image
Technical line drawing of a mechanical assembly with no visible text or symbolsnatural_image
Technical diagram of a mechanical assembly with no visible text or symbolsnatural_image
Abstract geometric pattern with layered chevron shapes and a blue upward arrow (no text or symbols)natural_image
Mechanical assembly diagram showing engine components and a close-up of a bolted joint with directional arrows (no text or symbols)natural_image
Technical line drawing of a mechanical device interior with internal components (no text or symbols)natural_image
Technical line drawing of a mechanical housing or enclosure with internal components and mounting holes (no text or symbols)natural_image
Hand interacting with mechanical components, no visible text or symbols→ Ta loss luftfilterhuset.
→ Byt ut luftfilterinsatsen.
71364 Winnenden (Germany)
Tel.: +49 7195 14-0
Fax: +49 7195 14-2212
Winnenden, 2011/03/01
www.kaercher.com/REACH
Takuu
natural_image
Close-up of a mechanical component with red L-shaped bracket and metallic bolts (no visible text or symbols)natural_image
Close-up of mechanical components with hoses and a circled detail (no visible text or symbols)Varo
natural_image
Technical line drawing of a mechanical component with an arrow indicating direction (no text or symbols present)natural_image
Line drawing of a mechanical device with wheels and a blade, no text or symbols presentnatural_image
Exterior view of a battery connected to a small electronic device (no visible text or symbols)natural_image
Technical line drawing of a vehicle engine compartment with no visible text or symbolsnatural_image
Technical line drawing of a mechanical assembly with no visible text or symbolsnatural_image
Technical diagram of a mechanical assembly with no visible text or symbolsnatural_image
Abstract geometric pattern with layered chevron shapes and a blue upward arrow (no text or symbols)natural_image
Mechanical assembly diagram showing engine components and a close-up of a bolted joint with directional arrows (no text or symbols)natural_image
Technical line drawing of a mechanical device interior showing internal components and mounting brackets (no text or symbols)natural_image
Technical line drawing of a mechanical device with internal components and directional arrows indicating movement (no text or symbols)natural_image
Hand interacting with mechanical components, no visible text or symbols→ Poista ilmansuodattimen kotelo.
→ Vaihda ilmansuodatinpanos.
71364 Winnenden (Germany)
Puh.: +49 7195 14-0
Winnenden, 2011/03/01
Häiriöapu
natural_image
Close-up of a mechanical component with red and black parts, no visible text or symbolsnatural_image
Close-up of industrial machinery components with hoses and a circled detail (no visible text or symbols)Προσοχή
natural_image
Technical line drawing of a mechanical device with no visible text or symbolsnatural_image
Line drawing of a mechanical device with wheels and a disc, no text or symbols presentnatural_image
Exterior view of a battery connected to a small electronic device (no visible text or symbols)natural_image
Technical line drawing of a car interior with no visible text or symbolsnatural_image
Technical line drawing of a mechanical assembly with no visible text or symbolsnatural_image
Technical diagram of a mechanical assembly with no visible text or symbolsnatural_image
Abstract geometric pattern with layered chevron shapes and a blue upward arrow (no text or symbols)natural_image
Close-up of a mechanical assembly with visible components and two labeled parts (1 and 2), no readable text or symbols present.natural_image
Technical line drawing of a mechanical device with internal components and mounting holes (no text or symbols)natural_image
Technical line drawing of a mechanical housing or enclosure with internal components and mounting holes (no text or symbols)natural_image
Hand interacting with mechanical components, no visible text or symbols71364 Winnenden (Germany)
Tηλ.: +49 7195 14-0
Φαξ: +49 7195 14-2212
Winnenden, 2011/03/01
Αντιμετώπιση βλαβών
www.kaercher.com/REACH
Garanti
natural_image
Close-up of a mechanical component with red and black parts, no visible text or symbolsnatural_image
Close-up of mechanical components with hoses and a circled detail (no visible text or symbols)Dikkat
natural_image
Technical line drawing of a mechanical component with no visible text or symbolsnatural_image
Line drawing of a mechanical device with wheels and a blade, no text or symbols presentnatural_image
Exterior view of a battery connected to a small electronic device (no visible text or symbols)natural_image
Top-down technical line drawing of a car engine bay with no visible text or symbolsnatural_image
Technical line drawing of a mechanical assembly with no visible text or symbolsnatural_image
Technical diagram showing a mechanical assembly with no visible text or symbolsnatural_image
Abstract geometric pattern with layered chevron shapes and a blue upward arrow (no text or symbols)natural_image
Mechanical assembly diagram showing internal components and a close-up of a bolted joint with directional arrows (no text or symbols)natural_image
Technical line drawing of a mechanical device with internal components and mounting brackets (no text or symbols)natural_image
Technical line drawing of a mechanical housing or enclosure with internal components and mounting holes (no text or symbols)natural_image
Hand interacting with mechanical components, no visible text or symbols71364 Winnenden (Germany)
Tel.: +49 7195 14-0
Winnenden, 2011/03/01
Arizalarda yardım
www.kaercher.com/REACH
Гарантия
natural_image
Close-up of a mechanical component with red and black parts, no visible text or symbolsnatural_image
Close-up of mechanical components with hoses and a circled detail (no visible text or symbols)Внимание!
natural_image
Technical line drawing of a mechanical device with no visible text or symbolsnatural_image
Line drawing of a mechanical device with wheels and a wheel rim (no text or symbols)natural_image
Exterior view of a battery connected to a power supply unit (no visible text or symbols)natural_image
Technical line drawing of an internal car engine bay with no visible text or symbolsnatural_image
Technical line drawing of a mechanical assembly with no visible text or symbolsnatural_image
Technical diagram of a mechanical assembly with no visible text or symbolsnatural_image
Abstract geometric pattern with layered chevron shapes and a blue upward arrow (no text or symbols)natural_image
Mechanical assembly diagram showing internal components and a close-up of a bolted joint with two circular indicators (1 and 2) pointing to features.natural_image
Technical line drawing of a mechanical device interior with no visible text or symbolsnatural_image
Technical line drawing of a mechanical device with internal components and mounting holes (no text or symbols)natural_image
Hand interacting with mechanical components, no visible text or symbols71364 Winnenden (Germany)
Тел.: +49 7195 14-0
Факс: +49 7195 14-2212
Winnenden, 2011/03/01
www.kaercher.com/REACH
Garancia
natural_image
Close-up of a mechanical component with red and black parts, no visible text or symbolsnatural_image
Close-up of mechanical components with hoses and a circled detail (no visible text or symbols)Vigyázat
natural_image
Technical line drawing of a mechanical component with no visible text or symbolsnatural_image
Line drawing of a mechanical device with wheels and a disc, no text or symbols presentnatural_image
Exterior view of a battery connected to a small electronic device (no visible text or symbols)natural_image
Technical line drawing of a vehicle engine compartment with no visible text or symbolsnatural_image
Technical line drawing of a mechanical assembly with no visible text or symbolsnatural_image
Technical diagram of a mechanical assembly with no visible text or symbolsnatural_image
Abstract geometric pattern with layered chevron shapes and a blue upward arrow (no text or symbols)natural_image
Mechanical assembly diagram showing internal components and a close-up of a bolted joint with two circular indicators (1 and 2) pointing to features.natural_image
Technical line drawing of a mechanical device with internal components and mounting brackets (no text or symbols)natural_image
Technical line drawing of a mechanical device with internal components and mounting holes (no text or symbols)natural_image
Hand interacting with mechanical components, no visible text or symbols
S. Reiser
Head of Approbation
71364 Winnenden (Germany)
Tel.: +49 7195 14-0
Fax: +49 7195 14-2212
Winnenden, 2011/03/01
www.kaercher.com/REACH
Záruka
natural_image
Close-up of a mechanical component with red and black parts, no visible text or symbolsnatural_image
Close-up of mechanical components with hoses and a circled detail (no visible text or symbols)Pozor
natural_image
Technical line drawing of a mechanical component with an arrow indicating direction (no text or symbols present)natural_image
Line drawing of a manual agricultural machine with a circular cutter head and wheels (no text or symbols)natural_image
Exterior view of a battery connected to a small electronic device (no visible text or symbols)natural_image
Technical line drawing of a vehicle engine compartment with no visible text or symbolsnatural_image
Technical line drawing of a mechanical assembly with no visible text or symbolsnatural_image
Technical diagram of a mechanical assembly with no visible text or symbolsnatural_image
Abstract geometric pattern with layered chevron shapes and a blue upward arrow (no text or symbols)natural_image
Mechanical assembly diagram showing internal components and a close-up of a bolted joint with two directional indicators (1 and 2), no readable text or symbols present.natural_image
Technical line drawing of a mechanical device interior with internal components (no text or symbols)natural_image
Technical line drawing of a mechanical housing or enclosure with internal components and mounting holes (no text or symbols)natural_image
Hand interacting with mechanical components, no visible text or symbols2006/42/ES (+2009/127/ES)
2004/108/ES
2000/14/ES
71364 Winnenden (Germany)
Tel.: +49 7195 14-0
Fax: +49 7195 14-2212
Winnenden, 2011/03/01
Pomoc při poruchách
natural_image
Close-up of a mechanical component with red and black parts, no visible text or symbolsnatural_image
Close-up of mechanical components with hoses and a circled detail (no visible text or symbols)Pozor
natural_image
Technical line drawing of a mechanical component with an arrow indicating direction (no text or symbols present)natural_image
Line drawing of a mechanical device with wheels and a blade, no text or symbols present→ Programsko stikalo nastavite na transportno vožnjo.
→ Dvignite zbiralnik smeti.
→ Počasi zapeljite k zbiralniku.
→ Blokirajte fiksirno zavoro.
→ Iztresite zbiralnik smeti.
→ Sprostite fiksirno zavoro.
→ Počasi odpeljite od zbiralnika.
→ Zbiralnik smeti prekucnite do končnega položaja.
→ Zbiralnik smeti spustite do končnega položaja.
Izklop stroja
→ Gumb za nastavitev števila vrtljajev motorja potisnite povsem nazaj.
→ Pritisnite in držite zavorni pedal.
→ Blokirajte fiksirno zavoro.
→ Ključ za vžig obrnite na "0" in ga izvlecite.
Transport
⚠️ Nevarnost
natural_image
Exterior view of a battery connected to a small electronic device (no visible text or symbols)natural_image
Top-down technical line drawing of a car interior with no visible text or symbolsnatural_image
Technical line drawing of a mechanical assembly with no visible text or symbols→ Odvijte oljni filter.
→ Očistite nastavek in tesnilno ploskev.
→ Tesnilo novega oljnega filtra pred vgradnjo namažite z oljem.
→ Vgradite novi oljni filter in ga močno privijte.
→ Uvijte izpustni vijak za olje vključno s te-snilom.
Opozorilo: Privijte izpustni vijak za olje z momentnim ključom na 25 Nm.
→ Nalijte motorno olje.
1 Pritrditveni vijak nosilca pometalnega valja
2 Pometalni valj
3 Nosilec pometalnega valja
4 Stransko tesnilo nosilne pločevine
5 Stransko tesnilo

natural_image
Technical diagram of a mechanical assembly with no visible text or symbolsnatural_image
Abstract geometric pattern with layered chevron shapes and a blue upward arrow (no text or symbols)Vgradni položaj pometalnega valja v smeri vožnje (tloris)
Opozorilo: Pri vgradnji novega pometalne-ga valja pazite na položaj krtačnega na-stavka.
→ Vstavite nov pometalni valj. Zareze po-metalnega valja morajo biti nataknjene na utore nasproti ležeče nihalke.
Opozorilo: Po vgradnji novega pometalne-ga valja je potrebno površino pometanja na novo nastaviti.
Preverjanje in nastavljanje površine po- metanja pometalnega valja
Opozorilo: Pometalna površina je tovarniško nastavljena na 80 mm, ob obrabi po-metalnih valjev jo je mogoče brezstopenjsko nastaviti.
→ Preverite pritisk v gumah.
→ Izklopite sesalni ventilator.
→ Stroj za pometanje zapeljite na ravno in gladko površino, kjer zazna prah ali kredo.
→ Programsko stikalo obrnite na pometanje s pometalnim valjem.
→ Programsko stikalo nastavite na transportno vožnjo.
→ Napravo odpeljite naprej.
→ Preverite ogledala za pometanje.

Oblika površine pometanja mora tvoriti enakomeren pravokotnik s širino 80-85 mm.
natural_image
Mechanical assembly diagram showing engine components and a close-up of a bolted joint with directional arrows (no text or symbols)1 Nastavitvena matica
2 Protimatica
→ Odprite stranske obloge motorja.
→ Odvijte protimatico.
→ Nastavite pometalno površino
→ Privijte protimatico.
→ Preverite površino pometanja pometal-nega valja.
Preverite in namestite ogledalo na stranskem omelu
→ Preverite pritisk v gumah.
→ Dvignite stransko omelo.
→ Stroj za pometanje zapeljite na ravno in gladko površino, kjer zazna prah ali kredo.
→ Programsko stikalo obrnite na pometanje s pometalnim valjem in stranskim omelom.
→ Dvignite stransko omelo.
→ Programsko stikalo postavite na Vožnjo.
→ Napravo odpeljite naprej.
→ Preverite ogledala za pometanje.
→ Odprite pokrov filtra.
natural_image
Technical line drawing of a mechanical device interior with internal components (no text or symbols)→ Otresalo filtra sklopite naprej.
natural_image
Technical line drawing of a mechanical device with internal components and mounting holes (no text or symbols)→ Zamenjajte filter za prah.
→ Ponovno zaprite pokrov filtra.
Preverjanje in nastavitev klinastega jermena
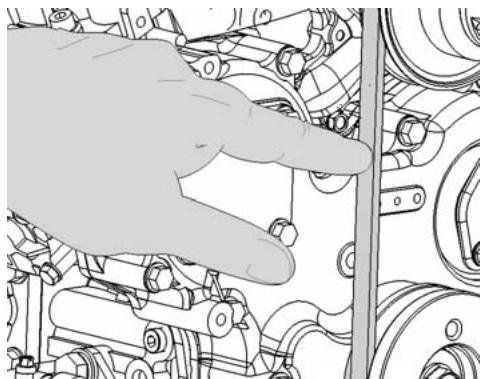
natural_image
Hand interacting with mechanical components, no visible text or symbolsKlinasti jermen mora pri tlaku 10 kg popustiti ca. 7-9 mm.
2006/42/ES (+2009/127/ES)
2004/108/ES
2000/14/ES
71364 Winnenden (Germany)
Tel.: +49 7195 14-0
Winnenden, 2011/03/01
Pomoč pri motnjah
www.kaercher.com/REACH
Gwarancja
natural_image
Close-up of a mechanical component with red and black parts, no visible text or symbolsnatural_image
Close-up of mechanical components with hoses and a circled detail (no visible text or symbols)Uwaga
natural_image
Technical line drawing of a mechanical component with an arrow indicating direction (no text or symbols present)natural_image
Line drawing of a mechanical device with wheels and a disc, no text or symbols presentnatural_image
Exterior view of a battery connected to a small electronic component (no visible text or symbols)natural_image
Technical line drawing of a vehicle engine bay with no visible text or symbolsnatural_image
Mechanical assembly diagram showing internal components and a directional arrow (no text or labels)natural_image
Technical diagram of a mechanical assembly with no visible text or symbolsnatural_image
Abstract geometric pattern with layered chevron shapes and a blue upward arrow (no text or symbols)natural_image
Close-up of a mechanical assembly with visible components and two labeled parts (1 and 2), no readable text or symbols present.natural_image
Technical line drawing of a mechanical device interior with no visible text or symbolsnatural_image
Technical line drawing of a mechanical housing or enclosure with internal components and mounting holes (no text or symbols)natural_image
Hand interacting with mechanical components, no visible text or symbols2006/42/WE (+2009/127/WE)
2004/108/WE
2000/14/WE
71364 Winnenden (Germany)
tel.: +49 7195 14-0
faks: +49 7195 14-2212
Winnenden, 2011/03/01
Usuwanie usterek
www.kaercher.com/REACH
Garantie
natural_image
Close-up of a mechanical component with red and black parts, no visible text or symbolsnatural_image
Close-up of mechanical components with hoses and a circled detail (no visible text or symbols)Atentie
natural_image
Technical line drawing of a mechanical component with no visible text or symbolsnatural_image
Line drawing of a mechanical device with wheels and a disc, no text or symbols present1 Jojă de ulei
2 Motor Diesel cu 3 cilindri
3 Stut de umplere ulei hidraulic
4 Rezervor de apă de răcire
5 Separator centrifugal
6 Rezervor de combustibil
7 Acumulator
8 Capac rezervor de combustibil
9 Rezervor de ulei hidraulic
10 Vizor
11 Radiator apă
natural_image
Exterior view of a battery connected to a small electronic device (no visible text or symbols)natural_image
Technical line drawing of a car interior with no visible text or symbolsnatural_image
Technical diagram of a mechanical assembly with no visible text or symbolsnatural_image
Technical diagram of a mechanical assembly with no visible text or symbolsnatural_image
Abstract geometric pattern with layered chevron shapes and a blue upward arrow (no text or symbols)natural_image
Mechanical assembly diagram showing internal components and a close-up of a bolted joint with two labeled parts (1 and 2), no readable text or symbols present.natural_image
Technical line drawing of a mechanical device interior with internal components (no text or symbols)natural_image
Technical line drawing of a mechanical housing or enclosure with internal components and mounting holes (no text or symbols)natural_image
Hand interacting with mechanical components, no visible text or symbolsDirective EG respectate:
2006/42/CE (+2009/127/CE)
2004/108/CE
2000/14/CE
Norme armonizate utilize:
EN 60335-1
EN 60335-2-72
EN 55012: 2007 + A1: 2009
EN 55014-2: 1997 + A2: 2008
71364 Winnenden (Germany)
Tel.: +49 7195 14-0
Fax: +49 7195 14-2212
Winnenden, 2011/03/01
natural_image
Close-up of a mechanical component with red L-shaped bracket and metallic bolts (no visible text or symbols)natural_image
Close-up of mechanical components with hoses and a circled detail (no visible text or symbols)Pozor
natural_image
Technical line drawing of a mechanical component with an arrow indicating direction (no text or symbols present)natural_image
Line drawing of a mechanical device with wheels and a disc, no text or symbols present→ Nastavte programový vypínač na transportnú jazdu.
→ Zdvihnite nádobu na nečistoty.
→ Pomaly sa presuňte ku zbernej nádobe.
→ Zatiahnite ručnú parkovaciu brzdu.
→ Vyklopte nádobu na nečistoty.
→ Povol'te parkovaciu brzdu.
→ Pomaly sa vzdial'te od zbernej nádoby.
→ Sklopte nádobu na nečistoty do koncovej polohy.
→ Spustite nádobu na smeti až do konco-vej polohy.
Vypnutie prístroja
→ Presuňte nastavenie počtu otáčok motora úplne dozadu.
→ Stlačte o podržte stlačený brzdový pedál.
→ Zatiahnite ručnú parkovaciu brzdu.
→ Kl'účik zapal'ovania otočit' na "0" a vytiahnut'.
Preprava
⚠️ Nebezpečenstvo
Nebezpečenstvo zranenia a poškodenia! Pri prepravovaní zariadenia zohl'adnite jeho hmotnost'.
natural_image
Exterior view of a battery connected to a small electronic device (no visible text or symbols)natural_image
Technical line drawing of a car interior with no visible text or symbolsnatural_image
Technical line drawing of a mechanical assembly with no visible text or symbols1 Priezor
2 Manometer
3 Uzatvárací kryt, plniaci otvor oleja
natural_image
Technical diagram of a mechanical assembly with no visible text or symbolsnatural_image
Abstract geometric pattern with layered chevron shapes and a blue upward arrow (no text or symbols)natural_image
Mechanical assembly diagram showing internal components and a close-up of a bolted joint with two labeled parts (1 and 2), no readable text or symbols present.→ Otvorte kryt filtra.
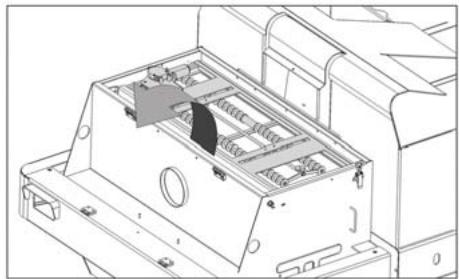
natural_image
Technical line drawing of a mechanical device with internal components and mounting brackets (no text or symbols)→ Vyklopte vibrátor filtra dopredu.
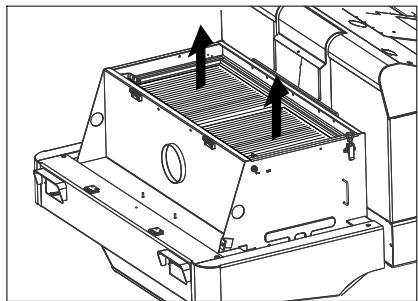
natural_image
Technical line drawing of a mechanical housing or enclosure with internal components and mounting holes (no text or symbols)→ Vymeňte prachový filter.
→ Uzavrite opät' kryt filtra.
natural_image
Hand interacting with mechanical components, no visible text or symbols2006/42/ES (+2009/127/ES)
2004/108/ES
2000/14/ES
Uplatňované harmonizované normy:
EN 60335-1
EN 60335-2-72
EN 55012: 2007 + A1: 2009
EN 55014-2: 1997 + A2: 2008
71364 Winnenden (Germany)
Tel: +49 7195 14-0
Fax: +49 7195 14-2212
Winnenden, 2011/03/01
Pomoc pri poruchách
www.kaercher.com/REACH
Jamstvo
natural_image
Close-up of a mechanical component with red L-shaped bracket and metallic bolts (no visible text or symbols)natural_image
Close-up of mechanical components with hoses and a circled detail (no visible text or symbols)Oprez
Stroj za metenje se bez vlastitog pogona ne smije kretati na duljim relacijama i ne brže od 10 km/h.
→ Polugu slobodnog hoda nakon pomicanja ponovno preklopite uvis.
Kretanje stroja za metenje s vlastitim pogonom
→ Polugu slobodnog hoda nakon pomicanja ponovno preklopite uvis.
Stavljanje u pogon
Opće napomene
→ Prije stavljanja u pogon pročitajte i obratite pažnju na upute za rad koje izdaje proizvođač motora, a prvenstveno na sigurnosne naputke.
→ Stroj za metenje postavite na ravnu podlogu.
→ Izvucite kontaktni ključ.
→ Zakočite pozicijsku kočnicu.
Punjenje goriva
⚠️ Opasnost
Opasnost od eksplozije!
- Smiju se koristiti samo goriva navedena u uputama za rad.
- Ne punite gorivo u zatvorenim prostorijama.
– Pušenje i otvoreni plamen su zabranjeni. - Pazite da gorivo ne dođe u dodir s vrućim površinama.
→ Na prikazu spremnika provjerite preostalu količinu goriva.
→ Isključite motor.
→ Odvijte zaklopac spremnika za gorivo.
→ Ulijte dizel gorivo.
→ Prebrišite preliveno gorivo i zatvorite zaklopac spremnika.
Ispitni i servisni radovi
natural_image
Technical line drawing of a mechanical device with no visible text or symbols→ Ručicu za gas postavite sasvim prema naprijed (velik broj okretaja).
Napomena: Broj okretaja bočne četke i valjka za metenje ovisi o broju okretaja motora.
Biranje programa
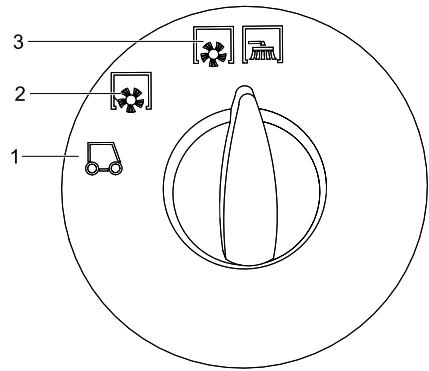
1 Transport
2 Metenje s valjkom za metenje
3 Metenje s valjkom za metenje i bočnim metlama
Pokretanje stroja
Napomena: Ovaj je uređaj opremljen kontaktnim prekidačem sjedala vozača. Uređaj se isključuje čim vozač ustane sa sjedala.
natural_image
Line drawing of a mechanical device with wheels and a disc (no text or symbols)→ Programski prekidač postavite u položaj za vožnju.
→ Podignite spremnik nakupljene prljavštine.
→ Polako dovezite uređaj do sabirne posude.
→ Zakočite pozicijsku kočnicu.
→ Ispraznite spremnik nakupljene prljavštine.
→ Otpustite pozicijsku kočnicu.
→ Polako udaljite uređaj od sabirne posude.
→ Spremnik za prljavštinu ispravite do kraja.
→ Spustite spremnik za prljavštinu u kraj-nji položaj.
1 Šipka za mjerenje razine ulja
2 3-cilindrični dizelski motor
3 Nastavak za punjenje hidrauličkog ulja
4 Spremnik rashladne vode
5 Centrifugalni separator
6 Spremnik za gorivo
7 Akumulator
8 Poklopac spremnika za gorivo
9 Spremnik za hidrauličko ulje
10 Kontrolno okno
11 Hladnjak za vodu
natural_image
Exterior view of a battery connected to a small electronic device (no visible text or symbols)→ Odvijte zatvarače svih ćelija.
→ Plus pol punjača povežite s plus polom akumulatora.
→ Minus pol punjača povežite s minus polom akumulatora.
→ Utaknite strujni utikač u utičnicu i uključite punjač.
→ Napunite akumulator s najslabijom mogućom strujom punjenja.
Napomena: Kada je akumulator napunjen, punjač najprije odvojite od električne mreže pa zatim od akumulatora.
Vađenje akumulatora
→ Odvojite stezaljku s minus pola (-).
→ Odvojite stezaljku s plus pola (+).
→ Otpustite držače na dnu akumulatora.
→ Skinite akumulator s držača.
→ Prazan akumulator zbrinite u otpad su- kladno zakonskim odredbama.
Provjera razine motornog ulja i dopunjavanje
⚠️ Opasnost
natural_image
Technical line drawing of a car interior with no visible text or symbols→ Odvijte vijak za ispuštanje ulja.
→ Otpustite zaporni vijak otvora za ulijevanje ulja.
→ Ispustite ulje.
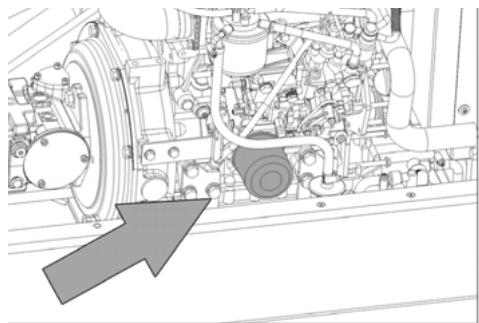
natural_image
Technical line drawing of a mechanical assembly with no visible text or symbols→ Odvijte filtar za ulje.
→ Očistite prihvatnik i brtveće površine.
→ Prije ugradnje uljem premažite brtvu novog filtra za ulje.
→ Ugradite filtar za ulje i pritegnite ga ru-kom.
→ Uvijte vijak za ispuštanje ulja zajedno s novim brtvilom.
Napomena: Momentnim ključem pritegnite vijak za ispuštanje ulja na 25 Nm.
→ Ulijte motorno ulje.
Za vrstu ulja pogledajte tehničke podatke.
→ Zatvorite otvor za ulijevanje ulja.
→ Ostavite motor neka radi približno 10 sekundi.
→ Provjerite razinu motornog ulja.
1 Pričvrsni vijak prihvatnika valjka za metenje
2 Valjak za metenje
3 Prihvatnik valjka za metenje
4 Limeni držač bočne brtve
5 Bočna brtva
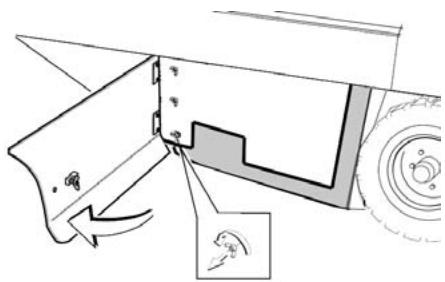
natural_image
Technical diagram of a mechanical assembly with no visible text or symbols→ Otvorite bočnu oplatu ključem.
→ Odvijte leptir matice na limenom držaču bočne brtve pa skinite limeni držač.
→ Bočnu brtvu preklopite prema van.
→ Odvijte pričvrsni vijak prihvatnika valjka za metenje pa zakrenite prihvatnik prema van.
→ Izvadite valjak za metenje.

natural_image
Abstract geometric pattern with layered chevron shapes and a blue upward arrow (no text or symbols)natural_image
Mechanical assembly diagram showing engine components and a close-up of a bolted joint with two labeled parts (1 and 2), no readable text or symbols present.1 Matica za namještanje
2 Protumatica
→ Otvorite bočnu oplatu motora.
→ Otpustite protumaticu.
→ Prilagodite profil metenja
→ Zategnite protumaticu.
→ Provjerite profil metenja valjka za metenje.
→ Otvorite poklopac filtra.

natural_image
Technical line drawing of a mechanical device interior with internal components (no text or symbols)→ Preklopite mehanizam za protresanje filtra prema naprijed.
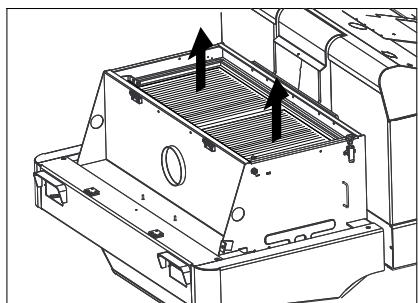
natural_image
Technical line drawing of a mechanical device with internal components and mounting holes (no text or symbols)→ Zamijenite filtar za prašinu.
→ Ponovo zatvorite poklopac filtra.
Provjera i namještanje klinastog remena

natural_image
Hand interacting with mechanical components, no visible text or symbolsKlinasti remen mora se pri pritisku od 10 kg utisnuti približno 7-9 mm.
→ Namještanje zategnutosti klinastog remenja prepustite ovlaštenoj servisnoj službi.
2006/42/EZ (+2009/127/EZ)
2004/108/EZ
2000/14/EZ
71364 Winnenden (Germany)
Tel.: +49 7195 14-0
Winnenden, 2011/03/01
Otklanjanje smetnji
Transport .... SR .. 5
Skladištenje uređaja ..... SR .. 5
Stavljanje uređaja van pogona SR .. 5
Nega i održavanje.... SR .. 5
Opšte napomene..... SR .. 5
www.kaercher.com/REACH
Garancija
U svakoj zemlji važe garantni uslovi koje je izdala naša nadležna distributivna organizacija. Eventualne smetnje na uređaju za vreme trajanja garancije uklanjamo besplatno, ukoliko je uzrok greška u materijalu ili proizvodnji. U slučaju koji podleže garanciji obratite se sa potvrdom o kupovini Vašem prodavcu ili najbližoj ovlašćenoj servisnoj službi.

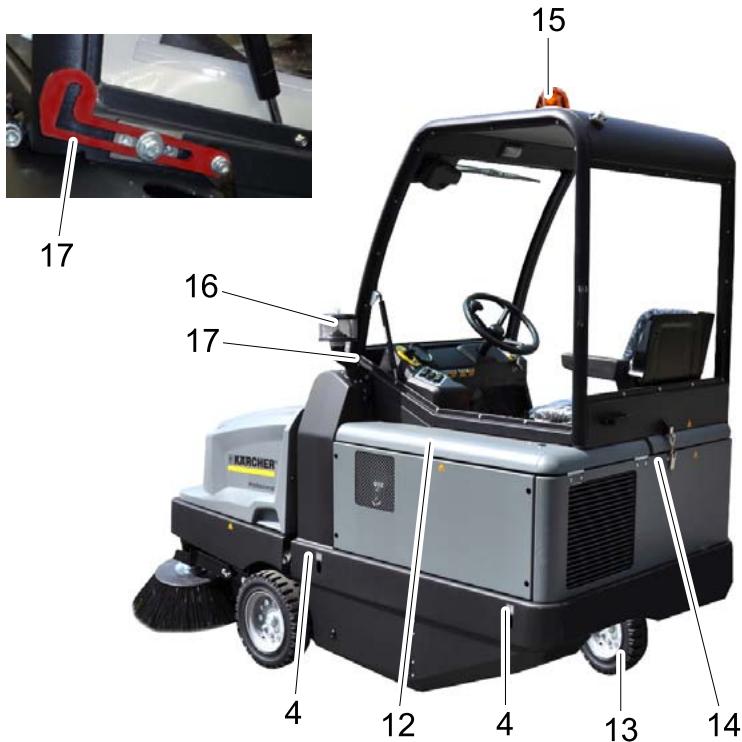
KM 130/300 R D
1 Upravljačka kabina (opcija)
2 Vrata kabine (opcija)
3 Zatvarač rezervoara za gorivo
4 Mesto vezivanja (4x)
5 Valjak za metenje
6 Prednji točak
7 Bočna metla
8 Osvetljenje (opcija)
9 Posuda za nakupljenu prljavštinu
10 Blokada poklopca uređaja
11 Brisači stakla (opcija)
12 Poklopac motora
13 Zadnji točak
14 Bravica kabine vozača
15 Rotirajuće svetlo
16 Centrifugalni separator
17 Sigurnosna poluga kabine vozača
18 Poluga za pozicioniranje valjka za metenje (bez prikaza)
Komandno polje

19 Programski prekidač
20 Funkcijski tasteri
21 Višenamenski ekran
22 Kutija sa osiguračima na radnom mestu
23 Upravljač
24 Kontaktna brava
25 Poziciona (ručna) kočnica
26 Podešavanje broja obrtaja motora
27 Sedište (sa kontaktnim prekidačem)
28 Kočna pedala
29 Vozna pedala
Kontaktna brava (24)
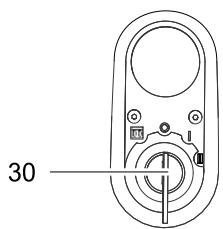
30 Kontaktni ključ
Simbol užarene niti: Predgrejavanje
natural_image
Close-up of a mechanical component with red L-shaped bracket and metallic bolts (no visible text or symbols)→ Pre nego što spustite kabinu vozača, odglavite sigurnosnu polugu.
Kočenje i otpuštanje pozicione kočnice
natural_image
Close-up of mechanical components with hoses and a circled detail (no visible text or symbols)Oprez
Uređaj za metenje se bez sopstvenog pogona ne sme kretati na dužim relacijama i ne brže od 10 km/h.
→ Nakon pomeranja polugu slobodnog hoda ponovo preklopite uvis.
Kretanje uređaja za metenje sa sopstvenim pogonom
→ Nakon pomeranja polugu slobodnog hoda ponovo preklopite uvis.
Stavljanje u pogon
Opšte napomene
→ Pre puštanja u rad pročitajte i sledite uputstvo za rad koje izdaje proizvođač motora, a prvenstveno sigurnosne napomene.
→ Uređaj za metenje postavite na ravnu podlogu.
→ Izvucite kontaktni ključ.
→ Zakočite pozicionu kočnicu.
Ulivanje goriva
⚠️ Opasnost
Opasnost od eksplozije!
- Sme da se upotrebljava samo gorivo navedeno u uputstvu za rad.
- Gorivo ne sme da se sipa u zatvorenim prostorijama.
- Zabranjeni su pušenje i otvoren plamen.
– Pazite da benzin ne dospe na vruće površine.
→ Na prikazu rezervoara proverite preostalu količinu goriva.
→ Isključite motor.
→ Odvijte zatvarač rezervoara za gorivo.
→ Ulijte dizel gorivo.
→ Prebrišite preliveno gorivo i zatvorite poklopac rezervoara.
Ispitni i servisni radovi
→ Proverite nivo motornog ulja.
→ Proverite hladnjak za vodu.
→ Proverite valjak za metenje.
→ Proverite pritisak vazduha u gumama.
→ Namestite sedište vozača.
→ Očistite filter za prašinu.
natural_image
Technical line drawing of a mechanical device with no visible text or symbols→ Papučicu za gas postavite sasvim prema napred (visok broj obrtaja). Napomena: Broj obrtaja bočne četke i valjka za metenje zavise od broja obrtaja motora.
Biranje programa

1 Transport
2 Metenje sa valjkom za metenje
3 Metenje sa valjkom za metenje i bočnim metlama
Pokretanje uređaja
Napomena: Ovaj uređaj poseduje kontaktni prekidač sedišta vozača. Uređaj se isključuje čim vozač ustane sa sedišta.
→ Sedite na sedište.
→ Postavite poluga za izbor smera vožnje u središnji položaj.
→ Zakočite pozicionu kočnicu.
→ Postavite polugu za podešavanje broja obrtaja motora za 1/3 prema napred.
Predgrejavanje
→ Utaknite kontaktni ključ u kontaktnu bravu.
→ Okrenite kontaktni ključ u položaj "Užarena nit".
Lampa predgrejavanja svetli.
Pokretanje motora
→ Nakon što se ugasi, okrenite kontaktni ključ u položaj "II".
→ Kada je uređaj pokrenut, pustite kontaktni ključ.
Napomena: Pokretač se nikada ne sme držati uključen duže od 10 sekundi. Pre ponovnog uključivanja pokretača treba sačekati najmanje 10 sekundi.
Vožnja uređaja
→ Postavljanje programskog prekidača u položaj za vožnju - .
→ Papučicu za gas postavite sasvim prema napred (visok broj obrtaja).
→ Pritisnite kočnu pedalu i držite je pritisnutom.
→ Otkočite pozicionu kočnicu.
Vožnja prema napred
→ Postavite polugu za izbor smera vožnje na "napred".
→ Polako pritisnite voznu pedalu.
Vožnja unazad
⚠️ Opasnost
Opasnost od povreda! Pri vižnji unazad ne sme doći do opasnosti po druga lica, po potrebi dajte instrukcije svim osobama koje mogu biti ugrožene.
Oprez
natural_image
Line drawing of a mechanical device with wheels and a disc, no text or symbols present→ Programski prekidač postavite u položaj za vožnju.
→ Odignite posudu za nakupljenu prljavštinu.
→ Polako navezite uređaj do sabirne posude.
→ Zakočite pozicionu kočnicu.
→ Prekrenite posudu.
→ Otkočite pozicionu kočnicu.
→ Polako udaljite uređaj od sabirne posude.
→ Prekrenite posudu za nakupljenu prljavštinu u krajnji položaj.
→ Spustite posudu za prljavštinu u krajnji položaj.
1 Šipka za merenje nivoa ulja
2 3-cilindrični dizel motor
3 Nastavak za punjenje hidrauličkog ulja
4 Posuda za rashladnu vodu
5 Centrifugalni separator
6 Rezervoar za gorivo
7 Akumulator
8 Poklopac rezervoara za gorivo
9 Rezervoar za hidrauličko ulje
10 Kontrolno okno
11 Hladnjak za vodu
Opšte sigurnosne napomene
⚠️ Opasnost
Opasnost od povreda! Uvek postavite sigurnosnu polugu kada je posuda za nakupljenu prljavštinu podignuta.
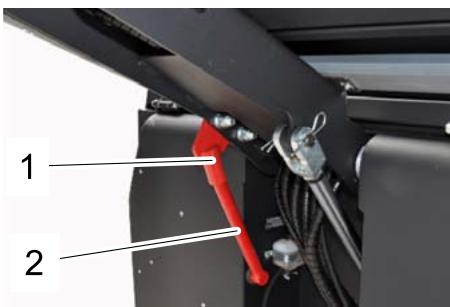
1 Držač sigurnosne poluge
2 Sigurnosna poluga
→ Sigurnosnu polugu za visoko pražnjenje preklopite prema gore i utaknite u držač (time ste je fiksirali).
| Motorno ulje i mazut, dizel i benzin ne smeju dospeti u životnu sredinu. Molimo Vas da štitite tlo i staro ulje odstranite u skladu sa propisima. |
Sigurnosne napomene za rad akumulatora
Pri radu sa akumulatorima obavezno obratite pažnju na sledeća upozorenja:
| Uzmite u obzir instrukcije na akumulatoru, u uputstvu za upotrebu i u uputstvu za rad vozila! | |
| Nosite zaštitne naočare! | |
| Kiseline i akumulatore držite van domašaja dece! | |
| Opasnost od eksplozije! | |
| Zabranjeni su vatra, varničenje, otvoren plamen i pušenje! | |
| Opasnost od povreda kiselinom! | |
| Prva pomoć! | |
| Upozorenje! | |
| Odlaganje u otpad! | |
| Akumulator se ne sme baciti u kantu za smeće! |
⚠️ Opasnost
natural_image
Exterior view of a battery connected to a small electronic device (no visible text or symbols)→ Odvijte zatvarače svih ćelija.
→ Plus pol punjača povežite sa plus polom akumulatora.
→ Minus pol punjača povežite sa minus polom akumulatora.
→ Utaknite strujni utikač u utičnicu i uključite punjač.
→ Napunite akumulator sa najslabijom mogućom strujom punjenja.
Napomena: Kada je akumulator napunjen, punjač najpre odvojite od električne mreže pa potom od akumulatora.
Vađenje akumulatora
→ Odvojite stezaljku sa minus pola (-).
→ Odvojite stezaljku sa plus pola (+).
→ Otpustite držače na dnu akumulatora.
→ Skinite akumulator s držača.
→ Prazan akumulator odložite u otpad u skladu sa važećim odredbama.
Provera nivoa motornog ulja i dopunjavanje
⚠️ Opasnost
Opasnost od opekotina!
→ Ostavite motor da se ohladi.
→ Nivo motornog ulja proverite najranije 5 minuta nakon isključenja motora.
→ Izvucite šipku napolje.
→ Obrišite i ugurajte štap unutra.
→ Izvucite šipku napolje.
→ Očitajte nivo ulja.
→ Šipku za merenje ulja ponovo ugurajte unutra.
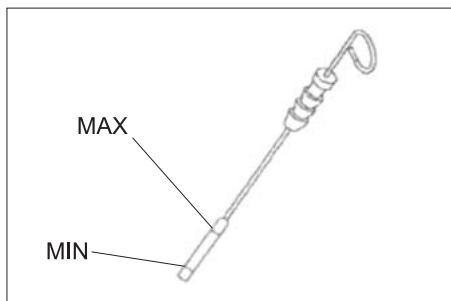
- Nivo ulja mora da se nalazi između oznaka "MIN" i "MAX".
- Ako je nivo opao ispod oznake "MIN", motorno ulje treba dopuniti.
- Nemojte puniti motor preko oznake "MAX".
→ Otpustite blokirni zavrtanj otvora za ulivanje ulja.
→ Ulijte motorno ulje.
Za vrstu ulja pogledajte tehničke podatke.
→ Zatvorite otvor za ulivanje ulja.
→ Sačekajte najmanje 5 minuta.
→ Proverite nivo motornog ulja.
Zamena motornog ulja i filtera za motorno ulje
Oprez
Opasnost od opekotina vrelim uljem!
→ Pripremite prihvatnu posudu za najmanje 6 lit. ulja.
→ Ostavite motor da se ohladi.
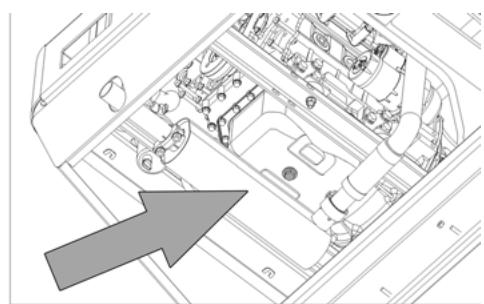
natural_image
Technical line drawing of a vehicle engine bay with no visible text or symbols→ Odvijte zavrtanj za ispuštanje ulja.
→ Otpustite blokirni zavrtanj otvora za ulivanje ulja.
→ Ispustite ulje.
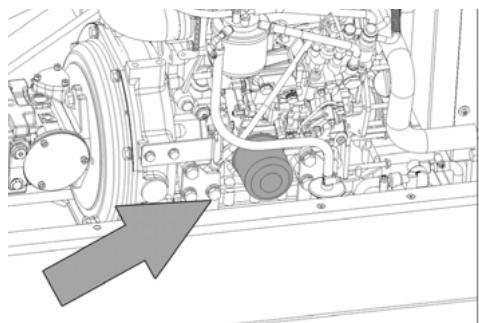
natural_image
Technical line drawing of a mechanical assembly with no visible text or symbols→ Odvijte filter za ulje.
→ Očistite prihvatnik i zaptivne površine.
→ Pre ugradnje premažite uljem zaptivku novog filtera za ulje.
→ Ugradite filter za ulje i pritegnite ga rukom.
→ Zavijte zavrtanj za ispuštanje ulja zajedno sa novom zaptivkom.
1 Kontrolno okno
2 Manometar
3 Poklopac otvora za ulivanje ulja
→ Na kontrolnom oknu proverite nivo hidrauličkog ulja.
- Nivo ulja mora da se nalazi između oznaka "MIN" i "MAX".
- Ako je nivo opao ispod oznake "MIN", treba dopuniti hidrauličko ulje.
→ Odvijte poklopac otvora za ulivanje ulja.
→ Očistite prostor za punjenje.
→ Dopunite hidrauličko ulje.
→ Zavijte poklopac otvora za ulivanje ulja.
Za vrstu ulja pogledajte tehničke podatke.
Napomena
Ako manometar pokazuje povišeni pritisak hidrauličkog ulja, onda servisna služba preduzeća Kärcher treba da zameni filter za hidrauličko ulje.
Provera hidrauličkog sklopa
1 Pričvrsni zavrtanj prihvatnika valjka za metenje
2 Valjak za metenje
3 Prihvatnik valjka za metenje
4 Limeni držač bočne zaptivke
5 Bočna zaptivka
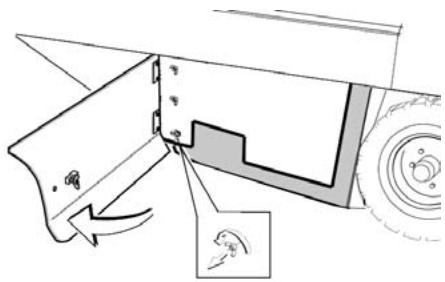
natural_image
Technical diagram of a mechanical assembly with no visible text or symbols→ Ključem otvorite bočnu oplatu.
→ Odvijte leptir navrtke na limenom držaču bočne zaptivke pa skinite limeni držač.
→ Bočnu zaptivku preklopite prema spolja.
→ Odvijte pričvrsni zavrtanj prihvatnika valjka za metenje pa zakrenite prihvatnik prema spolja.
→ Izvadite valjak za metenje.
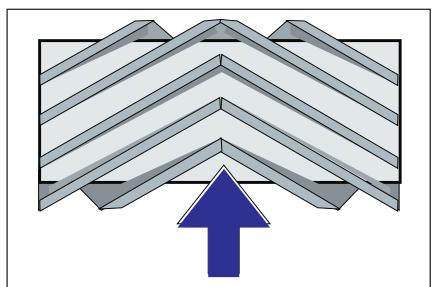
natural_image
Abstract geometric pattern with layered chevron shapes and a blue upward arrow (no text or symbols)Položaj ugradnje valjka za metenje u smeru vožnje (pogled odozgo)
Napomena: Pri ugradnji novog valjka za metenje pazite na položaj garniture čekinja.
→ Ugradite novi valjak za metenje. Žlebovi valjaka za metenje moraju biti nataknuti na ispuste naspramnih držača.
Napomena: Nakon ugradnje novog valjka za metenje mora se iznova podesiti profil metenja.
Provera i podešavanje profila metenja valjka za metenje
Napomena: Profil metenja je fabrički podešen na 80 mm, a u slučaju istrošenosti valjka za metenje se može kontinualno podesiti.
→ Proverite pritisak vazduha u gumama.
→ Isključite usisni ventilator.
→ Uređaj za metenje odvezite na ravnu i glatku površinu koja je vidljivo prekrivena prašinom ili izmrvljenom kredom.
→ Programski prekidač postavite na metenje valjcima.
→ Programski prekidač postavite u položaj za vožnju.
→ Pomerite uređaj vozeći ga unazad.
→ Proverite profil metenja.
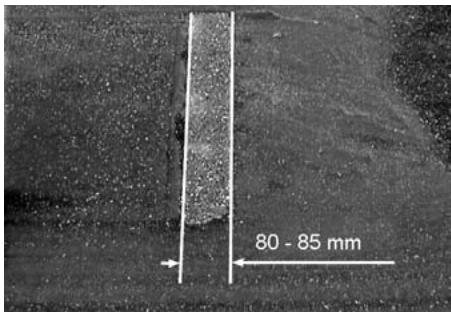
Pometena površina treba da ima oblik pravilnog pravougaonika širine između 80 i 85 mm.
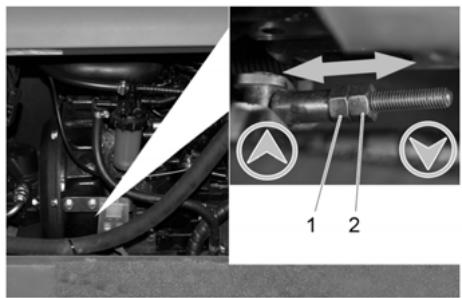
natural_image
Mechanical assembly diagram showing internal components and a close-up of a bolted joint with two circular indicators (1 and 2) pointing to features.1 Podešavajuća navrtka
2 Kontra-navrtka
→ Otvorite bočnu oplatu motora.
→ Otpustite kontra-navrtku.
→ Naknadno podesite profil metenja
→ Zategnite kontra-navrtku.
→ Proverite profil metenja valjka za metenje.
Provera i podešavanje profila metenja bočne metle
→ Proverite pritisak vazduha u gumama.
→ Podignite bočnu metlu.
→ Uređaj za metenje odvezite na ravnu i glatku površinu koja je vidljivo prekrivena prašinom ili izmrvljenom kredom.
→ Programski prekidač postavite na metenje valjcima i bočnom metlom.
→ Podignite bočnu metlu.
→ Programski prekidač postavite u položaj za vožnju.
→ Pomerite uređaj vozeći ga unazad.
→ Proverite profil metenja.
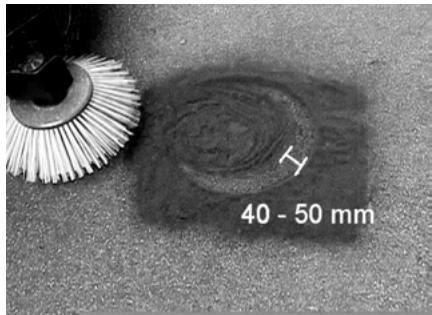
→ Otvorite poklopac filtera.
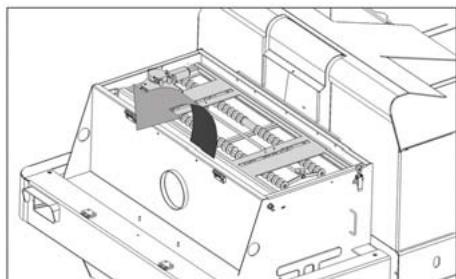
natural_image
Technical line drawing of a mechanical device interior with no visible text or symbols→ Preklopite mehanizam za protresanje filtera prema napred.

natural_image
Technical line drawing of a mechanical device interior with two arrows indicating direction (no text or symbols present)→ Zamenite filter za prašinu.
→ Ponovo zatvorite poklopac filtera.
Proverite i podesite klinasti remen

natural_image
Hand interacting with mechanical components, no visible text or symbolsKlinasti remen se mora pri pritisku od 10 kg utisnuti približno 7-9 mm.
→ Podešavanje zategnutosti klinastog remenja prepustite ovlašćenoj servisnoj službi.
Provera i zamena filtera za vazduh
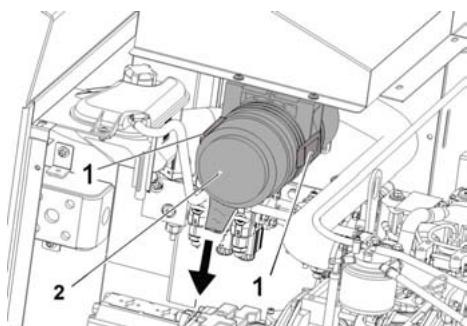
→ Uklonite kućište filtera za vazduh.
→ Zamenite uložak filtera za vazduh.
Napomena: Položaj ugradnje s izduvnim otvorom prema dole (vidi sliku).
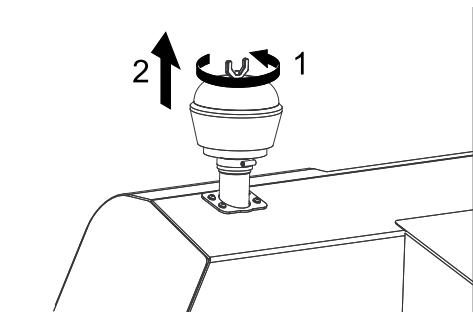
→ Odvijte leptir navrtku na centrifugalnom separatoru.
→ Očistite centrifugalni separator.
Zamena sijalice prednjeg fara (opcija)
→ Odvijte prednji far.
→ Izvadite far i izvucite utikače.
Napomena: Pazite na položaje utikača.
→ Rastavite prednji far.
→ Razvucite i izvadite kućište prednjeg fara držeći ga pritom vodoravno, budući da lampa nije pričvršćena.
→ Otkačite blokirnu kuku i izvadite sijalicu.
→ Stavite novu sijalicu.
→ Sastavite uređaj obrnutim redosledom.
Zamena osigurača
2006/42/EZ (+2009/127/EZ)
2004/108/EZ
2000/14/EZ
Primenjene uskladene norme:
EN 60335-1
EN 60335-2-72
EN 55012: 2007 + A1: 2009
EN 55014-2: 1997 + A2: 2008
71364 Winnenden (Germany)
Tel.: +49 7195 14-0
Winnenden, 2011/03/01
Otklanjanje smetnji
| Smetnja | Otklanjanje |
| Uređaj se ne može pokrenuti | Sedite na sedište vozača, kontaktni prekidača sedišta vozača se aktivira. |
| Punjenje ili zamena akumulatora | |
| Ulijte gorivo, ispustite vazduh iz sistema goriva | |
| Zamena filtera za gorivo | |
| Proverite i po potrebi popravite sistem vodova za gorivo, priključke i spojeve. | |
| Obavestite Kärcher servisnu službu. | |
| Motor radi neravnomerno | Očistite filter za vazduh ili zamenite filterski uložak. |
| Proverite i po potrebi popravite sistem vodova za gorivo, priključke i spojeve. | |
| Obavestite Kärcher servisnu službu. | |
| Pregrejan motor | Dopunite rashladno sredstvo |
| Isperite hladnjak | |
| Zategnite klinasto remenje | |
| Obavestite Kärcher servisnu službu. | |
| Motor radi, ali se uređaj kreće sporo ili nikako | Otkočite pozicionu kočnicu |
| Proverite da nema upletenih traka ili petlji. | |
| Obavestite Kärcher servisnu službu. | |
| Pišteći zvuk u hidraulici | Sipajte hidrauličku tečnost |
| Obavestite Kärcher servisnu službu. | |
| Četke se vrte polako ili se uopšte ne vrte | Papučicu za gas postavite sasvim prema napred (visok broj obrtaja). |
| Proverite da nema upletenih traka ili petlji. | |
| Obavestite Kärcher servisnu službu. | |
| U prostoru četki je usisna snaga mala ili je uopšte nema | Čišćenje filtera |
| Obavestite Kärcher servisnu službu. | |
| Uređaj diže prašinu | Podešavanje bočnih zaptivki |
| Uključite ventilator. | |
| Očistite filter za prašinu | |
| Zamenite filterske zaptivke | |
| Obavestite Kärcher servisnu službu. | |
| Jedinica za čišćenje ostavlja prljavštinu da leži | Ispraznite posudu za nakupljenu prljavštinu |
| Očistite filter za prašinu | |
| Zamenite valjak za metenje. | |
| Naknadno podesite profil metenja | |
| Zamenite zaptivne trake na posudi za prljavštinu | |
| Uklonite strana tela koja blokiraju valjak za metenje | |
| Obavestite Kärcher servisnu službu. | |
| Posuda za prljavštinu ne može da se podigne ili spusti | Proverite osigurače. |
| Obavestite Kärcher servisnu službu. | |
| Posuda za prljavštinu se vrti presporo ili se uopšte ne vrti | Obavestite Kärcher servisnu službu. |
| Smetnje u radu s hidrauličkim pokretnim delovima | Obavestite Kärcher servisnu službu. |
Tehnički podaci
| KM 130/300 R D | ||
| Podaci uređaja | ||
| Brzina vožnje prema napred | km/h | 10 |
| Brzina vožnje unazad | km/h | 10 |
| Savladavanje uspona (maks.) | -- | 18% |
| Površinski učinak bez bočnih metli | m^2/h | 10000 |
| Površinski učinak s bočnom metlom | m^2/h | 13000 |
| Radna širina bez bočne metle | mm | 1000 |
| Radna širina sa bočnom metlom | mm | 1300 |
| Stepen zaštite, zaštićeno od kapajuće vode | -- | IPX 3 |
| Trajanje primene sa punim rezervoarom | h | 4 |
| Motor | ||
| Tip | -- | YANMAR 3TNV76A |
| Tip | -- | 3-cilindrični četvorotaktni dizel motor |
| Način hlađenja | -- | Hlađenje vodom |
| Smer obrtanja | -- | Suprotno smeru kazaljke sata |
| Otvor | mm | 70 |
| Hod | mm | 82 |
| Radna zapremina | cm^3 | 1116 |
| Količina ulja | I | 3,4 |
| Broj obrtaja pri radu | 1/min | 2500 |
| Maksimalan broj obrtaja | 1/min | 2500 |
| Broj obrtaja u praznom hodu | 1/min | 1300 |
| Maks. snaga | kW/PS | 15,8 / 21,5 |
| Najviši obrtni momenat pri 2100 1/min | Nm | 67,9 |
| Filter za ulje | -- | Filterski uložak |
| Filter za usisni vazduh | -- | Unutrašnji/spoljašnji filterski uložak |
| Filter za gorivo | -- | Filterski uložak |
| Električne komponente | ||
| Akumulator | V, Ah | 12, 62 |
| Generator trofazne struje | V, A | 12, 80 |
| Pokretač | -- | Elektrostarter |
| Hidrauličke komponente | ||
| Količina ulja u kompletnom hidrauličkom sklopu | I | 26,5 |
| Količina ulja u hidrauličkom rezervoaru | I | 21,2 |
| Vrste ulja | ||
| Motor (preko 25 °C) | -- | SAE 30, SAE 10W-30, SAE 15W-40 |
| Motor (0 do 25 °C) | -- | SAE 20, SAE 10W-30, SAE 10W-40 |
| Motor (ispod 0 °C) | -- | SAE 10W, SAE 10W-30, SAE 10W-40 |
| Hidraulika | -- | HV 46 |
| Posuda za nakupljenu prljavštinu | ||
| Maksimalna visina pražnjenja | mm | 1400 |
| Zapremina posude za prljavštinu | I | 300 |
| Valjak za metenje | ||
| Prečnik valjka za metenje | mm | 300 |
| Širina valjka za metenje | mm | 1000 |
| Broj obrtaja | 1/min | 350 |
| Profil metenja | mm | 80 |
| Bočna metla | ||
| Prečnik bočnih metli | mm | 600 |
| Broj obrtaja (kontinualno) | 1/min | 0 - 60 |
| Gume | ||
| Veličina napred | -- | 15-4.5x8 |
| Pritisak vazduha napred | bar | 8 |
| Veličina pozadi | -- | 15-4.5x8 |
| Kočnica | ||
| Prednji točkovi | -- | mehanička |
| Zadnji točak | -- | hidrostatička |
| Filterski i usisni sistem | ||
| Tip | -- | Pljosnati naborani filter |
| Broj obrtaja | 1/min | 2800 |
| Površina filtera za finu prašinu | m^2 | 5,2 |
| Nominalni podpritisak usisnog sistema | mbar | 15,5 |
| Nominalni zapreminski protok usisnog sistema | m^3/h | 800 |
| Vibracioni sistem | -- | Elektromotor |
| Okolni uslovi | ||
| Temperatura | °C | -5 do +40 |
| Vlažnost vazduha, bez stvaranja kondenzata | % | 0 - 90 |
| Izračunate vrednosti prema EN 60335-2-72 | ||
| Emisija buke | ||
| Nivo zvučnog pritiska L_pA | dB(A) | 84 |
| Nepouzdanost K_pA | dB(A) | 3 |
| Nivo zvučne snage L_WA + nepouzdanost K_WA | dB(A) | 102 |
| Vibracije uređaja | ||
| Vrednost vibracije na ruci | m/s^2 | 1,4 |
| Sedište | m/s^2 | 0,7 |
| Nepouzdanost K | m/s^2 | 0,1 |
| Dimenzije i težine | ||
| Dužina x širina x visina | mm | 2040x1330x1430 |
| Poluprečnik okretanja udesno | mm | 1400 |
| Poluprečnik okretanja ulevo | mm | 1400 |
| Prazna težina (bez dodatnih sklopova) | kg | 951 |
| Dozvoljena ukupna težina | kg | 1512 |
| Dozvoljeno opterećenje prednje osovine | kg | 877 |
| Dozvoljeno opterećenje zadnje osovine | kg | 635 |
| Zapremina rezervoara za gorivo, dizel | l | 16 |
| Zadržavamo pravo na tehničke promene! | ||

www.kaercher.com/REACH
Гаранция
natural_image
Close-up of a mechanical component with red and black parts, no visible text or symbolsnatural_image
Close-up of mechanical components with hoses and a circled detail (no visible text or symbols)Внимание
natural_image
Technical line drawing of a mechanical component with an arrow indicating direction (no text or symbols present)→ Поставете лоста за газта напред (високи обороти).
natural_image
Line drawing of a mechanical device with a circular cutter head and wheels, no text or symbols presentnatural_image
Exterior view of a battery connected to a power supply unit (no visible text or symbols)natural_image
Technical line drawing of an internal vehicle or engine compartment with no visible text or symbolsnatural_image
Technical line drawing of a mechanical assembly with no visible text or symbolsnatural_image
Technical diagram of a mechanical assembly with no visible text or symbolsnatural_image
Abstract geometric pattern with layered chevron shapes and a blue upward arrow (no text or symbols)natural_image
Mechanical assembly diagram showing internal components and a close-up of a bolted joint with two circular indicators (1 and 2) pointing to features.natural_image
Technical line drawing of a mechanical device with internal components and mounting holes (no text or symbols)natural_image
Technical line drawing of a mechanical housing or enclosure with internal components and mounting holes (no text or symbols)natural_image
Hand interacting with mechanical components, no visible text or symbols71364 Winnenden (Germany)
Тел.: +49 7195 14-0
Факс: +49 7195 14-2212
Winnenden, 2011/03/01
www.kaercher.com/REACH
Garantii
natural_image
Close-up of a mechanical component with red and black parts, no visible text or symbols→ enne juhikabiiini allalaskmist vabastage fikseerimishoob.
natural_image
Close-up of mechanical components with hoses and a circled detail (no visible text or symbols)Ettevaatust
natural_image
Technical line drawing of a mechanical component with an arrow indicating a specific part (no text or symbols present)natural_image
Line drawing of a mechanical device with wheels and a blade, no text or symbols presentnatural_image
Exterior view of an electric vehicle battery connected to a power supply unit (no visible text or symbols)natural_image
Technical line drawing of a vehicle interior with no visible text or symbolsnatural_image
Technical line drawing of a mechanical assembly with no visible text or symbols1 Kontrollaken
2 Manomeeter
natural_image
Technical diagram of a mechanical assembly with no visible text or symbolsnatural_image
Abstract geometric pattern with layered chevron shapes and a blue upward arrow (no text or symbols)natural_image
Mechanical assembly diagram showing internal components and a close-up of a bolted joint with two labeled parts (1 and 2), no readable text or symbols present.→ Avage filtrikate.
natural_image
Technical line drawing of a mechanical device interior with no visible text or symbols→ Keerake filtripuhastaja kate ette.

natural_image
Technical line drawing of a mechanical housing or enclosure with internal components and mounting holes (no text or symbols)→ Vahetage tolmufilter.
→ Pange filtrikate jälle kinni.
natural_image
Hand interacting with mechanical components, no visible text or symbolsToode: Imur-pühkija istmega
Tüüp: 1.186-xxx
71364 Winnenden (Germany)
Tel: +49 7195 14-0
Winnenden, 2011/03/01
Abi häirete korral
www.kaercher.com/REACH
Garantija
natural_image
Close-up of a mechanical component with red L-shaped bracket and metallic bolts (no visible text or symbols)natural_image
Close-up of mechanical components with hoses and a circled detail (no visible text or symbols)Uzmanību
natural_image
Technical line drawing of a mechanical component with no visible text or symbolsnatural_image
Line drawing of a mechanical agricultural machine with wheels and a blade (no text or symbols)natural_image
Exterior view of a battery connected to a small electronic device (no visible text or symbols)natural_image
Technical line drawing of an internal vehicle or engine bay with no visible text or symbolsnatural_image
Technical line drawing of a mechanical assembly with no visible text or symbolsnatural_image
Technical diagram of a mechanical assembly with no visible text or symbolsnatural_image
Abstract geometric pattern with layered chevron shapes and a blue upward arrow (no text or symbols)natural_image
Mechanical assembly diagram showing engine components and a close-up of a bolted joint with directional arrows (no text or symbols)natural_image
Technical line drawing of a mechanical device interior with internal components (no text or symbols)natural_image
Technical line drawing of a mechanical device with internal components and mounting holes (no text or symbols)natural_image
Hand interacting with mechanical components, no visible text or symbolsKījsiksnai pie apm. 10 kg slodzes ir par 7-9 mm jāpadodas.
71364 Winnenden (Germany)
Tālr.: +49 7195 14-0
Fakss: +49 7195 14-2212
Winnenden, 2011/03/01
www.kaercher.com/REACH
Garantija
natural_image
Close-up of a mechanical component with red and black parts, no visible text or symbolsnatural_image
Close-up of mechanical components with hoses and a circled detail (no visible text or symbols)Atsargiai
natural_image
Technical line drawing of a mechanical component with no visible text or symbolsnatural_image
Line drawing of a mechanical device with wheels and a blade, no text or symbols presentnatural_image
Exterior view of a battery connected to a small electronic device (no visible text or symbols)natural_image
Technical line drawing of a vehicle interior with no visible text or symbolsnatural_image
Technical line drawing of a mechanical assembly with no visible text or symbolsnatural_image
Technical diagram of a mechanical assembly with no visible text or symbolsnatural_image
Abstract geometric pattern with layered chevron shapes and a blue upward arrow (no text or symbols)natural_image
Mechanical assembly diagram showing internal components and a close-up of a bolted joint with two directional indicators (1 and 2), no readable text or symbols present.→ Atidarykite filtro dangtelj.

natural_image
Technical line drawing of a mechanical device interior with internal components (no text or symbols)natural_image
Technical line drawing of a mechanical housing or enclosure with internal components and mounting holes (no text or symbols)natural_image
Hand interacting with mechanical components, no visible text or symbols
S. Reiser
Head of Approbation
71364 Winnenden (Germany)
Tel.: +49 7195 14-0
Faksas: +49 7195 14-2212
Winnenden, 2011/03/01
natural_image
Close-up of a mechanical component with red and black parts, no visible text or symbolsnatural_image
Close-up of mechanical components with hoses and a circled detail (no visible text or symbols)Увага!
natural_image
Technical line drawing of a mechanical component with no visible text or symbolsnatural_image
Line drawing of a mechanical dust collector with wheels and a blade (no text or symbols)natural_image
Exterior view of a battery connected to a power supply unit (no visible text or symbols)natural_image
Technical line drawing of a car interior with no visible text or symbolsnatural_image
Technical line drawing of a mechanical assembly with no visible text or symbolsnatural_image
Technical diagram of a mechanical assembly with no visible text or symbolsnatural_image
Abstract geometric pattern with layered chevron shapes and a blue upward arrow (no text or symbols)natural_image
Mechanical assembly diagram showing engine components and a close-up of a bolted joint with directional arrows (no text or symbols)natural_image
Technical line drawing of an internal mechanical device with no visible text or symbolsnatural_image
Technical line drawing of a mechanical device interior with internal components and mounting holes (no text or symbols)natural_image
Hand interacting with mechanical components, no visible text or symbols
S. Reiser
Head of Approbation
71364 Winnenden (Germany)
Тел.: +49 7195 14-0
Факс: +49 7195 14-2212
Winnenden, 2011/03/01
www.kaercher.com/REACH
质量保证
natural_image
Close-up of a mechanical component with red and black parts, no visible text or symbols→ 驾驶室下降之前将保险杆解锁。
刹住 / 松开定位制动器
→ 松开定位制动器,同时踩下刹车脚踏。
→ 刹住定位制动器,同时踩下刹车脚踏。
无自身驱动器的清扫机运动
→ 打开发动机盖。
natural_image
Close-up of mechanical components with hoses and a circled detail (no visible text or symbols)注意
natural_image
Technical line drawing of a mechanical device with no visible text or symbolsnatural_image
Line drawing of a mechanical device with wheels and a blade, no text or symbols presentnatural_image
Exterior view of a battery connected to a small electronic device (no visible text or symbols)natural_image
Technical line drawing of an internal vehicle or engine bay with no visible text or symbolsnatural_image
Technical line drawing of a mechanical assembly with no visible text or symbolsnatural_image
Technical diagram of a mechanical assembly with no visible text or symbolsnatural_image
Abstract geometric pattern with layered chevron shapes and a blue upward arrow (no text or symbols)natural_image
Close-up of a mechanical assembly with visible wiring and components, including a numbered inset showing two labeled parts (1 and 2) with arrows indicating direction.→ 打开过滤器盖。
natural_image
Technical line drawing of a mechanical device with internal components and mounting brackets (no text or symbols)→ 向前翻开过滤器振动器。

natural_image
Technical line drawing of a mechanical device with internal components and mounting holes (no text or symbols)natural_image
Hand interacting with mechanical components, no visible text or symbolsnatural_image
Technical line drawing of a mechanical device interior showing internal components and mounting brackets (no text or symbols)natural_image
Technical line drawing of a mechanical device with internal components and mounting holes (no text or symbols)natural_image
Technical line drawing of an industrial mechanical assembly with gears and components (no text or labels)natural_image
Technical diagram of an automotive engine bay with labeled components (no readable text or symbols)• افتح غطاء الفلتر.
natural_image
Close-up of a mechanical assembly with labeled parts (1 and 2) and directional arrows indicating movement or force, no readable text or symbols present..1 صامولة الضبط
.2 صامولة الزنق
natural_image
Technical diagram of a mechanical assembly with no visible text or symbolsnatural_image
Abstract geometric pattern with layered chevron shapes and a blue upward arrow (no text or symbols).1 العدسة الزجajية
.2. مانومتر
natural_image
Technical line drawing of a car interior showing engine compartment and dashboard (no text or symbols)natural_image
Technical line drawing of a mechanical assembly with no visible text or symbolsnatural_image
Exterior view of an electric vehicle battery connected to a power supply unit (no visible text or symbols)
ال Expected Luxury Climate Biological Tolerance. Least Expected Asfl
الخزان وهو مروفع.

natural_image
Line drawing of a mechanical device with wheels and a disc (no text or symbols)natural_image
Technical line drawing of a vehicle chassis with an internal component labeled (no text or symbols present)natural_image
Close-up of mechanical components with hoses and a circled detail (no visible text or symbols)
natural_image
Close-up of a mechanical assembly with red and black components, no visible text or symbolsother
| Component | Value | | ----------------- | --------- | | Top Left Side | 6.987-519.0 | | Top Right Side | 6.987-519.0 | | Bottom Left Side | 6.373-961.0 | | Bottom Right Side | 6.373-961.0 | | Bottom Left Side | 7.306-041.0 | | Bottom Right Side | 7.306-041.0 | | Top Center | 6.987-143.0 | | Top Right Center | 6.987-143.0 | | Top Left Center | 6.987-111.0 | | Top Right Center | 6.987-111.0 | | Bottom Center | 6.987-488.0 | | Bottom Right Center | 6.987-488.0 | | Bottom Left Center | 6.987-499.0 | | Bottom Right Center | 6.987-499.0 | | Bottom Center | 6.987-272.0 | | Bottom Right Center | 6.987-272.0 | | Bottom Left Center | 6.987-445.0 | | Bottom Right Center | 6.987-445.0 | | Bottom Center | 6.987-140.0 | | Bottom Right Center | 6.987-140.0 | | Bottom Left Center | 6.987-446.0 | | Bottom Right Center | 6.987-446.0 | | Bottom Center | 6.987-561.0 | | Bottom Right Center | 6.987-561.0 | | Bottom Left Center | 6.987-438.0 | | Bottom Right Center | 6.987-438.0 | | Bottom Center | 6.987-116.0 | | Bottom Right Center | 6.987-116.0 | | Bottom Left Center | 6.987-117.0 | | Bottom Right Center | 6.987-117.0 | | Bottom Center | 6.987-272.0 | | Bottom Right Center | 6.987-272.0 | | Bottom Left Center | 6.987-272.0 | | Bottom Right Center | 6.987-272.0 | | Bottom Center | 7.312-089.0 | | Bottom Right Center | 7.312-089.0 | | Bottom Left Center | 7.311-059.0 | | Bottom Right Center | 7.311-059.0 | | Bottom Center | 6.987-192.0 | | Bottom Right Center | 6.987-192.0 | | Bottom Left Center | 6.987-192.0 | | Bottom Right Center | 6.987-192.0 | | Bottom Center | 6.987-561.0 | | Bottom Right Center | 6.987-561.0 | | Bottom Left Center | 6.987-561.0 | | Bottom Right Center | 6.987-561.0 | | Bottom Center | 6.987-168.0 | | Bottom Right Center | 6.987-168.0 | | Bottom Left Center | 6.987-168.0 | | Bottom Right Center | 6.987-168.0 | | Bottom Center | 6.987-357.0 | | Bottom Right Center | 6.987-357.0 | | Bottom Left Center | 6.987-357.0 | | Bottom Right Center | 6.987-357.0 | | Bottom Center | 5.115-390.0 | | Bottom Right Center | 5.115-390.0 | | Bottom Left Center | 5.115-390.0 | | Bottom Right Center | 5.115-390.0 | | Bottom Center | 5.115-390.0 | | Bottom Right Center | 5.115-390.0 | | Bottom Left Center | 5.115-390.0 | | Bottom Right Center | 5.115-390.0 | | Bottom Center | 7.312-017.0 | | Bottom Right Center | 7.312-017.0 | | Bottom Left Center | 7.312-017.0 | | Bottom Right Center | 7.312-017.0 | | Bottom Center | 7.312-017.0 | | Bottom Right Center | 7.312-017.0 | | Bottom Left Center | 7.312-017.0 | | Bottom Right Center | 7.312-017.0 | | Bottom Center | 7.312-438.0 | | Bottom Right Center | 7.312-438.0 | | Bottom Left Center | 7.312-438.0 | | Bottom Right Center | 7.312-438.0 | | Bottom Center | 6.635-326.0 | | Bottom Right Center | 6.635-326.0 | | Bottom Left Center | 6.635-326.0 | | Bottom Right Center | 6.635-326.0 | | Bottom Center | 6.635-326.0 | | Bottom Right Center | 6.635-326.0 | | Bottom Left Center | 6.635-326.0 | | Bottom Right Center | 6.635-326.0 | | Bottom Center | 5.115-397 | | Bottom Right Center | 5.115-397 | | Bottom Left Center | 5.115-397 | | Bottom Right Center | 5.115-397 | | Bottom Center | 5 | | Bottom Right Center | 5 | | Bottom Left Center | 5 | | Bottom Right Center | 5 | | Bottom Center | 5 | | Bottom Right Center | 5 | | Bottom Left Center | 5 | | Bottom Right Center | 5 | | Bottom Center | 5 | | Bottom Right Center | 5 | | Bottom Left Center | 5 | | Bottom Right Center | 5 | | Bottom Center | 5 | | Bottom Right Center | 5 | | Bottom Left Center | 5 |AE Karcher FZE, P.O. Box 17416, Jebel Ali Free Zone (South), Dubai, United Arab Emirates,
+971 4 886-1177, www.kaercher.com
AR Kärcher S.A., Urugguay 2887 (1646) San Fernando, Pcia. de Buenos Aires
📞+54-11 4506 3343, www.karcher.com.ar
AT Alfred Kärcher Ges.m.b.H., Lichtblaustraße 7, 1220 Wien,
+43-1-25060-0, www.kaercher.at
AU Kärcher Pty. Ltd., 40 Koornang Road, Scoresby VIC 3179, Victoria,
+61-3-9765-2300, www.karcher.com.au
BE Kärcher N.V., Industrieweg 12, 2320 Hoogstraten,
+32-3-340 07 11, www.karcher.be
BR Kärcher Indústria e Comércio Ltda., Av. Professor Benedicto Montenegro no 419, Betel,
CA Kärcher Canada Inc., 6535 Millcreek Road, Unit 67, Mississauga, ON, L5N 2M2,
+1-905-672-8233, www.karcher.ca
CH Kärcher AG, Industriestrasse, 8108 Dällikon, Kärcher SA, Croix du Péage, 1029 Villars-Ste-Croix,
0844 850 864, www.kaercher.ch
CN Kärcher (Shanghai) Cleaning Systems, Co., Ltd., Part F, 2nd Floor, Building 17, No. 33, XI YA Road, Waigaogiao Free Trade, Pudong, Shanghai, 200131
+86-21 5076 8018, www.karcher.cn
CZ Kärcher spol. s r.o., Modletice c.p. 141, CZ-251 01 Ricany,
+420/323/606 014, www.kaercher.cz
GB Kärcher (U.K.) Ltd., Kärcher House, Beaumont Road, Banbury, Oxon OX16 1TB,
+44-1295-752-000, www.karcher.co.uk
GR Kärcher Cleaning Systems A.E., 31-33, Nikitara str. & Konstantinoupoleos str., 136 71 Aharnes,
+30-210-2316-153, www.karcher.gr
HK Kärcher Limited, Unit 10, 17/F., Apec Plaza, 49 Hoi Yuen Road, Kwun Tong, Kowloon,
++(852)-2357-5863, www.karcher.com.hk
HU Kärcher Hungaria KFT, Tormásrét ut 2., (Vendelpark), 2051 Biatorbagy,
+36-23-530-64-0, www.kaercher.hu
I Kärcher S.p.A., Via A. Vespucci 19, 21013 Gallarate (VA), 📞+39-848-998877, www.karcher.it
IE Kärcher Limited (Ireland), C1 Centrepoint Business Park, Oak Road, Dublin 12,
(01) 409 7777, www.kaercher.ie
JP Kärcher (Japan) Co., Ltd., Irene Kärcher Building, No. 2, Matsusaka-Daira 3-chome, Taiwa-cho, Kurokawa-gun, Miyagi 981-3408,
+81-22-344-3140, www.karcher.co.jp
KR Karcher (Korea) Co. Ltd., 162 Gukhoe-daero, (872-2 Sinjeong-Dong), Seoul, Korea
02-322 6588, A/S. 1544-6577, www.karcher.co.kr
LV Karcher SIA, Mārupes nov., Mārupe, Kārla Ulmaṇa gatve 101, Rīga, LV-1046
+371-67 80 87 07
MX Karcher México, SA de CV, Av. Gustavo Baz No. 29-C, Col. Naucalpan Centro, Naucalpan, Edo. de México, C.P. 53000 México,
+52-55-5357-04-28, www.karcher.com.mx
MY Karcher Cleaning Systems Sdn. Bhd., 71 & 73 Jalan TPK 2/8, Taman Perindustrian Kinrara, Seksyen 2, 47100 Puchong, Selangor Darul Ehsan
+603 8073 3000, www.karcher.com.my
NL Kärcher B.V., Postbus 474, 4870 AL Etten-Leur,
0900-33 666 33, www.karcher.nl
NO Kärcher AS, Stanseveien 31, 0976 Oslo, Norway,
📞+47 815 20 600, www.karcher.no
NZ Karcher Limited, 12 Ron Driver Place, East Tamaki, Auckland, New Zealand,
+64 (9) 274-4603, www.karcher.co.nz
PL Kärcher Sp. z o.o., Ul. Stawowa 140, 31-346 Kraków,
+48-12-6397-222, www.karcher.pl
RO Karcher Romania srl, Sos. Odaii 439, Sector 1, RO-013606 BUKAREST,
+40 37 2709001, www.kaercher.ro
SGP Karcher South East Asia Pte. Ltd., 5 Toh Guan Road East, #01-00 Freight Links Express Distripark, Singapore 608831,
+65-6897-1811, www.karcher.com.sg
SK Kärcher Slovakia, s.r.o., Beniakova 2, SK-94901 NITRA,
+421 37 6555 798, www.kaercher.sk
TR Kärcher Servis Ticaret A.S., Mahmudbey Mahallesi İstoç, Petrol Plaza C-Blok Kat: 2-3, Bağcılar, 34218 Istanbul
+90-232-252-0708, +90-232-251-3578, www.karcher.com.tr
TW Karcher Limited, 7/F, No. 66, Jhongijheng Rd., Sinjhuang City, Taipei County 24243, Taiwan,
USA To locate your local dealer please visit our web site at http://www.karchercommercial.com or call us at 888.805.9852
ZA Kärcher (Pty) Ltd., 144 Kuschke Street, Meadowdale, Edenvale, 1614,
+27-11-574-5360, www.karcher.co.za
- Vorsicht
- Safety instructions
- General notes
- Drive mode
- ⚠️ Danger
- Appliances with combustion engine
- Machines with driver cabin
- Note
- Accessories and Spare Parts
- Symbols in the operating instructions
- ⚠ Warning
- Caution
- Function
- Proper use
- Suitable surfaces
- Environmental protection
- Notes about the ingredients (REACH)
- Warranty
- KM 130/300 R D
- Before Startup
- Fold up the cab
- Lock/ release parking brake
- Moving sweeper without engaging self-propulsion
- Moving sweeper by engaging self-propulsion
- Start up
- Refuelling
- Inspection and maintenance work
- Operation
- Adjusting driver's seat
- Adjust engine speed
- Programme selection
- Starting the machine
- Pre-heat
- Start the engine
- Drive the machine
- Drive forward
- Reverse drive
- Driving method
- Brakes
- Driving over obstacles
- Sweeping mode
- Sweeping dry floors
- Sweeping damp or wet floors
- Emptying waste container
- Turn off the appliance
- Transport
- Storage
- Shutdown
- Maintenance and care
- Cleaning
- Cleaning the inside of the machine
- External cleaning of the appliance
- Maintenance intervals
- See inspection checklist 5.950-646.0!
- Maintenance by the customer
- Daily maintenance:
- Weekly maintenance:
- Maintenance to be carried out every 50 operating hours:
- Maintenance following wear:
- Maintenance by Customer Service
- Maintenance to be carried out after 50 operating hours:
- Maintenance to be carried out after 250 operating hours:
- Maintenance Works
- Preparation:
- General notes on safety
- Safety notes regarding the batteries
- Installing and connecting the battery
- Check fluid level in the battery and adjust if required
- Charging battery
- Danger
- Remove the battery
- Check engine oil level and top up, if required
- Oil grade: see Technical Data
- Change the motor oil and the oil filter. Caution
- Check hydraulic oil level and refill hy-draulic oil
- Check hydraulic unit
- Check water cooler and maintain it
- Checking roller brush
- Replacing roller brush
- Check and adjust roller brush sweeping track
- Check and adjust sweeping track of the side-brush
- Adjust the side seals
- Safety rod
- Check the tyre pressure
- Manually clean the dust filter
- Replacing dust filter
- Check and adjust the V-Belt
- Check air filter and replace, if necessary
- Changing the headlight bulb (option)
- Replacing fuses
- EC Declaration of Conformity
- Garantie
- Attention
- Garanzia
- Attenzione
- Voorzichtig
- Garantía
- Precaución
- Atenção
- Garanti
- Forsigtig
- Forsiktig!
- Generelle sikkerhetsanvisninger
- ⚠️ Fare
- Varning
- Takuu
- Varo
- Προσοχή
- Dikkat
- Гарантия
- Внимание!
- Garancia
- Vigyázat
- Záruka
- Pozor
- Izklop stroja
- ⚠️ Nevarnost
- Preverjanje in nastavljanje površine po- metanja pometalnega valja
- Preverite in namestite ogledalo na stranskem omelu
- Preverjanje in nastavitev klinastega jermena
- Gwarancja
- Uwaga
- Atentie
- Vypnutie prístroja
- Preprava
- ⚠️ Nebezpečenstvo
- Jamstvo
- Oprez
- Kretanje stroja za metenje s vlastitim pogonom
- Stavljanje u pogon
- Opće napomene
- Punjenje goriva
- ⚠️ Opasnost
- Ispitni i servisni radovi
- Biranje programa
- Pokretanje stroja
- Vađenje akumulatora
- Provjera razine motornog ulja i dopunjavanje
- Napomena: Momentnim ključem pritegnite vijak za ispuštanje ulja na 25 Nm.
- Provjera i namještanje klinastog remena
- Garancija
- Kočenje i otpuštanje pozicione kočnice
- Kretanje uređaja za metenje sa sopstvenim pogonom
- Opšte napomene
- Ulivanje goriva
- Pokretanje uređaja
- Predgrejavanje
- Pokretanje motora
- Vožnja uređaja
- Vožnja prema napred
- Vožnja unazad
- Opšte sigurnosne napomene
- Sigurnosne napomene za rad akumulatora
- Provera nivoa motornog ulja i dopunjavanje
- Zamena motornog ulja i filtera za motorno ulje
- Za vrstu ulja pogledajte tehničke podatke.
- Napomena
- Provera hidrauličkog sklopa
- Provera i podešavanje profila metenja valjka za metenje
- Provera i podešavanje profila metenja bočne metle
- Proverite i podesite klinasti remen
- Provera i zamena filtera za vazduh
- Zamena sijalice prednjeg fara (opcija)
- Zamena osigurača
- Гаранция
- Внимание
- Garantii
- Ettevaatust
- Garantija
- Uzmanību
- Atsargiai
- Увага!
- 质量保证
- 刹住 / 松开定位制动器
- 无自身驱动器的清扫机运动
Brand : KARCHER
Model : KM 130 300 R D
Category : Industrial sweeper