
NT-USB - Microphone RODE - Free user manual and instructions
Find the device manual for free NT-USB RODE in PDF.


| Product type | USB Condenser Microphone |
| Brand | Rode |
| Model | NT-USB |
| Polar pattern | Cardioid |
| Frequency response | 20 Hz - 20 kHz |
| Sampling frequency | 48 kHz |
| Resolution | 16-bit |
| Connectivity | USB (mini-B) |
| Power supply | Via USB (5V) |
| Weight | 580 g |
| Dimensions | 185 mm x 62 mm (with stand) |
| Main features | Zero-latency monitoring via headphone jack, mix, volume |
| Included accessories | Desk stand, pop filter, USB cable |
| Maintenance and cleaning | Clean with a soft dry cloth. Avoid moisture. |
| Safety | Do not expose to extreme temperatures. Unplug during storms. |
| Spare parts | Available through Rode (pop filter, cable, stand) |
| Repairability | Not user-repairable. Contact customer service. |
| Warranty | 2 years |
| Compatibility | Windows, macOS, some iOS devices via adapter |
Frequently Asked Questions - NT-USB RODE
User questions about NT-USB RODE
0 question about this device. Answer the ones you know or ask your own.
Ask a new question about this device
Download the instructions for your Microphone in PDF format for free! Find your manual NT-USB - RODE and take your electronic device back in hand. On this page are published all the documents necessary for the use of your device. NT-USB by RODE.
USER MANUAL NT-USB RODE
natural_image
Black RøDE audio recording device with textured grille and threaded neck (no visible text or symbols on body)NT-USB
Versatile Studio-Quality USB Microphone
www.rodemic.com/nt-usb
2 Features
- Compatible with Apple iPad®
- Cardioid polar pattern
• State-of-the-art surface mount electronics -
Designed in Australia
• Full 2 year guarantee* -
NT-USB microphone
- Tripod mount (stand)
- Pop shield
- USB cable (6m/20")
- Manual
- Microphone pouch
- Mic clip/Mounting ring
4
Specifications
| Acoustic Principle | Pressure Gradient |
| Active Electronics | JFET impedance converter with bipolar output buffer, A/D converter 16bit 48kHz, headphone amplifier |
| Directional Pattern | Cardiod |
| Frequency Range | 20Hz ~ 20kHz |
| Dynamic Range | 96dB |
| Maximum SPL | 110dB SPL |
| Power Requirements | USB 5VDC |
| Output Connection | USB |
| Net Weight | 520g |
Polar Response
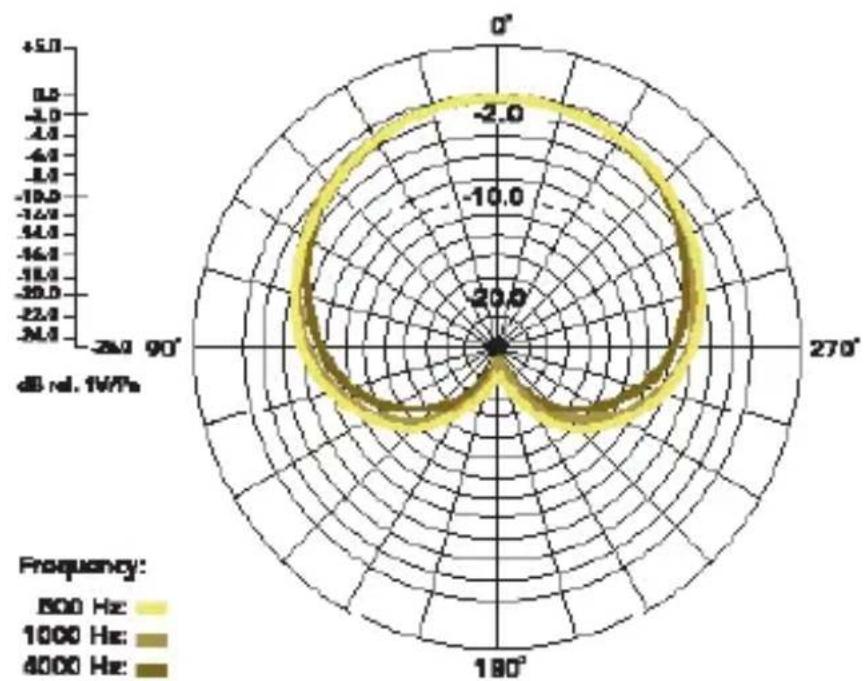
radar
| Angle | Frequency (dB rel. 1V/Hz) | |-------|---------------------------| | 0° | -2.0 | | 90° | -2.0 | | 180° | -2.0 | | 270° | -2.0 | | 360° | -2.0 |Frequency Response

line
| Frequency | dB to 1 VPa | | --------- | ----------- | | 20Hz | -5 | | 180 | -2 | | 1000 | 0 | | 1800 | 8 | | 2800 | 2 |6
Warranty
Register your NT-USB now and validate your free 2 year warranty.
Scan the QR code with a smartphone, or visit www.rodemic.com/warranty
The NT-USB is covered by a limited warranty for one (1) year from the date of purchase. This can be extended free of charge to a full two (2) year warranty by registering your microphone online by visiting our website as above.
Power requirements
7
The NT-USB is powered by your device's USB port, meaning that in most instances you can just plug the microphone in and get started right away. For non-standard USB ports, a powered USB hub may be required.
The NT-USB is a “Plug & Play” USB device, compatible with both Windows and Mac computers, as well as the Apple iPad via the USB camera connection kit (available directly from Apple).
The NT-USB features a purple LED inside the microphone cage that indicates when the microphone has power. If the light does not turn on after plugging the microphone in, the computer or device you are using may not provide enough power for the NT-USB. If this is the case, we recommend connecting the NT-USB via a powered USB hub.
8
Mounting the NT-USB
The NT-USB is supplied with a high quality tripod mount. To assemble simply screw the mounting ring onto the tripod stand (diagram 1). The mounting ring can also be used as a mic clip to attach the NT-USB to a mic or boom stand.
To install the NT-USB in the mounting ring place the microphone in the mount from above (optionally using the pop filter), and thread into the mounting ring. Once the microphone is facing the correct way, turn the dial at the bottom clockwise until tight (diagram 1).

natural_image
Diagram of a desktop microphone with a speaker and tripod base, showing sound waves and a downward arrow (no text or symbols)Diagram 1 - Mounting the NT-USB in the supplied tripod stand
To change the microphone position, always be sure to loosen the adjustment lever to ensure that you do not damage the stand.
When recording vocals, always use the supplied pop filter, mounted in front of the microphone. The pop filter will prevent plosives (hard 'P', 'B', 'T' and 'K' sounds) from overloading the microphone's capsule.

natural_image
Illustration of a handheld device with a curved arm and control panel, no visible text or symbolsDiagram 2 - Adjusting the microphone position
10
General operation
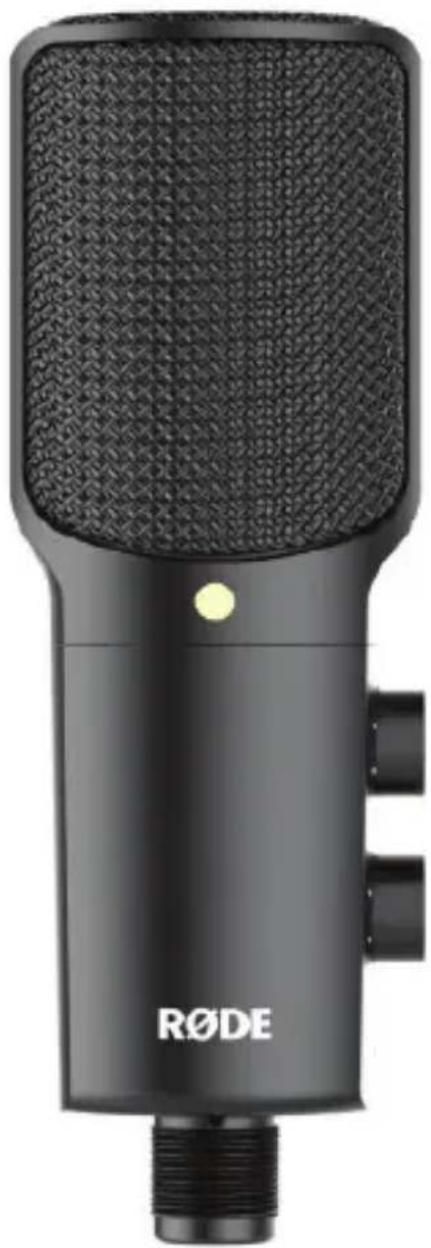
The gold dot on the face of the NT-USB indicates the front of the microphone, and the pickup area of the capsule. The microphone (and gold dot) should always be facing towards the sound source that you wish to record.
On the side of the NT-USB there are two adjustment knobs.

natural_image
Top-down view of a handheld device with circular control buttons and a keyhole (no text or symbols visible)Diagram 3 - Monitor mix control and headphone volume control
Monitor mix control
The Monitor mix control (the top knob) is used to 'mix' between the direct microphone signal (your voice for example) and the sound from your audio recording software on your computer / device (the music that you are singing along to). By turning the knob counter-clockwise, you will hear more of the direct microphone signal, and less of the signal coming from the computer / device software. If you turn the knob clockwise, you will hear more of the computer/device signal, and less of the direct microphone signal.
We recommend always beginning with the knob in the centre position. This will ensure that you are hearing an equal balance of both the direct signal, and the computer / device signal, enabling you to then achieve an ideal balance between the signals.
Headphone volume control
The headphone volume control (the bottom knob) allows you to control the volume of the playback through headphones connected to the NT-USB via the headphone jack.
General operation cont.
Recording vocals
We strongly recommend using the supplied pop shield for all vocal recording. This aids in minimising plosive sounds (hard 'P', 'B', 'T' and 'K' sounds) that produce a sudden jet of air which can cause the capsule to overload and produce a 'popping' sound.
Any moisture on the microphone capsule can cause problems for a condenser microphone such as the NT-USB, however the use of the pop shield will reduce the risk of this occurring.
Placement of the microphone and relative to the vocalist may be varied on several factors including room acoustics, the vocal performance, and whether the vocalist has a high or deep voice.
An ideal reference is to begin with the NT-USB with the pop shield attached, mounted directly in front of the vocalist, approximately 15cm (6") away. The pop shield will assist in keeping the performer at a constant minimum distance from the microphone and helps to maintain reasonable recording levels. Moving the vocalist a little closer will make the vocal sound more intimate and full, while moving the vocalist back will give the vocal a little more 'air' or
room sound, and will reduce the proximity effect (increased bass or low frequency response when the sound source is very close)
Experimentation should be made with the angle from which the microphone is addressed, as different results can be achieved when the vocalist is ‘off-axis’ to the microphone (and the gold dot).
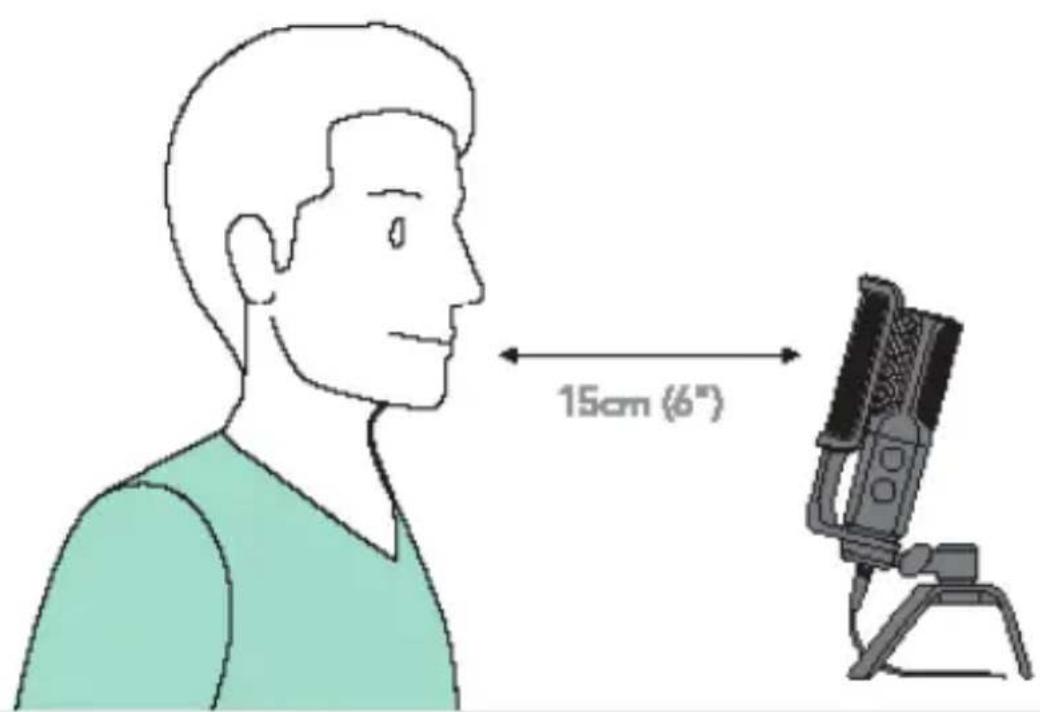
Diagram 4 - Positioning the NT-USB for vocals
14
General operation cont.
Setting your input level:
The NT-USB has been set to an ideal internal gain setting, without the need for physical level adjustments on the microphone body. Any necessary level adjustments to set the ideal recording level can be made from within your recording program, or via your computer's system preferences.
To adjust your input level from within your recording software, refer to the manual provided by the software developer.
To manually adjust your input level via your computer's system preferences, use the following instructions relevant to your device platform/operating system.
Adjusting the input level on a Mac OS computer:
- Click on the Apple symbol at the top left of your screen, and select System Preferences.

System Preferences
About This Mac
Software Update...
App Store...
System Preferences...
Dock
Location
Recent Items
Force Quit System Preferences
Sleep
Restart...
Shut Down...
Diagram 5 - Accessing Mac OS System Preferences
16
General operation cont.
- Click on 'Sound' to open the sound options
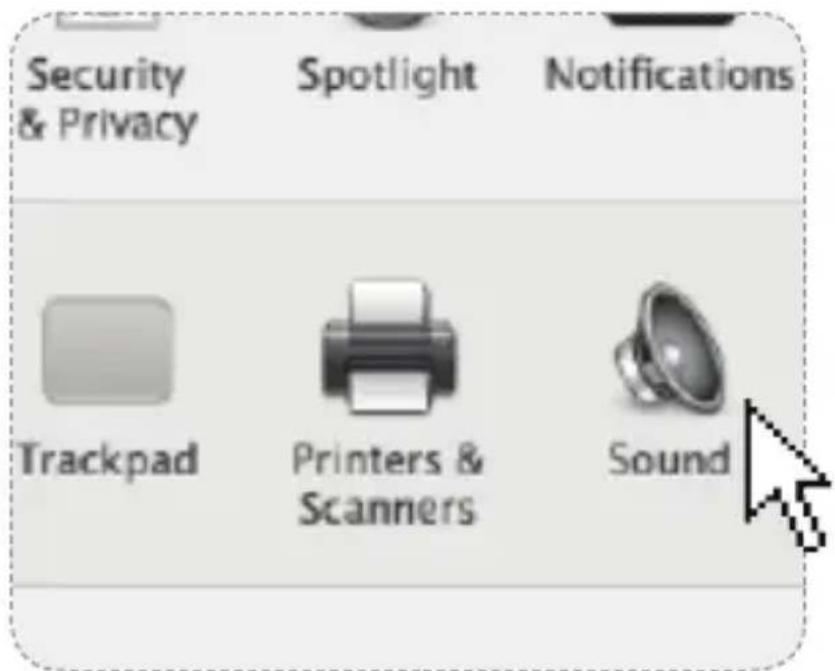
Diagram 6 - Opening 'Sound' options
- Open the 'Input tab'.
- From here, select the 'R∅DE NT-USB' from the list of devices, and adjust the input level using the slider.

Diagram 7 - Adjusting NT-USB input level
18
General operation cont.
Adjusting the input level on a Windows computer:
- Open the Start menu and click on 'Control Panel'
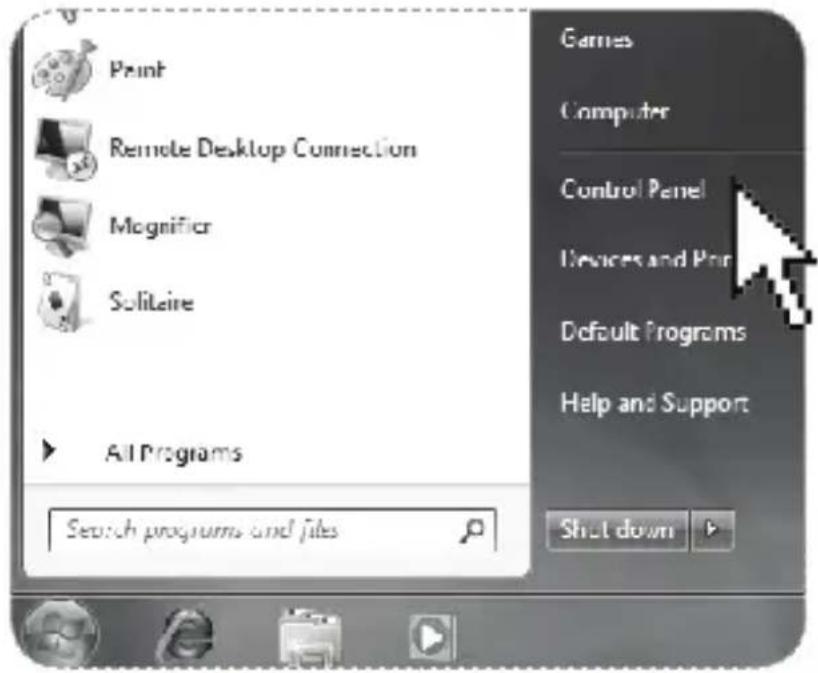
Diagram 8 - Accessing Windows Control Panel
- Open the 'Sound' preferences from within the Control Panel folder.

Diagram 9 - Opening 'Sound' options
20
General operation cont.
- Open the 'Recording' tab and double click on 'R∅DE NT-USB' from the list of devices.
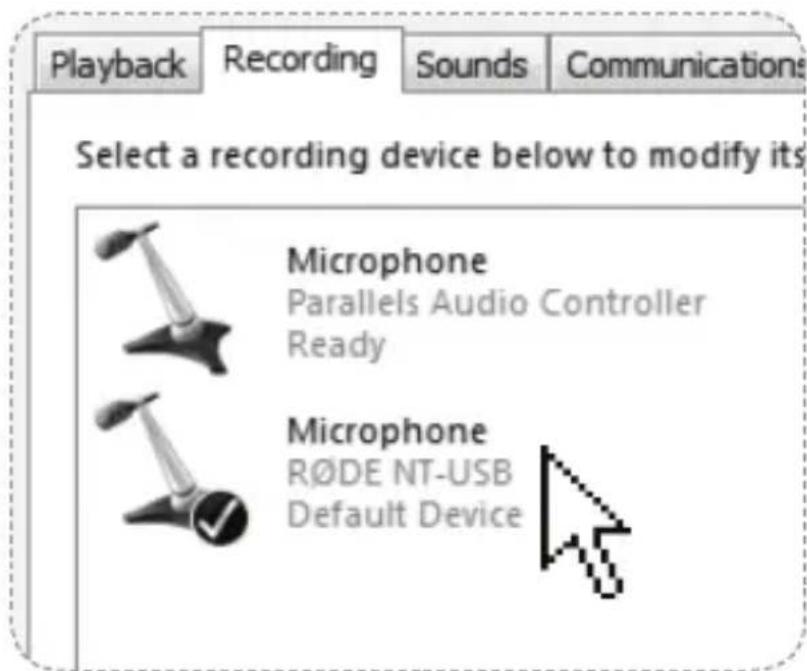
Diagram 10 - Selecting the NT-USB input device
- Adjust the input level using the slider.

Diagram 11 - Adjusting NT-USB input level
Using the NT-USB with your Apple iPad®
The NT-USB can be used to record with an Apple iPad using the USB Camera Connection Kit applicable to your iPad version (available as an accessory from most Apple retailers).
To record with the NT-USB on an iPad, simply connect the microphone to your iPad via the Camera Connection Kit, and the NT-USB will automatically replace the iPad's internal audio circuitry as the input and output source.
From there, you can record the NT-USB using your preferred application. We recommend using 'R∅DE Rec' (R∅DE's dedicated audio app), Apple's 'GarageBand' app, or Imageline's 'FL Studio Mobile' app.
Safety & maintenance
After use the NT-USB should be removed from its tripod mount, wiped with a dry, soft cloth and placed in the supplied protective pouch.
Be sure to place the moisture-absorbent crystals (supplied) at the head of the microphone, so as to absorb any moisture present. Eventually this pack of crystals will need to be dried. This is indicated by the crystals turning pink in colour. They can easily be re-used by placing them in an oven at 100 - 150 degrees celsius for approximately ten minutes. The crystals will operate effectively again once they have turned blue.
24
Support
If you experience any problem, or have any questions regarding your R∅DE microphone, first contact the dealer who sold it to you. If the microphone requires a factory authorised service, return will be organised by that dealer.
We have an extensive distributor/dealer network, but if you have difficulty getting the advice or assistance you require, please do not hesitate to contact us directly.
Alternatively please visit www.rodemic.com/support for contact details and a list of Frequently Asked Questions.
Importers & distributors
For a full list of international importers and distributors, visit our website at www.rodemic.com/distributors.
Contact R∅DE
International
107 Carnarvon Street
Silverwater NSW 2128 Australia
USA
2745 N Raymond Ave
Signal Hill CA 90755
USA
P0 Box 91028
Long Beach CA 90809-1028
USA

natural_image
Black RøDE audio recording device with textured grille and threaded neck (no visible text or symbols on body)NT-USB
www.rodemic.com/nt-usb
28
Merkmale
www.rodemic.com/warranty
natural_image
Diagram of a desktop microphone with a speaker and tripod base, showing a downward arrow indicating sound pressure (no text or symbols present)natural_image
Illustration of a handheld device with a curved arm and a small green circular symbol (no text or symbols present)natural_image
Top-down view of a handheld device with circular control knobs and indicator lights (no text or symbols visible)natural_image
Black RøDE audio recording device with textured grille and threaded neck (no visible text or symbols on body)NT-USB
www.rodemic.com/nt-usb
54
Caractéristiques
www.rodemic.com/warranty
natural_image
Diagram of a desktop microphone with a tripod base and a downward arrow indicating compression or disassembly (no text or symbols present)natural_image
Illustration of a handheld device with a curved arm and control panel, no visible text or symbolsnatural_image
Close-up of a gray electronic device casing with control knobs and buttons (no readable text or symbols)Signal Hill CA 90755
États-Unis
P0 Box 91028
Long Beach CA 90809-1028
États-Unis
natural_image
Black RøDE audio recording device with textured grille and threaded neck (no visible text or symbols on body)NT-USB
www.rodemic.com/nt-usb
80
Características
natural_image
Diagram of a mechanical device with a downward arrow indicating compression or disassembly (no text or symbols present)natural_image
Illustration of a handheld device with a curved arm and a small green circular symbol (no text or symbols present)natural_image
Close-up of a gray electronic device casing with control knobs and buttons (no readable text or symbols)Diagrama 8 - Acceder al panel de control de Windows
Signal Hill CA 90755
EE.UU.
PO Box 91028
Long Beach CA 90809-1028
EE.UU.
natural_image
Black RøDE audio recording device with textured grille and threaded neck (no visible text or symbols on body)NT-USB
www.rodemic.com/nt-usb
106
Caratteristiche
www.rodemic.com/warranty
natural_image
Diagram of a mechanical device with a downward arrow indicating compression or disassembly (no text or symbols present)natural_image
Illustration of a handheld device with a curved arm and a small green circular symbol (no text or symbols present)natural_image
Close-up of a gray electronic device casing with control buttons and a gold ring, no visible text or symbols.Signal Hill CA 90755
USA
P0 Box 91028
Long Beach CA 90809-1028
USA
130
说明书 中文

natural_image
Black RøDE audio recording device with textured grille and threaded neck (no visible text or symbols on body)NT-USB
多功能录音棚质量USB话筒
www.rodemic.com/nt-usb
132
特点
natural_image
Illustration of a desktop microphone with a speaker and tripod base, showing sound waves and a downward arrow (no text or symbols)natural_image
Illustration of a handheld device with a curved arm and a small green circular symbol (no text or symbols present)图2-调整话筒位置
140
一般操作
natural_image
Close-up of a gray electronic device casing with control buttons and a gold ring, no visible text or symbols.图3 - 监听混音控制和耳机音量控制
监听混音控制
图5 - 访问Mac OS系统偏好设置
146
一般操作(续)
- 点击 “声音” 打开声音选项。

图6 - 打开“声音”选项
图7 - 调整NT-USB的输入电平
148
一般操作(续)
调整Windows电脑上的输入电平:
- 打开开始菜单,然后单击“控制面板”。

图8 - 访问Windows控制面板
- 从控制面板文件夹中打开“声音”偏好。

图9 - 打开“声音”选项
150
一般操作(续)
图10 - 选择NT-USB输入设备
- 用滑块调整输入电平。
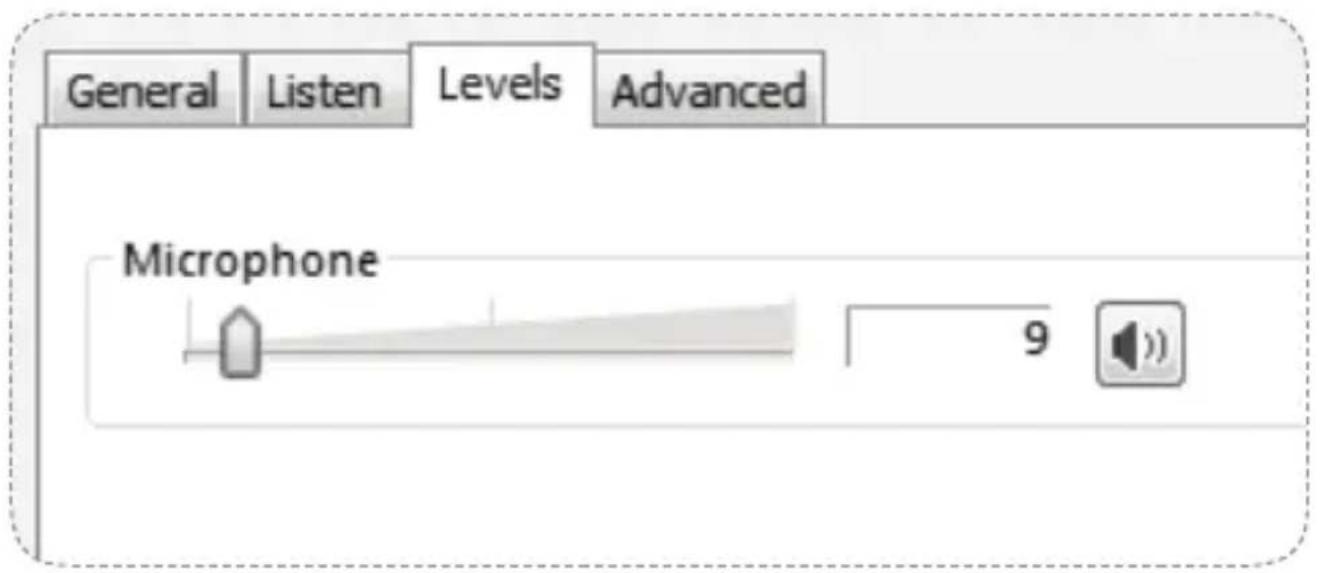
图11 - 调整NT-USB的输入电平
Signal Hill CA 90755
美国
PO Box 91028
Long Beach CA 90809-1028
美国

natural_image
Black RøDE audio recording device with textured grille and threaded neck (no visible text or symbols on body)NT-USB
www.rodemic.com/nt-usb
158
特徵
natural_image
Diagram of a desktop microphone with a tripod base and a downward arrow indicating compression or disassembly (no text or symbols present)natural_image
Illustration of a handheld device with a curved arm and a small green circular symbol (no text or symbols present)図 2 - マイクの位置を調節する
操作方法
natural_image
Close-up of a gray electronic device casing with control buttons and a gold ring, no visible text or symbols.Signal Hill CA 90755
USA
PO Box 91028
Long Beach CA 90809-1028
USA

natural_image
Black RøDE audio recording device with textured grille and threaded neck (no visible text or symbols beyond brand name)NT-USB
www.rodemic.com/nt-usb
184
특징
natural_image
Diagram of a mechanical device with a downward arrow indicating compression or disassembly (no text or symbols present)natural_image
Illustration of a handheld device with a curved arm and a small green circular symbol (no text or symbols present)그림 2-마이크 위치 조절하기
일반 작동법
natural_image
Close-up of a mechanical device's top panel showing dial indicators and control buttons (no readable text or symbols)그림 5 시스템 설정으로 들어가기
198
일반 작동 및 제어
그림 6 - '소리' 옵션 열기
그림 9 - '소리' 옵션 열기
202
일반 작동 및 제어
Signal Hill CA 90755
미국
PO Box 91028
Long Beach CA 90809-1028
미국
208

- NT-USB
- Features
- 4
- Specifications
- Warranty
- Power requirements
- 8
- Mounting the NT-USB
- 10
- General operation
- Monitor mix control
- Headphone volume control
- General operation cont.
- Recording vocals
- 14
- Setting your input level:
- Adjusting the input level on a Mac OS computer:
- System Preferences
- System Preferences...
- 16
- 18
- Adjusting the input level on a Windows computer:
- 20
- Using the NT-USB with your Apple iPad®
- Safety & maintenance
- 24
- Support
- Importers & distributors
- Contact R∅DE
- International
- USA
- 28
- Merkmale
- 54
- Caractéristiques
- 80
- Características
- 106
- Caratteristiche
- 132
- 特点
- 140
- 一般操作
- 监听混音控制
- 146
- 一般操作(续)
- 148
- 150
- 158
- 特徵
- 操作方法
- 184
- 특징
- 일반 작동법
- 198
- 일반 작동 및 제어
- 202
Brand : RODE
Model : NT-USB
Category : Microphone