
FZV 4001-E - Lawn mower Fieldmann - Free user manual and instructions
Find the device manual for free FZV 4001-E Fieldmann in PDF.


| Product type | Corded electric lawn mower |
| Brand | Fieldmann |
| Model | FZV 4001-E |
| Power supply | Mains 230 V ~ 50 Hz |
| Motor power | 1400 W |
| Cutting width | 40 cm |
| Cutting height | 25 – 75 mm, centrally adjustable |
| Grass collection bag capacity | 50 L |
| Weight | 12 kg |
| Dimensions (L×W×H) | 120 × 50 × 90 cm |
| Noise level | 96 dB(A) |
| Vibration | 2.5 m/s² |
| Main functions | Cutting, collecting, mulching (optional accessory) |
| Maintenance and cleaning | Clean the housing after each use; sharpen the blade regularly |
| Safety | Blade brake, two-hand safety switch |
| Spare parts and repairability | Blade, grass collection bag, wheels, power cable available |
| General information | 2-year warranty, protection class II |
Frequently Asked Questions - FZV 4001-E Fieldmann
User questions about FZV 4001-E Fieldmann
0 question about this device. Answer the ones you know or ask your own.
Ask a new question about this device
Download the instructions for your Lawn mower in PDF format for free! Find your manual FZV 4001-E - Fieldmann and take your electronic device back in hand. On this page are published all the documents necessary for the use of your device. FZV 4001-E by Fieldmann.
USER MANUAL FZV 4001-E Fieldmann
natural_image
Abstract black-and-white spiral pattern with no text or symbolsFIELDMANN®
Home & Garden Performance

natural_image
Black and white photo of a lawn mower with visible blade and handle (no text or symbols)FZV 4001-E
English 9
Češťina 21
Slovenčina 33
Magyarul 45
Polski 57
Deutsch 69
Español 81
Français 93
Italiano 105
Lietuviu 117
Русский 129
1
2

3

4

natural_image
Technical line drawing of a mechanical device with visible gears and shafts, no text or symbols present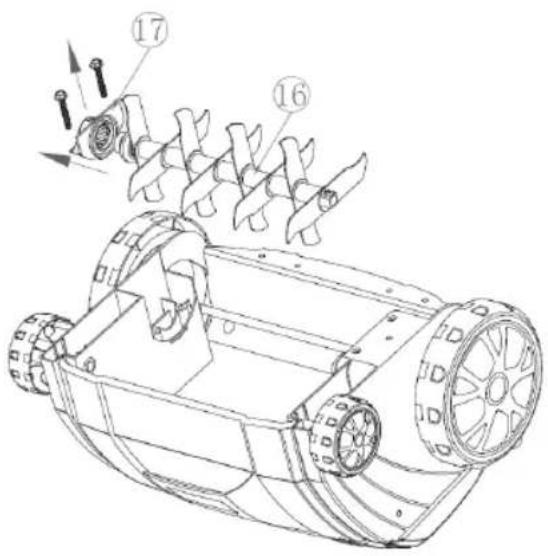


5
6

natural_image
Diagram showing airflow or particle movement around a vehicle with directional arrows indicating direction (no text or symbols)

Verticutter
OPERATION MANUAL
Thank you for purchasing this garden verticutter. Before you start using it, please read carefully this operating manual and keep it for future reference.
TABLE OF CONTENTS
APPENDIX OF FIGURES ...... 3
- GENERAL SAFETY INSTRUCTIONS 10
Important safety warnings
Packaging
Instructions for use
-
SYMBOLS 11
-
MACHINE DESCRIPTION AND PACKAGE CONTENT 12
-
SAFETY INSTRUCTIONS 13
-
PURPOSE OF USE 15
-
MACHINE ASSEMBLY 15
-
OPERATION 16
-
MAINTENANCE 16
-
CYLINDER REPLACEMENT / TROUBLESHOOTING 17
-
MOWING 18
-
TECHNICAL DATA 18
-
DISPOSAL 19
DECLARATION OF CONFORMITY 142
WARRANTY CERTIFICATE 154 - 159
WARRANTY TERMS 154 - 159
1. GENERAL SAFETY INSTRUCTIONS
Important safety warnings
* Unpack the product carefully and be sure not to throw away any part of the package before having found all components of the product.
- Keep the product in a dry place out of reach of children.
Read all cautions and instructions. The failure to adhere to warning cautions and instructions may result in an accident, fire and/or a serious injury.
Packaging
The product is placed in a package preventing damage during transport. This package is a raw material therefore it can be handed-over for recycling.
Instructions for use
Before beginning to work with the machine, read the following safety rules and instructions for use. Familiarize with operating elements and the proper use of the device. Keep the manual in a safe place for future reference. We recommend keeping the original package including the inner packaging materials, cash voucher and guarantee card for a period of warranty at minimum. For a case of transportation, pack the machine into the original box from the manufacturer, thus ensuring a maximum protection of the product during a possible transport (e.g. moving or sending into a service station).

Note: If you hand the machine over to next persons, hand it over together with the manual. Adherence to the attached instructions for use is a precondition for the proper use of the machine. The operation manual includes also instructions for operation, maintenance and repairs.
The manufacturer does not take any responsibility for accidents or damages resulting from the failure to adhere to this manual.
2. SYMBOLS

natural_image
Warning symbol with exclamation mark above an open book below (no text or symbols present)Attention! Before putting the machine into operation, read carefully the operating instructions and general safety instructions!

Do not use the machine in the rain or impaired weather conditions!

Beware. After turning the verticutter off, the blade keeps rotating for a while!

Keep safe distance!

Beware. Rotating blades! Sharp blade(s). Beware of injury and severing toes or fingers!

Always switch off the engine and remove the plug from mains before performing any adjustment or maintenance of the machine or if the power supply cable is entangled or damaged.

Use protective equipment while working.
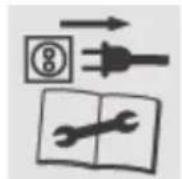
Before performing any work on the mower, remove the cable from the mains.
3. MACHINE DESCRIPTION AND PACKAGE CONTENT
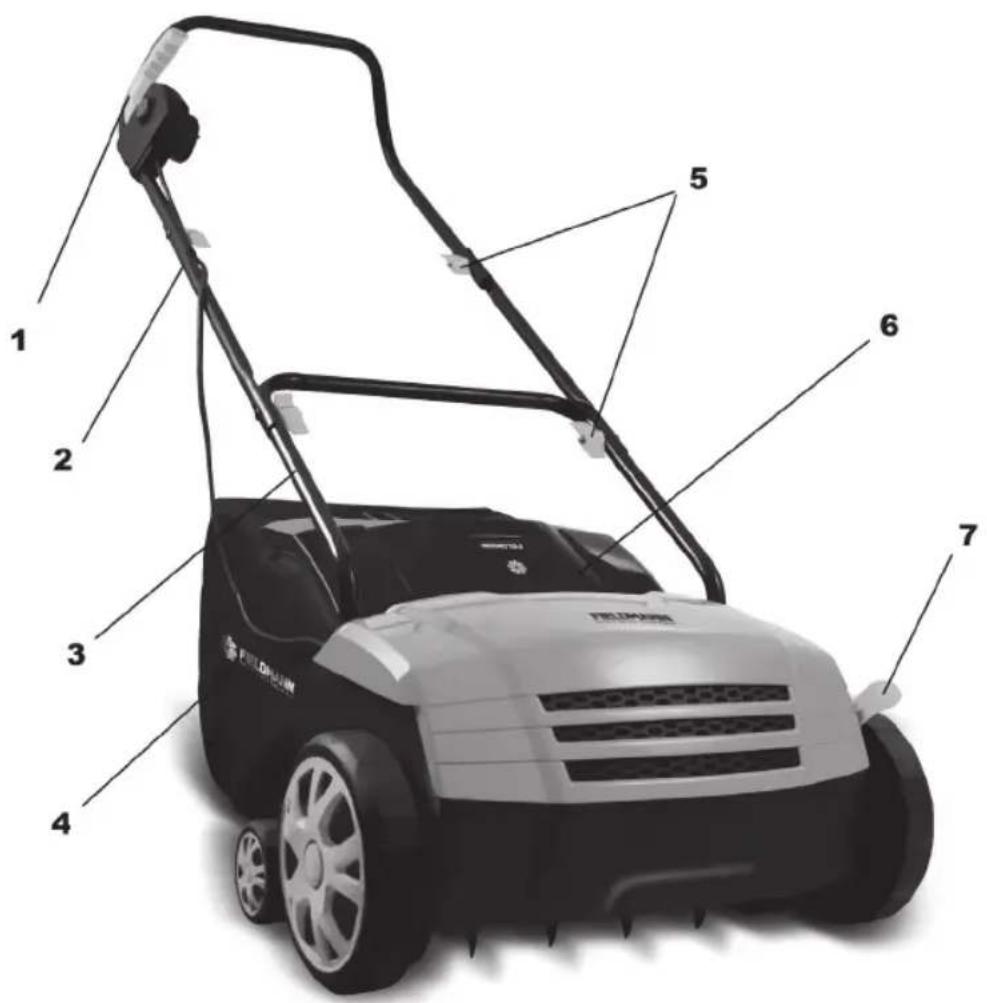
Machine description (see Fig.1)
1 - switch lever
2 - handle top
3 - handle bottom
4 - grassbox
5 - handle mounting nut
6 - discharge chute cover
7 - height of cut adjusting lever
Package Content
Remove the machine carefully from the packaging and check the completeness of the following parts:
electric verticutter
* two exchangeable cylinders
* installation kit
* operating instructions
When parts are missing or damaged, please contact your dealer.
4. SAFETY INSTRUCTIONS
Thank you for purchasing this garden verticutter. Before you start using it, please read carefully this operating manual and keep it for future reference.
Checks before each use
* Check the electric verticutter before each use.
Do not use the electric verticutter if safety devices (switch lever, safety interlock, rear cover or guard) are damaged or worn out
* Never use the machine with locked or missing safety devices
Note: Keep all nuts, bolts and screws tight and make sure the verticutter is in good working condition.
Before any work is started, inspect the area to be created.
* Check the working area for any foreign objects (e.g. stones, branches, string) and remove them if necessary.
Proper Use / Responsibility
⚠ Attention! Danger! Danger of injury! The verticutter may cause serious injury!
Do not put hands or feet near the cylinders of the verticutter.
You are responsible for the safety of methods of use specified in these instructions.
* Only work under good visibility.
Do not touch the machine and do not open the rear cover during operation.
* Familiarize with the surroundings of your working area. Check for possible hazards that may not be audible due to the noise of the equipment.
To keep your feet safe, wear sturdy shoes and long trousers.
* Keep your feet in safe distance from moving parts.
* Keep the area of operation clear of all persons (particularly children) or pets.
* Always push the verticutter at walking speed.
* Working posture: Be sure you are well balanced with sure footing while working.
Exercise extreme caution when changing direction on slopes.
⚠ Attention! Exercise extreme caution when walking backwards. You could stumble!
Do not use the verticutter in the rain or in humid or wet conditions.
Do not operate the verticutter near pool or garden lake edges.
Please abide by all local restrictions regarding the noise level.
Work Interruption
⚠ Attention! Never leave the electric verticutter unattended in the working area.
If you stop working, store the equipment at a safe place. Remove the plugs from the mains! If you interrupt work in order to move to another working area, always switch off the electric verticutter during the move. Move the wear compensation lever to the transport position.
If you hit an obstacle during verticutting
Switch off the electric verticutter
Remove the obstacle.
* Check the electric verticutter for any damage and have it repaired if necessary
Electrical Safety
* Keep the extension cable off the cylinder of the verticutter!
* Never use the verticutter in the rain.
Please observe the prescribed local rest periods.
It is necessary to check regularly the power supply / extension cable for any signs of damage or wear.
If the power supply / extension cable is damaged, immediately remove the mains plug.
The extension receptacle for extension cable must be water-resistant to protect against spraying water or the connecting receptacles for extension cables must be made of rubber or rubber-coated.
The extension cables must meet the requirements of DIN VDE 0620.
* Only use approved extension cables with adequate cable cross-section. Consult your electrician.
Connecting accessories must be used for extension cables.
For portable devices used outdoors, we recommend using 30 mA residual current devices. In Switzerland, the use of residual current devices is mandatory.
5. PURPOSE OF USE
Intended Use
The electric verticutter LS-S3201 is intended for aeration of lawns and grass areas in private home gardens and garden plots. It is not intended for use in public facilities, parks, sports grounds, roads, in farm sector and in forestry.
Note
Attention! In order to prevent injury, the electric verticutter may not be used for shrubs, green fence and bushes trimming. The electric verticutter may also be not used for soil levelling.
6. MACHINE ASSEMBLY (Fig. 2)
Handle Assembly
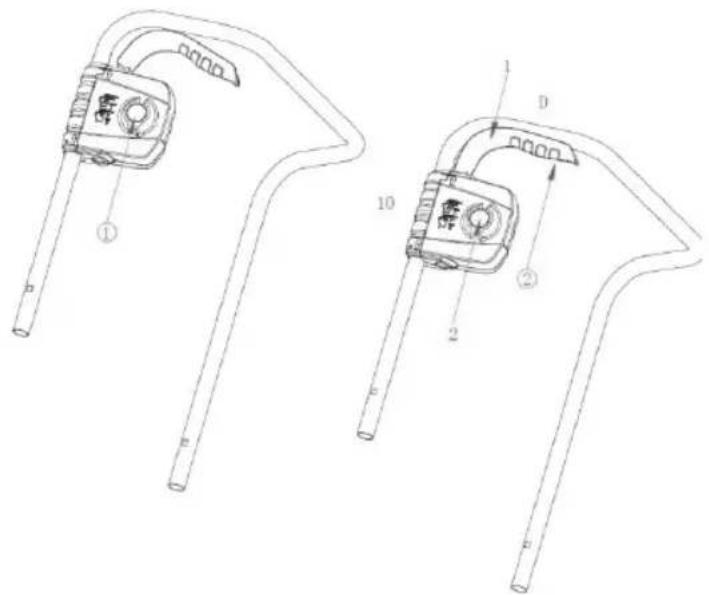
* Insert both bottom parts of the handle 5 (ends with round hole) into the holders in the engine cover 6 and secure them with Phillips head screws 9.
* Insert two locking bolts 1 from outside through the holes in two middle parts of the handle 2 and secure the bottom parts of the handle 5 with two wing nuts 4.
Screw the upper part of the handle with the switch lever 3 to the middle parts of the handle 2 with additional two locking bolts 1 and wing nuts 4.
Power Supply Cable Attachment
* Attach the power supply cable 8 to the handle using two cable clips 10.
Attachment of Fully-Assembled Grassbox to the Lawnmower
* Lift the protective guard
Make sure the discharge chute is clean and free of any debris
Locate the fully-assembled grassbox 12, 13 into the locating points in the rear part of the guard as shown
* Attach the safety flap upon the upper part of the grassbox. Make sure the grassbox is easily attachable.
Note: In case of use other than grass collection, the lawnmower can be used without the grassbox attached but with the protective guard engaged.
7. OPERATION (Fig. 3)
Attach the Extension Cable
Attach the cable holder (A2) to the upper handle
Starting and Stopping
Attention! Make sure the cylinder stopped rotating before switching "on" again. Do not rapidly switch off and on.
Starting:
* Press and hold the safety button
* Squeeze the switch lever 10 towards the handle (D)
Release the safety button
Stopping:
Release the switch lever 10
8. MAINTENANCE
Aerator Cleaning
⚠ Attention! Danger! The cylinder of the verticutter may cause serious injury!
Attention! Before any maintenance, disconnect the machine from the mains and wait until the cylinder of the verticutter has stopped.
Attention! During maintenance, always wear work gloves. The verticutter should be cleaned after each use.
⚠ Attention! Danger of injury and material damage.
⚠ Attention! Do not clean the verticutter under running water (particularly under high pressure).
⚠ Attention! Do not clean the verticutter using hard or sharp-pointed objects.
Remove grass and mud from the wheels, cylinder of the verticutter and the guard.
Adjustment after Wear and Tear (Fig. 5)

Note: Do not use wear adjustment to adjust height. Adjusting the cylinder of the verticutter without any visible wear and tear may result in damage to the cylinder of the verticutter or engine stalling.
During use, the cylinders, blades and springs of the verticutter are subject to wear and tear as a result of the method of operation. The more intensively the verticutter is used, the higher is the wear and tear of the blades or springs.
* Hard or very dry soil, as well as excessive use, accelerate the process of wear and tear.
If the results of your work with the aerator are increasingly deteriorating as a result of blade wearing, the cylinder of the verticutter can be adjusted twice.
The cylinder of the verticutter has 4 adjustment positions:
* Transport position 1
Aerating position 2
Aerating position 3:
First adjustment position after the blade wearing (the cylinder of the verticutter is lowered by 3 mm)
Aerating position 4:
Second adjustment position after the blade wearing (the cylinder of the verticutter is lowered by additional 3 mm)
Slightly push away the wear compensation lever 14 from the cover and slide it to the desired position.
9. CYLINDER REPLACEMENT (Fig. 4)
TROUBLESHOOTING
Replacement of the Cylinder of the Verticutter
⚠ Attention! Danger! The cylinder may cause injury!
Attention! Before any troubleshooting, disconnect the machine from the mains and wait until the cylinder has stopped.
Attention! During troubleshooting, always wear protective gloves.
* Unscrew two bolts 15 on the bottom of the cover.
Lift the cylinder with the blades of the verticutter 16 bevel-way and remove the drive wheel shaft.
Remove the bearing bush 17 from the cylinder with the blades of the verticutter 16.
* Push the bearing bush 17 into the aeration cylinder of the verticutter 18.
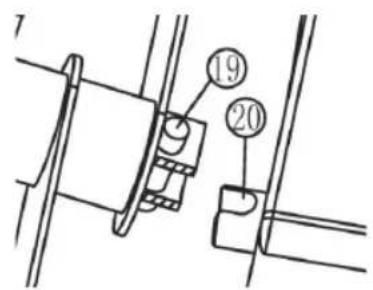
* Push the aeration cylinder of the verticutter 18 onto the drive wheel shaft so as the pin 19 snaps into the slot in the drive wheel shaft 20.
* Screw the bearing bush 17 to the bottom of the cover but do not tighten it too much.
If the cylinder of the verticutter is in the wear adjustment position 3 and if it is worn out, the cylinder must be replaced by a new one.
10. MOWING (Fig. 6)
For verticutting convenience, it may be best to start working at a point closest to the power supply and to work your way away from the power supply. Verticut / aerate the lawn at a right angle from the power supply and place the power cable to the side which has already been treated (E).
Attention! When verticutting, do not allow the motor to labour, in particularly heavy conditions. When the motor labours the speed of the motor drops and you will hear a change in the engine sound. When this occurs, stop mowing, release the switch lever and reduce the verticutting / aeration height. Failure to do so could damage the machine.
Note: The engine is protected by a safety cut out which is activated when the blade becomes jammed or if the engine is overloaded. When this occurs, stop the machine and remove the plug from the power supply. The safety cut out will only reset when the switch lever 10 is released. Before continuing to mow, clear any obstructions and wait for a few minutes for the safety cut out to reset. During this time do not operate the switch lever 10 as this will prolong the time to reset the safety cut out. If the machine cuts out again, increase the verticutting / aeration height to reduce the load of the engine.
11. TECHNICAL DATA
Electric verticutter FZV 4001-E
Rated power 1300 W
Blade length 32 cm
Cutting height ....+3/-3/-6/-9 mm
Grassbox capacity 40 L
Weight 10 kg
Protection rating IPX4
Aerator cylinder working speed 3900±5% rpm
Sound power level 96 dB(A)
Vibrations 40 m/s2
The User's Manual is in a specific language version.
12. DISPOSAL
INSTRUCTIONS AND INFORMATION ON DISPOSAL OF USED PACKAGING.
Put any used package material to the place determined by the municipality for waste disposal.
DISPOSAL OF USED ELECTRIC AND ELECTRONIC EQUIPMENT

This symbol on products or accompanying documents means that used electric or electronic products must not be put to ordinary municipal waste. Hand over such products to determined collection points for proper disposal, restoration and recycling. Alternatively, in some countries of the European Union or other European countries you can return your products to your local dealer when you buy an equivalent new product. By dutiful disposal of this product you can preserve precious natural resources and you help prevent any potential adverse effects on the environment and human health which could be the results of wrong waste disposal. Ask your local authority or the nearest collection point for additional details. In case of improper disposal of this waste kind penalties can be imposed in accordance with national regulations.
For companies in the European Union countries
Should you want to dispose of electric and electronic devices, ask your dealer or vendor for necessary information.
Disposal in other countries outside the European Union
Should you want to dispose of this product, ask your local authorities or your dealer for necessary information about disposal method.
CE
This product fulfils all basic requirements of the EU directives that apply to it.
Text, design and technical specifications can change without prior notice and we reserve the right for their change.
EN 20
Vertikulátor
NÁVOD K OBSLUZE
6. MONTÁŽ STROJE (Obr. 2)
Montáž rukojeti
6. MONTÁŽ STROJA (obr. 2)
Montáž rukoväti
natural_image
Warning symbol with exclamation mark above an open book below (no text or symbols present)natural_image
Warning symbol with exclamation mark above an open book below (no text or symbols present)natural_image
Warning symbol with exclamation mark above an open book below (no text or symbols present)natural_image
Warning symbol with exclamation mark above an open book below (no text or symbols present)natural_image
Warning symbol with exclamation mark above an open book below (no text or symbols present)natural_image
Warning symbol with exclamation mark above an open book below (no text or symbols present)natural_image
Warning symbol with exclamation mark above an open book below (no text or symbols present)natural_image
Warning symbol with exclamation mark above an open book below (no text or symbols present)E-mail: info@faster.cz
Cejl 31, 602 00 Brno, tel.: 531 010 292-3, fax: 531 010 294
CE DECLARATION OF CONFORMITY
Manufacturer:
FAST ČR, a.s.
Černokostelecká 2111, 100 00 Praha 10, Czech Republic
VAT no: CZ26726548
Product / brand: electrical Ian aerator and scarifier/ FIELDMANN
Type / model: FZV 4001E
230V AC; 1300W; IPX4; 320mm
The product is inline with regulations listed below:
EC Directive for low voltage electrical equipment No.2006/95/EC
E C Council Directive 2006/42/EC Machinery
EC Directive for Electromagnetic Compatibility (EMC) No.2004/108/EC
EC Directive for RoHS 2002/95/EC
and norms:
EN 60335-1:2002+A1+A11+A12+A2+A13+A14+A15
EN 60335-2-92:2005
EN 13684:2004+A3:2009
EN 62233:2008
EN 55014-1:2006+A1:2009+A2:2011
EN 55014-2:1997/+A1:2001+A2:2008
EN 61000-3-3:2008
EN 61000-3-2:2006+A1:2009+A2:2009
CE label: 14
Company FAST ČR, a.s. is authorized to act on behalf of manufacturer.
Place of issuance: Prague
Date of issuance: 7.4.2014
Name: Ing. Zdeněk Pech
Chairman of the Board
Signature:
FAST FAST CR, a.a.
Čemokostelecka 1621, 201 01 Řičany
ICO: 26726548 tel.: +420/ 323 204 111
DIC: CZ26726548 fax: +420/ 323 2194 110

230V AC; 1300W; IPX4; 320mm
230V AC; 1300W; IPX4; 320mm
230V AC; 1300W; IPX4; 320mm
E-mail: info@faster.cz
Cejl 31, 602 00 Brno, tel.: 531 010 292-3, faks: 531 010 294
230V AC; 1300W; IPX4; 320mm
230V AC; 1300W; IPX4; 320mm
E-mail: info@faster.cz
230V AC; 1300W; IPX4; 320mm
E-mail: info@faster.cz
DÉCLARATION DE CONFORMITÉ CE
Fabricant :
FAST ČR, a.s.
230V AC; 1300W; IPX4; 320mm
230V AC; 1300W; IPX4; 320mm
E-mail: info@faster.cz
Cejl 31, 602 00 Brno, tel.: 531 010 292-3, fax: 531 010 294
CE DECLARATION OF CONFORMITY
Manufacturer:
FAST ČR, a.s.
Černokostelecká 2111, 100 00 Praha 10, Czech Republic
VAT no: CZ26726548
Product / brand: electrical lan aerator and scarifier/ FIELDMANN
Type / model: FZV 4001E
230V AC; 1300W; IPX4; 320mm
The product is inline with regulations listed below:
EC Directive for low voltage electrical equipment No.2006/95/EC
E C Council Directive 2006/42/EC Machinery
EC Directive for Electromagnetic Compatibility (EMC) No.2004/108/EC
EC Directive for RoHS 2002/95/EC
and norms:
EN 60335-1:2002+A1+A11+A12+A2+A13+A14+A15
EN 60335-2-92:2005
EN 13684:2004+A3:2009
EN 62233:2008
EN 55014-1:2006+A1:2009+A2:2011
EN 55014-2:1997/+A1:2001+A2:2008
EN 61000-3-3:2008
EN 61000-3-2:2006+A1:2009+A2:2009
CE label: 14
Company FAST ČR, a.s. is authorized to act on behalf of manufacturer.
Place of issuance: Prague
Date of issuance: 7.4.2014
Name: Ing. Zdeněk Pech
Chairman of the Board
Signature:
FAST FAST CR, a.s.
Home & Garden Performance
| Den. | Der. | Music. | Music. | Rok. | 20 | ||
| Day | Griate | Ica | Monthe | Monday | 1st | Year | Fv. |
Home & Garden Performance
version 07/201
Záruční podmínky
Conditions of guarantee
This product is warranted for the period of 24 months from the date of purchase to the end-user. Warranty is limited to the following conditions: Warranty is referred only to the customer good using for common domestic use. The claim for service can be applied either at dealer's shop where the product was bought, or at below mentioned authorized services hops. The end-user is obligated to set up a claim immediately when the defects appeared but only will the end of warranty period. The end-user is obligated to cooperate to certify the claiming defects. Only completed and clean (according to hygienic standards) product will be accepted. In case of eligible warranty claim the warranty period will be prolonged by the period from the date of claim application till the date attempting over the product by end-user, or the date the end-user is obligated to take it over. To obtain the service under this warranty, end-user is obligated to certify his claim with duly completed. Following a unit receipt certificate of warranty, certificate of installation.
This warranty is void especially if apply as follows: ■ Defects which were put on sale. ■ Wear-out or damage caused by common use.
■ The product was damaged by unprofessional or wrong installation, used in contrary to the applicable instruction manual, used in contrary to legal enactment and common process of use or used for another purpose which has been designed. For the product was damaged by uncarred-for or insufficient maintenance. ■ The product was damaged by dirt, accident of force majeure (natural disaster, fire, flood, ...). ■ Defects on functionality caused by low duality of signal, electromagnetic field interference etc. ■ The product was mechanically damaged (e.g. broken button, fall...). ■ Damage caused by use of unsuitable media, fillings, expendable supplies (batteries) or by unsuitable working conditions (e.g. high temperatures, high humidity quakes, ...). ■ Repair, modification or other failure action to the product by unauthorized person. ■ End-user did not prove enough his right to claim (time and place of purchase). ■ Data on presented documents differs from data on products. ■ Cases when the claiming product can not be finentil'd according to the presented documents (e.g. the serial number or the warranty seal has been damaged).
Home & Garden Performance
Garantieschein | Hoja de garantía | Fiche de garantie Jamstveni list | Certificato di garanzia | Garantiebewijs
Vom Verkäufer auszufüllen. | Para ser llenado elvendedor. | À remplir par levendeur. | Popuni prodavatelj. | Da compilare dal venditore. | Door de verkoper in te vullen.
servis.brnoldfaster.cz
www.faster.cz
Fast Plus, spol. s r. o.
Na Pántoch 18
SK 631 06 Bratislava
Slovenská republika
Tel: -421/2/49 105 854
Fax: +421/2/49 105 859
servisidfastplus.sk
www.fastplus.sk
Home & Garden Performance
Tec sion 079211
Home & Garden Performance
Гарантийный талон
servis.prahaldaster.cz
www.faster.cz
AO «FAST ČR»
Цейл 31
602 00 Брно
Чешская Республика
Тел.: +420/531 010 295
Home & Garden Performance
revision 02/201
Условия гарантии
natural_image
Black and white photo of a lawn mower with adjustable blades and a flat blade (no visible text or symbols)
FIELDMANN®
Home & Garden Performance

- FIELDMANN®
- Verticutter
- OPERATION MANUAL
- TABLE OF CONTENTS
- GENERAL SAFETY INSTRUCTIONS
- Important safety warnings
- Packaging
- Instructions for use
- SYMBOLS
- MACHINE DESCRIPTION AND PACKAGE CONTENT
- Machine description (see Fig.1)
- Package Content
- SAFETY INSTRUCTIONS
- Checks before each use
- Proper Use / Responsibility
- Work Interruption
- If you hit an obstacle during verticutting
- Electrical Safety
- PURPOSE OF USE
- Intended Use
- Note
- MACHINE ASSEMBLY (Fig. 2)
- Handle Assembly
- Power Supply Cable Attachment
- Attachment of Fully-Assembled Grassbox to the Lawnmower
- OPERATION (Fig. 3)
- Attach the Extension Cable
- Starting and Stopping
- Starting:
- Stopping:
- MAINTENANCE
- Aerator Cleaning
- Adjustment after Wear and Tear (Fig. 5)
- CYLINDER REPLACEMENT (Fig. 4)
- TROUBLESHOOTING
- Replacement of the Cylinder of the Verticutter
- MOWING (Fig. 6)
- TECHNICAL DATA
- DISPOSAL
- INSTRUCTIONS AND INFORMATION ON DISPOSAL OF USED PACKAGING.
- DISPOSAL OF USED ELECTRIC AND ELECTRONIC EQUIPMENT
- For companies in the European Union countries
- Disposal in other countries outside the European Union
- Vertikulátor
- NÁVOD K OBSLUZE
- MONTÁŽ STROJE (Obr. 2)
- Montáž rukojeti
- MONTÁŽ STROJA (obr. 2)
- Montáž rukoväti
- CE DECLARATION OF CONFORMITY
- DÉCLARATION DE CONFORMITÉ CE
- Home & Garden Performance
- Záruční podmínky
- Conditions of guarantee
- Garantieschein | Hoja de garantía | Fiche de garantie Jamstveni list | Certificato di garanzia | Garantiebewijs
- Vom Verkäufer auszufüllen. | Para ser llenado elvendedor. | À remplir par levendeur. | Popuni prodavatelj. | Da compilare dal venditore. | Door de verkoper in te vullen.
- Fast Plus, spol. s r. o.
- AO «FAST ČR»
- Условия гарантии
Brand : Fieldmann
Model : FZV 4001-E
Category : Lawn mower