
Nudelmeister 68801 - Pasta machine UNOLD - Free user manual and instructions
Find the device manual for free Nudelmeister 68801 UNOLD in PDF.

| Product type | Electric pasta machine |
| Brand | Unold |
| Model | Nudelmeister 68801 |
| Mixing bowl capacity | Up to 500 g of dough |
| Main material | ABS plastic and stainless steel |
| Color | White and gray |
| Power cable | Approximately 150 cm |
| Included accessories | 7 pasta dies, 2 measuring cups, spatula, sausage accessory, key ring, tightening key |
| Functions | Mixing, kneading, pasta extrusion |
| Operating modes | MIX (mixing/kneading) and EXT (extrusion) |
| Safety switch | Yes, on the lid (prevents operation if improperly closed) |
| Types of pasta possible | Spaghetti, tagliatelle, lasagna, noodles, gnocchi, stuffed pasta (with sausage accessory) |
| Cleaning | Removable parts, hand wash with warm water and dish soap |
| Maintenance | Complete drying before storage; do not clean in dishwasher |
| Warranty | 24 months for domestic use |
| Intended use | Indoor, household use only |
| Approximate total weight | 4.5 kg |
| Dimensions (L × W × H) | 30 × 25 × 20 cm |
| Power supply | 220-240 V, 50/60 Hz |
| Rated power | 200 W |
Frequently Asked Questions - Nudelmeister 68801 UNOLD
User questions about Nudelmeister 68801 UNOLD
0 question about this device. Answer the ones you know or ask your own.
Ask a new question about this device
Download the instructions for your Pasta machine in PDF format for free! Find your manual Nudelmeister 68801 - UNOLD and take your electronic device back in hand. On this page are published all the documents necessary for the use of your device. Nudelmeister 68801 by UNOLD.
USER MANUAL Nudelmeister 68801 UNOLD
natural_image
White kitchen blender with clear glass casing and food being processed (no visible text or symbols)Bedienungsanleitung
Instructions for use | Notice d'utilisation Gebruiksaanwijzing | Istruzioni per l'uso Instrucciones de uso | Instrukcja obsługi
Modell 68801
Impressum:
natural_image
Modern kitchen appliance with digital display and bucket, no visible text or symbols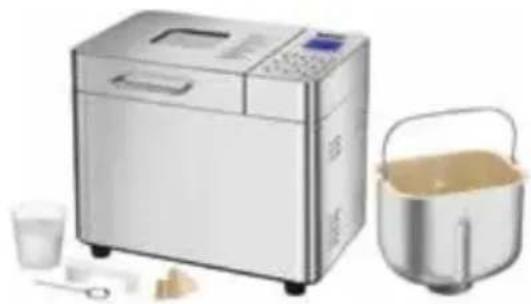
natural_image
Modern industrial machine with control panel and grain bowl, accompanied by small kitchen utensils (no visible text or symbols)UNOLD®
Care + Style
natural_image
Product photo of a red and black hairbrush with a curling tool, no visible text or symbols
natural_image
Close-up of a metallic stand with a white cable, no visible text or symbolsUNOLD®
Fan + Heat
natural_image
Close-up of a desktop electric fan with visible blades and base (no text or symbols)
natural_image
Illustration of a red electric fan with a mounted base (no text or symbols visible)INHALTSVERZEICHNIS
Instructions for use Model 68801
Technical Specifications....24
Explanation of symbols....24
Important Safeguards....24
Before using the appliance the first time.....26
Assembly 26
Making pasta....29
Important information about making pasta ..30
Cleaning and Care ....31
Recipe ideas ....32
Guarantee Conditions....34
Waste Disposal/Environmental Protection ....34
Service 23
DE Ab Seite 10
1 Lid with safety switch
2 Mixing container
3 Dough spatula
4 Front cover
5 Kneider cover
6 Feed screw with axle and cover (not pictured)
7 Kneader
8 2 measuring cups
9 Sealing ring
10 Wrench
11 \$ausage filler
FR Page 35
natural_image
Mechanical diagram of a helical screw with directional arrows indicating motion (no text or symbols)Abb. 1

natural_image
Mechanical assembly diagram showing a spiral shaft and housing with an arrow indicating direction (no text or symbols)Abb. 2
natural_image
Diagram of a mechanical component with directional arrows indicating motion (no text or symbols)Abb. 3
natural_image
Mechanical component diagram showing a bolt and nut assembly with arrows indicating direction (no text or symbols)Abb. 4
natural_image
Mechanical assembly diagram showing a piston and housing component (no text or labels)Abb. 5
natural_image
Two circular diagrams showing directional arrows, one with a curved arrow and the other with a straight arrow (no text or symbols)Abb. 6
natural_image
Technical line drawing of a mechanical component with an arrow indicating direction (no text or symbols)Abb. 7
natural_image
Diagram of a mechanical device with an arrow indicating rotation, no text or symbols presentAbb. 8
natural_image
Diagram of a mechanical component with curved arrows indicating motion or force direction (no text or symbols)Abb. 10
natural_image
Abstract mechanical component illustration with no visible text or symbolsAbb. 9
Power: 200 Watts, 230–240 V\~, 50–60 Hz
Dimensions: Approx. 30.5 x 18.0 x 29.0 cm
Weight: Approx. 4.6 kg
Power cord: Approx. 150 cm
Features: Mixing container for 500 g pasta dough, powerful, robust drive/motor, can be completely disassembled for easy cleaning, automatic mixing and kneading of ingredients, automatic dispensing of pasta dough, lid with safety switch, measuring cups for flour and liquids,
Accessories: 7 pasta extruder discs, 2 measuring cups, spatula, sausage filler


Equipment features, technology, colours and design are subject to change without notice. Errors and omissions excepted
EXPLANATION OF SYMBOLS

This symbol denotes a possible hazard which could cause injury or damage to the appliance.
IMPORTANT SAFEGUARDS
Please read the following instructions and keep them on hand for later reference.
General safety information
- This appliance can be used by children 8 years and older, as well as by persons with reduced physical, sensory or mental abilities or with lack of experience and/or knowledge, if they are supervised or if they have been instructed with regard to safe use of the appliance and have understood the dangers that can result from use of the appliance.
- Children must not play with the appliance.
- Children are not allowed to perform cleaning and user maintenance, unless they are 8 years of age or older and are supervised.
-
Keep the appliance and the power cord out of the reach of children under 8 years of age.
-
Connect appliance only to an AC power supply with voltage corresponding to the voltage on the rating plate.
- Do not operate this appliance with an external timer or remote control system.
- Never immerse the appliance or the power cord in water or other liquids.
- The appliance is intended for household use only, or for similar areas of use, such as:
■ kitchenettes in businesses, offices or other workplaces,
■ agricultural enterprises,
■ for use by guests in hotels, motels or other lodgings,
■ in private guesthouses or holiday homes.
-
Do not clean the appliance or power cord in a dishwasher.
-
Unplug the appliance from the electrical outlet before you disassemble and clean the appliance, remove or attach single parts or move the appliance to another location.
-
Caution: Avoid contact with moving parts of the appliance when it is in operation. Keep hands, hair or other objects away from the kneader and the feed screw: Danger of injury!
- Do not use the appliance with accessories of other manufacturers or brands, to prevent damage.
- Check the appliance, the plug and the power cord regularly for wear or damage. In case of damage to the power cord or other parts, please send the appliance or the base for inspection and repair to our after sales service. Unauthorized repairs can result in serious risks to the user and void the warranty.
Information on setup and operation of the appliance
- The appliance is suitable for indoor use only.
- Never touch the appliance or power cord with wet hands.
- For safety reasons, never place the appliance on hot surfaces, a metal tray or a wet surface. Do not place the appliance or power cord near open flames during operation.
- Always use the pasta maker on a level, uncluttered surface.
- Make sure that the power cord does not hang over the edge of the countertop or table, since this can cause accidents, for example if small children pull on the cord.
-
Do not wrap the power cord around the appliance and avoid kinking of the power cord to prevent damage.
-
Route the power cord so that there is no possibility of the cord being pulled or tripped over.
- Do not move the appliance as long as it is in operation, to prevent injuries.
- Do not use hot liquids.
- Do not switch on the appliance if the lid is not in place.

Caution: Avoid contact with moving parts of the appliance when it is in operation.
Never open the housing of the appliance. This can result in electric shock.
The manufacturer will not be liable in the event of incorrect assembly, improper or incorrect use or if repairs are carried out by unauthorized third parties.
BEFORE USING THE APPLIANCE THE FIRST TIME
- Remove all packaging materials and any transport safeguards. Keep packaging materials away from children – danger of suffocation! Dispose of packaging materials in accordance with local regulations.
- Check the appliance for damage. If the appliance shows visible signs of damage, do not operate it. Contact our customer service organisation instead.
- Check whether all listed accessory parts are present.
- Clean all components with a damp cloth, as described in the chapter "Cleaning and care".
ASSEMBLY
- Before assembling the appliance, make sure that it is not plugged into the electrical outlet.
- Place the appliance on a solid, level and dry surface.
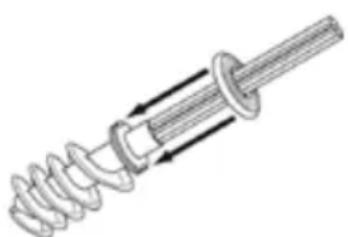
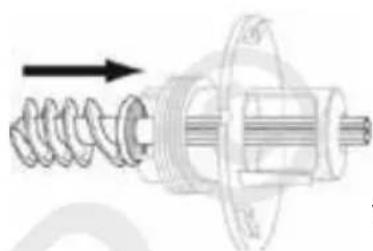
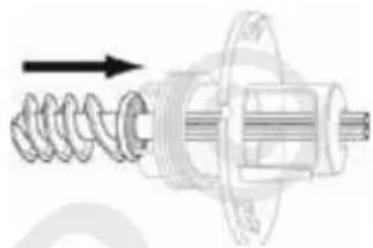
- Push the screw cover onto the feed screw axle. Make sure that the notches on the cover line up with the depressions on the feed screw axle. (Fig. 1)
natural_image
Diagram of a mechanical screw with threaded shaft and housing, showing directional arrows indicating motion (no text or labels)Fig. 1
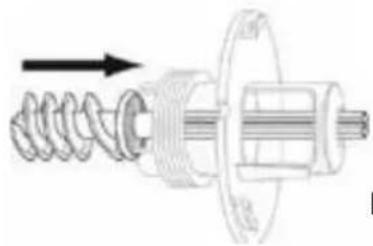
- Push the feed screw axle through the front cover so that the feed screw is within the front cover (Fig. 2).
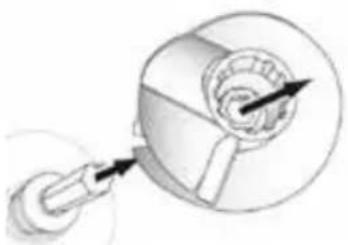
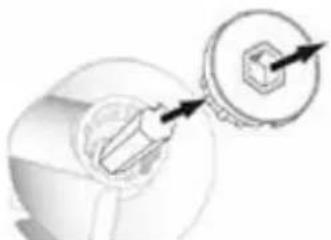
- Fasten the kneader to the axle. The feed screw axle is provided with a notch, which must align with the corresponding guide rail in the kneader. (Fig. 3).
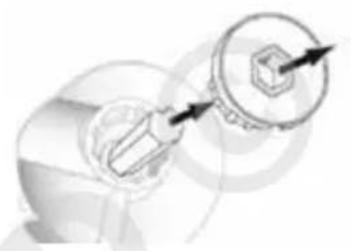
- Place the kneader cover on the axle. Here again, the notch must align with the corresponding guide rail. The flat side of the kneader cover must point to the back (Fig. 4).
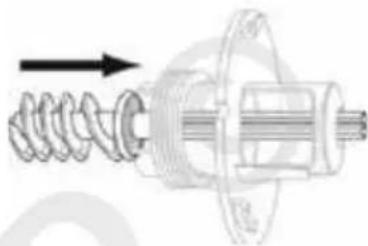
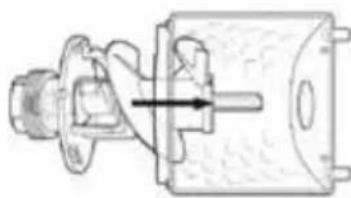
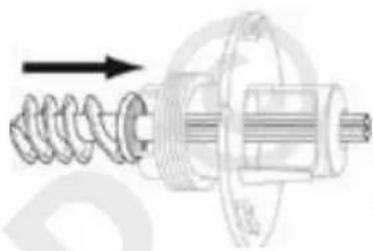
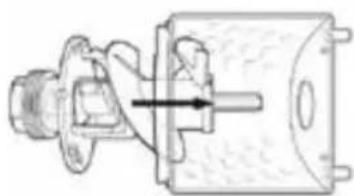
- Push the entire feed screw axle assembly through the front cover of the mixing container. The threads must point toward the outside (Fig. 5).
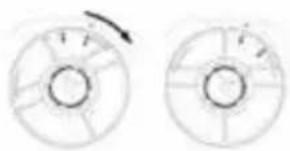
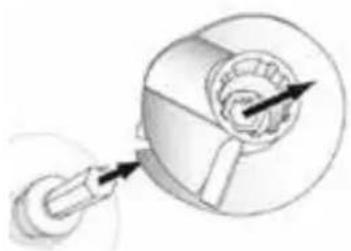
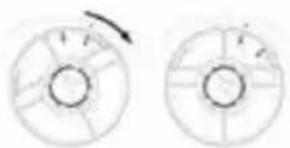
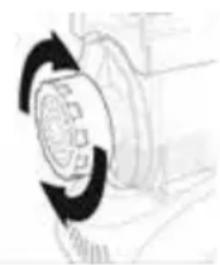
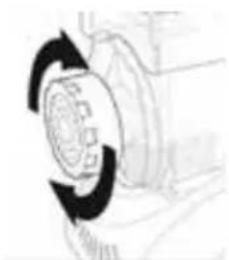
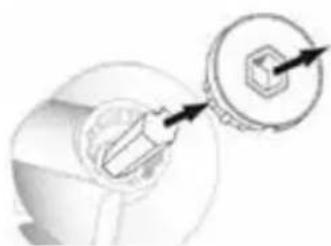
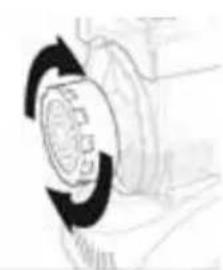
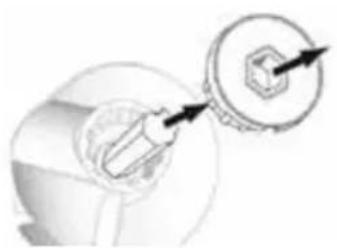
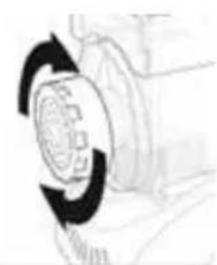
- Lock the front cover of the mixing container. The symbol ⚙ must align with the arrow on the mixing container. Then turn clockwise until the arrow aligns with the symbol ⚙ (Fig. 6).
- Important: The front cover must be correctly locked and secured before you continue assembling the appliance. If the lid is already on the mixing container, the front cover cannot be locked.
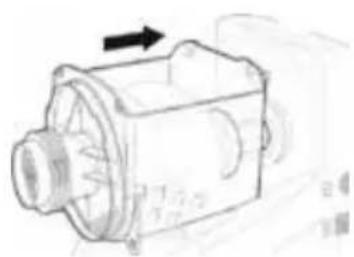
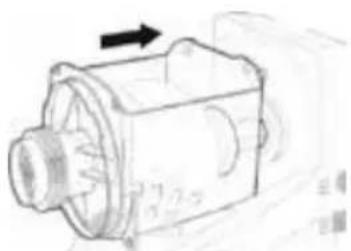
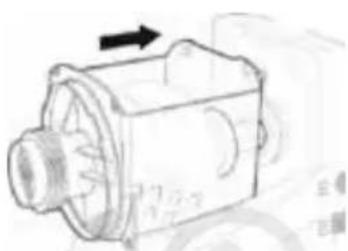
- Then push the entire front unit onto the motor block.
natural_image
Mechanical assembly diagram showing a spiral shaft and housing with an arrow indicating direction (no text or symbols)Fig. 2
natural_image
Diagram of a mechanical component with an arrow indicating direction, no text or symbols presentFig. 3
natural_image
Illustration of a robotic arm interacting with a mechanical component (no text or symbols visible)Fig. 4
natural_image
Mechanical assembly diagram showing a piston-cylinder mechanism with no visible text or symbolsFig. 5
natural_image
Two circular diagrams showing directional arrows, one with a curved arrow and the other with a straight line (no text or symbols)Fig. 6
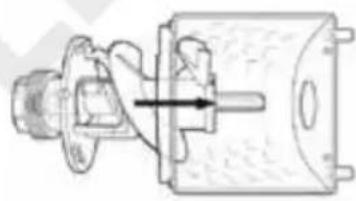
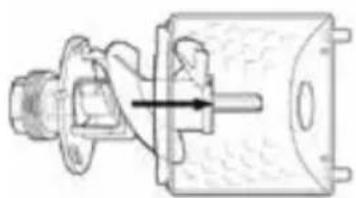
- The axle of the mixing unit must be inserted into the hole on the front side of the motor block. The two recesses and the bottom holes in the mixing unit must correspond exactly with the motor block (Fig. 7).
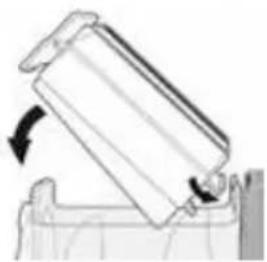
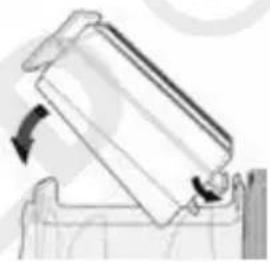
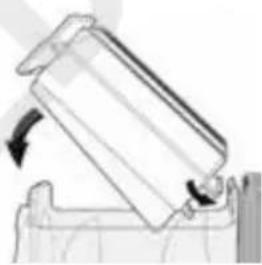
- Hold the lid upright on the mixing container and make sure that the two projections on the lid fit into the recesses on the front side of the motor block. Press the lid down until it locks into place on the mixing container (Fig. 8).
- Important: The sealing cover must audibly lock into place, since this activates the safety switch; otherwise, the appliance cannot be switched on. In case the cover does not lock into place, check whether the mixing container was inserted correctly.
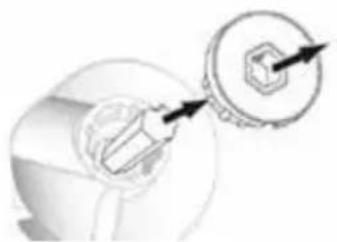
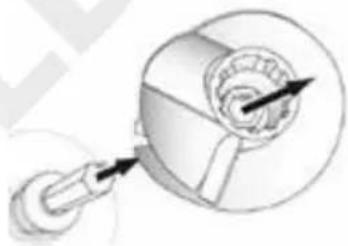
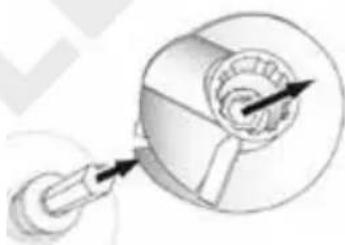
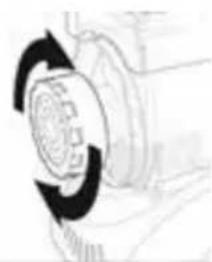
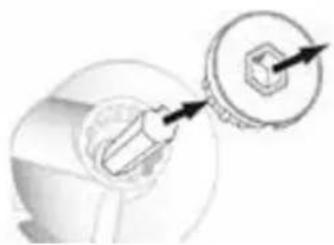
- Now insert the desired pasta extruder disc in the sealing ring. Turn the sealing ring clockwise onto the threads of the front cover until it is tight (Fig. 9). Tighten the sealing ring only by hand. You can use the included wrench to loosen the ring.
- To disassemble the appliance, perform the above steps in reverse sequence.

natural_image
Technical line drawing of a mechanical component with an arrow indicating direction (no text or symbols)Fig. 7

natural_image
Diagram of a mechanical component with an arrow indicating rotation, no text or symbols presentFig. 8
natural_image
Mechanical component diagram showing a rotating shaft and housing (no text or symbols)Fig. 9
MAKING PASTA
- Before assembling the appliance, make sure that it is not plugged into the electrical outlet and that both switches are set to OFF.
- Place the appliance on a solid, level and dry surface.
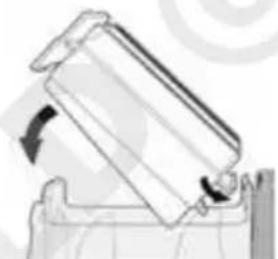
- Remove the lid from the mixing container by pulling the two projections slightly forward and then upward (Fig. 10).
- Place the flour in the container.
- Put the lid back on the mixing container and fasten.
- NOTE: The appliance cannot be switched on if the lid was not put on correctly (see section on Assembly).
- Select the desired pasta extruder disc and place it in hot water for about 1 minute. Then insert the pasta extruder disc in the sealing ring and screw the ring clockwise on the front cover until tight.
- Plug the power cord into an electrical outlet. Important: Both switches on the appliance must be set to OFF before you plug in the appliance.
- Make sure that the ventilation slots in the appliance are unobstructed during operation.
- Set both switches to MIX.
- Note that both switches must always be set to the same setting.
- Whisk the egg in a separate container. Put the egg in a measuring cup, weigh the required quantity of water or other liquid and add it to the egg. Pour this mixture slowly through the opening in the container lid.
- Put 1 tbsp of oil in the measuring cup and add water or other liquid to the required level. Pour this mixture as well through the opening in the container lid.
- IMPORTANT: Do not insert knives, spatulas or similar utensils into the opening in the lid while the appliance is in operation. The opening is only for adding liquid, extra flour, etc.
- Knead the dough about 4–5 minutes until it has reached the desired consistency. As soon as the desired consistency is reached, set both switches to OFF.
- It is easy to determine whether the pasta dough has the right consistency. The dough must be mixed well, should no longer be sticky and should break apart into several chunks. If the dough is still too moist, add a teaspoon of flour through the opening in the lid of the container while the appliance is

natural_image
Diagram of a structural component with curved arrows indicating direction (no text or symbols)Fig. 10
mixing the dough. If it is too dry, add a teaspoon of liquid through the opening in the lid.
- Important: Never switch directly from MIX to EXT. Always set the two switches to OFF first, for at least 5 seconds.
- Place a container in front of the appliance to catch the noodles. Set both switches to EXT. The pasta dough is pressed through the extruder disc.
- Cut the pasta with a sharp knife to the desired length.
- As soon as all the dough has been pressed through, set both switches to OFF and unplug the appliance from the electrical outlet. Please note that for technical reasons a small amount of dough will remain in the appliance and cannot be extruded.

Important: Always unplug the appliance from the electrical outlet before disassembly and cleaning.
- After you have finished making pasta, disassemble the pasta machine immediately and clean all the separate parts. Dried dough can make it difficult or impossible to disassemble the machine.
IMPORTANT INFORMATION ABOUT MAKING PASTA
Weighing the ingredients is more precise than using a measuring cup.
Do not use total ingredients of more than about 500 g, i.e. 350 g flour, since otherwise the dough will not be mixed well.
Let the pasta maker knead the dough about 3–5 minutes in order to mix the ingredients sufficiently. Do not exceed this time either, since the dough will then become too warm and sticky.
Toss the extruded pasta in semolina to keep it from sticking together.
If the pasta ingredients include vegetables, it is possible that the noodles will stick together during the extrusion process. Pull the noodles apart right away and toss them in semolina.
If you add herbs to the dough, please note that this will have a primarily visual effect. The flavour will be lost in the boiling water. Herbs with a high water content, such as chives and spring onions, are especially unsuitable.
You can use various types of flour to make pasta; wheat and spelt flour are ideal.
Semolina is also very good for making pasta. Pasta made from semolina retains its yellow colour after cooking and does not easily overcook.
Dough with a high protein content is also suitable due to the special gluten structure.
You can also add egg whites and/or yolks, water or pureed fruits or vegetables. The pasta can be air dried by spreading it out on a clean towel or you can put it in the oven at a very low temperature of 40–50 °C.
Special pasta drying racks are also available in stores.
Important: Hollow pasta varieties cannot be dried, because they will break while drying due to mechanical tension.
You can also use the pasta maker to make gnocchi, pastry dough or yeast dough. In this case, do not exceed the maximum weight of 500 g for the ingredients.
If the pasta dough sticks to the lid of the pasta maker, you can carefully push the dough down with a spatula through the two slits in the lid.
Dough not extruded from the pasta maker can be formed into a ball and sliced with a vegetable cutter. These noodles are very good in soup.
How to cook pasta properly
You can cook pasta fresh or dried.
Cook pasta in boiling, salted water. Be sure there is enough water in the pot; you should use 3 to 4 liters of water for 500 g of pasta. Pasta can also be cooked in a clear broth or milk.
Drain the pasta and serve it with a sauce, if you like. The cooking time depends on the type of pasta and your personal preference. Freshly made pasta is usually done when it floats to the surface of the water.
CLEANING AND CARE

Before cleaning, switch off the appliance by setting both switches to OFF and unplug it from the electrical outlet.
- Use the ring wrench to loosen and remove the sealing ring. If the sealing ring is too tight, plug in the appliance and let it run on MIX for about twenty seconds. This will reduce the tension on the sealing ring somewhat.
- Switch off the appliance and unplug it from the electrical outlet. Then unscrew the sealing ring from the appliance.
- When loosening the sealing ring, make sure that the lid is tightly closed, since otherwise the front cover of the mixing container will come off.
- Remove the lid from the mixing container.
- Turn the front cover counterclockwise and remove the mixing unit.
- Remove the kneader cover and the kneader from the feed screw axle.
-
Remove the feed screw from the front cover.
-
Place all single parts in warm or cold water with a little dishwashing detergent added. After letting the parts soak you can remove any remaining dough with a dish brush.
- Let the pasta extruder discs dry until the dough flakes off; then carefully remove any remaining dough with a toothpick or a knife.
- The single parts are not dishwasher suitable. They could be damaged if cleaned in the dishwasher.
- When cleaning the machine, check occasionally whether the opening for the safety switch is clogged with dough. Remove any dough residue using a toothpick, for example.
- Do not use any abrasive scouring agents, steel wool, metal objects, hot cleaning agents or disinfectants, since they can damage the appliance.
- Do not immerse the motor block in water or other liquids.
- The appliance must be completely dry before you use it again.
- When completely dry, store the pasta maker in a dry, safe place so that it is protected from dust, shocks, heat and moisture.
RECIPE IDEAS
Semolina pasta
340 g semolina, 160 g egg
Semolina pasta with water
340 g semolina, 140 g water, 10 g oil (e.g. sunflower oil)
Spinach pasta
340 g spelt flour or high-protein wheat flour, 175 g finely chopped blanched spinach leaves (or 175 g frozen spinach, e.g. creamed spinach), one finely chopped garlic clove if desired, 2 pinches ground nutmeg
Tomato pasta
340 g spelt flour; place a bowl on the scale and tare the scale to zero. Now break one egg into the bowl, add 1 tbsp tomato ketchup and fill with tomato paste to 160 g.
or
340 g spelt flour, 1 tbsp oil, 140 g chopped tomatoes (without skins and seeds). If you want the pasta to have a deep red colour, replace some of the chopped tomatoes with tomato paste.
Parsley pasta
340 g high-protein wheat flour, 160 g egg, 2 tbsp very finely chopped smooth parsley
Tip: You can also add mixed herbs or single herbs, such as chervil, dill, oregano or wild garlic. Herbs can be fresh or dried.
Instead of eggs you can use water, flavoured with instant herbs.
Black pasta
340 g high-protein wheat flour, 150 g egg, 10 g sepia (cuttlefish ink)
Whole grain wheat or spelt pasta
340 g finely ground whole grain flour, 150 g water, 10 g oil or 160 g egg
Curcuma pasta
340 g semolina, 1 tsp curcuma powder, 160 g egg
Wedding pasta
340 g semolina, 140 g egg yolk, 20 ml water
Shortbread
230 g flour, 150 g butter, 100 g sugar, 1 pinch of salt
Recipes for the sausage filling attachment
Please note that for technical reasons some of the mixture will remain in the dough container.
When grinding fresh meat, the appliance must always be thoroughly cleaned immediately after use, for hygienic reasons.
Pizza Bratwurst
500 g ground pork or 500 g spiced pork sausage, salt, pepper to taste, thin sausage casings (from sheep), 50 g grated Swiss cheese, 1 heaped tsp oregano
Put ground meat, spices and cheese in the dough container and mix about five minutes until all ingredients are thoroughly combined. Soak sausage casings in warm water and then push onto the sausage filling attachment and tie a knot in the end. Switch appliance to EXT and fill the casings with the sausage mixture. When the mixture has been filled, twist off the sausages at the desired length.
Tip: For a variation, add 50 g fried onions, 4 very small chopped chili peppers or 50 g chopped mushrooms to the basic mixture consisting of the meat, salt and pepper.
Cheese Sticks
350 g whole wheat flour, 120 ml warm water, 1 pinch sugar, 20 g fresh yeast, 200 g grated Swiss cheese, 1 egg, 3 pinches salt, 2 tsp caraway seed Dissolve yeast and sugar in water. First put the flour, then all other ingredients into the dough container and knead thoroughly. Use the sausage filling attachment to make 8-inch (20 cm) sticks, place on a greased baking sheet, brush with beaten egg yolk and let rise about 30 minutes in the oven at 50°C. Then bake 20-25 minutes at 190°C (circulating air).
Tip: You can sprinkle poppy seeds or sesame on the cheese sticks before baking.
You can add 50 g fried onions or 50 g finely chopped uncooked ham or 3 tbsp finely chopped parsley to the dough.
The authors have thoroughly considered and tested the recipes included in these operating instructions. Nevertheless, a guarantee cannot be accepted. The authors, respectively UNOLD AG and their assignees shall not be liable for personal injuries, material damages and financial loss.
GUARANTEE CONDITIONS
We grant a 24 months guarantee, and in case of commercial use a 12 months guarantee, starting from the date of purchase for any damage demonstrably due to manufacturing defects and when the appliance has been used according to its intended use. Within the warranty period we will remedy defective materials or workmanship through repair or replacement, at our option. Our warranty terms apply only to appliances sold in Germany and Austria. For other countries, please contact the responsible importer. In the event of a claim for remedy of defects, please send the appliance to our after sales service, properly packaged, together with a copy of the automatically generated sales receipt, which must show the date of purchase, and a description of the defect. You can print out a return receipt on our website www.unold.de/ruecksendung. (only for entries from Germany and Austria). The warranty does not cover damage from normal wear, improper handling and failure to comply with the maintenance and care instructions. The warranty is void if repairs or modifications are made to the appliance by third parties. Any claims of the end consumer vis-à-vis the retailer are not limited by this warranty.
WASTE DISPOSAL / ENVIRONMENTAL PROTECTION
Our appliances are produced on a high quality level for a long lifetime. Regular maintenance and expert repairs by our after-sales service can extend the useful life of the appliance. If an appliance is defective and repair is not possible we ask you to follow the following instructions for disposal. Do not dispose this appliance together with your standard household waste. Please bring this product to an approved collection point for recycling of electric and electronic products. By separate collection and disposal of waste products you help to protect natural resources and ensure, that the product is disposed in an adequate way to protect health and environment.
The instruction booklet is also available for download: www.unold.de
NOTICE D'UTILISATION MODÈLE 68801
SPÉCIFICATION TECHNIQUE
Puissance : 200 Watts, 230–240 V\~, 50–60 Hz
Dimensions : Env. 30,5 x 18,0 x 29,0 cm
Poids : Env. 4,6 kg
natural_image
Diagram of a mechanical screw with threaded shaft and housing, showing internal threading (no text or labels)fig. 1
natural_image
Mechanical assembly diagram showing a spring-loaded component with a central shaft and housing (no text or symbols)fig. 2

natural_image
Mechanical component diagram showing a rotating shaft and housing with directional arrows (no text or symbols)fig. 3

natural_image
Diagram showing a mechanical component with a bolt and nut assembly (no text or symbols)fig. 4

natural_image
Mechanical assembly diagram showing a rotating shaft and housing component (no text or labels)fig. 5
natural_image
Two circular diagrams showing directional arrows, one with a curved arrow and the other with a straight line (no text or symbols)fig. 6
natural_image
Technical line drawing of a mechanical component with an arrow indicating direction (no text or symbols)fig. 7
natural_image
Diagram of a mechanical device with an arrow indicating rotation or movement (no text or symbols present)fig. 8
natural_image
Mechanical component diagram showing a rotating wheel and gear mechanism (no text or symbols)fig. 9
FABRIQUER DES PÂTES
natural_image
Diagram of a mechanical component with curved arrows indicating motion or force direction (no text or symbols)fig. 10
CONDITIONS DE GARANTIE
natural_image
Technical line drawing of a mechanical screw or spring assembly with directional arrows indicating motion (no text or symbols)afb. 1
natural_image
Mechanical assembly diagram showing a spring-loaded component with a shaft and housing (no text or symbols)afb. 2
natural_image
Diagram of a mechanical component with arrows indicating direction, no text or symbols presentafb. 3
natural_image
Diagram showing a mechanical component with a magnified inset view of a hexagonal nut (no text or symbols)afb. 4
natural_image
Mechanical assembly diagram showing a rotating shaft and housing (no text or labels)afb. 5
natural_image
Two circular diagrams showing directional arrows, one with a curved arrow and the other with a straight line (no text or symbols)afb. 6

natural_image
Technical line drawing of a mechanical component with an arrow indicating direction (no text or symbols)afb. 7

natural_image
Diagram of a mechanical device with a rotating arrow indicating rotation (no text or symbols)afb. 8
natural_image
Mechanical component diagram showing a rotating wheel and gear mechanism (no text or symbols)afb. 9
PASTA MAKEN
natural_image
Diagram of a mechanical component with curved arrows indicating motion or force direction (no text or symbols)afb. 10
Misure: Circa 30,5 x 18,0 x 29,0 cm
Peso: Circa 4,6 kg
natural_image
Diagram of a mechanical screw with threaded shaft and housing, showing internal threading (no text or labels)Fig. 1
natural_image
Mechanical assembly diagram showing a spring-loaded component with a shaft and housing (no text or symbols)Fig. 2

natural_image
Diagram of a mechanical component with arrows indicating direction (no text or symbols)Fig. 3
natural_image
Diagram showing a mechanical component with a magnified inset view of a hexagonal nut (no text or symbols)Fig. 4
natural_image
Mechanical assembly diagram showing a rotating shaft and housing component (no text or labels)Fig. 5
natural_image
Two circular diagrams showing directional arrows, no text or symbols presentFig. 6
natural_image
Technical line drawing of a mechanical component with an arrow indicating direction (no text or symbols)Fig. 7
natural_image
Diagram of a mechanical component being lifted or displaced, showing rotational motion (no text or symbols)Fig. 8
natural_image
Mechanical component diagram showing a rotating shaft and housing (no text or symbols)Fig. 9
PREPARARE LA PASTA
natural_image
Diagram of a mechanical component with curved arrows indicating motion or force direction (no text or symbols)Fig. 10
Medidas: Aprox. 30,5 x 18,0 x 29,0 cm
Peso: Aprox. 4,6 kg
natural_image
Diagram of a mechanical screw with threaded shaft and housing, showing directional arrows indicating motion (no text or labels)Fig. 1
natural_image
Mechanical assembly diagram showing a spiral shaft and gear mechanism with directional arrow (no text or labels)Fig. 2
natural_image
Mechanical component diagram showing a rotating shaft and housing with directional arrows (no text or symbols)Fig. 3
natural_image
Diagram showing a mechanical component with a magnified inset of a hexagonal nut (no text or symbols)Fig. 4
natural_image
Mechanical assembly diagram showing a rotating shaft and housing (no text or labels)Fig. 5
natural_image
Two circular diagrams showing directional arrows, no text or symbols presentFig. 6

natural_image
Technical line drawing of a mechanical component with an arrow indicating direction (no text or symbols)Fig. 7
natural_image
Diagram of a mechanical device with a rotating component and base mount (no text or symbols)Fig. 8
natural_image
Mechanical component diagram showing a rotating shaft and housing (no text or symbols)Fig. 9
natural_image
Simple line drawing of a mechanical component with curved arrows indicating motion or force (no text or symbols)Fig. 10
natural_image
Technical line drawing of a mechanical screw or shaft assembly with directional arrows indicating motion (no text or symbols)rys. 1

natural_image
Mechanical assembly diagram showing a spiral shaft and housing with an arrow indicating direction (no text or symbols)rys. 2
natural_image
Diagram of a mechanical component with an arrow indicating direction, no text or symbols presentrys. 3
natural_image
Diagram showing a mechanical component with a circular inset view of a hexagonal nut (no text or symbols)rys. 4
natural_image
Mechanical assembly diagram showing a shaft and housing component (no text or labels)rys. 5
natural_image
Two circular diagrams showing directional arrows, one with a curved arrow and the other with a straight line (no text or symbols)rys. 6

natural_image
Hand-drawn sketch of a mechanical component with an arrow indicating direction (no text or symbols)rys. 7
natural_image
Diagram of a mechanical component being lifted by an arrow, showing motion (no text or symbols)rys. 8
natural_image
Mechanical component diagram showing gear and shaft assembly (no text or symbols)rys. 9
PRODUKCJA MAKARONU
natural_image
Diagram of a mechanical component with curved arrows indicating motion or force direction (no text or symbols)rys. 10

- Bedienungsanleitung
- UNOLD®
- INHALTSVERZEICHNIS
- Instructions for use Model 68801
- DE Ab Seite 10
- FR Page 35
- EXPLANATION OF SYMBOLS
- IMPORTANT SAFEGUARDS
- General safety information
- Information on setup and operation of the appliance
- Caution: Avoid contact with moving parts of the appliance when it is in operation.
- Never open the housing of the appliance. This can result in electric shock.
- BEFORE USING THE APPLIANCE THE FIRST TIME
- ASSEMBLY
- MAKING PASTA
- IMPORTANT INFORMATION ABOUT MAKING PASTA
- Important: Hollow pasta varieties cannot be dried, because they will break while drying due to mechanical tension.
- How to cook pasta properly
- CLEANING AND CARE
- Before cleaning, switch off the appliance by setting both switches to OFF and unplug it from the electrical outlet.
- RECIPE IDEAS
- Semolina pasta
- Semolina pasta with water
- Spinach pasta
- Tomato pasta
- Parsley pasta
- Black pasta
- Whole grain wheat or spelt pasta
- Curcuma pasta
- Wedding pasta
- Shortbread
- Recipes for the sausage filling attachment
- Pizza Bratwurst
- Cheese Sticks
- GUARANTEE CONDITIONS
- WASTE DISPOSAL / ENVIRONMENTAL PROTECTION
- NOTICE D'UTILISATION MODÈLE 68801
- SPÉCIFICATION TECHNIQUE
- FABRIQUER DES PÂTES
- CONDITIONS DE GARANTIE
- PASTA MAKEN
- PREPARARE LA PASTA
- PRODUKCJA MAKARONU
Brand : UNOLD
Model : Nudelmeister 68801
Category : Pasta machine