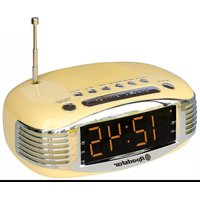
CLR-1966/CR - Radio ROADSTAR - Free user manual and instructions
Find the device manual for free CLR-1966/CR ROADSTAR in PDF.


| Product Type | AM/FM Clock Radio |
| Brand | Roadstar |
| Model | CLR-1966/CR |
| Dimensions (W x H x D) | 18 x 10 x 12 cm |
| Weight | 0.6 kg |
| Mains Power | 230 V, 50 Hz |
| Battery Power | 2 AA batteries (not included) |
| Frequency Bands | FM 87.5-108 MHz, AM 530-1600 kHz |
| Display | Digital LED with brightness adjustment |
| Main Functions | AM/FM radio, alarm clock, sleep timer, snooze function, clock with 12/24h display |
| Number of radio presets | 10 FM stations and 10 AM stations |
| Volume Control | Rotary knob |
| Headphone Jack | 3.5 mm jack |
| Antenna | Telescopic antenna for FM, built-in ferrite antenna for AM |
| Care and Cleaning | Clean with a soft, dry cloth. Do not use abrasive products. |
| Safety | Do not expose to water or humidity. Use only the supplied mains adapter. |
| Spare Parts and Repairability | Mains adapter available as an option. For any repairs, contact an authorized service center. |
| Color | Black and silver |
| Included Accessories | Mains adapter, instruction manual |
| Warranty | 2 years |
Frequently Asked Questions - CLR-1966/CR ROADSTAR
User questions about CLR-1966/CR ROADSTAR
0 question about this device. Answer the ones you know or ask your own.
Ask a new question about this device
Download the instructions for your Radio in PDF format for free! Find your manual CLR-1966/CR - ROADSTAR and take your electronic device back in hand. On this page are published all the documents necessary for the use of your device. CLR-1966/CR by ROADSTAR.
USER MANUAL CLR-1966/CR ROADSTAR
Roadstar
AM/FM Band PLL Clock Radio with Double Alarm
CLR-1966/CR
Instruction manual
Bedienungsanleitung
Roadstar is a registered Trademark of Roadstar S.A. - Switzerland All rights reserved




INDEX
| English Page 1 | |
| Deutsch Seite 9 | |
| Français Page 17 | |
| Italiano Pagina 25 | |
| Español Página 33 | |
| Português | Pagina 41 |

before operating the unit, please press it to be done. On your hand in Horseshugan, Al. No. 103. instruction manual carefully. Keep it also handy



English En
lish
the DC 4.5 V INPUT socket (13) located on the back of the unit.
- Connect the AC/DC adaptor into a 230V \~ 50Hz AC power outlet
Notes
- Use only the supplied AC/DC adaptor. Using other types of adaptor may damage the unit.
- Make sure that the AC/DC adaptor matches with your household voltage before connecting it into the wall outlet.
- Do not touch the AC/DC adaptor with wet hands.


Battery Back-up Power Failure Protection
This radio has a battery back up circuit that will keep the correct time and alarm settings in the event of a temporary power interruption.
Install 2 x 1,5-volt battery (type UM3), not included, into the battery compartment located on the bottom of the unit.
Note: We recommend an alkaline battery for longer usable life. Change the battery every 9 to 12 months for best result and avoid possible battery leakage.
If power is temporarily interrupted the display will blink and the radio will not play. However, the battery back-up circuit will continue to maintain the clock and alarm settings. When power is restored the clock will display the correct time and alarm settings, and no adjustment is necessary.
ora
SETTING THE CORRECT TIME
NOTE: The Clocki can be set only if the unit is in Stand-By mode (radio OFF).
-
Press 2 seconds the TIME CLOCK SET Button (11) until the display blink.
-
Press the TUN/TIME+ (4) button to advance hour
-
Press the TUN/TIME+ (3) button to advance MINUTE until the
correct time is displayed.
- Press the TIME SET Button (11) to complete the setting operation.
SETTING THE WAKE UP TIME
- Set the alarm time by following this procedure:
-
Press 2 seconds the ALARM 1 / VOL- (6) or ALARM 2 / VOL+ (5) Button.
-
Press the TUN/HR+ (4) button to advance HOUR until the correct time is displayed.
-
Press the TUN/MIN+ (3) button to advance MINUTES until the correct time is displayed.
-
Press shortly the ALARM 1 / VOL- (6) or ALARM 2 / VOL+ (5) to finish.
-
Press again shortly the ALARM 1 / VOL- (6) or ALARM 2 / VOL+ (5) button to select BU (Buzzer) or Radio to the activate or deactivate the alarm type (when ON, the indicator will light up on the right or left side of the display).
-
To switch off the alarm press repeatedly ALARM 1 / VOL- (6) or ALARM 2 / VOL+ (5) until the indication light disappear.
To review the alarm after set, press and hold ALARM 1 / VOL- (6) or ALARM 2 / VOL+ (5) button for 2 seconds. The Alarm time will be blinking on the display. After 5 seconds, it will go back to normal time display.


English En
li5h
- Press shortly the ON/OFF (2) button to switch the Radio ON manually.
- Press the AM/FM/AUX Button (9)
- Press 2 seconds the TUN/MIN+ (3) or - TUN/HR (4) button to start the Radio auto-tuning function (the unit will search automatically the strongest stations).
- Adjust the VOLUME Control (5/6) to a comfortable listening level.
- To search manually a Radio station, when in RADIO mode press the TUN- (3) or TUNE UP (4) button sequentially until the desired frequency is displayed, press the Tune/Preset/Mem button (9) two seconds until *P01 a flash, then press TUN/TIME+ (3) or - (4) button to store in the memory.
- To listen the desired Radio stations, short press Tune/Preset/Mem button (9) button to select the stored station.
- To turn off the radio, press the Power ON/OFF button (2). Note: For FM reception there is a built-in FM antenna wire at the rear of the unit. Move the wire around to obtain the best reception.
SNOOZE FUNCTION
When the alarm sounds, pressing the SNOOZE Button (1) will temporary stop about 8 minutes then the alarm sounds again.
SLEEP FUNCTION
- This function enables you to go to sleep listening to the Radio.
- Press the Power ON/OFF button (2) to switch ON the Radio.
- Press the SLEEP Button (10) sequentially. The clock display will show 10/20/30/45/60/90/120 minutes. The Radio turns on and will turn off automatically after the selected sleep timer.
- To turn off the Radio at any time during the Sleep period, press the Power ON/OFF button (2).
6
CARE AND MAINTENANCE
To prevent fire or shock hazard, do not allow this clock radio to be exposed to rain or moisture.
This clock radio should not be exposed to direct sunlight, very high or low temperature, moisture, vibration, or placed in a dusty environment. Do not use abrasives, benzine, thinners, or other solvents to clean the surfaces of the clock radio. To clean it, wipe with a mild non-abrasive detergent solution on a clean soft cloth.
Never attempt to insert wires, pins, or other objects into the ventilation holes or openings on the clock radio.
Note: When setting the Clock or Alarm times remember that this clock radio has a 24 Hour clock mode.
DIMMER FUNCTION
Press the SNOOZE/DIMMER button (1) to adjust the display intensity.
AC POWER (EXTERNAL AC ADAPTER)
For your own safety read following instructions carefully before attempting to connect this clock radio to the mains with external power transformer. This unit is designed to operate on DC-4,5V only. Connecting it to other power sources may damage it.
SPECIFICATIONS
FM Band: 87.5 to 108 MHz
AM Band: 522 to 1620 KHz
Power Supply: DC-4,5 V
Power Consumption: 3W
Design and specifications are subject to change without notice.

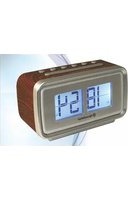

Brand : ROADSTAR
Model : CLR-1966/CR
Category : Radio