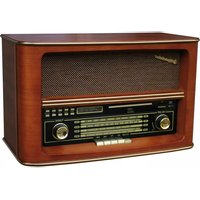
HRA-1550USMP - Radio ROADSTAR - Free user manual and instructions
Find the device manual for free HRA-1550USMP ROADSTAR in PDF.


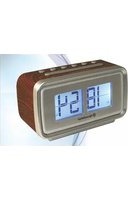
| Product type | Radio alarm clock with MP3/USB player |
| Brand | Roadstar |
| Model | HRA-1550USMP |
| Radio bands | FM, AM (MW) |
| Output power | 2 x 3 W RMS |
| Power supply | Mains 230 V ~ 50 Hz or batteries (not included) |
| Power consumption | 10 W max |
| Dimensions (W x H x D) | 280 x 140 x 100 mm |
| Weight | 1.2 kg |
| USB player | Yes, MP3 compatible |
| Alarm function | Radio or buzzer |
| Display | Digital LED |
| Speakers | 2 stereo speakers |
| Headphone jack | Yes, 3.5 mm jack |
| Antenna | Telescopic FM antenna, built-in AM ferrite loop |
| Maintenance and cleaning | Disconnect before cleaning; use a soft dry cloth |
| Safety | Do not expose to moisture or extreme temperatures |
| Spare parts and repairability | Contact Roadstar customer service |
| General information | For household use only |
Frequently Asked Questions - HRA-1550USMP ROADSTAR
User questions about HRA-1550USMP ROADSTAR
0 question about this device. Answer the ones you know or ask your own.
Ask a new question about this device
Download the instructions for your Radio in PDF format for free! Find your manual HRA-1550USMP - ROADSTAR and take your electronic device back in hand. On this page are published all the documents necessary for the use of your device. HRA-1550USMP by ROADSTAR.
USER MANUAL HRA-1550USMP ROADSTAR
is a registered Trademark of Roadstar S.A. - Switzerland All rights reserved


INDEX
English Page 1
Deutsch Seite 9
Français Page 17
Italiano Pagina 25
Español Página 33
- Your new unit was manufactured and assembled under strict ROADSTAR quality control. Thank you for purchasing our product. Before operating the unit, please read this instruction manual carefully. Keep it also handy for further future references.

WARNINGS

The exclamation point within the triangle is a warning sign alerting the user of important instructions accompanying the product.

The lightening flash with arrowhead symbol within the triangle is a warning sign alerting the user of "dangerous voltage" inside the unit.

To reduce the risk of electric shock, do not remove the cover. No user serviceable parts inside the unit. Refer all servicing to qualified personnel.
This unit operates on 230V \~ 50Hz. If the unit is not used for a long period of time, remove the plug from the AC mains.
230v\~

This unit must not be exposed to moisture or rain.

The power switch in this unit is mounted on the secondary circuit and does not disconnect the whole unit from the mains in OFF position.
Ensure all connections are properly made before operating the unit.

This unit should be positioned so that it is properly ventilated. Avoid placing it, for example, close to curtains, on the carpet or in a built-in installation such as a bookcase.

Do not expose this unit to direct sunlight or heat radiating sources.
Correct Disposal of This Product (Waste Electrical & Electronic Equipment)

This marking shown on the product or its literature, indicates that it should not be disposed with other household wastes at the end of its working life. To prevent possible harm to the environment or human health from uncontrolled waste disposal, please separate this from other types of wastes and recycle it responsibly to promote the sustainable reuse of material resources.
Household users should contact either the retailer where they purchased this product, or their local government office, for details of where and how they can take this item for environmentally safe recycling.
Business users should contact their supplier and check the terms and conditions of the purchase contract. This product should not be mixed with other commercial wastes for disposal.

2
EnglishEn
HRA-1550USMP NOSTALGIC HOME STEREO RADIO WITH CD/USB/SD MP3 PLAYER.
INSTRUCTION MANUAL
Please read this instruction manual carefully and familiarize yourself with your new HiFi system before using it for the first time. Please retain this manual for future reference.
LOCATION OF CONTROLS
- MP3/USB Port
- SD/MMC card Port
- CD Door
- CD LED Display
- CD/USB/SD Play/Pause Button
- CD/USB/SD Stop Button
- CD/USB/SD Program Button
- CD/USB/SD Repeat Button
- CD Open/Close Button
- CD/USB/SD Turning Switch
- CD/USB/SD 10+ Button
- CD/USB/SD 10- Button
- Tuning Knob
- CD/USB/SD Next Button
- CD/USB/SD Back Button
- Power Indicator / FM Stereo Indicator
- Shortwave 2 Button
- Shortwave 1 Button
- FM-ST Button
- AM Button
- CD/USB/SD Button
- SW2 Station
- SW1 Station
- Volume on /off Knob
- FM Station
- AM Station
- FM/SW1/SW2 Antenna
- AC power cord
3
- Audio signal L/R output port
- Audio signal L/R input port
- 3.5mm Earphone jack
CONNECTING TO POWER
Before switching on make sure that the voltage of your electricity supply is the same as that indicated on the rating plate.
For your own safety read the following instructions carefully before attempting to connect this unit to the mains.
This unit is designed to operate on AC 230V 50Hz current only. Connecting it to other power sources may damage the unit.
CAUTION
To prevent electric shock disconnect from the mains before removing cover. No user serviceable parts inside. Refer servicing to qualified service personnel.
SAFETY PRECAUTION
Do not allow this unit to be exposed to rain or moisture.
Mains Supply: 230V 50Hz - AC only
This symbol means that this unit is double insulated. An earth connection is not required.
POWER SUPPLY
Remove the stereo carefully from the box, retaining the packaging for future use.
AC POWER OPERATION
Connect the plug to a mains power inlet 230V AC \~ 50 Hz.
Note: If the Audio from CD, USB, SD or AUX-IN input is missing for 15 or more than 15 minutes, the unit can switch OFF itself. If you want to turn the unit on after it switches off itself, please turn the VOLUME ON/OFF Knob to OFF position first, and then turn the unit on.
FM TUNER
note: If none of function buttons is pressed, the default state will be FM after the unit is turn on.
1) Switch the function knob to AM/FM-ST/SW1/SW2 position.
2) Turn the Tuning Knob (13) to tune to your favourite station.
4
EnglishEn
3) In order to receive a better FM-ST/SW1/SW2 program, extend the rod antenna (27) as long as possible, and then rotate the antenna with 360 degrees, until it can receive the signal clearly.
4. FM STEREO indicator (16), when it receives a clear and stable radio station of FM-ST, the color of Power Indicator / FM Stereo Indicator will change to green blue from green, it is in stereo state.
PLAYING COMPACT DISC
Note: If there is error during the playing of CD / USB / SD card occasionally, please turn off the unit and restart it. Then it can return to normal playback.
Handle Compact Discs
- To remove a CD from its storage case, press down on the centre of the case and lift the disc out.
- Hold the disc by the edges. Avoid touching the recorded side of the disc.
Loading CDs
- Press the CD / USB button, then press OPEN / CLOSE button to open the CD door. (Do not force to open the CD door by hand at any time.)
- Place the CD in the compartment with the label side facing upwards.
- Close the CD door by hand. When fully closed, there will be "LOAD" appears on LED display and CD will turn after about ten seconds. Then the LED Display will indicate the total number of tracks on the disc.
Please note:
- Do not put anything other than a CD in the compartment. Other objects can damage the mechanism.
- Do not force to open/close the CD door by hand at any time.
- Keep the CD door closed when not in use to prevent dirt and dust from getting into the mechanism.
● Never insert more than one CD at a time. - If a disc is deeply scratched or too dirty, it may not play.
Playing CD
- When the disc is put into the unit, the unit will read the disc and display the total number of the tracks.
- If the disc is in CD format, the CD indicator will light.
- If the disc is in MP3 format, the MP3 indicator will light.
- If the disc is in WMA format, the WMA indicator will light. After displaying the total number of the tracks, the unit will play from the 1st song automatically.
- Press STOP button to stop playing.
- After pressing STOP button, you can press OPEN/CLOSE button to open CD door to get out of the CD disc at any time.

5
Pause
- To stop a track temporarily, press Play/Pause Button. The disc will pause, LED Display flashing at the current track position. The Play indicator light up.
● To resume play, press Play/Pause Button again.
The BACK/NEXT function can be used at any time during playing.
- Press NEXT button once to select next track. If it is the last track of the disc, the player will move to track1.
- Press BACK button once to select last track. If it is the first track of the disc, the player will skip to the last track. It will stop playing automatically after finish playing the last track, and the PLAY/PAUSE Indicator will not light. (If you want it continue to play, please press PLAY/PAUSE button again. Then it will play from the first track.)
- If there are many tracks in disc (MP3/WMA) or USB or SD card, you can press "10+ (FOLDER)" button or "10- (FOLDER)" button to select tracks quickly when it is playing. You can press "10+ (FOLDER)" button or "10- (FOLDER)" button to select file to play tracks when it stops playing. For example, if it displays "F 01", it starts to play the first track that in the first file.
- Press "10+" or "10-" button to skip ten tracks forwards or backwards to play tracks when it is playing. When it is in last few tracks, press "10+" button once, it will skip to the last track.
- When it stops playing, press "10+" or "10-" button every time, it will skip to next file or last file to play tracks.
PROGRAM TO PLAY
- Press "STOP" button to stop playing, it will display the total number of the tracks.
- Press "PROGRAM" button once, it will display "P 01".
- Press "BACK" or "NEXT" button to choose the tracks that you want to listen to, and press "PROGRAM" button once again.
- At this time, the display will show "P02", then you can program 2nd track. (It can program 20 tracks at most if in CD format. It can program 99 tracks at most if in MP3/WMA format)
- Press PLAY/PAUSE button, Play indicator will light, and it will start to play from the first track that you choose.
● After finish playing all the programmed tracks that you choose, the CD will stop automatically. - If you want to cancel the tracks that you choose, press STOP button.
- REPEAT, BACK, NEXT function can also work after program.
6
EnglishEn
Note: 10- and 10+ Button cannot work when playing the programmed tracks.
REPEAT PLAYING
You can set repeat playing the disc or the tracks that you choose.
REPEAT PLAYING ONE TRACK
When CD/USB / SD CARD is playing:
- Press REPEAT button, the REPEAT Indicator glitters. Then a selected song will be continuous playing until you press STOP button to make the REPEAT Indicator off or press REPEAT button twice.
- The tracks you choose will repeat playing till you press STOP button to make REPEAT indicator out, or press Repeat button twice to make REPEAT indicator out.
REPEAT PLAYING ALL TRACKS
When CD/USB/ SD is playing:
- Press REPEAT button twice, REPEAT indicator will be on all the time. It will repeat playing the tracks that in the disc/USB/SD till you press STOP button to make REPEAT indicator out, or press REPEAT button once to make REPEAT indicator out.
REPEAT PLAYING PROGRAMED TRACKS
- Choose the tracks that you want to program, press PLAY/PAUSE button to play programmed tracks from the first one.
- Press REPEAT button once, it will repeat playing the track that you choose, REPEAT indicator will flash. The programmed track will be repeat playing till you press STOP button twice, or press REPEAT button twice
- Press REPEAT button twice, it will repeat playing all the programmed tracks and the REPEAT indicator will be on all the time. All the programmed tracks will be repeat playing till you press STOP button once, or press REPEAT button once.
Note: 10- and 10+ Button cannot work when repeat playing the programmed tracks.
USING OF USB/SD
- Insert an USB/MP3 player/SD/MMC card first.
- Press CD/USB function switch, then press CD/USB button to select to play USB or SD/MMC card.
7
- When it finish reading and display the total tracks, the machine will play from the first track that in USB/SD/MMC card automatically. You also can use the functions (such as FAST FORWARD, FAST BACKWARD, PROGRAM and REPEAT PLAYING).
CONVERSION OPERATION OF CD/USB/SD
While CD or USB or SD is playing, you can convert CD and USB/SD by pressing CD/USB button, CD and USB indicators be converted too. After finish converting, it will start to play from the first song of CD/MP3 or USB or SD.
Note:
a. This unit doesn't have charging function. If you want to play MP3 or other machine that with batteries by this unit, please take out the batteries before you connect the MP3 or other machine to USB port. Otherwise it will damage this unit.
b. It can not read all the MP3 machine which sell on the market.
c. Please stop playing USB or other operation before take out the USB to prevent destroying it.
USING OF AUX IN
When it is playing RADIO (FM/AM/SW1/SW2), plug the 3.5mm RCA cord into AUX IN port (30), it will turn to Aux in function once RADIO (FM/AM/SW1/SW2) are disconnected. It can be connected with external audios' Line Out jacks.
Please adjust the volume of external audio to make sure the output volume in best quality.
Note: When AUX IN is not in use, please take out Aux in cord from the unit, otherwise there will be no sounds from the unit while using other functions.
USING OF LINE OUT
When it is playing CD/USB/SD/RADIO (AM/FM-ST/SW1/SW2)/AUX, plug the 3.5mm RCA cord into LINE OUT port (29). It can be connected with Aux in port of external audios' amplifier.
USING OF HEADPHONE
When you put the headphone into the earphone jack, the sound will be output through headphone, and no sounds from speakers.
Care & Maintenance
Cleaning CDs
* Use a soft cloth to wipe off any fingerprints and dust from the disc surface.
* Wipe in a straight line from the centre to the outside of the disc. Small dust particles and light stains will not affect reproduction quality.
8
EnglishEn
* Never use chemicals such as record sprays, anti-static sprays, benzene or thinners to clean your CDs.
^ To reduce the risk of scratches, always put CDs back in their cases after use.
* Do not expose CDs to direct sunlight, high humidity or high temperatures for long periods.
* Do not stick paper or write anything on either side of the CD.
* Only discs displaying this symbol can be played on this unit.
Cleaning the Lens
* A dirty lens will cause sound skipping. If the lens is very dirty, the CD may not work.
* Please use the cleaning disc.
SPECIFICATIONS
Technical specifications
| Power input | 230 V_i ~50Hz |
| Volume Output | 3.5 X 2 W |
| Power consumption | 30W |
| product size | 510 £^2 290 £^3 340mm |
| Net weight | 8.2 kg |
Radio frequency range
| FM | 87.5-108 MHz |
| AM | 520-1600 KHz |
| SW1 | 2.5 – 7.0 MHZ |
| SW2 | 7.5 – 22 MHZ |
CD player
| Frequency Response | 100Hz - 16 KHz |
| Headphones | 3.5 mm stereo headphone plug |
Design and specifications are subject to change without notice.
SICHERHEITSHINWEISE

Volume Output 3,5 X 2 W
Output Audio 3.5 X 2 W


- INDEX
- WARNINGS
- 230v\~
- Correct Disposal of This Product (Waste Electrical & Electronic Equipment)
- 2
- EnglishEn
- HRA-1550USMP NOSTALGIC HOME STEREO RADIO WITH CD/USB/SD MP3 PLAYER.
- INSTRUCTION MANUAL
- LOCATION OF CONTROLS
- 3
- CONNECTING TO POWER
- CAUTION
- SAFETY PRECAUTION
- POWER SUPPLY
- AC POWER OPERATION
- FM TUNER
- 4
- PLAYING COMPACT DISC
- Handle Compact Discs
- Loading CDs
- Please note:
- Playing CD
- Pause
- PROGRAM TO PLAY
- REPEAT PLAYING
- REPEAT PLAYING ONE TRACK
- REPEAT PLAYING ALL TRACKS
- REPEAT PLAYING PROGRAMED TRACKS
- USING OF USB/SD
- 7
- CONVERSION OPERATION OF CD/USB/SD
- Note:
- USING OF AUX IN
- Note: When AUX IN is not in use, please take out Aux in cord from the unit, otherwise there will be no sounds from the unit while using other functions.
- USING OF LINE OUT
- USING OF HEADPHONE
- Care & Maintenance
- Cleaning CDs
- 8
- Cleaning the Lens
- SPECIFICATIONS
- SICHERHEITSHINWEISE
Brand : ROADSTAR
Model : HRA-1550USMP
Category : Radio