
CLR-2860UMP - Radio ROADSTAR - Free user manual and instructions
Find the device manual for free CLR-2860UMP ROADSTAR in PDF.


| Product Type | Car Radio / Receiver |
| Model | CLR-2860UMP |
| Brand | ROADSTAR |
| Power Supply | 12V DC (negative ground) |
| Radio Tuner | FM/AM with 30 preset stations |
| Media Playback | USB, MP3 playback |
| Audio Output | 4 x 40W max power |
| Dimensions (W x H x D) | 178 x 50 x 160 mm (DIN size) |
| Weight | Approx. 0.8 kg |
| Display | LCD with backlight |
| Audio Features | Built-in equalizer (preset EQ modes) |
| Connectivity | Front USB port, AUX input |
| Remote Control | Included (wired or IR) |
| Safety | Detachable faceplate for theft prevention |
| Cleaning | Use a soft, dry cloth; avoid liquids |
| Spare Parts & Repairability | Contact ROADSTAR service center |
| General Information | User manual available for download |
Frequently Asked Questions - CLR-2860UMP ROADSTAR
User questions about CLR-2860UMP ROADSTAR
0 question about this device. Answer the ones you know or ask your own.
Ask a new question about this device
Download the instructions for your Radio in PDF format for free! Find your manual CLR-2860UMP - ROADSTAR and take your electronic device back in hand. On this page are published all the documents necessary for the use of your device. CLR-2860UMP by ROADSTAR.
USER MANUAL CLR-2860UMP ROADSTAR
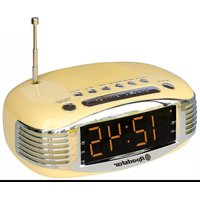
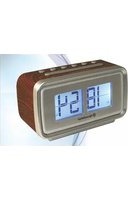
Kitchen Alarm Clock with PLL FM RDS Radio And CD player
INSTRUCTION MANUAL
Please read the safety and operation instructions before using the unit.


CAUTION RISK OF ELECTRIC SHOCK DO NOT OPEN

CAUTION : TO REDUCE THE RISK OF ELECTRIC SHOCK, DO NOT REMOVE COVER (OR BACK). NO USER SERVICEABLE PARTS INSIDE. REFER SERVICING TO QUALIFIED SERVICE PERSONNEL.

The lightning flash with arrowhead symbol, within an equilateral triangle, is intended to alert the user to the presence of un-insulated “dangerous voltage” within the product’s enclosure that may be of sufficient magnitude to constitute a risk of electric shock to persons.

The exclamation point within an equilateral triangle is intended to alert the user to the presence of important operating and maintenance (servicing) instructions in the literature accompanying the appliance.
WARNING :
TO REDUCE THE RISK OF FIRE OR ELECTIC SHOCK, DO NOT EXPOSE THIS APPLIANCE TO RAIN OR MOISTURE.
CAUTION
- DO NOT REMOVE EXTERNAL CASING TO EXPOSE THE ELECTRONICS. NO USER SERVICEABLE PARTS ARE WITHIN.
- IF THE SUPPLY CORD IS DAMAGED, OR YOU ARE EXPERIENCING PROBLEMS WITH THIS PRODUCT, CONTACT AN AUTHORISED REPAIRER. DO NOT USE THE PRODUCT UNTIL IT HAS BEEN REPAIRED.
- USE OF CONTROLS OR ADJUSTMENT OR PERFORMANCE OF PROCEDURE OTHER THAN THOSE SPECIFIED HEREIN MAY RESULT IN HAZARDOUS SITUATION.
- DO NOT INSTALL THIS EQUIPMENT IN A CONFINED SPACE, SUCH AS A BOOK CASE OR BUILT IN CABINET.
- THIS EQUIPMENT MUST NOT BE EXPOSED TO DRIPPING OR SPLASHING.

The crossed out “Wheelie bin” is intended to show that this appliance must not be placed with ordinary household waste.
When this appliance has reached the end of its useful life. It must be disposed of in accordance with local by-laws. Consult our local waste disposal authority (WEEE Directive)
CLR-2860UMP Kitchen Radio with CD/MP3/USB player
General Description
- FM radio by Digital Tuning System (DTS) with PLL technology
- RDS feature provide radio station name display & automatic time up-date
- CD/MP3/USB playback function provided
- Negative LCD Display with Blue back light
- 12/24 Hour clock display format (User select at mode key)
- Built in calendar with auto leap year handling within 2000-2099
- Alternative display of clock and date is programmable
-
2 alarms which can be set to 4 alarm mode (daily, weekday, week-end or one day independently)
-
AOT (Auto OFF Timer) function available up to 90 Minutes
-
Alarm output can be set to radio, CD or buzzer
-
Ascending Alarm for the buzzer sounds progressively faster in 4 levels
-
SDA (Special Date Alert) function
-
Backup battery (3V) for keeping preset data and clock running
-
64 preset radio station for total 2 different user
-
Automatic/Manual search Up/Down features are provided
-
A.M.S.(automatic memory store) & Memory review function provided
-
Electronic Volume Control provided
-
Easy step key-lock function to prevent accidental keying
-
back light with high-low dimmer
-
Radio frequency range: 87.5 - 108.0MHz
-
Remote control function provide
-
AUX in function provide for play back external audio product
-
When the unit no voice output last in 15 minutes on CD mode and AUX IN mode, it will be entered the stand-by mode.
24 Working both table & under cabinet

INSTALLATION
With the supplied mounting plate you can install the appliance under, for example, a wall cupboard. For the installation of the appliance proceed as follows:
- Slide the mounting plate to the rear and remove the mounting plate.
- Select a suitable installation location for the appliance (see also the section Set-up location requirement).
- Hold the mounting plate under the installation location. Thereby the front edge of the mounting plate should be approx. 2.2cm behind the front of the cupboard so that, after the installation, the appliance is flush with the cupboard.
- Mark the 4 securing points with a pencil.
- Using a spike or nail, make a small depression at the retaining lug into the respective depression on the mounting plate.
- Firmly screw the mounting plate on with the supplied screws(see illustration)
- Place the appliance aslant, with the recesses in the top face of the appliance, in the mounting plate until the appliance audibly locks into place.
- Check to ensure that the appliance is securely seated.
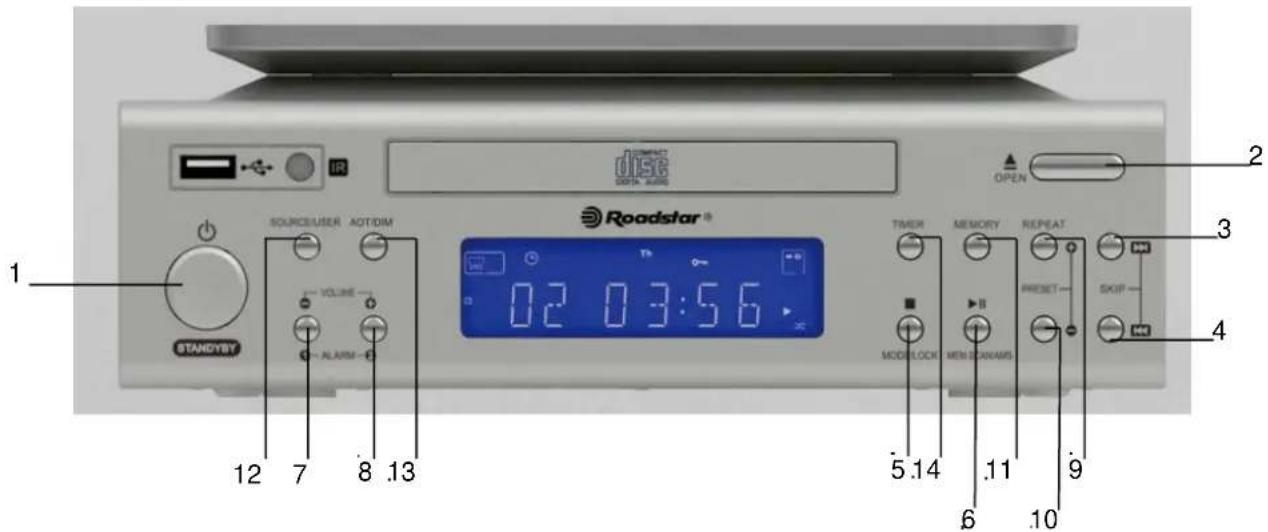
□ Key List:
- Power:
Power on/Off - Open : Control of CD tray
- UP | FF : Station tune up and forward of CD playback
- DOWN|RW : Station tune down and backward of CD play back
- Mode | Stop : Mode set and Stop of CD playback
- MEM.Scan/AMS | Pause /Play : Preset Station review ,AMS, Play & Pause of CD play back
- AL1/VOL- : Alarm 1 setup and Volume decrease
- AL2/VOL+ : Alarm 2 setup and Volume increase
- Preset+ / Repeat : Call back preset station for up
- Preset- : Call back preset station for down
- Prog. /MEM : Station Memory
- FUNC/user : CD、AUX、FM、USB selector / user select
- AOT/Dim : Automatic Off Timer and Dimmer control
- Timer Opera for timer function
1 Start to Using the device
When unit is powered up first time, Automatic update function will start automatically and "PLEASE WAIT FOR SETTING THANKS" is flashing on LCD. When press any key to terminate this function.
Note: When unit is powered up first time, Automatic update function will start automatically in 3\~5 minutes. If the signal is received, time display on LCD accordingly
When the automatic system setting had been terminate by user, the date and clock are defaulted to 01.01.2012, 0:00.
• The alarms are defaulted to 0:00,
• The radio is switched off
• It then switches to auto-run mode
- Default back light automatically set to dim from 23:00 to 05:59
2 How to setup the device:
When Radio is Off (Auto-Run Mode), Press
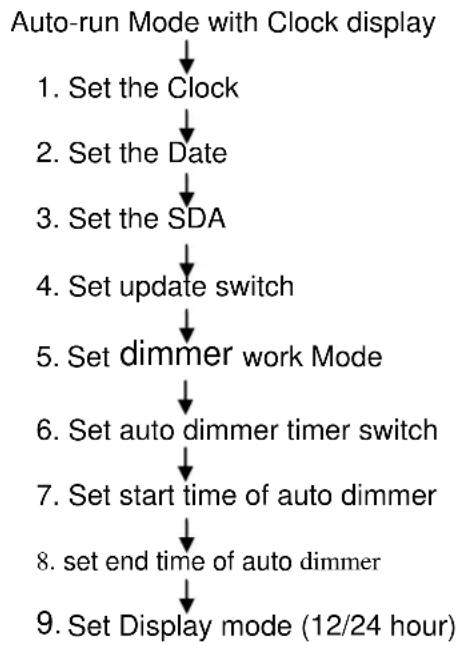
flowchart
graph TD
    A["Auto-run Mode with Clock display"] --> B["1. Set the Clock"]
    B --> C["2. Set the Date"]
    C --> D["3. Set the SDA"]
    D --> E["4. Set update switch"]
    E --> F["5. Set dimmer work Mode"]
    F --> G["6. Set auto dimmer timer switch"]
    G --> H["7. Set start time of auto dimmer"]
    H --> I["8. set end time of auto dimmer"]
    I --> J["9. Set Display mode (12/24 hour)"]

- In clock display mode with Power OFF, the user can select alternative display for clock and date. For details, please refer to the section of selecting alternative display.
- In frequency display mode, the frequency of the radio station being received is displayed together with the band goes solid in the display
- Press
to review/set the alarm-1 when Power Off - Press
to review/set the alarm-2 when Power Off - Only when the radio is ON, press
, or and then again to store the current station into memory. - Only when the Power ON, press
and Vol. -> to adjust speaker volume - When the radio is ON, press
to store preset memory automatically for the current user. - At every minute boundary, the real time clock is compared with the alarm setting if it has been enabled. For details, please refer to the section of 'When alarm is active'
Note: The Radio will active in background for time update at the 3.00 & 5.00 AM
2.1 How to set the clock:
2.1.1 Press
2.1.2 The clock goes flashing
2.1.3 The second keeps counting up once per second
2.1.4 Press
2.1.5 Press
2.1.6 Press and hold
2.1.7 Press
2.1.8 Press other key to start its corresponding function.
2.1.9 When no key has been pressed for 10 seconds, the current setting is confirmed and it switches to auto-run mode
2.2 How to set the date:
2.2.1 Press
2.2.2 The current date goes flashing in the format of dd. mm. yy
2.2.3 Press
2.2.4 Press
2.2.5 Press other key to start its corresponding function.
2.2.6 When no key has been pressed for 10 seconds, the current setting is confirmed and it switches to auto-run automatically.
2.2.7
2.3 How to set the SDA (Special Date Alert):
2.3.1 Press
2.3.2 The DATE & 'SDA 1' goes flashing alternative
2.3.3 Press
2.3.4 Press
2.3.5 Press
2.3.6 Press
2.3.7 Press
2.3.8 Press
2.3.9 Press other key to start its corresponding function.
2.3.10 When no key has been pressed for 10 seconds, the current setting is confirmed and it switches to auto-run mode automatically.
In case of ignore the year the SDA will be active ever year at same date
2.4 Update setting mode:
2.4.1 Press
2.4.2 Press
2.4.3 Press
2.4.4 Press other key to start its corresponding function.
2.4.5 When no key has been pressed for 10 seconds, the current setting is confirmed and it switches to auto-run mode automatically.
2.5 How to set the dimmer:
2.5.1 Press
2.5.2 press "Down" or "UP" tune off or tune on dimmer function
| Key Press Display Function | |
| Down DIM OFF Dimmer Off | |
| Up DIM ON Dimmer On |
2.5.3 When no key has been pressed for 10 seconds, the current setting is confirmed and it switches to auto-run mode automatically.
2.6 How to set Automatic Dimmer / Timer:
2.6.1 Press
2.6.2 When the timer switch on, back light will automatically dim from 23:00 \~ 05:59, press any key could be brighter for 60 second.
| Key Press Display Function | ||
| Down | DT OFF | Dimmer Timer off |
| Up | DT ON | Dimmer Timer on |
2.7 How to set Dimmer Timer / Start Time:
2.7.1 The device could let user to select starting time if they want
2.7.2 Press
2.8 Set Dimmer Timer stop time
The device could let user to select starting time if they want.
Press
Press "Down" or "UP" to select end time of timer
2.9 How to set 12/24 hour mode:
2.9.1 Press
2.9.2 Press
2.9.3 Press
2.9.4 Press
2.9.5 Press other key to start its corresponding function.
2.9.6 When no key has been pressed for 10 seconds, the current setting is confirmed and it switches to auto-run mode automatically.
2.10 Alarm Setting:
2.10.1 Press
2.10.2 Press
2.10.3 Press
2.10.4 Press and hold
2.10.5 Press
2.10.6 Press and hold
2.10.7 Press same alarm key, which is
| Output format | LCD display |
| Beep sound | ‘Bell’ symbol goes solid |
| Radio output | ‘Radio’ symbol goes solid |
| CD output | CD icon goes solid |
| Disable | All the ‘Bell’ and ‘Music’ are cleared |
2.10.8 Press other key to start its corresponding function
2.10.9 CD & Radio will walk for 60 Minutes, Buzzer only for 10 Minutes
2.10.10 When no key has been pressed for 10 seconds, the system goes back to auto-run mode
2.11 Cooking Timer Value Preset:
2.11.1 There are 6 preset Cooking timer
2.11.2 Press
2.11.3 Press
2.11.4 Once
2.11.5 Similar to < T 1>, repeat same step to select the desired cooking timer preset memory.
2.12 AOT (Automatically Off Timer):
2.12.1 When device stay in standby, press "AOT" button to tune on radio and AOT function will active
2.12.2 Once "AOT" was press, The current AOT value should show on display, press the key every time will change each 10 minutes, value of timer since 10 to 90 minutes maximum.
2.12.3 The function will automatically start if not any key press for 10 seconds
3 How to work of device
3.1 Using Cooking Timer:
3.1.1 Press
3.1.2 Press
3.1.3 When the timer is running press
3.1.4 When the timer remain 30 seconds, the remind tone "be" will sound, (it also sound at 30s, 25s, 20s, 16s, 12s, 9s, 6s, 4s, 2s & 1s) the time reach to 00.00, the voice "be...be...be...be...be" will be heard for one hour. Press
3.1.5 Press and hold
3.1.6 As the alarm becomes active, the cooking timer, if exists, is terminated immediately.
3.2 When SDA (Special Date Alert) Active:
3.2.1 When the date/month/(year) matches with the SDA which has been enable, alert becomes active.
3.2.2 As the SDA active, Sound of beep toggles at the Speaker for 10 minutes, Muted Radio even radio ON & The "SDA" goes flash on LCD display
3.2.3 Press any key to start its corresponding function and the SDA will be terminate
3.2.4 When SDA is active, even key-lock has been switched on, press any key can terminate alarm.
3.3 When alarm is active:
3.3.1 When the real time clock matches with the alarm which has been enabled, alarm becomes active
3.3.2 As the alarm becomes active, the AOT if exists, is terminated immediately
3.3.3 If Beep sound alarm is selected,
a. Sound of beep toggles at the Speaker
b. Muted Radio even radio ON
c. The duration of alarm is 10 minutes
3.3.4 If Radio alarm is selected,
d. Radio On
e. the duration of the alarm is 60 minutes
3.3.5 Press any key to terminate the currently active alarm, even key-lock has been switched on.
3.4 Using the Radio:
3.4.1 start radio
- Press
once to turn on the unit - Press < Func/User > key to select Radio
- Press
again to turn off the unit
3.4.2 Select User
- Press and hold
for 3 seconds to change the current USER, the selected "USER A" or "USER B" will show on display for 5 seconds.
• Each user arranged 32 memories (User A and memory1 preset in factory)
3.4.3 Recall radio preset memory
• There are 4 preset key for store radio station and cooking timer.
- When the radio is ON, press
- Press
- When new preset memory key is pressed, MUTE is active. When keying the preset memory has been released for 1 second, the selection of preset memory is considered as valid and the radio will be tuned to that frequency immediately with MUTE idle.
- At any time, press other key to start its corresponding function. (When Radio is OFF, same operation for cooking timer memories recall)
3.4.4 Store into memory
- To store the tuning frequency of radio station being received into any of the preset memory, press
- Select the desired memory station and page by pressing the corresponding key until its number goes solid above 'MEM'
- Press
again to confirm the process of storing. Then, 'MEM' goes solid. - When 'MEMORY' is flashing, pressing
or will start turning and exit memory store - Press other key to start its corresponding function.
When Radio is OFF, same operation for cooking timer memories store.
3.4.5 Search Up/Down:
- When the radio is ON, press
once to change the receiving frequency up by 1 step - Press
once to change the receiving frequency down by 1 step. - Press and hold
to search the next radio station by moving the receiving frequency up. - Press and hold
to search the next radio station by moving the receiving frequency down.
3.4.6 Using of A.M.S. (Auto Memory Store)
- When radio is on.
- Press and hold < MEM> for 3 seconds to active AMS mode.
- In this mode, the radio will automatically scan the radio station and store the station that had been scanned until scan up all the frequency or stored all the memory station, it will exit automatically.
When AMS function active, the stored memories will replace by the new scanned radio station.
3.5 Using CD/MP3:
3.5.1 start the CD/MP3
- Press
once to turn on the unit - Press
key to select CD/MP3 - Press
again to turn off the unit
3.5.2 Using CD/MP3 Player
- Press
to open tray of CD and put CD media to tray, press "Open/Close" key again to close door of CD tray, at the moment, device will catch data from CD and "Reading, Please wait" for about 5-10 seconds - Once the CD read and confirm it's workable format, device will play from beginning of play list if not any key press.
- Press "Play/pause" to play of Pause under music play back
- Press "Prog./Mem" to select play back mode as intro, random or repeat
- Press and hold "UP | FF" to fast speed forward, press once to next track
- Press and hold “Down | RW” to Fast speed rewind, press once back to previously track.
3.5.3 Program play
- Press
once to program mode when stop mode. - Press
or to select tack for first of program list. - Press
again to select tack for next. Up to 64 - Press
to confirm the setting and play. - Press
twice to cancel program play
3.6 Using USB:
3.6.1 Start the USB
- Press
once to turn on the unit - Press
key to select USB - Press
again to turn off the unit.
3.6.2 Using USB Player
- Insert USB-Disk into UBS jack, device will reading.
• The device seek complete, device will play from beginning of play list if not any key press. - Press "Play/pause" to play of Pause under music play back
- Press "Prog./Mem" to select play back mode as intro, random or repeat
- Press and hold "UP | FF" to fast speed forward, press once to next track
- Press and hold “Down | RW” to Fast speed rewind, press once back to previously track.
3.6.3 Program play
- Press
once to program mode when stop mode. - Press
or to select tack for first of program list. - Press
again to select tack for next. Up to 64 - Press
to confirm the setting and play. - Press
twice to cancel program play
3.7 Output Level control (Electronics Volume Control)
- When radio, CD or Aux was on,
- Press
- Press
once, to decrease speaker volume by one step. Hold for continually. Protect your ear, don't make it too loud!
3.8 Auto Standby:
- When the unit have no voice output last in 15 min, it will enter the standby mode.
- when the unit haven't got FM signal or AUX have suspend/stop working, CD player have suspend/stop working
3.15 Key-lock:
3.15.1 Press and hold the
3.15.2 Press and hold the
3.16 Using AUX-IN function:
3.16.1 Tune on your sound source device, connect audio cable with 3.5mm jack from source device output into hold of "AUX"
3.16.2 Select output levels refer to "3.5 Output level control" to select a sound output you want.
3.16.3 Control your source device to play back it.
3.17 Battery Backup Memory (Battery not included):
3.17.1 Open cover of battery compartment
3.17.2 Place battery into compartment, tune clockwise to close and lock door
3.18 Using the Remote Control:
3.18.1 Press each button same as unit to control the device.
3.19 LCD Dimmer:
3.19.1 Press
3.19.2 Press and hold < Dimmer > to turn on the adorn light, press

" ELMINATION OF RESIDUES OF ELECTRIC AND ELECTRONIC APPLIANCES BY CONSUMERS RESIDENT IN THE EUROPEAN UNION."
This symbol on the product or in its packaging indicates that it must not be disposed off with other household waste produced in the user's residence. It is the responsibility of the user to dispose off these types of appliances by depositing in a "recycling plant" or at a collection point for the recycling plant so that its electrical and electronic parts can be recycled. The selective collection and recycling of the harmful residues of electric and electronic home appliances and parts at the time its disposal will contribute towards the conservation of our natural resources and will guarantee that it will be recycled in a manner most beneficial to the environment and public health. To gain more information on the points of collection of electric and electronic appliances for recycling, please contact the office of your local municipality or with the recycling plant or return it back to the establishment from which the purchase was made.
Roadstar
CLR 2860UMP
MONTAGE
Please note: Design and characters may change without prior notice.

- Kitchen Alarm Clock with PLL FM RDS Radio And CD player
- WARNING :
- CAUTION
- CLR-2860UMP Kitchen Radio with CD/MP3/USB player
- General Description
- □ Key List:
- Start to Using the device
- How to setup the device:
- How to set the clock:
- How to set the date:
- How to set the SDA (Special Date Alert):
- Update setting mode:
- How to set the dimmer:
- How to set Automatic Dimmer / Timer:
- How to set Dimmer Timer / Start Time:
- Set Dimmer Timer stop time
- How to set 12/24 hour mode:
- Alarm Setting:
- Cooking Timer Value Preset:
- AOT (Automatically Off Timer):
- How to work of device
- Using Cooking Timer:
- When SDA (Special Date Alert) Active:
- When alarm is active:
- Using the Radio:
- start radio
- Select User
- Recall radio preset memory
- Store into memory
- Search Up/Down:
- Using of A.M.S. (Auto Memory Store)
- Using CD/MP3:
- start the CD/MP3
- Using CD/MP3 Player
- Program play
- Using USB:
- Start the USB
- Using USB Player
- Program play
- Output Level control (Electronics Volume Control)
- Auto Standby:
- Key-lock:
- Using AUX-IN function:
- Battery Backup Memory (Battery not included):
- Using the Remote Control:
- LCD Dimmer:
- Roadstar
- CLR 2860UMP
Brand : ROADSTAR
Model : CLR-2860UMP
Category : Radio