USER MANUAL MKA 2000 E EINHELL
natural_image
Line drawing of a portable air conditioner unit with fan and hose (no text or symbols)
MKA 2000 E
1
2

3

natural_image
Three technical line drawings of a mechanical device with no visible text or symbols

natural_image
Technical line drawing of an air conditioner unit with a 30 cm height dimension label (no text or symbols on the device itself)


natural_image
Front view of a car grille with a stylized logo on the grille (no text or symbols)


Inhaltsverzeichnis
- Safety informations
- Layout
- Proper use
- Technical data
- Before starting the equipment
- Operation
- Cleaning, maintenance and ordering of spare parts
- Disposal and recycling
- Troubleshooting
GB
⚠️ Important!
When using the equipment, a few safety precautions must be observed to avoid injuries and damage. Please read the complete operating instructions and safety regulations with due care. Keep this manual in a safe place, so that the information is available at all times. If you give the equipment to any other person, hand over these operating instructions and safety regulations as well. We cannot accept any liability for damage or accidents which arise due to a failure to follow these instructions and the safety instructions.
1. Important safety instructions
●Read and comply with the safety instructions before you start to use the equipment.
- Keep the operating instructions in a safe place once you have read them and give them to all third parties who may also operate the air conditioner.
- Position the equipment in such a way that the mains plug is accessible at all times.
- Check the mains lead at regular intervals for signs of defects or damage. A damaged mains lead may only be replaced by an electrician or ISC GmbH in compliance with the relevant regulations.
●This equipment is not designed for commercial use.
●The equipment must never be used in bathrooms.
●Children or infirm persons may use the equipment only under supervision. Children are not allowed to use the equipment as a toy.
●The air conditioner is only suitable for air-conditioning in small- to medium-sized rooms. Never use it for special purposes such as for the storage of food, precision instruments, plants, animals, paints or works of art, since they could become damaged.
- Check that the actual mains voltage is the same as the mains voltage specified on the rating plate.
●The equipment may only be operated from a properly earthed shock-proof socket.
●For electrical safety purposes we recommend that you install a residual current device circuit-breaker (earth-leakage circuit-breaker).
●Important! Do not extend the cable and never use multiple plugs. Otherwise there is a risk that electrical safety can no longer be guaranteed.
●Never pull the mains plug out of the socket while the equipment is running.
●In the event of any abnormalities in the operation
of the equipment (e.g. smell of burning), immediately switch off the equipment and pull the plug. There is a risk of electric shock or fire damage if the equipment is allowed to continue running with possible defects.
●Never pull the plug out of the socket by pulling the cable. Hold the mains plug firmly to pull it out of the socket. Otherwise there is a risk of damaging the cable.
●Never actuate any switches with wet hands.
Otherwise there is a danger of an electric shock.
●Never allow the cool air to blow directly at you and do not allow the air in the room to become too cold. This may lead to discomfort and may also be harmful to health.
●Never place and plants or animals directly in the path of the flow of cool air. Plants or animals may suffer under the effect of the flow of cool air.
●Never poke fingers or objects in the air outlet vents. The rotating fan can cause injuries.
●Never attempt to repair the air conditioner yourself. Improper repair and maintenance work can result in damage to the equipment and cause fires or damage from condensation water.
●Always switch off the equipment and pull the plug before you start to clean it (risk of injury).
●Never clean the air conditioner with water. This could result in an electric shock or fire.
●Do not use any inflammable agents for cleaning purposes as they could cause a fire or deformation.
●Never touch any metal parts on the inside of the equipment when removing the air filter. You may injure yourself.
- If the air conditioner is not used for a lengthy period of time the room has to be ventilated every now and then, otherwise there is a risk of lack of oxygen.
●Never install the equipment in a room in which combustible gases can be emitted. Emitted gases may collect and cause an explosion.
●Never hold any burning objects close to the equipment if they could be directly affected by the emitted air. This may result in their not being completely burnt.
●Pull the mains plug out of the socket if the equipment is not going to be used for some time.
●Always switch off the equipment and pull out the power plug during a storm. Electrical parts may get damaged as a result of overvoltage.
- If the coolant circuit should develop a leak, switch off the equipment immediately and contact your service partner.
●There is a risk of harmful gas being generated if any of the coolant escapes and comes into contact with a flame. Switch off the equipment
GB
●To avoid electromagnetic interference the device should be kept away from televisions and radios.
●Always place the portable device on a firm, horizontal footing.
●The unit must always be stored and operated in an upright position.
●The unit must never be covered whilst it is operating since this prevents air passing in and out of it, resulting in the unit being damage.
Packaging
The unit is supplied in packaging to prevent it from being damaged in transit. The raw materials in this packaging can be reused or recycled.

CAUTION!
Read all safety regulations and instructions.
Any errors made in following the safety regulations and instructions may result in an electric shock, fire and/or serious injury.
Keep all safety regulations and instructions in a safe place for future use.
2. Layout
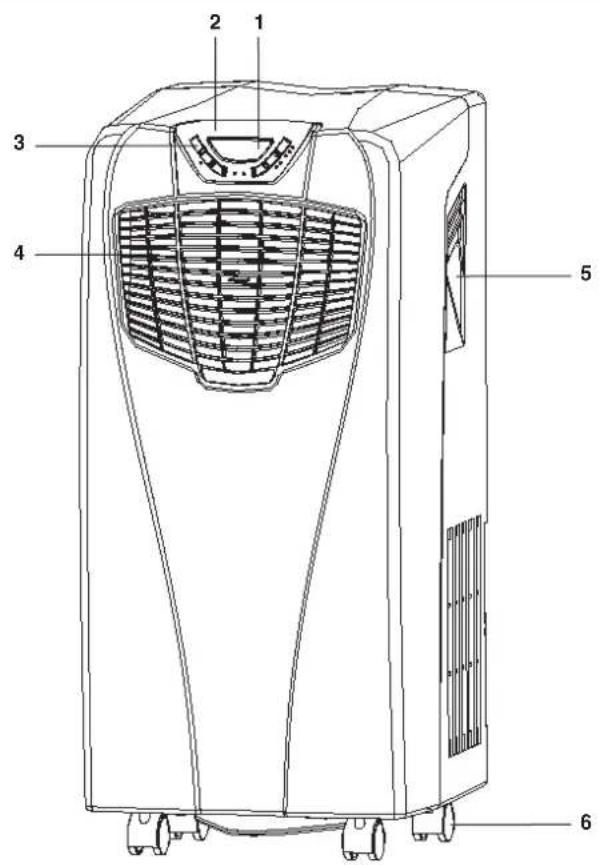
Front (Fig. 1)
- LED display
- Indicator panel
- Function button
- Air outlet grille
- Trough handles
- Guide rollers
Rear (Fig. 2)
- Mains lead hanger
- Air filter
- Air inlet
- Connection operating for exhaust hose
- Air inlet
- Connection for continuous condensation drain
Accessories (Fig. 3)
- Wall adapter
- Exhaust air hose
- Foam with connection opening for wall adapter
- Foam
- Cover cap for window/wall opening
- Water drainage hose
- Activated carbon filter
- Remote control
3. Proper use
The air-conditioning system is only designed to air-condition dry rooms with a maximum room volume of 50 m^3 . The room volume depends on the local conditions. Large window areas, additional heat sources (PC, television, people, etc.), poor wall insulation, etc. serve to reduce this room volume.
The machine is to be used only for its prescribed purpose. Any other use is deemed to be a case of misuse. The user / operator and not the manufacturer will be liable for any damage or injuries of any kind caused as a result of this.
Please note that our equipment has not been designed for use in commercial, trade or industrial applications. Our warranty will be voided if the machine is used in commercial, trade or industrial businesses or for equivalent purposes.
4. Technical data
Mains voltage: 220 - 240 V \~ 50 Hz
Refrigerant: R410
Refrigerant group: L1
Refrigerant filling capacity: 350 g
Cooling capacity*: 2020 W
Power input*: 774 W
Energy efficiency class*: A (EER 2.61)
Area of application: "Room temperature" 18 - 32°C
Max. pressure: 4.2 MPA
Max. dehumidifier output (30 °C/80% RH): 20 l/day
Fan speed levels: 2 + Automatic
Max. air throughput: 260 cbm/h
Rated current consumption: 3.0 A
Compressor start-up current RLA max. 15 A
Sound pressure level: ≤ 54 dB(A)
Housing dimensions H x W x D:
710 x 310 x 350 mm
Unit weight: approx. 22 kg
* Data in accordance with EN 14511
5. Before starting the equipment
●Before you connect the equipment to the mains supply make sure that the data on the rating plate are identical to the mains data.
●Always place the portable device on a firm, horizontal footing.
●The machine must always be in an upright position.
GB
●Never tilt the device by more than 45°! Whenever the device has been transported (inclined positions), leave for at least one hour before connecting to a socket outlet.
●In the cooling function the warm exhaust air must be transferred outside by the exhaust air hose. An opening in the wall or window must therefore be provided.
- Please note that the minimum distance between the equipment and the wall to the side 50 cm and rear must be 36 cm. The minimum distance to other objects at the front must be 2 m.
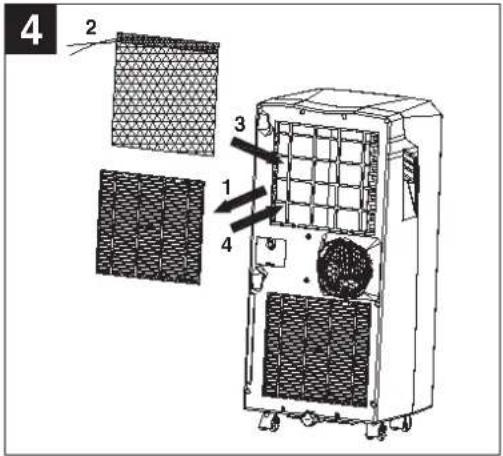
5.1. Installing the activated charcoal filter (Fig. 4)
- Remove the top filter cover from the unit (1)
●Take the activated charcoal filter out of the bag (2)
●Fit the activated charcoal filter on the rear of the unit (3)
●Secure the top filter cover back on the unit (4)
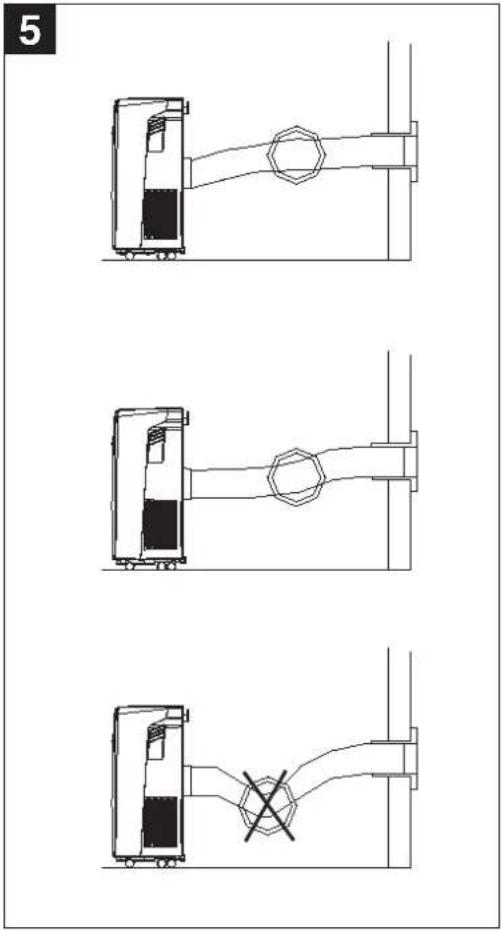
5.2. Installing the exhaust air hose (Fig. 5)
Use only the supplied exhaust air hose ( 120 mm). The length of the exhaust air hose can be varied from between 360 mm to 1500 mm. For the most effective cooling the hose should be as short as possible. Avoid kinks are excessive bends in the hose so that the exhaust air can be transferred out without hindrance. If you ignore this advice, the device as a whole may overheat and shut down. This could result in damage to the device.
Warning!
The length of the exhaust air hose is matched to the technical specifications of the device. Never extend the hose as this could lead to malfunctions or faults on the device.
Under certain circumstances a partial vacuum may develop in the room, which will lead to a reduction in the cooling performance of the device. To prevent this from happening you must ensure that there is a supply of air to the room (leave the door to the room slightly open).
Fitting the exhaust air hose through an open window (Fig. 6)
- Secure the exhaust air hose to the connection opening for the exhaust air hose by turning it anti-clockwise.
- Secure the exhaust air hose to the feed-through ring (3) by turning it anti-clockwise. Use the foam parts and shorten them if required. Insert the feed-through ring into the foam opening. The warm air will be removed to the outdoors. Secure
the window so that the foam is kept firmly in place.
Note: Take appropriate precautions to prevent unauthorized entry through the window.
Installing the exhaust air hose through the window or wall (Fig. 7/8)
●Cut or chisel a hole with a diameter of approx. 130 mm in the window or wall.
- Secure the exhaust air hose to the connection opening for the exhaust air hose by turning it anti-clockwise.
●Guide the exhaust air hose (1) through the window or wall (2) and secure it on the outside to the feed-through ring (3) by turning it anticlockwise.
●Screw the feed-through ring to the external wall.
●Place the cover cap on the outside end of the feed-through ring when the unit is not being used.
6. Operation
6.1 Description of the control elements (Fig. 9)
- "ON/OFF" switch
- "TIMER" switch
- "TIMER" LED - timer on
- "UP" switch - higher
- "COMP" LED - compressor running
- "W.F." LED - condensate tray full
- "Down" selector switch - lower
- LED "Fan: Slow"
- LED "Fan: Fast"
- LED "Fan function set"
- LED "Cool mode set"
- LED "Automatic mode set"
- "MODE" switch
- "SPEED" switch – fan speed
- LED indicator panel
- Remote control sensor
6.2 Switching the device on and off
Press the On/Off switch. The device starts up automatically. If the ambient temperature:
●is higher than 23^ C the device will run in cooling mode;
- if it is between 20^ and 23^ the device will run in fan mode.
The status of the device, or mode in which it is running, will be shown by the corresponding LEDs (see indicator panel).
Note: The LCD indicator panel shows the current room temperature (0 -50°C).
GB
To switch the device off, press the On/Off switch again.
Important.
After you have switched off the unit, you must wait at least three minutes before you switch it on again. This protects the compressor from overloads and considerably extends its service life.
The cooling system switches itself off whenever the room temperature is below the value set on the thermostat. The air circulation/ventilation fan continues to run as set. If the room temperature increases again, the cooling system switches on again.
6.3 Selecting the mode
Press the "Mode" selector (MODE) in the sequence "Automatic", "Cool", "Fan". The LED for the selected mode lights up (see indicator panel).
6.4 Setting the set-point temperature
Press the "Warmer" selector (UP) or "Cooler" (DOWN) to set your desired set-point temperature. If you press the "Warmer" or "Cooler" selector, the LCD indicator panel will show your desired set-point temperature. Otherwise the LCD indicator panel always shows the current room temperature.
6.5 Selecting the fan speed
Press the "Fan speed" selector to set the desired fan speed.
The LED for the mode lights up (see indicator panel). If the device is in "Automatic mode" (AUTO) the fan speed will be selected automatically by the device in dependency on the room temperature. The corresponding LED lights up. The "Fan speed" is deactivated.
6.6 Setting the timer
Press the switch for the "Timer" (TIMER) to set the desired operating time (1 - 12 h). The "Timer" (TIMER) LED lights up. If the timer is set, the device starts automatically. If you press the "Timer" switch, the time you have set will be shown in the LCD indicator panel. If the timer has not been switched on, the device will run continuously.
If the unit is connected to the voltage supply and you press the TIMER switch, you can set the time at which you wish the unit to be switched on. If, for example, the timer shows "2", this means that the device will start up automatically in 2 hours time.
6.7 Remote control
All modes and functions can be set using the supplied remote control.
●Use two alkali batteries, type R03 AAA (1.5 V) (not supplied).
●Never use a combination of new and used batteries.
●Never use a battery type other than the specified one.
- If the remote control is not used for a lengthy period of time, remove the batteries to prevent them leaking.
●Dispose of spent batteries properly.
- Point the remote control towards the air-conditioning system. The range is max. 5 meters.
●Direct sunlight and objects can considerably reduce the range of the remote control.
●Handle the remote control with care. Do not drop it and keep it away from heat and moisture.
Inserting batteries
- Open the battery compartment cover.
- Insert two new batteries. Be sure to observe the correct polarity (+/-) of the batteries.
- Close the battery compartment cover.
6.8 SETTING THE AIR FLOW DIRECTION (Fig. 10)
The vertical direction of the air flow is determined by the vertical ventilation grille. It has to be adjusted by hand.
6.9 Draining the condensate in the condensate tray (Fig. 11)
For the cooling mode the device is fitted with a condensate return unit. When the system is in operation the condensate is collected in a trough (approx. contents 1.2 liters) integrated in the device. From there it is evaporated by the condenser and transferred outside by the exhaust air hose.
Note:
If the humidity in the room exceeds 85% (RH), a condensate drainage hose (see section "6.10") is absolutely essential.
ALL OF THE CONDENSATE MUST BE DRAINED OFF BEFORE YOU EVER RELOCATE OR STOP USING THE DEVICE.
Note:
When the condensate tray is full the compressor and the fan motor shut down. The "W.F." LED flashes and a signal sounds. The signal can be disabled by pressing any button. The unit will then be shut down completely.
GB
When this happens, empty the tray as described below:
- Switch off the unit, pull the plug and do not move the unit.
- Push a container under the drain screw (1).
- Unscrew the drain screw (1).
- Remove the rubber bung (2) from the drain opening (3).
- The condensate runs into the container. If the container is smaller than the condensate tray, seal the drain opening (3) with the rubber bung (2) and empty the container. Then repeat the process from point 4.
- Once the condensate tray has been completely emptied, fit the bung (2) and the drainage screw (1) again.
- Start the unit again. The "W.F." LED will no longer flash.
6.10 Draining the condensate with a hose (Fig. 12-14)
ALL THE CONDENSATE MUST HAVE BEEN DRAINED BEFORE YOU START THE FOLLOWING PROCESS.
- Switch off the unit and pull the power plug.
- Unscrew the drain screw (1).
- Remove the rubber bung (2) from the drain opening (3).
- Connect the condensate drainage hose (4) and secure it with a clip
- The drainage hose can be extended with a hose (5) with a diameter of 18mm. If you do so, make sure you use a suitable connector.
Note:
The drainage hose must run to the outside with a slight fall. The "Condensate tray full" indicator is not operational.
7. Cleaning, maintenance and ordering of spare parts
To avoid an electric shock or risk of fire, always pull out the mains plug first before starting any cleaning work.
7.1 Cleaning the air filter (fig. 15)
The air conditioner is fitted with 2 filters.
- Dust filter (close-meshed filter net)
- Activated carbon filter (binds particles in the air and prevents the development of bacteria)
Important: Never use the device without air filters.
1) Dust filter
Remove the filter cover (1 - 3) by pulling it to the rear.
Then remove the activated carbon filter. Use a vacuum cleaner or tap the dust filter gently to remove the dust. If the filter is very dirty, wash it carefully with warm water. Then allow to dry thoroughly.
2) Activated carbon filter
The activated carbon filter is located behind the top dust filter and cannot be washed. Its service life is dependent on the operating conditions. The filter should be inspected and replaced if necessary. The filter cover then has to be fitted back on the device with the activated charcoal filter.
7.2 Cleaning the housing
Use only gentle cleaner and a soft cloth to clean the housing. Never use aggressive media, petrol, alcohol or thinner. Only fit the filter back in place when thoroughly dry.
7.3 At the end of the season
- At the end of the season, let the device run for approx. 3 hours in the fan function (FAN).
●Then roll up the power cable and store it in the storage compartment provided at the back of the device (fig. 15).
●Place a suitable container beneath the condensate drain and remove the plug. The trough then empties (see Chapter 6.9).
●Re-insert the plug in the condensate drain.
Important: If the plug is not inserted or is not inserted correctly, water will escape the next time the device is used again.
●Clean the filter and the housing.
●Re-insert the filter when thoroughly dry.
●Store the device in an upright position, preferably packed in the original box, in a dry and dust-tight location.
7.4 Maintenance
●There are no parts inside the equipment which require additional maintenance.
7.5 Ordering replacement parts:
Please quote the following data when ordering replacement parts:
●Type of machine
●Article number of the machine
●Identification number of the machine
●Replacement part number of the part required
For our latest prices and information please go to www.isc-gmbh.info
GB
8. Disposal and recycling
The unit is supplied in packaging to prevent its being damaged in transit. This packaging is raw material and can therefore be reused or can be returned to the raw material system.
The unit and its accessories are made of various types of material, such as metal and plastic.
Defective components must be disposed of as special waste. Ask your dealer or your local council.
9. Troubleshooting
If the device is operated properly you should experience no problems with malfunctions or faults. In the event of any malfunctions or faults, please check the following before you contact your customer services.
| Problem Rectification measures |
| Device does not work Is the mains plug properly connected?Is there a voltage supply at the mains socket outlet?Was the ON/OFF button pressed?Is the condensation water tank full or not properly inserted? |
| Device does not have a cooling effect or cooling performance is not satisfactory | If the room temperature is below 18°C, the cooling mode will not work.If the room temperature is above 18°C, the cooling compressor will automatically activate after a potential defrosting phase.Is the room exposed to direct sunlight?Are any doors and windows open?Are there a lot of people in the room?Is a device in the room generating a lot of heat? |
| Weak ventilation performance Is the air hose blocked?Is the filter soiled?Is the air inlet or air outlet blocked? |
| The device is too loud Has the device been set up on an uneven surface/at an angle? |
| The compressor does not work Is the condensation water tank full?If the compressor has overheated and the overheating cutout has switched off the compressor, wait until the compressor cools down. |
Have the device inspected by a specialist firm when you have used it for some time.
F
Consumo nominal: 3,0 A
natural_image
Symbol of a trash bin crossed with a diagonal line, no text or numbers present
©Nur für EU-Länder
For EU countries only
Never place any electric tools in your household refuse.
To comply with European Directive 2002/96/EC concerning old electric and electronic equipment and its implementation in national laws, old electric tools have to be separated from other waste and disposed of in an environment-friendly fashion, e.g. by taking to a recycling depot.
Recycling alternative to the demand to return electrical devices:
As an alternative to returning the electrical device, the owner is obliged to cooperate in ensuring that the device is properly recycled if ownership is relinquished. This can also be done by handing over the used device to a returns center, which will dispose of it in accordance with national commercial and industrial waste management legislation. This does not apply to the accessories and auxiliary equipment without any electrical components which are included with the used device.
The reprinting or reproduction by any other means, in whole or in part, of documentation and papers accompanying products is permitted only with the express consent of ISC GmbH.
F
GB Technical changes subject to change
All of our products undergo strict quality checks to ensure that they reach you in perfect condition. In the unlikely event that your device develops a fault, please contact our service department at the address shown on this guarantee card. Of course, if you would prefer to call us then we are also happy to offer our assistance under the service number printed below. Please note the following terms under which guarantee claims can be made:
- These guarantee terms cover additional guarantee rights and do not affect your statutory warranty rights. We do not charge you for this guarantee.
- Our guarantee only covers problems caused by material or manufacturing defects, and it is restricted to the rectification of these defects or replacement of the device. Please note that our devices have not been designed for use in commercial, trade or industrial applications. Consequently, the guarantee is invalidated if the equipment is used in commercial, trade or industrial applications or for other equivalent activities. The following are also excluded from our guarantee: compensation for transport damage, damage caused by failure to comply with the installation/assembly instructions or damage caused by unprofessional installation, failure to comply with the operating instructions (e.g. connection to the wrong mains voltage or current type), misuse or inappropriate use (such as overloading of the device or use of non-approved tools or accessories), failure to comply with the maintenance and safety regulations, ingress of foreign bodies into the device (e.g. sand, stones or dust), effects of force or external influences (e.g. damage caused by the device being dropped) and normal wear resulting from proper operation of the device.
The guarantee is rendered null and void if any attempt is made to tamper with the device.
-
The guarantee is valid for a period of 2 years starting from the purchase date of the device. Guarantee claims should be submitted before the end of the guarantee period within two weeks of the defect being noticed. No guarantee claims will be accepted after the end of the guarantee period. The original guarantee period remains applicable to the device even if repairs are carried out or parts are replaced. In such cases, the work performed or parts fitted will not result in an extension of the guarantee period, and no new guarantee will become active for the work performed or parts fitted. This also applies when an on-site service is used.
-
In order to assert your guarantee claim, please send your defective device postage-free to the address shown below. Please enclose either the original or a copy of your sales receipt or another dated proof of purchase. Please keep your sales receipt in a safe place, as it is your proof of purchase. It would help us if you could describe the nature of the problem in as much detail as possible. If the defect is covered by our guarantee then your device will either be repaired immediately and returned to you, or we will send you a new device.
Of course, we are also happy offer a chargeable repair service for any defects which are not covered by the scope of this guarantee or for units which are no longer covered. To take advantage of this service, please send the device to our service address.
F BULLETIN DE GARANTIE
Chère Cliente, Cher Client,
Stimate clientă, stimate client,