FX-401 E - Elliptical bike REX - Free user manual and instructions
Find the device manual for free FX-401 E REX in PDF.


| Product type | Elliptical trainer |
| Brand | Rex |
| Model | FX-401 E |
| Dimensions (L x W x H) | 150 x 60 x 170 cm |
| Device weight | 45 kg |
| Max user weight | 120 kg |
| Power supply | 2 AAA batteries |
| Screen | LCD with backlight |
| Training programs | 12 preset programs |
| Resistance | 8-level magnetic |
| Heart rate sensor | On the handles |
| Pedals | Non-slip and adjustable |
| Maintenance | Lubricate bearings every 3 months |
| Cleaning | Soft, non-abrasive cloth |
| Safety | Emergency stop and stabilizers |
| Warranty | 2 years |
| Repairability | Spare parts available |
| Spare parts | Contact after-sales service |
Frequently Asked Questions - FX-401 E REX
User questions about FX-401 E REX
0 question about this device. Answer the ones you know or ask your own.
Ask a new question about this device
Download the instructions for your Elliptical bike in PDF format for free! Find your manual FX-401 E - REX and take your electronic device back in hand. On this page are published all the documents necessary for the use of your device. FX-401 E by REX.
USER MANUAL FX-401 E REX
natural_image
Red circular logo with white stylized 'R' and crown motif (no text or symbols)REX
SPORT
FITNESS-GERÄTE-PROGRAMM

natural_image
Exterior view of a modern exercise bike (REX FX-400E) with visible legs, arms, and control panel (no text or symbols on the device itself)BEDIENUNGSANLEITUNG
OPERATING INSTRUCTIONS / ISTRUZIONI PER L'USO
MANUEL DE L'UTILISATEUR / BEDIENINGSHANDLEIDING

Inhaltsverzeichnis
Vorwort D-3
F Fitness-Test...... D-21
Pflege/Wartung D-22
DEUTSCH
Stückliste

Stückliste

ACHTUNG
Trainingsstart
Puls-Programm (CARDIO) (55%/75%/90%/TAG)
Watt-Programm (WATT)
A Manuell (MANUAL)
C Puls-Programm (CARDIO - 55%/75%/90%/TAG)
Identification of important notes GB-25
Trademark and Copyright GB-25
Important safety instructions GB-26
Exploded view GB-27
Parts list GB-28
Assembly GB-31
Workout instructions GB-35
Workout instructions/Notes GB-35
A Intensity GB-35
B Frequency GB-35
C Motivation GB-35
D Organisation of workout sessions GB-35
-
Warming up phase GB-35
-
Workout phase GB-36
-
Cooling down phase GB-36
E Muscle development GB-36
F Weight loss GB-36
Operation GB-37
I-Console+ App GB-37
Button functions GB-38
Display information GB-38
Workout parameters GB-39
Workout programmes GB-40
A Manual GB-40
B Profile programmes GB-40
C Pulse programme...... GB-40
D Watt programme GB-41
E Body fat analysis (BODY FAT) GB-42
Body fat percentage GB-42
BMI (Body Mass Index) GB-42
F Fitness test (TEST) GB-43
Care/Maintenance GB-44
Technical data GB-44
Disposal GB-44
Warranty GB-45
Preface

Congratulations on your purchase of our fi tness machine. You have purchased a really excellent product and will certainly enjoy using it.
To avoid injuring yourself or damaging the machine, please read the operating instructions carefully before using the machine for the first time. Keep the operating instructions in a safe place.
Identifi cation of important notes
Particularly important notes are identified in the operating instructions as follows:

This warning alerts you to possible hazards to your health or life or that of other persons which may occur with the handling or operation of this machine.

This note alerts you to possible hazards for your machine.

This information provides you with additional advice and tips.
Trademark and Copyright
Android is a trademark of Google Inc. All other brand names and product names are trademarks or registered trademarks of the respective owners. Protected trademarks have not been identified as such in this manual. However, this does not mean that they may be used freely.
„Made for iPod“, „Made for iPhone“ and „Made for iPad“ means that an electronic accessory has been specifically developed in order to communicate with or to connect to an iPod, iPhone or iPad according to Apple Inc. standards. Apple Inc. is not responsible for the function of these devices or their standards in co-ordination with the technical and safety requirements of the respective country. Please note that the use of this device may affect the wireless performance of your iPod, iPhone or iPad.
iPad, iPhone, iPod, iPod classic, iPod nano, iPod shuffle and iPod touch are registered trademarks of Apple Inc., registered in the US and in many other countries.
Errors and technical changes reserved. Reprint prohibited
Important safety instructions

Keep the operating instructions in a safe place. Make sure they are included in case you sell or pass the fitness machine on to someone else.

It is important for you to read through the instructions completely before assembling and using the machine.
The safe and highly productive use can only be achieved if the machine is properly assembled, maintained and used correctly. It is your obligation to inform all users of this machine about the hazards and safety precautions before use.
The machine complies with DIN EN 957-1/9 and is suitable only for private home use and may not be used commercially or for therapeutic purposes.
Use the machine only in dry indoor rooms at room temperature. Protect it from moisture, dust/dirt and extreme temperature fluctuations.
Only set up the machine on a solid, level surface and use a protective cover for the floor/carpet. Remove all sharpedged objects from the surroundings and leave a free space of at least 0.5 m around the machine.
Make sure to prevent liquids (including perspiration!) from leaking into the inside of the machine or in the fitness computer.
Use the machine only as specified! If you find defective components during the assembly or the inspection, or if you hear unusual noises during use, stop your training immediately. Do not use the machine until the problem has been remedied.
Before using the exercise machine, check to see if all screws and nuts have been securely fastened and tightened.
The safety level of the machine can only be maintained if it is regularly checked for damage and wear. Have professionals carry out repairs and use only original spare parts.
Keep the machine away from children and house pets. It is only suitable for adults.
The machine is not designed for use by persons with restricted physical, sensory or mental abilities or lack of experience and/or knowledge unless they are supervised by a person responsible for their safety or have received instructions on how to use the machine from such a person.
The approved maximum weight of the user may not exceed 130 kg.
Before you begin training, consult your doctor to determine whether training could represent a risk to your health. Your doctor's advice is imperative if you are taking medication that affects your heart rate, blood pressure or cholesterol level.
Be aware of your body's signals! Incorrect or excessive training can impair your health or even damage it. Stop if any of the following symptoms occur: pain, tightness of chest, irregular heartbeat, shortness of breath, feelings of lightheadedness, dizziness or nausea. If only one of these conditions occurs, consult your doctor before continuing your exercise programme.
Wear suitable clothing when working out! Do not wear loose clothing with which you could get caught in the machine or which could restrict or hinder your movements.
Use caution when lifting and moving the machine to, e. g., prevent injuries to your back. Always use lifting techniques if possible, or get someone to help you.
To operate, use only the supplied original mains adapter. The machine as well as the mains adapter is only intended for indoor operation. The power source to be used may only be a protected 220-240 V/50 Hz power outlet! Mortal danger!
Disconnect the mains plug after your workout or when cleaning or maintaining your exercise machine.
Exploded view

Parts list

Parts list
| No. Name Size Quantity | |||
| 1 Frame 1 | |||
| 2 Foot front 1 | |||
| 3 Frame tube 2 | |||
| 4 Plug 2 | |||
| 5L Transport roll left 1 | |||
| 5R Transport roll right 1 | |||
| 6 Washer D22 x D8.5 x 1.5T 20 | |||
| 7 Spring washer D15.4 x D8.2 x 2T 32 | |||
| 8 Washer D21 x D8.5 x 1.5T 12 | |||
| 9 Screw M8 x 1.25 x 20L 24 | |||
| 9a Screw M8 x 1.25 x 90L 2 | |||
| 9b Screw M8 x 1.25 x 80L 2 | |||
| 9c Screw M8 x 1.25 x 15L 4 | |||
| 10 Display support tube 1 | |||
| 11L Support tube for left footboard | 1 | ||
| 11R Support tube for right footboard | 1 | ||
| 12L Support tube for left handgrip | 1 | ||
| 12R Support tube for right handgrip | 1 | ||
| 13 Bushing #9950ZZ 4 | |||
| 14 Washer D16 x D8.5 x 1.2T 8 | |||
| 15 Plug 2 | |||
| 16 Idler | 1 | ||
| 17 Nut M10 x 1.5 x 10T 2 | |||
| 18 Connecting strut | 1 | ||
| 19 Foot rear | 1 | ||
| 20 Nut M8 x 1.25 x 15 4 | |||
| 21 Pedal | 2 | ||
| 22 Swivel base | 2 | ||
| 23L Upper cover left | 2 | ||
| 23R Upper cover right 2 | |||
| 24 Nut M10 x 1.25 x 7T 2 | |||
| 25 Motor 1 | |||
| 26 C-Clip D22.5 x D18.5 x 1.2T 2 | |||
| 27 Fixing plate | 2 | ||
| 28 Height adjustment | 2 | ||
| 29 Upper computer cable 800L 1 | |||
| 30 Lower computer cable 800L 1 | |||
| 31 Plug 2 | |||
| 32L Brace left for foot pedal | 1 | ||
| 32R Brace right for foot pedal | 1 | ||
| 33 Crank | 2 | ||
| 34 Nut M8 x 1.25 x 8T 1 | |||
| 35 Belt | 1 | ||
| 36L Cover left | 1 | ||
| 36R Cover right | 1 | ||
| 37 Flywheel | 1 | ||
| 38 Wheel | 2 | ||
| 39 Side covering | 2 | ||
| 40 Screw M8 x 1.25 x 20 6 | |||
| 41 Washer D10 x D24 x 0.4T 6 | |||
| 42 Short axle 2 | |||
| 43 Bushing #6004ZZ 2 | |||
| 44 Mains adapter | 1 | ||
| 45 Magnet round | 1 | ||
| 46 Washer D25 x D8.5 x 2T 2 | |||
| 47 Washer D10 x D24 x 0.4T 2 | |||
| 48 Traction cable | 1 | ||
| 49 Cover | 1 | ||
| 50 Cover | 2 | ||
| 51 Nut 3/8"-25UNF x 6.5T 2 | |||
| 52L Handle left 1 | |||
| 52R Handle right | 1 | ||
| 53 Soft grip D30 x 3T x 680L 2 | |||
| 54 Soft grip D23 x 5T x 530L 2 | |||
| 55 Plug 2 | |||
| No. Name | Size Quantity | ||
| 56 Spring | D3 x D19 x 67L 1 | ||
| 57 Screw | D24 x D13.5 x 2.5T 4 | ||
| 58 C-Clip | M6 x 1.0 x 15L 6 | ||
| 59 Washer | M8 x 1.25 x 50L 6 | ||
| 60 Bushing | D26 x D19.5 x 0.3T 1 | ||
| 61 Crank axle 1 | |||
| 62 Belt pulley 1 | |||
| 63 Screw | ST3.5 x 1.27 x 15L 15 | ||
| 64 | Display | SM-2613-71 | |
| 65 Pulse sensor | 2 | ||
| Pulse sensor cable | 2 | ||
| 66 Screw | D21 x D8.5 x 1.5T | 2 | |
| 67 Cover left | 1 | ||
| 68 Cover right | 1 | ||
| 69 Connecting piece | 2 | ||
| 70 Fixing plate for idler | 1 | ||
| 71 Washer | 2 | ||
| 72 Bushing | 14 | ||
| 73 Screw | 4 | ||
| 74A | Cover left | D14 x D6.5 x 0.8T | 2 |
| 74B | Cover right | 2 | |
| 75 C-Clip | 2 | ||
| 76 Washer | 4 | ||
| 77 Washer | 1 | ||
| 78 Bearing | 4 | ||
| 79 Crank cover | M6 x 1 x 6T | 2 | |
| 80L | Fixing plate for left pedal | 1 | |
| 80R | Fixing plate for right pedal | 1 | |
| 81 Handgrip | M10 x 1.5 x 10T 1 | ||
| 82 Nut | M8 x 1.25 x 30L 3 | ||
| 83 Bushing S-16(1T) | 2 | ||
| 84 Cable connector | 2 | ||
| 85 Nut | M6 x 1 x 6T | 1 | |
| 86 Sensor cable | D13 x D6.5 x 1.0T | 1 | |
| 87 Fixing plate for display | 1 | ||
| 88 Nut | M8 x 1.25 x 6T 4 | ||
| 89 Nut | M5 x 0.8 x 10L 1 | ||
| 90 Axle cover | ST4 x 1.41 x 15L | 2 | |
| 91 Screw | D27 x D21 x 0.3T | 1 | |
| 92 Pin | D29 x D11.9 x 9T | 4 | |
| 93L | Rear axle cover left | 2 | |
| 93R | Rear axle cover right | D6 x D19 x 1.5T | 2 |
| 94 Screw | D10 x D24 x 0.4T | 1 | |
| 95 Washer | 1 | ||
| 96 Washer | 1 | ||
| 97 Crank cover | M5 x 0.8 x 10L 4 | ||
| 98 Bushing M5 x 0.8 x 15L 4 | |||
| 99 Screw | 8 | ||
| 100 | Screw | 8 | |
| 101 | Screw | 4 | |
| 102 | Screw ST4.2 x 1.4 x 15L | 4 | |
| 103 | Screw ST4 x 1.41 x 15L | 4 | |
| 104 | Screw ST4 x 1.41 x15L | 2 | |
| 105 | Inner tube | 1 | |
| 106 | Cable | 1 | |
| 107 | Drink bottle holder | 1 | |
| 108 | Screw M5 x 0.8 x 15L | 2 | |
| 109 | Drink bottle | 1 | |
| 110 | Chest strap | Polar T34 1 | |
| 111 | Cable (1) | 1 | |
| 112 | Cable (2) | 1 | |
| 113 | Screw ST3.5 x 1.27 x 15L | 2 | |
| 114 | Pulse cable | 600L | 2 |
| 115 | Screw ST4 x 1.41 x 25L | 2 | |
| 116 | Screw M5 x 0.8 x 12L | 1 | |
Assembly
STEP 1


- Assemble both frame tubes (3) to the rear foot (19). For each case use four screws (9) as well as one washer (6 + 8) and one spring washer (7) in each case (see Fig.).
- Connect both frame tubes (3) with the connecting strut (18). Use both swivel bases for the fixation (22).
- Seal the ends of the frame tubes (3) with the two plugs (4).
- Mount the front and rear foot (2 + 19) to the frame (1). Use four screws (9a + 9b) four cap nuts (20), four spring washers (7) with respectively one washer each (6).
STEP 2


- Mount the left/right support tube for the footboard (11L + 11R) to the crank (33). Use one washer (59), one washer (8) and one screw (40) each.
- Attach the axle cover (90) (see Fig. 2-1).
- Assemble both rear covers (93L + 93R) with one screw each (63 + 100) to the support tubes for the footboard (11L + 11R) (see Fig. 2-2).
- Now fi x the footboards 821) with two screws each (73) to the fi xing plates of the support tubes (11L + 11R) (see Fig. 2-3).
Assembly


- Release the screws of the drink bottle holder from the handlebar support tube (10) (see Fig. 3-1).
- Now push the cover (49) over the handlebar support tube (10) (see Fig. 3-2).
- Connect the upper computer cable to the lower computer cable (29 + 30) (see Fig. 3-3).
- Push the handlebar support tube (10) with cover (49) onto the main frame (1). Make sure not to pinch the computer cable.
- Now fasten the handlebar support tube with four Allen screws (9) as well as one washer (6) and one spring washer (7) each to the frame (see Fig. 3-4).
- Push the cover over the screw connection.
STEP 4


- Connect the cables (55L + 111) and (44R + 112) (see Fig. 4-1 or 4-2).
- Mount the left/right handle (52L + 52R) to the handlebar support tube (10). First use the washer (71), then the cover (23L), the washer (8) as well as the screw (40) for fixation (see Fig. 4-1 / 4-2).
- Now pull the pulse sensor cable of the handgrip (81) up through the hole in the handlebar support tube (10).
- Next, screw the handgrip with two screws (9) and one washer (6) as well as one spring washer (7) each to the handlebar support tube (see Fig. 4-3).
Assembly
STEP 5


- Mount the left/right support tube for the handgrip (12R + 12L) with the left/right support tube for the footboard (11R + 11L). Use one screw (40) and one washer (46 + 41) for each side.
- Fix the left/right cover (74L + 74R) with one screw each (63 + 100) (see Fig. 5-1/5-3).
- Mount the covers (23R) with four screws each (63) to the right/left handle (52R/52L).
- Connect the left/right handle (52R + 52L) with two screws (9) as well as two washers (6) and two spring washers (7) each to the left/right support tube for the handgrip (12R + 12L) (see Fig. 5-2/5-4).
STEP 6


- Connect the upper computer cable (29), the cables of the pulse sensors (65) and the cables (111) and (112) to the display (64) (see Fig. 6-1).
- Fix the display with four screws (101) to the handlebar support tube (see Fig. 6-2).
- Mount the covers (67 + 68) with two screws (63) and three screws (104) (see Fig. 6-3).
- Fix the drink bottle holder (107) with two screws (108) to the handlebar support tube and put the drink bottle (109) in the holder.
Assembly


- Set up the machine at the designated location.
- Use the left and right height regulation at the rear foot to align the home exercise machine so that it stands securely and firmly.
- Insert the plug of the mains adapter (44) into the socket at the front left end of the home exercise machine (see Fig.).
- Then insert the mains adapter into the power outlet. The machine is ready to operate.
Workout instructions
Using your fi tness machine will provide you with numerous advantages. It will improve your physical fi tness, emphasize your muscles, and help you lose weight in conjunction with a calorie-reduced diet.
DESIGNING YOUR WORKOUT/NOTES
To achieve an optimal workout, you should consider several important things regarding the manner (of working out) and organization of your workout before you begin. To improve your health and body, you should consider the following factors when planning your workout:
A Intensity
The workout must be organised in such a way that the physical effort during the workout is higher than your normal effort. But breathlessness or exhaustion may not occur. During an effective workout, your pulse should be between 70% and 85% of your maximum pulse (see also the "Workout Phase" chapter).
During the first few weeks of your workout, your pulse should be at roughly 70% of your maximum pulse and slowly increase to 85% of your maximum pulse in the following weeks and months. The workout requirements could be increased, e.g., by extending the workout duration and/or increasing the levels of difficulty according to your increasing condition. The following resources can help you to check your pulse rate:
a) You can feel your pulse rate yourself and count the beats per minute (e.g. at your wrist) → Measurement of pulse rate by the usual methods.
b) You can measure your pulse with the sensor surfaces attached to the handle.
c) You can also determine your pulse rate using specific calibrated pulse measuring devices.
Pulse measurement by sensor is only an orientation, as movement, friction, perspiration etc. can cause deviations from the actual pulse. The pulse beat related electrodermal effect of some people is so low that the result is insufficient for accurate pulse measurement.
B Frequency
Experts recommend 3–5 workout sessions per week, depending on your training goal. Your workout should be accompanied by a balanced and healthy diet. An average adult requires at least 3 workout sessions per week to change their body weight or improve their condition, or 2 workout sessions per week to maintain their current condition.
C Motivation
To successfully complete a training programme, regularity is a very important point. Mental preparation as well as a fixed time period and space per workout session will also contribute to that goal. We recommend you always keep your personal goal in sight and if possible, to workout only when you are in a good mood. Work out continuously so that each day helps you come closer to your training objective.
D Organisation of workout sessions
There are three workout phases that should be done during every workout:
a) Warming up phase
b) Workout phase
c) Cooling down phase
1. Warming up phase
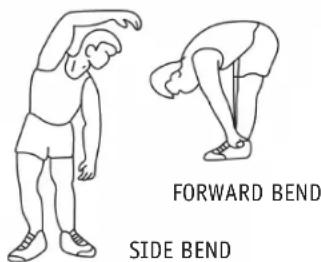
This phase contributes to improved circulation in your body and correct muscle function. It also decreases the risk of cramps and muscle injury. It is therefore recommended to start with a few stretching exercises (see figure) before every workout session. Each exercise should last approx. 30 seconds. Avoid sudden movements and do not strain your muscles. Stop the stretching exercise as soon as it hurts.

2. Workout phase
When working out, make sure you keep an even and consistent speed. Optimal training means choosing a workout that keeps your pulse at a value of approx. 70%–85% of your maximum pulse (target zone). Use the graphic to read the matching target zone for you.

line
| AGE | PULSE | | --- | --- | | 20 | 160 | | 40 | 120 | | 75 | 90 |EThe workout phase should last at least 12 minutes. At the beginning, a workout time of approx. 15–20 minutes is usual.
Once you have reached a higher degree of fitness, you may have to work out longer and harder.
Watch your posture during the workout:
- Keep your torso upright
- Keep your eyes directed forwards
- Movement should occur from your legs
- Do not exercise without holding on! – Your arms are meant to stabilize your body.
- Lift your heels up slightly during the workout just as for the classic cross-country method.
- Change your grip position regularly
3. Cooling down phase
This phase is intended to relax your muscles and your cardiovascular system. To do so, e. g. reduce your speed for approx. 5 minutes. Then repeat the stretching exercises as described in Phase 1. Remember not to make any sudden movements in this phase and do not strain your muscles.
E Muscle development
To develop your muscles with the home exercise machine, you will have to choose a higher workout intensity. You may discover that your fi tness is not suffi cient enough to keep to the workout programme in its entirety.
In this case, modify your workout plan as follows:
You should work out during the warm up and cool down phase as usual. But at the end of the exercise phase, increase the intensity so that your legs receive a more intense workout. However, if you exceed the target zone of your pulse, you will have to decrease your speed!
F Weight loss
For your body to work correctly, it will need "fuel" just like a motor. The muscles receive oxygen from the cardiovascular system of the body. This oxygen supplies energy to the muscles on the one hand and is also used to burn carbohydrates or fats on the other hand. Due to the chemical composition, the conversion of body fats to energy can only then occur, if you do aerobic training, meaning you have sufficient oxygen while exercising. Anaerobic training ("being breathless") causes oxygen deficiency, which means fat cannot be broken down. The body still has enough oxygen at 50% to 80% of the maximum pulse (maximum pulse = 220 - age) and can achieve the best results in this area regarding fat burning. Fat burning is increased the more often and longer you complete such a workout.
Operation
ICONSOLE+ APP
In addition to operating your workout device via display, you can also use a smartphone or tablet PC. The iConsole+ App will also record workouts and track your workout results. Simply download the „iConsole+“ app from the App Store or through Google Play.

The following iOS and Android devices are supported:
Android devices:
Android tablet OS 4.0 or higher
Android tablets with a resolution of 1280x800 pixels
Android phone OS 4.0 or higher
Android phone with a resolution of 800x480 pixels
iOS devices:
iPod touch (4th generation
iPod touch (3rd generation)
iPhone 4S
iPhone 4
iPhone 3GS
iPad 2
iPad
iPad mini
You will find more information to iConsole+ App on our home page: rex-sport.de

Start of workout
-
Start the app.
-
Connect the workout device with your smartphone or tablet PC (password: 0000) by tapping on the Bluetooth icon and selecting the workout device.
-
Choose a workout programme from your smartphone or tablet PC.
-
Begin with your workout.

As soon as the workout device is connected with the smartphone or tablet PC, the display will switch off automatically. During the workout, you will only be able to control the workout device with the app. To prevent your battery from discharging too quickly, you can charge your smartphone or tablet PC via USB cable. You will find the USB port on the back at the upper display edge.
When the device is operated via the app function, the buttons at the ends of the grips cannot be used.
End of workout
-
End and save your workout as necessary.
-
End the app.
-
Switch off the Bluetooth reception of your smartphone or tablet PC.

Approx. 30 seconds after the Bluetooth connection has ended, the display of the workout device will switch back on automatically and you may use it again as accustomed.
BUTTON FUNCTIONS

START/STOP:
Start and stop your training with this button. With the keys on the right handle (see Fig. 2) you can be also control this setting.
AUF/AB (UP/DOWN):
You can select various programmes and values with the UP/DOWN buttons. You can also increase or reduce the intensity levels during your workout with these buttons. Pretend with the arrow keys on the left grip (see Fig. 1) this setting can also change.
RESET:
This button will reset the value you just entered. If the RESET button is pressed for approx. 4 seconds, this will reset all set programme values.
MODUS (MODE):
With this button you can confirm your selected programmes and values (such as workout parameters, personal data, etc.). With the keys on the right handle (see Fig. 2) you can be also control this setting.
KÖRPERFETT (BODY FAT):
This button starts the body fat analysis. Please refer to the Body Fat Analysis chapter for more information.
TEST:
The TEST button lets you carry out a fi tness test. Please refer to the Fitness Test chapter for more information.
DISPLAY INFORMATION
The LCD switches to the SLEEP mode automatically after 4 minutes of inactivity. Pressing any button will interrupt the SLEEP mode.
1. TIME
The computer displays the current workout time. If a specified time is entered, the time will run backwards (countdown) and you will hear an acoustic signal when this time has elapsed (0:00). (Specified time max. 1–99 minutes)
2. SPEED/RPM
The computer indicates the current speed. (0.0-99.9 km/h). Some models will alternately display the pedal revolutions/min. ("RPM")
3. WATT
The computer shows the wattage (10–350).
4. PULSE
The PULSE display reflects your current pulse rate in heartbeats per minutes. The display can only reflect the correct values if you properly grasp both sensors on the handles with your palms. Under the circumstances, it can take up to 2 minutes until the pulse rate is displayed.
5. DISTANCE
The computer shows you the distance you have travelled. If a specified distance is entered, the display will run backwards (countdown) and you will hear an acoustic signal when this time has elapsed (0.00). (Specified distance max. 1–99.9 km)
6. CALORIES
Here the computer shows you the calories you have burned during the workout. When entering a specified calorie count you can choose from 10 to max. 9990 kcal in increments of 10. In this case, the display runs backwards (countdown) to zero. This ends your workout and an acoustic signal sounds.
7. INTENSITY LEVELS/LOAD
Each programme has 32 intensity levels. The LCD displays the levels using 8 horizontal bars as well as numbers (1-32). One bar corresponds to one intensity level. The flashing column reflects the progress of time or the route, depending on the respective specification.
With the UP/DOWN buttons you can increase or decrease the intensity levels even during the ongoing workout (LOAD). This is not possible for programmes which automatically set the intensity levels (such as WATT or the PULSE programme).
WORKOUT PARAMETERS
Workout parameters are objectives you can set for every workout programme. The following workout parameters are available:
| Parameter Setting range Standard | value Step Note | |||
| Time 1:00~99:00 00:00 +/- 1 | ||||
| Distance 1~99,9 0,0 +/- 1 | ||||
| Calories 10~9990 0 | +/- 10 | |||
| Pulse | 30~230 | 0 | +/- 1 | |
| Watt | 10~350 | 120 | +/- 5 | This value can only be specified in the watt programme. |
You can generally select or even combine several exercise parameters. Some parameters cannot be set in particular programmes.
The workout parameters can only be specified after you have selected a workout programme. You will find a more detailed description in the setting description of the respective programmes.
WORKOUT PROGRAMMES
After switching on the machine, the required workout programme can be selected with the UP/DOWN buttons. You can set further sub-programmes (if available) with the MODE button and the UP/DOWN buttons.
The following workout programmes are available:
Manual (MANUAL)
Profi le programmes (BEGINNER 1-4, ADVANCE 1-4, SPORTY 1-4)
Pulse program (CARDIO) (55%/75%/90%/TAG)
Watt programm (WATT)
A Manual (MANUAL)
This workout programme lets you determine the level of diffi culty yourself.
- Select the Manual programme (MANUAL) with the UP/DOWN buttons and confirm with the MODE button.
- If you wish to specify one or several workout para meters, use the MODE button to select the required parameter(s). You set the values with the UP/DOWN buttons and confirm with the MODE button.
- Press the START/STOP button to begin the workout. This is also possible if you have not selected a workout parameter before.
- Now set an intensity level (LOAD) suitable for you with the UP/DOWN buttons.

As soon as one of the preset parameters has counted down to zero, you will hear an acoustic signal and the workout programme stops automatically. If you have preset further parameters, you can continue the programme after pressing the START/STOP button.
During the workout, you can increase or decrease the intensity levels (LOAD) with the UP/DOWN buttons. You can interrupt your workout by pressing the START/STOP button. Press the START/STOP button again to continue your workout. If you wish to stop your workout completely, press the RESET button instead. This will bring you back to the programme selection.
B Profi le programmes
(BEGINNER 1-4, ADVANCE 1-4, SPORTY 1-4)
The Profession I programmes offer a selection of 12 sub-programmes with very different intensity courses.
- Select the Professional I programme "BEGINNER, ADVANCE, SPORTY" with the UP/DOWN buttons and confirm with the MODE button.
- Now set one of the each 4 sub-programmes (1-4) by pressing the UP/DOWN buttons and confirm with the MODE button.
- If you wish to specify the workout parameter TIME, use the UP/DOWN buttons to select the required value and confirm with the MODE button.
- Press the START/STOP button to begin the workout. This is also possible if you haven't selected a workout parameter before.

As soon as the preset parameter has counted down to zero, you will hear an acoustic signal and the workout programme stops automatically.
During the workout, you can increase or decrease the intensity levels (LOAD) with the UP/DOWN buttons. You can interrupt your workout by pressing the START/STOP button. Press the START/STOP button again to continue your workout. If you wish to stop your workout completely, press the RESET button instead. This will bring you back to the programme selection.
C Pulse programme (CARDIO - 55%/75%/90%/TAG)
The intensity level for the Pulse programme is specified by the computer and is adapted automatically according to current pulse and set heart rate or programme. The intensity levels will also increase or decrease during your workout in dependence on your pulse.
$$ 55 \% \text { target pulse } = 55 \% \text { of (220 - Age)} $$
$$ 75 \% \text{target pulse} = 75 \% \text{of (220 - Age)} $$
$$ 90 \% \text{target pulse} = 90 \% \text{of (220 - Age)} $$
TAG
= Target pulse programme (Target pulse you specified)

Make sure you always work out with the target pulse specification suitable for you. Observe the notes and the exercise parameters chapter.
- Select the Pulse programme „CARDIO“ with the UP/DOWN buttons and confirm with the MODE button.
- Set your age using the UP/DOWN buttons and confirm with the MODE button.
- Now set one of the sub-programmes (55%/75%/90%/TAG) by pressing the UP/DOWN buttons and confirm with the MODE button.
- If you wish to specify the workout parameter TIME, use the UP/DOWN buttons to select the required value and confirm with the MODE button.
- Finally, press the START/STOP button to begin the workout. This is also possible if you have not selected a workout parameter before.
As soon as the preset parameter has counted down to zero, you will hear an acoustic signal and the workout programme stops automatically.
You can interrupt your workout by pressing the START/STOP button. Press the START/STOP button again to continue your workout. If you wish to stop your workout completely, press the RESET button instead. This will bring you back to the programme selection.

You may use the chest strap supplied as an alternative to the hand sensors. Make sure you position the strap close to your heart and that the strap has good skin contact.
D Watt programme (WATT)
In this programme, the computer automatically selects the intensity resistance in dependence on the speed and the selected watt value.
- Select the Watt programme (WATT) with the UP/DOWN buttons and confirm with the MODE button.
- Now set the required watt value by pressing the UP/DOWN buttons and confirm with the MODE button.
- If you wish to specify the workout parameter TIME, use the UP/DOWN buttons to select the required value and confirm with the MODE button.
- Finally, press the START/STOP button to begin the work-out. This is also possible if you haven't selected a work-out parameter before.

The computer will emit an acoustic signal when you are stepping too quickly or too slowly.

As soon as the preset parameter has counted down to zero, you will hear an acoustic signal and the workout programme stops automatically.
During the workout you can increase or decrease the watt value (WATT) with the UP/DOWN buttons. You can interrupt your workout by pressing the START/STOP button. Press the START/STOP button again to continue your workout. If you wish to stop your workout completely, press the RESET button instead. This will bring you back to the programme selection.
E Body fat analysis (BODY FAT)

Heart rate monitoring systems may be inaccurate. Over exercise may result in serious injury or death. If you feel faint stop exercising immediately. Health risk!

Please note that the body fat analysis is not suitable for everyone. It is not suitable for children below the age of 7, people suffering from heart diseases, pregnant women, or people taking cardiovascular medication. The computer may display the incorrect values for the following group of people:
• Adults over the age of 70
- Dialysis patients
• People suffering from edemas
• Bodybuilders, professional athletes, intense athletes.
• People with a resting heart rate of 60 or less
See your doctor for an individual consultation before the body fat measurement, as your doctor will either recommend or advise against the analysis.
- Select the body fat analysis programme (BODY FAT) using the UP/DOWN buttons and confirm with the MODE button.
- Set your gender (MALE, FEMALE) by pressing the UP/DOWN buttons and confirm with the MODE button.
- Set your body height by pressing the UP/DOWN buttons and confirm with the MODE button.
- Set your weight by pressing the UP/DOWN buttons and confirm with the MODE button. Measurement begins.
- To measure, curl your hands completely around the sensors and hold the position for approx. 15 seconds.
To obtain a correct result, please observe the following notes:
- Do not move during the measurement!
- Ensure sufficient contact between your fingers and the electrodes.
- Your arms should be stretched out (straight elbows).
- Do not hold your arms too high or too low in front of your body.

If you would like to have your pulse rate displayed during the workout, you do not need to observe the listed points and notes. Here it is more than enough to simply place your palms on the sensors.
The measurement result will be displayed after approx. 15 seconds. You will be able to read the information about your body fat percentage (%) and the BMI value.
The following table will indicate to you how to classify the determined values. Please remember that the measured values are merely reference points to help you choose the most reasonable form of exercise as well as to determine your current physical condition. The measured values are only to be used for the workout and serve no medical purpose.
Body fat percentage
This value indicates how much of your overall body weight consists of fatty tissue (body fat in percentage).
BMI (Body Mass Index)
The BMI applies the body weight to the body surface that is calculated from the square of the body size. The BMI is merely a rough estimate, as it considers neither the stature and gender nor the individual composition of the body mass of fat and muscle tissue of a human.
To exit the programme, press the body fat button again.
Operation
| Symbol - + [Triangle pointing up] [Rhombus] | |||||
| Evaluation underweight athletic/slim normal too high fat percentage | |||||
| Body fat Man (FAT %) | < 13% 13-26% 26-30% >30% | ||||
| Woman | < 23% | 23-36% | 36-40% | >40% | |
| BMI | Man & Woman | < 19 | 20-25 | 25-27 | >27 |
F Fitness test (TEST)
The measurement of your heart recovery rate serves as indication of your physical and athletic condition. The faster your heart rate returns to its normal rate after the exercise (heart recovery rate), the "fitter" you are.
After your completed workout, press the TEST button to start the fitness test.
Then place your hands immediately back on the hand pulse sensors. After 60 seconds, the computer will show the result of the measured heart recovery rate as school grades:
F 1.0 = Very good to F 6.0 = unsatisfactory
It is advisable to work out consistently to improve your heart recovery rate to the value F 1.0.
To return to the programme selection, press the TEST button again.
For the fitness test, use the hand pulse sensors!
Care/Maintenance
We recommend checking all machine parts that could loosen (screws, nuts, etc.) regularly every 2 to 4 weeks, depending on the frequency of use. Use a soft, perhaps slightly moistened cloth to clean. Do not use aggressive cleaning agents. Keep liquids of any type away from the computer and the machine interior, as the liquids could cause considerable functional impairments. The belt in the lower area of the exercise machine can develop rubber skid marks. This is completely normal.
Technical data
Dimensions: approx.
164cm (L)
Weight: approx. 60 kg
Classifi cation: HA
Max. Weight load: 130 kg
x 64
cm
Flywheels: 15 kg
Step resistance: 16-fold computer-controlled
Brake system: Magnetic braking system,
speed
independent
Disposal
Disposing of the fi tness machine (without battery)

At the end of its useful life, the fitness machine may not be disposed of in normal household rubbish. Instead, it must be deposited at a collection point for the recycling of electrical and electronic devices.
Packaging recycling

The packaging material is partially re-useable. Dispose of the packaging in an environmentally friendly manner and add it to the recyclable waste. Dispose of the packaging at a public collection point. Enquire of your city/municipal administration for your nearest available disposal point.
Disposing of the battery
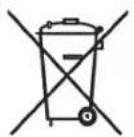
Batteries do not belong in the household rubbish. As the consumer, you are legally obliged to return spent batteries and rechargeable batteries. Dispose of the batteries at a public collection point.
Warranty
- You may only assert warranty claims within a period of max. 2 years as of the purchase date. Our warranty is limited to the elimination of material and fabrication defects, or the replacement of the machine. Realisation occurs according to our choice through repair to the machine. Our warranty is free of charge.
The malfunction and its causes are always examined by our customer service and includes:
- Spare parts delivery for the repair work within the scope of the warranty
- Repair or replacement of the defective component
(Replaced spare parts will be passed to our possession.)
-
For eligible warranty claims, the costs for shipping and the costs for disassembly and installation will be charged at our expense. Warranty claims must be verified by submitting the purchase receipt.
-
The buyer agrees to use the purchased machine for no other purpose than as designated in the operating instructions.
-
The warranty expires if the machine is modified by third parties, or changed by installing outside parts, or defects that occurred in initial conjunction with the change. Further, the warranty claim also expires if the regulations regarding the management of the machine were not observed.
-
Not included in the warranty:
- Expendable items not associated with repair work on recognised malfunctions.
- All maintenance work or other work that developed due to wear, accident or operating conditions as well as use with disregard to the manufacturers' specifications.
• All events, such as noise development, vibrations, wear, etc. that do not affect the machine qualities. SI-Z
- Damage caused by: - installing parts by third parties or the efforts of the user to remedy the damage himself.
- not using original spare parts
– damage caused by lack of care, unsuitable care pro-33378 Rheda-Wiedenbrück E-Mail: si-service@prophete.net ducts, etc. Germany www.rex-sport.de
- Components subject to wear or use (except clear material or manufacturer defects), such as: - Bearings - Lamps - Stickers - Belts - Batteries, etc.
• Costs for maintenance, inspection and cleaning work.
-
Warranty claims only authorize the customer to demand the elimination of the defect. Claims for return or reduction of the purchase price only apply after subsequent improvement fails.
-
The examination and decision about a warranty claim is incumbent upon the manufacturer.
-
The replacement of direct or indirect damage will not be granted.
-
Warranty claims will only be considered if lodged with SI-Zweirad-Service-GmbH directly after finding the defect.
-
An executed warranty will neither renew nor extend the period of warranty. Asserting warranty claims after the period of warranty has expired is precluded.
-
Arrangements other than the above-mentioned only then apply if they are confirmed by the manufacturer in writing.
-
If your machine sustained damage during the delivery, please record all damage on the delivery note. Have the supplier (market, carrier) sign the damage report and then contact us immediately.
-
Should you have a technical problem with the machine you have acquired, our customer service staff are available:

line
| Age | POULS | | --- | --- | | 20 | 160 | | 40 | 120 | | 75 | 100 |APPLICATION ICONSOLE+
5. DISTANZ (distance)
Programmes Pouls (CARDIO) (55%/75%/90%/TAG)
Programmes Watt (WATT)
A Manuel (MANUAL)
C Programmes Pouls (CARDIO - 55%/75%/90%/TAG)

AVVERTENZA
line
| ETÀ | IMPULSO | | --- | ------- | | 20 | 200 | | 40 | 160 | | 75 | 120 |Avvio del training
Programma pulse (CARDIO) (55%/75%/90%/TAG)
Programma Watt (WATT)
A Manuale (MANUAL)
C Programma Pulse (CARDIO - 55%/75%/90%/TAG)
iConsole+ App NL-103
Onderdelenlijst

Onderdelenlijst

Start training
AUF/AB (OMHOOG/OMLAAG):
A Handmatig (MANUAL)


- REX
- SPORT
- Inhaltsverzeichnis
- Stückliste
- Trainingsstart
- A Manuell (MANUAL)
- C Puls-Programm (CARDIO - 55%/75%/90%/TAG)
- Preface
- Identifi cation of important notes
- Trademark and Copyright
- Important safety instructions
- Exploded view
- Parts list
- Assembly
- Workout instructions
- DESIGNING YOUR WORKOUT/NOTES
- A Intensity
- B Frequency
- C Motivation
- D Organisation of workout sessions
- Warming up phase
- Workout phase
- Cooling down phase
- E Muscle development
- F Weight loss
- Operation
- ICONSOLE+ APP
- Start of workout
- End of workout
- START/STOP:
- AUF/AB (UP/DOWN):
- RESET:
- MODUS (MODE):
- KÖRPERFETT (BODY FAT):
- TEST:
- DISPLAY INFORMATION
- TIME
- SPEED/RPM
- WATT
- PULSE
- DISTANCE
- CALORIES
- INTENSITY LEVELS/LOAD
- WORKOUT PARAMETERS
- WORKOUT PROGRAMMES
- A Manual (MANUAL)
- B Profi le programmes
- (BEGINNER 1-4, ADVANCE 1-4, SPORTY 1-4)
- C Pulse programme (CARDIO - 55%/75%/90%/TAG)
- D Watt programme (WATT)
- E Body fat analysis (BODY FAT)
- Body fat percentage
- BMI (Body Mass Index)
- F Fitness test (TEST)
- Care/Maintenance
- Technical data
- Disposal
- Disposing of the fi tness machine (without battery)
- Packaging recycling
- Disposing of the battery
- Warranty
- APPLICATION ICONSOLE+
- DISTANZ (distance)
- A Manuel (MANUAL)
- C Programmes Pouls (CARDIO - 55%/75%/90%/TAG)
- Avvio del training
- A Manuale (MANUAL)
- C Programma Pulse (CARDIO - 55%/75%/90%/TAG)
- Onderdelenlijst
- Start training
- AUF/AB (OMHOOG/OMLAAG):
- A Handmatig (MANUAL)
Brand : REX
Model : FX-401 E
Category : Elliptical bike