460 P Big Wheeler - Lawn mower GUDE - Free user manual and instructions
Find the device manual for free 460 P Big Wheeler GUDE in PDF.

User questions about 460 P Big Wheeler GUDE
0 question about this device. Answer the ones you know or ask your own.
Ask a new question about this device
Download the instructions for your Lawn mower in PDF format for free! Find your manual 460 P Big Wheeler - GUDE and take your electronic device back in hand. On this page are published all the documents necessary for the use of your device. 460 P Big Wheeler by GUDE.
USER MANUAL 460 P Big Wheeler GUDE
natural_image
Icon of an open book inside a black circle (no text or symbols)Deutsch DE 3
Original Operating Instructions
LAWN MOWER
Français FR 17
natural_image
Line drawing of a lawn mower with visible blades and wheels (no text or symbols)

text_image
1 10 11 8 7 4 2 3 12 6 9 13 5 BIG WHEELER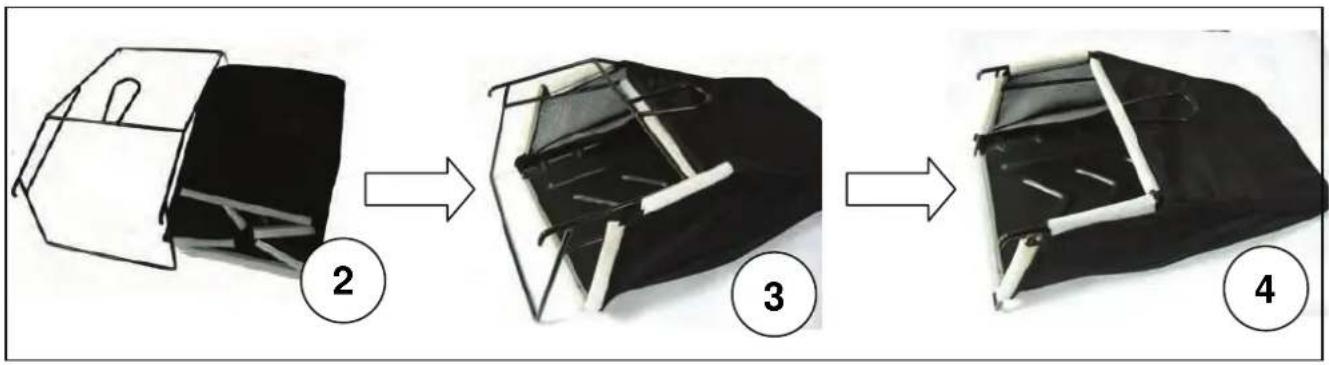
flowchart
graph LR
    A["Step 2: Opening of black fabric"] --> B["Step 3: Rip and fold"]
    B --> C["Step 4: Final packaging with white rods"]
DE

97/68/EC & 2004/26/EC
EN 836/A3:1997+A1+A2+A3+AC
EN ISO 14982:2009
Zertifizierstelle:
TÜV Rheinland LGA Products GmbH
Tillystrasse 2
D-90431 Nürnberg
Deutschland
Referenznummer:
S 5018 6528 0001
CC 5018 6332
e1*97/68SN3-IIA*2004/26*0337*02
SNCH*2000/14*2005/88*1760*00
natural_image
Illustration of a lawn mower with motion arrows indicating cycle (no text or symbols)Betrieb
UPPER LIMIT - OBERGRENZE LOWER LIMIT - UNTERGRENZE
natural_image
3D rendering of a black industrial engine with visible components and no text or symbolstext_image
Technical diagram of a mechanical assembly with labeled parts and a hand symbol indicating safety.natural_image
Close-up of a spark plug being held, showing size and thickness details (no text or symbols on the component itself)Luftfilter
natural_image
3D rendering of a mechanical engine assembly with black housing, yellow valve, and red button (no visible text or symbols)LAGERUNG
Please read carefully the following Operating Instructions before putting the appliance into operation.
A.V.2
Reprints, even partial, are subject to approval. Technical changes reserved.
 | Do you have any technical questions? A claim? Do you need spare parts or the Operating Instructions?You will be helped quickly and without needless bureaucracy at our webpage www.guede.com in the Services part.Please help us be able to assist you. To be able to identify your appliance when claimed, we need to know its serial No.,order No. and year of production. All these details can be found on the type label. Enter the details below for future reference.Serial No.Order No.Year of production: | ||
| Tel.: +49 (0) 79 04 / 700-360 | Fax: +49 (0) 79 04 / 700-51999 | E-Mail: support@ts.guede.com | |
Marking:

B1

B2
B3

B4

B5

B6

B7

B8
B1: Please read and follow the Operating Instructions and safety instructions before putting the appliance into operation.
B2: Risk of injury by thrown-away items when the engine is running. Safe distance must necessarily be adhered to.
B3: Keep an appropriate distance from the cutting knife when operating the appliance.
B4: Risk of explosion – engine to be only refuelled when the appliance is off.
B5: Toxic exhaust gases – appliance to be used outdoors only.
B6: Hearing protection and safety protective glasses to be used.
B7: Switch off the engine and unplug the spark plug before any repair, servicing and cleaning.
B8: Caution: hot surface – risk of burn
Product safety, prohibitions:
 |  |
| Product corresponds to appropriate EU standards | Proven safety |
Technical specifications:
 |  | |
| Engine | Idle | |
 |  | |
| Cutting height Weight | ||
 |  | |
| Cutting width Grass catcher capacity | ||
 | ||
| Capacity | ||
Environment protection:
 |  | ||
| Dispose waste professionally so as not to harm the environment. | Packing cardboard material may be delivered to collection centres for recycling. | ||
 | |||
| Any defective and/or disposed electric or electronic appliances must be delivered to appropriate collection centres. | |||
Package:
| Protect against moisture This side up | |
Technical specifications:
| BIG WHEELER 460 P LAWN MOWER | |
| Engine 2.6 kW/3.5 PS max. at 3,600 per min | |
| Engine type/capacity | DOV 4-stroke / 123 ccm |
| Idle speed 2,900 per min | -1 |
| Cutting width 456 mm | |
| Grass catcher capacity | 50 l |
| Tank capacity 1 litre | |
| Height adjustment 6 levels (25 mm-75 mm) | |
| Noise | LWA 96 dB |
| Vibrations a_hw 4,131 m per s^2 | |
| Weight | 29 kg |
| Order No. 95320 | |
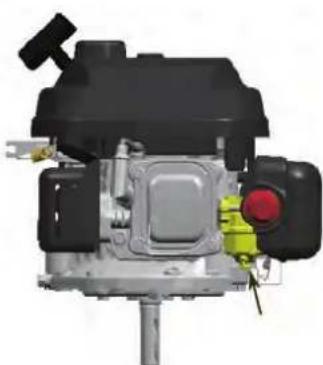
Supply includes plus appliance specification (pic. 1)
- Sliding handle
- Air filter
- Spark plug
- Exhaust/noise suppressor
- Oil filler neck
- Height adjustment lever
- Grass catcher
- Reversing starter
- Type label
- Brake clip
- Gas lever
- Primary pump
- Adjusting; automatic switch-off lever
EU DECLARATION OF CONFORMITY
We,
Güde GmbH & Co. KG
Birkichstrasse 6
D-74549 Wolpertshausen
Germany,
herewith declare that the following appliance complies with the appropriate basic safety and healthy requirements of the EU Directives based on its design and type, as brought into circulation by us.
In case of alternation of the machine, not agreed upon by us, this declaration will lose its validity.
Machine description:
BIG WHEELER 460 P LAWN MOWER
Article No.
95320
Applicable EU Directives:
2006/42/EC
2004/108/EC
2000/14/EC & 2005/88/EC
97/68/EC & 2004/26/EC
Applicable harmonised standards:
EN 836/A3:1997+A1+A2+A3+AC
EN 14982/A3:2009
Place of certification:
TÜV Rheinland LGA Products GmbH
Tillystrasse 2
D-90431 Nuremberg
Germany
Reference number:
S 5018 6528 0001
CC 5018 6332
e11*97/68SA*2004/26*0337*02
2000/14 (2005/88) 1760 / 00
Date/authorised signature: 2 Nov, 2010

Title of signatory:
Managing Director Mr Arnold
Technical documentation:
J. Bürkle FBL; QS
Warranty
The warranty applies exclusively to material defects or manufacturing defects. Original purchase voucher with the purchase date must be provided for lodging a claim in the warranty period. The warranty does not cover any unauthorised use such as appliance overload, violent use, damage by a foreign person or foreign item. Failure to follow the Operating Instructions or assembly instructions and ordinary wear and tear are also excluded from the warranty.
General safety instructions
Instructions
IMPORTANT: The lawn mower may amputate toes and fingers and throw away items. Failing to observe the below-mentioned rules may lead to serious injuries.
WARNING: To prevent unintentional appliance starting when adjusting, transporting or servicing the mower, the spark plug must be disconnected at all times.
WARNING: Exhaust gases and their components contain or, more precisely, emit chemicals acting as carcinogenic agents may damage the fetus or cause infertility.
WARNING: The absorber and other engine components may become very hot in the operating condition and remain hot even when the engine has been switched off. Do not touch these components to avoid burns.
- Do not touch these components to avoid burns. Familiarise with the operating elements and appropriate use of the appliance.
- Keep your hands and legs in safe distance from the rotating parts. Keep safe distance from the appliance exhaust. Caution: do not touch the rotating parts of the appliance.
- The appliance should only be operated by responsible persons who have familiarised themselves with the Operating Instructions.
- Inspect carefully the area where the appliance is to be used. Remove any items that could be thrown away when operating the appliance.
- Do not use the mower if there are persons (children, in particular) or animals around.
- Wear solid shoes and long trousers when working. Never cut when barefooted or in open sandals.
- If not necessary, avoid moving the mower backwards. Look backwards and under you when moving backwards.
- Never use the mower if any protective equipment, e.g. ejection flap and/or grass catcher, is damaged or missing.
- Accessories allowed by the manufacturer to be used only.
- Switch off the knife when crossing any path or road.
- Switch off the engine and release the spark plug - before releasing any blocked parts or cleaning an obstructed ejection channel
- before any check, cleaning or works on the mower
- after a foreign item has been caught by the mower. Check whether the mower is not damaged and remove any damage by restarting the mower. - if there are any abnormally strong vibrations (appliance to be checked immediately)
- Switch off the engine before removing the grass catcher and wait until the knife fully stops.
- Cut only in broad daylight or under adequate artificial lighting.
- Do not operate the appliance when under the influence of alcohol or drugs.
- Never cut in wet grass. Pay attention to where you are putting your legs and hold the guide handle firmly. Guide the mower step by step.
- Release the wheel drive clutch before starting the engine.
- Replace any defective absorber.
- Protective glasses to be worn whenever you work with the mower.
- Remove any obstacles, e.g. stones and branches.
- Check the ground for any unevenness; obstacles may be hidden in high grass.
- Do not cut near slopes and ditches as stability and balance could be affected.
- Do not use the appliance on too steep terrains.
- Be sure to know that the owner or user is liable for any injuries, putting other persons at risk and damage to property.
- Be cautious and switch the mower off if there are children around.
- On slopes, cut along the level line, never upwards or downwards.
- Never let children or other persons not familiarised with the Operating Instructions operate the appliance. The age of the user may be limited by local regulations.
- WARNING: Fuel is highly flammable.
- Fuel to be stored in containers designated for that purpose only.
- Tank to be refuelled outdoors only; no smoking.
- Fuel to be added before starting the engine.
Never open the fuel tank cap and add fuel when the engine is hot or running. - If fuel is spilled, never try to start the appliance. Take the appliance away and avoid an ignition source from being generated around the spilled fuel.
-
Provide safe replacement of the fuel tank and caps.
-
Check always whether the knife, knife bolts and cutting equipment are not damaged or worn before using the mower. Always replace any damaged and worn knives and bolts in the entire set to prevent appliance unbalance. Do not make any alterations to the safety equipment. Check regularly if they work properly.
- Keep the appliance clean, with no grass, leaves or other dirt. Oil or fuel run out to be removed at all times. Let the engine cool down before storing the mower in closed spaces.
- Be particularly careful when changing direction on slopes.
- Never adjust the wheel height when the engine is running.
- When worn out or damaged, the grass catching equipment may no longer work properly and items may be thrown away. Check regularly the mower parts and use spare parts recommended by the manufacturer to replace them if necessary.
- The mower knife is very sharp. Risk of injury! Be particularly careful when servicing the knife and wear protective gloves or cover the knife edges.
- Do not change the basic engine setting and do not overload the engine.
-
Be especially careful when turning the mower or pulling it towards your body.
-
If it is necessary to incline or lift the mower to cross a surface other than grass or when carrying the mower to or from the area to be cut, switch off the knife.
- Release all knife and drive clutches before starting the engine.
- Start the engine as specified in the Operating Instructions and make sure your legs are in a safe distance from the knife.
- Do not incline the mower when starting unless necessary. In such a case, do not incline the mower more than necessary and lift the part reversed from you at all times.
- Do not start the engine when standing in front of the ejection outlet.
- Never lift or transfer the mower when the engine is running.
- Lower the brake adjustment when the engine is off. If the engine is fitted with a stop valve, close the fuel supply after cutting is finished.
- Make sure your posture is always safe when working on slopes.
- Do not let the combustion engine run in closed spaces where dangerous carbon monoxide may accumulate.
ASSEMBLY/PREPARATION
CAUTION: All assembly and servicing works must necessarily be performed when the engine is switched off! Please read the entire Operating Instructions before assembling your new mower.
IMPORTANT: The mower is supplied with no oil and fuel.
Unpacking the mower
Take the mower out of the cardboard and check whether there are no parts left in the package.
Grass catcher assembly (pic. 2) (pic. 3) (pic. 4)
- Take the grass catcher, frame and plastic insertion out of the package (pic. 2)
- Insert the frame in the grass catcher and make sure the clutch on the frame is outside the grass catcher (pic. 3)
- Attach the grass catcher to the frame now (pic. 4)
Handle assembly
IMPORTANT: Dismount the handle carefully to prevent cable squeezing or damage.
- Lift the handle until it snaps in the operating position.
- Remove the protection sleeve, lift the upper part of the handle and assemble it with the lower part. Tighten the safety bolts on both sides of the handle.
- Remove the protection sleeve of the operating handle in the upper part.

natural_image
Illustration of a lawn mower with motion arrows indicating cycle (no text or symbols)Operation
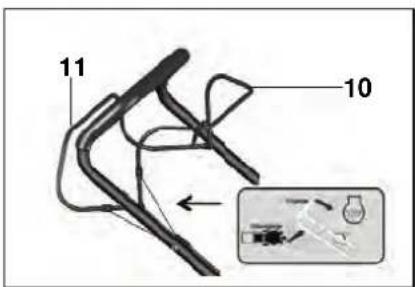
Brake clip (10) – press in this direction to the handle when starting. Release the lever to switch the engine off. Gas lever (11) is used to move the mower forward.
text_image
11 10Area of use
Cutting and collection
Grass is collected to the grass catcher (catcher capacity is reduced if grass is moist or wet). To fasten the grass catcher to the mower, lift the cover plate and fit the grass catcher.
Cutting (without grass catcher)
The cut grass is left in stripes.
GAS CONTROL
Self-propelled movement is controlled as follows: press the automatic switch-off clip (10) towards the handle and the gas lever (11) towards the handle at the same time.
To stop the forward movement, release the gas lever (11).
CUTTING HEIGHT ADJUSTMENT
The wheels height must be adjusted depending on the required cutting height. Using the lever (8), adjust the height as required. The medium position is ideal for most of the mowers.
ADDING OIL BEFORE STARTING THE APPLIANCE
Oil level must be checked every time the appliance is to be used. Add oil (500ml SAE30 engine oil) if necessary.

text_image
UPPER LIMIT LOWER LIMITYour mower is supplied without oil in the engine.
WARNING: Make sure the engine oil does not overflow as the absorber would smoke when the appliance is started.
- Make sure the mower is standing on a level surface.
- Remove the cap off the oil tank.
- Insert and attach the oil gauge.
IMPORTANT:
- Check the oil level every time the appliance is to be used. Add oil to the gauge level marking if necessary.
- Change oil after 25 hours of operation or after the season is over. Oil may need to be changed more often in a dusty or dirty environment, see the "OIL CHANGE" in the Servicing Section in this manual (SAE 30).
ADDING FUEL(unleaded)
- Fuel is added through the filling hole in the tank. Make sure fuel is not spilled. Use common pure unleaded fuel. Mix the fuel with oil. Buy only adequate fuel volume so that it can be consumed within 30 days.
WARNING: Spilled oil or fuel to be wiped off. Not to be stored, spilled, used near open fire.

natural_image
3D rendering of a mechanical engine or pump assembly (no visible text or symbols)WARNING: Alcohol-enriched fuels (gasohol) or fuels with ethyl alcohol or methanol mixtures may attract humidity and subsequent acid formation. Due to long storing, pure fuel may damage the engine fuel system. To prevent engine problems, you should empty the fuel system before storing the appliance for more than 30 days. Empty the fuel tank, start the engine and let it run until the fuel system and carburettor are empty. Add fresh fuel each season. See the storing instructions, too. Never pour cleaners to the fuel tank to clean the engine or carburettor. By doing so, you could cause irrevocable engine damage.
STARTING THE ENGINE
When starting the appliance, first make sure the spark plug is in place and there is sufficient amount of oil and fuel in the appliance.
Caution: The engine may smoke when the appliance is started for the first time, which is caused by the protective oil film on the inside surface of the engine. Take this as normal.
- Press the primary pump (13) 3-5 times.
- Press the automatic switch-off clip (12) towards the sliding handle (1).
- With the automatic switch-off clip (12) engaged, pull out slowly the starting cord (9) until you can feel slight resistance and then pull strongly the starter until the engine starts.
Caution: The first steps may need to be repeated several times in cold weather or when the appliance has not been operated for a long time.
STOPPING THE ENGINE
To stop the engine, release the automatic switch-off clip (12).
CAUTION: The knife keeps rotating for a couple of seconds after the engine has been switched off. To leave the mower unattended, disconnect the spark plug cap. Important tips and advice for cutting grass!!!
- Adjusting a bigger cutting height may be necessary under certain conditions, e.g. grass being too high, to relief the strain when pushing the mower, remove engine overloading and prevent grass from getting stuck in the mower. It is possible that the area will need to be cut more times.
- Vent ports in the grass catcher may get blocked if the catcher is not cleaned regularly. Clean the grass catcher regularly with water and let it dry before applying it.
- Keep the upper part of the engine at the starter clean. This will improve the air flow and increase the engine service life.
- Cut in dry weather only.
- Keep the knives sharp at all times.
SERVICING
IMPORTANT – Regular servicing is absolutely necessary for constant operational reliability and maintaining the original appliance performance.
Original spare parts are supplied by the customer service centre and dealers. An authorised service centre is recommended to provide the annual servicing and inspection
of the safety elements. Please contact your dealer for servicing and spare parts.
1) Keep all bolts and nuts tightened to be sure that the appliance is in an operation-reliable condition. Regular servicing is necessary to provide safety and trouble-free operation.
2) Never keep the appliance with fuel in closed rooms as the evaporating fuel could ignite.
3) It is necessary to let the appliance cool down and empty the fuel before keeping the mower in closed rooms.
4) To minimise the risk of fire, keep the engine and muffler and the fuel tank clean and with no grass, leaves and fats. Do not store the mower with the cut grass.
5) For safety reasons, avoid using the appliance with any parts that are worn or damaged. Replace any defective parts with new ones, do not repair them. Original spare parts and original spare knives to be used only.
Parts of quality other than specified may damage the appliance and put your safety at risk.
6) If it is necessary to empty the fuel tank, do it outdoors and with the engine being cold.
7) Wear solid protective gloves when disassembling and servicing the knives.
8) Check the appropriate rotating direction and balance of the knives after sharpening.
9) Check regularly the wear and pollution of the self-closing cover and grass catcher.
10) Wear safety gloves whenever the appliance needs to be transported, held in hands or inclined.
At all times, hold the appliance for parts guaranteeing safe holding. Consider the mower weight and weight distribution.
CLEANING
Wash the appliance thoroughly with water before it is used, remove any grass and mud from inside – this will prevent dirt from drying inside the appliance and problems the next time the appliance is started.
One or two times a year, remove the gear housing and use a brush or compressed air to clean the space around the belt pulleys and drive belts.
Once in a season, you should clean the inside of the driving wheels. Disassemble both wheels. Remove grass and dirt off the geared wheels and their edges using compressed air or a brush.
KNIFE DISASSEMBLY
To clean/sharpen/replace the knife CAUTION: The spark plug must be disconnected before disassembly.
Release the bolt when disassembling the knives.

natural_image
Technical line drawing of a mechanical assembly with no visible text or symbolsReassemble as shown in the picture. Tighten the bolts. Torque - 40 Nm. The bolt should also be replaced when replacing the knives.
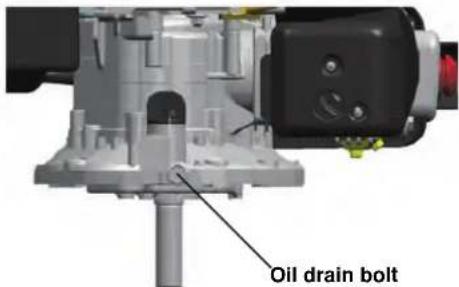
OIL CHANGE
The oil drain plug is located under the engine. Make sure there is a container to collect the oil and remove the plug. As soon as all the oil has flowed out, fit in a new plug with a washer and wipe any oil remnants.
Add new SAE30 oil to the tank. Check the oil level with a clean gauge. The oil must reach between min. and max. level marking on the gauge. Make sure the tank is not overfilled.
Start the engine and let it run for a short time. Then switch it off, wait for a minute and check the oil level. Ad some oil if necessary.
text_image
Oil drain boltSpark plug
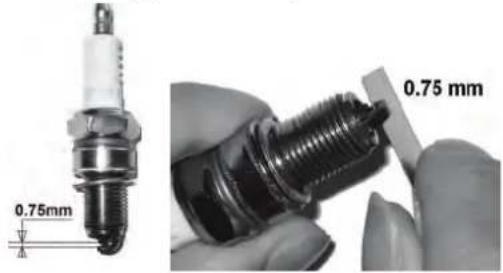
As soon as the engine has cooled down, remove the spark plug with the supplied wrench, clean it with a wire brush and adjust the distance to 0.75 mm (0.030") using a feeler gauge. Refit the spark plug. Make sure it is not tightened too much (alternatively: (Bosch WR 7 DC); (NGK BPR 6 ES))

natural_image
Close-up of a spark plug and its internal screw assembly, both shown with a 0.75 mm dimension label (no text or symbols on the components themselves)Air filter
Loosen the filter cap and remove the foam filter element. To prevent a foreign item from getting to the suction inlet, refit the filter cap.
EMPTYING THE FUEL TANK AND CARBURETTOR
Put a container allowing fuel storage under the carburettor. To prevent fuel spilling, use a funnel.
Remove the drain bolt and put the fuel valve tie rod to the ON position.
Re-fit the drain bolt with a gasket ring when the fuel tank is empty. Tighten the bolt.
natural_image
3D mechanical assembly diagram showing internal components with no visible text or symbolsSTORING
Fuel must not remain in the fuel tank for more than 1 month. Clean the mower at regular intervals and store it in a dry and locked room.
ENVIRONMENT
For environment protection, a special attention should be paid to the following points:
- Use common pure unleaded fuel.
- A funnel and/or can with level control to be used at all times to prevent fuel from spilling when refuelling.
- Do not fill the fuel tank up to the edge.
- Make sure the engine oil does not overflow.
- When changing oil, make sure the used oil is disposed under the applicable regulations. Prevent oil spillage.
- Do not put old oil filters to municipal waste – deliver them to an appropriate collection centre.
- Replace the absorber if defective. Original spare parts to be used for any repair.
- Contact a professional for any adjustment to the carburettor.
- Filter to be cleaned as instructed at all times.
- After the mower service life has expired, we recommended returning the appliance to the seller that will dispose it in accordance with the applicable regulations.
- At regular intervals, check the level of wear and technical condition of the mower.
TROUBLESHOOTING
| ENGINE NOT STARTING | Possible cause Remedy | |
| Check the fuel | Lack of fuel | Add fuel |
| Wrong fuel, appliance storing without emptying the fuel tank, wrong fuel type. | Drain the fuel tank and carburettor. Add fresh fuel. | |
| Check the spark plug | Wrong, dirty or wrongly set spark plug. | Replace the spark plug. |
| Spark plug is wet from fuel (flooded engine). | Dry and refit the spark plug. | |
| Have the engine repaired by an authorised seller or read the service manual. | Clogged fuel filter, wrong carburettor or ignition system setting, blind valves, etc. | Replace or (if necessary) repair any defective component. |
| Forward movement is defective | Stroke is too long Change the stroke setting |  |
| Grass is not being collected | Blocked channel, full grass catcher, grass is too wet | Clean the ejection channel, empty the grass catcher, cut only in dry weather |
| Engine not starting but the automatic switch-off lever (10) is pressed | Automatic switch-off lever stroke is too long | Shorten the automatic switch-off lever using an adjusting nut (pic. 1/13) |
SERVICING PLAN
| REGULAR SERVICING PERIOD (4) | Before using the appliance | Every month or | Every 3 months or | Every 6 months or | Every year or | Every 2 years or | ||
| Provide appropriate servicing in the specified month or after the specified hours of operation have expired with the first to happen being applicable. | 5 hours | 25 hours | 50 hours | 100 hours | 250 hours | |||
| Engine oil (SAE 30) | Check | O | ||||||
| Replacement | O | O | ||||||
| Air filter | Check | O | ||||||
| Replacement | O | |||||||
| Spark plug | Check Cleaning | O | ||||||
| Replacement | O | |||||||
DÉCLARATION DE CONFORMITÉ CE
Nous,
Güde GmbH & Co. KG
Birkichstrasse 6
D-74549 Wolpertshausen
Allemagne
Directives applicables de la CE:
2006/42/EC
2004/108/EC
2000/14/EC & 2005/88/EC
97/68/EC & 2004/26/EC
EN 836/A3:1997+A1+A2+A3+AC
EN 14982/A3:2009
natural_image
Illustration of a lawn mower with motion arrows indicating cycle (no text or symbols)Fonctionnement
natural_image
3D rendering of a black industrial engine or pump unit with no visible text or symbolsnatural_image
Exploded view diagram of a mechanical assembly with labeled parts and a hand icon (no text or symbols)natural_image
Close-up of a spark plug being held, showing its 0.75mm size and a close-up of its tip (no text or symbols on the component itself)Filtre à air
natural_image
3D rendering of a mechanical assembly with no visible text or symbolsSTOCKAGE
97/68/EC & 2004/26/EC
EN 836/A3:1997+A1+A2+A3+AC
EN 14982/A3:2009
Certifikační orgán:
TÜV Rheinland LGA Products GmbH
Tillystrasse 2
D-90431 Nürnberg
Německo
Referenční číslo:
S 5018 6528 0001
CC 5018 6332
e11*97/68SA*2004/26*0337*02
2000/14 (2005/88) 1760 / 00

natural_image
Illustration of a lawn mower with visible blades and handle, showing motion arrows (no text or symbols)Provoz
natural_image
3D rendering of a mechanical engine or pump device with no visible text or symbolstext_image
Technical diagram of a mechanical assembly with labeled parts and a hand symbol indicating support or hazard.natural_image
Close-up of a spark plug being held, showing its dimensional measurement (0.75mm) and magnified detail (no text or symbols on the component itself)Vzduchový filtr
natural_image
3D mechanical assembly diagram showing internal components with no visible text or symbolsULOŽENÍ
97/68/EC & 2004/26/EC
EN 836/A3:1997+A1+A2+A3+AC
EN 14982/A3:2009
Certifikačný orgán:
TUV Rheinland LGA Products GmbH
Tillystrasse 2
D-90431 Nürnberg
Nemecko
Referenčné číslo:
S 5018 6528 0001
CC 5018 6332
e11*97/68SA*2004/26*0337*02
2000/14 (2005/88) 1760 / 00
natural_image
Illustration of a lawn mower with a handle and blade, showing motion arrows (no text or symbols)Prevádzka
natural_image
3D rendering of a mechanical engine or pump assembly (no visible text or symbols)text_image
Technical diagram of a mechanical assembly with labeled components and a hand symbol indicating safety or hazard.(Bosch WR 7 DC); (NGK BPR 6 ES))
natural_image
Close-up of a spark plug with a 0.75mm thickness dimension, shown from two angles (no text or symbols on the component itself)Vzduchový filter
natural_image
3D rendering of a mechanical assembly with no visible text or symbolsULOŽENIE
97/68/EC & 2004/26/EC
EN 836/A3:1997+A1+A2+A3+AC
EN ISO 14982:2009
natural_image
Illustration of a lawn mower with motion arrows indicating cycle (no text or symbols)Gebruik
TANKEN VAN BRANDSTOF (loodvrije benzine)
natural_image
3D rendering of a black engine or pump assembly with visible components and no text or symbolsnatural_image
Technical line drawing of a mechanical assembly with no visible text or symbolsnatural_image
Close-up of a spark plug being held, showing its dimensional annotation (0.75mm) and magnified detail (no text or symbols on the component itself)Luchtfilter
natural_image
3D rendering of a mechanical engine assembly with no visible text or symbolsOPSLAG
97/68/EC & 2004/26/EC
EN 836/A3:1997+A1+A2+A3+AC
EN 14982/A3:2009
natural_image
Illustration of a lawn mower with a handle and blade, showing motion arrows (no text or symbols)Esercizio
natural_image
3D rendering of a black engine or pump assembly with visible components and no text or symbolsnatural_image
Technical line drawing of a mechanical assembly with no visible text or symbolsnatural_image
Close-up of a spark plug being held, showing its 0.75mm size and a close-up of its internal structure (no text or symbols visible)Filtro d'aria
natural_image
3D rendering of a mechanical engine assembly with black housing, yellow valve, and red button (no visible text or symbols)CONSERVAZIONE
97/68/EC & 2004/26/EC
EN 836/A3:1997+A1+A2+A3+AC
EN 14982/A3:2009