KTC-D500E - Car stereo KENWOOD - Free user manual and instructions
Find the device manual for free KTC-D500E KENWOOD in PDF.
User questions about KTC-D500E KENWOOD
0 question about this device. Answer the ones you know or ask your own.
Ask a new question about this device
Download the instructions for your Car stereo in PDF format for free! Find your manual KTC-D500E - KENWOOD and take your electronic device back in hand. On this page are published all the documents necessary for the use of your device. KTC-D500E by KENWOOD.
USER MANUAL KTC-D500E KENWOOD
Switching to Digital TV Screen A B C 5
Functions During Digital TV Screen A B 5
Functions During Digital TV Screen 6
Touch Operation A 6
Basic Operation
(When connected with DDX7029 A) 7
Functions When Displaying the Easy Control Panel 7
Functions While Displaying the Control Screen 7
Basic Operation
(When connected with DDX6029 3) 8
Displaying the Easy Control Panel 8
Displaying the TV Control screen 8
Basic Operation
(When connected with LZ-760R 9
Functions While Displaying the Control Screen 9
Displaying EPG 10
Viewing the Program Guide 10
Channel Search and Channel List 11
Searching for currently available station (Auto Scan) 11
Manually Searching Station (Manual Search) 11
Selecting a station from Channel List 12
Erasing Channel List 12
Setup 13
System Setup 13
Setting the Clock 14
Updating the Software 14
Restoring to Factory Default 15
Information and Conax 16
Displaying Information 16
Setting CA Control 16
Remote Control Unit 18
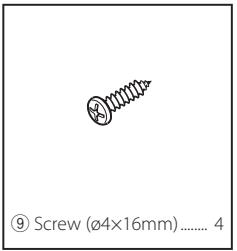
List of Accessories 20
Installing the Digital TV Tuner 21
Installing and Connecting the Remote
Control Receiver 22
Inserting Pay Card 23
Connection 24
Specifications 25
Safety precautions
WARNING
- Mounting and wiring this product requires skills and experience. For safety's sake, leave the mounting and wiring work to professionals.
CAUTION
- Make sure to ground the unit to a negative 12V DC power supply.
- Use only the screws provided or specified for installation. If you use wrong screws, you could damage the unit.
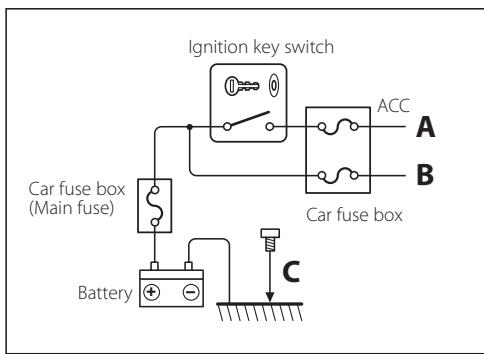
- If your vehicle's ignition does not have an ACC position, or if the ignition wire is connected to a power source with constant voltage such as a battery wire, the power will not be linked with the ignition (i.e., it will not turn on and off along with the ignition). If you want to link the unit's power with the ignition, connect the ignition wire to a power source that can be turned on and off with the ignition key.
- If the fuse blows, first make sure the wires aren't touching to cause a short circuit, then replace the old fuse with one with the same rating.
- After the unit is installed, check whether the brake lamps, blinkers, wipers, etc. on the car are working properly.
Monitor units that can be connected to this unit
- A group
DNX7200
KVT-829DVD
KVT-729DVD
DDX8029
DDX7029
KOS-V500
KOS-V1000
group
DDX6029
KVT-827DVD
KVT-727DVD
KVT-627DVD
DDX8027
DDX6027
KVT-M707
group
LZ-760R
group
Unit with RCA video input
How to reset your unit
- If the unit fails to operate properly, press the Reset button.
This Product is not installed by the manufacturer of a vehicle on the production line, nor by the professional importer of a vehicle into an EU Member State.
Information on Disposal of Old Electrical and Electronic Equipment (applicable for EU countries that have adopted separate waste collection systems)

Products with the symbol (crossed-out wheeled bin) cannot be disposed as household waste.
Old electrical and electronic equipment should be recycled at a facility capable of handling these items and their waste byproducts. Contact your local authority for details in locating a recycle facility nearest to you. Proper recycling and waste disposal will help conserve resources whilst preventing detrimental effects on our health and the environment.
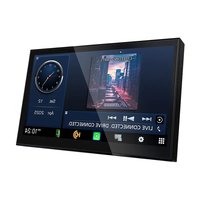
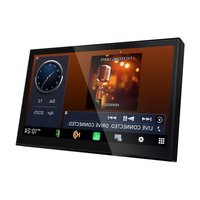
Lets view some digital broadcasts.
ABC
Switching to Digital TV Screen
Press [V.SEL] on the monitor to switch to Digital TV Broadcasting.


- When you first switch to digital TV broadcasting, a Welcome Menu appears and Auto Scan starts.
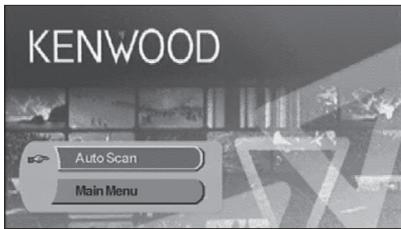
When Auto Scan ends normally, a Channel List containing channels available at the current location is created and the first channel is displayed.
- Auto Scan may have been performed already at the dealer where the unit was installed.
- The display language can be changed (page 13).
A B
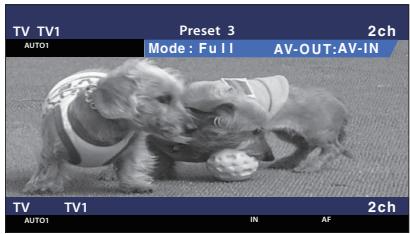
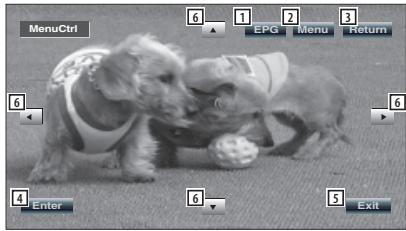
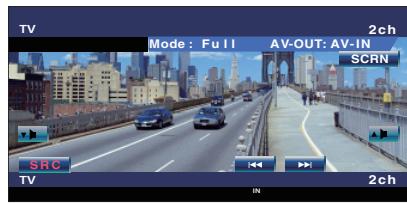
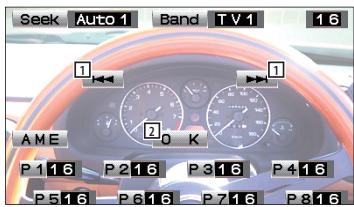
Functions During Digital TV Screen
Basic functions are available even when the TV screen is displayed.
Picture Source Display Area Displays the TV Status, Display Mode, and AVOUT settings (page 13).
2 Channel Down Search Area Searches downward and selects the channel.
3 Channel Up Search Area Searches upward and selects the channel.
4 Menu Control Area (A group only) Displays the Menu Control screen (page 11).
5 Information Display Control Area Turns ON/OFF the display of information in the Picture Source Display Area 1 and Source Information Display Area 2.
Audio Source Information Display Area

-
There are four ways to select the desired station.
-
By searching for available station
- By selecting from EPG (Electronic Program Guide) (page 10)
- By selecting from the Channel List (page 12)
-
By specifying a channel number (page 11)
-
You can add the selected channel to the Channel List if it is not already listed.
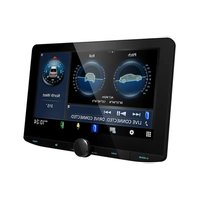
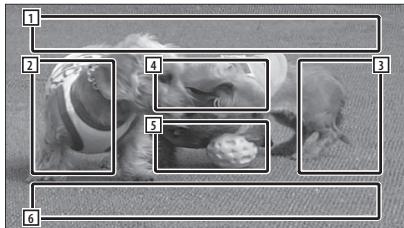
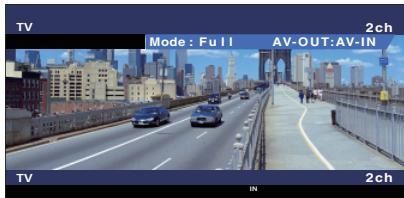
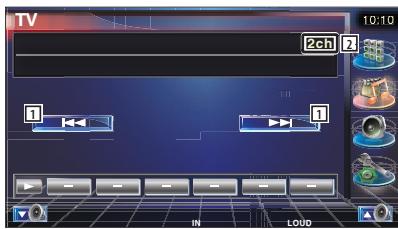
Functions During Digital TV Screen

Basic functions are available even when the TV screen is displayed.
1 Channel Down Search Area Searches downward and selects the channel.
2 Control Screen Display Area Switches to Control Screen.
3 Channel Up Search Area Searches upward and selects the channel.

- When the Control Screen is displayed, touch [OK] or wait approximately 10 seconds. The Digital TV Screen will reappear.
Touch Operation

Menu Control Screen appears by touching the area shown below.
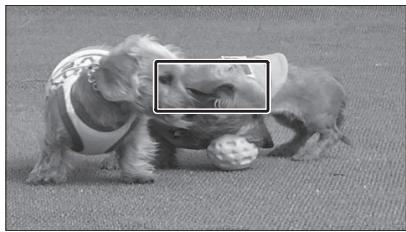

1 Shows EPG Screen (page 10).
2 Shows DVB Menu Screen (page 11).
3 Returns to previous screen.
4Executes selected menu item.
Returns to Digital TV Screen.
6 Moves highlight in DVB menu.
[List of abbreviations]
CH
Channel
EPG
Electronic Program Guide
OSD
On Screen Display
PIG
Picture in Graphic
RCU
Remote Control Unit
STB
Set Top Box
Normally this will be built in to the vehicle and it will not be necessary for the user to access it.
TV
Television
Basic Operation (When connected with DDX7029 A)
Various control screens appear in the Digital TV Source mode. (You can only operate Digital TV with the optional accessory Digital TV Tuner connected.)
Functions When Displaying the Easy Control Panel
Displays a floating control panel in the screen.


Switches the source.
2 Select a channel.
3 Displays the Screen Control screen. (page 7 for the

- The Easy Control Panel display is hidden when you touch a central area of the monitor.
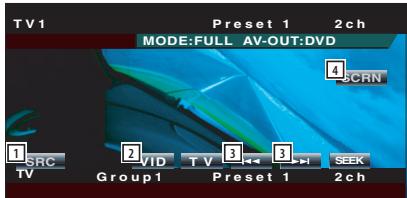
Functions While Displaying the Control Screen
Switches to control screen to use various playback functions.


1 Select a channel.
2 Channel Number Display
Basic Operation (When connected with DDX6029 3)
Various control screens appear in the Digital TV/Video Source mode. (You can only operate Digital TV with the optional accessory Digital TV Tuner connected.)
Displaying the Easy Control Panel
The Control Panel is displayed in a floating position of the TV picture.


Switches the source.
Switches to Video (VIDEO).
3 Select a channel.
4 Displays the Screen Control screen. (page 8 for the

- The Easy Control Panel display is hidden when you touch a central area of the monitor.
- Buttons other than mentioned above are disabled in DVB mode.
Displaying the TV Control screen
You can tune in a TV station using various functions.


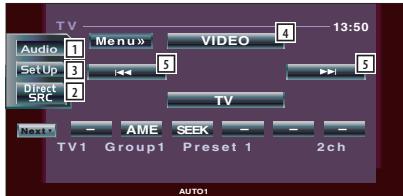
1 Calls the Sound Effects Menu.
2 Displays the Source Select screen.
3 Calls the Setup Menu.
Switches toVIDEO.
Select a channel.

- Buttons other than mentioned above are disabled in DVB mode.
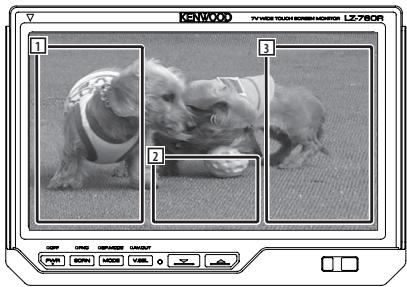
Basic Operation (When connected with LZ-760R
Various control screens appear in the Digital TV Source mode. (You can only operate Digital TV with the optional accessory Digital TV Tuner connected.)
Functions While Displaying the Control Screen
You can tune in a TV station using various functions.

1 Select a channel.
Closes Control Screen and shows Digital TV screen.

- Buttons other than mentioned above are disabled in DVB mode.
Receiving and displaying EPG (Electronic Program Guide) sent together with a program.
Viewing the Program Guide
You can check the programs on each channel in the EPG (Electronic Program Guide).
1 Show EPG by pressing [EPG] key
EPG appears.
2 Select the channel or time to display
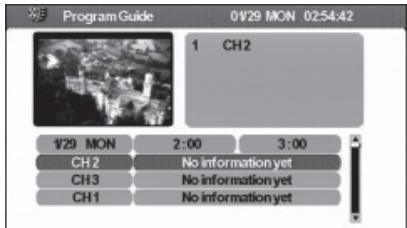
On the EPG, you can change the displayed channel by touching [▲] or [▼] and time frame by touching [▲] or [▶].
3 Touch [Return] (Exit) when you are finished
![KENWOOD KTC-D500E - Touch [Return] (Exit) when you are finished - 1](/content/2019/11/124191/images/da64fc85e5013dd7ba2427512de0e8da27099530bdf5d3d163c6ad571f69071f.jpg)
- A "no data" message will be displayed if the selected channel does not provide EPG data.
- It can also be displayed from the Menu Control screen.
The available stations (TV/Radio) are saved in the Channel List.
Searching for currently available station (Auto Scan)
Search for currently available stations and save them in the Channel List.
1 Show DVB Menu by pressing [MENU] key
2 Touch [▲] or [▼], select [Channel Search]
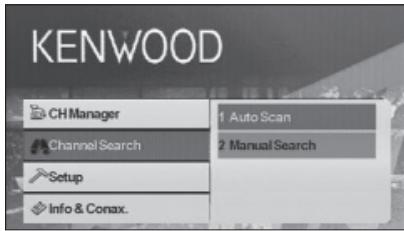
3 Touch [▶]
4 Touch [▲] or [▼], select [Auto Scan]
5 Touch [Enter] (OK)
Channel search is performed and the available channel is saved in the channel list.

- When you perform Auto Scan, the content of the current channel list is discarded and a new list is created. To search for available channels without discarding the content of the current channel list, perform channel search from the Digital TV Screen (page 5).
Manually Searching Station (Manual Search)
Search a station by specifying area or channel.
1 Show DVB Menu by pressing [MENU] key
2 Touch [ ] or [ ] ,select [Channel Search]
3 Touch [▶]
4 Touch [▲] or [▼], select [Manual Search]
5 Touch [Enter] (OK)
6 Touch [▲], [▼], [▲], or [▶] to select TP Number, bandwidth, frequency, or CH number

- Manual search is for advanced users and offers the ability to search for specific channels. Regular users are recommended to use "Auto Scan" (page 11).
Selecting a station from Channel List
Stations that are available by Auto Scan or other methods are saved in the Channel List.
1 Show DVB Menu by pressing [MENU] key
2 Touch [▲] or [▼], select [CH Manager]
3 Touch [▶]
4 Touch [▲] or [▼], select [TV Channel List] or [Radio Channel List]
5 Touch [Enter] (OK)
The Channel List appears and the program of the currently selected station appears in the PIG (Picture in Graphic) screen. In addition Channel Information is shown underneath the PIG screen.
6 Touch [] or [] to select a channel
When you move the cursor down the channel list, the PIG screen will change accordingly.
7 Touch [Enter] (OK)
The received channel is switched.
Erasing Channel List
Erase channels registered in the Channel List.
1 Show DVB Menu by pressing [MENU] key
2 Touch [] or [] , select [CH Manager]

3 Touch [▶]
4 Touch [▲] or [▼], select [Erase All Channels]
5 Touch [Enter] (OK)
A confirmation message appears.
6 Touch [Enter] (OK)
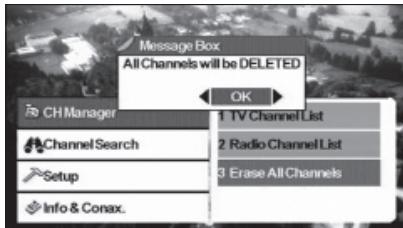
All channels in the Channel List are erased.

- After Deleting all the Channels pressing TV Channel List or Radio Channel List will cause a message box to be displayed: No TV Channel List or No Radio Channel List.
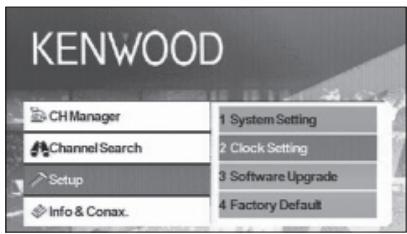
Setting this unit's behavior and clock.
System Setup
Set the behavior of this unit such as the display language and aspect ratio.
The following items can be set:
| OSD Language | User could select the desired language. |
| TV Aspect Ratio | This function provides 4:3 and 16:9 two ratio for user to select. If your display supports 16:9 screen format and selected channel provides 16:9 format program, select 16:9. |
| TV Screen Format | There are four screen format could be selected, Full, Pan&Scan, Letter Box, and Combined. |
| Auto Switching Interval | User could set the auto switching interval time from OFF to 30 Seconds when the box cannot receive the video signal. User also could use the [A] to [Z] key on the RCU to switch the signal immediately. |
| TV Type | Select the TV signal type (PAL or NTSC) according to the display. |
| 0/5 Volt | Set "0/5 Volt" ON when connecting an antenna with booster amplifier to this unit. |
| Power On Option | This function provide user to select the unit at a power on mode or a stand by mode. If the user select the unit at power on mode, when user turn on the car, then the unit will be turned on at the same time. |
| Volume Rate Control | If user connect to an amplifier, user could use the volume rate to control the volume. There are 18 levels could be selected. |

- Depending on the country where you buy your receiver, some functions might not be available in this menu.
- If you changed the "0/5 Volt" setting, perform Auto Scan.
1 Show DVB Menu by pressing [MENU] key
2 Touch [▲] or [▼], select [Setup]

3 Touch [▶]
4 Touch [ ] or [ ] , select [System Setting]
5 Touch [Enter] (OK)
System Setup Menu appears.
6 Touch [] or [] to select the item to set
7 Touch [<] or [> ] to select the value to set
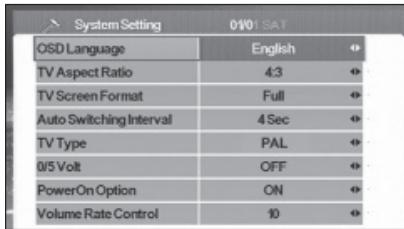
8 Touch [Return] (Exit) when you are finished
Setting the Clock
Set the clock to the network. Also set the time zone and summer time as necessary.
1 Show DVB Menu by pressing [MENU] key
2 Touch [] or [] , select [Setup]
3 Touch [▶]
4 Touch [▲] or [▼], select [Clock Setting]
5 Touch [Enter] (OK)
Clock Setting menu appears.
6 Touch [<] or [> ] to select the value to set
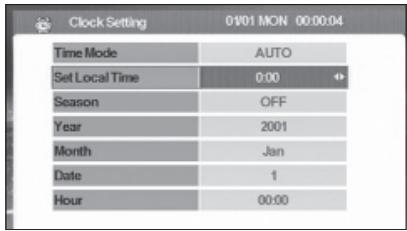
7 Touch [Return] (ext) when you are finished

Real-time data (Year, Month, Date, and Hour) will automatically be downloaded when the Clock Setting Menu is shown.
Updating the Software
Download the new software from the network and update the software installed in this unit.
1 Show DVB Menu by pressing [MENU] key
2 Touch [] or [] , select [Setup]
3 Touch [▶]
4 Touch [▲] or [▼], select [Software Upgrade]
5 Touch [Enter] (OK)
If there is a new software, it is downloaded and this unit's software is updated.

- This function is only available when the network supports this feature.
- When new software is loaded, this might have different functions than the software you are using now. This manual might not be accurate anymore for the new software version.
Restoring to Factory Default
Restore this unit's settings to factory default.
1 Show DVB Menu by pressing [MENU] key
2 Touch [▲] or [▼], select [Setup]
3 Touch [▶]
4 Touch [ ] or [ ] ,select [Factory Default]
A confirmation message appears.
5 Touch [<] or [> to show [OK]
6 Touch [OK]
Displaying information and setting Conax.
Displaying Information
Display various system information, smart card expiration date, and Conax information.
1 Show DVB Menu by pressing [MENU] key
2 Touch [▲] or [▼], select [Info & Conax.]
3 Touch [▶]
4 Touch [▲] or [▼] to select the information to display
5 Touch [
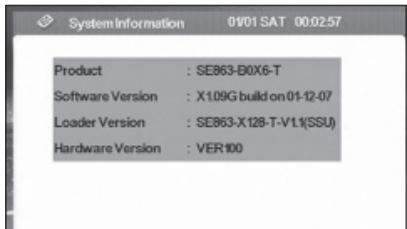
The selected information is displayed.
Setting CA Control
Set channel access control (CA Control) for channels broadcasting programs of specific genre.
1 Show DVB Menu by pressing [MENU] key
2 Touch [▲] or [▼], select [Info & Conax.]
3 Touch [▶]
4 Touch [▲] or [▼], select [CA Control]
5 Touch [Enter] (OK)
CA Control screen appears.
6 Touch [▲] or [▼] to select an item and enter a value
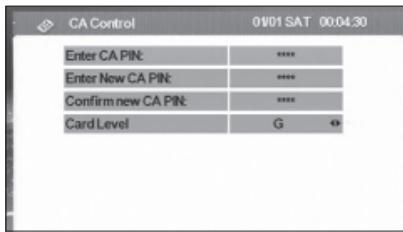
7 Touch [Enter] (OK)

- This function is not available unless a card is inserted.
- You can change the [Card Level] by touching [<] or [>]. However, you must enter a password when [Enter CA PIN:] appears to change the Card Level setting.
- To change the password, enter the current password for [Enter CA PIN:] and new password for [Enter New CA PIN:] and [Confirm new CA PIN].
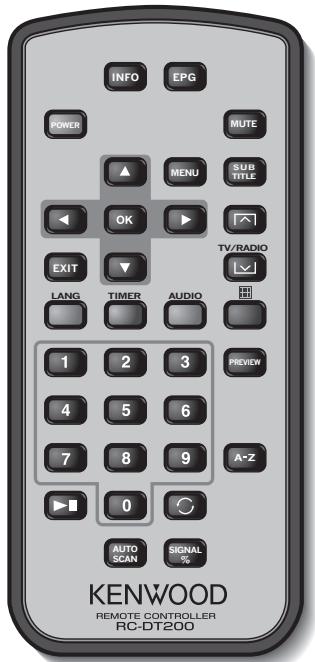
INFO
Current channel info (toggle between pages in menu using / / / ).
EPG
Opens the Electronic Program Guide.
POWER
Powers the (STB) unit on and off.
MUTE
Mutes the sound. Volume mute only works in TV/Radio mode (i.e. not when a menu is opened).
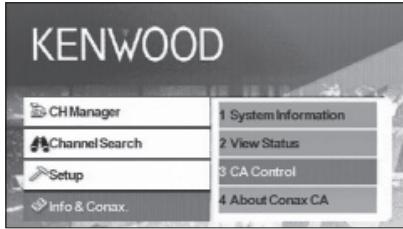
MENU
Press once to enter Main Menu.
The Main Menu consists of 4 sub-menus.
- CH Manager
- Channel Search
- Setup
- Info & Conax.
#
a. Changes channels (channel up, channel down).
b. Toggles between menu items (up/down).
#
Toggles between menu items (left/right).
OK
Verifies input.
EXIT
a. Return to the previous menu in menu screen or escape from menu.
b. Return to normal TV mode from a menu. Repeated pressing will take you through all opened menus until normal TV mode is reached.
SUBTITLE
Switches to Subtitle Mode.

Page up

a. TV/radio mode
b. Page down
LANG
Switches language.
TIMER
Sleep timer.
Press to set different times.
AUDIO
Audio modes.

Switches to teletext.
0-9
a. Selects a channel to watch. Press two numbers one after the other to go beyond 9 (e.g. press 2 and then 3 to go to channel 23).
b. Selects a sub-menu item.

Pauses/resumes TV streaming images.

Returns to the channel you were watching previously.
PREVIEW
Previews image display.
A-Z
Changes to alternative frequency.
AUTOSCAN
Searches the network for available channels.
SIGNAL%
Signal power/quality bar
Loading battery
Use one lithium battery (CR2025). Insert the batteries with the + and -poles aligned properly, following the illustration inside the case.
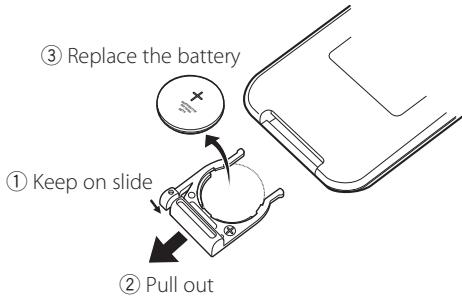
WARNING
- Store unused batteries out of the reach of children. Contact a doctor immediately if the battery is accidentally swallowed.

- Do not set the remote control in hot places such as on the dashboard.
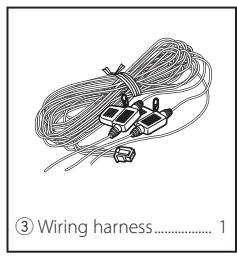
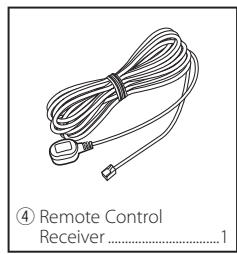
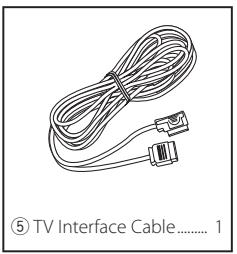
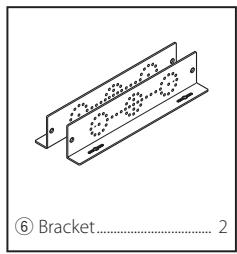
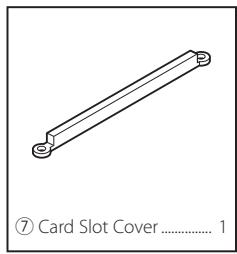
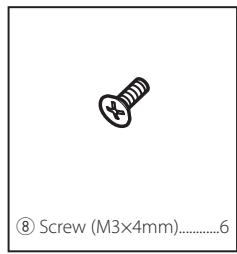
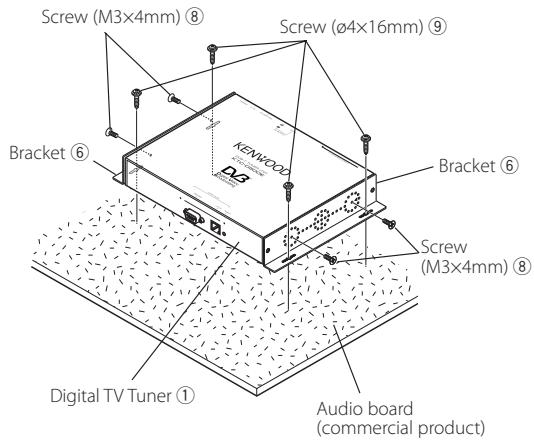
List of Accessories
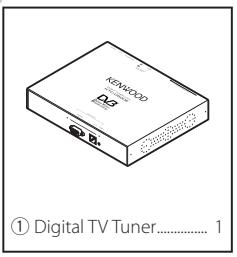

Installing the Digital TV Tuner
The Digital TV Tuner (main unit) can be installed by securing it to the pile carpet with Velcro or by screwing it on to a commercially available audio board.
Installing the Main Unit
- There are various terminals on the main unit. Leave some space to connect cables on the terminal side of the main unit.
- Do not place anything on top of the main unit. This can cause product failure.
- Do not install the main unit stacked with other units.
- Install the main unit at least 1.5m away from radio antenna.
Installing with Screw
1 Use a tapping screw to secure the bracket to the vehicle's audio board (commercial product).

- When drilling holes in the vehicle, be sure there is nothing on the other side.
Damage to cables or pipes can cause accident or malfunction.
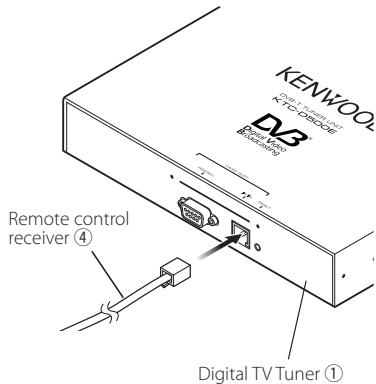
Installing and Connecting the Remote Control Receiver
Paste the remote control receiver to the dashboard.
1 Remove the paper from double-stick tape and paste it on the back of the remote control receiver.
2 Wipe the dirt and oil off from the installation area and paste the remote control receiver 6 to the dashboard.
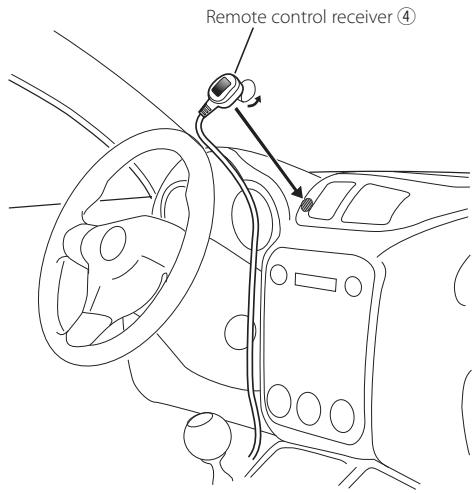
3 Connect the connectors of the remote control receiver to the main unit.

- Wipe oil and dirt off from the installation surface.
- Avoid area where there is direct sunlight or close to TV monitor because the remote control signals may be affected.
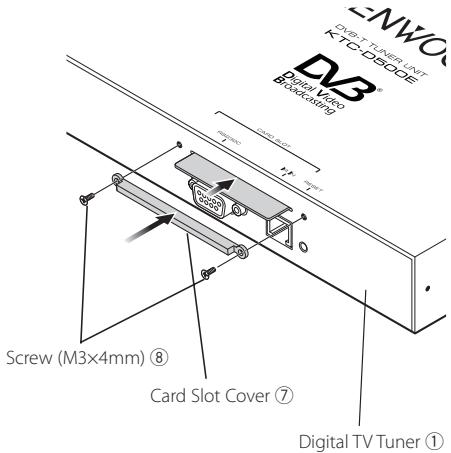
Inserting Pay Card
Insert the Pay Card into the card slot, and attach the card slot cover.
Connect the monitor and power as follows.
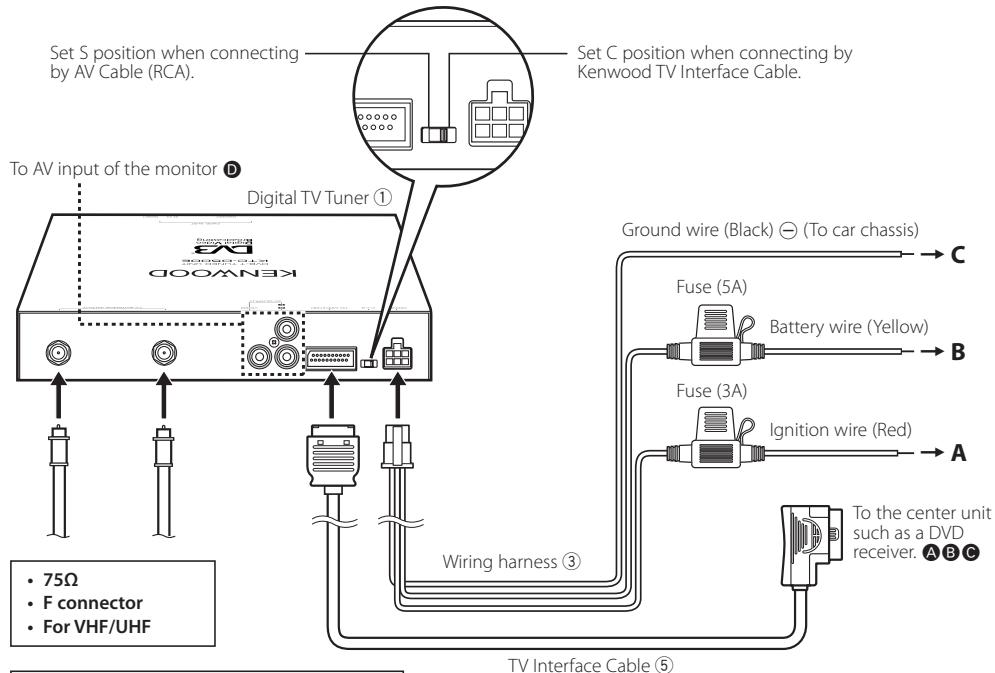

Connection of antenna with booster amplifier
Set "0/5 Volt" ON when connecting an antenna with booster amplifier to this unit.
TVtuner
Input Frequency
VHF:174-230MHz
UHF:470-862MHz
Demodulation Type
: QPSK/ 64QAM/ 16QAM
Channel Bandwidth
:6/7/8MHz
FFT Size
: 2K and 8K
Guard Interval
:1/4,1/8,1/16,1/32
Puncture Rate
:1/2,2/3,3/4,5/6,7/8
Antenna input
:2-ch Diversity
Connector Type
: F Type × 2
General
Operating Voltage (11 - 16V)
:14.4V
Current Consumption
: 860 mA
Dimensions (W× H× D) (Main unit)
: 215× 37× 172.4mm
Operational temperature range
: -10°C ~ +60 °C
Storage temperature range
: -30°C ~ +85 °C
Weight
:1.2 kg
Listed accessories 44
Remote Control Unit (Telecommande)
STB
Defina as funções这其中 a single variable, such as a function of the form f(x) , is called a function of x .