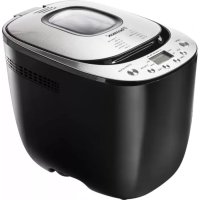
DBM400 - Bread maker BESTRON - Free user manual and instructions
Find the device manual for free DBM400 BESTRON in PDF.

User questions about DBM400 BESTRON
0 question about this device. Answer the ones you know or ask your own.
Ask a new question about this device
Download the instructions for your Bread maker in PDF format for free! Find your manual DBM400 - BESTRON and take your electronic device back in hand. On this page are published all the documents necessary for the use of your device. DBM400 by BESTRON.
USER MANUAL DBM400 BESTRON
natural_image
Line drawing of a standard loaf machine with control buttons and ventilation slots (no text or symbols)EN User's instructions, Automatic breadmaking machine
text_image
Technical diagram of a microwave oven with labeled parts including a main unit, interior sink, and accessoriesFiguur 1 Overzicht
natural_image
Warning symbol with a brush and exclamation mark, no text presentnatural_image
Diagram of a vehicle's rearview and side profile showing structural components (no text or labels)Figuur 2
natural_image
Symbolic illustration of a tree above a crossed-out trash bin and a horizontal line below (no text or labels)Technische gegevens
Type: DBM400
Vermogen: 660W
Netspanning: 230V \~ 50Hz
Milieu
R Neyman
Quality control

natural_image
Abstract line drawing with intertwined curves and a looped shape (no text or symbols)Recepten
Maateenheden
ml: mililiter
g: gram
TL: theelepel
EL: eetlepel
text_image
Technical diagram of a coffee maker with numbered parts for identification and assembly reference.natural_image
Warning symbol with a brush and exclamation mark, no text or numbers presentnatural_image
Symbolic illustration of a tree above a crossed-out trash bin and a horizontal line below it (no text or labels)Umwelt
natural_image
Abstract line drawing with intertwined curves and a looped shape (no text or symbols)Rezepte
Maßeinheiten
ml: Milliliter
g: Gramm
TL: Teelöffel
EL: Esslöffel
text_image
Technical diagram of a coffee maker with numbered parts for identification and assembly reference.Figure 1 Aperçu
natural_image
Diagram of a vehicle's cross-section showing structural components and directional arrows (no text or labels)natural_image
Symbolic illustration of a tree above a recycling bin with no text or labelsEnvironnement
• Directive EMC 2004/108/EC
natural_image
Abstract line drawing with intertwined curves and a looped shape (no text or symbols)Recettes
Unités de mesure
ml: millilitre
g: gramme
Bread making machine DBM400
Congratulations with the purchase of your breadmaker. You can set the breadmaker to start baking bread at any time you wish, thereby ensuring that the loaf is ready at the time you need it – and that your house is filled with the delicious smell of freshly-baked bread.

Safety instructions
General
- Please read these instructions carefully and retain them for future reference.
- Use this appliance solely in accordance with these instructions.
- This appliance is not intended for use by persons (including children) with reduced physical, sensory or mental capabilities, or lack of experience and knowledge, unless they have been given supervision or instruction concerning use of the appliance by a person responsible for their safety.
- Children should be supervised to ensure that they do not play with the appliance.
- Have any repairs carried out solely by a qualified electrician. Never try to repair the appliance yourself.

Electricity and heat
- Before use please verify that the mains voltage is the same as indicated on the rating plate of the appliance.
- Make sure that you always use an earthed wall socket to connect the appliance.
- Always remove the plug from the wall socket when the appliance is not in use.
- Remove the plug from the wall socket by pulling the plug, not the power cord.
- Check the appliance's power cord regularly to make sure it is not damaged. Do not use the appliance if the power cord is damaged. Have a damaged power cord replaced by a qualified repair service.
- When using an extension lead always make sure that the entire cable is unwound from the reel.
- Use solely approved extension leads.
- To prevent the risk of fire the appliance needs space to allow it to loose heat. Make sure that it has sufficient space around, and that it makes no contact with flammable material. Do not cover the appliance. Also make sure that the air vents are not covered or blocked.
- Make sure that the appliance, the power cord or the plug do not make contact with heat sources, such as a hot hob or naked flame.
- Make sure that the appliance, the power cord and plug do not make contact with water.
Use
- Never use the appliance outdoors.
- Never use the appliance in humid rooms.
- Place the appliance on a flat, stable surface.
- Do not let the power cord hang over the edge of the draining board, worktop or table.
- Make sure that your hands are dry when you touch the appliance, the power cord or the plug.
- Switch off the appliance and remove the plug from the wall socket in the event of a malfunction during use, and before cleaning the appliance or storing it after use.
- Never immerse the appliance, the cord or the plug in water or any other liquid.

PLEASE NOTE
Do not touch the appliance if it falls into water. Remove the plug from the wall socket immediately. Do not use the device again.
Introduction
The delicious smell of homemade bread is an unforgettable experience. Warm, fresh homemade bread is a tremendous sensation – and with your Bestron Breadmaker DBM400 you can enjoy the sensation every day! Moreover the breadmaker will enable you to experience the enjoyment of homemade bread every day – and prepared with the greatest of ease. The appliance is fitted with a small computer that does all the work for you.
You can use your breadmaker to bake many different types of bread. Moreover you can also use the appliance to make jams – and dough for rolls, pizzas, and cakes. It's all very simple, and the result tastes like the produce prepared by a traditional baker.
Before use for the first time
We recommended that you read these instructions carefully before you use your breadmaker for the first time. In particular, please give attention to the following instructions.
- Carefully take your new breadmaker out of the packaging, and remove all packaging materials.
- Remove any dust from the appliance that may have been trapped in the packaging.
- Clean your breadmaker with a damp cloth. Bear in mind that the baking tin is finished with a non-stick coating. Consequently do not clean the tin with scouring agents.
- Grease the baking tin with oil or margarine before you use it for the first time.
- Fit the baking tin to the appliance. Do not fit the dough hook, and do not add any ingredients. Allow the appliance to operate for between 3 and 5 minutes (use baking program "cuisson/bakken", see the notes to program "cuisson/bakken")
- Allow the appliance to cool down, and repeat the procedure.
- Fit the baking tin you wish to use.
- Lightly grease the shaft with a little baking butter or oil, and fit the dough hook to the drive shaft.
It was necessary to lubricate the components of this appliance during its manufacture, and for this reason the breadmaker may release traces of smoke when used for the first time. However, this is absolutely normal.
About the breadmaker DBM400
You can use this breadmaker to bake loaves with a maximum of about 900 g (the weights are approximate, and depend on the recipe).

- Viewing window
- Lid
- Handle
- Drive shaft
- Kneading blade
- Baking tin
-
Ventilation opening
-
Lid handle
- Housing
- Control panel
- Power cord and plug
- Measuring cup for water and flower
- Measuring spoon for salt and yeast
Operating panel

text_image
14. Base/Buils Super napole/mel Français/Frana Pitie/Geeg Cubson/Bakken Complet/Volkoren Suord/Zoet Rapide/Snel Pitie/Geeg sélection selectie 15. 18:8.8. L - daire/licht P - moyenne/mikel H - fonobeldonker koret kleur couleur coule start-stop nache anti 16. 17. 18. 19.Figure 2 Operating panel
- Program menu
- Display
- Select-button
- Timer-buttons
- Crust colour-button
- Start-stop-button
Display and functions, control panel
Display:
• shows the selected firmness of the crust
• shows the selected program number
• shows the remaining time
• shows the temperature warning (see the Troubleshooting section).
"Sélection/selectie" button (16): used to select the program from the menu.
"Couleur croûte/korst kleur" button (18): used to select the required colour of the crust (light, medium, dark).
Delayed baking buttons ▲17: used to delay the baking process (setting for the programs basic, french, whole wheat, sweet and quick).
Start/Stop button (19): Press the Start button for at least 1 second. A beep will be heard, and the colon in the display begins to flash; the program has started. Press the Stop button for at least 1 second. A beep will be heard, and the colon in the display stops flashing.
Programs
Base/Basis (White or brown bread) (3:00)
For white and brown bread. Also for bread containing herbs and raisins.
Super rapide/snel (Rapid) (0:58)
For baking loaves of bread in a very short period of time. Bread baked using this program can be quite hard and firm. The temperature of the water should be between 35 and 45°C.
Français/frans (French bread) (3:50)
For light and crusty bread such as, for example, French bread. This bread needs to rise for a longer period of time, and consequently the preparation time is longer than for other programs.
Complet/volkoren (wholemeal bread) (3:40)
For wholemeal bread containing a high proportion of wholemeal flour. This program uses a longer preheating time. This offers extra time for the dough to absorb water, and for the dough to rise. The kneader blade is stationary during this 15-minute resting time. The use of a delayed start is not recommended when baking wholemeal bread; this can yield a poorer result.
Brioché/zoet (Sweet bread) (2:50)
For sweet breads with a crisper crust. The crispy crust is obtained by heating the dough containing sugar to a higher temperature.
Rapide/snel (Quick) (1:34)
For baking loaves of bread in a short period of time. Bread baked using this program can be moister and have a denser structure. The temperature of the water should be between 35 and 45°.
Pâte/deeg (Dough) (1:20)
Used to knead various types of dough. The dough is not baked. Remove the dough from the appliance, and use it to form the pizza dough or rolls. Prepare portions of dough of a maximum of 900g.
Cuisson/bakken (Bake)
This setting can be used either to heat the baking tin or to extend the baking time; this can be of use when preparing products such as jams. This program enables you to extend the baking time for a minimum of 10 minutes (0:10). The time shown in the display decreases in 1-minute increments. Press the Stop button if you wish to stop the baking process. The baking time can be extended in 10-minute increments, to a maximum of 1 hour. To do so, press the ▲button and then press the Start button.
| Process | knead 1 (min) | rise 1 (min) | knead 2 (min) | rise 2 (min) | pause (sec) | rise 3 (min) | bake (min) | total time | signal time |
| Program1 Base/basis 10 20 | 15 20 30 | 55 60 3 | :00 2:25 | ||||||
| 2 Super rapide/snel | 13 10 | 35 0:58 | 0:57 | ||||||
| 3 Français/frans 18 | 40 22 20 | 30 60 7 | 0 3:50 2:47 | ||||||
| 4 Complet/volkoren | 10 25 | 20 30 30 | 70 65 3:40 3:00 | ||||||
| 5 Brioché/zoet | 10 | 5 | 20 | 30 | 30 | 57 | 48 | 2:50 | 2:30 |
| 6 Rapide/snel | 14 | 5 | 75 1:34 | ||||||
| 7 Pâte/deeg | 7 | 5 | 18 | 50 | 1:20 | ||||
| 8 Cuisson/bakken | 10 min. till 1 hour | ||||||||
Setting the delayed start
- Determine the time at which the bread is to be ready.
- Calculate the difference between the required time and the current time.
- Set the time using the Timer buttons ▲ and ▼
For example: You wish your bread to be ready at 08.00, and it is now 21.00 on the previous evening. The difference in time is 11 hours. Set the display on 11:00
ATTENTION
You can increase a maximum time delay of 13 hours in 10-minute steps. Keep the "Minuterie/timer" buttons pressed in to speed the increase time.
Using the breadmaker
Note Measuring the precise amount of each ingredient is of great importance!
A good product can be obtained only by using the indicated quantities and weights, and consequently you should use the measuring cup and spoon supplied with your breadmaker.
Note Make sure you add the correct quantity of yeast!
If the dough in the appliance rises excessively and collapses immediately – or fails to rise – then the likely cause is the amount of yeast. Try a new bread baking with the right amount of yeast.
- Remove the baking tin Open the lid, lift the handle, and pull firmly to remove the baking tin. Always remove the baking tin from the breadmaker before filling the tin; this will avoid ingredients falling into the motor, or into the appliance.


2. Fit the dough hook
Fitting the dough hook is very simple; just slide it onto the drive shaft. Lightly grease the shaft with baking butter; it will be easier to remove the hook later on.
3. Measuring/weighing ingredients
Measure the amounts of the ingredients given in the recipe accurately, and pour into the baking tin in the correct sequence:
- Pour the water or milk into the baking tin; use lukewarm water or milk (21-28°C).
- Carefully add salt, sugar and flour/bread mix.
- Make a small hollow in the surface of the flour, and put the piece of yeast or baking powder in the hollow.
ATTENTION
Make sure that the yeast does not come into contact with water; this will immediately start the fermentation process.
Add ingredients that would be broken down by kneading later during the preparation process, for example at the end of KNEAD2. The breadmaker sounds a beep when KNEAD2 is almost finished, so that you know when you can add the ingredients.
4. Fitting the baking tin
Press the baking tin firmly into place. A click will be heard when the tin locks into position.
- Put the plug in the wall socket. The display on the top of the appliance will now illuminate. The display will automatically show the 1st menu and the standard time. A beep will sound each time any button is pressed.
6. Menu selection
Select a program by pressing the "Selection/selectie" button (16).
7. Bread colour
Press this button (18) to select the colour of the bread, or to select the faster baking process.
8. Setting delayed start
When you wish to enjoy fresh bread for breakfast you will now need to set the delayed start using the procedure given in the next Section.
9. Starting the process (19)
Start the breadmaker by pressing the Start/Stop button. The program begins, and the remaining time is shown in the display. The colon between the hours and minutes flashes to show that the program is running.
10. Program sequence
The breadmaker will now automatically work through all the steps of the program as set before starting the appliance. The display shows which step in the program is currently in progress. Water vapour may be seen escaping from the ventilation openings whilst the breadmaker is in operation; this is absolutely normal.
11. End of program
At the end of the program the display will show 0:00, and a beep will be heard. The display will then change to show the original duration of the program.
12. Keep-warm function
The keep-warm function circulates hot air through the baking section for an additional approximately 1 hour. This is applicable to the majority of the programs; best results will be achieved when the baking tin is removed within the indicated time. A beep will sound at the end of the keep-warm period. Press the Start/Stop button to stop the function.
13. Removing the product
Press the Start/Stop button, and remove the baking tin.
PLEASE NOTE
• Always wear oven gloves when opening the lid and when touching the baking tins.
14. Removing the loaf from the baking tin.
Allow the loaf in the baking tin to cool for about 5 to 10 minutes, and then turn the tin upside down to allow the loaf to drop onto a rack. The dough hook may be left behind in the baking tin. If so, fill the baking tin with hot water and leave to soak before removing the dough hook. However, the dough hooks will usually remain in the loaf. Once the loaf has cooled completely remove the dough hook with a utensil that will not damage the non-stick layer (such as a wooden spoon or spatula).
- Once you have finished using the breadmaker always press the Start/Stop button and remove the plug from the wall socket.
Whenever possible, try to avoid opening the breadmaker's lid while a program is running. This may be detrimental to the quality of the bread. When you have to open the lid to add ingredients then try to close the lid again as quickly as possible. This will reduce the temperature drop in the appliance.
Beep
The beep is heard:
• on pressing any of the buttons;
• at the end of any program;
- at the end of the keep-warm period;
- during the 2nd kneading period used in certain programs, as a reminder that it is time to add certain specific ingredients (nuts, chocolate, etc.).
Interruptions to the power supply and power cuts
After interruptions to the power supply of a maximum of 10 minutes the breadmaker will automatically continue to work through the program.
With longer power cuts the display will automatically return to the starting time of the relevant program; it will then be necessary to start the breadmaker again.
Storing and cutting bread
The loaf will need to cool for at least 20 to 40 minutes before it can be cut properly. Preference is given to the use of a sharp electric knife, or a serrated bread knife.
Since your bread does not contain any preservatives you will not be able to keep it for long; you can keep the bread for about three days at room temperature. You can store bread in a deep-freeze if you wish to keep it for a longer period of time.

Troubleshooting table
| Problem Cause Solution | ||
| The crust is too thick. The bread has been kept warm for too long, and it has dried out. | Remove the loaf from the baking tin shortly after the end of the baking time. | |
| IThe ingredients are not evenly mixed and/or baked properly. | Incorrect program selected. | Select the correct program for the bread. |
| The dough is too thick to be kneaded properly. | Add sufficient water. | |
| The display shows E:01 The temperature in the breadmaker is too high. | Press the Start/Stop button to stop the breadmaker, and open the lid to allow the interior to cool. | |
| The motor makes a sound, but the dough is not being kneaded. | The baking tin has not been fitted correctly, or the dough is too stiff to be kneaded. | Check that the baking tin has been added properly; always take care when weighing out the ingredients for the dough. |
| The loaf is too small. No yeast, or the yeast is not working properly. | Make sure that the conditions are right for the yeast. | |
| The dough rises above the baking tin. | Too much yeast and/or water added. | Reduce the quantity of moisture and/or yeast. |
| The loaf collapses whilst it is baking. | Too much water or yeast makes the dough too soft and weak. | Reduce the quantity of moisture and/or yeast. |
| On cutting the loaf the centre is found to be hollow. | Too much water and/or yeast added, no salt added. | Reduce the quantity of moisture and/or yeast, and add more salt. |
| Powder remaining in the baking tin. | Too little water added. Use | more water. |
Table 2

natural_image
Warning symbol with a brush and exclamation mark (no text or numbers present)Cleaning and maintenance
ATTENTION
• Always remove the plug from the wall socket before cleaning the appliance.
- Wait until the breadmaker has cooled down completely.
- IMPORTANT! The lid and/or housing must never be sprayed with or immersed in water or other liquids.
- Clean the exterior of the breadmaker solely with a damp cloth.
- Any stains on the interior of the lid or in the air slits will be on the surface only; these stains develop during the baking process. They have no influence on the performance of the appliance. After each use of the appliance remove these stains using a damp cloth with a little washing-up liquid.
- Clean the interior of the breadmaker solely with a damp cloth.
- Remove the breadmaker's lid by sliding it upwards in the attachment slots and lifting it clear (see drawing).
- Replace the lid in the reverse sequence.

natural_image
Diagram of a vehicle's rear suspension system with directional arrows indicating movement (no text or labels)Figure 3
- Use only warm water to clean the baking tin. Avoid scratching the non-stick layer.
- Verify that the breadmaker has cooled down completely before storing it in a cupboard.

ATTENTION
Never use the following cleaning agents utensils:
- Paint thinners;
- White spirit or petrol;
- Scourers;
- Polish;
• Chemical cleaning cloths.
Care of the non-stick coating
Avoid damage to or scratches in the non-stick coating. Never use sharp objects such as metal spatulas, knives or forks. The colour of the coating can change over the course of time. This is caused by the repeated moistening and heating of the coating. However, it has no influence on the quality of the bread baked by the breadmaker. The opening in the centre of the kneading blades must be cleaned at regular intervals; after cleaning, lubricate with a drop of edible oil. This will prevent the kneading blades from sticking to the drive shafts. Remove any dust from the ventilation openings.
Storing of the breadmaker
Make use that all parts are dry. Check that there is no moisture inside the appliance. Close the lid; do not put anything on the lid.
Technical details
Type: DBM400
Output: 660W
Power supply: 230V \~ 50Hz

natural_image
Symbolic illustration of a tree above a trash bin with crossed lines, no text or labels present.The environment
Dispose of packaging material, such as plastic and boxes, in the appropriate waste containers.
When this product reaches the end of its useful life do not dispose of it by putting it in a dustbin; hand it in at a collection point for the reuse of electrical and electronic equipment. Please refer to the symbols on the product, the user's instructions or the packaging.
The materials can be re-used as indicated. Your help in the re-use, recycling or other means of making use of old electrical equipment will make an important contribution to the protection of the environment.
Contact your municipality for the address of the appropriate collection point in your neighbourhood.
Warranty terms
The importer guarantees the appliance against defects caused by manufacturing and/or material faults for 60 months from the date of purchase, subject to the following conditions.
- No charges will be made for labour costs or materials during the warranty period. Any repairs carried out during the warranty period do not extend the warranty period.
- The importer automatically becomes the owner of any faulty parts that he replaces or a faulty appliance (in the event of replacement of the appliance).
- All claims submitted under warranty must be accompanied by the original bill of sale.
- Claims under warranty must be submitted to the dealer where the appliance was purchased or to the importer.
- The warranty is issued solely to the first purchaser and cannot be transferred.
- The warranty does not cover damage caused by:
a. Accidents, incorrect use, wear and/or neglect.
b. Faulty installation and/or use in a manner contravening the prevailing legal, technical or safety regulations.
c. Connection to a mains voltage other than the voltage specified on the type plate.
d. Unauthorized modifications.
e. Repairs carried out by third parties.
f. Careless transport, i.e. without suitable packaging materials or protection.
- No claims may be made under this warranty for:
a. Losses incurred during transport.
b. The removal or changing of the appliance's serial number.
-
The guarantee does not cover power cords, lamps or glass parts.
-
No claims can be submitted under this warranty for damage other than the repair or replacement of faulty parts. The importer can never be held responsible for any consequential loss or damage or any other consequences, resulting either directly or indirectly from the appliance supplied by the importer.
-
In case of claims under guarantee you can contact your dealer where the appliance is purchased. Bestron offers you also the possibility to send the appliance directly to our Service Department. Do not send your appliance without consulting us. The package may be refused and any any costs will be for your account. Please contact the Service Department and they will tell you how to pack and send the appliance.
-
This appliance is not suitable for professional use.
Service
If a fault should occur please contact the BESTRON service department:
THE NETHERLANDS:
BESTRON NEDERLAND BV
BESTRON SERVICE
Moeskampweg 20
5222 AW 's-Hertogenbosch
Tel: +31 (0) 73 - 623 11 21
Fax: +31 (0) 73 - 621 23 96
Email: info@bestron.com
Internet: www.bestron.com
CE Declaration of conformity
This product conforms to the essential requirements of the following EU safety directives:
• EMC Directive 2004/108/EC
• Low Voltage Directive 2006/95/EC
R. Neyman
Quality control

natural_image
Abstract line drawing with intertwined curves and a looped shape (no text or symbols)Recipes
Units of measure
ml: millilitre
g: gram
tsp: teaspoon
Tbsp: tablespoon
| Basic recipe Ingredients Unit | |||
| Weight: approx. 900 gTime setting: possible | WeightWaterRye flourSugarSaltDried yeast | 9mlgTbsptspg | 9004006101210 |
| Program: 3 Add the ingredients in the abovesequence. | |||
| White bread Ingredients Unit | |||
| Weight: 900 gTime setting: not possible, in view of the addition of milk | MilkWhite flourButter (soft)SugarSaltDried yeast | mlggtsptspg | 29057035128 |
| Program: 1 Add the ingredients in the abovesequence. | |||
| Herb bread Ingredients Unit | |||
| Weight: approx. 900 gTime setting: possible | WaterLeavenRye flourSugarSaltBlack pepper (ground)Mixed herbsDried yeast | mlggtspTbsptspgg | 36090360111236 |
| Program: 3 Add the ingredients in the abovesequence. | |||
| Wholemeal bread Ingredients Unit | |||
| Weight: approx. 900 gTime setting: possible | WaterPine honeyWholemeal flourSaltDried yeast | mlTbspg tspg | 315 212 590210 |
| Program: 3 Add the ingredients in the abovesequence. | |||
| Savoury ham bread Ingredients | Unit | ||
| Weight: approx. 900 gTime setting: possible | Water | ml | 325 |
| Leaven | g | 120 | |
| Rye flour | g | 300 | |
| White flour | g | 30 | |
| Sugar | tsp | 1 | |
| Salt | Tbsp | 1 | |
| Dried yeast | g | 8 | |
| Add after beep:Ham cubes | g | 160 | |
| Program: 3 Add the ingredients in the abovesequence. | |||
| Three-grain bread Ingredients Unit | |||
| Weight: approx. 900 gTime setting: not possible, because of addition of milk and egg | MilkThick sour milkEggButter or margarineWhite flourHerbal saltDried yeastAdd after beep:LinseedWheat grainSunflower seeds | mlTbspstukggtspg | 900 112 14545036234523 |
| Program: 3 Note: you can also replace wheat grain with sesame seed or pumpkin seeds. | |||
| Onion bread Ingredients Unit | |||
| Weight: approx. 900 gTime setting: possible | WaterSunflower oilWhite flourSugarHerbal saltGrilled onionsDried yeast | mlTbspgtsptspgg | 290257013708 |
| Program: 1 Add the ingredients in the abovesequence. | |||
| Beer bread Ingredients Unit | |||
| Weight: approx. 900 gTime setting: not recommended | Water | ml | 135 |
| Beer | ml | 135 | |
| Leaven (liquid) | ml | 135 | |
| Malt syrup | Tbsp | 112 | |
| White flour | g | 490 | |
| Buckwheat flour | Tbsp | 3 | |
| Bran | Tbsp | 112 | |
| Sesame seed | Tbsp | 3 | |
| Salt | tsp | 2 | |
| Dried yeast | g | 6 | |
| Program: 1 Add the ingredients in the abovesequence. | |||
| Raisin bread with cinnamon Ingredients Unit | |||
| Weight: approx. 900 gTime setting: not possible | MilkSoft butterWhite flourSugarSaltCinnamonDried yeastAdd after beep:Raisins | mlggtsptspg | 24030430601 112 870 |
| Program: 1 Tip: Rinse the raisins with hot waterand sprinkle with flour before adding them to the dough. This will prevent all the raisins sinking to the bottom. | |||
| Almond bread with apricots Ingredients Unit | |||
| Weight: approx. 900 gTime setting: not possible | MilkSoft butterEggWhite flourSugarSaltDried yeastAdd after beep:Apricots (dried/finely cut)Almonds (finely chopped) | mlgpieceggtspg | 18055154070 12 84545 |
| Program: 4 Add the ingredients in the abovesequence. | |||
natural_image
Warning symbol with a brush and warning triangle (no text or numbers)natural_image
Diagram of a vehicle's rear suspension system with arrows indicating movement (no text or labels)Figura 2
natural_image
Two symbolic icons: a tree above a circular background and a crossed-out trash bin below a solid black rectangle (no text or symbols)natural_image
Abstract line drawing with intertwined curves and a looped shape (no text or symbols)Ricette
Unità di misura
ml: millilitro
g: gramm
oc: cucchiaino
C: cucchiaio
text_image
Technical diagram of a coffee maker with numbered parts for identification and assembly reference.Figura 1 Partes del aparato
Cuisson/bakken (Hornear)
natural_image
Warning symbol with a brush and exclamation mark (no text or numbers present)natural_image
Diagram of a vehicle's cross-section showing airflow or traffic flow between two curved road surfaces (no text or symbols)Figura 3
natural_image
Two symbolic icons: a tree above a circular background and a crossed-out recycling bin with a battery (no text or symbols)Medio ambiente
natural_image
Abstract line drawing with intertwined curves and a looped shape (no text or symbols)Recetas
Unidades de medida
ml: militro
g: gramo
ctda.: cucharadita
cda.: cucharada
natural_image
Line drawing of a standard loaf of bread maker with control panel and buttons (no text or symbols)BESTRON®
DBM400
v 090410-05