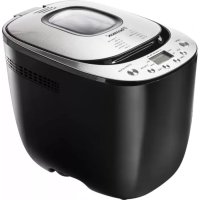
ABM3000B - Bread maker BESTRON - Free user manual and instructions
Find the device manual for free ABM3000B BESTRON in PDF.


| Brand | Bestron |
| Model | ABM3000B |
| Product type | Bread machine |
| Capacity | 700 g and 900 g |
| Number of programs | 12 programs (Basic, French, Whole wheat, Rapid, Sweet, Dough, Gluten-free, Cake, Sandwich, Butter/Milk, Knead, Bake) |
| Crust setting | Light, medium, dark |
| Delay timer | Up to 13 hours |
| Keep warm | Up to 60 minutes |
| Power failure memory | 10 minutes |
| Pan coating | Non-stick |
| Viewing window | Yes |
| Accessories included | Bread pan, kneading hook, measuring cup, measuring spoon, auxiliary hook |
| Cleaning | Clean exterior with damp cloth; pan with hot water; do not immerse housing |
| Safety | Automatic stop at end of program; overheat protection (display HHH); temperature sensor |
| Warranty | 60 months (see conditions) |
Frequently Asked Questions - ABM3000B BESTRON
User questions about ABM3000B BESTRON
0 question about this device. Answer the ones you know or ask your own.
Ask a new question about this device
Download the instructions for your Bread maker in PDF format for free! Find your manual ABM3000B - BESTRON and take your electronic device back in hand. On this page are published all the documents necessary for the use of your device. ABM3000B by BESTRON.
USER MANUAL ABM3000B BESTRON
natural_image
Black and white photo of a BASTRON brand wheat bread maker with control panel and digital display (no visible text or symbols on the device itself)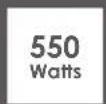

ABM3000B INSTRUCTION MANUAL
DE
Bedienungsanleitung
FR
Mode d'emploi
NL
Handleiding
EN
Instruction manual
IT
natural_image
Two circular diagrams showing a mechanical component being lifted by a bolt, with no text or symbols present.R. Neyman Quality control
natural_image
Two circular diagrams showing a mechanical component with a downward arrow and a moving box with rotational arrows (no text or symbols)DÉCLARATION DE CONFORMITÉ CE
WAT U MOET WETEN OVER DIT APPARAAT
natural_image
Two circular diagrams showing a mechanical component with a downward arrow and a moving box with rotational arrows (no text or symbols)
R. Neyman
Quality control
GARANTIEBEPALINGEN
Congratulations with the purchase of this Bestron product. These instructions tell you how the product works and how to use it. Read the instructions carefully before you start using the appliance. Only use the appliance in the manner described in the instructions. Keep these instructions in a safe place for future reference.
Defects:
If the appliance is defective, do not try to repair it yourself. Always have a qualified mechanic carry out any repairs.
Children:
- This appliance may be used by children over the age of 8 years old and persons with reduced physical, sensory or mental capabilities or lack of experience and know-how, but only if supervised or if they have been instructed on how to use the appliance safely and are aware of its potential dangers.
• Children are not allowed to clean and maintain the appliance, except if they are over the age of 8 years old and supervised. - Keep the appliance and the cable out of reach of children under the age of 8 years old.
- Keep an eye on children to ensure that they do not play with the appliance.
WHAT YOU SHOULD KNOW ABOUT ELECTRICAL APPLIANCES
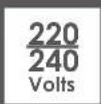
- Check that the mains voltage corresponds with that shown on the rating plate of an electrical appliance before you use it.
- Check that the socket to which you connect the electrical appliance is earthed.
• Always install electrical appliances on a stable and level surface where it cannot fall over.
• Certain parts of an electrical appliance may become warm or sometimes hot. Do not touch them as you may burn yourself.
• Make sure your hands are dry when you touch an electrical appliance, a cord or a plug. - Electrical appliances must be able to lose their heat to avoid fire hazards. Therefore, make sure that the appliance has sufficient clearance around it and that it does not come into contact with flammable materials. Electrical appliances must never be covered.
• Make sure that electrical appliances, cords or plugs do not come into contact with water. -
Never immerse electrical appliances, cords or plugs in water or any other liquid.
-
Do not touch electrical appliances if they have fallen in the water. Immediately pull the plug out of the socket. Stop using the appliance.
• Make sure that electrical appliances, cords and plugs do not come into contact with heat sources, such as a hot hob or open fire. - Never let cords hang over the edge of the sink, a worktop or a table.
• Always remove plug from the socket when you are not using the electrical appliance. - Remove the plug from the socket by pulling the plug itself and not the cord.
- Regularly check if the cord of the electrical appliance is not damaged. Do not use the electrical appliance if the cord shows signs of damage. If the cord is damaged, it should be replaced by the manufacturer, a technical service provider or a person with an equivalent qualification, to avoid any danger.
- The appliance may not be switched on with the aid of an external time switch, or by a separate system with remote control.
WHAT YOU NEED TO KNOW ABOUT THIS DEVICE
- Never use the appliance outdoors.
- Never use the device in damp rooms.
- Do not use accessories that are not supplied with the machine. This can damage the machine.
- Do not touch moving or rotating parts of the machine when the machine is switched on.
- Never move the appliance when it is switched on or still warm.
- Never turn on the appliance without properly placing the bread pan with the correct ingredients.
- Ensure sufficient free space around the appliance (minimum 10 cm) and above (minimum 30 cm).
- Parts of the appliance become hot during use. Always use the handle to open and close the cover.
- Do not place heavy objects on the cover to keep the device closed.
- Avoid getting water on the hot bread pan. This can cause the bread pan to deform and no longer fit into the appliance.
- Metal foils or other materials should not be placed in the bread maker. This can create the risk of fire or short circuit.
- Clean the appliance thoroughly after use (see ‘Cleaning and maintenance’).
USE - Before the first use
- Carefully remove your new bread maker from the packaging and remove all packaging materials.
- Remove any dust that may have been trapped during packing.
- Clean your bread maker with a damp cloth.
- The bread pan has a non-stick coating. Do not use abrasives.
- Grease the bread pan with oil or margarine before first use.
- Place the bread pan without the kneading hook and let the appliance work for 3 to 5 minutes without content. (Use the "Baking" program for this).
- Let your device cool down and repeat the cleaning.
- Take the bread pan out of the bread maker.
- Lightly grease the drive shaft with a little baking butter or oil and place the kneading hook on the shaft. During the production of this device it is necessary to lubricate components and therefore the device may give off a little smoke during the first firing. However, this effect is completely normal.
ENVIRONMENT

- Dispose of packaging material such as plastic and cardboard boxes in the designated containers.
- Do not dispose of this product as normal domestic waste at the end of its life, but hand it in at a collection point for the reuse of electric and electronic equipment. Look for the symbol on the product, the user instructions or the packaging showing the type of waste.
- The materials can be used as indicated. By helping us reuse and process the materials or otherwise recycle the old equipment, you will be making an important contribution towards the protection of the environment.
- Your municipality can tell you where to find the designated waste collection point in your neighbourhood.
The appliance is only intended for household purposes, not for professional use.
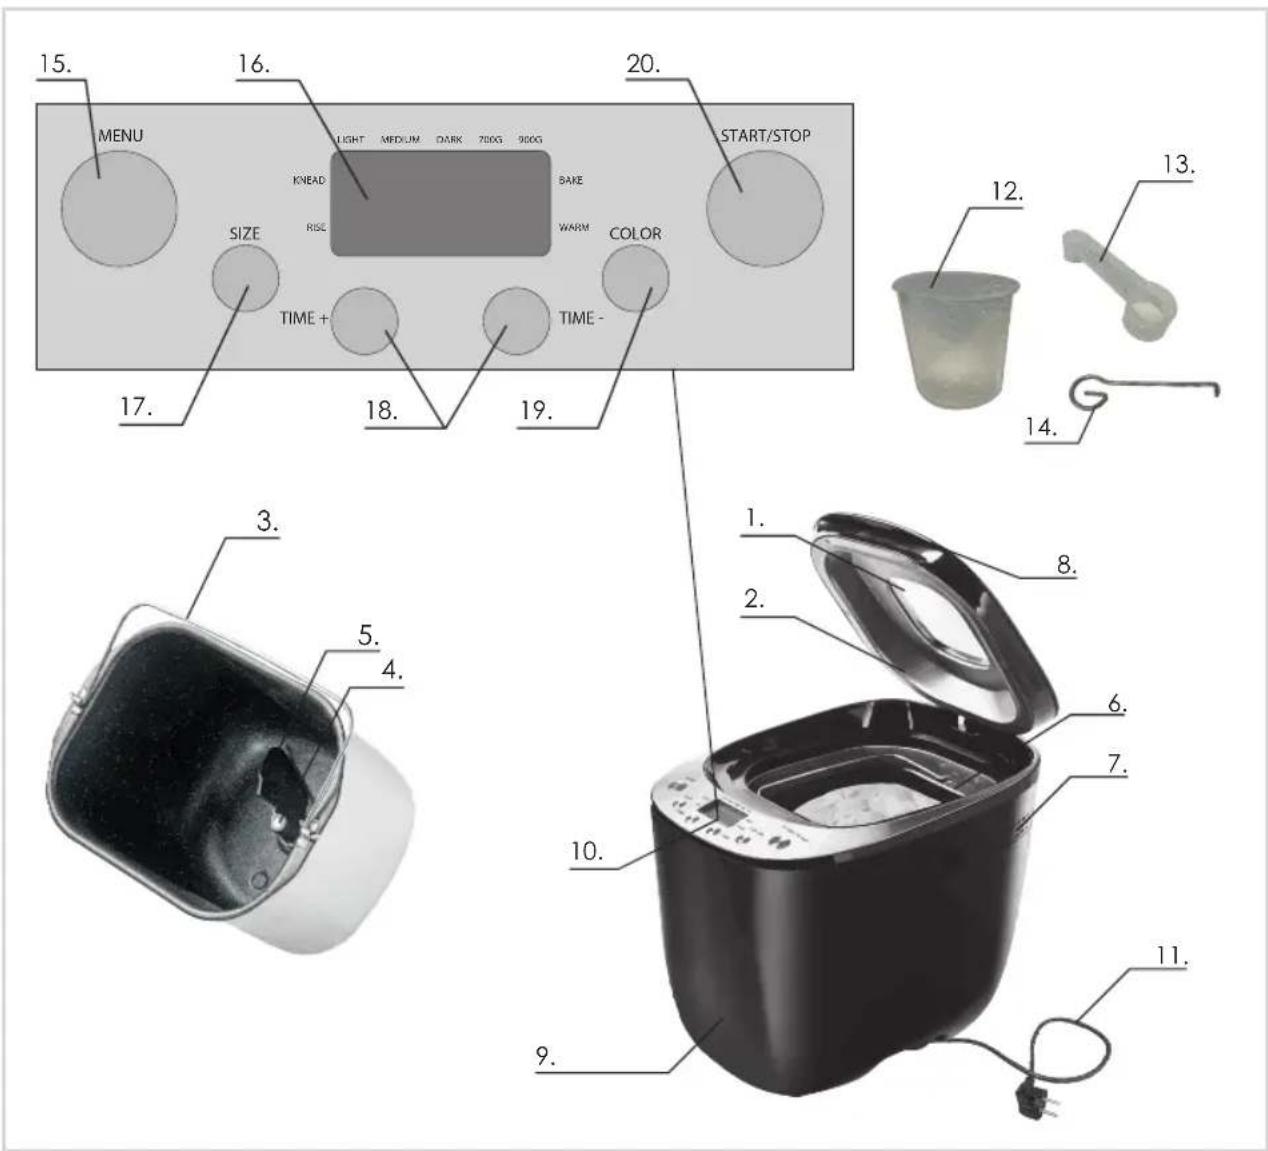
- Viewing window
- Cover
- Handle
- Drive shaft
- Kneading Hook
- Bread pan
- Ventilation opening
- Cover handle
- Casing
-
Operator Panel
-
Power cord with power cable
- Measuring cup
- Measuring spoon
- Auxiliary hook
- Program key
- Display
- Size key
- Timer keys
- Colour key
- Start/stop-key
USE - Display
After switching on
As soon as the bread maker is connected, a beep will sound and after a short time "3:10" will appear on the display. The two points between "3" and "10" flash. The arrow points to 900 g and MEDIUM. This is the standard setting.
Start/Stop
This button is used to start and stop the selected baking program. You will hear a short beep and the two dots on the LCD screen will start flashing, the work light will come on and the program will start. Any other button is deactivated to avoid any accidental disturbance to the operation of the program. To stop the program, press approx. 2 sec. on this button. You will now hear a beep, the work light will go out and the program will stop.
Pause function
Also use the START/STOP button to pause a running program. Press the button again to resume the program. Otherwise, the program will automatically resume after 10 minutes.
Menu
Select the desired program with this button. Each time it is pressed, the program will vary. The programs are described in the chapter "Program description".
Colour
Select a light, medium or dark crust colour with this button. Each time it is pressed, the display will show a different crust colour. Note: This button does not apply to the programs "Dough" and "Knead".
Measurement
Select the weight of the bread with this button. Each time it is pressed, the display will show a different weight. Note: this button does not apply to the programs "Quick Bake", "Dough", "Cake", "Knead" and "Baking".
Time delay
Use the TIME + and TIME - buttons to set any delay time. The maximum delay duration is 13 hours. That includes the baking time.
Example: it is now 8.30 pm and a loaf of bread should be baked at 7 am the next morning.
First calculate the total time difference. In this case, the time difference is 10 hours and 30 minutes.
Set the time to 10.30 am with the TIME + and Time - keys.
To complete the time setting, press the START/STOP button.
The bread will be ready at 07:00.
Note: this button does not apply to the "Baking" program. And for delayed baking don't use ingredients that spoil quickly, such as eggs, fresh milk, fruit, onions, etc.
Keep warm
Bread is automatically kept warm for a maximum of 60 minutes after baking. If you want to take out the bread,
switch off this function by pressing START/STOP.
Memory
In the event of a power failure, the appliance keeps the current program in memory for 10 minutes. If power is restored within 10 minutes, the program will resume where it left off. If the power failure lasts longer than 10 minutes, the program must be restarted manually.
If the program was only in the kneading phase, you can press the START/STOP button to move on. If the process already continued, you'll have to start all over again with new ingredients.
Warnings in the display
Display shows: "H HH"
This then means: the temperature in the device is too high. Stop the program, open the cover and let it cool down for 10 to 20 minutes.
Display shows: "L LL"
This then means: the temperature in the device is too low. Stop the program, open the cover and let it run device to reach room temperature for 10 to 20 minutes.
Display shows: "E rr"
This then means: the temperature sensor is broken or disconnected. Stop the program and have the device repaired by an authorised expert.
USE - Program description
1. Basic (3 hours and 10 minutes)
For kneading, rising and baking normal bread. You can also add ingredients to increase flavour.
2. French bread (4 hours)
For kneading, rising and baking with a longer rising time. The bread baked in this menu usually has a crispy crust and light texture.
3. Wholemeal bread (3 hours and 32 minutes)
For kneading, rising and baking wholemeal bread. It is not recommended to use the delay function as this can lead to poor results.
4. Rapid baking program (2 hours and 25 minutes)
For baking in a shorter time than the basic program. The bread is usually a bit smaller and has a dense texture.
5. Sweet breads (3 hours and 5 minutes)
For baking sweet breads. You can also add ingredients to add flavour.
The sweet breads get a crispy crust. This is created by a strong heating of sugar.
6. Dough (1 hour and 30 minutes)
For kneading and rising only. So the dough does not bake. For example, for making sandwiches, pizza, steamed bread, etc.
7. Gluten free (3 hours and 35 minutes)
For baking gluten-free bread. You can also add ingredients to add flavour.
8. Cake (2 hours and 55 minutes)
For kneading, rising and baking, rise with baking soda or baking powder instead of yeast.
9. Sandwich (3 hours and 15 minutes)
For baking bread with a lighter consistency and a thin crust.
10. Butter Milk (3 hours and 15 minutes)
For making bread with butter, milk or yoghurt.
11. Knead (18 minutes)
Kneading only. The dough does not rise and therefore does not bake.
12. Baking (60 minutes)
For baking only, so no kneading and rising. Also used to set the baking time on selected settings. When selecting this program, the minimum delay time is 10 minutes.
USE - Baking times table
The baking times table below shows how each program is structured. It can also determine when, if necessary, ingredients can be added.
| PROGRAMME | VOLUME P | ARAMTR. | TOTAL RECORD TIME | KNEADING 1 | RISING 1 | KNEADING 2 | RISING 2 | RISING 3 | BAKING LIGHT | BAKING MEDIUM | BAKING DARK | KEEPING WARM |
| 1. BASIC | 700G | TIME 03:03 9 20 14 25 | 40 75 75 75 60 | |||||||||
| TEMP. °C --- 26 31 33 | 35 91 100 109 | 60 | ||||||||||
| 900G | TIME 03:10 10 20 15 25 | 40 80 80 80 | 60 | |||||||||
| TEMP. °C --- 26 31 33 | 35 91 100 109 | 60 | ||||||||||
| 2. FRENCH | 700G | TIME 03:50 16 40 19 30 | 45 80 80 80 | 60 | ||||||||
| TEMP. °C --- 26 31 33 | 35 91 100 109 | 60 | ||||||||||
| 900G | TIME 04:00 18 40 22 30 | 45 85 85 85 | 60 | |||||||||
| TEMP. °C --- 26 31 33 | 35 91 100 109 | 60 | ||||||||||
| 3. WHOLE WEAT | 700G | TIME 03:47 9 25 18 35 | 60 80 80 80 | 60 | ||||||||
| TEMP. °C --- 26 31 33 | 35 91 100 109 | 60 | ||||||||||
| 900G | TIME 03:55 10 25 20 35 | 60 85 85 85 | 60 | |||||||||
| TEMP. °C --- 26 31 33 | 35 91 100 109 | 60 | ||||||||||
| 4. QUICKBOX - | TIME 02:25 10 12 13 - | 30 80 80 80 | 60 | |||||||||
| TEMP. °C --- 26 31 - 35 | 91 100 109 | 60 | ||||||||||
| 5. SWEET | 700G | TIME 03:00 10 5 20 34 | 40 75 75 75 | 60 | ||||||||
| TEMP. °C --- 26 31 33 | 35 91 100 109 | 60 | ||||||||||
| 900G | TIME 03:05 10 5 20 34 | 40 80 80 80 | 60 | |||||||||
| TEMP. °C --- 26 31 33 | 35 91 100 109 | 60 | ||||||||||
| 6. DOUGH - | TIME 01:30 | 18 | - | - | 30 | 42 | - | - | - | - | - | |
| TEMP. °C | - | - | - | 33 | 35 | - | - | - | - | - | ||
| 7. GLUTEN FREE | 700G | TIME 03:30 12 20 13 45 | 45 75 75 75 | 60 | ||||||||
| TEMP. °C | - | - | 26°C | 31 | 33 | 35 | 91 | 100 | 109 | 60 | ||
| 900G | TIME 03:35 12 20 13 45 | 45 80 80 80 | 60 | |||||||||
| TEMP. °C | - | - | 26°C | 31 | 33 | 35 | 91 | 100 | 109 | 60 | ||
| 8. CAKE | - | TIME 02:55 10 5 20 30 | 35 75 75 75 | 60 | ||||||||
| TEMP. °C --- 26 31 33 | 35 91 100 109 | 60 | ||||||||||
| 9. SANDWICH | 700G | TIME 03:10 15 30 5 25 | 40 75 75 75 | 60 | ||||||||
| TEMP. °C --- 26 31 33 | 35 91 100 109 | 60 | ||||||||||
| 900G | TIME 03:15 15 30 5 25 | 40 80 80 80 | 60 | |||||||||
| TEMP. °C --- 26 31 33 | 35 91 100 109 | 60 | ||||||||||
| 10. BUTTER | 700G | TIME 03:10 10 20 15 35 | 30 80 80 80 | 60 | ||||||||
| TEMP. °C --- 26 | - | 31 33 35 | 91 100 109 | 60 | ||||||||
| 900G | TIME 03:15 10 20 15 40 | 30 80 80 80 | 60 | |||||||||
| TEMP. °C --- 26 31 33 | 35 91 100 109 | 60 | ||||||||||
| 11. KNEADING | - | TIME 00:18 | 18 | - | - | - | - | - | - | - | - | - |
| TEMP. °C | - | - | - | - | - | - | - | - | - | - | ||
| 12. BAKING - | TIME 01:00 | - | - | - | - | - | - | 60 | 60 | 60 | 60 | |
| TEMP. °C | - | - | - | - | - | - | 91 | 100 | 109 | 60 |
The kneading hook can be removed after 2 x kneading to avoid holes in the bread.
USE - Working with the bread maker
Note: for the best results, you must adhere to the quantities and weights mentioned.
Note: if the dough in the appliance expands too much and immediately collapses again, or does not expand at all, the cause is probably in the amount of yeast used. Try again with the correct amount of yeast.
USE - Baking a loaf
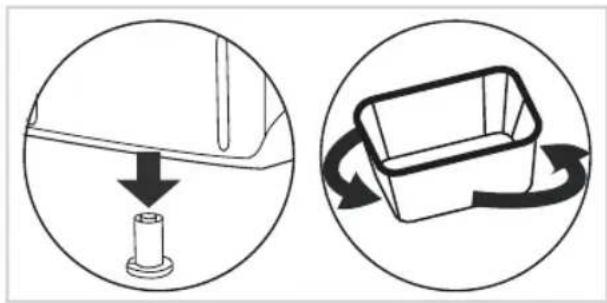
- Open the cover and turn the bread pan to the left until it unlocks. Then take the bread pan out of the appliance by the handle.
Note: always use oven gloves when opening the cover and touching the bread pan.
Note: fill the bread pan outside the appliance so that no ingredients get into the appliance. - Simply attach the kneading hook to the drive shaft. Lightly grease the axle with baking butter so that the hook can be easily removed later.
- Measure all ingredients accurately according to the recipe and put them in the bread pan in the correct order:
A. Put lukewarm water or milk at the bottom of the bread pan.
B. Then add salt, sugar and flour/bread mix.
C. Make a small hole in the top of the flour and add yeast or baking powder.
Note: The yeast must not come into contact with the water. This immediately starts the fermentation process.
Note: If your recipe contains ingredients can be crushed fine, do not add them until later, for example at the end of the 2nd kneading. The appliance gives a signal that you can add the ingredients to the dough.
-
Put the bread pan back in place and turn to the right until it locks.
-
Close the cover and plug in the power cord. The display lights up and automatically shows the first program with the corresponding time.
-
Select a program with the menu button.
-
Select the crust colour with the colour key.
-
Choose the size with the size key.
-
If necessary, set a time delay with the Time + and Time - keys.
-
Start the program with the START/STOP button. The program will start and the time remaining will be shown in the display. The colon in the time display flashes to indicate that the program is running.
Note: if a delay time has been set, the device will not start when you press the START/STOP button. The program will only start according to the set time.
- The bread maker now automatically runs through all steps of the preset program you have set. On the display you can see which step of the program the appliance is working on. During the baking process, vapor can come out through the vents. This is completely normal.
Note: remove the dough hook after kneading and before rising to avoid holes in the bread. Open the cover and remove the kneaded dough from the bread pan. First, cover your hands with flour so that the dough doesn't stick to your hands. Remove the hook from the dough. Return the dough to the bread pan and close the cover.
natural_image
Two circular diagrams showing a mechanical component being inserted into a housing, with no text or symbols present.- During the Basic, French bread, Wholemeal bread, Sweet breads, Gluten-free, Sandwich and Butter Milk programs, you will hear various signal tones that indicate that you can add ingredients. Open the cover, add the ingredients and close the cover again.
- When the program has finished, you will see 0:00 in the display and a signal tone will be heard. The display then shows the original running time of the program. Hold down START/STOP for approx. 2 sec. You can now open the cover and take out the bread pan by turning the handle counter-clockwise so that it unlocks. (Note: the pan can be hot!)
- Let the bread cool down in the bread pan for 5 to 10 minutes. Then loosen the sides a little with a spatula. Carefully remove the bread and let it cool for 20 minutes before slicing.
Note: if the kneading hook has not been removed after the kneading process, the kneading hook is still in the bread when you take it out of the bread pan. Let the bread cool down first and then carefully remove the kneading hook, if necessary with the help of the auxiliary hook, before cutting it.
- If the START/STOP is not pressed at the end of the program, the machine switches on the keep warm function. This applies to most programs. For best results, remove the loaf pan within the specified time. A signal tone will be heard when the keep warm function has ended. You can stop the function by pressing the "START/STOP" button.
- Unplug the power cord when you're finished using the bread maker.
Note: always use oven gloves when opening the cover and touching the bread pan.
Note: preferably never open the cover of the bread maker while a program is running. This can affect the quality of the bread. If you do need to open the cover to add ingredients, do this quickly so that the temperature in the bread maker doesn't drop too much.
CLEANING AND MAINTENANCE
• Before any cleaning, unplug the appliance.
- Wait until the bread maker has cooled down completely.
- Do not spray or immerse the cover and/or casing in liquids or water.
- Only clean the outside of the bread maker with a damp cloth.
- Stains on the inside of the cover or in the air slots are only external phenomena and arise during the baking process. They do not affect the operation of the device. After each use, polish these stains with a damp cloth and a little washing-up liquid.
- Only clean the inside of the bread maker with a damp cloth.
- Only use warm water for cleaning the bread pan. Avoid scratching the non-stick coating.
• Make sure the bread maker is completely cool before putting it away.
- Use chemical cleaning agents, scouring pads, etc.
TROUBLE SHOOTING
| PROBLEM CAUSE SOLUTION | ||
| The bread crust is too thick | The bread has been kept warm for too long and has dried out | Take the bread out of the bread pan faster after the program has ended |
| The bread rises too fast | Too much yeast and flour and not enough salt have been used | Carefully weigh and add ingredients |
| The bread is not baked properly in the centre | - Too much or too little water used- Recipes with moist ingredients | - Carefully weigh and add ingredients- Use a little less water (1 to 2 teaspoons) |
| Ingredients are not mixed and/or baked properly | - Wrong program has been selected- Dough is too thick so that it cannot be stirred properly | - Select the correct program- Add enough moisture |
| The display shows HHH | The temperature in the bread maker is too high | Press START/STOP, open the cover and allow to cool |
| The result has a heavy and bulky texture | - Using too much flour or using too little moisture- Not enough yeast or sugar | Carefully weigh and add ingredients |
| The bread does not rise at all or not enough | - Not enough yeast- Yeast is old- Moisture is too hot- The moisture has come into contact with the yeast too quickly- Wrong flour- Too much or too little moisture- Not enough sugar | - Carefully weigh and add ingredients- Use moisture that has cooled slightly more |
| The bread goes down in the middle | - The dough volume is too big for the pan- The fermentation was too short or the fermentation was too fast- Too high humidity in the bread pan | - Use another liquid or leave it to cool at room temperature. Add the ingredients in the correct order, make a small ditch in the centre of the flour and put in the crumbled yeast or the dry yeast, do not let the yeast and liquid come into direct contact- Use cold water |
| The pieces of bread are uneven or have lumps in the centre | The bread has not been cooled well enough | Let the bread cool better |
| The motor makes noises but the dough is not kneaded | The baking pan is not properly attached or the dough is too stiff to knead | Check that the baking pan is properly attached and always carefully weigh the ingredients of the dough |
| The bread remains too small | No yeast has been used, or the effect of the yeast is insufficient | Provide the good environmental conditions for yeast |
| The dough rises from the baking tin | There is too much moisture and/or yeast present | Reduce the amounts of moisture and/or yeast |
| The bread does not come out of the bread pan easily | The bottom of the bread is attached to the kneading hook | Grease the dough hook with butter/oil before you start. |
| The centre of the loaf appears to be hollow | Too much water and/or yeast and/or too little salt has been used | Reduce the amounts of moisture and/or yeast and use more salt |
| Powder remains in the baking tin Too little water has been used Use more water | ||
CE DECLARATION OF CONFORMITY
This product meets the requirements of European guidelines.
R. Neyman
Quality control
WARRANTY CONDITIONS
Bestron offers a 60-month warranty on this equipment against defects resulting from manufacturing and/or material errors, subject to the following conditions.
- No labour or material costs will be charged during this warranty period.
- Any repairs carried out under the warranty will not extend the warranty period.
- Faulty parts, or in the event of exchange, the faulty equipment itself, will automatically become the property of Bestron.
- The warranty is valid for the first buyer only and is non-transferable.
- The warranty is not valid for damage caused by:
- Accidents
- Improper use
- Wear and tear
- Neglect
- Faulty installation
- Connection to a different mains voltage than indicated on the type plate
- Unauthorised changes
• Repairs carried out by unqualified third parties - Use in violation with the applicable statutory, technical or safety standards
-
Careless transport without suitable packaging or other protection
-
Warranty cannot be claimed:
-
For damage during transport
-
If the serial number of the appliance is removed or changed
-
Items excluded from warranty are:
-
Cords
- Lamps
- Glass parts
- Filters
- The warranty does not entitle the purchaser to compensation for any damage other than replacement or repair of the faulty parts. Bestron cannot in any event be held liable for any indirect or consequential losses caused by or in relation to the equipment it has provided.
- Claims under a warranty may only be submitted to your (online) retailer or directly to the Bestron Service Department. Never send items without being asked to. We may refuse the parcel and you will be liable for the costs. Contact us first and we tell you how the appliance should be packaged and sent. Each claim under a warranty must be accompanied by the relevant receipt.
SERVICE
If an unexpected problem occurs, please contact the BESTRON service department:
www.bestron.com/service
COMPLIMENTI!
natural_image
Two circular diagrams showing a mechanical component with a downward arrow and a moving box with rotational arrows (no text or symbols)natural_image
Two circular diagrams showing a mechanical component being inserted into a housing, with arrows indicating motion (no text or symbols)natural_image
Two circular diagrams showing a mechanical component being inserted into a housing and then moving a box with rotational arrows (no text or symbols)R. Neyman
Kvalitetskontroll
GARANTIBESTÄMMELSER
- Felaktig installation
NEED HELP? CHAT WITH US! WHATSAPP CUSTOMER SERVICE

BESTRON.COM/WHATSAPP

- ABM3000B INSTRUCTION MANUAL
- DÉCLARATION DE CONFORMITÉ CE
- WAT U MOET WETEN OVER DIT APPARAAT
- GARANTIEBEPALINGEN
- Defects:
- Children:
- WHAT YOU SHOULD KNOW ABOUT ELECTRICAL APPLIANCES
- WHAT YOU NEED TO KNOW ABOUT THIS DEVICE
- USE - Before the first use
- ENVIRONMENT
- USE - Display
- After switching on
- Start/Stop
- Pause function
- Menu
- Colour
- Measurement
- Time delay
- Keep warm
- Memory
- Warnings in the display
- USE - Program description
- Basic (3 hours and 10 minutes)
- French bread (4 hours)
- Wholemeal bread (3 hours and 32 minutes)
- Rapid baking program (2 hours and 25 minutes)
- Sweet breads (3 hours and 5 minutes)
- Dough (1 hour and 30 minutes)
- Gluten free (3 hours and 35 minutes)
- Cake (2 hours and 55 minutes)
- Sandwich (3 hours and 15 minutes)
- Butter Milk (3 hours and 15 minutes)
- Knead (18 minutes)
- Baking (60 minutes)
- USE - Baking times table
- USE - Working with the bread maker
- USE - Baking a loaf
- CLEANING AND MAINTENANCE
- TROUBLE SHOOTING
- CE DECLARATION OF CONFORMITY
- Neyman
- Quality control
- WARRANTY CONDITIONS
- SERVICE
- COMPLIMENTI!
- GARANTIBESTÄMMELSER
Brand : BESTRON
Model : ABM3000B
Category : Bread maker