
Powerline 3600 E - Lawn mower AL-KO - Free user manual and instructions
Find the device manual for free Powerline 3600 E AL-KO in PDF.


| Product type | Electric lawn mower |
| Brand | AL-KO |
| Model | Powerline 3600 E |
| Cutting width | 36 cm |
| Cutting heights | 7 positions (1.6 cm to 7 cm) |
| Motor | Electric with brake, 1000 W |
| Voltage / Frequency | 230 V / 50 Hz |
| Protection | IPX4 |
| Sound level (LpA) | 90.4 dB(A) |
| Guaranteed sound power level | 91 dB(A) |
| Weight (estimated) | Approximately 12 kg |
| Grass catcher capacity | Approximately 30 L |
| Power supply | Mains, extension cord max 15 m (H05 VV-F or H05 RN-F) |
| Main features | Duo-Air-Management pneumatic system, grass catcher fill indicator, 7 cutting heights |
| Safety | Start circuit breaker, safety stop by releasing handles, blade brake in less than 3 seconds |
| Maintenance | Clean after use with brush, vertical folded storage |
| Warranty | 24 months for private use |
| Spare parts | Original replacement blade ref. 61605 (for 36 cm) |
| Repairability | Repairs only by authorized service center, use of original parts |
Frequently Asked Questions - Powerline 3600 E AL-KO
User questions about Powerline 3600 E AL-KO
0 question about this device. Answer the ones you know or ask your own.
Ask a new question about this device
Download the instructions for your Lawn mower in PDF format for free! Find your manual Powerline 3600 E - AL-KO and take your electronic device back in hand. On this page are published all the documents necessary for the use of your device. Powerline 3600 E by AL-KO.
USER MANUAL Powerline 3600 E AL-KO
natural_image
Line drawing of a lawn mower with handlebars and wheels (no text or symbols)D Original Betriebsanleitung
GB Translation of original user instructions
F Traduction du mode d'emploi original
nl Vertaling van de originele gebruikershandleiding
cZ Překlad originálního návodu k použití
PI Tłumaczenie oryginalnej instrukcji obsług
s Översättning av orginalbruksanvisning
Traduzione delle istruzioni per l'uso originali
E Traducción del manual de instrucciones original
P Tradução do manual de instruções original
InFormation I manuals I sErVIcE
EIEktro - rasEnmähEr
3300 E / 3600 E / 4100 E


CE
474422_a | 01/2011
Inhaltsverzeichnis - Contents - Contenu - Inhoudsopgave - Obsah - Spis treści
D
Please read these operating instructions carefully before assembling and using your machine.
- Operating parts 4
- Technical data (see Supplement to Operating Instructions)
- Notes on Safety 7
- Notes on these operating instructions 16
- Proper Use 16
- Assembly 16
- Putting into operation 16
- Information concerning correct mowing 18
- Maintenance / care / storage 19
- Troubleshooting 19
- Instructions for correct use / safety instructions 20
Warranty 21
EU Certificate of Conformity (see Supplement to Operating Instructions).
CZ
A
F
1 Hinged tension handle
2 Frame
3 Two-hand safety switch
4 Housing handle
5 Multi-function box
6 Locking lever
7 Cable strain relief
8 Cable
9 Ventilation slits
10 Start button
11 Safety hoop
12 Plug
13 Cable guide
14 Grass catcher
15 Locking disk
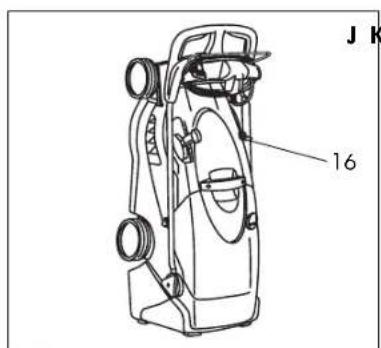
16 Retaining bar
17 Filling level indicator
Elementy funkcyjne – Funktionsdelar – Parti funzionali – Componentes – Componentes do funcionamento
natural_image
Diagram of a car with articulated arms and a curved arrow indicating motion (no text or symbols)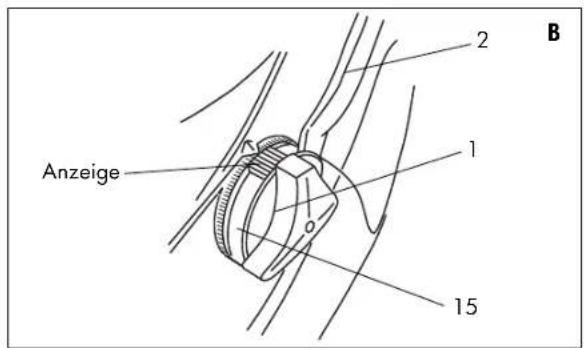
natural_image
Two stick figures in chair positions, one holding a rope and the other wrapped around it (no text or symbols)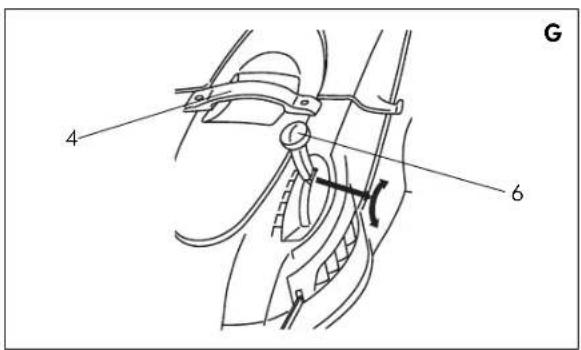




3. Sicherheitshinweise – Notes on Safety – Consignes de sécurité – V eiligheidsaanwijzingen – Bezpečnostní pokyny – Wskazówki dotyczące bezpieczeństwa – Säkerhetsanvisningar – Avvertenze di sicuezza – Indicaciones de seguridad – Instr uções de segurança
Please adhere to the following safety instructions on the appliance:
Be extremely cautious and attentive!
Warning! Read instruction handbook before starting!
Keep bystanders away from the danger zone!
Caution: Sharp knives – unplug power prior to repair or if the cable shows damage.
Keep the power cord away from the cutting tools!
Warning! The cutting tool continues to rotate for a short time after switching off the motor!
4. Notes on these Operating Instructions
Please read these operating instructions carefully and observe the notes they contain as well as the accompanying notes on safety. Use these operating instructions to familiarise yourself with how to operate and control your lawnmower, its proper use, and the notes on safety.
Warning! Never allow children or other people who are not familiar with these operating instructions to use this unit.
Local laws may specify a minimum age for users of this type of gardening equipment.
Never mow your lawn if other people, especially children and pets are nearby. Remember that the user or operator is responsible for all accidents that occur involving other people or their property.
Keep these operating instructions in a safe place.
5. Proper Use
The Brill lawnmower is intended for cutting lawns and areas of grass in domestic gardens and allotments and not for commercial use in public areas, parks, spor ts stadia, on streets and in agriculture and forestry.
Adherence to the instructions for use enclosed by Brill is a pre-condition for the proper use of
the equipment. The instructions for use also include the operating, care and maintenance instructions.
Warning! The mower must not be used for trimming bushes, hedges and herbaceous plants, for cutting and chopping weeds or for mowing lawns on rooftops or in balcony boxes because of the risk of physical
injury. Moreover, the machine may not be used as a shredder for cutting up tree and hedge trimmings or for rolling out uneven areas of ground.
Only use approved extension cords made of PVC (code H05 VV-F) or rubber (code H05 RN-F) with a maximum length of 15 m.
6. Assembly
Checking all the Parts are Included:
The box contains the following parts:
- Complete lawnmower
- Grass catcher
- Operating instructions
● Service centre directory
Fitting the Guide Handle
Remove the appliance from the packaging, release the guide bars with the retaining bar (fig. A1
Pos. 16), fold the guide bars (fig. A2) back, engage the guide bar at the required height (six height settings are possible, fig. B) and firmly screw it together with the left and right tension handles (fig. A pos. 1).
Warning! Ensure that the cable is not squeezed (fig. A pos. 8).
Environmental protection, disposal (pursuant to RL 2002 /96 EC)

The packaging material is made ao recyclable materials. Dispose of packaging materials in accordance
with regulations. Electrical appliances are not to be disposed of in the normal household waste, they must be professionally disposed of. Important for Germany:
electrical appliances are to be disposed of through your local disposal sites.
7. Putting into operation
Always carry out a visual inspection before using your lawnmower
to ensure that cutting tool, retaining bolts and entire cutting unit are
not worn or damaged. Always replace worn or damaged cutting
tools with new parts to ensure the lawnmower is properly balanced (see Maintenance, Care and Storage).
Only mow your lawn in daylight or when your lawn is lit by ample artificial lighting. If possible, avoid using the lawnmower when the grass is wet. Always ensure you have a sturdy stance when working on slopes and inclines.
Push the lawnmower at walking pace. Be particularly careful when turning the lawnmower or pulling it towards you. Always stop the cutting tool before tilting the lawnmower to move it over a sur face other than grass and when moving the lawnmower to and from the area of lawn you are planning to mow.
Never use the lawnmower if the safety devices or protective grilles are damaged, or if the installed safety devices, e.g. baffle plates and/or grass catching devices have been removed.
Warning! Do not remove or bridge the safety devices installed by the manufacturer. This will prevent the lawnmower switching off automatically and may cause serious injury.
Keep your hands and feet away from the internal housing and grass ejection chute when the motor is running.
Always wear sturdy shoes and long trousers when mowing. Never mow your lawn when barefoot or when wearing only lightweight sandals.
Adjusting the cutting height
The cutting height can be adjusted in seven stages using the stopping lever (fig. G pos. 6). To adjust the cutting height, disengage the stopping lever by pulling it, move the stopping lever to the required position and allow it to engage.
Cutting height
Stage 1 = 1,6 cm
this position is only for ornamental lawns and especially level surfaces.
Stage 2 = 2,5 cm Stage 3 = 3 cm Stage 4 = 4 cm Stage 5 = 5 cm Stage 6 = 6 cm Stage 7 = 7 cm
Note:
in order to move the stopping lever to an higher stage more easily, slightly lift the appliance up using the housing handle (fig. G pos. 4).
Warning! Switch off the motor before adjusting the cutting height. When setting the lawnmower to a lower cutting height, ensure that the blades of the cutting tool do not touch the ground if the ground is uneven.
Attaching the extension cable
Push the socket of the extension cable onto the plug (fig. C /D /E pos. 12) of the starter switch and then loop the extension cable through the cable lock (fig. F pos. 7) so that the extension cable is a slightly slack near the plug.
The cable lock prevents the plug-in connection from becoming accidentally unplugged.
Always unroll the spare cable completely and coil the cable loosely on the ground.
Push the extension cable plug into the appropriate socket. The mains socket must be fused at a minimum of 16 A.
For your safety, use a residual-current operated circuit breaker with a nominal fault current ≤ 30 mA.
When mowing, always guide the extension cable on the side of the lawnmower closest to the grass you have already mowed.
Warning! Do not feed the extension cable around or underneath doors or through open windows! Always hold the plug and/or the coupling housing when unplugging the extension cable from the socket. Do not pull on the cable.
Starting the lawnmower
Carefully start the motor or press the starter switch according to the instructions provided by the manufacturer. Keep your feet away from the cutting tool. Stand the lawnmower on an even surface.
Check the terrain where you will be using your lawnmower and remove all obstacles and objects, which could get caught and then ejected.
If the cutting tool is blocked by a foreign body or the motor is overloaded, release both of the safety hoops (fig. C pos. 11) the safety hoop (fig. D /E pos. 11); the motor is automatically switched off. If necessary, remove the foreign body.
Warning! Do not tilt the lawnmower when starting the motor. If you do need to tilt the lawnmower for some reason while starting the motor, in this case, press down gently on the guide handle and tilt the mower. Only tilt the mower as far as is absolutely necessary and only lift the front edge of the mower (the edge that is furthest away from you).
To start, press the start button (fig. C /D / E pos. 10) and press one of the safety hoops (fig. C pos. 11) the safety hoop (fig. D /E pos. 11) with the other hand. After the motor has star ted up, release the start button (fig. C /D / E pos. 10).
Warning! A frequent overloading of the motor (the rotational speed is audibly reduced during working) results in damage being caused to the motor coil.
Stopping the Motor
To turn the motor off, release the safety hoops (fig. C pos. 11) the safety hoop (fig. D/E pos. 11). The integrated brake ensures that the cutting tool comes to a halt within a period of 3 seconds.
Warning! The cutting tool continues to move for a short time after you switch off the motor!
8. Information concerning correct mowing
GB
General Information about Lawn Care
We recommend mowing your lawn every week if possible to keep your lawn looking its best. Mowing your lawn regularly strengthens the individual blades of grass and makes your lawn more resistant.
Short grass cuttings (up to around 1 cm in length) can be left on the lawn after mowing. Longer cuttings should be removed so that the lawn does not turn yellow and become matted.
Cut your lawn for the first time in the spring as soon as the grass begins to grow and you can walk on the lawn. If the grass has already grown too tall, first mow in one direction with a high cutting height then mow at right angles to the first cut with the required shorter cutting height.
Mowing
Only mow with sharp, unworn blades so that the blades of grass are not frayed and the lawn does not turn yellow.
The cutting height should always be at least 3 – 4 cm since the lower part of the grass blade is white. If you cut the grass too short, the lawn will no longer appear lush and green. The blades of grass will also dry out too quickly above all in the summer.
If you mow your lawn using stage 1 (this position is only for or namental lawns and especially level surfaces), you should water the lawn well after mowing as it is other wise possible that the lawn will dr y out and turn yellow.
The dual channel air system with the effective cutting technology collects grass and sucks in an air stream even with the deepest lawn cutting height.
To achieve a clean cut, always guide your lawnmower at an appropriate speed in straight cutting paths. The paths should always overlap by a few centimetres so that you do not miss strips of lawn.
Never lift or carry the lawnmower when the motor is running.
If the lawnmower comes into contact with a foreign object, switch off the motor and unplug the mains plug. Inspect the lawnmower for damage and carry out any necessary repairs before you restart the motor and continue mowing. Inspect the lawnmower immediately if it begins to vibrate unusually vigorously.
Note:
When working on slopes and inclines always work diagonally to the incline. You can prevent the lawnmower from sliding downhill by mowing slightly diagonally upwards. Do not mow extremely steep slopes and take extra care when changing directions on slopes.
Clean the underside of the mower housing on a regular basis. Remove grass residues, which make it more difficult to start the motor and impair the cutting quality and ejection of grass cuttings.
Always switch off the motor before leaving the lawnmower unattended.
Mowing with the Grass Catcher,
As soon as grass rests remain on the lawn or the filling level display (fig. 1 pos. 17) shows FULL, the grass box is full and must be emptied.
Important for the filling level indication:
If you set the cutting height to minimum, this may under certain circumstances disturb the filling level indication.
Should the cutting height adjustment be higher, it is possible that the multi-function box will lift up as a result of the lawn mower's improved air intake (Duo-Air-Management). This effect does not have an effect on the function and safety of the lawn mower. The multi-function box can be mechanically locked with the catch lever (Fig. L, Pos. 18).
Handling the grass box
To remove the grass box, open the multi-function box (fig. H pos. 5), lift up the grass box (fig. H pos. 14) from the front using the handle so as to ensure that the cut grass remains in the grass box.
After emptying, initially insert the grass box between the right and left guides and then insert it at the front in the area where the handle is. If the grass box has been correctly inserted, the multi-function box is positioned against the housing.

Warning! Always switch off the motor and wait for the tool to stop rotating before ng the grass catcher.
Note:
To ensure the grass catcher is filled as full as possible, you should clean the grass catcher and above all the air grille after each use. Keep the ventilation slits (fig. A pos. 9) and the support surfaces of the grass box free from deposits.

Warning! Do not use your hands or feet to remove buttings from the mower. Use a suitable implement is a broom or dustpan br ush.
Mowing without the Grass Catcher
Due to the high rear discharge area, the cut grass is evenly deposited on the lawn when mowing without a grass box.
When mowing without a grass box, no filling level will be indicated.
9. Maintenance, care and storage
Maintenance
Maintenance covers all work that keeps your lawnmower in good working order. You can prevent accidents and failure of parts by checking your lawnmower regularly (check that the bolted connections are secure, check for cracks and damage) and by replacing damaged or worn parts.
Repairs must only be carried out by the service centres authorised by the manufacturer or authorised specialist dealers.
A service centre directory is supplied with your lawnmower.
Warning! Disconnect the mains plug before carrying out all maintenance work! Otherwise there is a risk of injur y.
Check the grass catching device regularly for wear or reduced function. For safety reasons, always replace worn or damaged parts.
Never clean your lawnmower under running water and in particular never using a highpressure water jet due to the danger of injury to people and property.
Store your lawnmower in a dr y place that is protected from frost. Store your lawnmower out of the reach of children.
Exchanging the Blade
Please only use original replacements blades supplied by the
manufacturer. Original replacement blades are available from your specialist dealer.
Cutting path width 33 cm (original Brill replacement part Article No. 61604).
Cutting path width 36 cm (original Brill replacement part Article No. 61605).
Cutting path width 41 cm (original Brill replacement part Article No. 61606).
Never use replacement parts or accessories not supplied by the manufacturer.
If the cutter bar is damaged, it must be replaced due to the associated problems with imbalance. For safety reasons, the cutter bar must only be replaced at the ser vice centres approved by the manufacturer or by specialist dealers.
Do not regrind the cutter bar (out of balance).
To replace the cutter bar, loosen both of the screws (fig. K pos. 2). When inserting it, ensure that the wings of the cutter bar (fig. K pos. 1) point in the direction of the housing, Insert both of the screws (fig. K pos. 2) and tighten them. (Torque: 8 Nm).
Care
The easiest way to remove dirt and grass cuttings is directly after mowing. Clean your lawnmower with a brush and cloth.
Always keep the ventilation slits (fig. A pos. 9) free from soiling. If necessary, remove any cut grass from the ventilation slits.
Storage
Warning! Before storing, always pull out the mains plug!
Always store your lawnmower indoors.
Allow the motor to cool off before depositing the machine in a closed room.
In order to save space and clean the appliance, you can store it as shown in fig. J. To do so, slightly loosen the jointed tension handles (fig. A pos. 1) until the guide bars are able to disengage, fold the guide bars forward and secure them in position using the retaining bar (fig. J pos. 16).
Warning! When folding together ensure that the cable is not bent or trapped.
As shown in (fig. J), you can coil a short extension cable around the holder provided for this purpose on the operating panel.
Warning! The cable must be fully unwound before commencing work with this appliance.
10. Troubleshooting
General
Faults usually only occur if you do not operate, care for and maintain your lawnmower properly. The following table contains the most common faults and remedies to rectify these faults. If you encounter any other faults, please contact your closest service centre authorised by the manufacturer or an authorised specialist dealer.
Warning! Repairs that require specialist knowledge must only be carried out by an authorised specialist.
Warning! For safety reasons only use original spare parts or parts approved by the manufacturer of your lawnmower.
We stress that, in accordance with the Product Liability Act, we accept
no liability for damage caused by our products, if this damage was the result of incorrect repair, or if parts other than our original parts or parts approved by us were used to replace original product parts, or if the repairs were not carried out at a service centre authorised by the manufacturer or by an authorised specialist. The same applies to additional parts and accessories.
| Fault | Possible | Cause |
| Abnormal noises, lawnmower rattles. | mower housing are loose. | Tighten bolts.Bolts at motor, its fixing |
| Lawnmower does not run smoothly or vibrates vigorously. | Blade damaged (out of balance), cutter bar fixings at motor shaft loose. | Tighten bolts for blade.Damaged parts must be replaced at an authorised service centre. |
| Lawn turning yellow, cut not clean. | Blade is too blunt, cutting height too low. | Change blade and /or use a slightly higher cutting height. |
| Mower leaves deep tracks. | Ground softened by water, lawn too wet. | Allow lawn to dry, do not mow if grass is wet. |
| Motor not running. | No power supply.Extension cord defective. | Check power is available.Unplug the plug from the mains power! Check the extension cord. |
| Motor cuts out. | Blockage due to foreign object or unit jammed. | Switch off the motor.Unplug the plug from the mains power! Remove foreign object or reason for blockage. |
Remedy
11. Instructions for correct use, safety instructions

Check each time you use the equipment
Inspect the equipment each time before you use it. Do not use the equipment if safety devices (switch handle, safety covers) and / or if the cutting device is damaged or worn. Never disable safety devices.
Check the work area before starting work. Remove any foreign bodies present (e.g. stones, branches or bones). Check for foreign bodies whilst working.
Always wear strong shoes and long trousers whilst working. Do not work barefoot or in lightweight sandals.
Check the cutting tools regularly for damage and have them repaired correctly if necessary.
Only have cutting tools replaced by Brill Service or your authorised specialist dealer.

Use / Responsibility
Make sure that there are no other people (especially children) or animals within or near the working area.
Powered equipment can cause serious injuries! You are responsible for safety in the area where you are working. Never start the equipment whilst tilted – risk of injur y!
Always use the equipment solely for the purpose described in the operating instructions.
Only work in daylight or with adequate artificial lighting.
Ensure that you are standing safely and on firm ground, even on a slope.
Work across the slope, never up and down.
Do not work on excessively steep slopes.
Be careful if you change direction on a slope, turn the
machine round or draw it towards you.
Be careful if you are going backwards, risk of stumbling!
Only push the equipment at walking pace.
Turn the motor off if the equipment has to be tilted when transporting it over surfaces other than grass and if you are transporting the equipment backwards and forwards to the work area.
Never use the machine with damaged protective devices or without protective devices.
When starting or operating the starter switch take care as stipulated by the manufacturer's instructions. Ensure that your feet are far enough away from the cutting tool.
When starting or switching on the motor, the machine should not be tilted unless the machine has to be raised during the process. In this case only tilt it as far as absolutely necessary and only raise the side away from you.
Do not start the motor when you are standing in front of the discharge duct.
Keep your fingers and feet away from the cutting tool!
Never lift or carry a machine with the motor running.
Each time you have to work on the machine or leave it or top it up, always switch off the motor.
If you strike an obstacle when working, please disable the machine. Unplug from the mains. Remove the obstacle, check the equipment for any damage and have it repaired if necessary.
If the equipment begins to vibrate strongly, unplug from the mains and ascertain the cause.

Never leave the equipment unattended. If you stop work, unplug the equipment from the mains and store the equipment in a safe place.
If you stop work to go to a different work area, it is essential to turn the equipment off and unplug from the mains.

Never use the equipment in the rain or in damp, wet conditions.
Never work immediately adjacent to a swimming pool or garden pond with electrical equipment.
Comply with local quiet periods in your community!

Check the power cable regularly for damage and signs of wear.
Only use permitted extension cables.
Unplug the mains plug immediately if the mains cable /extension cable is damaged or severed.
Warranty
The manufacturer warrants its products for exclusively non-commercial use for a period of 24 months from the date of original purchase. This warranty does not affect statutory warranty claims. The warranty covers all substantial faults of the product, which are caused by defects in material and workmanship. If a product exhibits such a defect we will, at our option, repair or replace it without cost for parts and labour provided the following requirements are fulfilled:
- The product must have been sold to the customer in a legally correct way.
- The original receipt with the customer's address, date of purchase, model and product designation is presented as proof of purchase. The product must have been purchased within the EC.
● The product was handled properly and according to the recom-
mendations in the operating instructions. It is essential that the product has been maintained and cleaned according to the information in the operating instructions. No attempt to disassemble or repair the product has been made by either the buyer or an unauthorised third party.
- It must be ensured that only original replacement parts and original accessories approved by the manufacturer are used. There may be an increased risk of consequential damage and accidents if non-original parts or non-original accessories are used. This warranty does not cover consequential damages.
● The product must be either taken directly or sent with postage paid to an authorised service centre. The original receipt must be sent with the product.
● The warranty does not cover damage from misuse, abuse, use
of unsuitable, non-original or unauthorised interchangeable parts, replacement parts or accessories, as well as improper maintenance and cleaning.
The products contain various components that are subject to nor mal or use-related wear. The warranty does not extend to these wearing parts.
In particular the following components relating to this product are excluded:
Blades/blade bar / drive belt / care roller /blade roller / lower blade /cutting plate / cutting line /cutting head cover / saw blade /nickel-cadmium-cell (battery).
The manufacturer warranty does not affect existing warranty claims between the customer and the dealer /seller.
E 112777
| a | b | c | d | e | f |

E 112776
| a | b | c | d | e | f |

E 112778
| a | b | c | d | e | f |
EC declaration of conformity
We hereby declare that this product, in the form in which it is marketed, meets the requirements of the harmonised EU guidelines, EU safety standards, and the product-specific standards.
| Product | Manufacturer | Executive Offi cer |
| Electric lawn mower | AL-KO Geräte GmbH | Anton Eberle |
| Serial number | Ichenhauser Str. 14 | Ichenhauser Str. 14 |
| G1071075 | 89359 KOETZ | 89359 KOETZ |
| DEUTSCHLAND | DEUTSCHLAND |
Model
| 3300 E (33cm) |
| 3600 E (36cm) |
| 4100 E (41cm) |
EU directives
| 2006/42/EG |
| 2006/95/EG |
| 2004/108/EG |
| 2000/14/EG |
Harmonised standards
| EN 60335-1 |
| EN 60335-2-77 |
Sound power level
| measured / guaranteed | |
| 3300 E (33cm) | 87 / 88 dB(A) |
| 3600 E (36cm) | 90 / 91 dB(A) |
| 4100 E (41cm) | 93 / 94 dB(A) |
Conformity evaluation
| 2000 /14/EGAppendix VIII |
Notifi ed body
If any material or manufacturing defects are found during the statutory customer protection period, we will either repair or replace the equipment, whichever we consider the more appropriate. This statutory period may vary according to the legislation in force in the country where the equipment was purchased.
Our warranty is valid only if: The warranty is no longer valid if:
The equipment has been used properly ■
The equipment has been tampered with ■
The operating instructions have been followed ■
Technical modifications have been made ■
Genuine replacement parts have been used ■
The trimmer was not used for its intended purpose (for example, used for commercial or communal applications)
The following are not covered by warranty:
Paint damage due to normal wear ■
■ Wear parts identified by a border XXX XXX(X) on the spare parts list
Combustion motors – these are covered by a separate warranty from the manufacturer concerned ■
To make a claim under warranty, please take this statement of warranty and proof of purchase to the nearest authorised customer service centre. This warranty does not affect the usual statutory rights of the customer relative to the seller.


- Inhaltsverzeichnis - Contents - Contenu - Inhoudsopgave - Obsah - Spis treści
- D
- Please read these operating instructions carefully before assembling and using your machine.
- CZ
- F
- Elementy funkcyjne – Funktionsdelar – Parti funzionali – Componentes – Componentes do funcionamento
- Sicherheitshinweise – Notes on Safety – Consignes de sécurité – V eiligheidsaanwijzingen – Bezpečnostní pokyny – Wskazówki dotyczące bezpieczeństwa – Säkerhetsanvisningar – Avvertenze di sicuezza – Indicaciones de seguridad – Instr uções de segurança
- Notes on these Operating Instructions
- Proper Use
- Assembly
- Checking all the Parts are Included:
- Fitting the Guide Handle
- Putting into operation
- Adjusting the cutting height
- Cutting height
- Note:
- Attaching the extension cable
- Starting the lawnmower
- Stopping the Motor
- Information concerning correct mowing
- GB
- General Information about Lawn Care
- Mowing
- Handling the grass box
- Mowing without the Grass Catcher
- Maintenance, care and storage
- Maintenance
- Storage
- Troubleshooting
- General
- Instructions for correct use, safety instructions
- Warranty
- EC declaration of conformity
Brand : AL-KO
Model : Powerline 3600 E
Category : Lawn mower